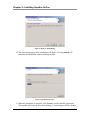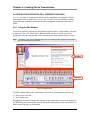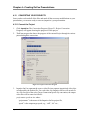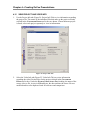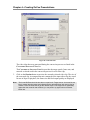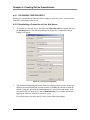
1
Impatica OnCue User’s Manual Version 3.3.3 Copyright 2005 © Impatica Inc. All rights reserved. Impatica OnCue User’s Manual The contents of this manual and associated Impatica OnCue software are the property of Impatica Inc. and are copyrighted. All specifications, claims, features, representations and/or comparisons provided are correct to the best knowledge of Impatica as of the date of publication, but are subject to change without notice. INFORMATION IS PROVIDED BY IMPATICA ON AN “AS IS “ BASIS, WITHOUT ANY OTHER WARRANTIES OR CONDITIONS, EXPRESSED OR IMPLIED, INCLUDING BUT NOT LIMITED TO, WARRANTIES OF MERCHANTABLE QUALITY, SATISFACTORY QUALITY, MERCHANTIBILITY OR FITNESS FOR A PARTICULAR PURPOSE. IN NO EVENT SHALL IMPATICA INC. BE LIABLE FOR ANY LOSS OF REVENUE OR PROFIT OR ANY OTHER COMMERCIAL DAMAGE, INCLUDING BUT NOT LIMITED TO SPECIAL, INCIDENTAL, CONSEQUENTIAL OR OTHER DAMAGES. WE ARE ALSO NOT RESPONSIBLE FOR THE CLAIMS BY A THIRD PARTY. OUR MAXIMUM AGGREGATE LIABILITY SHALL NOT EXCEED THIRTY DOLLARS CANADIAN ($30 CDN). PowerPoint, Windows 95/98/NT/Me/2000/XP and Outlook are trademarks of Microsoft Corporation. Java is a trademark of Sun Microsystems. Netscape is a trademark of Netscape Communications Corporation. The Java Impatica OnCue runtime is distributed in Eastridge Technology's Jshrink format. QuickTime is a trademark of Apple Computer, Inc. This software is based in part on the work of the Independent JPEG Group. This product includes software developed by the Apache Software Foundation (http://www.apache.org/). Impatica OnCue User’s Manual Version 3.3.3 i Table of Contents 1 2 3 4 Introduction ................................................................................................. 1 1.1 What is Impatica OnCue? ...................................................................... 1 1.2 Elements of an OnCue Presentation...................................................... 1 1.2.1 Full Presentations ........................................................................... 2 1.2.2 “Video Only” Presentations ............................................................. 4 Installing Impatica OnCue .......................................................................... 5 2.1 Installation Steps.................................................................................... 5 2.2 Template Installation.............................................................................. 9 2.4 Installing QuickTime 6............................................................................ 9 2.4 Registration Code ................................................................................ 12 Quick Start to Impatica OnCue ................................................................ 13 3.1 Prepare the PowerPoint presentation .................................................. 13 3.2 Prepare the Video or Audio.................................................................. 13 3.3 Launch Impatica OnCue and Create a Project..................................... 13 3.4 Create the Markers .............................................................................. 14 3.5 Convert the Project and Preview Results............................................. 14 3.6 Uploading the Presentation.................................................................. 14 Creating OnCue Presentations ................................................................ 16 4.1 Preparing PowerPoint Presentations ................................................... 16 4.2 Preparing the Video or Audio ............................................................... 17 4.3 Launching Impatica OnCue.................................................................. 17 4.4 Creating a New Project and Selecting a Project Type ......................... 18 4.4 Selecting Project Assets ...................................................................... 19 4.5 Modifying an Existing Project ............................................................... 20 4.6 Closing a Project.................................................................................. 20 4.7 Removing Assets ................................................................................. 20 4.8 Editing the Cue Points (Full Presentation only).................................... 21 4.8.1 4.9 Using the Edit Window.................................................................. 21 Placing Cues........................................................................................ 27 Impatica OnCue User’s Manual Version 3.3.3 ii 4.9.1 Placing Cues Manually ................................................................. 27 4.9.2 Placing Cues during Playback ...................................................... 29 4.9.3 Saving Cues to a Marker File........................................................ 29 4.10 Video Encoding Options ................................................................... 30 4.10.1 Target Connection Speed ............................................................. 30 4.10.2 Frame Rate................................................................................... 31 4.10.3 Network Overhead (%) ................................................................. 31 4.10.4 Net Target Connection Speed ...................................................... 32 4.10.5 Default Playback Speed................................................................ 32 4.11 Presentation Options ........................................................................ 32 4.11.1 Allow Skipping of Unviewed Slides ............................................... 33 4.11.2 Loop Presentation......................................................................... 33 4.11.3 Initial Volume ................................................................................ 34 4.11.4 Generate Support Files................................................................. 34 4.11.6 Sound Format ............................................................................... 34 4.12 5 6 Converting Your Projects.................................................................. 35 4.12.1 Convert the Project ....................................................................... 35 4.12.2 Cancel Conversion........................................................................ 36 4.13 Previewing a Project......................................................................... 36 4.14 Deleting Project Output .................................................................... 37 4.15 View Project and Video Info ............................................................. 38 4.16 Uploading Your Projects................................................................... 40 4.16.1 Establishing a Connection to Your Web Server ............................ 40 4.16.2 Uploading Files ............................................................................. 42 4.16.3 Managing Web Folders and Files ................................................. 43 4.16.4 Disconnecting from Your Web Server........................................... 44 4.16.5 E-mail tab...................................................................................... 44 Supported and Unsupported Video and Audio Formats ....................... 46 5.1 Overview .............................................................................................. 46 5.2 Video Formats...................................................................................... 46 5.3 Audio Formats...................................................................................... 47 Tips and Tricks.......................................................................................... 48 Impatica OnCue User’s Manual Version 3.3.3 iii 7 6.1 Narration .............................................................................................. 48 6.2 Previously Narrated PowerPoint Presentations ................................... 48 6.3 Default Encoding Settings.................................................................... 48 6.4 Setting up the Web Server ................................................................... 49 6.5 Path and File Names ........................................................................... 50 Narrative Script ......................................................................................... 51 7.1 8 E-mailing the Presentation ....................................................................... 53 8.1 9 Using Automatic URL Links ................................................................. 51 Sending Impatica Content Through E-mail .......................................... 53 8.1.1 Outlook Express 5 ........................................................................ 53 8.1.2 Microsoft Outlook 2000 ................................................................. 54 8.1.3 Netscape Messenger 4.7 .............................................................. 54 8.1.4 Yahoo! Mail................................................................................... 55 8.1.5 Other E-mail Alternatives .............................................................. 55 Product Technical Specifications............................................................ 56 9.1 Supported Software ............................................................................. 56 9.2 System Requirements.......................................................................... 56 Appendix A ....................................................................................................... 57 Narrative Script File Reference....................................................................... 57 Impatica OnCue User’s Manual Version 3.3.3 iv Chapter 1—Introduction 1 Introduction This manual explains everything you need to know about using Impatica OnCue to create presentations that integrate video, PowerPoint slides, scrolling text and navigation controls for plug-in-free delivery over the Internet. This manual covers: installing Impatica OnCue creating Impatica OnCue Presentations publishing Impatica OnCue presentations to the web delivering Impatica OnCue presentations via e-mail tips & tricks for using Impatica OnCue For information on converting PowerPoint files either as standalone streaming content or as components of an Impatica OnCue presentation, please consult the Impatica for PowerPoint User’s manual. This manual assumes that the reader has a basic understanding of Windows fundamentals and is able to apply concepts such as FILE, SAVE and BROWSE. For more help with Windows fundamentals, consult your Windows manual. 1.1 WHAT IS IMPATICA ONCUE? Impatica OnCue simplifies the creation and integration of multimedia presentation components including video and Microsoft PowerPoint presentations into a synchronized presentation format that can be played without plug-ins over the Internet or on corporate intranets. 1.2 ELEMENTS OF AN ONCUE PRESENTATION An overview of the elements that go into an Impatica OnCue presentation are illustrated below. Impatica OnCue User’s Manual Version 3.3.3 1 Chapter 1—Introduction Figure 1: OnCue Presentation Elements Impatica OnCue enables the creation of two types of presentations for Internet delivery: fully synchronized presentations including video and/or audio, PowerPoint slides, narrative script and navigation index, and “video-only” presentations. 1.2.1 Full Presentations Impatica OnCue creates and converts Impatica project files, which consist of: the presentation: an impaticized slide show file (“.imp” or “-imp.jar”) created using Impatica for PowerPoint. the video or audio: a source video or audio file that will be convertd to produce the video component. When audio is selected, an accompanying image must also be provided in the project folder. the template: an impaticized user interface template file (“.imp”) that has been provided by Impatica. It specifies the look and feel of the presentation, including the layout, background, text formatting and button appearance. the markers: a text file (“.txt”) that includes video synchronization points and can be created using Impatica OnCue. Impatica OnCue User’s Manual Version 3.3.3 2 Chapter 1—Introduction the script: a text file(“.txt”) that includes slide titles for the table of contents and the searchable text. It also provides synchronization information for use during playback. Using Impatica for PowerPoint, it can be automatically generated from the PowerPoint notes and slide titles. Once the project is impaticized a collection of component files representing the slides, video, template and narrative script components is created. The impaticized presentation can be played from the automatically generated HTML page or can be embedded within an e-mail message or custom web page. The Impatica OnCue presentation and any other impaticized content is read by Impatica's Java player applet, and played while the files stream over the Internet. No special viewer or plug-in software is required on the client device or on the server where the presentation is hosted. A typical presentation is shown below in Figure 2: Presentation Playback Layout. 7 1 5 2 6 3 4 8 9 10 Figure 2: Presentation Playback Layout Impatica OnCue User’s Manual Version 3.3.3 3 Chapter 1—Introduction Impatica OnCue presentations consist of several components: 1 Presentation title: derived from the name of the source PowerPoint file. 2 Video: often of the presenter. For audio-only presentations, an image to display in this area may be provided. Alternatively, this area may be omitted from the presentation layout by using an audio-only template file. 3 Presentation index: two-level collapsible index for jumping to specific slides through the presentation. Indicates viewers’ progress by highlighting items that have already been viewed. 4 Presentation window: displays the PowerPoint slides. 5 VCR controls: VCR-like video controls to pause and play the presentation as well as to navigate forward or backward one paragraph at a time. 6 Speed selector: spinner button for selecting the desired playback speed. 7 Keyword search: enables searching for keywords in the narrative text. Provides a list of paragraphs containing the keywords provides keyword search each of which may be clicked to navigate to the corresponding point in the presentation. 8 Scrolling text: often the transcription of the speaker, displays the narrative text and any keyword search results. 9 Status, volume and mute controls: indicate the current time in the presentation and enable volume control. 10 Next and Previous slide buttons: enable moving forward and backward through slides. 1.2.2 “Video Only” Presentations Impatica OnCue can also convert standalone video for delivery over the Internet or corporate intranets. Like the full presentation, a video-only presentation can be played back without plug-ins at a variety of connection speeds. More specifically, Impatica OnCue can be used as a standalone encoder program to read and encode video files. The impaticized video files (with the extension “.imv”) can then be read by Impatica's Java player applet and played while the file streams over the Internet. Once you have created the Impatica video file, it can be played from any HTML web page file or can be embedded within an e-mail message. No special server-side software is required. Impatica OnCue User’s Manual Version 3.3.3 4 Chapter 2—Installing Impatica OnCue 2 Installing Impatica OnCue Impatica OnCue is installed by downloading it from the Impatica web site. Each copy of Impatica OnCue must be registered as either an evaluation copy or a licensed copy before it can be used. Review the download instructions on the Impatica website prior to downloading the software. Note: Impatica for PowerPoint is an integral part of Impatica OnCue and must also be downloaded and installed. Both Impatica for PowerPoint and Impatica OnCue must be the same version number (3.3.3) to work properly. A copy of Impatica OnCue that was previously registered as an evaluation copy may be changed to a licensed copy without re-installation. If you currently have an evaluation copy of the software and would like to upgrade to a licensed copy, please contact Impatica. Installing a new version of Impatica OnCue will not affect your existing presentations. To install Impatica OnCue, you will need to complete the following processes: install Impatica for PowerPoint 3.3.3 if it is not currently installed install Impatica OnCue install the Impatica OnCue template file install QuickTime 6.0 set the registration code 2.1 INSTALLATION STEPS 1. Go to the download area of the Impatica website at http://www.impatica.com/download/download-oncue.html 2. Review the installation instructions. 3. Install Impatica for PowerPoint, if necessary. Please refer to the Impatica for PowerPoint User’s Manual (available on our website) for detailed instructions on installation and use. 4. Select DOWNLOAD IMPATICA ONCUE to begin the download process. 5. At the prompt RUN PROGRAM FROM ITS CURRENT LOCATION OR SAVE TO DISK, choose SAVE THIS PROGRAM TO DISK. 6. In the SAVE AS dialog box, specify the location where the downloaded setupOnCue.exe file should be saved. Tip: Remember this location so that you can run this installation file once it has been downloaded. Your desktop is a convenient and easy to remember location. Impatica OnCue User’s Manual Version 3.3.3 5 Chapter 2—Installing Impatica OnCue 7. Once the Impatica OnCue setup file has been downloaded, it will need to be run. Double-click the setupOnCue.exe file icon to begin. The Installer Welcome Window will appear. Click Next to proceed. Figure 3: Installer Welcome 8. Read the License Agreement for Impatica OnCue, click the I ACCEPT THE TERMS IN THE LICENSE AGREEMENT radio button to agree to the terms of the license agreement. Click on Next to proceed. Impatica OnCue User’s Manual Version 3.3.3 6 Chapter 2—Installing Impatica OnCue Figure 4: Software License Agreement 9. Choose a destination directory. The default directory is C:\Program Files\Impatica OnCue 3.3.3. To change the destination directory, click the Change button, choose the desired location and click OK. Figure 5: Installation Location 10. Click on the Next button. 11. When ready, click Install. Impatica OnCue User’s Manual Version 3.3.3 7 Chapter 2—Installing Impatica OnCue Figure 6: Ready to Install Dialog 12. The status and progress of the installation will display. Pressing Cancel will terminate the installation without installing any files. Figure 7: Installation Progress 13. When the installation is complete, click FINISH to exit the installer application. The installer will create an icon on the desktop. To start Impatica OnCue, doubleImpatica OnCue User’s Manual Version 3.3.3 8 Chapter 2—Installing Impatica OnCue click this icon. If prompted, restart your computer before launching Impatica OnCue. Figure 8: Installation Complete Dialog 2.2 TEMPLATE INSTALLATION Impatica provides a set of templates with the purchase of Impatica OnCue. A link to download these templates will be provided to you upon purchase, with your Impatica OnCue registration information. 1. Download the ZIP package containing the templates. 2. Extract the ZIP package to a convenient location. You will need to be able to locate these files when creating OnCue presentations. Once the template library has been downloaded and extracted, you can preview the template library by launching the file “Standard-OnCue-Template-Kit.html.” Once you have found a template that you wish to use, simply click and drag the corresponding “.imp” template file onto the Impatica OnCue Project Assets tab. Optionally, you may purchase template customization services from Impatica. When you receive the tailored template by e-mail, copy it to a convenient location for future use. 2.4 INSTALLING QUICKTIME 6 Impatica OnCue uses QuickTime technology for video playback during the creation of presentations. Viewers of the Impatica OnCue presentations do not require the QuickTime plug-in. Impatica OnCue User’s Manual Version 3.3.3 9 Chapter 2—Installing Impatica OnCue At the time of the printing of this manual, the QuickTime installer could be found at the following website - http://www.apple.com/quicktime/download/standalone.html 1. Click on the Free Download Now button. The download process should begin automatically. You may be presented with a dialog box asking if you want to install and run the QuickTime installer. Choose Yes. 2. The download will begin and you will be presented with a QuickTime welcome screen. Figure 9: QuickTime Installation Welcome 3. Click Next until you reach the Software License Agreement. Review it and click Agree. 3. Choose a destination directory, and then click Next until you reach the Choose Installation Type screen. Select the CUSTOM radio button, and then click Next. Impatica OnCue User’s Manual Version 3.3.3 10 Chapter 2—Installing Impatica OnCue Figure 10: QuickTime Installation Type Note: It is mandatory to do a Custom install. Impatica OnCue uses components that are not installed by either the minimum or recommended installations. Figure 11: QuickTime Required Components Impatica OnCue User’s Manual Version 3.3.3 11 Chapter 2—Installing Impatica OnCue 5. Use the Select All button to install all components. (There will be a checkmark next to each component currently selected.) 6. Click Next and then Finish to complete the installation. After completing the above steps, you have all the necessary software installed and are now ready to launch Impatica OnCue. 2.4 REGISTRATION CODE Each copy of Impatica OnCue must be registered as either an evaluation copy or a licensed copy before it can be used. The first time that you run Impatica OnCue, you will be prompted to accept the software license agreement and to enter your registration information. It is important that you enter your Name, Organization and Registration Code exactly as they were provided to you, including spaces and case sensitivity. Copies that were previously registered as evaluation copies can be re-registered as licensed copies without re-installation. To change the registration information for your copy, in the main Impatica OnCue window click on the Registration Code… button. In the dialog box that appears, enter your Name, Organization and Registration Code exactly as they were provided to you, including spaces and case sensitivity. Then click OK. The main Impatica OnCue window will indicate that the program is enabled by displaying either “Evaluation by” or “Registered to” followed by the name and the organization provided. Impatica OnCue User’s Manual Version 3.3.3 12 Chapter 3—OnCue Quick Start 3 Q u i ck Start to Impatica OnCue In this step-by-step guide, the process of constructing an Impatica OnCue presentation will be briefly outlined. For more detailed information regarding each step, please consult the next chapter. There are six basic steps to creating an Impatica OnCue presentation: 1. 2. 3. 4. 5. 6. Prepare the PowerPoint presentation. Prepare the video or audio file. Launch Impatica OnCue and create a project. Create the marker file using the Edit window. Convert the presentation and preview the result. Upload the presentation to a website. 3.1 PREPARE THE POWERPOINT PRESENTATION 1. Create your Microsoft PowerPoint presentation. Add the narrative text by typing the text in the Notes section of each slide. This text will appear in the scrolling text area of the Impatica OnCue presentation window. 2. Impaticize the PowerPoint presentation using Impatica for PowerPoint. Ensure the GENERATE SCRIPT FILE and optionally the INCLUDE PARAGRAPH CUE POINTS checkboxes are selected. (Please see the Impatica for PowerPoint User’s Manual for more details on using Impatica for PowerPoint.) 3.2 PREPARE THE VIDEO OR AUDIO 1. To prepare the accompanying video for the presentation, it is best to shoot, capture and edit the video as if to create a standalone video. Best results are achieved when the video is in an uncompressed AVI format, with the sound set to 8000Hz, 16bit, mono (see Chapter 5: Supported and Unsupported Video and Audio Formats for details on usable media formats). For an audio presentation, record and edit the audio in one of the supported audio formats (see Chapter 5: Supported and Unsupported Video and Audio Formats). 3.3 LAUNCH IMPATICA ONCUE AND CREATE A PROJECT 1. Create and name a new Project file and save it. 2. Identify the project assets: • A video or audio file, • A script file, • An impaticized PowerPoint presentation (“-imp.jar” or “.imp”) file, Impatica OnCue User’s Manual Version 3.3.3 13 Chapter 3—OnCue Quick Start • And the template (“.imp) file. Use Browse to load these files into the Project Assets section of Impatica OnCue. The script and presentation files are both generated by Impatica for PowerPoint when the PowerPoint presentation is impaticized. The template .IMP file can be found in the template library ZIP package downloaded during installation. 3.4 CREATE THE MARKERS 1. Click Edit on the main Impatica OnCue window to create the markers necessary for synchronizing the video, impaticized PowerPoint slides and text in the presentation. 2. Use one of two methods to set the cues: • Click and drag the slides to the appropriate times, thereby synchronizing them to the video, or • Click on the slide Bulldoze button and press Play. When the playhead reaches a point in the video where a slide should be positioned, click on the Place Slide button. 3. Synchronize the automatic text scrolling and slide animations by placing the paragraph and animation cues in the same manner as the slides. 4. Save the marker file and exit the Edit window. 3.5 CONVERT THE PROJECT AND PREVIEW RESULTS Before converting the project, review the settings on the VIDEO OPTIONS and PRESENTATION OPTIONS tabs. Either accept the default settings or modify them as desired. 1. Choose Impaticize to convert your presentation. The conversion will take a short period of time to complete. Conversion times will vary between projects. 2. Use Preview to view your presentation. This will launch Microsoft Internet Explorer and play the presentation. 3. Select the PROJECT INFO tab to display a list of the source assets used, information regarding the video clips, and the Conversion Settings used. 4. To make changes to the presentation, click Done to return to the first screen, modify the settings and re-convert. 3.6 UPLOADING THE PRESENTATION 1. Once the presentation is complete, the project may be uploaded to a web server for plug-in free delivery through a web page or an e-mail message. From the main OnCue window, with the project selected, click on Connect. Impatica OnCue User’s Manual Version 3.3.3 14 Chapter 3—OnCue Quick Start 2. Enter the information necessary to connect to your server into the fields in the connection window. Click Connect. 3. Once a connection has been made, use Put Project to move the files to the website. The impaticized presentation is now ready for plug-in free, platform independent delivery. Impatica OnCue User’s Manual Version 3.3.3 15 Chapter 4—Creating OnCue Presentations 4 C r e ating OnCue Presentat i o n s The following sections will detail each of the steps described in the previous chapter. 4.1 PREPARING POWERPOINT PRESENTATIONS 1. Set the slide dimensions. In PowerPoint, go to the FILE menu and choose PAGE SETUP. Set the page size to suit your template file. For most templates, the appropriate page size is 6.30” wide by 4.72” high. 2. Name the presentation. Use FILE, SAVE AS and give the presentation a name. This name will become the title that will be displayed at the top of the resulting Impatica OnCue presentation. 3. Create the script. The script file includes the slide titles for the table of contents, the note text for the scrolling text area and the synchronization points. The text in the script is typically the transcript of the corresponding video. In the PowerPoint file, type the corresponding text into the NOTES section of each slide. Impatica for PowerPoint will automatically extract this text when generating the OnCue script file for you. Some things to note about the automatic script generation: The title of each slide will become an entry in the index of the Impatica OnCue presentation during playback. The index is a two-level index. A PowerPoint ‘Title Slide’ denotes a level one section, while any other slide denotes a subsection. Each paragraph in the notes may be synchronized to the video, or notes may be synchronized only on a slide-by-slide basis. To enable synchronization of each paragraph, select the INCLUDE PARAGRAPH CUE POINTS checkbox option in Impatica for PowerPoint. To ensure consistency, it is highly recommended that you always use a script file that was created at the same time as the impaticized slide presentation. If the PowerPoint file needs to be re-impaticized, the script should be generated again as well. Should you want to edit the script file manually, refer to Chapter 7: Narrative Script for a description of each tag. 4. Launch Impatica for PowerPoint. Prior to converting the PowerPoint file, select the ONCUE SCRIPT FILE option. Select INCLUDE PARAGRAPH CUE POINTS if you want to be able to synchronize your text at the paragraph level. The resulting script and impaticized presentation files will be in the folder specified in the SAVE LOCATION field. The script file will have a file name that matches the Impatica file name, but with the suffix “-script.TXT.” Impatica OnCue User’s Manual Version 3.3.3 16 Chapter 4—Creating OnCue Presentations Note: When converting a PowerPoint presentation file for Impatica OnCue, there is no need to generate an HTML file or upload the .IMP file to the web server. Impatica OnCue will generate the appropriate HTML and upload the .IMP file to the appropriate location when it converts the entire presentation. Please refer to the Impatica for PowerPoint User’s Manual for detailed instructions on installing and using Impatica for PowerPoint. 4.2 PREPARING THE VIDEO OR AUDIO The video or audio must be recorded in digital format and edited. For video, this will require an appropriate video capture card. Editing will require a corresponding program, such as Adobe Premiere. Note: Impatica recommends using video in uncompressed AVI format, with the sound set to 8000Hz, 16bit, mono. For details on supported video and audio formats, see Chapter 5 Supported and Unsupported Video and Audio Formats. The following tips should be considered while preparing a video for use within Impatica OnCue: The source video file must have a frame size that corresponds to your template. For most templates, video should have a frame size of 160 pixels wide by 120 pixels high. It is not possible to alter the frame size in Impatica OnCue. 4.3 LAUNCHING IMPATICA ONCUE 1. To begin preparation of your impaticized presentation, launch Impatica OnCue from your Start Menu or desktop icon. Alternatively, you can drag and drop one or more project files onto the Impatica OnCue desktop icon to invoke the software. Double-clicking an existing project file will also launch the Impatica OnCue application, with the selected project added to the list of opened projects. 2. When Impatica OnCue is loaded, the main window (Figure 14: Impatica OnCue) appears. Impatica OnCue User’s Manual Version 3.3.3 17 Chapter 4—Creating OnCue Presentations Figure 14: Impatica OnCue 4.4 CREATING A NEW PROJECT AND SELECTING A PROJECT TYPE A project is a collection of files that make up the necessary components of an Impatica OnCue presentation (either full presentation mode or video only). Impatica OnCue assists in assembling the necessary files to create your project. Impatica OnCue projects are identified with the extension “.ipj.” 1. To create a new project, click the New Project… button in the main Impatica OnCue screen. 2. Identify your new project file by providing a file name. 3. Open or create any additional projects. Each open project will appear in the SOURCE PROJECTS list. 4. In the PROJECT ASSETS tab, select the output presentation type you would like to generate using the radio buttons. Impatica OnCue can create two types of presentations: full presentations or videoonly presentations. A full presentation synchronizes impaticized PowerPoint slides with video and scrolling narrative text. This presentation mode requires a video, an impaticized PowerPoint file, a template, and a tagged script file. A marker file containing Impatica OnCue User’s Manual Version 3.3.3 18 Chapter 4—Creating OnCue Presentations synchronization timings must also be provided, or may be generated using Impatica OnCue’s Edit button. A video-only project converts a video to Impatica’s video format for plug-in free Internet delivery. This presentation mode requires only a video or audio and a still image. 4.4 SELECTING PROJECT ASSETS 1. In the PROJECT ASSETS tab, all of the files necessary to prepare the selected presentation type are identified. The fields that are required for conversion will display “required” until a file is selected. 2. To choose the appropriate file for a field, click and drag the file into the field. Alternatively, you may click on the Browse… button. A dialog box will appear, allowing navigation to select the appropriate file. Figure 15: Selecting Project Assets A description of each asset is given below: SOURCE VIDEO OR AUDIO FILE Either a video file or an audio file with an accompanying still image is required for both full and video-only presentations. For full presentations the size of the video must match the template provided. In most cases, this means that the video frame size must be 160 x120 pixels. For video only, the output video size will be the same as the input video. Video options can only be set once the video file is entered in the Project Assets tab. For audio only presentations, an image file (.gif or .jpeg) must be placed inside the project folder. Like the video, the image must have dimensions that match the template provided. For most templates, the image size must be 160x120 pixels. For details on supported video and audio formats, see Chapter 5 Supported and Unsupported Video and Audio Formats. Impatica OnCue User’s Manual Version 3.3.3 19 Chapter 4—Creating OnCue Presentations MARKER TEXT FILE SCRIPT TEXT FILE The marker file is required in full presentation mode and is optional in video-only mode. In full presentation mode, the marker file contains a listing of all synchronization information. The marker file can be created and edited using the Impatica OnCue edit window. In video-only mode, the marker file represents a list of points in time to split the video into separate video clips. The narrative script file can be generated automatically using Impatica for PowerPoint. It includes the titles for the presentation table of contents and the text for the scrolling searchable text box. PRESENTATION IMPATICA FILE The impaticized PowerPoint presentation. TEMPLATE IMPATICA FILE The customized template provided by Impatica. It specifies the layout and look and feel of the presentation. 4.5 MODIFYING AN EXISTING PROJECT 1. If a project file has been created previously, clicking on the Open Project… button will reopen the project file. The OPEN dialog box will appear displaying all project files (“.ipj”) that have been created and saved in the selected folders. Select the project file by clicking on the file name and clicking Open. Projects may also be opened by dragging project files from any folder or from the desktop onto the SOURCE PROJECTS list. 2. The selected project will appear in the SOURCE PROJECTS list box and all the files associated with the project will be displayed in their respective boxes. You may now modify and convert the presentation. 4.6 CLOSING A PROJECT 1. The Close Project button becomes enabled when there are one or more source projects open. Clicking this button closes the currently selected project and removes the project name from the SOURCE PROJECTS list, saving all settings for the project. 4.7 REMOVING ASSETS 1. Files can be removed from the project by clicking on the appropriate Remove button opposite the file you wish to remove. 2. Selecting another asset replaces the original file with the newly selected file. Impatica OnCue User’s Manual Version 3.3.3 20 Chapter 4—Creating OnCue Presentations 4.8 EDITING THE CUE POINTS (FULL PRESENTATION ONLY) A “Cue” is a point of synchronization between the components of an Impatica OnCue presentation. When a marker file is saved, each cue time is stored so that the resulting presentation has accurately synchronized slides, paragraphs, animations and video or audio. 4.8.1 Using the Edit Window Cues can be edited by clicking the Edit button. Impatica OnCue’s Edit window will open, as shown in Figure 16: Edit window. When this Edit window is closed, you will be prompted to save the changes and will be returned to the main Impatica OnCue screen. Note: The video, script, and presentation files must be identified in their respective fields before the Edit button will become active. Preview Timeline Figure 16: Edit window The Edit window displays the components of the OnCue presentation in two sections: the Preview area; and the Timeline area. Dragging the divider bar changes the amount of space allocated to any area or element in the Edit dialog box. Resizing the element affects the editing display only and will have no effect on the final OnCue presentation. Impatica OnCue User’s Manual Version 3.3.3 21 Chapter 4—Creating OnCue Presentations 4.8.1.1 Preview Area The top portion of the Edit window is the Preview area. It displays the following components: video table of contents slide show scrolling narrative text These four components are always synchronized, showing the presentation at the current position of the timeline area’s green playhead or black cue line, if it is active. The cue line is active only when a cue is being moved in the timeline area. The timeline’s cue line and playhead are described in greater detail in the upcoming section, Timeline Area. Video: The video area presents the current frame in the video. The original aspect ratio of the video will always be maintained if this element is resized. For audio presentations, the image found in the project folder will be displayed in this area. A time indicator displaying the current and total time of the video is provided under the video image. Table of Contents: Below the video is the Table of Contents for the presentation. It is comprised of the titles of the slides and will produce the navigation index in the final Impatica OnCue presentation. The table of contents is shown as a collapsible tree, indicating the top-level section and subsection slides. Slides can be promoted or demoted by selecting the slide, going to the Edit menu and choosing PROMOTE SLIDE or DEMOTE SLIDE. Slide: In addition to a display of the current slide, the slide show area includes the title of the current slide as well as the current slide number and the total number of slides. Text: The narrative text is displayed to the right of the slide show area. The text corresponding to the currently displayed slide will be highlighted in the narrative text. The presence of a paragraph sign (¶) indicates that an editable cue exists for that paragraph. The corresponding cue can be moved in the timeline area to specify the time at which the paragraph should appear and be highlighted. Figure 17: Preview Area Impatica OnCue User’s Manual Version 3.3.3 22 Chapter 4—Creating OnCue Presentations 4.8.1.2 Timeline Area The bottom portion of the Edit window is the timeline area. It provides the tools to edit cues, defining the synchronization of the Impatica OnCue components. While the preview area represents the elements as they would appear at any given moment in time, the timeline represents the entire Impatica OnCue presentation over time. The timeline area includes four rows, as shown in Figure 18: Timeline rows. timeline ruler video filmstrip audio waveform and slides, each of which is comprised of a slide thumbnail, paragraph row, and animation row Three vertical lines intersect the rows of the presentation: Playhead: the thick green line topped with a downward-pointing triangle showing progression during playback. By moving the playhead with a mouse or keyboard, you can move to any given point in the presentation and see in the preview area what the end user will see when viewing your OnCue presentation. End line: the thick red line that appears at the end of the audio waveform. It indicates the end and or total playing time of the presentation. The video frames and slides near the end of the presentation may extend over the end line so that you can see them in their entirety. Cue line: a temporary black line that indicates the position of the cue currently being repositioned. The cue line appears when holding the mouse down on a slide to re-position it. A cue line also appears for paragraph or animation cues to represent their positions as they are moved. The preview area will display the presentation components as they will appear at the cue line’s point in time. Figure 18: Timeline rows The Filmstrip is a fixed representation of the video as it appears over time. The image under the playhead or an active cue line displays the frame at the corresponding moment in time. For an audio presentation, the filmstrip will not appear. Impatica OnCue User’s Manual Version 3.3.3 23 Chapter 4—Creating OnCue Presentations The ability to synchronize on exact frames is particularly important when creating a still version of a presentation. A still version of a presentation is created with only one video frame displayed per slide, or one frame for the entire presentation. Cueing a single image for the slide or entire presentation allows for an appropriate image to be selected. The image selected by the cue line will be displayed for the duration of the slide during playback. The Audio Waveform is much like the filmstrip. It graphically displays the sound for the entire video. The waveform is a helpful means of identifying appropriate cue placements, since in many cases slide, paragraph, and animation transitions will take place during a period of silence in the sound. A flat section in the waveform represents silence in the audio. The Slides Row is the only row that contains moveable objects. It displays all of the slides with their corresponding paragraphs and animations. A slide’s placement in the timeline indicates the time at which the slide will appear. Clicking and dragging the slide within the timeline can change this transition time, thereby enabling synchronization with the video and audio. Note: When the Edit window is opened without a specified marker file, the slides and their animations will be placed along the timeline according to their original PowerPoint timings. When a slide is moved, its paragraphs and animations move with it. While the position of the slide is being modified, the black line along the left edge of the slide acts as the cue line; therefore, the preview area changes to reflect the position of the beginning of the slide. Note: The slide order cannot be changed in the edit window. To rearrange slides, reorder them in PowerPoint and then reconvert using Impatica for PowerPoint. Each slide contains a paragraph row and an animation row. Paragraphs are each denoted by a rectangle containing the first few words of the text for that paragraph. Paragraph cues are represented as black handles that appear between two paragraphs. Clicking and dragging the handle to a new position can modify the position of paragraph cues. An animation cue slider represents each animation or animation sequence within a slide. Clicking and dragging these sliders can control the timing of animations. A set of PowerPoint 2002 (XP) animations that are set to begin “with previous” are viewed as a single animation sequence by Impatica OnCue and will therefore be represented by a single animation slider. To adjust the timing within the sequence, modify the timings in the source PowerPoint file or set the animation triggers to “after previous” or “on mouse click” and re-impaticize the presentation. As paragraph and animation cues are moved, the corresponding slide remains in place. While a paragraph or animation cue is dragged, a black cue line appears and the preview area is continually updated to reflect the current position of that line. Impatica OnCue User’s Manual Version 3.3.3 24 Chapter 4—Creating OnCue Presentations Paragraph and animation cues that are dragged beyond the end of the slide are deposited into Slide Drawers. See Section 4.9.1.3 Placing Cues in the Slide Drawer for more details. Tip: Slides can be moved independently of their paragraph and animation cues by holding down the ALT key and dragging the slide. The slide cue will move relative to the timeline and the paragraph and animation cues will remain in their positions. 4.8.1.3 Zoom In and Out 1. The timeline can be zoomed in or out. Press the Zoom In button at the bottom left of the Edit Window to increase the view of the timeline (e.g., from 20 second intervals to 10 second intervals) thereby stretching the display and giving a finer resolution of time. Note: By default, when the edit window is launched, the initial zoom level is adjusted so that the entire presentation can be displayed. 2. Press the Zoom Out button to compress the timeline (e.g., from 10 seconds to 20) and see more of the presentation. 3. Zoom commands may also be used from the View menu. Alternatively, the Zoom Selector may be chosen from the bottom left of the Edit menu where pre-defined zoom selections may be chosen. 4.8.1.4 Buttons and Menus The edit window includes several buttons that are described below: Playback Controls Rewind Moves the playhead back to the beginning of the video. Pause/Playback Starts the playback. If the presentation is currently playing, the button toggles to Pause. Pause stops the playback, leaving the playhead in its current position. Cue Placement Controls Place Slide Place Paragraph Place Animation Impatica OnCue User’s Manual Version 3.3.3 Moves the next Slide, Paragraph or Animation to the current playhead position. (If cursor is on last Slide, Paragraph or Animation, the button will be disabled.). 25 Chapter 4—Creating OnCue Presentations Bulldoze Slide Bulldoze Paragraph Bulldoze Animation When selected, the playhead pushes slide, animation or paragraph cues during playback. (For more details, see Placing Cues during Playback.). Zoom Controls Zoom in Zooms in on timeline to show more detail but less time. Maximum Zoom In ratio is 1:1. Zoom out Zooms out of timeline to show less detail, but more time. Maximum Zoom Out ratio is 1:524288. Zoom selector Drop down list provides pre-defined zoom levels. In addition to the commands found on the buttons in the Timeline area, the Edit menu also contains the following commands: Import Animation cues from Source: imports the animation timings from the source PowerPoint presentation. Keep Animation cues from Source: Reverts the animation cues to the timings in the original impaticized presentation file and prevents further editing. To unlock the animation cues, deselect the menu item. 4.8.1.5 Keyboard Shortcuts The following keyboard shortcuts may be used in the OnCue Edit window + Zoom In - Zoom Out s Place Slide p Place Paragraph a Place Animation Spacebar c Ctrl - c , (comma) Play/Pause Center Current Playhead Position Move Playhead To Center Of View Move Playhead Left Impatica OnCue User’s Manual Version 3.3.3 26 Chapter 4—Creating OnCue Presentations . (period) Move Playhead Right Alt - Ctrl - , Move Playhead To Start Of Movie Alt - Ctrl - . Move Playhead To End Of Movie Alt - , Scroll Left Alt - . Scroll Right Ctrl - , Scroll Block Left Ctrl - . Scroll Block Right Ctrl - s Save Ctrl - Shift - z Ctrl - i Revert Import Animation Cues From Source 4.9 PLACING CUES There are two methods of placing cues while editing the presentation. They are: manually using playback 4.9.1 Placing Cues Manually 4.9.1.1 Slide Cues 1. To place a slide cue, click and drag the slides in the timeline area. The first slide’s cue is fixed at the beginning and cannot be moved because it must appear with the beginning of the video. When a slide is selected, the cue line, the black line along the left edge of the slide, is used to set the cue time. As the slide and cue line are moved, the video frame under the cue line changes to reflect the video frame at that particular moment in time. The paragraph and animations on the slide move with the slide, keeping their time relative to the beginning of the slide. Note: 2. The slide order cannot be changed in the edit window. To rearrange slides, reorder them in PowerPoint and then reconvert using Impatica for PowerPoint. Move slides to the desired position. The current slide will push any subsequent slides that it encounters. If the slide is subsequently moved back, any slides it had pushed will remain where they were dropped. Once a slide is released or dropped, its cue time will be set. Note: All cues have a minimum separation of 1/10 of a second. Impatica OnCue User’s Manual Version 3.3.3 27 Chapter 4—Creating OnCue Presentations 4.9.1.2 Paragraph and Animation Cues Paragraph and animation cues can be set in a manner similar to setting slide cues. Moving a paragraph handle or an animation slider will push objects of the same type as they are encountered in the same slide. Animation and paragraph cues do not affect any component of other slides. 1. To move a Paragraph cue, drag the black cue handle that appears between paragraph objects. The first paragraph of a slide cannot be moved. 2. To move an Animation cue, click and drag the animation cue slider to the desired position. 4.9.1.3 Placing Cues in the Slide Drawer If a paragraph or animation cue is set to a time beyond the end time of that element’s slide, the element will be moved into the slide’s drawer. Elements in a drawer will not appear during playback. 1. Drag a paragraph or animation cue to the right until the drawer symbol appears. When a slide has items in its drawer, an icon appears on the slide, allowing the drawer to be opened and providing access to paragraphs and animations that would have otherwise been hidden. 2. To remove items from the drawer either drag them to the left into the viewable portion of the slide, or move the slide that follows to the right, extending the first slide’s play time. 4.9.1.4 Placing a Cue Using the Playhead 1. Click and drag the green playhead arrow to the desired cue time position. 2. Once the playhead is in place, click the Place Slide, Place Paragraph or Place Animation button and the next slide, paragraph or animation to the right of the playhead will be moved to the playhead position. These buttons will be active only if there is a corresponding object that can be moved. Tip: Use this approach to synchronize elements exactly. For example, to perfectly synchronize a paragraph with an animation cue, simply move the playhead to the desired point, then click the Place Paragraph button and the Place animation button. 4.9.1.5 Locking a Slide 1. To lock a slide, including all of its paragraphs and animations, double-click on it. The slide’s thumbnail, paragraphs and animations will be grayed-out, indicating that it is locked. A locked slide cannot be moved until the slide is unlocked. Other slides will not be able to be moved beyond a locked slide. Impatica OnCue User’s Manual Version 3.3.3 28 Chapter 4—Creating OnCue Presentations 2. To unlock a slide double-click on the locked slide. The cues contained in that slide may now be edited. 4.9.2 Placing Cues during Playback Another way to place cues is to set them during the playback of the presentation. This method closely mimics a presenter changing slides and triggering animations during a live presentation. While using the playback method to place cues, the presentation can be viewed and heard, advancing the slides, paragraphs and animations as it progresses. The additional Bulldoze feature may be turned on during playback to force all of the cues to be pushed along the timeline. 4.9.2.1 Placing Cues using Place Slide, Place Paragraph, Place Animation 1. Click the Play button to start the video, slide and text playback from the current position of the playhead. 2. Click the Place Slide button when a slide transition is desired. This will move the next slide to the current position of the playhead. The playback will be uninterrupted, and the slide preview will be updated to show the new slide. 3. Paragraph and animation cues can be set in the same fashion. Clicking the corresponding Place Paragraph or Place Animation buttons will move the next paragraph or animation to the current playhead position. 4.9.2.2 Placing Cues using Bulldoze Mode Slide, paragraph and animation cues may optionally be collected and pushed along by the playhead. This option is set for each cue type by selecting the corresponding Bulldoze button next to the place buttons. 1. Click the Bulldoze button for Slide, Paragraph and/or Animation, as desired. 2. Press Play. 3. Bulldoze causes the cues to be collected as they are encountered and pushed along with the playhead until they are placed. 4. Click the corresponding Place Slide, Place Paragraph or Place Animation button and the first object of that type will be placed in the current playhead position. Note: When the playhead encounters a locked slide while bulldozing any slide, paragraph and or animation, all of the collected elements are dropped and the playhead continues to play through the locked slide, without bulldozing any of its elements. Bulldozing will resume at the next unlocked slide. 4.9.3 Saving Cues to a Marker File 1. Once all of the cues have been placed, they can be saved to a marker file either by choosing SAVE or SAVE AS from the FILE menu. Closing the edit window will also prompt you to save. Impatica OnCue User’s Manual Version 3.3.3 29 Chapter 4—Creating OnCue Presentations 2. The saved marker file will automatically be inserted as an Impatica OnCue asset for your project. 4.10 VIDEO ENCODING OPTIONS When the presentation is converted, it will be done so according to the video encoding settings specified on the VIDEO OPTIONS tab of the main Impatica OnCue screen. These settings may be specified for the currently selected project, for all projects in the Source Projects list (using the Apply to All button), or even as the default for future projects (using the Save As Default button). Figure 19: Video Encoding Options 4.10.1 Target Connection Speed To give your audience the flexibility of choosing the best speed according to the resources available to them, it is possible to create multiple versions of your presentation for different playback speeds. The audience may then choose the playback speed at any time during playback. The TARGET CONNECTION SPEED is the expected bandwidth that the viewer of the presentation will have available for playback. Available speeds are STILL, 64KBPS, 128KBPS, and 256KBPS for Full Presentation with video. Impatica OnCue User’s Manual Version 3.3.3 30 Chapter 4—Creating OnCue Presentations The STILL option is included for very low bandwidth applications, such as dial-up, where it is better to replace the full video with a still image to ensure smooth and timely playback. The STILL setting has additional options: ONE PER CLIP and ONE. The ONE PER CLIP setting causes the first frame of video associated with each slide to appear for the duration of the slide, while ONE displays the first frame of the video for the entire presentation playback. When encoding the video, any combination of the speeds can be selected, but all desired output speeds must be converted at once. Simply click the checkbox under TARGET CONNECTION SPEED beside the speed(s) for which you wish to encode. For video-only presentations, there is the additional ability to choose 56KBPS, or to specify a custom bit rate in the field provided. 4.10.2 Frame Rate Impatica OnCue can encode the video files at different frame rates. The desired frame rate for each target connection speed is displayed in the FRAME RATE (FPS) column. The options available are based on the frame rates of the original source video file. The defaults are appropriate for each output target speed. If the FILE option is selected as the FRAME RATE, the frame rate used for conversion will be that of the original video file. The picture quality of the video is directly affected by the frame rate. In order to fit a video through a given bandwidth, the picture quality must decrease in order to achieve a higher frame rate. Note: You may wish to impaticize using the file settings as presented and then experiment by subsequently adjusting these settings for each output target speed to see how they will affect the quality of the output video. Only frame rates that are factors of the source are possible. 4.10.3 Network Overhead (%) Network overhead may vary depending on the type of network or device connection. Default values of network overhead for Internet delivery will be displayed in the NETWORK OVERHEAD (%) column and may be altered accordingly. As a general rule, you may wish to start with the values as presented. The following table suggests network overhead settings for various output devices. Impatica OnCue User’s Manual Version 3.3.3 31 Chapter 4—Creating OnCue Presentations Output Target (kbps)/ Network/Device Type Network Overhead (%) Still Not Applicable 56 25 64 20 - 25 128 15 – 20 256 10 - 15 Custom LAN 5 –10 CD-ROM/CD-R 0% Hard Disk 0% As the network overhead value is adjusted, the actual bandwidth required for the streaming Impatica content is shown in the NET TARGET CONNECTION SPEED. As the NETWORK OVERHEAD goes up, the NET TARGET CONNECTION SPEED goes down. 4.10.4 Net Target Connection Speed Impatica OnCue automatically calculates your NET TARGET CONNECTION SPEED as follows: (100% less the Network Overhead %) of Target Connection Speed This is the value that Impatica OnCue will attempt to achieve in its conversion process. In order to maximize the quality of the output video while matching the NET TARGET CONNECTION SPEED as closely as possible, the conversion process makes several passes of the source video trying various quality settings. 4.10.5 Default Playback Speed To select the speed at which your presentation will play by default, select it from the DEFAULT PLAYBACK SPEED drop-down list. All of the currently selected Target Connection Speeds will be available from this list. 4.11 PRESENTATION OPTIONS Several additional options for customizing the presentation are available on the PRESENTATION OPTIONS tab. As with the Video Options, these settings may be specified for the currently selected project, for all projects in the Source Projects list (using the Apply to All button), or even as the default for future projects (using the Save As Default button). Impatica OnCue User’s Manual Version 3.3.3 32 Chapter 4—Creating OnCue Presentations Figure 20: Presentation Options 4.11.1 Allow Skipping of Unviewed Slides Impatica OnCue presentations offer a variety of methods to navigate the presentations, including the interactive table of contents, VCR-style controls, next and previous slide buttons and keyword search. Presentations converted with the Allow Skipping of Unviewed Slides checkbox selected allow unrestricted navigation through the presentation using these tools. In some instances, however, it is important to restrict navigation capabilities so that viewers cannot skip any slides in the presentation. For example, some action on the last slide of the presentation, such as an e-mail link to indicate completion or a link to a quiz, should only be accessible once all of the presentation slides have been viewed in their entirety. Presentations converted with the Allow Skipping of Unviewed Slides checkbox deselected will prevent viewers from skipping presentation slides. Viewers will be able to navigate through previously viewed slides, for review purposes, but will not be able to jump ahead in the presentation. 4.11.2 Loop Presentation Presentations impaticized with the Loop Presentation option selected will automatically replay once the presentation has ended. If this selection is left unchecked, the presentation will simply finish playing at the end of the last slide. Impatica OnCue User’s Manual Version 3.3.3 33 Chapter 4—Creating OnCue Presentations 4.11.3 Initial Volume Presentations created with Impatica OnCue include a volume control. By setting the Initial Volume, you can control at what volume your presentation begins to play. 4.11.4 Generate Support Files 4.11.4.1 Zip Package When this option is selected, Impatica OnCue will create a zip package that contains all of the components of the impaticized OnCue presentation. The ZIP file will be saved in the project folder. Once this zip package has been created, it can be used to upload the presentation to a learning management system. 4.11.4.2 SCORM Package This option can be selected to produce a SCORM conformant sharable content object. This package can then be used within a SCORM conformant learning management system. The SCORM package will have the extension “-scorm.zip” and will be located in the same folder as the corresponding impaticized OnCue presentation. The package produced includes generic meta-data. To edit the meta-data, unzip the package using a tool such as WinZip, then open and edit the metadata.xml file using a text editor. Re-zip the package once the changes are complete. For more information about SCORM, please visit www.adlnet.org/ 4.11.6 Sound Format Impatica OnCue offers three options for sound format: compact, Sun µLaw and WAV. Impatica OnCue is generally used to produce content for Internet delivery. In order to achieve reliable playback over a variety of Internet connections, the tiny Impatica compact format is best used for delivering the audio component of the presentation. In some instances, however, OnCue presentations may be delivered in other ways, such as on CD-ROM or over a high-bandwidth internal network. In such cases where bandwidth is not a concern, it may be desirable to increase sound quality, by using the Sun µLaw or WAV formats, even at the expense of increasing file size. Sun µLaw audio is 5 times the file size of the compact format, while WAV is 10 times the size of the compact format. Note: Impatica highly recommends the use of the compact sound format for Internet delivery of presentations. Sun µLaw and WAV audio significantly impacts the resultant file size and therefore can critically impede smooth playback over slow Internet connections. Impatica OnCue User’s Manual Version 3.3.3 34 Chapter 4—Creating OnCue Presentations 4.12 CONVERTING YOUR PROJECTS Once you have selected all of the files and made all the necessary modifications to your presentation, you are now ready to convert (impaticize) your presentation. 4.12.1 Convert the Project 1. Click Impaticize. The Conversion Progress (Figure 21: Project Conversion Progress) will appear showing the progress of each project. 2. The PASS progress bar shows the progress of the current Project through its various passes through the conversion. Figure 21: Project Conversion Progress 3. Impatica OnCue segments the source video file into separate impaticized video clips as indicated by the marker file. For each video clip, Impatica OnCue will encode an .imv file for each of the select Target Connection speeds. By convention, the output video files will be named as follows: projectname-speed-nn.imv where: “projectname” is the name of the Impatica OnCue project file, “speed” is the output target speed; e.g., “still”, “64” etc.; Impatica OnCue User’s Manual Version 3.3.3 35 Chapter 4—Creating OnCue Presentations “nn” is the segment number, generally corresponding to the slide number. 6. The CONVERSION SETTINGS USED list shows the settings used for conversion. The PROJECT ASSETS list provides the source file information for the project. 7. Once all the projects have been converted a new screen will appear. This screen allows the preview, deletion and uploading of converted presentations. (Figure 22: Converted Projects). 4.12.2 Cancel Conversion 1. At any time during the conversion, the process may be cancelled by clicking on the Skip button to cancel the current project or Skip Remaining to cancel the current and remaining projects. If no projects completed conversion you will be returned to the main Impatica OnCue screen. 4.13 PREVIEWING A PROJECT 1. To preview a convertd project, select the project name in the CONVERTD PROJECTS list and click Preview (See Figure 2: Presentation Playback Layout). 2. Microsoft Internet Explorer will be automatically launched and the selected presentation will play. The preview provides the opportunity to view the presentation before it is uploaded or sent by e-mail. Impatica OnCue User’s Manual Version 3.3.3 36 Chapter 4—Creating OnCue Presentations Figure 22: Converted Projects 4.14 DELETING PROJECT OUTPUT 1. If you wish to have the output deleted for any reason, select the desired project and click the Delete Output button. 2. All files that were generated during the conversion process will be deleted and the project will be removed from the list. A dialog box (Figure 23: ) will be displayed requesting confirmation of your action. 3. Click OK to delete the output files or Cancel to cancel the request. Note: Only the impaticized files are deleted. None of the original asset files will be deleted. Figure 23: Delete Output Impatica OnCue User’s Manual Version 3.3.3 37 Chapter 4—Creating OnCue Presentations 4.15 1. VIEW PROJECT AND VIDEO INFO Use the Project Info tab (Figure 24: Project Info Tab) to view information regarding the project file. The names of the individual files that make up the project currently selected in the CONVERTED PROJECTS list box are shown. If more than one project is listed, select each project separately to view its information. Figure 24: Project Info Tab 2. Select the Video Info tab (Figure 25: Video Info Tab) to review information regarding the video files and clips for the project selected in the CONVERTED PROJECTS list box. Under the SOURCE VIDEO/AUDIO FILE heading, the name of the source video or file, its size in MB and bytes, the date and time the source file was modified and its color depth are listed for reference and comparison. Impatica OnCue User’s Manual Version 3.3.3 38 Chapter 4—Creating OnCue Presentations Figure 25: Video Info Tab The video clips that were generated during the conversion process are listed in the CONVERTED IMPATICA FILES list. The CONVERSION SETTINGS USED list provides the target speeds, frame rate, and network overhead used in the conversion process for each video clip. 3. Click on the Preview button to preview the currently selected video clip. The size of the converted clip, its compression ratio compared to the input video clip, the actual bit rate in kbps for playback, the frame size and final output quality are displayed. Note: The Actual Bit Rate should be less than or equal to the Target rate set. An actual bit rate that is greater than the target rate indicates that the selected frame rate was too high to achieve. Lower the frame rate to get the desired output. If the target rate is significantly higher than the actual bit rate achieved, you may wish to try again with an increased frame rate. Impatica OnCue User’s Manual Version 3.3.3 39 Chapter 4—Creating OnCue Presentations 4.16 UPLOADING YOUR PROJECTS Before you can upload your Impatica files or applet to your web server, you must first establish a connection to the server. 4.16.1 Establishing a Connection to Your Web Server 1. To connect to your web server, first select the WEB SERVER UPLOAD tab and click the Connect button. The following dialog box (Figure 26: Connection Settings Dialog) will appear: Figure 26: Connection Settings Dialog 2. The ACCOUNT NAME dropdown list allows for creating a new account, choosing a different account, deleting the current account, or making the current account the default. Using the ACCOUNT NAME dropdown list, select an account name. If an account has not yet been set up, choose New Account, give it a name and set the appropriate values to connect to your web server. For each account, you must specify values for the following settings: Impatica OnCue User’s Manual Version 3.3.3 40 Chapter 4—Creating OnCue Presentations Field Description FTP Server Name The domain name or numerical IP address of the FTP server to upload to, e.g., ftp.yourserver.com. FTP Port May be required due to the unique set-up of the FTP server. Normally, field is left blank. (The default is port 21.) FTP User Name Used to authenticate identity when connecting to server. FTP Password Needed with User Name to authenticate identity. Web Documents Folder The folder on the FTP server to which the contents are to be uploaded. The folder will contain HTML and supporting files published to the web site, or one of its sub-folders. This field must contain a name and/or path to the upload folder For example, to put a convertd presentation into a folder called “presentations”, if the public folder containing the files that make up the website is “public_html”, then the Web Documents Folder is “public_html/presentations”. If the desired upload destination is displayed on connection without entering any information in this field, then the field should be left blank. Web Site Location Address (URL) to which the files are to be uploaded. It will be made up of the address (URL) to the web server (HTTP server) with the addition of the Web Documents Folder location, if any. This field must reflect the corresponding value in the Web Documents Folder. For example, if the Web Documents Folder value is “public_html/presentations”, then the Web Site Location would be www.yourserver.com/presentations. The “public_html” is the root public folder and therefore does not need to be included. Connection Type Set to ACTIVE or PASSIVE. Active is the default connection type. Certain cases (e.g., with firewalls) may require a passive connection. Generally, if an active connection fails, the protocol will automatically revert to passive. Upon connecting, ensure Impatica applet is on server Setting that specifies whether Impatica OnCue will verify if the applet files exist in the correct folder on the FTP server. When selected, the files will automatically be uploaded if not already there. Remember Password This checkbox allows an encrypted version of the password to be saved locally. 3. If changes are made to an account, OnCue will prompt for the changes to be saved upon clicking Connect or Cancel. Impatica OnCue User’s Manual Version 3.3.3 41 Chapter 4—Creating OnCue Presentations Note: If you are uncertain about any of these values, please contact your web master or service provider for details. 4.16.2 Uploading Files Once the connection has been established, the files will need to be uploaded, or put on the server. 1. To upload the currently selected Impatica project, click Put Project. To upload all of the converted projects, choose Put All Projects. Figure 27: Uploading to Web Server The UPLOAD TO radio buttons (Figure 27: Uploading to Web Server) provide you with two options to upload your files. When the PROJECT FOLDER radio button is selected, Impatica OnCue creates a project folder with the project name and uploads all files to that folder. When the CURRENT FOLDER radio button is selected, Impatica OnCue uploads all files for all projects under the current folder name. This option will allow you to manage your own file structure. Impatica OnCue User’s Manual Version 3.3.3 42 Chapter 4—Creating OnCue Presentations 3. The Put Other (Figure 27: Uploading to Web Server) button can be used to upload any file, for instance, previously encoded files, custom HTML or any other file. Click the Put Other button and choose a file from the OPEN dialog box that appears. 4. When the Put Project, Put All Projects or Put Other buttons are clicked, the UPLOAD PROGRESS screen appears (Figure 28: Upload Progress) to report the progress of the upload process. It will show the name of the project being uploaded and the number of bytes that have been uploaded. Figure 28: Upload Progress 5. The Skip Remaining button provides you with the option to skip the upload process for the remaining projects. 4.16.3 Managing Web Folders and Files Impatica OnCue allows you to manage your files and folders on your web server. Once you are connected to the server, you will see a file listing in the Web Server Upload tab. In order to upload one or more Impatica projects, you must first browse to the appropriate location on your FTP server. The following buttons are available: Impatica OnCue User’s Manual Version 3.3.3 43 Chapter 4—Creating OnCue Presentations Open Opens the folder or file selected in the REMOTE SERVER PATH list box. Method can be used on Parent Folder. New Folder Opens a New Folder dialog box, requesting name of new folder to be added to the server. Delete Deletes the selected item from the server. 4.16.4 Disconnecting from Your Web Server 1. Click the Disconnect button in the WEB SERVER UPLOAD tab (Figure 27: Uploading to Web Server) to disconnect from the server. 4.16.5 E-mail tab The presentation may be embedded into an e-mail message so that it will start to play when the e-mail is opened. 1. Select the E-MAIL tab from the Converted Projects screen (Figure 29: E-mail HTML) and choose the desired project from the list of encoded files in the CONVERTED PROJECTS list box. Note: This tab will only contain information if the project has been uploaded to a server. Impatica OnCue User’s Manual Version 3.3.3 44 Chapter 4—Creating OnCue Presentations Figure 29: E-mail HTML 2. Click the Copy HTML button. 3. Switch to the HTML editor portion of your e-mail client, if it exists, and paste the HTML. Example: in Microsoft Outlook Express, switch to the Source tab at the bottom of a New Mail window and delete the contents. Paste the HTML. Return to the Edit tab of the email prior to sending. 4. Alternatively, you may wish to save the e-mail HTML as a text file. To do so, click the Save button, navigate to the desired folder, enter a filename and click Save. For specific instructions for several e-mail clients, see Chapter 9: E-mailing Your Presentation. Note: Due to the size of the Impatica OnCue presentation template, (778x525 pixels) some email recipients will not be able to see the entire presentation within their e-mail preview window. To work around this, e-mail the URL to allow the presentation to be opened in the recipient’s default browser. Impatica OnCue User’s Manual Version 3.3.3 45 Chapter 5—Supported Video & Audio 5 Supported and Unsupported Video and Audio Fo r m at s 5.1 OVERVIEW This section of the User’s manual describes audio and video settings and parameters that are supported in Impatica OnCue. In addition, the section entitled Tips and Tricks includes some guidelines and suggestions to consider when preparing and encoding your source video files. 5.2 VIDEO FORMATS Impatica OnCue includes support for the following types of video and audio files: Any .mov or .avi that QuickTime 6.0 player can open MPEG-4 (.mp4) audio and video files DV (NTSC versions only) Any audio that QuickTime 6.0 player can play, such as WAVE (.wav), AU (.au), Audio Interchange File Format (.aiff), MPEG-3 (.mp3) and MPEG-4. AVI (.avi) files that can be opened in Windows Media Player, including AVI videos compressed with codecs such as DivX. For this category of AVI files, the audio must be in PCM format. When this type of video is selected, the audio will be available for synchronizing in the edit environment, but the video will not be visible. However, the video will appear in its entirety in the impaticized presentation. The following formats are not supported: MPEG-1 and MPEG-2 Any Microsoft formats such as Windows Media Video (.wmv), Windows Media Audio (.wma) and Advanced Streaming Format (.asf) Impatica recommends using video that is in uncompressed AVI format, with the sound set to 8000Hz, 16bit, mono for the video portion of a full Impatica OnCue presentation. This will keep the compression artifacts to a minimum. If a compressed video is used, another level of compression is added, thus degrading the quality of the video. If compressed video must be used, it is recommended that you keep the quality settings as high as possible to keep the image degradation to a minimum. Furthermore, Impatica OnCue requires video that has more than one keyframe and favors video in which all frames are keyframes. In Adobe Premiere, access the setting that determines the frequency of keyframes in uncompressed video by selecting EXPORT MOVIE SETTINGS, KEYFRAME AND RENDERING OPTIONS. Deselect OPTIMIZE STILLS to export video that is made up solely of keyframes. Impatica OnCue User’s Manual Version 3.3.3 46 Chapter 5—Supported Video & Audio When Impatica OnCue encounters a video source file greater than 8-bit depth, a lossy true color compression algorithm is used. When an 8-bit encoded source file is encountered, loss-less output is produced. Impatica recommends using 8-bit color depth for hard edged art (such as video screen captures) and 24-bit for continuous tone content such as live motion video. 5.3 AUDIO FORMATS Impatica OnCue supports audio presentations. For these, the audio can be in any of the audio formats that the QuickTime 6.0 player can play, such as WAVE (.wav), AU (.au), Audio Interchange File Format (.aiff), MPEG-3 (.mp3) and MPEG-4 (.mp4). The audio quality of the file selected should always be at least 8000Hz, 16 bit, mono; 8 bit sound is not recommended. For audio presentations, a corresponding image must be provided in the project folder. This image can be in either GIF or JPEG format. Impatica OnCue User’s Manual Version 3.3.3 47 Chapter 6—Tips & Tricks 6 Tips and Tr i ck s This section of the Impatica OnCue User’s Manual contains a collection of topics that are intended to make it easier to create effective streaming presentations. 6.1 NARRATION Narration is a critical component of Internet or e-mail delivered streaming video files. Here are some suggestions to make your narration more engaging and effective. Be brief and to the point. Online viewers have a very short attention span and they are only a single mouse click away from leaving. Use a script. Even though you may be highly effective as a stand-up or impromptu presenter, your online presentation does not benefit from your presence and charisma. More importantly, you do not have the benefit of watching and gauging reactions and modifying your delivery accordingly. Edit and re-edit the script to produce the shortest possible way of delivering a clear, concise and focused message. Consider using a professional narrator and sound recording studio. This depends on the objective of your presentation and on the intended audience. For example, if you are using professionally prepared graphics, your presentation probably warrants professional narration. Try it. Review the results, and judge for yourself. 6.2 PREVIOUSLY NARRATED POWERPOINT PRESENTATIONS If you are using a previously narrated PowerPoint presentation as the slide show component of an Impatica OnCue presentation, then it will be necessary to create a copy of the original PowerPoint presentation and manually delete the audio from each slide. Use this silent version as the source file to produce the presentation “-imp.jar” or “.imp” file for use with Impatica OnCue. 6.3 DEFAULT ENCODING SETTINGS When you select any of the standard target playback speeds, Impatica OnCue will display default settings for: Frame Rate Network Overhead If you override the default settings for network overhead, Impatica OnCue will update and display the net target value. Changing the frame rate will not change the Net Target, but this setting will have an effect on the output quality. By lowering the frame rate, you allow for more data per frame and therefore a higher quality picture. By raising the frame rate, the picture quality will degrade, but the video will look smoother. The defaults Impatica chose are for Impatica OnCue User’s Manual Version 3.3.3 48 Chapter 6—Tips & Tricks “talking head” video. If a different type of video is used, frame rate may be more or less important. This is a matter of personal preference for the user. Default encoding settings: Frame Rate Output Target Net Target Output Frame Rate Network Overhead (fps) (kbps) (kbps) (fps) (%) 10 56 44.8 2 20 10 64 51.2 2 20 10 128 108.8 5 15 10 256 230.4 10 10 12 56 44.8 2 20 12 64 51.2 2 20 12 128 108.8 6 15 12 256 230.4 6 10 15 56 44.8 1 20 15 64 51.2 1 20 15 128 108.8 5 15 15 256 230.4 5 10 24 56 44.8 2 20 24 64 51.2 2 20 24 128 108.8 6 15 24 256 230.4 8 10 25 56 44.8 1 20 25 64 51.2 1 20 25 128 108.8 5 15 25 256 230.4 5 10 30 56 44.8 2 20 30 64 51.2 2 20 30 128 108.8 6 15 30 256 230.4 10 10 6.4 SETTING UP THE WEB SERVER OnCue presentations are delivered from a standard HTTP Web server using a Java player applet. As a result, any standard Web server setup will work just fine. However, for performance reasons, it is good practice to use a single instance of the applet (.class files Impatica OnCue User’s Manual Version 3.3.3 49 Chapter 6—Tips & Tricks and/or .jar files) for all Impatica content hosted on the server so that all HTML containing Impatica content refers to one applet. When a Java applet is invoked, the browser first checks to see if the player is already in cache and, if so, uses the cached copy of the player instead of downloading the player from the Web server. As a result, the content plays almost instantaneously. However, the only way for the browser to ascertain that the required player is in cache is to compare the path names of the requested and cached players. Therefore, all references to Impaticized content should point to a common code base for the player files. 6.5 PATH AND FILE NAMES By their very nature, Java applets are designed to run on any Java-enabled platform, including Windows, Macintosh, Sun Solaris, Unix, Linux, OS/2, set-top boxes and many of the emerging handheld devices. The Impatica OnCue player applet can be launched and the associated Impatica content can be streamed from any HTTP server. No special streaming server software is required. It is therefore important to specify pathnames and file names that are meaningful on your server platform(s). The following conventions should be followed for any reference to server pathnames: do not use pathnames that begin with HTTP or FTP - Impatica OnCue does not support such pathnames. do not use spaces in file or folder names; use dashes, hyphens or underscores instead. PowerPoint does support long file names in a Windows environment but blanks are not permitted in Unix pathnames. some servers, e.g., Unix, are case sensitive. Impatica OnCue User’s Manual Version 3.3.3 50 Chapter 7—Narrative Script 7 N a r r at i ve Script The chief strength of Impatica OnCue is its ability to combine and synchronize many different components to produce a single unified presentation. In order for this synchronization to occur, there must be some central master record of when and how all of these components fit together. This record is called a Narrative Script (or, “script file”). The Narrative Script contains all script text that is to be displayed in the script window of the OnCue presentation, as well as synchronization information for all slides and video in the presentation. This information is presented as a markup file, where information is expressed along with tags, which explain to OnCue what the information means. These files can become very daunting for the novice user to modify, but fortunately, Impatica for PowerPoint has the ability to generate script files automatically. To use this feature, enter the narration text for each slide as notes, using the notes view in Microsoft PowerPoint. Then, convert the Microsoft PowerPoint presentation using Impatica for PowerPoint, making sure that the ONCUE SCRIPT FILE option is turned on. This will produce a script file ready to use in your Impatica OnCue presentation. The following section will explain one particular feature of Impatica OnCue that can only be accessed through the Narrative Script file. To edit and create script files, knowledge of the structure and elements of a file is needed. Please consult Appendix A for a detailed explanation of all relevant elements of a narrative script file. 7.1 USING AUTOMATIC URL LINKS Sometimes, there is a need in a presentation to access elements not contained directly in the presentation itself. For example, you may wish to: • Give access to an external example, such as a software simulation, or • Administer a separate quiz on the material contained in the presentation. In order to allow this sort of supplemental information access, it is possible to simply provide a hyperlink within the slides of the presentation. In addition, Impatica OnCue supports the addition of automatic external URL links to an OnCue presentation. This is done by using a <url> tag. The URL tag is used after a time tag, and will cause the following behavior to automatically occur at the time given in the time tag: • The presentation will pause. • A browser window will open, pointing to the URL specified in the URL tag in the script file. • The user may navigate at will in the new browser. When the user has finished with the resource, the new browser window should be closed. Impatica OnCue User’s Manual Version 3.3.3 51 Chapter 7—Narrative Script • To restart the presentation at the point that it was left off, the user must open the browser window containing the OnCue presentation, and press the play button. Playback continues normally. Note: The order in which tags must occur is very specific. The URL tag must occur after a time tag. If there are other tags associated with that time tag (such as a slideID and/or a video tag), then the URL tag must occur after these tags as well. Example: The following is an excerpt from a typical script file. The URL tag MUST occur last in any sequence of tags associated with a time tag. <s> <t=> <slideID=”1”> <video=”video1.avi”> <url=”www.example.com”> The behavior of the URL tag is very distinct from that of a link is placed in the PowerPoint presentation itself. The actions associated with this tag occur automatically at the prescribed point in the presentation, whereas the link in the PowerPoint presentation will only trigger if the user clicks on that link. Impatica OnCue User’s Manual Version 3.3.3 52 Chapter 8—E-mailing the Presentation 8 E-mailing the Presentat i o n 8.1 SENDING IMPATICA CONTENT THROUGH E-MAIL Sending your presentations through e-mail is similar to adding your presentations to your web site with one notable exception: the HTML code that invokes and plays your content is not added to your web site; it is embedded within the e-mail message that will be sent to the desired recipients. When you use Impatica OnCue to send your presentation by e-mail, the presentation is not embedded in the e-mail message nor is it attached to it. Rather, the e-mail contains a few brief lines of HTML code that refer to your converted presentation. This HTML code is very similar to the HTML code that would have been added to your web page if your presentation were accessible from your web site. The recipients of your rich streaming e-mail may not be expecting a narrated, animated message. You may wish to add some HTML text at the beginning of your message to prepare them for what is coming. This may read as follows: <HTML> <CENTER>This e-mail contains rich streaming media. Please ensure that your sound is turned up and that you are online. <BR> </CENTER> <APPLET>.... </APPLET> </HTML> Also, some recipients use e-mail clients that are not able to display rich streaming e-mail messages within their e-mail window. Fortunately, Impatica OnCue has a built-in solution for this problem. If their e-mail program cannot process the <APPLET> tag, the link contained in the automatically generated HTML will be displayed in the recipient's e-mail window. When they click on the link, the e-presentation will be displayed in their browser as it should have been displayed in their e-mail window. Once you have uploaded your impaticized presentation, you will be able to view, copy and save automatically generated e-mail HTML by clicking the “E-mail HTML” tab. Many newer desktop e-mail programs are capable of sending HTML encoded e-mail messages, including Outlook Express 5 and Outlook 2000 for Windows, Netscape Messenger 4.7 for Windows, etc. 8.1.1 Outlook Express 5 1. Open a New Message window. 2. At the bottom of the window, click the Source tab. If the Source tab is not visible, from the View menu, select Source Edit. Impatica OnCue User’s Manual Version 3.3.3 53 Chapter 8—E-mailing the Presentation 3. Copy and paste the “e-mail HTML” into the message area, replacing the default HTML that may be present. 4. Click on the Preview tab to test your content. If it does not play, most likely the applet files or content files have not been uploaded to the correct location on your web server. 5. Click on the Edit tab. 6. Address and send your e-mail in the normal fashion. 8.1.2 Microsoft Outlook 2000 1. Save the “e-mail HTML”. 2. Open the HTML document in Internet Explorer. 3. From the EDIT menu, choose SELECT ALL. 4. From the EDIT menu choose COPY. 5. Launch Microsoft Outlook. 6. To ensure that Outlook is enabled to send HTML content, from the TOOLS menu, select OPTIONS and, in the OPTIONS window, click on the MAIL FORMAT TAB and select HTML as the message format. 7. Open a NEW MESSAGE window. 8. Click anywhere in the message and from the EDIT menu, choose PASTE. 9. Address and send your e-mail message in the normal manner. 8.1.3 Netscape Messenger 4.7 1. Open a NEW MSG window. 2. Click on the Options button. 3. In the Format drop down box, select PLAIN TEXT AND HTML. 4. Copy and paste your “e-mail HTML” into the message area. 5. Unfortunately, Netscape Messenger modifies the HTML you insert, often rendering it inoperative. To verify and remedy this, in the TOOLS menu, select HTML TOOLS and EDIT HTML SOURCE. Edit out any extraneous information that has been added by Netscape Messenger. 6. Alternatively, you can enter your HTML directly into the HTML Edit window. Unfortunately, there is not any way to Copy and paste your HTML directly into the HTML Edit window. 7. Click OK to close the EDIT HTML window. 8. Address and send your e-mail in the normal fashion. Impatica OnCue User’s Manual Version 3.3.3 54 Chapter 8—E-mailing the Presentation 8.1.4 Yahoo! Mail 1. Click on Compose. 2. Select the radio button “html tags allowed” below the message area. 3. Copy and paste the “e-mail HTML” into the message area. 4. Click on HTML preview below the message to test your content. 5. Address and send your message in the normal fashion. 8.1.5 Other E-mail Alternatives In addition to desktop e-mail programs, there are numerous Application Service Providers that offer broadcast e-mail services and a growing number of software products that are fully HTML capable. For further information, contact Customer Support at [email protected]. Impatica OnCue User’s Manual Version 3.3.3 55 Chapter 9—Product Technical Specifications 9 Product Te chnical Specificat i o n s 9.1 SUPPORTED SOFTWARE This version supports the following: Microsoft Windows NT, 2000, and XP. Microsoft PowerPoint 97, 2000 and 2002(XP). For details on the features supported by Impatica for PowerPoint, refer to the Impatica for PowerPoint User’s manual, available on-line. 9.2 SYSTEM REQUIREMENTS Production: Pentium or equivalent Windows 2000 or XP 128 MB RAM 50 MB available disk space 1024 x 768 screen resolution 16-bit color Hosting: Any HTTP web server No special server side software Playback Any operating system with standard Java support such as Windows, Linux, Solaris, and MAC OS Any Java enabled browser, such as Internet Explorer 4+, Netscape Navigator 4+, Mozilla, and Opera 4+ Any of the most commonly used e-mail programs such as Outlook 2000+, Outlook Express 5+, Netscape Messenger, Mozilla Mail, AOL Webmail, Lotus Notes R5 and Eudora 4.3+ Impatica OnCue User’s Manual Version 3.3.3 56 Appendix A—Product Technical Specifications Appendix A NARRATIVE SCRIPT FILE REFERENCE The following is a listing of all relevant elements of a narrative script file, and an explanation of their usage. This is not an exhaustive reference; there are some tags that are automatically generated by Impatica for PowerPoint that are not mandatory, and serve no user-controllable purpose. Those tags have been omitted. Tag Type: Comment Structure: <! Text goes here> Example: <! Narrative Script Example> Usage Restrictions: None Explanation: The purpose of a comment is to allow you to add helpful hints, titles, and other information to aid other people in reading the script file. The comment tag can appear in any location in the script file, and does not alter the behavior of the script file in any way. The space after the exclamation point (“!”) must be present. After the space, you may enter any amount of text you desire. When finished, add a “>” at the end of your comment to signal the end of the comment. Tag Type: Title Structure: <title ="put title here"> Example: <title ="Impatica for PowerPoint - Product Overview"> Usage Restrictions: Must be first non-comment tag in file. Cannot be used in any other position. Explanation: The title is the title heading that appears at the top of the Impatica OnCue presentation. It is only used once, since the presentation can have only one title. Impatica OnCue User’s Manual Version 3.3.3 57 Appendix A—Product Technical Specifications Tag Type: Section/Slide Structure: <s="Slide or Section name here"> Example: <s="Introduction"> Usage Restrictions: Must be followed by time tag (“<t>”). Explanation: This tag is used to show the beginning of a new section (usually the beginning of a new slide). A new Section/Slide tag will also correspond with a new top-level entry in the table of contents of the OnCue presentation. The name of the new slide/section from the tag (the text in quotes in the tag) is the text that will appear in the table of contents. Tag Type: Video Structure: <video=”Name of Video”> Example: <video=> Usage Restrictions: Must appear after a <t> tag, but after any <slideID> tag associated with that <t> tag. If the first <t> tag is not found, t=0s is assumed. Explanation: This tag supplies the name of the video file that will be shown in the video section of the OnCue presentation. The name should usually be left blank (as in the example) since it will be updated during presentation conversion. Tag Type: Subsection/Slide Structure: <ss=”Name of Subsection”> Example: <ss="Overview">, <ss="Topics">, <ss="Thank You"> Usage Restrictions: Must be followed by time tag (“<t>”). Explanation: This tag is used to show the beginning of a new subsection (usually the beginning of a new slide). A new Subsection/Slide tag will also correspond with a new second-level entry in the table of contents of the OnCue presentation. The name of the new subsection from the tag (the text in quotes in the tag) is the text that will appear in the table of contents. Impatica OnCue User’s Manual Version 3.3.3 58 Appendix A—Product Technical Specifications Tag Type: Time Structure: <t= > Example: N/A Usage Restrictions: Mandatory after <s>, <ss> tags, optional after <p> tags. Also, a <t> tag must be the final non-comment element in the script file. Explanation: The time tag specifies a synchronization point, with reference to the beginning of the video (which is t=0). Usually in editing, the time in this tag is left blank (simply “<t=>”), since a time will be given to it automatically during the conversion of the presentation. Tag Type: Paragraph Structure: <p> Example: N/A Usage Restrictions: None Explanation: The paragraph tag inserts a blank line in the scrolling text portion of the Impatica OnCue presentation. Since the video with the presentation can also be synchronized to paragraphs by adding a time tag (<t=>) immediately after the paragraph tag. The text in the narrative script following the <p> will be shown when the video reaches the time defined in the time tag. Tag Type: URL Structure: <url= “www.yoururl.com”> Example: <url= “www.impatica.com”>. Please see section 7.1 for an additional example illustrating proper placement of a URL tag within a Narrative Script file. Usage Restrictions: Must occur after a <t> tag, but after all other tags that are connected to that particular time tag. Please see section 7.1. Explanation: This tag causes the presentation to pause at the point in time defined by the associated time tag, and to open an external browser window that will display the web page located at the URL supplied in the tag. When finished, the user must close the new window and manually restart the presentation. Impatica OnCue User’s Manual Version 3.3.3 59