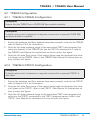
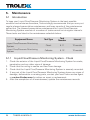
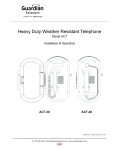
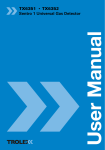
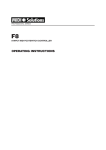
1
TX6023 • TX6024 User Manual
TX6023 • TX6024 Contents
Liquid Flow/Pressure Monitoring
System
1.
Product Overview
4
3.4
Connecting in Group I
1.1
Operating Features
4
Hazardous Areas (Mining)
1.2Application
5
3.5Connections
15
1.3
6
4.Configuration
17
1.4Dimensions
7
4.1
TX6023 Configuration
17
1.5
8
4.2
TX6024 Configuration
19
2.Certification
9
5.Maintenance
20
2.1
Intrinsically Safe
9
5.1Introduction
20
3.Installation
13
6.Support
21
3.1
Safety Precautions
13
7.Disposal
21
3.2
Tools and Test
Equipment Required
Product Options
Technical Information
3.3Preparation
www.trolex.com
14
Disclaimers22
14
Trademarks22
14
Contact Details
22
Document History
22
TX6023-4-UM-EN-01
3
1. Product Overview
TX6023/4
2 x 4 to 20 mA calibrated analogue output signal
Protected to IP66
1.1 Operating Features
•
•
•
•
•
4
For use on cutters, shearers, power packs, road headers, etc in the mining and
tunnelling industry
Precision monitoring of both flow and pressure to improve integrity on heavy
duty machinery results in less downtime and more productivity
Versatile - high flow capability at high static pressure for use with water and oil
Low maintenance - clear bore hole path with no invasive components – no
springs, no levers and no mechanical shuttles
Robust corrosion resistant pressure capsule for accurate analogue pressure
monitoring gives high overpressure capability and superior long term stability
TX6023-4-UM-EN-01
www.trolex.com
TX6023 • TX6024 User Manual
1.2Application
The flow and pressure output signals from the TX6023/4 Liquid Flow/Pressure
Monitoring System sensors can be connected to a TX9042 Programmable Sensor
Controller or TX9131 Programmable Trip Amplifiers. When used in conjunction
with a TX9042 or TX9131 the values of flow velocity and line pressure indicate
minute changes in flow delivery to spray heads or hydraulic systems on cutting
and shearing machines, road headers, continuous miners and dust suppression
systems, etc. Monitoring line pressure together with volumetric flow means that
precise flow rates can be determined where there are fluctuations in line pressure.
The flow sensor combines a high accuracy differential pressure sensor and a
stainless steel diaphragm pressure sensor with a high precision venturi, for
mounting into small bore fluid lines. The system can be connected directly into oil
or water circuits on heavy mining machinery, providing a flow path for the fluid with
no mechanical intrusions. In combination with the venturi, the differential pressure
sensor gives an output proportional to flow.
When connected to the TX9042 Programmable Sensor Controller, a linearised,
compensated display of flow is shown. The line pressure is also displayed. The flow
and pressure signals can be used to control the state of up to 4 output relays.
Underground Mining and Tunnelling
TX6145 and TX6147
I M1 Ex ia I
Type of protection:
Intrinsically safe Ex ia
TX6114
I M1 Ex ia I Ma
Category:
IM1
www.trolex.com
TX6023-4-UM-EN-01
5
1.3 Product Options
TX6023 Liquid Flow/Pressure Monitoring System for use with TX9042
Programmable Sensor Controller or P5438.91 Programmable Trip Amplifier
Order Reference
Flow Range
Pressure Range
0 to 50 bar
0 to 100 bar
0 to 200 bar
0 to 20 l/min
TX6023.76.81
TX6023.77.81
TX6023.78.81
0 to 30 l/min
TX6023.76.82
TX6023.77.82
TX6023.78.82
0 to 50 l/min
TX6023.76.83
TX6023.77.83
TX6023.78.83
0 to 120 l/min
TX6023.76.84
TX6023.77.84
TX6023.78.84
0 to 200 l/min
TX6023.76.85
TX6023.77.85
TX6023.78.85
0 to 300 l/min
TX6023.76.86
TX6023.77.86
TX6023.78.86
TX6024 Liquid Flow/Pressure Monitoring System with Pre-conditioned Flow
Sensor Output
Order Reference
Flow Range
Pressure Range
0 to 50 bar
0 to 100 bar
0 to 200 bar
0 to 20 l/min
TX6024.76.81
TX6024.77.81
TX6024.78.81
0 to 30 l/min
TX6024.76.82
TX6024.77.82
TX6024.78.82
0 to 50 l/min
TX6024.76.83
TX6024.77.83
TX6024.78.83
0 to 120 l/min
TX6024.76.84
TX6024.77.84
TX6024.78.84
0 to 200 l/min
TX6024.76.85
TX6024.77.85
TX6024.78.85
0 to 300 l/min
TX6024.76.86
TX6024.77.86
TX6024.78.86
Checkpoint
l/min - litres per minute
Checkpoint
Higher pressure ranges are available, please contact Trolex for details.
6
TX6023-4-UM-EN-01
www.trolex.com
TX6023 • TX6024 User Manual
1.4Dimensions
Venturi Diameter A and Flow Rate
Venturi Diameter A
Flow Rate
63.5 mm
0 to 20 l/min
63.5 mm
0 to 30 l/min
63.5 mm
0 to 50 l/min
63.5 mm
0 to 120 l/min
89 mm
0 to 200 l/min
89 mm
0 to 300 l/min
www.trolex.com
TX6023-4-UM-EN-01
7
1.5 Technical Information
Flow measuring range
options
20, 30, 50, 120, 200 and 300 l/min (venturi
dependent)
Pressure range options
0 to 50, 0 to 100 and 0 to 200 bar
Higher pressure ranges are available
Maximum pressure drop
0.9 to 2.0 bar
Accuracy
+/- 2% of full scale
Repeatability
+/- 1% of full scale
Ambient temperature range
-20°C to +60°C
Supply voltage
12 V dc nominal
Output signals
Flow: 4 to 20 mA
Pressure: 4 to 20 mA
Protection classification
IP66
8
TX6023-4-UM-EN-01
www.trolex.com
TX6023 • TX6024 User Manual
2.Certification
2.1 Intrinsically Safe
2.1.1 TX6145 and TX6147
1.
Europe (ATEX)
Ex Certificate number: Baseefa 05ATEX0193U
Ex Certification code: I M1 Ex ia I (-60°C ≤ Ta ≤ +70°C)
Specific Condition of Use
The connector pins of the component must be protected to IP54 minimum when
installed.
General Conditions of Use
Prior to installation, it is essential that user refers to the above certificate to
ensure that the termination and cable parameters are fully complied with and are
compatible with the application. Copies of certificates are available from Trolex.
ATEX Directive (94/9/EC)
EMC Directive (2004/108/EC)
2.Australia
Ex Certificate number: AUSEx 02.1519X
Ex Certification Code: Ex ia I (-60°C ≤ Ta ≤ +70°C)
Specific Condition of Use
The connector pins of the component must be protected to IP54 minimum when
installed.
General Conditions of Use
Prior to installation, it is essential that user refers to the above certificate to
ensure that the termination and cable parameters are fully complied with and are
compatible with the application. Copies of certificates are available from Trolex.
www.trolex.com
TX6023-4-UM-EN-01
9
3.
South Africa
Ex certificate number: MASC M/13-575U
Ex certification codes: Ex ia I (-60°C ≤ Ta ≤ +70°C)
Specific Condition of Use
The connector pins of the component must be protected to IP54 minimum when
installed.
General Conditions of Use
Prior to installation, it is essential that user refers to the above certificate to
ensure that the termination and cable parameters are fully complied with and are
compatible with the application. Copies of certificates are available from Trolex.
2.1.2 TX6114
1.
Europe (ATEX)
Ex Certificate number: Baseefa 03ATEX0021X
Ex Certification code: I M1 Ex ia I Ma (-20°C ≤ Ta ≤ +60°C)
Specific Conditions of Use
1. When installing the apparatus, please note that the screen of the integral cable
must be connected internally to the frame of the apparatus.
2. Also during installation, please note that Pin 4 of the optional plug-socket
arrangement is connected internally to the frame of the apparatus.
3. When the absolute version is used, the electrical circuit is not capable of
withstanding 500 V RMS to earth or frame, and this must be taken into account
when installing.
General Conditions of Use
Prior to installation, it is essential that user refers to the above certificate to
ensure that the termination and cable parameters are fully complied with and are
compatible with the application. Copies of certificates are available from Trolex.
ATEX Directive (94/9/EC)
EMC Directive (2004/108/EC)
10
TX6023-4-UM-EN-01
www.trolex.com
TX6023 • TX6024 User Manual
2.
Australia (ANZEx)
Ex Certificate number: ANZEx 12.3024X
Ex Certification Code: Ex ia I (-20°C ≤ Ta ≤ +60°C)
Conditions of Certification
1. Prior to installation, it is essential that the user refers to the above certificate to
ensure that the termination and cable parameters are fully complied with and
are compatible with the application. Copies of certificates are available from
Trolex.
2. It is a condition of safe use that, when installing the apparatus, the screen of
the integral cable must be connected internally to the frame of the apparatus.
3. It is a condition of safe use that Pin 4 of the optional plug-socket arrangement is
connected internally to the frame of the apparatus.
4. It is a condition of safe use that the apparatus measures high process
pressures, but shall be exposed to the hazardous gas at atmospheric pressure
only.
General Conditions of Use
Prior to installation, it is essential that user refers to the above certificate to
ensure that the termination and cable parameters are fully complied with and are
compatible with the application. Copies of certificates are available from Trolex.
3.
South Africa
Ex certificate number: MASC M/11-421X
Ex certification codes: Ex ia I (-20°C ≤ Ta ≤ +60°C)
Specific Conditions of Use
1. When installing the apparatus, please note that the screen of the integral cable
must be connected internally to the frame of the apparatus.
2. Also during installation, please note that Pin 4 of the optional plug-socket
arrangement is connected internally to the frame of the apparatus.
3. When the absolute version is used, the electrical circuit is not capable of
withstanding 500 V RMS to earth or frame, and this must be taken into account
when installing.
www.trolex.com
TX6023-4-UM-EN-01
11
General Conditions of Use
Prior to installation, it is essential that user refers to the above certificate to
ensure that the termination and cable parameters are fully complied with and are
compatible with the application. Copies of certificates are available from Trolex.
2.1.3 TX6023/4
1.
Russia (GOST-R)
Ex certificate number: POCC GB. ГЂ05.B03981
Ex certification code: PO Ex ia I
Conditions of Use
Prior to installation, it is essential that user refers to the above certificate for any
specific conditions of use. The user must ensure that the termination and cable
parameters are fully complied with and are compatible with the application. Copies
of certificates are available from Trolex.
2.
India (CIMFR Test Report)
Test report CIMFR/TC/P/H796 available – Please contact Trolex.
12
TX6023-4-UM-EN-01
www.trolex.com
TX6023 • TX6024 User Manual
3.Installation
3.1 Safety Precautions
1. Ensure sensor ranges are compatible with the application.
2. Ensure that appropriately rated pressure couplings are used for the installation
of the sensors.
3. Where the sensors are to be used on high pressure systems, take care to
isolate and relieve the system pressure before installation or removal.
4. Ensure all fittings are secure before applying pressure to the system.
5. Do not insert sharp or metallic objects into any sensor pressure orifice, as this
may cause internal damage to the sensors.
6. Static line pressures in excess of 2 times the rated operating pressure of the
TX6114 may cause permanent damage or de-calibration of the output signal.
7. For Intrinsically Safe applications the instrument must be used with an
Approved Intrinsically Safe power supply source.
8. All interconnecting cables to monitoring equipment must comply with the
requirements of the particular monitoring device being used in order to
preserve the Intrinsically Safe integrity of the system.
9. Out of balance pressure or high pressure surges can cause permanent damage
to the sensing elements inside the instruments. Never operate the instrument
without both process connections being connected.
10. If maintenance work or testing is being carried out on the hydraulic circuits
of the machine, then the instruments should be protected against pressure
surges or the application of reverse pressure.
11. Ensure that the correct modules are fitted in the TX9042.
www.trolex.com
TX6023-4-UM-EN-01
13
3.2. Tools and Test Equipment Required
No special tools are needed.
3.3.Preparation
1. Check that the supply voltage is correct for the application and is from an
approved supply.
2. Check that the certification code is correct.
3. Check that the pressure range is correct.
4. Check that the flow range is correct - refer to venturi details.
5. Check that the mechanical fittings are correct.
3.4 Connecting in Group I Hazardous Areas (Mining)
The output signals of the sensors are certified Intrinsically Safe for use in
Group I hazardous areas (mining) when used with approved equipment.
(eg TX9042 Programmable Sensor Controller or TX9131 Trip Amplifiers). The
complete system, both sensors and monitoring devices can be mounted in
the hazardous area. Both the sensors and the monitoring equipment should be
powered from the same certified power supply.
Checkpoint
Ensure that the sensors are the intrinsically safe versions Group I.
14
TX6023-4-UM-EN-01
www.trolex.com
TX6023 • TX6024 User Manual
3.5Connections
The flow and pressure sensors and the venturi can be mounted in any attitude,
however, a slight zero shift may be noticed due to gravity acting on the flow sensor
diaphragm. This can be zeroed via the TX9042 or TX9131, refer to respective User
Manuals for details.
The venturi can be mounted utilising standard proprietary pipe clamps. The venturi
diameters are 63.5 mm and 89 mm, equivalent pipe diameters are 21/2” and 3”.
3.5.1 TX6023 to TX9042 Connections
3.5.2 TX6023 to TX9131.PD779 Connections
www.trolex.com
TX6023-4-UM-EN-01
15
3.5.3 TX6024 to TX9042 Connections
3.5.4 TX6024 to TX9131 Connections
16
TX6023-4-UM-EN-01
www.trolex.com
TX6023 • TX6024 User Manual
4.Configuration
In order to get the best performance out of the TX6023/4 Liquid Flow/
Pressure Monitoring System, it should be used in conjunction with the TX9042
Programmable Sensor Controller or the TX9131 Programmable Trip Amplifier. Some
set-up of these controllers will be required in order to linearise and compensate the
flow reading.
4.1 TX6023 Configuration
4.1.1 TX6023 to TX9042 Configuration
Checkpoint
Ensure that the TX9042 has a P5423.553 flow module installed.
Checkpoint
If display and control of pressure is required, ensure that a separate P5423.508
pressure module is installed.
1. Ensure the pressure and flow sensors have been correctly wired to the TX9042,
refer to Section 3.5.1 for information.
2. From the venturi used, determine the Flow Constant and program it into the
flow channel of the TX9042, refer to the TX9042 User Manual for instructions on
how to enter this figure.
3. Note the full scale pressure range of the associated TX6114 and program this
value into channel of the TX9042 that has the TX6114 connected to it, refer to
the TX9042 User Manual for instructions on how to enter this figure.
4. Note the full scale flow range of the venturi being used and program this value
into Upper on the TX9042, refer to the TX9042 User Manual for instructions on
how to enter this figure.
5. With the unit correctly wired and hydraulically connected, the display should
read the correct flow. Due to mechanical constraints and mounting attitude,
there may be a little zero drift, this can be removed by setting DP Zero on the
TX9042, refer to the TX9042 User Manual for instructions on how to enter this
figure).
Checkpoint
Note that the DP Zero should only be carried out at zero flow, otherwise it will
invalidate the sensor calibration.
www.trolex.com
TX6023-4-UM-EN-01
17
6. In order that the display on the TX9042 does not display a small amount of flow,
due to further zero drift, Flow Mask on the TX9042 can be set to a flow value,
below which the display will read zero. Refer to the TX9042 User Manual for
instructions on how to enter this figure.
4.1.2 TX6023 to TX9131.PD779 Configuration
Checkpoint
If display and control of pressure is required, ensure that a separate TX9131 is
also used.
1. Ensure the pressure and flow sensors have been correctly wired to the TX9131,
refer to Section 3.5.2 for information.
2. From the venturi used, determine the Flow Constant and program it into the
TX9131.PD779, refer to the User Manual for instructions on how to enter this
figure.
3. Note the full scale pressure range of the associated TX6114 and program this
value into the TX9131 connected to the TX6114 pressure sensor, refer to the
TX9131 User Manual for instructions on how to enter this figure.
4. Note the full scale flow range of the venturi being used and program this
value into Upper on the TX9131.PD779, refer to the TX9131 User Manual for
instructions on how to enter this figure.
5. Now, with the unit correctly wired and hydraulically connected, the display
should read the correct flow. Due to mechanical constraints and mounting
attitude, there may be a little zero drift, this can be removed by setting DP Zero
on the TX9131.PD779, refer to the TX9131 User Manual for instructions on how
to enter this figure.
Checkpoint
Note that the DP Zero should only be carried out at zero flow, otherwise it will
invalidate the sensor calibration.
6. In order that the display on the TX9131.PD779 does not display a small amount
of flow, due to further zero drift, Flow Mask on the TX9131.PD779 can be set to
a flow value, below which the display will read zero. Refer to the TX9131 User
Manual for instructions on how to enter this figure).
18
TX6023-4-UM-EN-01
www.trolex.com
TX6023 • TX6024 User Manual
4.2 TX6024 Configuration
4.2.1 TX6024 to TX9042 Configuration
Checkpoint
Ensure that the TX9042 has a P5423.556 flow module installed.
Checkpoint
If display and control of pressure is required, ensure that a separate P5423.508
pressure module is installed.
1. Ensure the pressure and flow sensors have been correctly wired to the TX9042,
refer to Section 3.5.3 for information.
2. Note the full scale pressure range of the associated TX6114 and program this
value into channel of the TX9042 that has the TX6114 connected to it, refer to
the TX9042 User Manual for instructions on how to enter this figure.
3. Note the full scale flow range of the venturi being used and program this value
into Upper on the TX9042, refer to the TX9042 User Manual for instructions on
how to enter this figure.
4.2.2 TX6024 to TX9131 Configuration
Checkpoint
If display and control of pressure is required, ensure that a separate TX9131 is
also used.
1. Ensure the pressure and flow sensors have been correctly wired to the TX9131,
refer to Section 3.5.4 for information.
2. Note the full scale flow range of the venturi being used and program this value
into Upper on the TX9131, refer to the TX9131 User Manual for instructions on
how to enter this figure.
3. Note the full scale pressure range of the associated TX6114 and program this
value into the TX9131 connected to the TX6114 pressure sensor, refer to the
TX9131 User Manual for instructions on how to enter this figure.
www.trolex.com
TX6023-4-UM-EN-01
19
5.Maintenance
5.1Introduction
To keep your Liquid Flow/Pressure Monitoring System in the best possible
condition and minimise downtime, Trolex strongly recommends that you carry out
regular planned preventative maintenance and keep records of the maintenance
carried out. The planned preventative maintenance for Liquid Flow/Pressure
Monitoring System consists of a number of tasks carried out at regular intervals.
These tasks are listed in the maintenance schedule below:
Task Type
Task
Number
Interval
Liquid Flow/Pressure Monitoring
System
Check
5.1.1
12 months
Liquid Flow/Pressure Monitoring
System
Calibrate
5.1.2
12 months
Equipment Name
5.1.1 Liquid Flow/Pressure Monitoring System - Check
1. Check the exterior of the Liquid Flow/Pressure Monitoring System for cracks,
penetration and any other signs of damage.
2. Check that the wiring is secure and free from damage.
3. Check that the Liquid Flow/Pressure Monitoring System is securely mounted.
4. If any part of the Liquid Flow/Pressure Monitoring System shows any signs of
damage, deformation or missing parts, contact your local Trolex service agent
or [email protected] for advice on repair or replacement.
5. After the completion of all maintenance, update the maintenance records.
20
TX6023-4-UM-EN-01
www.trolex.com
TX6023 • TX6024 User Manual
5.1.2 Liquid Flow/Pressure Monitoring System - Calibrate
1. Under normal circumstances, the calibration of the Liquid Flow/Pressure
Monitoring System will not change significantly.
2. Check the accuracy by comparing the display reading with a reference value of
flow velocity.
OR
2. Alternatively the Liquid Flow/Pressure Monitoring System can be removed
and returned to your local Trolex service agent, for checking and calibration
across the full operating spectrum. Contact [email protected] for further
information.
3. After the completion of all maintenance, update the maintenance records.
6.Support
If you need technical support to operate this product, or would like details of our
after sales technical support packages, please contact your local Trolex service
agent or [email protected].
7.Disposal
Part of the ethos of Trolex is sustainable design. The Liquid Flow/Pressure
Monitoring System contains materials that can be recovered, recycled and reused.
At the end of its useful life ensure that the Liquid Flow/Pressure Monitoring System
is recycled in accordance with local laws and bylaws for the geographic area where
it is located. The end of its useful life is to be determined by the owner/operator
of the equipment and not Trolex. Ensure that the Liquid Flow/Pressure Monitoring
System is recycled by licenced waste contractors with the appropriate licences
for handling metallic and electronic waste in the geographic area where the Liquid
Flow/Pressure Monitoring System is located.
Checkpoint
Consult your local Trolex service agent or the Trolex Product Support Department
if you require assistance with disposal: [email protected]
www.trolex.com
TX6023-4-UM-EN-01
21
Disclaimers
The information provided in this document contains general descriptions and
technical characteristics of the performance of the product. It is not intended as
a substitute for and is not to be used for determining suitability or reliability of
this product for specific user applications. It is the duty of any user or installer to
perform the appropriate and complete risk analysis, evaluation and testing of the
products with respect to the relevant specific application or use. Trolex shall not be
responsible or liable for misuse of the information contained herein. If you have any
suggestions for improvements or amendments, or find errors in this publication,
please notify us at [email protected].
No part of this document may be reproduced in any form or by any means,
electronic or mechanical, including photocopying, without express written
permission of Trolex.
All pertinent state, regional, and local safety regulations must be observed
when installing and using this product. For reasons of safety and to help ensure
compliance with documented system data, only Trolex or its affiliates should
perform repairs to components.
When devices are used for applications with technical safety requirements, the
relevant instructions must be followed.
Trademarks
© 2014 Trolex® Limited.
Trolex is a registered trademark of Trolex Limited. The use of all trademarks in this
document is acknowledged.
Document History
Issue 01 21 March 2014
Original publication of this document
Contact Details
Trolex Ltd, Newby Road, Hazel Grove, Stockport, Cheshire, SK7 5DY, UK
+44 (0) 161 483 1435 [email protected]
22
TX6023-4-UM-EN-01
www.trolex.com