1
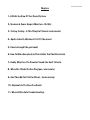
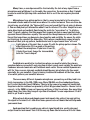
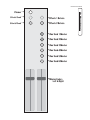
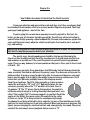
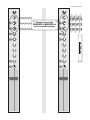
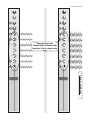
the
Church Sound Sur vival Guide 1
Chu rc h
Sound
l
a
v
i
v
r
u
S G u ide
What you need to know to Run Church Sound
SG001
Bob Kilpatrick
Church Sound Sur vival Guide 2
The Church Sound
Su rvival
Guide
What Yo u Need To Know To
Ru n Chu rch Sou nd
by
Bob Kilpatrick
A step by step
explanation
-in plain Englishof the parts
of your sound system,
what they do and
how to work with them.
© 2004 Bob Kilpatrick Ministries, Inc.
Copying this material is both illegal and immoral. Copy our address instead;
Bob Kilpatrick Ministries, P.O.Box 2383, Fair Oaks, CA 95628
Chapters
1- A Bird's Eye View Of Your Sound System
2- Speakers & Power Amps & Monitors- Oh, My!
3- Testing...Testing...Is This Thing On?! (mics & instruments)
4- Apollo to Earth. We Have Lift-Off. (the mixer)
5- Once Is Enough (the gain knob)
6- How To Make Everybody In Church Hate You (the EQ controls)
7- Daddy, Why Does The Preacher Sound Like God? (effects)
8- When She Thinks She Can Sing (pan, solo & mute)
9- And Then We Put It All In A Bowl... (basic mixing)
10- Elephants In The Pews (feedback)
11- When All Else Fails (troubleshooting)
Church Sound Sur vival Guide 3
Church Sound Sur vival Guide 4
Chapter One
A Bird's Eye View Of Your Sound System
If a bird, with its limited intelligence and simple thought process, flew over your
church building after the roof had been blown off, here's how he would see your sound
system-Instruments
-Mixing Console
-Speakers.
And really, that little bird has it right. There are only three aspects to your sound system, as simple or complex, big or small, as it may be. There are the parts that MAKE
noise; there are the parts that MIX the noise together and effect (change) it; there are
the parts that BROADCAST the noise.
The parts that make the noise- the microphones, instruments, CD players, 8tracks- have to get IN to the mixer. The mixer mixes them together in some (hopefully)
pleasing combination. The mixer sends this combined sound OUT to the parts that make
it loud- the power amplifiers and speakers- and they broadcast it to the world... or at
least to the tenth row.
On the next page there is a diagram of a sound system. Remember, no matter how
complex a system is, it still just has these three parts. And remember this, too; it works
on the flow of electricity. Every microphone and instrument has some sort of wire connecting it to the mixer, as do the speakers, effects units and every other device. Even the
wireless units will eventually plug in via wired cables. It pays to respect this fact. It also
helps to transition to a metaphor I find useful in describing how sound works.
Sound systems are like sprinkler systems. Just as the water flows into the heart of
a sprinkler system and is sent to various watering stations, so your sound is flowing into
the mixing console and will then be sent in various directions. Just as the water eventually comes out a sprinkler and is broadcast over the yard, so your sound must eventually
end up somewhere- coming out a speaker, going on to tape, feeding headphones, etc.
So, how does the sound from the noise-makers get into the console? There are
many kinds of connectors- Cannon (XLR), phone jack, mini-phone jack, RCA, Elko, banana plugs, USB, light-pipe, firewire- but the two most common are Cannon (XLR) and
phone jack connectors. I don't know why they're called Cannon plugs. Maybe it's because
Church Sound Sur vival Guide 5
The Whole System
IN
OUT &
Back IN
Effects
Mixing Console
OUT
Power Amplifier
Power Amplifier
Main Speakers
Monitor Speakers
Church Sound Sur vival Guide 6
they're large, round and look like small cannons. I do know, however, that XLR stands for
ground (X), left (L) and right (R). Cannon plugs look like this
while phone jacks/guitar
this.
cables look like
Most microphones will use an XLR, while most instruments use a phone jack/guitar cable. There is a difference in the impedance at which they function, but I have no
idea how to explain that in technical- or even layman's- terms. Let's see... XLR cables are
low impedance (low Z), which means that they offer little resistance to the signal as it
moves down the wire. Phone jacks are high impedance (high Z), which means they offer a
lot of resistance to the signal. (For more information on this subject, ask a tech-nerd.)
The real world application is that you can use XLR cables for long distance runs,
but you can't do the same with guitar cables. Because the console is generally further
away from the stage than you can run a guitar cable, you need a way to drop the impedance of the signal and make it able to get to the console without losing the purity of its
sound. Enter the DI (direct injection), better known as a Direct Box. A
typical direct box looks like these
examples (my fave- the LRBaggs
ParaAcoustic DI. Can't be beat for
guitar and most other instruments, and they make a bass
model, too.)
The purpose of the direct box is to get the signal strength of your instrument up and to
the console sounding real good.
Advice: try to resist using cheap direct boxes- sometimes called line transformersbought at a shack that mainly deals in radios. Many times, the temptation to save a few
dollars will cost you in the quality of your sound and the reliability of the product. Buy
good stuff.
Church Sound Sur vival Guide 7
In a normal church system, there will be a snake between the stage and the console. There is no need to fast and pray. You want this snake there. This is the highly technical term for a bundled bunch of cables with various sorts of connectors at each end.
Sometimes these are installed in the stage/platform, so you'll never see the snake itself.
In many churches, especially the ones
that meet in rented facilities and must
set-up and tear-down for each service,
the snake is laid out on the floor for all to
see. It will look something like this. This is
only a way to get
your cables on the stage- and sometimes your speakers- connected to the console.
Generally, you want to convert all your signal from high to low impedance at the
stage, before it goes into the snake. The cable ends (connectors) on the snake will each
be assigned a number or letter. These correspond to the numbers and letters at the other
end of the snake (surprised?) This is what we call organization. The simplest, most fool
proof system of organization is to plug cable "1" into channel "1" on your mixer, cable
"2" into channel "2" and so forth. If you come up with a better approach, please contact
me.
Advice: invest in a cable tester. These are inexpensive and will help you easily find out if
a cable is working or not. It just makes sense.
Advice: if you're experiencing difficulties in your sound, start with the simplest, most
convenient possible solution and work toward the most complex and least convenient.
Again, it just makes sense. Make sure everything is powered up and volume is up first.
Next check your console settings. Then check your connections. Then check your cables.
Crawl around under the stage after that.
The Mixing Console goes by various names; soundboard, board, mixer, console,
mixing desk, desk, "you stupid thing!", etc. We'll just refer to it as the mixer. It is called a
mixer because it takes all the individual elements that will make up your overall sound
and mixes them together into one (mono) or two (stereo) sends. It will generally have the
ability to shape the sound through equalization and effects, and it will generally have
the ability to send sound to various places, ie., to main speakers, monitors, a tape deck,
the mother's cry room. This is where the noisemakers and the broadcasters meet. You've
got your noisemakers plugged in. Let's move on to the power amps and speakers.
Unless it has a built in amplifier, a mixer puts out an unpowered signal from its
speaker or main outputs. Hence, the need for a power amplifier. Be careful not to send a
powered signal to a power amp. Crazy things can happen. The good news is that if crazy
things happen once, they probably won't happen again; you'll have fried your amps or
speakers. The bad news is that this can be an expensive lesson.
On the back of the mixer there will be one or two outputs marked "Mains," "Main
Church Sound Sur vival Guide 8
1 & 2," "Speaker Left & Right" or simply "1 & 2" or "Left & Right." These should be sent to
your power amplifiers and on to your main speakers, sometimes called house speakers
or mains. Many new speakers have power amps built in. These are called "self-powered"
speakers. For small to mid-sized systems, these make good sense and sound great. Either
way, though, your signal is first going to a power amp and then out the speakers. The
same will be true of your on-stage monitor speakers. Mixer- power amp- speakers, in
that order.
When connecting all these parts, it's a good idea to have the electrical power off
and the volume levels everywhere all the way down. Bring the volume levels on the power
amps (or the back of the speaker cabinets, if they are self-powered) up before you bring
up the volume on the mixer. I'd also suggest playing a CD through the system first before
turning up mics and instruments. This will allow you to get an idea of the relative volume
without injuring anyones ears.
Your on-stage monitoring system can be comprised of speakers, in-ear phones or
a combination of the two. Either way, as with the main outputs, the mixer will send an
unpowered signal, so you'll need to power that to the speakers or headphones. Warning!:
headphones and speakers don't take the same amount of power! Use a headphone amp
for headphones.
On the back of the mixer, you'll find outputs marked "Aux 1," "Monitor 1" or something like that. "Aux" simply stands for auxiliary, meaning it's an additional output.
There is no mystery to this. Remember, it's like a sprinkler system, helping you to get flow
to various stations. The volume to the monitors will be somewhat independent of your
inputs and (hopefully) completely independent of your main outputs. You should be able
to turn down your main speakers and still hear the monitors. Try this with a CD player.
We'll talk more about this in the chapter about Aux sends.
You may be using an external effects unit (It's called external because it's not inside your mixer.) If so, you'll need to send signal out to it and back in to the mixer so you
can combine the sound it makes with all the other sounds. This creates what is called an
effects loop, simply because it loops out and back in again. On the back of your mixer
there may be an output specifically marked as "effects send." I'll tell you a secret; this is,
in almost every case, just an Aux send with another name. There's nothing special about
it. The manufacturer is trying to helpfully guide you. You could use this output to send
signal anywhere you wanted. If there isn't a specially marked output for effects, use
one of the Aux sends. If your mixer has more than two Aux sends, find the ones that are
"Post" (more about this later) and use one or two of them for your effects loop.
Church Sound Sur vival Guide 9
Chapter Two
Speakers & Power Amps & Monitors- Oh, My!
Sound is traveling through your cables in one direction- from the noisemakers, to
the mixer, through it to the power amps and out to the speakers. When connecting your
gear, "Input" means that's where the sound comes in to this piece of gear. Conversely,
"Output" is where it will leave and travel on.
Whatever signal you send through a cable will appear at the other end of that
cable. This sounds rudimentary, but I'm surprised at the number of sound folks who
think that they can send a main mix AND a monitor mix through the same cable to the
same power amp and expect each of them to be different coming out the speakers. They
can't, unless you're using a stereo cable, which is really two cables in one sheath. You will
need one amp for mains and another for monitors.
Let me explain something about "mono" and "stereo" at this point. "Mono" is, of
course, one signal. "Stereo" is simply two monos traveling through a system, or down a
cable that has two different wires carrying two different signals. Even though you can
make them sound very much alike, they're still two mono signals with completely discreet paths. Some power amps are stereo, meaning that they have two separate mono
amps at work powering two different signals. This means that you can use each of the
two independently of each other. If you like, you can run your mains out the left side and
your monitors out the right side. Even though they may be marked "Left" or "Right," this
is, again, the manufacturer trying to provide a helpful guide. There is nothing uniquely
left or right about them. They're both mono channels through which your noise can pass
through to the speakers. They are completely separate power amps in one housing.
If you can, however, you should have two different power amps for your mains and
monitors. Again, they can't share a power amp, otherwise they'll produce the same mix
of sounds. You'd like the monitors to be independent of your main mix for a variety of
reasons. Here are some;
- Your guitar player is deaf and likes his instrument very loud in the monitors.
- You are playing a track for the choir to sing with.
- You are sending a "click track" (timing metronome) to the drummer that you don't
want heard by the audience.
- You want a way to talk with the performers during the performance without being
heard by the audience.
- You are trying to make a tone deaf diva wannabee sound good by letting the track
drown her out in the mains without her knowing it.
Church Sound Sur vival Guide 10
In the section on the channel module we'll be talking more about the Aux sends,
but let me say at this point that your mixer is capable of producing completely different
mixes through the various outputs it has- main, monitor, Aux, effects, etc. Just like your
sprinkler system, the flow is sent in a certain direction and is handled differently at each
station. Your monitor mix should be completely different from your main mix. If you are
using an Aux send for your monitors, each little volume knob on each channel strip is
helping you create a unique mix just for the monitors. More about this later.
When connecting your mixer to your power amp and your power amp to your
speakers, be sure that you are plugging the right cable into the right input. With some
of the new self-powered speakers, there are multiple inputs on the back of the speaker
housing. In one recent incident, a sound man plugged his main outputs from his mixer
into the wrong input of his self-powered speakers. He blew them up. His confusion was
primarily brought on by the introduction of a new kind of input connector that he didn't
recognize. It's called a Neutrik connector and looks like this. It's a cool design because it
will accept either XLR or phone jacks in the same connector. My
sound man friend had never seen this before and didn't read the
words by the other connector or didn't think that it was important. It is important. Make sure your connections are right before
you power things up.
Your mixer should be sending a "line level" signal, different
than a "mic level" signal. Match them up properly to protect your
gear.
There are many opinions about where to place your main
speakers. You can group them in the center or spread them out to the far sides, or have
an array of speakers that goes all the way across the stage. Do what works for your
building. The only common practise in all of these approaches is that the speakers should
be above the heads of the audience and the manufacturers name should be right side up.
This is the manufacturers way of showing you which way their speakers are meant to
work best. If you turn your speakers on their sides, you'll compromise the sound.
Speakers are made to have a dispersion pattern. That is, how wide and how high
and low the sound will go from the speaker. Let's talk sprinklers again. You can have one
that sprays water in a half circle out about ten feet. If you were to turn that sprinkler
head on its side, you'd have a narrow, vertical strip of water spraying straight up, out
and straight down. You'd miss all the grass on the sides. Speakers disperse
sound in the same way. A speaker on its side will have a very narrow hot
spot directly in front of it and will not throw the sound
out to the sides. Instead, you'll be losing much of your
sound upward and downward. Be sure to place them
properly for maximum coverage and efficiency.
Church Sound Sur vival Guide 11
When your main speakers are not elevated above the audience, you are losing a lot
of your sound in the people closest to the speakers. Bodies are marvelously sound absorptive. The first row will get blasted while you try to raise the volume to throw to the
back of the room. Solution; raise your speakers. Put them on speaker stands if you can.
You'll get a surprising rise in volume, coverage and clarity from this simple move.
Placing monitor speakers is a bit more complex, partly because of their proximity to the
microphones, partly because of the needs of the performers and partly because of the
aesthetic look of the stage that is desired. Probably the most important first concern is
to face your monitor speakers away from the audience. This will reduce the effect they
have on your main mix. Because different frequencies travel in different patterns, your
monitor placement can have a significant, and mostly negative, effect on the sound in
the auditorium, especially a small auditorium or room.
Higher frequencies travel in a straighter, narrower line while lower frequencies
tend to go everywhere. If you stand behind a speaker, you'll notice that you hear loads
of bass rumble and not a lot of the high-hat. It's not a clear sound. Well, your audience
is behind all your monitor speakers and they're hearing the low end rumble without the
clarity of the higher frequencies, too. I've known many sound people who were frustrated because their main mixes were muddy. They tried to boost the high frequencies to get
clarity and instead got brittleness. Most of the time, they were not taking into consideration the effect the monitors were having. There are several ways to mitigate this effect.
- If you move your monitors closer to your performers, you can reduce the volume level
on stage.
- On the other hand, you can raise your main speaker volume level to over-ride the monitors.
- You can also use sound dampening materials on the back of your stage or platform.
This will reduce the mid and high frequencies but will have little effect on the low rumble
coming from the monitors.
- You can reduce the level of the low frequencies going to your monitors.
I prefer a combination of the above approaches. I'd suggest moving the monitors
closer while also dropping some of the lows out of them. Because I like loud monitors
when I perform, I shy away from suggesting that you turn them down.
There is another way to completely do away with this problem: use in-ear monitors. Most churches will not do this because the standard in-ear system is very expensive. I have used another in-ear approach that is not only inexpensive, but works
very well for church sound and worship team applications. On the next page is a simple
diagram of how it works. I'll also describe it. My band and I used this approach when we
recorded a live CD and we were all quite satisfied with the sound.
You'll need the following gear to make this happen:
Church Sound Sur vival Guide 12
- headphone amp- preferably one with six or more stereo headphone outputs,
each with its own volume control. Loads of companies make these, among them Furman,
Behringer and Rane. You'll need as many of these amps as it takes to provide for all your
musicians (six musicians= one amp, in our example.) You can send two different mixes to
two different headphone amps and give your rhythm section one mix while sending the
other to your vocalists.
- stereo extension cables- these have a male end and a female end. You'll need one
for every headphone output.
- stereo phonejack to mini-phonejack adaptor- this simply allows you to plug in
virtually any set of mini-phonejack earbuds to the extension cables.
- cheap earbud headphones- the kind you'd use for a portable CD player. You can
pick these up at any electronics store.
Voila! We have meatloaf!
Put your headphone amp on the stage somewhere, accessible to as many of the
performers as possible. That way, they can easily adjust their own volume. Run your
extension cables to the various positions of the performers. I'd suggest taping them (the
extension cables, not the worship team) to a mic stand, keyboard rack or drum stool.
Our bass player bundled his with his guitar cable so it ran alongside it.
Each performer wears their earbuds on to the stage (running the cables under
their clothes so they are less obvious.) When they get to their position, they plug into
the adaptor on the end of the extension cable. When they're done leading worship, they
unplug and walk off. Simple and inexpensive. This whole approach, with two headphone
amps, will cost you less than $1,000.
If your worship leader plays guitar, he can bundle his extension cable with his guitar cable like our bassist and be as mobile as he ever was. You can also consider having a
couple of on-stage monitor wedges to fill in when someone is on stage without earbuds.
Church Sound Sur vival Guide 13
Wired In-Ear System
20'-30' stereo
extension cables
headphone amp
line level,
unpowered
send to
headphone amp
Church Sound Sur vival Guide 14
Chapter Three
Testing...Testing...Is This Thing On?! (mics & instruments)
There are so many different types of microphones! And you hear so many different terms for them- condenser, dynamic, capacitor, electret, piezo, cardioid, omni... it
can be confusing and intimidating. Let's try to sort some of this out in a decidedly nonprofessional, real-life way.
At bottom, there are two kinds of microphones- dynamic and condenser. Condenser and capacitor mics are one and the same. Here in the US we call them condensers;
in the UK they call them capacitors. The same is true of tubes and valves. What we call a
tube mic or tube amp, the Brits call a valve mic or valve amp.
The basic difference between the dynamic and condenser mics is the way they
convert sound into an electrical signal. The way they are constructed to accomplish this
produces characteristics that are predictable to each. Dynamic mics tend to handle high
frequencies less well as condensers but tend to be tougher and handle loud volumes better. Condensers tend to reproduce the highs better and are a bit more true to the source
sound. They are more expensive and more fragile, too. Dynamics tend to have what's
called "proximity effect," which is the boominess you hear when you sing closer to the
mic. As I understand, this is due to the physics of the design, but all I know is I can sound
like Barry White if I want to.
Proximity effect can be useful when using a dynamic mic on a guitar or bass cabinet. Putting it very close to the speaker cone will give a punchier sound. It can also help
some singers get the sound they're looking for.
Condenser mics need a power source in order to work. Some come with batteries while others rely on an external power source. Years ago, someone came up with the
idea of sending the power through one of the three wires in an XLR cable. This power is
48 volts and is called "phantom power." It's called that because you can't see the power
source at the microphone. It's like a ghost, but a good ghost. You'll probably see a button
on your mixer that is labeled "phantom power" or "48v" or some variation of these. This
button enables or disables the phantom power flowing through the microphone cables.
Some mixers have a button on each channel, some have it in channel groups of eight
while some have one button for all channels.
Advice: if you don't need phantom power to any of your microphones or instruments,
turn it off. The less electricity flowing around, the better.
Church Sound Sur vival Guide 15
Many times, a sound person will be frustrated by the lack of any signal from a
microphone and will blame it on the cable, the connection, the musician or God. It might
be wise to avoid the lightning strike and check first to see if the mic requires phantom
power.
Microphones have pickup patterns; that is, areas in proximity to the mic where
the sound is louder and better and areas where it is softer and worse. There are three basic patterns, one of which, the "figure eight," is so rarely used that I'm not going to discuss
it. You can find plenty of information about it on the internet. The other two patterns are
omin-directional and cardioid. Omni being the prefix for "everywhere" or "in all directions," it's pretty obvious that this means that an omni mic has no sweet spot but picks
up sound from all directions equally. This sounds like the optimum sort of mic, doesn't it?
Except that sometimes you have mics close together and you'd like the one on the violin
not to pick up the sound of the didgeridoo. This is where a cardioid mic comes in handy.
Because of their pick-up pattern, cardioid mics tend to reject sound from "off-axis"
(right in back of the mic.) Here is a mic (1.) with the pickup pattern shown. The
other illustration (2.) is a graph of the pattern
without the microphone. If you turn it over (3.),
it looks like a heart, hence the term cardioid,
Latin for "heart-shaped."
1.
2.
3.
Cardioid mics work better in situations where you need to isolate the primary
sound and where you need off-axis rejection of other sounds, most notably the monitors.
Condenser mics and omni mics will feed back much earlier than a cardioid dynamic mic
will. For these reasons, dynamic cardioids should be your mic of choice for live sound,
especially for your vocalists. If you're having trouble with feedback all the time, check
to see what pattern your vocalists' mics are.
There are many different dynamic microphones you can buy, and they tend to be
fairly inexpensive, in the $80-$200 range. Shure SM-58s are the standard workhorse,
but I prefer the Audix line of OM mics. They're in the same price range but handle high
frequencies better and have less proximity effect. My personal favorite- the one I use in
concert- is the OM6, but you can't go wrong with any of this line of mics. One more thing
about them, they have the strongest rejection of feedback I've ever experienced. It's difficult to get them to squeal!
We've already discussed plugging your instruments into a direct box and getting
the signal to the board. Let's talk about some general rules of thumb that will help make
your sound clear.
Each musician that is sending you a direct signal should give you his strongest
output from his instrument. Turn it all the way up. Some like to reserve a little for them-
selves in case they want to turn up during their set. This
is counter-productive to your goal, mainly because it
changes the input level on that channel which changes
the volume send levels everywhere down the line- mains,
EQs, Aux sends, monitors- everything. If you're not expecting it, it can play havoc with what was a good mix.
Church Sound Sur vival Guide 16
Another reason for getting their strongest signal is
what is called "signal to noise ratio," sometimes noted as
"S/N." This is a very important piece of knowledge and
will come in handy later in the book. I'm going to define it
now, but remember it later when we talk about the gain
knob.
Every piece of equipment in your system produces
noise. The instruments do, the reverb unit does, the mixer, the power amps, the speakers themselves. How much
noise each produces is unique to itself. This amount of
inherent noise is called the "noise floor." You can't change
this. You can't get rid of it, but you can fight it. You can
even reduce it in a way. Here's how.
In diagram #1 to the right you see the supposed
noise floor of a guitar. For our example, let's say it's 10 Db. Don't let the Db scare you. It's
not the terminology that matters at this point, it's the numbers and their relationships.
Let's say the guitar's noise floor is 10 lemons. Let's say the guitar player is only giving
you a very low output level of 20 lemons. This creates the signal to noise ratio. What
that means for you is that half of his signal is noise. When you raise his level so that he
can be heard, you're raising not only the signal he intended to give
you but the noise floor as well. In diagram #2, we've raised his level
to 40 lemons. Consequently, the noise floor has risen to 20 lemons.
20 bad lemons!
Here's where it gets interesting. Let's say the guitar
player is ashamed for giving you such a low signal, repents,
changes his ways and boosts
his output level all the way
to 11, which gives you a level
of 100 lemons. The inherent
noise of the instrument does
not go up. It's the noise floor
of his instrument or piece
of gear, remember, but NOT
the noise floor of your input. Now the diagram (#3,
Church Sound Sur vival Guide 17
previous page) looks like this. Okay, but we still only need 40 lemons of level from him, so
we're going to bring the input on the mixer down. His noise floor goes down, too! How cool
is that! So, because your guitar player did the right thing and gave you everything he's
got, his signal is VERY much cleaner (diagram #4, previous page), your sound is better
and the congregation has a higher worship experience. See what a little twist of a knob
can do?! Good lemons!
The rule of getting high levels applies to keyboards and bass as well. The stronger
the signal from the instrument, the better everyone will sound.
Let's talk about keyboards for a bit. Unless you're doing a stereo mix in the main
speakers, it is not necessary to receive a stereo feed from electronic keyboards. Of
course, you can if you want, or if you have 144 channels and don't know what to do with
them all, or if the keyboard player is the pastor's wife. These are all good reasons to have
a stereo feed from the keyboard. If none of these is true, though, and you're fighting a
limited number of available channels, I'd cut the keys to mono (I'd also group background
worship team vocalists around one or two mics instead of letting each of them have their
own mic, but that's a later discussion.)
You might also try to talk your keyboardist into experimenting with some sounds
other than the stock "piano with crappy strings" patch or the "electric piano that reminds us all of Richard Marx" patch. Yes, I'm being snide, but there's a method here.
Keyboards, guitars, vocals, sax, horns, organ and any other melodic instruments are
all crowding your space between 125 and 800 hertz. This may not mean much to youand your eyes are starting to glaze over- but this is the reason for most muddy mixes.
There's just too much going on in the same frequency range. Getting crisper sounds out of
everybody will clean up a mix in a hurry. So ask your keyboardist to try something else,
like those bell tones everyone loved in the 80s.
Sometimes bassists and guitarists insist that their tone is wholly and completely
dependent on the sound of their cabinet, so they insist that you mic their cabinet.
Hmmm... how can I put this politely... if their tone is from their cabinet, ask them to
stand their guitar and cabinet on the platform for the worship service and enjoy the
service themselves from the front pew. If it's not their fingers and hands that give them
"their" sound, they should sell their instrument and become an usher.
I recorded an album in the late 80s and had the pleasure of having Chris
Hayes, lead guitarist and songwriter for "Huey Lewis & the News" play on the project. He brought two guitars and an amp into the studio. The amp promptly blew up. We
scrounged up another replacement amp for him and he plugged in. The engineer, Steve
Counter, asked Chris if he had any favorite settings to get his sound. Chris replied that
Steve should do whatever sounded good to him, so that's what Steve did. Chris played on
three songs and there is no mistaking who it is. His sound was not dependent on his amp,
cabinet or settings. It was in his fingers.
Church Sound Sur vival Guide 18
In a live setting, the sound the audience hears is not the same sound the players
hear. For most purposes, I prefer that the guitarist and bassist go direct into the mixer.
If they like, they can step out into the room and help to tweak the sound in the mains.
However, that sound, too, will change depending on where one is in the auditorium. It's a
fascinating game, this search for tone, but you will gain more control and cleaner signal
if they go direct. Okay, enough meddling.
No, wait! We left out the vocalists. I have to be an equal opportunity meddler
here. As I mentioned earlier in this chapter, my preference would be to group the backing
vocalists around a mic or two. This will not only make your job easier, it'll improve the
blend of their voices. You can have a mic set aside for solos, if any of them need to step
up and sing one.
Advice: Pay attention to the stage from start to finish. Don't let friends come to the mixer
and engage you in conversation. Don't be making a count of the number of people in attendance this Sunday. Let one of the ushers do that. Pay attention to the responsibility
before you. That way, when a backing vocalist does step up to sing a solo, you'll be there
to give them good sound.
Microphone etiquette demands that vocalists not puff into their mics. Besides
being an unpleasant sound, this sends moisture onto the diaphragm and can junk up a
perfectly good microphone in no time. If you need to check if a mic is on, the best way
is to tap it with your wedding ring. If you're not married, use a promise ring or an ankle
bracelet. Any metal lightly tapped on the grill of a mic makes a very strong, clear sound
and doesn't hurt the mic.
The same etiquette asks vocalists not to dangle their mics down toward the monitors. They'll get a lot of attention this way, but probably not the kind they want.
That's it for the band. Let's move on to the mixer itself.
Houston, we have a problem...
Church Sound Sur vival Guide 19
Chapter Four
Apollo to Earth. We Have Lift-Off. (the mixer)
Now we're getting to the really important stuff. This is the heart of the matterthe heart of the system- where things go really right or really wrong. This is the piece of
gear that you will have the most tactile contact with. It's a big subject. Let's go.
There is a diagram on the following page of a channel strip. We're going to go
through it step by step, starting with the knob that's furthest away from you- the gain
knob- and working toward the control that's closest to you- the fader. What I am going
to describe is a generic board that does not exist. It is only in my dreams. Your mixer will
differ from this one. There are knobs and buttons on your mixer that I won't mention.
That's what an owner's manual is for. I'm going to attempt to cover the most important
parts of a mixer and give you a better real-life understanding of the effect each control
has.
I have chosen to describe a channel strip because, unless you have a very sophisticated or very odd mixer, one channel strip on your board will be just like all the other
channel strips. If you know one, you know them all. A mixer can be intimidating because
of all the rows of button, knobs and faders. Breaking it down to a channel strip will help
clear the fog and dispel the fear.
A mixer is laid out in a logical, ergonomic way. The reason, for example, that the
gain knob is the top one, closest to the actual input connector, is because it is the door to
the mixer through which a signal must pass. Based on that, a second reason is that the
manufacturer is trying to create the shortest signal path through the mixer that he can.
Another reason that that particular knob is furthest away from you is because it is the
knob you should adjust the least. The fader is the one you should adjust most. That's why
it's so easy to reach. More on this later.
Here is a fact that you may not have considered; every control on your mixerother than the buttons- is a volume control. This is not a joke. Each and every knob
controls the amount of level being sent somewhere. Like a valve on your sprinkler system,
the more you open it up, the more signal gets through. "Aha!" you may say, "what about
the PAN?!" As you will see later, even that is a volume control.
In the diagram on the next page, all the round objects are knobs that you turn for a
variable effect on the signal. All the small rectangles with rounded corners are buttons
you push for an "on/off" effect.
The gain knob- this control goes by various names; attenuator, input level, gain,
Church Sound Sur vival Guide 20
4
Pre or Post4
Pre or Post4
Low Shelf
4
Mute4
Solo
3High EQ (Equalization)
3Mid EQ
3Low EQ
3Aux Send 1 (Pre or Pre-or-Post)
3Aux Send 2 (Pre or Pre-or-Post)
3Aux Send 3 Pre
3Aux Send 4 Pre
3Aux Send 5 Pre
3Aux Send 6 Pre
3Pan
3Fader
The Channel Strip
3Input, Gain, Attenuation, Pad
Church Sound Sur vival Guide 21
pad. Whatever the name, this is, as I said, the entry way for the signal into the channel
strip.
High EQ- EQ stands for equalization. It's an old term meaning that this control, as
is also true of the mid and low EQ controls, is for evening out- equalizing- the tone of the
signal. This boosts or cuts the high frequencies; that is, increases or decreases the level
sent to that frequency.
Mid EQ- does the same thing High EQ does, only for the mid-range frequencies.
Low EQ- boosts or cuts the lowest range.
Low Shelf- this button engages or disengages what's called a low end roll-off, or
low cut. It will generally reduce the volume steeply of any signal in the range below 75100 hz.
Advice: I cut EVERYTHING below 100-125 hz except the bass. There are few useful tones
for human ears in that range. There are loads of overtones that can cause distorion or
muddy sound in other frequencies. When I started doing this, I noticed an immediate
greater clarity in my mixes.
Aux Sends 1-6- This simply means that these are auxiliary- extra or additionalsends. They are used to create an entirely independent mix of the signals. You'll notice
that some of these are marked Pre, some are Post and some are switchable between Pre
and Post. You may ask yourself "What in the world does THAT mean?!" I am here to answer that question. Of course, you already know that Pre means before and Post means
after, but before and after what?- Before or after the channel fader. Pre-sends tap into
the path of the signal before it reachs the fader; post-sends tap into the signal path after
the fader. Any Aux send that is Pre will still continue to carry signal even when the fader
is down. In fact, no fader moves will affect this level at all. Any Aux send that is Post will
change in relation to the fader. If the fader comes down, so will all the Post sends.
Solo button- This doesn't necessarily mute all other sounds except the one coming through this channel when engaged. It's primary purpose is to solo the level of that
channel input to your Db meters (those green, yellow and red lights up in the top right
hand corner of the mixer that bounce around so much while the band is playing.) This
is so you can see if your input level, controlled by your gain knob, is too low, too high or
just right. You should use this on every channel during the sound check. Ask each musician to make noise one by one at full volume. This gives you a fairly accurate way of
setting your input level. When no channel is soloed, the meters are generally measuring
the master output. But when you press the solo button, the meters immediately change
function and begin to measure the input level of that specific channel. This is very important. Make sure you understand this point. It will help you every time you get started
on a mix. On a recording session, the first thing we do is to set the input level. This is
foundational. If your foundation is built on sand, collapse will your house (in non-Yoda,
your sound will be bad.)
Church Sound Sur vival Guide 22
The Mute button- this mutes the signal coming through the channel. You won't
hear it anymore. Some mixer mute buttons affect the entire channel strip, meaning that
they mute the EQs, the Aux and effects sends as well as the mains. Others only mute the
main outputs. You should know which way your mixer does things. Otherwise, you may
mute a guitar player (like me) sometime and when he unplugs his guitar, it will make a
nice, attention-getting thwack in the monitors. This is not good for winning friends.
The Fader- this reduces or increases the level on the channel to the main speakers
and any controls that are set to Post fader.
"What about that extra button just left of the mid EQ knob?" you ask. Some mixers have a sweepable mid-range EQ control that you can engage or disengage. Consult
your manual for this one. I don't want to talk about it.
That wasn't so hard, was it? Now that you know one channel strip, you know them
all. Rejoice!
The master controls take all the signal being sent through the send path it is assigned to and give you one volume knob or fader to raise or lower them all at once. The
master faders- generally there are two of them, marked left and right or one and twocontrol the volume reaching your main speakers. The little knobs that control your main
output for aux sends and all other sends do exactly the same job as the faders only in a
rotary knob rather than linear fader. Remember, they're all volume controls.
The effects loop you have created with an external processing unit- reverb, compressor, delay or multi-effects gear- has to be connected as a loop. If you send signal
OUT to the INPUT of something, you must send the processed signal OUT of it and back
IN to the mixer in order for it to be heard through your mixer. There will generally be
four volume controls in this loop.
-First is the send level from each channel to the master send that is feeding the
effects unit. This allows you to determine how much of each channel you want affected
by the gear.
-Second is the master send to the effects unit from the mixer. This combines all
the individual channel volumes and sends it all as one signal into the effects unit.
-Third is the level (volume) in the effects unit itself. Most of the time these are
preset and work just fine the way they are. You may have the desire to tweak these settings. Remember that what you do there will have an effect down the path of the signal.
The fourth and last volume control is your master effects return level. Whether it
Church Sound Sur vival Guide 23
4
Effects2 Send4
Effects1 Send
3Effects 1 Return
3Effects 2 Return
3Aux Send 1 Master
3Aux Send 2 Master
3Aux Send 3 Master
3Aux Send 4 Master
3Aux Send 5 Master
3Aux Send 6 Master
3Master Faders
Left & Right
The Master Controls
4
Phones
Church Sound Sur vival Guide 24
comes back into the mixer through an input labeled "effects return" or through one of
the Aux returns, you'll still have this final volume control. This will increase or decrease
the amount of the effected signal that comes into the mixer and goes out to your main
outputs and, possibly, to other Aux sends.
Some mixers have sub sends or group sends. On each channel there will be a button that engages or disengages that channel being sent to a sub-group typically marked
"1&2," "3&4" etc. Sometimes the channel is automatically disengaged from sending
directly to the master ouput when you choose one of the subs. Either way, the purpose
of this control is to allow you to put together a group of channels whose output to the
mains- or elsewhere- is controlled by one or two faders. This is useful, for example, when
you have a great mix on your drum mics but the overall sound of the drums is too loud
or too soft. If, after getting a great mix on the drum channels, you assign them all to sub
1&2, you can then raise or lower the volume of that group without changing the levels on
each channel individually.
Remember, the outputs of the sub group must be assigned to the master faders
as well, otherwise you'll hear nothing from those channels in the mains. Also remember
that some mixers will allow you to assign the channel outputs to both the master and
the sub group faders. If you have some channels going to both the master and a subgroup (and the sub-group is assigned to the master fader) you are sending the same
signal to the master twice. The effect for you is that your sub-group faders will not
control all the sound from those channels that reaches the master fader. In order to have
complete control of those channels assigned to the sub-group, be sure to disengage them
from sending to the master fader directly.
If your mixer has direct outputs from the sub-groups, you can also use your sub
faders to send signal to a completely separate destination. If, for example, you wanted to
record the service, you could use a sub group or an Aux send. The benefit of using an Aux
send is that you would have independent volume control on each channel to the recorder.
The benefit of using the sub-group faders is that you would have the EQ from each channel going on to tape.
Remember, signal (the sound) has a path. This is called "signal path." It is linear. It
travels in one direction. It only goes where you send it. It will gladly split, amoeba-like,
and travel two, three, four or more paths if you send it in those directions. You are like
God to your own little Sound Universe. Your creations will only do what you allow them
to do. Be wise.
Church Sound Sur vival Guide 25
3
4
Changing this knob
changes all levels to all sends.
The Gain Knob
Church Sound Sur vival Guide 26
Chapter Five
Once Is Enough (the gain knob)
Some sound people think it's really cool to mix from the gain, input or attenuator knob at the far back of the console. It is not cool. Not only is it not cool- and you will
be held in extreme disdain by professionals- it is also not helping you do what you are
wanting to do. Of course, I'm assuming that what you are wanting to do is something
good for the sound, the musicians, the worship team, the church and God.
If, on the other hand, your goal is not to benefit the church but to "do it the way
you've always done it" and, thereby, keep your musicians in a constant state of frustration and tension, then, by all means, continue to mix from the gain knob. Just don't be
at the sound board when I come to your church. This is probably the only unforgiveable
action a sound person can take when working with me. I can let other things slide, but not
this.
The reason it is so important to me is simply this; when you change the gain on
a channel, you change every volume level everywhere else you are sending that channel (see the diagram on the previous page.) What this means for me, the singer/guitarist
on the platform, is that my monitor mix completely changes when the gain changes. I
wonder why we spent so much time getting a sound check if the sound person is going to
change everything by mixing from the gain knob! Don't do it! Don't do it! Don't do it!
At the beginning of my sound checks in churches I tell the sound person that I am
going to play my hardest on the guitar so they can set the input level on the channel. I
tell them that I will not be raising the level of my ouput during the concert. I am leaving
that to them. Once that is set so that there is no distortion coming in, it never has to be
adjusted again. That way, when we get a monitor level that I'm comfortable with, it will
remain the same from sound check to service.
Of course, besides changing the monitor level, changing the gain will also affect
every other level on that channel. You may end up sending distorted signal to your effects device, or blowing the kids in the nursery away through the speaker in their ceiling,
or ruining your recording of the service/concert.
Remember the ergonomics we talked about earlier? The reason that gain knob is
so far away from you is that it is the knob you need to change least. The reason the faders are right at your hands is that THOSE are the ones you should change for your main
speakers. Please, I beg of you, don't mix from the gain/input knobs!
Church Sound Sur vival Guide 27
That said, there are those rare occasions when you simply must adjust the gain
on a channel. Perhaps that guitarist we talked about has backslid, has reserved some
volume for himself, has given you half as much signal as he can and turns his guitar up
during the service, distorting the channel unpleasantly. What do you do, knowing that
your adjustment of the gain knob changes every other level on the channel?
You try to counter-adjust the other levels. This is something of an intuitive process that you'll get better at with time and experience. The first concern is the level to
the monitors. WHILE you are adjusting the input gain downward, simultaneously adjust
the send to the monitors upward. Watch the musician on the platform to catch any communications- facial scowls, pleasant nods, etc.- they're sending your way. After you have
got that level to something like what it was before, check your other sends to make sure
they're not distorting. Use your solo button to see if your input level is good.
In the recording of a live album once, I told the sound man not to adjust the gains
on the channels after we got them set. I even wrote it down for him in his concert notebook. I mentioned it again to him during the set-up and again during the sound check.
He didn't listen to me. When our drummer played softly, he raised the inputs. When he
played louder, he tried to adjust back to what we had set during the sound check. On one
song he dropped the bass so low it was unusable. He nearly ruined the recording for us.
He certainly made a lot more work for us in the mixing of the recording. I cannot say this
more strongly. Don't use your input controls to mix your sound. Use them for their intended purpose- to control the level into the mixer. Use your faders... please.
Church Sound Sur vival Guide 28
Chapter Six
How To Make Everybody In Church Hate You (the EQ controls)
If you need attention and approval for a job well done, don't be a sound man. Don't
be a Sunday School teacher, either, or a nursery worker. Sing solos or preach. That'll get
you respect and applause... most of the time.
If you're going to be a sound man you must reconcile yourself to this fact; the
better you do your job the more invisible you will be. You will only attract attention to
yourself when things go wrong- when feedback fills the room, when someone speaks into
a mic and there's no sound, when the soloist is waiting for the track to start...and waiting...and waiting...
Advice: Pay attention at all times to your primary job, which is to make the sound excellent. Don't let anything or anyone divert your attention.
The goal of every church sound person should be that no one listening to the
church service should know that there IS a sound person. It should sound as effortless
and seamless as possible, as if the sound they hear is a naturally occurring phenomenom. There is a way, however, to let everyone know that you're there, and to incur loads
of ill will... EQ.
There are generally three (sometimes four) EQ knobs. Each of them performs the
same, or similar, function in a different frequency range. They decrease or increase the
volume in their frequency range. In order to be able to increase and decrease, you must
have a starting point that is right in the middle, between increase and decrease. You'll
notice that your EQ knobs probably have a little diagram around
them like a clock face. The little ticks normally go to plus or minus
twelve Db, written like -"12" and "+12." Halfway between the two
extremes, generally where the "12" would be on a clock, there is
the number "0." The "0" means that in that position, the control is
neither boosting (raising) or cutting (lowering) the signal level- zero
effect. This is called "flat." If someone suggests to you that they'd like
you to set the EQ flat, they mean return the controls to the center
of their arc, to the "0." In this position the sound passing through
the channel is not being affected by these controls. Let me put that another way. In this
position, the electrical current is not being affected. When you increase or decrease this
signal, you are changing the electrical current and, consequently, the sound. The purest
sound of the instrument, mic or playback device occurs at "0."
Church Sound Sur vival Guide 29
3
4
Changing these knobs
DECREASES or INCREASES the
level in a specific frequency
The EQ Knobs
Church Sound Sur vival Guide 30
For this reason, and several others, I am inclined to use EQ very judiciously and
with restraint. It seems that some sound people think that every signal that passes
through their mixer needs EQ tweaking. I am of the opposite opinion. Unless it is objectionable in its pure form, I will let the sound pass through without EQ.
The first of two personal exceptions is that I sometimes like to add a little brightness to vocals (3Db boost at 3-6khz or so) and, as I said before, cut everything (except
the bass) 125-150 hertz and below. The reasons for this have less to do with affecting
the sound and more to do with creating clarity in the mix and helping the vocals cut
through or rise above that mix.
The second exception I make is for instrumentalists- mainly guitarists- who have
been tweaking their sound in solitude. What sounds good by itself does not always sound
good in the context of a band. I will sometimes reduce the guitarists low end even more
than normal to try to brighten up his sound and clear out the low-mid range, where most
of the sonic action is taking place.
Most electronic instruments, guitar pickups and effects processors these days
are making great sounds. I am reluctant to tweak them unless I know for sure that I have
a better idea than the manufacturer. For these reasons my first choice is to NOT EQ any
sound. Listen to it first before making any changes.
There have been a number of occasions when I asked a sound person to zero out
the EQ, make it flat. They didn't understand what I meant and were perhaps too shy to
admit it, so instead they turned all the controls to minus twelve Db- as much a decrease
in each range as is possible. You can imagine how this made the sound sound! It wasn't
good. So, take a little brotherly advice; be humble. If you don't know something, say you
don't know it. I'd rather work with a learner than a know-it-all who doesn't know it all.
And I think most performers are like me.
As I have mentioned before, most of your sound is happening in the low midrange
of the frequency spectrum. The human voice, pianos, guitars, keyboards, flutes, trumpets, tubas, dulcimers are all vying for some sort of room in this very crowded area. The
hardest job you face is to clear this frequency out and to make everything sound full and
clear without sounding too thin. Good luck! Here are a few personal tips. Don't tell anybody I told you these tricks. I don't want them getting around.
- Your background vocalists are supporting the lead vocalist(s) who is (are), rightly, the center(s) of attention. Their sound doesn't need to be as full as the lead vocal(s).
Therefore, I will often cut the low end from the BGVs (background vocals) even more than
125-150 hz. Sometimes I'll cut as high as 250-400 hz. This will clear up a lot of rumble
and mic handling noise as well. It will also make the BGVs sparkle. Wet it down with a
little reverb and you've got a sound!
Church Sound Sur vival Guide 31
- As I mentioned, dropping some of the lows from the guitars and keys will also
help clear out the low mids. However, you can't get too carried away or your mix will
start to sound thin or brittle. I'd suggest leaving the primary rhythm instrument (that is,
the one played by the person who is highest in the pecking order at the church) alone and
work on the others. Seriously, one instrument needs to occupy the space. If you clear it
all out, it'll sound too empty.
- I'm not a fan of electronic drums, being something of a purist in that regard.
However, if you are using them they probably won't need any EQ at all. The manufacturer
designed the sounds to accompany other musicians. They were formulated with a band
context in mind. Leave it alone unless it's just too terrible to let pass.
+12
+6
0
-6
-12 0
6 5.4
130.81
2 6 1. 6 3
5 2 3. 2 6
1046. 52
2 0 9 3. 0 4
4186.08
8 3 7 2 .1 6
1 6 7 4 4. 3 2
Let's take a look at a very simple diagram that will help to illustrate what your EQ
controls do. Above this paragraph is a diagramof the frequency spectrum up to around
16,000 Hz (16 kHz.) The numbers represent the "C" notes up the scale, with middle C
being at 261.63. Each doubling of the frequency is a rise in tone of one octave. The rise in
octaves is due to a halving of the size of the sound wave. A middle C, say, might look like
the left wave (below.) One octave above middle C would look like the middle wave and two
octaves above middle C would look like the right wave.
As you can see- and I hope this is not too confusing- each time you double the
frequency of the wave (the number of waves per second), you halve
the space between its peaks and valleys. It doesn't take long to climb
from 65 to 4186Hz!
Church Sound Sur vival Guide 32
When you raise the EQ on your mixer, it looks something like a mountain. You are
boosting the frequencies in the middle of its range more than those at either end (like
the illustration at the bottom right, previous page.) So, in the diagram at the top of the
previous page, we are raising the lows 6 Db around 150 Hz, lowering the mids 6 Db at
around 1kHz and raising the highs 6 Db at around 5kHz. Can you see the effect this is
having on the sound? (This is not an advisable setting, by the way. It is only for illustration.) When the sound folks turned my EQ all the way down thinking they were making it
flat, they were actually creating a series of peaks and valleys across the spectrum. When
these are set at "0" they create a flat line, hence the "make it flat" request. Methinks flat
is the way to start and adjust at your own risk.
Chapter Seven
Church Sound Sur vival Guide 33
Daddy, Why Does The Preacher Sound Like God? (effects)
We want our pastor to "speak as though the oracles of God." We don't want him to
sound as though he was speaking from heaven, or a deep cave, or some other planet. Does
the pastor really need "Cathedral Reverb?"
I think not. In fact, I'm not sure very many performers or speakers will ever need
"Cathedral Reverb." Reverbs started with the mic'ing of a large space with a speaker in it.
It moved from there to coils and springs and is now a function of the digital age, all bytes
and bits. From the beginning its use has been highly influenced by personal preference
and changing musical tastes. Do you remember those gated Phil Collins drums from the
80s with huge reverb? Who could forget...
Effects are perhaps the most easily abused area of a sound person's responsibilites. Maybe it's because this is the one area where a sound person can make a contribution to the "sound" of the sound. Once again, I want to advise restraint and judicious use.
You have created an effects loop by connecting one or two of the Aux or effects
sends to the INPUTs of the effects unit, and connecting the OUTPUT of the effects unit to
one or two of the effects returns or Aux returns on the mixer. You are planning to send
some mix of sounds to the effects unit and add some reverb, delay, chorus or other timebased effect to your main output. You must, of course, use your own best judgment and
taste in how much and what kind of effect you add. I won't address anything other than
reverb here. It's too big a subject and, besides, reverb is, and should be, the most commonly used.
I would suggest tending more toward reverbs with higher frequencies. With a
"dark" or "medium" reverb, you can clutter up your low mids and muddy your sound in a
hurry. A brighter reverb will add a bit of sparkle without getting in the way of any primary sounds. Remember also that every space, including your auditorium, has a natural reverb. I've been in plenty of rooms that didn't need any reverb effect added- it had
plenty of its own. Here's an easy way to hear the reverb of your room. Stand in the middle while no other noise is going on (hopefully with no one else there) and clap your hands
once loudly. Listen for how long you can hear the sound reverberate. Do this several times
from different spots to "read" the room. This will help you determine if and how much
reverb you can safely add to your main speakers.
Natural reverb occurs because of the reflection of a sound on a surface. You won't
get reverb in an open field, contrary to movie sound effects. The surface a sound re-
Church Sound Sur vival Guide 34
flects from has everything to do with the strength of the reflection and how fragmented
or focused the reflection remains. Smoother surfaces reflect more focused and louder
echos, more true to the original sound. A more textured surface will break the sound up
because there are many tiny surfaces the original sound is reflecting from. Think of it
this way; if you bounce a perfectly round ball vertically on a wood or marble floor, the
ball will bounce straight up. It doesn't change much if at all from its original path. If you
bounce the same ball on a gravel surface, there's really no predicting where it might end
up. Every little surface in the gravel will send it one way or another. This is true of your
sound as well.
Because of the reflective nature of surfaces, walls that are smooth and parallel
will bounce more sound around than will walls that are rough and assymetric in their
relationship to each other. Square walls produce what is called a "standing wave." That
means you are getting a very strong secondary reflection of your sound that will influence how you hear the speakers. This secondary sound is competing with your primary
sound a micro-second after it. This will also muddy up your mixes.
There are many possible solutions that will help deaden the reflective qualities of
a room, most dealing with the installation of non-reflective or absorptive surfaces to the
walls, ceiling and floors. This is best handled by a professional.
Our main point here, however, is to understand how this affects what we hear and
how we use our reverb effect. If you can, play a recording of a solo instrument in your
empty auditorium and add reverb to it. Begin by adding way too much. You want to hear
how the reverb sounds so you can recognize it even at low levels. Then add just a little of
various reverbs and walk around the room listening to it. This will help tremendously in
knowing your room and how to make it sound great.
Church Sound Sur vival Guide 35
3
4
Changing these knobs
changes levels to the aux sends
(monitors, effects, remote feeds,
etc.)
The Aux Send Knobs
Church Sound Sur vival Guide 36
Chapter Eight
When She Thinks She Can Sing (pan, solo & mute)
I know. The title of this chapter has only a little to do with the mute button. It's
just my attempt at being clever. We do want to discuss the pan, solo and mute button
functions. There is a diagram on the next page that will help.
The pan control is a way of placing something anywhere in the stereo field between
all the way (hard) left and all the way (hard) right. It is only useful in a stereo, two channel system. Stereo is actually, as we have previously mentioned, two completely different
signals being sent to two completely different speakers. They may sound very similar
but they are not the same. If you wanted to, you could pan some instruments hard left
and the rest hard right and get two completely different sounds from the left and right
speakers. Even when you put things in the center of the stereo field, you are still sending
two discreet signals to separate outputs.
The way the pan control works as you move it from the center to the hard left or
right position is to maintain one constant volume while reducing the other. I told you it
was a volume control! When the knob is at center, the volumes on each side are equal.
When you move it to the RIGHT, it maintains that same volume in the RIGHT while gradually reducing the volume sent to the LEFT. In other words, it reduces the volume on the
opposite side. That's all it does. It's just a volume control.
In my opinion, stereo mixing for live applications is generally only good for one
person- the sound person. He tends to mix with his point of reference being the center.
That means every one to the left and right of him is getting a skewed perspective on the
sound. For this reason, and also that it's so hard to create distinct left and right areas in
a large room with an audience, I think it's wise to mix mono for live events. What you'd
like is for everyone in the auditorium, from front to back and side to side, to have the
same aural experience. Mono is it.
As I mentioned earlier, the primary function of the solo button is not to mute all
other sounds so you can listen to one sound only. Its primary purpose is to put the sound
of the solo channel into the meters (generally at the top right of your board) so you can
gauge your input level. Again, use this to set your input levels and to re-check them if
you think things have changed.
The mute button is the one you use when she can't sing and doesn't know it. Or
when someone isn't playing the guitar that tends to hum, vibrate and feedback if left
alone. Or when someone takes a wireless mic off the stage and engages in some activity
Church Sound Sur vival Guide 37
The Pan Knob
3
4
Changing this knob
DECREASES the level sent to the
OPPOSITE side of the knob. It
does NOT INCREASE the level to
the side you are turning it toward.
you don't want to broadcast to the whole congregation.
Church Sound Sur vival Guide 38
It's this simple; mute a channel when you don't want any sound from it. It's also
this simple; PAY ATTENTION! If you have muted a microphone and someone steps up to
use it again, be there to unmute it! Don't get distracted. Don't talk to friends. Don't close
your eyes, lift your hands and worship. Worship with your eyes open and your hands
at the ready. Just like Nehemiah's men at the rebuilding of the walls of Jerusalem; work
with one hand on your sword. Be ready to do the job God gave you.
Remember also to ascertain how much your mute button mutes. Does it mute every send in the channel, or does it only mute the send to the main outputs? Knowing this
will save you embarrassment later.
Chapter Nine
Church Sound Sur vival Guide 39
And Then We Put It All In A Bowl... (basic mixing)
The goal of mixing a live event is to make a clear, balanced combination of all the
sounds for all the audience at a volume that they will enjoy. That's a tall order, especially
when your church has old, young, black, white, rich, poor, rockin', swingin', hip-hoppin'
and line-dancin' people.
You probably have this person in your church; they complain about the high volume of the service just about every week. When they're sick and can't be there, they
phone in their complaint. The chances are very good that this person is an old person.
The chances are also very good that you think they're over-reacting and being WAY too
sensitive about this. But there is also something else going on...
As we age, we develop hot spots in our hearing. Most people know that we lose
hearing, however little or gradual, as we grow older. What most don't know is that we
also develop acute sensitivity to certain frequencies- kind of hyper-hearing. When an
older saint tells you it's too loud, they may not be over-reacting. They might be telling
you the truth; it is too loud- for them. Because of their hyper=hearing, certain sounds at
normal volumes are hurtful to their ears. Knowing this can help you inform them of this
phenomenom and direct them to some place in the room where the sound will be good
for them.
There are a good many churches whose volume levels are too low in their services.
When I can hear the actual sound of the pastors voice over the projected sound of his
voice in the speakers, I think the volume needs to come up. There is a way of getting good
volume levels that envelope the audience and hold their attention without causing damage to the ears or being abrasive and irritating. Having a good, large system helps a lot.
Keeping your EQ changes modest will help, too.
In an earlier chapter we talked about the "0" setting on the EQ controls, where
the electrical current and volume level is passed through that control without change.
There is the same feature and notation on most faders. About two-thirds of the way up
the fader will be a "0" or the word "Unity" or simply a "U." This is noting the same thing
for the fader as is true of the EQ. With your volume set at this point you are allowing the
electrical signal to pass through the fader unchanged. This is the optimal spot for your
fader. If you are consistently keeping your faders very low on all channels, your gain/input or you amplifiers are probably set wrong. Starting with your faders at "0" is your
first step toward getting a clean mix.
Church Sound Sur vival Guide 40
Let's assume that you have that in order and that you have gone through your
sound check, have set all your inpout gains properly and have a nice EQ and effects
sound on every channel. Now it's down to you and the faders. Mixing, after all, is mostly
about volume- the relative volume of musical parts to each other in relation to the
whole.
The first thing I do when trying to get the initial balance right is to close my eyes
and listen to the sound. Keeping in mind what instruments are playing, I want to know if
I can hear what they're doing without seeing them. I also want to watch them play and
see if their relative volume to the other instruments and vocals is in keeping with their
relationship to the music and the band. For instance, I don't want the percussionist dominating the sound when she's only playing the cowbell. It has to be in context. Context is
everything.
When I am mixing a recording, I first create a triangle of sound between the lead
vocal, bass and drums. If I get those working together, everything else will fall into place.
You might try this with your live mixes as well. After you get the lead vocal, bass and
drums sounding tight and strong, bring in the percussion, main keys, main guitars, secondary keys and guitars, other melodic instruments and, lastly, the BGVs. Close your
eyes. How does it sound? Can you distinguish every instrument? You may have to tweak
your EQ and effects at this point and change some volumes after you've done that. Don't
over-tweak, though. You're not going to get it perfect. There is no perfect. Just get it
good.
Advice: Do NOT mix on head-phones except to occasionally reference something in particular. The mix sounds different in the phones than it does in the room. You want to
experience- and mix for- the same aural environment as your audience.
Once more let me encourage you not to over-tweak the sound. Some sound people
seem to feel that to justify their existence they have to be turning a knob, pushing a
button or pulling down a fader at all times. This is not true. Your existence is justified by
the mere fact that God made you and delights in you. If the sound system sounds good,
leave it alone. Just don't fall asleep and, for heaven's sake, DON'T leave the mixer! Stay
on task, even when it's boring.
Chapter Ten
Church Sound Sur vival Guide 41
Elephants In The Pews (feedback)
We've all had the feedback experience when something just starts squealing or
thundering through the room and it seems, for a few seconds, as though it will never stop.
We panic. We reach for any control- button, knob or fader- that will stop this thing NOW!
Feedback is a loop created through a microphone or pickup in which the sound the
instrument or mic is producing is "heard" by the instrument or mic itself and reproduced
again and again and again. Feedback can be pretty cool sometimes, for instance, when
a guitar player holds one note until next Tuesday by facing his cabinet and intentionally making the guitar ring out. It can be hurtful or damaging to the ears as well and can
certainly put a wet blanket on what was, up to that point, a pretty good service. How do
we keep it from happening and how do we handle it when it does?
The first step in preventing feedback is, of course, to consider what is most likely
to feed back- microphones. I would say the cause of feedback ninety per cent of the time
is from the improper handling of microphones. We already talked about using dynamic
cardioid mics (preferably Audix OM series) to reduce this possibility. The second step in
preventing this is to listen for feedback BEFORE it occurs. During your sound check, listen
for those mics or instruments that are either very loud in the monitors or very close to
the monitors. Remind all the people on the platform that their mics will feed back if not
handled properly. Tell them about off-axis rejection and the proper relationship of the
mic to the monitor. Try to have the mics as close to the source sounds as possible.
Handling feedback when it occurs involves first paying attention while you are
mixing- to the stage/platform and to your mixer. Your mixer probably has a little light
just above the fader- perhaps by the solo or mute button, sometimes by the input knobon each channel. This little light- or series of LEDs- will most likely turn green whenever
there is audible signal passing through it. It might become yellow when the sound is good
and strong, and turn red when it's overloading or distorting. This little light of mine, I'm
going to let it shine. I'm also going to watch it shine. This little light is your friend. It tells
you when anything is happening on a channel and can be your first clue where feedback
is happening.
When feedback starts, though, the first thing to do is look at the stage. Is someone
dangling their mic right down toward a monitor? If so, mute them quickly! The second
place to look is at your little lights on each channel. Scan across the channels for light. If
you see one constantly lit when it should be bouncing around, mute it. The chances are
good you will eliminate your feedback right then and there.
Church Sound Sur vival Guide 42
If your instrumentalists are cooperating with you and not raising their levels after
the sound check, you're pretty well assured that it's not in an instrument. Don't miss
anything. If you have been paying attention, as you should be, you may have noticed that
Sister Jane, who wasn't feeling well during the sound check, has laid her mic down and
left the stage holding her stomach. If you're paying attention, you saw that happen and
muted that mic. If you weren't, you could have feedback on your hands- and conscience.
To be frank with you, feedback is, most of the time, the sound person's fault. They
simply weren't paying attention to what was happening on the stage. The ounce of prevention you can most wisely supply is your full and undivided attention to your job at
the mixer.
If you are having feedback at every service, it might be due to a misplacement of
a bass or guitar cabinet or monitor. Sometimes a speaker cabinet can get in front of the
main speakers, or too close to one, and cause feedback. It may not show up in the sound
check but happens only in the service. That's probably due to the change that happens to
the sonic character of the room when it fills up with people.
Take a long look at where things are placed and rearrange if necessary. Be prepared to encounter resistance. Just like some dear saints don't like anyone sitting in
"their" pew, some worship team members are pretty protective of "their" space. Keep in
mind, and remind them, that the goal is not to change things merely to change them, but
to make the sound better.
On rare occasions, a reverb unit will cause feedback, most of the time because it's
settings were changed and not set properly. Be sure to check that after you check the
stage, the mics and the channel lights.
Chapter Eleven
Church Sound Sur vival Guide 43
When All Else Fails (troubleshooting)
The best way to learn about sound mixing is to adopt the attitude of a student. Be
a learner. Read your mixer's manual or operations guide. Do the same for the reverb unit,
the power amps and the speakers. Watch other people mix in every circumstance. Don't
be afraid to ask questions.
When special musical guests visit your church, pump them for information.
They've been around. They've seen a lot. They'll probably be happy to help out.
There is a lot of information about sound on the internet. In writing this book, I
kept Google at hand so I could check for information readily. You can type in the words
"sound wave" or "power amps" or "cardioid pattern" and come up with many enlightening and helpful articles. Some of the very best audio people in the world have put their
knowledge on the internet. Take advantage of it.
Don't be afraid to call the manufacturer of your gear to ask a specific question
about some application of their gear. They are mostly glad to help. They recognize that
good service makes repeat customers.
There are several good magazines you should subscribe to that are specifically focused on helping you do well. Christian Musician is a magazine for which I write a regular
column. It is full of great information for people like you. It's sister magazine is Worship Musician. Besides great interviews with musicians and sound people, this magazine
offers specific tips to the church sound community. You can find them and more on the
internet at
www.christianmusician.com
www.audixusa.com
www.lrbaggs.com
www.bobkilpatrick.com
Lastly, if your sound just doesn't sound good, call in a professional audio consultant. I am not one. Don't call me. You can find them on the internet or by referral. There
are numerous companies that specialize in church sound, so they'll know your language
and understand the dynamics, pressures and applications you're dealing with.
Go forward! Survive! Make good sound!