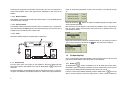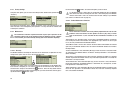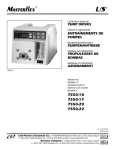
1
LISTEN
MANAGE
ARCHIVE
BURN
DISTRIBUTE
English
User manual
HIFIDELIO USER MANUAL
WARNING
Both the product described in this user manual and the documentation are protected by
copyright law. Copyright remains with the author. Software and documentation may not be
copied, reproduced, translated or distributed in any form, not even in part, without prior
written consent by the copyright owner.
To reduce the risk of fire or electric shock, do not expose this unit to rain or moisture.
The authors decline any liability with regard to the software described herein. They do not
make any warranties for the correctness of the contents of this documentation, nor are they
liable for any direct or indirect damages which may arise from the use of, or the inability to
use, either the software or the accompanying documentation, even if the possibility of such
damages may have been brought to their attention.
The authors do not assume responsibility for any bugs or defects in the software. This
restriction of liability extends also to their distributors and retailers.
Trademarks and registered trademarks are acknowledged. They remain the exclusive property of their owners. Absence of such identification does not constitute a breach of trademark protection.
NOTES ON COPYRIGHT
Intellectual property, including music, is subject to world-wide copyright protection. In most
countries it is permitted to make a copy for personal use of sound storage medium such as
CDs that have been acquired legally and have no copy protection or of music data such as
downloads from the Internet (please consider possible Digital Rights Management).
In no case is it permitted to offer these copies for sale commercially or to pass them on to
third parties. Always make sure that the music files (for example downloads from the Internet) are properly licensed, i. e. that the party offering them also possesses the rights to the
titles being offered.
Please note that recording music cassettes, vinyl records or CDs may injure copyright.
WARRANTY COVERAGE
4th edition
© April 2007 Hermstedt AG
Email: [email protected]
http://www.hifidelio.net
http://www.hermstedt.com
Hermstedt AG
Carl-Reuther-Str. 3
D-68305 Mannheim
Tel.: +49 (0)621 7650-200
Fax: +49 (0)621 7650-333
SUPPORT
Should you have difficulties with your Hifidelio, please contact Hermstedt AG for help as follows:
Email:
[email protected]
Hotline:
+49 621 76 50 200 (Monday – Friday: 9-12 am and 1-5 pm Central European
Time)
Address: Hermstedt AG, Carl-Reuther-Str. 3, D-68305 Mannheim
Hermstedt AG provides a limited warranty on the Hifidelio and its original accompanying
accessories for a period of twenty-four (24) months from the date of purchase from an
authorised Hermstedt AG dealer, provided the hardware product is unused at the time of
purchase. The range of warranty covers defects in material and workmanship. Within the
limits of the warranty Hermstedt AG commits itself to remedy these defects. The warranty
does not apply to damage caused by accident, abuse, misuse, misapplication or to a unit or
part that has been modified without written permission of Hermstedt AG or repaired by anyone who is not a Hermstedt service partner.
CAUTION
1. Heed warnings – All warnings on the unit and in the operating instructions should be
adhered to.
2. Water – To reduce the risk of electric shock, do not expose this unit to rain or moisture.
Install this unit in a cool, dry, clean place – away from windows, heat sources, sources
of excessive vibration, dust, moisture and cold, which could damage its components.
Avoid sources of humming (transformers, motors).
3. Moisture – Avoid sudden temperature changes. Condensation may be created inside the
device whilst moving it from a cold to a warm location or using it in a moist room.
Proper function of the unit may be inhibited. Should this situation arise, remove the CD,
CD-R or CD-RW from the unit, switch it off and wait at least an hour until the moisture
evaporates.
Caution: this unit is not equipped with a moisture sensor.
10. Power sources – Before plugging your unit into the AC main supply, make sure that the
voltage indicated at the back of the unit complies with the local main voltage.
11. No use period – The power cord of the unit should be unplugged from the outlet when
left unused over a long period of time. When doing so, always grasp the plug, never the
cable itself.
12. Lightning – To prevent lightning damage disconnect the AC power plug when there is a
thunderstorm.
13. This unit is not disconnected from the AC power source so long as it is connected to the
wall outlet, even if the unit itself is turned off. This state is called the standby mode.
When the unit is in standby mode, it is designed to consume a very small quantity of
power.
14. Never force a connector into a port. If the connector and port do not join with reasonable ease, they probably don’t match. Make sure that the connector matches the port
and that you have positioned the connector correctly in relation to the port.
4. Location – Do not place this unit on an unstable cart, stand, tripod, bracket, or table.
The unit may fall, causing serious injury to a child or adult, and seriously damage the
unit. Despite a stable placement, this unit can fall due to external forces (pulling or
stumbling on the cable, or other accidental physical contact) and consequently be damaged or cause damages due to its own weight.
5. Do not place any heavy objects on top of the unit.
6. For your own safety do not attempt to open the case of the unit or disassemble it. You
run the risk of electric shock and of voiding the limited warranty. No user-serviceable
parts are inside. Contact your dealer if something should drop into the case.
7. Do not use force on switches, controls or connection wires. When moving the unit, first
disconnect the power plug and the wires connected to other equipment. Never pull the
wires themselves, only the plugs.
8. Cleaning – Do not attempt to clean this unit with aerosol sprays, chemical solvents,
alcohol, or abrasives, or to remove dust with air pressure; this might damage the finish
or affect the performance. Use a clean, soft, dry cloth. Unplug the unit from the wall
outlet before cleaning.
9. Be sure to read the “HELP” section regarding common operating errors before concluding that the unit is faulty.
UPnP enabled by TwonkyVision, www.twonkyvision.com
MPEG Layer-3 audio coding technology licensed from Fraunhofer IIS
and Thomson.
Supply of this product does not convey a license nor imply any right to distribute content created with this
product in revenue-generating broadcast systems (terrestrial, satellite, cable and/or other distribution channels), streaming applications (via Internet, intranets and/or other networks), other content distribution systems (pay-audio or audio-on-demand applications and the like) or on physical media (compact discs, digital
versatile discs, semiconductor chips, hard drives, memory cards and the like). An independent license for
such use is required. For details, please visit http://mp3licensing.com
English
Thank you for purchasing the audio streaming client Hifidelio. To assure the finest performance, please read this manual carefully before operating your unit. Keep it in a safe place
for future reference.
DISPOSAL AND RECYCLING INFORMATION
European Union
This symbol means that according to local laws and regulations this product and
its remote control should be disposed of separately from household waste. When
this product reaches its end of life, take it to a collection point designated by local
authorities.
Battery Disposal Information
Batteries – even those containing no heavy metal – may not be disposed of in household
waste. Used batteries must be disposed of properly in appropriate waste sites according to
local environmental laws and guidelines.
particular installation. If this equipment does cause harmful interference to radio or television reception, which can be determined by turning the equipment off and on, the user is
encouraged to try to correct the interference by one or more of the following measures:
• Reorient or relocate the receiving antenna.
• Increase the distance between the equipment and receiver.
• Plug the equipment into an outlet on a circuit different from that to which the receiver is
connected.
• Consult the dealer or an experienced radio/TV technician for help.
LGPL AND GPL NOTICE
LGPL Library written Offer
NOTE ON USAGE OF WIRELESS EQUIPMENT
This device complies with the specifications following the provisions of the R&TTE
Directive 1999/5/EC concerning usage of 802.11g wireless antenna. Further information can be found under www.hifidelio.com/compliance.
COMMUNICATION REGULATION INFORMATION
This product contains Linux 2.4.26, that is made available under the GNU LGPL license version 2 resp. 2.1 (hereafter called “the Library”).
Hermstedt AG hereby offers to deliver or make available, upon request, for a charge no
more than the cost of physically performing source distribution, a complete machine-readable copy of the corresponding source code of the Library on a medium customarily used for
software interchange.
Please contact:
FCC Compliance Statement
Changes or modifications may cause this unit to fail to comply with Part 15 of the FCC Rules
and may void the user’s authority to operate the equipment.
Hermstedt AG
Jörg Hermstedt
Carl-Reuther-Str. 3
68305 Mannheim - Germany
This offer is valid for a period of three years after the date of purchase of this product.
This equipment complies with FCC radiation exposure limits set forth for an uncontrolled
environment. This equipment should be installed and operated at a minimum distance of 8
inches between the radiator and your body. This transmitter must not be co-located or
operating in conjunction with any other antenna or transmitter.
GPL Package written Offer
Information to the User
Hermstedt AG hereby offers to deliver or make available, upon request, for a charge no
more than the cost of physically performing source distribution, a complete machine-readable copy of the corresponding source code of the Program on a medium customarily used
for software interchange.
This equipment has been tested and found to comply with the limits for a Class B digital
device, pursuant to Part 15 of the FCC rules. These limits are designed to provide reasonable protection against harmful interference in a residential installation.
This equipment generates, uses, and can radiate radio frequency energy and, if not
installed and used in accordance with the instructions, may cause harmful interference to
radio communications. However, there is no guarantee that interference will not occur in a
This product contains Linux 2.4.26, that is made available under the GNU GPL license version 2 (hereafter called “the Program”). The License conditions may be found on the delivered disk.
Please contact:
Hermstedt AG
Jörg Hermstedt
Carl-Reuther-Str. 3
68305 Mannheim - Germany
EU-Konformitätserklärung
English
EC-Declaration of Conformity
This offer is valid for a period of three years after the date of purchase of this product.
Hersteller / Verantwortliche Person:
Manufacturer / responsible person
Adresse / Address:
HERMSTEDT AG, Jörg Hermstedt
Carl-Reuther-Str. 3
D-68305 Mannheim
Germany
Erklärt, dass das Produkt / Declares that the product:
Typ / type:
Modell / model:
HIFIDELIO
HIFIDELIO / HIFIDELIO PR-80
HIFIDELIO PRO / HIFIDELIO PRO-S
Verwendungszweck /:
Intended use
Wireless Music Center
bei bestimmungsmäßiger Verwendung den grundlegenden Anforderungen gemäß Artikel 3
der R&TTE-Richtlinie 1999/5/EG entspricht und dass die folgenden Normen angewandt
wurden:
complies with the essential requirements of Article 3 of the R&TTE 1999/5/EC Directive, if used for its intended
use and that the following standards has been applied:
1. Sicherheit (Artikel 3.1.a der R&TTE-Richtlinie)
Savety (Article 3.1.a of the R&TTE directive)
angewendete Norm(en)
EN 60950
Ausgabe
applied standard(s)
2000
issue
2. Elektromagnetische Verträglichkeit (Artikel 3.1.b der R&TTE –Richtlinie)
Electromagnetic compatibility (Article 3.1.b of the R&TTE Directive)
angewendete Norm(en)
EN 55022
Ausgabe
applied standard(s)
1998
issue
3. Effektive Nutzung des Frequenzspektrums (Artikel 3.2 der R&TTE –Richtlinie)
Effective use of radio spectrum (Article 3.2 of the R&TTE Directive)
harmonisierte Standards
EN 300 328
harmonised standards
Ausgabe
issue
Mannheim, 26/10/2006
(Ort und Datum der Konformitätserklärung)
Jörg Hermstedt
(Name und Unterschrift)
(Place and date of the declaration of conformity)
(Name and signature)
2004
Front Panel / Panneau avant / Vorderseite
2
9
11
Remote Control
Télécommande
Fernbedienung
12
Front Panel / Vorderseite / Pannello frontale
1
hifidelio
THE HOME OF YOUR MUSIC
7
8
30
1
3
4
5
6
7
8
10
13
Back Panel / Panneau arrière / Rückseite
31
32
4
5
3
6
36
21
22
12 Remote control
10 Function keys
sensor
Funktionstasten
FernbedienungsTasti di
sensor
funzionamento
Sensore per il
11 Turn&Select
telecommando
wheel
13 Headphones jack
Bedienrad
Kopfhörerbuchse
Manopola di
Ingresso cuffia
controllo
35
10
23
20
4 Stop
7 Record
Stopp
Aufnahme
5 Play/Pause
Registrazione
Start/Pause
8 Eject CD
CD-Auswurf
Play/Pausa
6 Next track
Espulsione CD
Titel weiter
9 Display
Bildschirm
Tracia successiva
Back Panel / Rückseite / Pannello posteriore
33
34
1 On/Off
Ein-/Ausschalter
2 CD slot
CD-Schlitz
Inserimento CD
3 Previous track
Titel zurück
Traccia
precedente
24 25
26
20 Power mains connection
Netzanschluss
21 Ethernet 10/100MBit
(4 port switch)
4 porte Ethernet
10/100MBit
22 USB ports
USB-Ports
Porte USB
23 Wireless network antenna
(WLAN)
Antenne für das Funknetzwerk (WLAN)
Antenna rete Wireless
(WLAN)
24 Digital audio lines out
Digitale Audio-Ausgänge
Uscita audio digitale
25 Analogue audio line out
Analoger Audio-Ausgang
Uscita audio analogico
26 Analogue audio line in
Analoger Audio-Eingang
Ingresso audio analogico
Remote Control
Fernbedienung
Telecomando
1 On/Off
Ein-/Ausschalter
3 Previous track
Titel zurück
Traccia precedente
4 Stop
Stopp
5 Play/Pause
Start/Pause
Play/Pausa
6 Next track
Titel weiter
Traccia successiva
7 Record
Aufnahme
Registrazione
8 Eject CD
CD-Auswurf
Espulsione CD
10 Function keys
Funktionstasten
Tasti di
funzionamento
30 Keypad
Zifferblock
Tastiera numerica
31 Menu
Menü
32 Mute
Mute
33 Navigation
Navigazion
34 Volume
Lautstärke
35 Brightness
Helligkeit
Luminosità
36 Additional
function keys
Zusätzliche
Funktionstasten
Altri tasti di
funtionamento
NUMBERS IN THE DRAWINGS REPRESENTED ON THE INSIDE OF THE
FRONT PAGE
FRONT PANEL
Thank you for purchasing the Hifidelio, your new Music Centre. Its elegant and intuitive
design allows you to start using it immediately. It is made for your living room and you can
unpack it, put it in your stereo cabinet and operate it as easily as any other stereo component. Nevertheless the user manual contains a lot of interesting sections describing the
numerous features of the Hifidelio in detail and deserves a closer look.
1. On/Off
6. Next track
11. Turn&Select wheel
Getting started:
2. CD slot
7. Record
12. Remote control sensor
1. Place the Hifidelio in the vicinity of your stereo amplifier and a power outlet.
3. Previous track
8. Eject CD
13. Headphones jack
2. Load the remote control with the batteries.
4. Stop
9. Display
3. Connect Hifidelio to your stereo amplifier using the enclosed audio cable.
5. Play/Pause
10. Function keys
4. Connect the AC mains lead to AC mains socket.
5. Switch on your stereo components and the Hifidelio.
BACK PANEL
20. Power mains connection 22. USB ports
24. Digital audio lines out
21. Ethernet 10/100MBit (4
port switch)
23. Thread for the wireless
network antenna
(WLAN)
25. Analogue audio line out
1. On/Off
7. Record
32. Mute
3. Previous track
8. Eject CD
33. Navigation
4. Stop
10. Function keys
34. Volume
5. Play/Pause
30. Keypad
35. Brightness
6. Next track
31. Menu
36. Additional function keys
26. Analogue audio line in
REMOTE CONTROL
After about 40 seconds the Hifidelio is operational. Now you may insert an audio CD, play its
tracks, or import these songs to the Hifidelio. Take your remote control and explore the
world of digital music. Have fun and enjoy your Hifidelio!
CONTENTS
1
1.5.3 Mute (32) .................................................................. 5
About this User Manual.................................... 1
What is the Hifidelio? ....................................... 1
First Steps......................................................... 1
1.5.4 Navigation (33) .......................................................... 6
1.5.5 Volume (34) ............................................................ 6
1.5.6 Brightness (35) ....................................................... 6
3.4
3.5
Playing archived Songs ................................. 11
Burning a Music CD ....................................... 11
4
ADVANCED FUNCTIONS
Playlists .......................................................... 12
1.3.1 Checking Parts List and Finding a Place.................... 1
1.5.7 Additional Function Keys (36).................................... 6
4.1
1.3.2 Connecting................................................................. 1
1.5.7.1
4.1.1 Create a new Playlist ............................................... 12
1.3.2.1
Analogue Audio Line Out........................................ 1
1.3.2.2
Digital Audio Lines Out........................................... 1
2
1.3.2.3
Analogue Audio Line In .......................................... 1
2.1
1.3.2.4
Wireless Network................................................... 2
2.1.1 Library ....................................................................... 6
4.2.1 Create a new Searchlist ........................................... 13
1.3.2.5
Ethernet network ................................................... 2
2.1.1.1
Artists .................................................................... 6
4.2.2 Edit an existing Searchlist........................................ 15
1.3.2.6
Power..................................................................... 2
2.1.1.2
Albums................................................................... 7
4.2.3 Playback of a Searchlist........................................... 15
1.3.3 Getting Started........................................................... 2
2.1.1.3
Songs..................................................................... 7
4.3
1.4
The Operating Keys .......................................... 2
2.1.1.4
Genres ................................................................... 7
4.3.1 Editing Meta Data..................................................... 16
1.4.1 On/Off (1) ................................................................... 2
2.1.1.5
Playlists ................................................................. 7
4.4
1.4.2 CD Slot (2) .................................................................. 3
2.1.1.6
Searchlists (Smart playlists).................................. 7
1.4.3 Control Buttons (3) to (6)
........................................ 3
2.1.2 Internet Radio ............................................................ 8
1.4.4 Record (7) ................................................................. 3
2.1.3 Analogue Recording .................................................. 8
1.4.5 Eject CD (8) ............................................................... 3
2.1.4 Settings & Extras ....................................................... 8
1.4.6 Display (9) .................................................................. 3
2.2
1.4.7 Header Icons .............................................................. 3
2.2.1 Music Disc ................................................................. 8
1.4.7.1
Icons on the Left .................................................... 4
2.2.2 USB Device ................................................................ 9
1.4.7.2
Icons on the Right near the hour indication ........... 4
2.2.3 Library - Composer.................................................... 9
1.4.8 Function Keys (10) ..................................................... 4
2.2.4 Music Server ............................................................. 9
1.4.9 Turn&Select Wheel (11) ............................................. 4
2.2.5 Import ........................................................................ 9
1.4.9.1
The outer Turn ring ................................................ 4
The inner Select wheel .......................................... 5
3
THE BASIC FUNCTIONS
4.5.4 Receiving an Internet Radio Broadcast .................... 21
1.4.9.2
1.4.9.3
Text Entry with the Help of the Turn&Select wheel
3.1
3.2
Playing a Music Disc...................................... 10
Importing a Music Disc .................................. 10
5
ACCESSORIES
5.1
MP3 Players.................................................... 22
(11)......................................................................... 5
1.5
The remote Control Unit ................................... 5
Magnifying Function .............................................. 6
4.1.2 Renaming or Deleting an existing Playlist................ 13
THE MAIN MENU
4.1.3 Playback of a Playlist ............................................... 13
Permanent Menu Options ................................ 6
4.2
Variable Menu Options..................................... 8
3.2.1 Importing an Audio CD............................................. 10
1.5.1 Keypad (30) ................................................................ 5
3.2.2 Importing a Data Disc .............................................. 11
1.5.2 Menu (31) .................................................................. 5
3.3
Copying an Audio CD...................................... 11
Searchlists (Smart Playlists) ......................... 13
Meta Data ....................................................... 15
Digitising Sounds of external analogue Sources
......................................................................... 17
4.4.1 Creating a new Recording........................................ 17
4.4.2 Adjusting the Record Level ...................................... 17
4.4.3 Start the Recording .................................................. 17
4.4.4 Editing the recorded File .......................................... 18
4.4.5 Importing the Tracks................................................ 19
4.4.6 Deleting Tracks ........................................................ 20
4.5
Internet Radio................................................. 20
4.5.1 My Stations… .......................................................... 20
4.5.2 Top 500… ................................................................ 21
4.5.3 Predefined Stations.................................................. 21
5.1.1 Connecting an MP3 Player ....................................... 22
5.1.2 Copying Songs from the Hifidelio to an MP3 Player. 22
5.1.3 Copying Songs from an MP3 Player to the Hifidelio. 23
English
1.1
1.2
1.3
INTRODUCTION
CONTENTS
5.1.4 Eject your MP3 Player .............................................. 23
5.2
The Hifidelio Backup Hard Disk ..................... 23
6.5.4.2
Further Maintenance Functions........................... 32
5.2.1 Information............................................................... 23
7
COMMUNICATION
5.2.2 Backup ..................................................................... 23
7.1
Hifidelio – the Centre of your new Computer
Network .......................................................... 33
Hifidelio – a Member of your existing Computer Network..................................................... 34
Multi-room Streaming.................................... 34
5.2.3 Restore..................................................................... 24
5.2.4 Disconnecting the Hifidelio Backup Hard Disk......... 24
5.3
7.2
The Hifidelio Keyboard ................................... 24
7.3
6
SETTINGS & SPECIALS
7.3.1 Hifidelio and DAAP Client......................................... 34
6.1
General Settings ............................................. 25
7.3.2 Hifidelio and DAAP Server ....................................... 35
6.1.1 Sound....................................................................... 25
7.3.3 Hifidelio and UPnP/AV Clients.................................. 35
6.1.1.1
7.3.4 Hifidelio and UPnP/AV Server .................................. 35
Dynamics Compression ....................................... 25
6.1.2 Play Mode ................................................................ 26
7.4
6.1.3 Appearance.............................................................. 26
7.4.1 Copying Music Files from a Computer to the Hifidelio .
6.1.4 Date & Time ............................................................. 27
................................................................................. 35
6.1.5 Prevent Changes...................................................... 27
7.4.2 Copying Music Files from the Hifidelio to a Computer .
6.1.6 Language ................................................................. 27
................................................................................. 36
6.2
Import & Burn ................................................. 28
Transfer of Music Files .................................. 35
9
USING A COMPUTER TO MANAGE THE
HIFIDELIO
9.1
Using a web browser ..................................... 41
9.1.1 Under Windows XP................................................... 41
9.1.2 Under Mac OS X ....................................................... 41
9.1.3 Direct Access with the IP Address ........................... 41
9.1.4 The Browser User Interface ..................................... 41
9.2
Using a VNC Viewer software ........................ 41
10
HELP!
10.1 “My Windows XP computer cannot find the
Hifidelio…” ....................................................
10.2 “My Hifidelio is dead…”................................
10.3 RecoveryDisk .................................................
10.4 Software Update.............................................
42
42
43
43
10.4.1 Software Update via Internet ................................... 43
10.4.2 Software Update using the Web Browser User Interface ..........................................................................43
8
ADVANCED NETWORKING
6.2.3 Analogue Recording................................................. 29
8.1
8.2
Ports................................................................ 37
Configuration.................................................. 37
6.2.4 CD Burning............................................................... 29
8.2.1 Hifidelio Network..................................................... 37
6.3
Network .......................................................... 30
8.2.2 Home Network......................................................... 37
6.3.1 Configuration ........................................................... 30
8.2.3 Expert Mode ............................................................ 38
6.3.2 Services ................................................................... 30
8.2.4 WLAN ....................................................................... 38
6.3.3 CD Database ............................................................ 30
8.2.4.1
Network Name..................................................... 39
6.4
6.5
8.2.4.2
Protection ............................................................ 39
10.6 Technical specifications of the Hifidelio’s network interface................................................ 45
8.2.4.3
6.2.1 Compression ............................................................ 28
6.2.2 CD Behaviour ........................................................... 28
Hifidelio Information....................................... 31
Service ............................................................ 31
10.4.2.1 Download Update File .......................................... 44
10.4.2.2 Install Update File ................................................ 44
10.4.3 Software Update using a CD .................................... 44
10.5 Useful key combinations ............................... 44
10.5.1 Update the Hifidelio operating system ..................... 44
10.5.2 Forced CD eject........................................................ 44
10.5.3 Interruption of the Encoding of Music Files ............. 44
Key....................................................................... 39
10.6.1 Hifidelio Network ..................................................... 45
6.5.1 Software Update ...................................................... 31
8.2.5 Web Proxy................................................................ 40
10.6.2 Home Network ......................................................... 45
6.5.2 Software Upgrade .................................................... 31
8.2.6 Activation of Changes.............................................. 40
10.6.3 Expert Mode ............................................................. 45
6.5.3 Factory Settings....................................................... 32
8.2.7 Summary ................................................................. 40
6.5.4 Maintenance ............................................................ 32
8.3
10.7 Register your Hifidelio ................................... 45
10.8 Overview of all main menu options............... 45
6.5.4.1
Recovery .............................................................. 32
Information about IP Addressing................... 40
10.8.1 Permanent menu options......................................... 45
CONTENTS
10.8.1.1 Main Menu: Library .............................................. 45
10.8.1.3 Main Menu: Analogue recording .......................... 46
10.8.1.4 Main Menu: Settings & Specials .......................... 46
10.8.2 Variable menu options ............................................. 47
10.8.2.1 Main Menu: Music Server .................................... 47
10.8.2.2 Main Menu: Import............................................... 47
11
TECHNICAL DATA
12
REGISTRATION CARD
English
10.8.1.2 Main Menu: Internet Radio................................... 46
1
INTRODUCTION
1.3
1.1
About this User Manual
1.3.1 Checking Parts List and Finding a Place
Besides the Hifidelio itself and this user manual you should find the following items in the
package:
• Power cord,
• Cinch audio cable,
Please see the drawings representing the Hifidelio and the remote control on the inside of
the front page. The bracketed numbers in the manual refer to the numbers in the drawings.
• Optical Toslink audio cable (Hifidelio Pro only),
Since the Hifidelio software is maintained and updated continuously, the software version
of your Hifidelio may differ from the one described here. This may show up as some minor
differences in the wording of messages or the design of screens. Please note that the most
accurate PDF file of this user manual can be downloaded from the Hifidelio web page
(www.hifidelio.com) under the service information as a PDF document or directly from the
web browser user interface of the Hifidelio.
• WLAN antenna,
• Remote control and batteries,
• RecoveryDisk.
Place the Hifidelio on a stable and level surface within the reach of your Hi-fi components.
Incorrect placement may damage the Hifidelio or compromise its functions.
1.3.2 Connecting
1.2
What is the Hifidelio?
The Hifidelio is a music server to be connected to your stereo system and is designed to
store your complete music library and play it back. It enables you to very easily find the
music tracks you want to play. You can store songs from external sources on your Hifidelio,
and you are able to produce your own CD from its content (obeying the Copyright Laws of
your country). You can generate individual playlists or let the Hifidelio generate searchlists
according to criteria you have defined. You can connect the Hifidelio to a computer network and broadcast per streaming Internet radio stations. Additionally, you can create a
multi-room solution by connecting the Hifidelio to other additional devices, the so-called
satellites. Your Hifidelio can then distribute its music to these devices based in various
rooms. You can also use the Hifidelio as a simple CD player.
The front panel of the Hifidelio provides you with the operating keys. The backlit display
shows the menus for ease of operation. Additionally, you can control your Hifidelio with the
help of the remote control or through the web browser user interface on your computer.
1.3.2.1 Analogue Audio Line Out
Connect your Hifidelio to the stereo system or to an amplifier with the help of the delivered
audio cable. The analogue audio line output (25) from the Hifidelio has to be connected to
the corresponding input jacks of your stereo amplifier. Make sure you match the red plug to
R (right) and the black or white plug to L (left). Ensure a tight connection of the plugs to
avoid noise.
1.3.2.2 Digital Audio Lines Out
Alternatively you can connect the Hifidelio using one of both digital audio lines out (24): S/P
DIF (Toslink) or coaxial (RCA/Cinch).
1.3.2.3 Analogue Audio Line In
On the back of the Hifidelio you will find an analogue Audio In port (26) for cassette decks,
tape recorder, or similar components. Connecting a vintage turntable usually requires an
additional phono pre-amplifier, unless connected to the phono line in of your stereo amplifier.
1
English
This manual applies to the product models Hifidelio PR-80, Hifidelio Pro and Hifidelio Pro-S
referred to below as Hifidelio. Additional features of Hifidelio Pro and Hifidelio Pro-S are
mentioned explicitly throughout the text. In chapter 11 «Technical Data» on page 48 you will
find the technical description of these product models.
First Steps
Usually all your components (cassette decks, tape recorder, tuner, etc.) are connected to a
central stereo amplifier, whose audio output signals (LINE OUT) are well suited to the
Hifidelio.
guage. To change the language later on, please refer to section 6.1.6 «Language» on page
27.
1.3.2.4 Wireless Network
If the Hifidelio should communicate with other wireless devices, screw the WLAN antenna
into the thread (23) at the back.
1.3.2.5 Ethernet network
Select the function key
“English” to switch to the English language. The display will be
shown in English immediately.
If the Hifidelio should communicate with other devices via Ethernet, plug a standard network cable (Ethernet 10/100MBit) into one of the four Ethernet ports (21) on its back side. A
computer shop can provide you with a suitable cable.
Upon the first use of your Hifidelio or after having had switched it off for a long period of
time, you will be asked to enter the proper date and time. This is important for the automatic backup mechanism.
1.3.2.6 Power
Connect the Hifidelio’s AC power receptacle (20) to a power plug.
Adjust date and time with the help of the Turn&Select wheel (11) (see section 6.1.4 «Date &
Time» on page 27) and press the function key
“OK”. The main menu is displayed.
1.4
The Operating Keys
Please see the drawing representing Hifidelio’s front and remote control on the inner front
page. The bracketed numbers refer to the numbers in these drawings.
1.3.3 Getting Started
1.4.1 On/Off (1)
Turn your stereo system, your receiver, or your amplifier on. Choose the appropriate audio
input channel and turn your Hifidelio on by using the On/Off button (1
) located on the
front panel.
The display illuminates and the Hifidelio logo appears. After about 40 seconds, a virtual curtain opens. The Hifidelio is now operational and you are asked to choose your preferred lan-
2
The On/Off button (1
) switches the Hifidelio on or off. By briefly pressing this button,
the Hifidelio is put into sleep mode and thereby consumes minimal power. By pressing this
button again, the Hifidelio becomes operational again within a few seconds.
In order to switch off the Hifidelio completely, keep the On/Off button (1
) pressed for
about 2 seconds and release it when the display shows a closing “curtain”. Anytime you
unplug the Hifidelio from the power supply or switch it off completely, it needs the initialisation time of about 40 seconds to become operational again.
1.4.2 CD Slot (2)
Menu: Artists/Albums/Songs/Lists – The songs from the artist, the album, or the list will be
burned on a CD-R.
Menu: Analogue Recording – Signals at the Audio line input are digitised and will be
imported to the Hifidelio.
1.4.5 Eject CD (8)
Carefully insert a music disc, printed side up, into the CD slot until the mechanism catches
it.
Press this button and the music disc is ejected from the slot. You can then remove it.
As soon as the disc is in the drive, a security bar is activated and no other disc can be
inserted into the CD slot.
1.4.6 Display (9)
1.4.3 Control Buttons (3) to (6)
The display shows the current mode and possible options of the Hifidelio while navigating
through the menu. It is divided into three parts: header, menu area, and the current assignment of the function keys.
These buttons control the playback of songs of music CD’s or the tracks stored on the
Hifidelio.
Header
The Play/Pause button (5
) starts the playback of a song, the Stop button (4
) ends it.
Additionally, the Play/Pause button (5
) pauses the playback and resumes it at the same
position.
Function
Key
Options
The Previous Track (3
) / Next Track (6
) buttons skip a track of a disc or a list in the
given direction with each brief press of the button during playback. Keep these buttons
pressed for fast forward or rewind within the track.
During the playback of a list of songs (artist, album, playlist, ...), you may choose any other
song or list of songs by briefly pressing the Next Track button (6
). The current song will
be played back to its end and then the newly chosen song or list is started. Pressing the
Play/Pause button (5
) instead stops the current song and starts the newly chosen one
immediately.
Each button shows its activity with a pulsing white light.
1.4.4 Record (7)
The Record button (7) is used for different functions depending on the chosen menu item. In
all cases music is transferred from one place to another.
Menu: Music disc or tracks – Disc or tracks will be imported to the Hifidelio.
Menu: Music from the USB Mass Storage Device – Music files stored on the USB device will
be imported to the Hifidelio.
Menu area
The header shows the name of your device, or the music source, the current time, and
through various icons, the current activities of the Hifidelio. The menu area shows the menu
options which can be navigated by using the Turn&Select wheel (11), or information on the
currently played, imported, or burned song. On the right the options of the four function
keys are displayed.
After about five minutes of inactivity the screen saver is started. By touching the wheel, a
control key, or the remote control, the display contents are brought back into view.
1.4.7 Header Icons
The header line of the display shows the Hifidelio icon and the device name. If music is currently played back its source is shown in place of the Hifidelio’s name: Music Server, Inter-
3
English
When switching the Hifidelio to sleep mode or switching it off, your Hifidelio remembers the
last performed action and carries it out after restarting. The Hifidelio fades out playback
when switched off and fades in at the same point again when restarted.
Menu: Import – Audio files inside the “Import” folder will be imported to the Hifidelio.
net Radio, Import or Analogue Recording. The following table shows the meaning of further
icons displayed flashing, animated, or steadily.
1.4.7.1 Icons on the Left
Steady
The Hifidelio icon shows that the main menu is referring to the
music library located on the Hifidelio.
Flashing
The Hifidelio system is busy with complex operations and therefore
is not available for further actions.
Animated The Hifidelio is currently accessing the network, e.g. to a DAAP server.
Steady
Mute mode is activated.
Steady
Random mode is activated.
Steady
Repeat mode is activated.
1.4.8 Function Keys (10)
Pressing a function key executes the displayed action. Depending on your position in the
menu, some keys may not be assigned to a function. If the chosen situation has more than
four options, the function key
shows “More…” and enables you to toggle between the
option sets.
Steady
The CD icon is shown in place of the Hifidelio’s icon. A disc has
been inserted into the CD drive and its music is played back.
Steady
The server icon is shown in place of the Hifidelio’s icon: a UPnP/AV
or DAAP server is connected to the Hifidelio over the network and
has been selected. The library is now referring to the music library
of the server and its music is played back.
Steady
The iPod icon is shown in place of the Hifidelio’s icon: an iPod is
connected to the Hifidelio and its music is played back.
1.4.9 Turn&Select Wheel (11)
Steady
The USB icon is shown in place of the Hifidelio’s icon: a USB player
is connected to the Hifidelio and its music is played back.
The Turn&Select wheel (11) consists of two parts, the inner Select wheel and the outer Turn
ring. Both parts can be turned independently of one another.
Turn ring
1.4.7.2 Icons on the Right near the hour indication
Animated A music disc is currently being played back.
Select wheel
Animated The Hifidelio is currently burning the chosen tracks on a music CD,
an MP3 CD, or a data CD.
Function keys
Animated The Hifidelio is currently importing or coding music tracks, e.g.
from a music disc.
1.4.9.1 The outer Turn ring
Animated The Hifidelio is currently transferring tracks to other devices, for
example on an MP3 player or to the Hifidelio backup hard disk.
When turned clockwise the outer Turn ring (11) enters the submenu of the chosen option.By
turning the outer Turn ring counter clockwise the previous menu level is reached again.
Animated A music track is currently being played back; the output volume is
turned on.
4
1.5.1 Keypad (30)
When turned clockwise or counter clockwise, the inner Select wheel (11) moves the menu
selection down and up. The chosen option is always highlighted in black.
You may directly address an individual track from a music disc or from a list contained on
the Hifidelio by selecting its number. Use the numerical keypad to enter the number.
In order to browse long lists more easily, the cursor will wrap from the end to the beginning of the list and vice versa. Turn the inner Select wheel (11) to the end or the beginning
of the list. When the end or the beginning of the list is reached, the cursor will stop automatically. After a short pause, turn the inner Select wheel (11) again in the same direction;
the cursor is now at the beginning or the end of the list.
The keypad can be used to enter textual information like meta data (see section 4.3 «Meta
Data» on page 15) . It works like the keypad of a mobile phone.
The keypad has the following layout:
Key
Edit:
Edit:
Browse:
Choose:
1. character, also after 2. character, also after Artists, albums, songs In albums
space
space
If headphones are connected and the Hifidelio is playing music back, the inner Select wheel
(11) controls the volume of the headphones output.
0
0@_-*#[]()+=
0@_-*#[]()+=
0@_-*#[]()+=
0
1
1./,?':;&~!
1./,?':;&~!
1./,?':;&~!
1
1.4.9.3 Text Entry with the Help of the Turn&Select wheel (11)
2
ABCabc2
abcABC2
abc2
2
3
DEFdef3
defDEF3
def3
3
4
GHIghi4
ghiGHI4
ghi4
4
5
JKLjkl5
jklJKL5
jkl5
5
6
MNOmno6
mnoMNO6
mno6
6
7
PQRSpqrs7
pqrsPQRS7
pqrs7
7
8
TUVtuv8
tuvTUV8
tuv8
8
9
WXYZwxyz9
wxyzWXYZ9
wxyz9
9
Turning the inner Select wheel (11) while songs are playing will fast forward or rewind
within the song, similar to pressing and holding the control keys 3 ( ) and 6 ( ).
In the edit mode the Turn&Select wheel (11) allows you to enter text easily.
With the help of the inner Select wheel (11), select a character from the alphanumerical list
at the bottom and confirm your choice by turning the outer Turn ring (11) slightly to the
right. Function keys
“Delete” and
“Insert” help correcting typos. When finished,
press the function key
“OK”.
1.5
The remote Control Unit
The remote control unit is another way to control the functions of your Hifidelio. Its keys
duplicate all the buttons on the front panel. The inside front page shows a drawing of the
front of the remote control unit. The bracketed numbers refer to the numbers in this drawing.
1.5.2 Menu (31)
Is a shortcut to the main menu of the Hifidelio.
In edit mode this key toggles between upper case, lower case, and special characters
(umlauts).
1.5.3 Mute (32)
Toggles the volume of the output, between zero and your preset value.
The On/Off switch (1
), the control elements (3) to (8) and the function keys (10) are
identical to the buttons on the front panel of the Hifidelio (except for fast forward and
rewind within a song, switching off the device, or launching an analogue recording).
5
English
1.4.9.2 The inner Select wheel
1.5.4 Navigation (33)
2
According to the function of the Turn&Select wheel (11), you can navigate through the
menus of the Hifidelio by using these keys. The central “OK” key is equivalent to the function key
, which generally confirms the chosen action.
1.5.5 Volume (34)
Besides the buttons on the front panel and the remote control, the menu shown on the display is your main control of the Hifidelio. The main menu gives you access to the various
parts of the Hifidelio software. The function key “Help” provides context-sensitive help at
your fingertips. To the right of a menu option a triangle indicates that additional submenu
options are available.
Adjusts the level of the audio output, which usually is connected to your stereo components.
2.1
1.5.6 Brightness (35)
Adjusts the level of the background light of the keys and the display.
1.5.7 Additional Function Keys (36)
THE MAIN MENU
Permanent Menu Options
2.1.1 Library
The main menu option “Library” gathers your music collection. Press the function key
“Info” to display the statistics of the stored music files.
These keys directly select main menu options. They are labelled according to the options:
“Artist”, “Album”, “Songs”, “Genre”. “Lists“ = Playlists. “Source” = Random on/off. “Info”
shows the general statistics of the library, for instance how many songs are stored.
1.5.7.1 Magnifying Function
Browsing the lists with the remote control is made easier as the text is magnified on the
display. The Hifidelio can be controlled more easily from a distance. The large font size of
the main menu or of the artists/album/songs/genre lists is activated by pressing the menu/
artists/album/songs/genre key of the remote control. Thereby, the position in the menu
structure is important for choosing the appropriate key. Press the right arrow (33) to enter a
list; the magnified font size will be kept.
To disable the “Magnifying” function, press the left arrow (33) twice to go back to the main
menu or press any other additional function key (36). Operating the device directly from its
front panel also deactivates this function.
6
Under the main menu option “Library”, your music collection is managed in different lists.
Turn the outer Turn ring of the Turn&Select wheel (11) slightly to the right in order to display these lists.
2.1.1.1 Artists
This reveals an alphanumerical list of all artists stored on the Hifidelio.
English
Behind each artist you will find the list of his/her albums and behind each album its songs.
“All…” shows all songs of the chosen artist including songs which are not part of an
album. These lists are automatically filled by importing songs to the Hifidelio.
2.1.1.2 Albums
This reveals an alphanumerical list of all albums stored in the Hifidelio. Behind each album
you will find its songs.
Behind every genre you will find the list of artists, albums, and songs assigned to this
genre. “All…” shows all songs of the chosen genre.
Genres without assigned songs are not visible here. But you may choose from all genres
when assigning one to a song or an album. Of course, you may add your own genre by just
typing an appropriate text into the genre field of a song, album, or artist (see section 1.4.9.3
«Text Entry with the Help of the Turn&Select wheel (11)» on page 5).
2.1.1.5 Playlists
2.1.1.3 Songs
This reveals an alphanumerical list of all songs stored on the Hifidelio.
This reveals all the playlists you have created on your Hifidelio. The chosen songs are listed
in the submenus of your playlists.
2.1.1.4 Genres
This option provides a list of genres in which your songs, albums, or artists are classified.
For detailed explanations about how to create a new playlist, please refer to section 4.1
«Playlists» on page 12.
2.1.1.6 Searchlists (Smart playlists)
This reveals all the searchlists you have created on your Hifidelio. The chosen songs are
listed alphanumerically in the submenus of your playlists.
7
2.1.4 Settings & Extras
This menu option opens the area of setting and configuring the Hifidelio. This starts with
simple things like date and time or the name of the Hifidelio and goes as far as advanced
configuration of a wireless network. A separate chapter deals with these topics in details
(chapter 6 «Settings & Specials» on page 25).
2.2
Variable Menu Options
The following menu options are displayed in the main menu only in certain circumstances.
For detailed explanations about how to create a new searchlist, please refer to section 4.2
«Searchlists (Smart Playlists)» on page 13.
2.1.2 Internet Radio
If your Hifidelio is connected to the Internet (see chapter 7 «Communication» on page 33),
selecting “Internet Radio” from the main menu opens an additional world of unlimited MP3
and Ogg Vorbis music streams.
For detailed explanations about “Internet Radio”, please refer to section 4.5 «Internet
Radio» on page 20.
2.2.1 Music Disc
If a music disc is loaded into the CD slot, this option is displayed at the top of the main
menu.
In the submenu of the disc you will find the list of its tracks. The position of the cursor in
the menu structure defines the selection of songs played or imported.
If the title information of the audio CD could not be found on the internal CD database and if
an Internet access is not available or enabled, generic descriptions are displayed here. In
this case, you can enter the meta information yourself (see section 1.4.9.3 «Text Entry with
the Help of the Turn&Select wheel (11)» on page 5).
2.1.3 Analogue Recording
The Hifidelio can record sound from analogue sources plugged into its audio input (27), like
turntables, tape recorders, tuner or cassette decks.
For detailed explanations about how to make such a recording, please refer to section 4.4
«Digitising Sounds of external analogue Sources» on page 17.
8
If the inserted music disc is a data disc (CD or DVD), the disc name is displayed at the top of
the main menu. In the case of existing folder structure on the disc, the submenu first shows
the list of the artists and then their albums and songs. A data disc contains songs with different audio formats (MP3, FLAC, AIFF etc.). If these formats support meta tag information,
the names of the artists, albums and songs are shown on the display.
2.2.2 USB Device
If a USB device (player, stick, external hard disk,…) is connected to the Hifidelio, it appears
at the top of the main menu (see chapter 5 «Accessories» on page 22).
As soon as a remote music server is selected (the iTunes server in the living room in our
example), the header changes from “Hifidelio” to the name of this remote music server. The
main menu option “Library” now shows all artists, songs and playlists of the iTunes server.
Pressing the function key
“Local Library” enables the music library of the local Hifidelio
again.
Please note the recommendations concerning access to an iTunes server in section
7.3.2 «Hifidelio and DAAP Server» on page 35.
2.2.3 Library - Composer
If classical music is stored on the Hifidelio, the composers can be listed like artists or
albums. The classic mode is activated in the menu option “Settings & Specials” (see section 6.1.3 «Appearance» on page 26).
2.2.5 Import
If the Hifidelio is integrated with a network, other computers can copy music files to the
import folder of the Hifidelio (see section 7.4.1 «Copying Music Files from a Computer to the
Hifidelio» on page 35). The main menu option “Import” gives you the choice of importing
some or all of them.
2.2.4 Music Server
If the Hifidelio is integrated with a network, all available and compatible music servers are
listed here. These music servers are either other Hifidelio music servers or computers with
corresponding music server software (e.g. DAAP or UPnP/AV server). Their music collections must be published for remote use to be seen here. (See section 7.3 «Multi-room
Streaming» on page 34).
To import all available files and folders contained in the import folder press the function key
“Import” from the main menu.
Note: The import process does not encode any of the files. Therefore, your music files have
to be in a file format that your Hifidelio is able to play. Furthermore there is no check on
double entries by the Hifidelio.
9
English
Select a music server from the list with the help of the Select wheel of the Turn&Select
wheel (11). Press the function key
“Select” and the complete library of the selected
music server is now available on your Hifidelio.
3
THE BASIC FUNCTIONS
This chapter explains the basic functions of the Hifidelio.
3.1
Playing a Music Disc
Insert the music disc, printed side up, into the CD slot (2) until the Hifidelio’s mechanism
catches it.
The Hifidelio has a CD database with more than 2 million names of audio CD’s (artists,
albums, songs, genres, etc.) If the meta data of the audio CD’s are stored on the internal CD
database of the Hifidelio, titles and artists are displayed automatically. Depending on the
settings and the availability, this information can be searched for in the Internet CD database (see section 6.3.3 «CD Database» on page 30).
If the meta data of the audio CD is not found in the internal CD database and if an Internet
access is not available or enabled, generic descriptions are displayed in place of the artist
or track names. In this case, you can enter the meta information yourself (see section
1.4.9.3 «Text Entry with the Help of the Turn&Select wheel (11)» on page 5).
If the inserted music disc is a data disc (CD or DVD), the disc name is displayed at the top of
the main menu. In the case of existing folder structure on the disc, the submenu first shows
the list of the artists, then their albums and songs. A data disc contains songs with different audio formats (MP3, FLAC, AIFF etc.). If these formats support meta tag information, the
names of the artists, albums and songs are shown on the display.
Press the Play/Pause button (5
) to start the playback of the music disc. Depending on
the settings the playback of an audio CD can start automatically (see section 6.1.2 «Play
Mode» on page 26).
3.2
Importing a Music Disc
Insert a music disc, printed side up, into the CD slot (2) until the Hifidelio’s mechanism
catches it. Wait until the Hifidelio reads it. Its title is shown as the topmost entry of the main
menu. Press the Record button (7
) or the function key
“Import” to import all or
some tracks of the CD onto the Hifidelio’s hard disk. If you want to import only selected
tracks, select and mark these tracks before starting the import. Pressing the Stop button
(4
) will immediately stop the import of the music disc.
3.2.1 Importing an Audio CD
You can configure your Hifidelio to start importing audio CD’s automatically (see section
6.2.2 «CD Behaviour» on page 28).
The recording of an audio CD happens in two steps: the Hifidelio first records the music
files on the hard disk without any compression or encoding; the second step is the encoding of these files in the chosen format (see section 6.2 «Import & Burn» on page 28). After
completion of the first step, you can eject the audio CD, insert the next one and start its
import. This action is done at 3 times the speed. The coding for one hour of music takes
about 20 to 30 minutes, whereas the import of the music tracks is completed within 10
minutes using 12 times the speed.
The record icon
flashes in the display header as long as the Hifidelio is still encoding
the files of the first audio CD. During this operation, the handling of the Hifidelio may not be
quite as quick and smooth as usual. Therefore, we recommend that you allow your Hifidelio
some more time to work.
or
The progress of the import is shown on the display. Already imported songs can be played
back immediately.
While the song is playing, artist, album title, and song title are displayed. Furthermore other
appearance options are available in the settings (see section 6.1.3 «Appearance» on page
26).
The control buttons (3: “Previous track”
to 6: “Next track” ) give you the options to
pause the playing, to stop it, or to start the playback of the next or previous track in the list.
The Eject button (8
) returns the disc to you.
10
Audio CD’s which are not recognised by the CD database are labelled by the Hifidelio with
the import date and time (e.g. an album is named “Audio-CD 2005-06-07 12:34”).
If you want to import songs already stored on your Hifidelio, you are presented with a
choice of overwriting or skipping it.
After the encoding you may have a look at the “Information” window to check the encoding
format and the amount of space of your imported files.
3.2.2 Importing a Data Disc
The recording of a data disc happens in only one step: during the import, music files are
neither converted into the configured audio format nor checked for duplicates. The progress
of the import is shown on the display. Already imported songs can be played back immediately.
3.3
Copying an Audio CD
3.4
Playing archived Songs
Under the main menu option “Library”, use the lists titled Artists, Albums, Songs, Genres, or
Playlists to find the song or the songs you want to play in the Hifidelio’s music collection.
Then press the Play/Pause button (5
) and the playback starts. You can even playback
songs located in the Import folder.
The playback takes place according to your settings (see section 6.1.2 «Play Mode» on page
26).
While the song is playing, artist, album title, and song title are displayed. Long names are
displayed alternating from the left and the right. Furthermore other appearance options are
available in the settings (see section 6.1.3 «Appearance» on page 26).
Insert a music disc, printed side up, into the CD slot (2) until the Hifidelio’s mechanism
catches it. Wait until the Hifidelio reads it. Its title is shown as the topmost entry of the main
menu. Press the function key
“Copy” to duplicate the audio CD.
or
If the Large Play View is enabled, the display switches after the preset time to this view.
Now you can see the song title and artists right from your couch.
The control buttons (3: “Previous track”
to 6: “Next track”
pause the playing, to stop it, and to fast forward or rewind.
The Hifidelio reads all tracks of the audio CD and then asks you to insert a fresh CD-R into
the CD slot (2). Remove the ejected audio CD and insert a CD-R into the CD slot (2). The
burning process starts automatically.
Your attention is drawn to the fact that duplication of copy-protected audio CD’s may
infringe copyright and digital rights laws of your country even in case of private
usage.
3.5
) give you the options to
Burning a Music CD
Select an album, a playlist or mark some tracks. Press the Record button (7
). (For
detailed explanations about how to create a playlist, please refer to section 4.1 «Playlists»
on page 12.)
Please only use standard shaped, round 12cm CD’s available on the market.
11
English
Your attention is drawn to the fact that duplication of copy-protected audio CD’s may
infringe copyright and digital rights laws of your country even in case of private
usage.
4
ADVANCED FUNCTIONS
This chapter discusses advanced functions of the Hifidelio and shows their benefits using
step-by-step explanations.
Choose the requested format. For an audio CD, the music files are first converted into an
original audio format and then burned onto the CD. An MP3 CD only contains MP3 files (file
names are limited to 64 characters); files with other formats are ignored during the burning
process. A Data CD is the compilation of files regardless of their format (MP3, AIFF, FLAC,
etc.).
Press the function key corresponding to the chosen format. The Hifidelio checks if the compilation exceeds the capacity of a CD-R (800MB).
4.1
Playlists
You can create playlists on the Hifidelio. A playlist is a compilation of songs, albums, or artists which you save under a name of your choice. With a playlist, you choose which songs
to play according to a given occasion or mood and the order in which to play them. You can
even use a playlist just for playing back some chosen songs of an artist in random mode.
4.1.1 Create a new Playlist
Adding a new Playlist
Choose the option “Playlists” in the library and enter it by turning the outer Turn ring of the
Turn&Select wheel (11) slightly to the right.
A message on the Hifidelio’s display asks you to insert a fresh CD-R into the CD slot (2). The
burning process begins automatically and proceeds according to your settings (see section
6.2.4 «CD Burning» on page 29). After completion of the burning process, the newly burned
CD is automatically ejected.
Please only use standard shaped, round 12cm CD’s available on the market.
Press the function key
“New” and enter the name of the playlist with the help of the
Turn&Select wheel (11) (see section 1.4.9.3 «Text Entry with the Help of the Turn&Select
wheel (11)» on page 5).
Press the function key
12
“OK” and the new blank, playlist is created.
4.1.2 Renaming or Deleting an existing Playlist
Choose from the menu options, “Artists”, “Albums”, or “Songs”, the tracks you want to add
to your new playlist. To select multiple entries mark the first one using the function key
“Mark” and turn the inner Select wheel of the Turn&Select wheel (11) to extend the selection to the last entry you want to include.
You may rename or delete an existing playlist any time by selecting it from the list and
using the appropriate function keys.
4.1.3 Playback of a Playlist
To play back a playlist, just choose it from the menu and press the Play/Pause button
(5
). If the play mode is set to Repeat or Random, the songs of the playlist are played in
random order or are repeated continuously (see section 6.1.2 «Play Mode» on page 26).
When your selection is satisfactory, press the function key
“Add to List”. You will see
the list of all your playlists. For your convenience the last used list is pre-selected as the
target.
4.2
Searchlists (Smart Playlists)
With the Hifidelio, you can create searchlists based on different criteria – so-called smart
playlists. These lists are dynamic as the content of a list depends on the available set of
songs on the Hifidelio. Changing attributes of songs, albums, or artists will change the contents of these lists immediately
4.2.1 Create a new Searchlist
With the help of the inner Select wheel of the Turn&Select wheel (11) choose the playlist to
which you want to assign the selected songs, and press the function key
“Add to List”.
Now all your selected songs are part of this playlist.
Adding a new Searchlist
Choose the option “Searchlists” in the library and enter it by turning the outer Turn ring of
the Turn&Select wheel (11) slightly to the right.
Press the function key
“New” and enter the name of the playlist with the help of the
Turn&Select wheel (11) (see section 1.4.9.3 «Text Entry with the Help of the Turn&Select
wheel (11)» on page 5).
You can use the function keys
inside a playlist. Function key
ing deleting and adding songs.
“ ” and
“ ” to rearrange the position of songs
“More…” reveals the second part of the options, includPress the function key
“OK” and the new, empty searchlist is created.
13
English
Adding songs to a Playlist
Adding Search Criteria
You are now asked to enter the first search criteria.
A second criteria appears, showing “Enter criteria” by default. Follow the right arrow to the
list of meta data fields, choose Genre and turn further to the right to the search conditions.
By turning the outer Turn ring of the Turn&Select wheel (11) to the right, you are presented
with the list of all meta data fields available for entering search criteria.
The following example “Love Songs” shows how to handle search criteria. This list “Love
Songs” should only contain songs with the title containing “Love” and from the genre
“Rock”.
With the help of the outer Turn ring of the Turn&Select wheel (11) follow the right arrow to
the list of meta data fields, choose Title and turn further to the right to the search conditions.
Use the function key
“Change” to let the list of genres appear. The list shows all available genres including those without assigned songs.
Choose the genre “Rock” and confirm it by pressing the function key
search criteria are defined.
“OK”. Now both
Press the function key
“Change” and enter “Love” with the help of Turn&Select wheel
(11) (see section 1.4.9.3 «Text Entry with the Help of the Turn&Select wheel (11)» on page
5).
Turn the outer Turn ring of the Turn&Select wheel (11) once to the left to return to the list of
searchlists and then once to the right to enter the list. Whenever you are looking at the contents of this searchlist, you will only see Rock songs with titles containing Love.
Press the function key
“OK” and now the first search condition is displayed. If you want
to limit this special playlist to just one genre of music, press the function key
“New”
again.
14
“CD No”: if an album is made up of several CD’s, the CD number indicates which CD the
song is to be found on. The songs of an album are sorted first by the CD number and then
by the track number. You can use the function keys
“ ” and
“ ” to rearrange
the indexing of a CD.
4.2.2 Edit an existing Searchlist
“Track number”: this number represents the position of the song on an album. You can use
the function keys
“ ” and
“ ” to adjust the playing sequence as your wish.
If you want to rename, change or delete a searchlist, choose it from the list and press the
corresponding function key.
Press the function key
changed at any time.
“Ranking”: the function key
“ ” increases the ranking one star at a time, while function key
“ ” decreases it accordingly. Ranking may be very useful for creating
searchlists.
“Change” to see and edit the search criteria. The criteria may be
“Play Count”: the Play Count shows how often a song has already been played.
4.2.3 Playback of a Searchlist
To play such a searchlist, simply choose it from the menu option Searchlists and press the
Play/Pause button (5
). If the play mode is set to Repeat or Random, the songs of the
searchlist are played in random order or are repeated continuously (see section 6.1.2 «Play
Mode» on page 26).
4.3
“Volume”: you can increase or decrease the playback volume of a song by using the function keys
“ ” and
“ ”. This may be useful for reducing the differences of
dynamics between songs.
Meta Data
The function key
usually offers the option “Information” which gives you access to the
meta data of a song, an album, an artist, or a group of songs. These data originate from the
internal CD database, the online “freeDB” CD database, or by manual entries.
To keep the internal CD database updated, we recommend the annual subscription
to our ServiceDisk, which is mailed four times a year. You can order the subscription directly through Hermstedt AG (detailed information on www.hifidelio.com).
Press the function key
"Normalise” in order to adjust a song uniformly to an output
level of 89dB (the commonly recognised norm). If a song is too soft or too loud, its output
level will be increased or decreased accordingly. Thus, opposite to the dynamics compression, the output level of a song is calculated (Replay Gain) and saved permanently in the
file. The note icon
flashes in the header on the display as long as this operation is not
completed. (normalisation requires about half of the play time of a song.)
“Encoding”: uncompressed music files (AIFF, WAV, FLAC) stored on the Hifidelio can be
encoded later into the preset format (MP3 or FLAC). Of course, FLAC files can only be converted into MP3. The note icon
flashes in the header on the display as long as this
operation is not completed. (encoding requires about half of the play time of a song.)
“Songs”, “Artists”, “Composers”, “Albums”, “Genre” and “Year”: you can edit these entries
by pressing the function key “Change”.
15
English
Searchlists are automatically generated and therefore always reflect the changes made on
the Hifidelio (e.g. adding or deleting songs, changing the meta information…). If the
searchlist shows no entries, your Hifidelio contains no songs matching your criteria.
Meta Data of an Album
Use the Turn&Select wheel (11) to navigate in the library in order to select the album to be
renamed and press the function key
“Information” to see the meta data pertaining to
the album. Since the artist and the album title applies to all tracks, this meta data needs to
be entered only once per album.
“Comment”: you can edit texts which can be useful for creating searchlists (e.g. “Mum’s
music”, “Italian hits”, etc.).
Additional information is displayed here and cannot be changed: playing time, date and
time of the import on the Hifidelio, sampling rate and file size.
4.3.1 Editing Meta Data
If the internal CD database or the Internet CD database does not offer meta data for your
songs, you can enter these details manually.
Choose the corresponding entry. Press the function key
“Change” and enter the title
with the help of the Turn&Select wheel (11) (see section 1.4.9.3 «Text Entry with the Help of
the Turn&Select wheel (11)» on page 5). These changes apply to all tracks contained on this
album.
You can also enter these details using your computer (see chapter 7 «Communication» on
page 33) or using the external Hifidelio keyboard available as an optional accessory (section 5.3 «The Hifidelio Keyboard» on page 24).
Meta Data of a Genre
Meta Data of a single Song
The meta data “Genre” shows which genre is assigned to a song, an album or an artist. To
change a music genre, press the function key
“Change” and select a genre from the
list provided.
Use the Turn&Select wheel (11) to navigate to the list of songs. Select a track showing a
generic description. Press the function key
“Information”.
You can add your own genres by pressing the function key
The information template of the chosen song is displayed. Press the function key
“Change” and enter the title with the help of Turn&Select wheel (11) (see section 1.4.9.3
«Text Entry with the Help of the Turn&Select wheel (11)» on page 5).
16
“New”.
Meta Data of several Entries
Sometimes you may want to assign the same genre to several songs, artists or albums. To
select multiple entries, mark the first one using the function key
“Mark” and turn the
inner Select wheel of the Turn&Select wheel (11) to extend the selection to the last entry
you want to modify. Then press the function key
“Information” and edit the corresponding meta data. The changes you make affect the entire selection.
4.4
Digitising Sounds of external analogue Sources
4.4.2 Adjusting the Record Level
The level of the analogue input is shown on the display. You can adjust the record level
automatically or manually.
During analogue recording the Hifidelio is not available for other operations. Please make
sure that the encoding of imported music CD’s is complete. The note icon
should no
longer be flashing in the header on the display!
Auto adjust Level
The Hifidelio stores your recording twice: first as an uncompressed AIFF file and after cutting the recording to single tracks, these songs are recorded as individual entries. These
songs are finally imported to your Hifidelio music storage and are encoded in the chosen
format according to your settings (see section 6.2 «Import & Burn» on page 28).
4.4.1 Creating a new Recording
Choose the main menu option “Analogue Recording”.
Press the function key
“New” or the Record button (7
) at the front panel to prepare your Hifidelio for the recording. To start the recording later, you will have to press the
Play/Pause button (5
).
Start your tape or other source and play some of the loudest parts of the music.
If your Hifidelio is set to “Auto adjust level” (see section 6.2.3 «Analogue Recording» on
page 29), play two or three songs for the Hifidelio to utilise as a representative sample and
to take the truest measurement. After the recording has been started the recording level is
changed only if over modulations are detected.
Manual adjust
If you want to adjust the recording level manually, play a song with high dynamics and
watch the level display closely. Use the inner Select wheel of the Turn&Select wheel (11) to
adjust the level. The loudest parts of the music should bring the peak level display to its
maximum without getting to the rightmost, blackrimmed element. Your selected record
level is reflected by the lower row, while the upper row shows the current input level using
your current record level settings.
Manually adjusted record levels are never ever changed by the Hifidelio, even if this yields
to an over modulation of the recording.
You may now stop the playback of your music source.
4.4.3 Start the Recording
The default name of the file, generated from the current date and time, is displayed. The
available recording time is shown beneath the progress bar. It depends on the amount of
available space on your Hifidelio. The more songs your Hifidelio already has stored, the
smaller the available space for recordings becomes. The maximum recording time is set to
three hours.
When all adjustments are done, rewind your tape to the beginning and press the Play/Pause
button (5
) of the Hifidelio.
You can now prepare the recording with the help of this display.
Below the progress bar three values are displayed:
17
English
The Hifidelio can record audio signals from its analogue audio input (27). It allows you to
record and digitise songs e.g. from LPs, music cassettes, tapes, or tuner. How to connect
an analogue source is explained in section 1.3.2 «Connecting» on page 1.
• left: track number
• centre: duration of the currently recorded track
• right: total duration of the recording
You may edit “Artist”, “Composer”, “Album”, or “Genre” (see section 4.3.1 «Editing Meta
Data» on page 16). This meta data applies to all single tracks after dividing this file. Time
and File Size are also displayed here, but can not be modified.
If the function “Auto dividing” is switched off (see section 6.2.3 «Analogue Recording» on
page 29), the function key
“Divide” is enabled (otherwise this key is not assigned to
any function). Pressing this function key during the recording process separates individual
tracks.
Editing Gaps
Press the function key
“Edit” to prepare your recorded file for importing. The display
shows a representation of the file:
The recording is stopped automatically when the maximum recording time is expired or
after the preset time of silence (see section 6.2.3 «Analogue Recording» on page 29). You
may end it manually by pressing the Stop button (4
). Pressing the Stop button (4
)
stops the paused recording.
4.4.4 Editing the recorded File
The main menu option “Analogue Recording” now shows your recording. Now you may add
meta data, edit, delete, or import it.
or
The bar shows a section of about 15 minutes of the recording. Depending on the position of
the cursor, the remaining parts are displayed as grey-hatched elements at the left or the
right end of the bar.
Press the function key
gaps.
“More…” to display other function keys to set and delete the
Setting Gaps
If you did not set gaps during the recording, the track counter still shows “1”. Press the
Play/Pause button (5
) on the front of the Hifidelio to start the playback of the recording.
Listen to the music to find the end of the current track. You can turn the inner Select wheel
of the Turn&Select wheel (11) to fast forward or rewind.
Editing Meta Data
Press the function key
file.
“Information” to display the meta data of the selected recorded
Tip: Check the time information and compare it to the data on the record cover or the cassette inlay. With the help of the displayed time information you can reach the next gap
faster.
When you reach the right time, press the function key
“Divide” to set a gap. This gap is
displayed immediately as a vertical bar and the duration of the next track is reset to zero.
Proceed until you reach the end of the recording.
If you set a long period of silence as a separate track, you can delete this afterwards very
easily.
18
Navigate in the recorded File
Turning the inner Select wheel of the Turn&Select wheel (11) or pressing the Previous Track
(3 ) / Next Track (6 ) buttons for a longer period, moves the cursor backwards or forwards on the track.
English
With a slight turn of the outer Turn ring of the Turn&Select wheel (11) or by pressing the
Previous Track (3 ( )) / Next Track (6 ) buttons briefly, the cursor moves to the next or
previous gap.
When the cutting is complete (a triangle appears to the right of the title of the recording)
turn the outer Turn ring of the Turn&Select wheel (11) to show the list of tracks.
With the help of the wrap mechanism, you can navigate within a long analogue record from
its end to its beginning, or vice versa (see section 1.4.9.2 «The inner Select wheel» on page
5).
Deleting a Gap
If you set a gap at the wrong place, you can delete it by joining the two adjacent tracks.
If the cursor is exactly on a gap, pressing the function key
left and right of this gap.
“Join” joins the tracks to the
Unwanted tracks, like the previously mentioned silence, may now be deleted from the list
by pressing the function key
“Delete“.
Editing Meta Data of single Tracks
Choose the track you want to edit and press the function key
If the cursor is inside a track, press the function key
with its direct successor.
“Information”.
“Join” to join the current track
The meta data is displayed showing “Artist”, “Composer”, “Album”, and “Genre” according to your previous entries for the recorded file. You may now edit the title information of
this track by pressing the function key
“Change” (see section 4.3.1 «Editing Meta Data»
on page 16).
4.4.5 Importing the Tracks
Pressing the function key
“Join all” deletes all gaps at once.
Cutting the recorded File
When all gaps are in place you can cut the recorded file into its single tracks by pressing
the function key
“More…” and then the function key
“Divide”. The process is
shown on the display.
Finally all preparation have been made and the tracks can now be imported to the Hifidelio
song library. Press the Record button (7
) or the function keys
“More…” and then
“Import” to import all tracks or part of those which you first selected. When the importing is done, the display shows the final message.
19
An extensive list with several thousand stations is available. It is categorised into your own
stations “My Stations…”, “Top 500”, and a predefined list of genres.
4.5.1 My Stations…
After importing is completed, the songs are converted to the format given in the settings
(see section 6.2 «Import & Burn» on page 28).
If you do not rename the recording file, it is imported with the album name composed from
the recording date and time (i.e. “Record 25.04.2005 11:34”).
Here you can manually create your own personal list of radio stations, sorted alphanumerically.
Select the menu option “My Stations…” and enter it by turning the outer Turn ring of the
Turn&Select wheel (11) slightly to the right.
The original recording file can be copied from the “Record” folder of the Hifidelio to a networked computer and edited there (see chapter 8 «Advanced Networking» on page 37).
4.4.6 Deleting Tracks
After importing, the uncompressed, undivided original recordings remain inside the
“Record” folder of your Hifidelio as long as it is not deleted manually. To delete files, enter
the main menu option “Analogue Recording” to display the list of these recording files.
Select the chosen recording with the help of the inner Select wheel of the Turn&Select
wheel (11) and press the function key
“More…” and then
“Delete”.
4.5
Press the function key
“New” and enter the name of your first radio station with the
help of the Turn&Select wheel (11) (see section 1.4.9.3 «Text Entry with the Help of the
Turn&Select wheel (11)» on page 5).
Internet Radio
If your Hifidelio is connected to the Internet (see chapter 7 «Communication» on page 33),
selecting “Internet Radio” from the main menu opens an additional world of unlimited MP3,
and Ogg Vorbis music streams.
If your Hifidelio Pro is connected to the Internet through a firewall, you may have to
open additional ports in order to allow streaming. The web pages of the Internet
radio stations should provide this information. Please note: due to listening to Internet radio, additional traffic costs may be invoiced by your Internet provider.
Press the function key
“OK” and enter the URL (the Internet address) of this station.
Press the function key
“OK” and your first radio station is displayed.
Select the main menu option “Internet Radio”.
You may later change, rename, or delete these stations.
20
The stations are sorted by data rates, and are listed in corresponding subfolders. The higher
the data rate is, the better the audio quality of the station.
Please note that your Hifidelio can only play those Internet radio stations, which use the formats MP3 and Ogg Vorbis.
4.5.4 Receiving an Internet Radio Broadcast
Choose the station you would like to listen to and press the Play/Pause button (5
English
Tip: the Hifidelio supports two kinds of URLs (web addresses). Direct URLs which allow the
downloading of the MP3 files immediately after the connection has been established and
URLs with suffixes like .pls oder .m3u accessing playlists.
).
4.5.2 Top 500…
This list shows the 500 most popular Internet radio stations. Obviously this list is not static
but changes over time.
To access the next station from the list, press the Next Track button (6
panel of the Hifidelio or on the remote control.
) on the front
The function key
“Information” provides you with information about the genre or the
number of listeners at the time your first connected.
Initially this list is blank. Press the function key
“Search” or turn the outer Turn ring of
the Turn&Select wheel (11) slightly to the right. Your Hifidelio now looks for the appropriate
stations and fills the list.
The function key
“Now Playing” provides you with the name of the radio station you
are currently listening to.
The stations are sorted by data rates, and are listed in corresponding subfolders. The higher
the data rate is, the better the audio quality of the station.
4.5.3 Predefined Stations
The Hifidelio provides you with a comprehensive genre list. Initially these lists are blank.
Please choose the genre you want to hear and press the function key
“Search” or turn
the outer Turn ring of the Turn&Select wheel (11) slightly to the right. The Hifidelio now
looks for the appropriate stations and fills the list.
The function key
“Remember” stores the URL (the web address) of the current station
to your personal station list. That is the easiest way to compile your favourites without
being affected by other lists which may change over time.
21
5
ACCESSORIES
Example of an iPod:
You can connect several accessories to the Hifidelio.
The accessories mentioned in this chapter are not part of the package content of the
Hifidelio, but are available optionally. Your retailer can provide you with these accessories.
5.1
MP3 Players
The USB ports (22) on the back of the Hifidelio can be used for connecting an MP3 player.
This enables you to play the songs from the MP3 player via the Hifidelio and can edit meta
data and playlists. The Hifidelio supports the iPod of the company Apple Inc. as well as USB
sticks and file-based MP3 players.
Example of a file-based MP3 player:
The iPod of the company Apple Inc. must first be formatted with the Apple software
delivered with the player in order to initialise its music database. You can then connect it to your Hifidelio and copy songs onto it. At the time of printing this user manual, the Hifidelio supports the product models iPod, iPod mini, iPod nano and iPod video.
File-based MP3 players do not require any special software in order to transfer files
from the computer to the player. These players are recognised as USB Mass Storage Devices.
If your MP3 player supports folders, you should create at least one folder on your player
before connecting it to your Hifidelio. Your Hifidelio will then automatically sort the music
files into folders accordingly by artist and album. However, if the Hifidelio cannot find any
folder, it will then consider that this device does not support folders and copy the files without any structure on the player. Please note that an NTFS formatted MP3 player cannot be
recognised by your Hifidelio. The Hifidelio recognises FAT, FAT32, HFS+ and EXT2 formats.
During the playback of songs from the connected MP3 player, the title, artist and album are
shown on the Hifidelio’s display.
Protected AAC files (DRM) of the iPod are shown on the Hifidelio with a lock (
and cannot be played back on the Hifidelio.
)
5.1.1 Connecting an MP3 Player
If an MP3 player is connected to the Hifidelio it is handled like an additional medium and
appears with its own name as a new entry at the top of the main menu. The submenu of the
MP3 player shows – if existing – the menu structure (Songs, Artists, Albums, Genres, and
Playlists) of the external device. Navigate through this submenu in the usual manner in
order to listen to music or edit meta data.
22
5.1.2 Copying Songs from the Hifidelio to an MP3 Player
Navigate to the main menu option “Library” and choose the songs you want to copy from
the lists “Artists”, “Albums”, or “Songs”. Then press the function key
“Add to List”.
The name of the MP3 player appears in the list of the target playlists in addition to your own
playlists.
5.2.1 Information
English
Select the MP3 player as the target playlist and press the function key
“Add to List” to
transfer the songs to the external player. The process of the import is shown on the display.
5.1.3 Copying Songs from an MP3 Player to the Hifidelio
By pressing the function key
backup hard disk is displayed.
“Information” detailed information about your Hifidelio
Select songs from your MP3 player that you want to copy onto the Hifidelio and press the
Record button (7
). The process of the import is shown on the display. During this process, music files are neither converted into the configured audio format nor checked for
duplicates. Already imported songs can be played back immediately.
Some MP3 players may not allow the copying of songs to another device, just like
the iPod.
5.1.4 Eject your MP3 Player
Press the function key “Eject” before unplugging the MP3 player or the iPod from the
Hifidelio!
5.2
5.2.2 Backup
Choose the function key
“Backup” to copy the content of the internal Hifidelio hard disk
to the Hifidelio backup hard disk. Overwriting of existing songs must be confirmed.
During the backup operation all function keys are locked. No music disks can be imported
and the analogue recording is disabled. You may playback tracks and listen to the music. A
complete backup of a full Hifidelio disk may take several hours.
The Hifidelio Backup Hard Disk
The external Hifidelio backup hard disk can be connected to one of the USB ports (22) on
the back of the Hifidelio in order to make a backup copy of the content of its internal hard
disk. The backup operation saves the following on this external backup device: all songs,
playlists and searchlists, your personal Internet radio stations stored in the list “My Stations…”, the analogue recordings still stored in the Record folder, as well as your settings.
When the backup process is completed you can check the amount of transferred data by
pressing the function key
“Information”.
The external Hifidelio backup hard exists in two models: 80GB for Hifidelio and Hifidelio PR80, as well as 160GB for Hifidelio Pro and Hifidelio Pro-S. Whereas the 80GB hard disk
needs no external power supply, the 160GB hard disk has to be connected to the power
plug with the help of the delivered power cable.
Make sure that the Hifidelio backup hard disk is switched on by using its switch on the
back.
The Hifidelio backup hard disk is shown in the main menu as “Backup Disk”.
If faulty music files are contained on the internal hard disk of the Hifidelio, a corresponding
message is displayed after completion of the backup procedure. In addition, a text file
23
(BackupErrors.txt) is saved in the Import folder and lists all faulty files that could not be
saved.
5.2.3 Restore
Use the option “Restore” to transfer data back to the Hifidelio. The Hifidelio recovers the
state of the backup copy. Files which had been added after the last backup cannot be
restored. The restore process should not be interrupted and may take about the same
amount of time as the backup process does. During the restore process all other functions
are disabled.
5.2.4 Disconnecting the Hifidelio Backup Hard Disk
Press the function key
disk!
“Eject” on the Hifidelio, before unplugging the backup
F1, F2, F3, F4:
Function keys on the right hand of the display
F5:
Artists
F6:
Albums
F7:
Songs
F8:
Genres
F9:
Playlists
F10:
Music disc
F11:
Random (on or off)
F12:
Info
FN + F10:
Eject
“+” on key pad (FN + “Ö” key):
Louder
“-” on key pad (FN + “P” key):
Lower
Pos 1:
First title in a list
Ende:
Last title in a list
Internet radio
5.3
The Hifidelio Keyboard
A Hifidelio USB keyboard can be connected to one of the USB ports (22) on the back of the
Hifidelio in order to help edit texts easily.
Sleep mode, or wake-up from sleep mode
The keys are assigned as follows:
Space bar or Return:
Play/Pause
Esc:
Stop
Cursor right or left:
Corresponding to outer turn wheel
Cursor up or down:
Corresponding to inner select wheel
Bild:
Previous track (key shortly pressed)
Fast rewind (key held pressed)
Bild:
Next track (key shortly pressed)
Fast wind (key held pressed)
“*” on key pad (FN + “0”(Zero) key):
Record
24
Settings
Switch-off, or wake-up from sleep mode
6
SETTINGS & SPECIALS
Night Mode
The setting “Night Mode” is recommended for quiet environments in order to attenuate loud
music peaks.
The above screenshot shows the configuration possibilities of the main menu option “Settings & Specials”.
Loud Environment
6.1
General Settings
The setting “Loud Environment” may be used to ensure a constant playback volume in
places with lots of environmental noise.
Expert Mode
6.1.1 Sound
The function key
“Export Mode” allows acoustics experts to set the parameters of
dynamics compression themselves.
“Volume Lineout”: adjusts the volume of the audio line output (25) to match the needs of
your stereo amplifier.
“Volume Headphone”: adjusts the volume of the headphones lineout (13).
6.1.1.1 Dynamics Compression
Dynamics compression adjusts the volume of the played music dynamically: It limits the
output level during playback to a preset value, for example to avoid annoying loud peaks.
The dynamics compressor limits the range of dynamics of the audio material. When the
defined threshold level is reached, the compressor compresses the signal according to a
certain ratio. Attack time and release time define how fast the compression begins and
ends.
Output
level
Output
level
Threshold
Hard
Soft
Ratio
The function key
Ratio
Input level
Off
“Off” switches dynamics compression off completely.
Threshold
Input level
“Method”: this activation method defines how the transition between compression and
non-compression should be done. The “Soft Knee” setting is recommended for instrumental sound, “Hard Knee” for voices (suppressing “pop” sounds in talking and singing).
25
English
This chapter explains how to configure the Hifidelio according to your needs.
6.1.3 Appearance
This menu controls the way your Hifidelio shows items on the display.
“Threshold”: this is the level, that when reached, the compression should be applied.
“Ratio”: this defines the magnitude of the compression (the relation between input and output level). A ratio of 4:1 means that an input level increase of 100% over the threshold
causes only an increase of 25% to the output level.
“Attack”: this sets the interval which the compressor waits until it reacts. This interval
should not be too short, to avoid a pumping effect.
“Release”: this sets the interval the compressor should go on after the input level falls
below the threshold. Turning the control to the right facilitates smoother transitions; turning to the left has the contrary effect.
“Contrast” and “Brightness”: adjusts the contrast of the display and the brightness of the
control buttons and of the display to the lighting environment.
6.1.2 Play Mode
“Classic Mode”: toggles the display of the submenu option “Composers” in addition to “Artists” and “Albums” in the Library menu option.
Here you can choose how the Hifidelio should play back songs.
“Small Letters” – On: uses a smaller font size and displays more letters per line.
“Random“: in random mode (
random order.
), songs of the selection (artist, album, etc.) are played in
“Repeat“: in repeat mode (
), the Hifidelio returns to the first title of the current selection after the last title has been played.
(Both options “Random” and “Repeat” are function keys which can be used during playback!)
“Fading”: here you define an interval of 0 to 12 seconds in which the ending song is faded
out and the next song’s volume is turned up again.
“Auto Play Audio CD”: the Hifidelio can automatically start the playback when an audio CD
is inserted.
26
“Track Numbers” – Off (default setting): displayed below the progress bar is the elapsed
time, the remaining play time, and the total playing time of the current song.
“Track Numbers” – On: displayed below the progress bar is the remaining play time, the
number of the current track within the playlist, and the number of the tracks of the playlist.
English
“Time Zone”: select the continent and country or the city nearest to your location.
“Spectrogram”: toggles the display of banded frequency levels during the playback of
songs.
“Set automatically”: if your Hifidelio is connected to the Internet, time information (date and
time) can be received automatically.
“Large Play View After”: determines if and when the display switches to a larger view after
the given interval.
Select the menu option “Set automatically” and press the function key
“Change”. A
new option “Time Server” is displayed. You can change the preset time server by pressing
the function key
“Change” and then by selecting a server from the list.
6.1.4 Date & Time
6.1.5 Prevent Changes
You can adjust the internal time and date of your Hifidelio here.
This menu option allows you to prevent unwanted changes, for instance deleting songs,
changing the network settings, etc. Music discs, songs from the library, or Internet radio
stations can still be played back.
6.1.6 Language
“Date & Time”: use the inner Select wheel of the Turn&Select wheel (11) for setting the digits; a slight right turn of the outer Turn ring moves the cursor to the next field (see section
1.4.9.3 «Text Entry with the Help of the Turn&Select wheel (11)» on page 5).
You may choose the display language here. Press the appropriate function key. The display
changes immediately.
By pressing the function keys
“Date Format” or
“Time Format” respectively all
available date or time formats are listed. Select the format and confirm your choice by pressing the function key
“OK”.
27
6.2
Import & Burn
Under this menu option, you choose the settings concerning the importing of songs from
audio CD’s or from an analogue recording, and concerning the process of burning a CD-R.
6.2.1 Compression
Here you choose the format that your Hifidelio will use to encode the music files by importing an audio CD or an analogue recording.
If you plan on transferring songs from your Hifidelio to an MP3 player or playing
them back via streaming, make sure that the chosen encoding format is supported
by these devices. Otherwise the songs can’t be played back on these devices.
The following table shows how many music CD’s can be stored on the Hifidelio, depending
on the encoding used for the files. An average music CD contains 635 MB and the available
space of a Hifidelio system is calculated from the capacity of the internal hard disk minus 3
GB needed for the system files and the database.
Encoding
Quality
Hifidelio PR-80
Hifidelio Pro
RAW (AIFF/WAV)
no compression
115
235
MP3
good - 128 kbit/s
high - 160 kbit/s
higher - 192 kbit/s
CD Quality - 320 kbit/s
1 280
1 025
850
510
2 615
2 090
1 705
1 045
FLAC (Free Lossless
Audio Codec)
lossless compression
195
395
6.2.2 CD Behaviour
“Encoder”: here you choose the internal format which the imported song should be
encoded to. The type of encoding defines quality, size of the stored data and compatibility
in various respects. The Hifidelio uses the format “MP3” with the data rate set to “High”
(160 kbit/s) by default.
This menu controls the way your Hifidelio will handle music discs.
“Playback during import”: toggles the automatic playback of songs during the import.
“On inserting audio CD…”: here you set that an audio CD to automatically be imported after
inserting it into the Hifidelio’s drive. It will eject automatically after the import is complete.
“Date Rate”: here you choose the MP3 quality level which the imported song should be
encoded to. The Hifidelio has a data rate level called “CD Quality” which is equivalent to
320 kbit/s. Additionally, the MP3 format files can be encoded using Variable Bite Rate (VBR).
If the VBR encoding is enabled, you can then set its quality level.
“CD Recognition”: here you set which disc formats your Hifidelio will recognise.
28
“Auto stop after”: the analogue recording will be paused if no signal is recorded during the
period of time set here.
English
6.2.4 CD Burning
Here are the settings concerning the burning of CD’s.
If the CD recognition is set to "Data disc", your Hifidelio cannot recognise any music
CD any longer!
6.2.3 Analogue Recording
This menu option stores the settings which the Hifidelio applies during recording music
from the analogue sources.
“Auto Dividing” – On: the Hifidelio automatically sets the gaps between tracks when it
detects a silent period.
“CD Format”: select the requested format. For an audio CD, the music files are first converted into an original audio format and are then burned onto the CD. An MP3 CD only contains MP3 files (file names are limited to 64 characters); files with other formats are ignored
during the burning process. A Data CD is the compilation of files regardless of their format
(MP3, AIFF, FLAC, etc.).
“Create Folders” – On: by burning a MP3 or data CD, the Hifidelio will create folders by artists/albums/songs.
“Gap between Tracks”: this value defines the minimum duration of silence that automatically leads to the setting of a gap (usually between two songs).
Gaps may be edited, deleted, or newly set and are used for dividing the analogue recording
into single tracks before their import to the Hifidelio music library. This automatism is very
reliable and useful when recording common LPs or tapes of popular music which songs
usually have very distinctive starts and ends. Classical music, live recordings and spoken
text may not fit as easily. You may switch off this function then.
“Speed”: the setting “Secure” leads to 8 times the speed, the setting ”Fast” burns up to 24
times the speed. This depends on the quality of the CD material used.
“Auto Adjust Level”: here you can set the Hifidelio to do the levelling automatically or you
can choose to adjust the level manually before starting the recording.
“Recognition Method": here you choose the recognition method (Music or Speech) used
during the automatic adjustment of the recording level.
“Gap between Songs”: here you define the length of the gaps between songs in seconds.
“Create CD Text”: here you activate the creation of CD text for music files on the CD-R.
Information about the CD-Rs which have been burned on the Hifidelio are registered in the
Hifidelio database. Thus, these CD-Rs can be recognised by the Hifidelio later.
Please only use standard shaped, round 12cm CD’s available on the market.
29
6.3
Network
These settings define the Hifidelio’s properties for integrating with other computers in a
local area network, wired and wireless.
6.3.1 Configuration
Depending on the technology used by your satellites or clients, one of both server modes
(UPnP/AV or iTunes (DAAP) must be enabled.
If the Hifidelio should work as a UPnP/AV client, enable the service „Search for UPnP/AV“:
the Hifidelio will automatically search for the UPnP/AV server within the network (see section 7.3.4 «Hifidelio and UPnP/AV Server» on page 35). The UPnP/AV servers found are listed
under the main menu option “Music Server”.
In order to control the Hifidelio with the help of a UPnP/AV remote control unit, the service
“Control via UPnP/AV” should be enabled here.
In some cases it may be necessary to switch off server modes to protect the Telnet server
from unauthorised access.
The Telnet access makes it possible for a computer expert in case of a severe system failure, to conduct error diagnostics from another computer (e.g. to create a log
file). The login details are: root/root.
6.3.3 CD Database
“Hifidelio Network”: acting as the central switch, the Hifidelio works as a DHCP server of
the network, and optionally as a WLAN Access Point (see section 7.1 «Hifidelio – the Centre
of your new Computer Network» on page 33).
“Home Network”: the Hifidelio is connected to the existing network as a DHCP client, and
optionally as a WLAN client (see section 7.2 «Hifidelio – a Member of your existing Computer Network» on page 34).
The Hifidelio maintains a large internal music database of about 2 million titles. Almost
every music CD you insert is recognised. The meta data, the names of the tracks, the artist,
and the CD title are displayed immediately. If the Hifidelio is connected to the Internet, it
can look into the online CD database. A brand-new CD may get its information this way.
“Expert Mode”: a local computer network already exists and the Hifidelio can be integrated
by manual IP configuration, and optionally as a WLAN client (see chapter 8 «Advanced Networking» on page 37).
6.3.2 Services
Here you can enable and disable the server mode of your Hifidelio.
“Online Access” – On: the Hifidelio receives the meta data for an inserted CD from the
online freeDB database, on the condition that the Hifidelio is connected to the Internet.
In order to control the Hifidelio with the help of a web browser or a VNC Viewer application,
“Web Interface” or “VNC” should be enabled here (see chapter 9 «Using a Computer to
manage the Hifidelio» on page 41).
30
“Server URL": the URL (web address) of the online CD database can be changed here, if
required. The freeDB online access uses HTTP port 80.
If the online access to the freeDB database fails, the Hifidelio automatically switches to its
integrated CD database for retrieving meta data.
6.4
Hifidelio Information
The menu option displays important information about the Hifidelio.
6.5
Service
Under this menu option, fundamental changes to the Hifidelio operating systems are possible.
“Device name”: you can edit the name of your device here.
“Version”: the version number of the operating system is displayed here.
6.5.1 Software Update
If your Hifidelio is connected to the Internet, you may easily update its system software
using the function key
“Software Update” (see section 10.4 «Software Update» on page
43).
If your Hifidelio is connected to the Internet, you may easily update its system software
using the function key
“Software Update” (see section 10.4 «Software Update» on page
43).
If your Hifidelio is still working as a basic version (i.e. the Hifidelio “Basic” without the Pro
functionalities, model which has been replaced by Hifidelio PR-80 from Mai 2006), the function key
is assigned with the option “Software Upgrade”. Press this function key and
type your upgrade key. This function key is displayed here as long as no valid upgrade key
has been entered.
6.5.2 Software Upgrade
“Serial Number”: you need it for the registration of your Hifidelio (see section 10.7 «Register your Hifidelio» on page 45).
“Hard Disk”: indicates the size of the internal hard disk.
"“Free”: the available space is displayed here in percentages.
“CD Database”: shows the date of the internal CD database.
If your Hifidelio is still working as a basic version (i.e. the Hifidelio “Basic” without the Pro
functionalities, model which has been replaced by Hifidelio PR-80 from Mai 2006), the function key
is assigned with the option “Software Upgrade”. Press this function key and
type your upgrade key. This function key is displayed here as long as no valid upgrade key
has been entered.
31
English
To keep the internal CD database updated, we recommend the annual subscription
to our ServiceDisk, which is mailed four times a year. You can order the subscription directly through Hermstedt AG (detailed information on www.hifidelio.com).
To keep the internal CD database updated, we recommend the annual subscription
to our ServiceDisk, which is mailed four times a year. You can order the subscription directly through Hermstedt AG (detailed information on www.hifidelio.com).
6.5.3 Factory Settings
Use the function key
Using this menu option, you can restore all settings to their default values (function key
“Restore”).
If a backup file shows a future date, we recommend deleting this file. The Hifidelio
looks at the latest date of a backup file and starts a new backup only if the Hifidelio
internal current date is later. You should correct the date settings of your Hifidelio
(see section 6.1.4 «Date & Time» on page 27).
“Delete” to remove backup files you do not need.
6.5.4.2 Further Maintenance Functions
This affects ALL parameters of the “Settings & Specials” menu. Your imported music and
their meta data is not endangered by this operation – all songs will still be available after
executing this command.
6.5.4 Maintenance
ALL maintenance functions explained hereafter request prior agreement of the
Hermstedt support team. If you would incorrectly or improperly execute a maintenance function, you could eventually damage your music collection completely.
These maintenance functions have been primarily implemented in order to solve
problems issued from former versions (before version 2.1). By using a version
more recent than the 2.1, the execution of these maintenance functions is not
necessary.
“Check Library”: this operation checks if each entry of the Hifidelio database corresponds
to an existing music file on the hard disk. If no appropriate song is found or its size is equal
to “0”, the entry is deleted from the Hifidelio database.
“Check Music Folder”: all music files stored in the music folder of the Hifidelio are checked
upon entry in the Hifidelio database. Files not listed in the Hifidelio database are moved to
the import folder.
6.5.4.1 Recovery
The Hifidelio database containing the meta data of all stored tracks is duplicated on every
startup of the system. You can access the recovery files here.
“Search new Meta Info”: meta information (ID3 tags) of each music file is read; fields which
are still blank in the Hifidelio database are filled in. Existing information is not overwritten
(field is not blank).
This function is recommended if music files have been generated or edited on a computer
and then copied onto the Hifidelio. If these songs have been imported from a music CD, this
information is no longer available.
“Recovery”: this option shows a list of the 20 most recent backup files. If the Hifidelio database becomes corrupted, you can restore a former version from these files. Choose the
desired version and press the function key
“Restore”. Since this may delete information you entered after the creation of the backup file, you must confirm this action by pressing the function key
“Restore” again.
32
“Read all Meta Info”: meta information (ID3 tags) of each music file is read, and information already contained in the Hifidelio database is overwritten. As a consequence, customised adjustments of information are lost.
“Write all Meta Info”: meta information (ID3 tags) of the Hifidelio database is written in each
music file. This operation is recommended if music files have been exclusively imported
from a music CD to the Hifidelio.
7
COMMUNICATION
The Hifidelio can be used as a stand alone piece of hifi equipment which plays back your
music collection. However, the Hifidelio offers a wider range of possibilities when it is connected within a network to additional Hifidelio’s, satellites, or your home computers.
You may
• play songs from the Hifidelio on your computer or on satellites (see section 7.3 «Multiroom Streaming» on page 34),
• play songs from your computer on the Hifidelio (see section 7.3 «Multi-room Streaming»
on page 34),
• transfer songs from your computer to the Hifidelio (see section 7.4.1 «Copying Music
Files from a Computer to the Hifidelio» on page 35),
• transfer songs from the Hifidelio to your computer (see section 7.4.2 «Copying Music
Files from the Hifidelio to a Computer» on page 36),
• control the Hifidelio from your computer (see chapter 9 «Using a Computer to manage
the Hifidelio» on page 41),
• listen to Internet radio stations with the Hifidelio (see section 4.5 «Internet Radio» on
page 20),
• use the online CD database as a source of information for your audio CD (see section
6.3.3 «CD Database» on page 30).
The Hifidelio can communicate with other devices in many ways. The factory set mode
defines your Hifidelio as the main device and is called “Hifidelio Network”. Using this mode
the Hifidelio is responsible for organising the communication within the network. The alternate mode is called “Home Network” configuring the Hifidelio as part of an existing local
computer network. In addition, the Hifidelio can be configured in the expert mode.
7.1
Hifidelio – the Centre of your new Computer Network
If you don’t yet use a local network, use your Hifidelio as the centre of your multi-room
installation and let it automatically organise its “Hifidelio Network”. You can listen to your
Hifidelio music collection in other rooms by using additional Hifidelio’s, a Hifidelio ST-64
satellite or existing Macintosh or Windows PCs as music streaming devices.
33
English
Note: During the maintenance operation "Check library" and "Check Music Folder", a text
file "maintenance.txt" is created in the Import folder. This file contains the list of songs
deleted from the Hifidelio database or the list of the files moved to the Import folder. You
can copy this file on your computer (see section 7.4.2 «Copying Music Files from the
Hifidelio to a Computer» on page 36).
Bedroom
Bathroom
Child
Bedroom
Bathroom
Child
WC
Kitchen
Living room
WC
Hobby
Kitchen
Living room
Hobby
The “Hifidelio Network” configuration is explained in detail in section 8.2.1 «Hifidelio Network» on page 37.
The “Home Network” configuration is explained in details in section 8.2.2 «Home Network»
on page 37; the “Expert Mode” configuration in section 8.2.3 «Expert Mode» on page 38.
7.2
7.3
Hifidelio – a Member of your existing Computer Network
If you already use a computer network, the Hifidelio can smoothly integrate into it. In this
case, another computer or router will administrate the network. This is usually the case
when a computer is connected to the Internet via a router.
The network configuration of your Hifidelio can be run automatically with the “Home Network” mode or manually with the “Expert Mode”.
This can be done conventionally by Ethernet cables or wireless (WLAN). The antenna (23)
for wireless communication (WLAN) and the plugs (21) for Ethernet cabling are to be found
on the back of the Hifidelio.
If you use a cable modem in order to access the Internet, check first if you may connect several devices to it. Otherwise your computer and your Hifidelio cannot use
this Internet access at the same time. Should several devices share the same Internet account, you must then use an additional router.
Multi-room Streaming
“Streaming” means the permanent transfer of data such as music files. Used for audio
equipment, “multi-room streaming” is the distribution of music streams throughout the various rooms of your house. For this purpose, you need a server which stores the music files
on its hard disk (e.g. the Hifidelio). In each room you install a receiver; also called an audio
streaming satellite or a streaming client. This receiver accesses the music server over the
network (Ethernet or wireless) and streams the chosen music. The satellite either plays
back the music directly through its built-in speakers (i.e the Hifidelio ST-64) or is connected to an amplifier and additional speakers.
In order to create a multi-room solution with other devices, the Hifidelio supports – as a
server as well as a client – both the UPnP/AV and DAAP (iTunes) streaming protocols. Consequently, connections between the Hifidelio and PCs are possible in both directions. The
Hifidelio can play songs that are stored in music libraries on Macintosh or Windows PCs,
and the computer can play the songs stored in the library of your Hifidelio. Make sure that
their music collections are published for remote use to be seen here.
7.3.1 Hifidelio and DAAP Client
The complete music collection of the Hifidelio is accessible by every computer equipped
with DAAP software (e.g. iTunes).
34
Protected AAC files (DRM) of the iTunes servers are shown on the Hifidelio with a
lock ( ) and cannot be played back on the Hifidelio.
Besides connecting to other Hifidelio’s or DAAP servers, the Hifidelio can communicate with
UPnP/AV clients, also called UPnP/AV satellites. These UPnP/AV satellites are devices which
receive music from a server within the network in a streaming mode. The communication
between satellites and server is organised by the UPnP/AV protocol. The satellites are
UPnP/AV clients and the Hifidelio is the UPnP/AV server.
The Hifidelio and the client devices can be connected by standard cabling or by a wireless
network. Make sure that the network settings are correct and the UPnP/AV service is enabled (see section 6.3.2 «Services» on page 30).
7.3.4 Hifidelio and UPnP/AV Server
You may use the iTunes software to playback the songs of your Hifidelio, however you cannot modify it. As the songs remain stored in the Hifidelio, the Hifidelio must be turned on if
you want to access them. Make sure that the service “iTunes (DAAP)” is enabled (see section 6.3.2 «Services» on page 30).
Besides the UPnP/AV Media Server inside the Hifidelio, there is also a UPnP/AV client of the
company TwonkyVision GmbH (www.twonkyvision.com) integrated to the Hifidelio software. Therefore the Hifidelio can access a UPnP/AV server (e.g. on a Network Attached
Storage) in order to play back the music stored there per streaming on the stereo system
(see section 2.1.4 «Settings & Extras» on page 8).
7.3.2 Hifidelio and DAAP Server
7.4
Much the same way, available DAAP music servers are displayed on the Hifidelio under the
main menu option “Music Server” (see section 2.2.4 «Music Server» on page 9).
If the Hifidelio is connected to the network, you can copy music files from your computer to
the import folder of the Hifidelio and from the record folder of the Hifidelio to the computer.
The most known DAAP server on the market is the iTunes server of the company Apple Inc.
The communication between the Hifidelio and the iTunes server worked perfectly until version 6 of the iTunes software. Unfortunately, because of important changes made by the
company Apple Inc. to its software, the iTunes software version 7, released mid September
2006, is not compatible with older versions: the reason is the deviation of the iTunes software from the DAAP standard. This also means that the Hifidelio cannot access an iTunes 7
server for streaming the music stored in the iTunes library.
However, the Hifidelio remains compatible with all DAAP servers which fully support the
DAAP protocol. Therefore, if you still want to access the iTunes music folder, we recommend installing the free Firefly Media Server software of the company Roku on your computer. This software allows sharing of the iTunes library with other DAAP devices. The Firefly
software is available at http://www.rokulabs.com/firefly.
Transfer of Music Files
7.4.1 Copying Music Files from a Computer to the Hifidelio
By default the Hifidelio is configured as a Windows file server (SMB server) and publishes
the volume “Import”. Computer name is the name of the Hifidelio and it is registered in the
workgroup “HIFIDELIO”. No password is necessary. This file server option can be used by
any Windows- and Mac OS X computer.
From a Mac OS X computer:
On a Mac OS X operating system, choose the function “Go” > “Connect to Server” and type
the correct IP address of the Hifidelio:
35
English
7.3.3 Hifidelio and UPnP/AV Clients
To import only a selection of songs or folders, select the main menu option “Import” and
turn the outer Turn ring of the Turn&Select wheel (11) slightly to the right, The content of
the import folder is displayed. Select the songs and press the function key
“Import”.
During importing, music files are neither converted to the configured audio format nor
checked for duplicates. The progress of the import is shown on the display. Upon completion of the import operation, the imported music files are deleted automatically from the
“Import” folder and classified with the help of their meta data in the corresponding lists
(artists, albums, songs, etc).
From a Windows computer:
7.4.2 Copying Music Files from the Hifidelio to a Computer
On a Windows operating system, you access the Hifidelio as follows:
Besides the volume “Import”, the Hifidelio publishes the volume “Record”. It contains the
original uncompressed files of analogue recordings. As long as they are not removed manually they stay there. For archiving purposes you may transfer these files to your computer
before deleting them from the Hifidelio’s hard disk.
(If you have problems accessing your Hifidelio from your Windows XP computer, see section 10.1 «“My Windows XP computer cannot find the Hifidelio…”» on page 42.)
If you copy MP3, AIFF, WAV, FLAC, AAC, or Ogg Vorbis music files or even complete folders
with music files to the Import folder, the option “Import” is displayed in the main menu and
you can then import these files to the Hifidelio using this option. Only the music files
encoded with a format supported by the Hifidelio are imported. Files with other formats
remain in the Import folder, until you delete them manually.
Pressing the function key
“Import” from the main menu starts the import of all songs
contained in the Import folder and their integration into the Hifidelio database.
36
8
ADVANCED NETWORKING
8.1
Ports
The Hifidelio provides four 10/100BaseT-Ethernet ports (21) on its back, which are configured as a general switch. The ports automatically adapt to the used bandwidth and cabling.
Cross-over cables are not required.
The Hifidelio can also be used as a WLAN station according to 802.11g (54 Mbit/s). This
standard is backwards compatible with 802.11b (11 Mbit/s). The necessary antenna (23) is
also located on the back of the Hifidelio. Depending on the chosen configuration mode, the
Hifidelio acts as a WLAN client or an Access Point.
8.2
English
In addition to its primary use as your Music Centre, the Hifidelio can be integrated into your
local computer network or can be the starting point of a home network and therefore offer
additional useful functions. This chapter explains the configuration options for connecting
the Hifidelio to your network.
The network settings of Windows and Macintosh computers must be set to “Obtain an IP
address automatically” or “DHCP”. This is especially important if you are using a portable
computer alternately at home and at the office and its networking settings are configured
for your office.
Switch on your Hifidelio first and then the other devices (computers or satellites). They will
see the Hifidelio and adjust to it automatically. After this first mutual communication, all
devices have their information and you may use them in any sequence.
Configuration
Select the main menu option “Settings & Specials”, “Network” and then “Configuration”.
Should the Hifidelio also act as a WLAN Access Point, the Network Name, Key, and Channel
have to be set as you like. These chosen settings must be used by the other devices (computers or satellites) upon logging onto the Hifidelio (see section 8.2.4 «WLAN» on page 38).
8.2.2 Home Network
Under the menu option “Configuration”, you can choose from these three operating modes:
Hifidelio Network, Home Network, and Expert Mode.
8.2.1 Hifidelio Network
At delivery, the default configuration is set to “Hifidelio Network”. In this mode, the Hifidelio
works as DHCP server of the network, and optionally as a WLAN Access Point. It acts as the
central server of a private network (acc. RFC 1918) by providing a DHCP service and distributing IP addresses to connected devices out of 192.168.72.0/24 range.
The Hifidelio is connected to the existing network as a DHCP client, and optionally as a
WLAN Access Point or WLAN client. This existing network has a connection to the Internet.
Under the main menu option “Settings & Specials” enter the submenu option “Network >
Configuration” and activate the Home Network by pressing the function key
“Home
Network”. The Hifidelio is configured as a DHCP client, i.e. it recognises the existing network and automatically retrieves the necessary configuration parameters from the DHCP
server.
37
“Internet via = WLAN”: the Hifidelio acts as a WLAN client. Network Name, Protection, and
Key must be set to the corresponding values of the available WLAN Access Point. Using
these settings, the Hifidelio logs onto it (see section 8.2.4 «WLAN»).
Network specialists can find additional information in section 10.6 «Technical specifications of the Hifidelio’s network interface» on page 45.
If the WLAN function of the Hifidelio is enabled, you have to determine if the Hifidelio will
connect to the Internet via Ethernet or WLAN.
“Internet via = Ethernet”: the Hifidelio acts as a WLAN Access Point. The Network Name,
Protection, Key, and Channel can be set as you like. The chosen settings must be used by
the other devices (computers or satellites) upon logging onto the Hifidelio (see section 8.2.4
«WLAN».
“Internet via = WLAN”: the Hifidelio acts as a WLAN client. Network Name, Protection, and
Key must be set to the corresponding values of the available WLAN Access Point. Using
these settings, the Hifidelio logs onto it (see section 8.2.4 «WLAN»).
8.2.3 Expert Mode
A local computer network already exists and has a connection to the Internet, and the
Hifidelio can be integrated by manual IP configuration, and optionally as a WLAN Access
Point or a WLAN client.
Under the main menu option “Settings & Specials” enter the submenu option “Network >
Configuration” and press the function key
“Expert Mode”.
8.2.4 WLAN
For all modes, the WLAN function can be enabled/disabled separately.
• Hifidelio Network: the Hifidelio acts as a WLAN Access Point.
• Home Network:
- Internet via = Ethernet: the Hifidelio acts as a WLAN Access Point.
- Internet via = WLAN: the Hifidelio acts as a WLAN client.
• Expert Mode:
- Internet via = Ethernet: the Hifidelio acts as a WLAN Access Point.
- Internet via = WLAN: the Hifidelio acts as a WLAN client.
The Hifidelio as WLAN Access Point
If the Hifidelio acts as a WLAN Access Point, you have to name the network by yourself,
choose a protection mechanism and the channel, and create a key for protecting its access.
Other devices have to use these parameters for accessing your wireless network upon logging onto the Hifidelio.
IP address, subnet mask, router address, and name server address must be manually
entered here. Some basic understanding of IP networking is required.
If the WLAN function of the Hifidelio is enabled, you have to determine if the Hifidelio will
connect to the Internet via Ethernet or WLAN.
“Internet via = Ethernet”: the Hifidelio acts as a WLAN Access Point. The Network Name,
Protection, Key, and Channel can be set as you like. The chosen settings must be used by
the other devices (computers or satellites) upon logging onto the Hifidelio (see section 8.2.4
«WLAN».
38
Hifidelio as WLAN Access Point
Router
Please check the spelling of the wireless Network Name, and the key as well as the used
encryption mode. If something does not match, your Hifidelio will be unable to log onto the
network.
8.2.4.2 Protection
The Hifidelio as WLAN client
If the Hifidelio acts as a WLAN client, you must enter the Network Name, Protection, Key
and Channel of your existing network. By using these settings, the Hifidelio logs onto it.
In all modes, the Hifidelio supports both WEP and WPA encryption of the wireless network
key: WEP (Wired Equivalent Privacy) and WPA (Wi-Fi Protected Access).
Hifidelio as WLAN client station
Router
8.2.4.3 Key
To protect the wireless network from unauthorised access, its access should be protected
by the entry of a valid Key.
WEP Encryption
The Hifidelio supports WEP keys with 64 (40) bit or 128 (104) bit encryption. The WEP key
format is hexadecimal (from 0 to 9 and from A to F) or ASCII (5 or 13 digits).
8.2.4.1 Network Name
If your Hifidelio acts as a WLAN Access Point, you have to name the network by yourself.
For an easy cross platform access, we recommend that you do not use spaces or special
characters for the network name.
Examples for hexadecimal key:
• using 64 (40) bit encryption: 3F:F2:35:4A:A4
39
English
Should you want the Hifidelio to connect to an existing wireless network, you have to enter
the Network Name of the chosen wireless network as well as the Key and the used Protection. Enter the Network Name manually or press the function key
“Search” and then
choose the wireless network from the list.
• using 128 (104) bit encryption: 42:EE:FD:49:EF:8E:6C:4C:2E:32:99:BD:39
To avoid failure, the key of the wireless network has to be entered in a special edit field.
Only valid characters and digits are accepted.
Additionally a random key generator lets you create 64 and 128 bit keys automatically.
Press the function key
“Random 64 Bit” or function key
“Random 128 Bit”: the edit
window opens and proposes a key. Using the Turn&Select wheel (11), you may change it as
you like.
or
Please do NOT use one of the example keys printed here! Create your own and use
the random key generator.
To activate your changes, press the function key
“OK”. By pressing the function key
“Cancel”, these changes are rejected and the previous settings are restored.
8.2.7 Summary
The possible network configuration settings are summarised in the following table:
Network Configuration IP Configuration
WLAN Function
Hifidelio Network
Automatic (DHCP server)
WLAN Access Point
Home Network
Automatic (DHCP client) Internet via Ethernet > WLAN Access
Point
Internet via WLAN > WLAN client
Expert Mode
Manual
WPA Encryption
Internet via Ethernet > WLAN Access
Point
Internet via WLAN > WLAN client
The WPA encryption uses a key in ASCII format (from 8 to 64 digits).
8.2.5 Web Proxy
8.3
If your Hifidelio is using a Proxy server to connect to the Internet, its IP address can be configured in Home Network and Expert Mode.
The currently used IP addresses can be displayed any time under “Network > Configuration” by using function key
“Information”.
8.2.6 Activation of Changes
After changing the network configuration, an alert is displayed as soon as you turn the
outer Turn ring of the Turn&Select wheel (11) to the left.
40
Information about IP Addressing
9
USING A COMPUTER TO MANAGE THE HIFIDELIO
9.1
The browser user interface is optimised for display on a Nokia PDA or on your computer.
Select the required style sheet.
The browser user interface shows the same menu structure as the one displayed directly
on the Hifidelio and allows navigation of the Hifidelio as usual. You can browse lists, control songs playback, etc. The “Menu” button in the left column always brings you back to
the home page.
Using a web browser
9.1.1 Under Windows XP
Switch your Hifidelio on. The Windows XP operating system of your computer will immediately find the new device in the network and will show a corresponding message on its display.
If this message no longer appears on the display, open the network environment of your
computer. The Hifidelio is shown in the UPnP services list.
A double-click on the name of your device will launch your standard web browser and the
home page of the Hifidelio appears.
Note: the UPnP/AV service has to be enabled to allow your Hifidelio to be listed there (see
section 6.5 «Service» on page 31).
(If you have problems accessing your Hifidelio from your Windows XP computer, see section 10.1 «“My Windows XP computer cannot find the Hifidelio…”» on page 42.)
9.1.2 Under Mac OS X
The browser user interface of the Hifidelio is a Bonjour service and automatically appears
under Mac OS X in the bookmarks of any Bonjour capable web browser (e.g. Safari from
Apple Inc. or Camino from Mozilla.org). Double-click the name of your Hifidelio and the
home page of the Hifidelio appears.
9.1.3 Direct Access with the IP Address
Launch the web browser of your choice on your computer. Enter the IP address of your
Hifidelio as the URL (Internet address). The Hifidelio displays this address in “Settings &
Specials” > “Network” > function key
“Information”. If the Hifidelio is configured as
central switch (“Hifidelio Network”), you can enter either “192.168.1.1“ or “http://hifidelio”
as the URL (Internet address). Confirm your entry. The home page of Hifidelio appears.
Click the question mark
to display the “Help & Service” page. This page accesses
update options, as well as the user manual, and other useful links.
9.2
Using a VNC Viewer software
A VNC (Virtual Network Computing) server application is included in the Hifidelio’s operating system and allows for the shared use of its screen. A VNC viewer application which runs
on a computer interacts with the server and shows the content of the Hifidelio’s display and
its buttons over the network. Likewise, it transmits the keyboard presses and mouse clicks
from the computer to the Hifidelio. Multiple VNC client applications are available for almost
all computer operating systems (Windows, Linux, Mac OS X), as well as for PDA and mobile
phone operating systems.
Launch the VNC viewer application of your computer and open a new connection. Enter the
IP address of your Hifidelio and confirm your entry by pressing the Return key. The VNC
window shows an emulation of the Hifidelio's front panel with its display and control keys.
The device can be remote controlled from the keyboard of your computer or by clicking the
control buttons.
41
English
This chapter describes how to manage the Hifidelio using a web browser or a VNC Viewer
software instead of operating via the Turn&Select wheel (11) and control buttons on its
front. For this purpose the Hifidelio must be connected to a computer network and set up
correctly (see chapter 8 «Advanced Networking» on page 37). Furthermore, the services
“Web Interface” and “VNC” have to be enabled (see section 6.5 «Service» on page 31).
9.1.4 The Browser User Interface
10
HELP!
10.1 “My Windows XP computer cannot find the Hifidelio…”
If your Windows XP computer has not yet been connected to the network, you should firstcheck if it is correctly configured to be able to connect to the network.
By using this application, you can navigate the Hifidelio as usual, as if you were to be
standing directly in front of it.
Open “My Network Places” under the “Start” menu, and then click “View Network Connections”. On the right side of the window, select “Local Area Connections”. Click the right button of your mouse, and choose “Properties”. The Properties window opens. Under the General tab, verify that the option “Client for Microsoft Networks” is listed there and checked.
If this option is missing, launch the “Network Setup Wizard” under “Start” > “All Programs” > “Accessories” > “Communication”. Run the wizard for the standard configuration. Then check if the option “Client for Microsoft Networks” is now listed and checked
(see above).
Your computer should now be configured correctly for the network connection and be able
to easily find your Hifidelio within the network.
10.2 “My Hifidelio is dead…”
If the pressing of buttons or the turning of wheels does not produce any results from your
Hifidelio, please try one or both first aid measures:
• Press the On/Off button (1
) on the front of your Hifidelio for about 4-5 seconds. The
Hifidelio should now be switched off. Wait a few seconds and press the On/Off button
(1
) to switch your Hifidelio on again. It takes about 40 seconds for the initialisation
process and then the main menu should be displayed again. Your stored music is not
endangered by this action.
OR
• Unplug the Hifidelio’s power cord from its AC outlet. Wait a few seconds and plug it in
again. Now press the On/Off button (1
) on the front of your Hifidelio. It needs about
40 seconds for the initialisation process and then the main menu should be displayed
again. Your stored music is not endangered by this action.
If these efforts did not produce results, please hold your “Hifidelio RecoveryDisk” and follow the instructions of the next section.
42
10.4.1 Software Update via Internet
The Hifidelio package contains a RecoveryDisk, which can be used to restore the operating
system software to the Hifidelio. Please note that in a worst case scenario of this restore
process all your music files and the accompanying meta data may get lost! Please process
carefully.
If your Hifidelio is connected to the Internet, you can launch the update process directly
from your device. Choose the main menu option “Settings & Specials”, the “Service”, and
“Software Update”.
1. Switch off the Hifidelio by pressing the On/Off button (1
react, unplug the power cord.
). If your Hifidelio does not
2. Switch the Hifidelio on by pressing the On/Off button (1
) and hold down the Play/
Pause button (5
) until the Hifidelio’s display shows three CD icons and the Hifidelio
logo.
3. Insert the RecoveryDisk into the slot. Please note that the Hifidelio waits only about 10
seconds for a disc. The Hifidelio then starts using the operating system of the disk.
4. A count down from 10 to 0 appears on the display. If you do not intervene, the “Recovery” option is launched automatically; or, press the function key
“Cancel” to interrupt the count down and the display shows four options:
Press the function key
est software updates.
“Software Update” and the Hifidelio starts to search for the lat-
• Delete ( ): the Hifidelio system will be completely restored. Everything, including
music files and meta data, is deleted. After this process, the Hifidelio returns to its
delivery state.
• Recovery ( ): only the operating system is restored. Music files and meta data are
not affected. If this option fails, or error messages are shown, or if in any other
respect something did not function properly, you must choose Option 1 for recovering.
• Reboot (
way.
• Power off (
): cancel the recovery operation and restart the Hifidelio in its normal
): cancel the recovery operation and switch the Hifidelio off.
5. Press the appropriate function key and its confirmation message and the chosen process starts, showing status messages during its progress.
6. Upon successful completion of the options “Delete” or “Recovery”, the Hifidelio shows
a message on the display and can be restarted in its normal way.
10.4 Software Update
If an update has been found, the version number and size are displayed. Pressing the function key
“OK” starts the updating.
After successfully updating the software, you can restart or power off your Hifidelio.
10.4.2 Software Update using the Web Browser User Interface
If your Hifidelio is not connected to the Internet, but is connected to your local network, you
can load the current software version onto your Hifidelio with the help of the web browser
user interface.
Use your preferred method to access the Hifidelio’s Home Page (see section 9.1 «Using a
web browser» on page 41). Click on the question mark
to display the “Help & Service”
page. The update process is carried out in two steps:
To benefit from the technological progress and the development of your Hifidelio, you may
update the internal software of your Hifidelio directly via the Internet, by using the web
browser user interface, or by using an update CD.
43
English
10.3 RecoveryDisk
10.4.2.1 Download Update File
First you must download the update file from the Hifidelio web page. Clicking on the corresponding link opens a new window of your browser and displays the Hifidelio update page.
From this page you can download the current version for your Hifidelio. Save the update file
onto the hard disk of your computer.
10.4.2.2 Install Update File
Click the link “Install update file” and browse your hard disk to select the update file. Clicking “Send” starts updating your Hifidelio. You can follow the update steps on the Hifidelio’s
display. During this process the device is not operational.
After successfully updating the software, the Hifidelio restarts automatically.
Note: If your Hifidelio is networked with a computer which is not connected to the Internet,
you can process step 1 “Download Update File” on another computer (e.g. a friend's) and
copy the update file onto your computer via an external storage medium (e.g. one USB
stick). You can then launch step 2 “Install Update File” from your computer with the help of
the web browser user interface.
10.4.3 Software Update using a CD
If your Hifidelio is not connected to the Internet, nor to a local network, you can download a
CD image containing the update software from the Hifidelio update page on the Internet
(www.hifidelio.com).
1. For downloading the CD image on your computer, click the link indicated on the update
page.
2. Switch the Hifidelio on by pressing the On/Off button (1
) and hold down the Play/
Pause button (5
) until the Hifidelio’s display shows three CD icons and the Hifidelio
logo. Then release this button.
3. Insert the RecoveryDisk into the slot. Please note that the Hifidelio waits only about 10
seconds for a disc. Then the Hifidelio starts using the operating system of the disk and
the update procedure is launched automatically.
4. Upon successful completion, the Hifidelio shows a message on the display and can be
restarted in its normal way. During the restart, the Update CD is then ejected.
10.5 Useful key combinations
Some buttons of the Hifidelio front panel can be used together for special purposes. Your
Hifidelio must be switched off correctly in order to use these functions.
10.5.1 Update the Hifidelio operating system
Switch the Hifidelio on by pressing the On/Off button (1
) and hold down the Play/Pause
button (5
) until the Hifidelio’s display shows three CD icons and the Hifidelio logo. Then
release this button. You can now insert the RecoveryDisk, UpdateCD or ServiceDisk into the
slot. Please note that the Hifidelio waits only about 10 seconds for a disc. Then the Hifidelio
starts using the operating system of the disk.
10.5.2 Forced CD eject
2. Unzip the file using appropriate software (WinZIP, Stuffit Expander, etc.).
Switch the Hifidelio on by pressing the On/Off button (1
) and hold down the CD eject
button (8
) until the Hifidelio’s display shows the corresponding eject icon. Then release
this button. The disc inserted in the CD drive is ejected.
3. Burn the ISO image to a CD-R by choosing the “ISO image” option of your burn software.
10.5.3 Interruption of the Encoding of Music Files
Do not unpack the ISO image file before burning it onto a CD-R or burn the image file
itself as a single file on the CD-R. This would render your update CD useless!
Using this self-made CD-R or an Update CD of Hermstedt AG, you can update the system
software of your Hifidelio.
1. Switch off the Hifidelio by pressing the On/Off button (1
) for about 2-3 seconds until
the virtual curtain starts closing in the display, then release it.
44
Switch the Hifidelio on by pressing the On/Off button (1
). As soon as the virtual curtain
starts opening on the display, press the Stop button (4
) briefly. The curtain opens again
to confirm your command. All encodings of your Hifidelio are stopped.
This key combination is only usefull if the Hifidelio would regularly crash after a restart due
to encoding jobs (the note icon
still flashes in the header). Afterwards, the music files
remain uncompressed on the hard disk until the encoding is launched again manually (see
section “Encoding” from page 15).
10.6 Technical specifications of the Hifidelio’s network interface
/www.hifidelio.com/registration) or with the help of the registration form to be found at the
end of this manual (see chapter 12 «Registration Card» on page 51).
English
10.6.1 Hifidelio Network
The Hifidelio is DHCP and DNS server with the IP address 192.168.72.1. If the WLAN function of the Hifidelio is enabled, the IP address is used for both Ethernet and WLAN and all
ports are connected by port switching.
10.6.2 Home Network
10.8 Overview of all main menu options
10.8.1 Permanent menu options
10.8.1.1 Main Menu: Library
Setting “Internet via Ethernet”
The Hifidelio acts as DHCP client and receives its IP address and the DNS server address
per Ethernet. The Hifidelio acts as WLAN Access Point and is connected to the Ethernet via
a software bridge.
Submenu
Level 1
Artists
Names of the artists sor- “All…”
ted alphanumerically
Setting “Internet via WLAN”
The Hifidelio acts as DHCP client and receives its IP address and the DNS server address
from the wireless network. The Hifidelio acts as WLAN client (STA) and is connected to the
Ethernet with the help of a NAT router, a DHCP server and a DNS relay. The local IP network of the Hifidelio (Ethernet) has the address range 192.168.72.x.
Composers
Names of the compo“All…”
sers sorted alphanumerically
Albums
Names of the albums
sorted alphanumerically
Setting “Internet via WLAN”
Songs
Names of the songs sorted alphanumerically
The IP address and the DNS server address for the wireless network are free configurable.
The Hifidelio acts as WLAN client (STA) and is connected to the Ethernet with the help of a
NAT router, a DHCP server and a DNS relay. The local IP network of the Hifidelio (Ethernet)
has the address range 192.168.72.x.
Genres
Names of the genres
sorted alphanumerically
In order to benefit from the manufacturer’s warranty, you should register your Hifidelio
directly after its purchase. This can be done either directly through the Internet (under http:/
Level 4
All songs of the artist
sorted alphanumerically
All songs of the composer sorted alphanumerically
All albums of the com- All songs of the album
poser sorted alphanu- sorted on track nummerically
ber
The IP address and the DNS server address for the Ethernet are free configurable. The
Hifidelio acts as WLAN Access Point and is connected to the Ethernet via a software bridge.
10.7 Register your Hifidelio
Level 3
All albums of the artist All songs of the album
sorted alphanumeri- sorted on track numcally
ber
10.6.3 Expert Mode
Setting “Internet via Ethernet”
Level 2
All songs of the album
sorted on track number
“All…”
“All…”
All songs of
this genre
All albums of this
genre
All songs of
the album
All artists of the genre “All…”
sorted alphanumerically
All songs of
the artist of
this genre
All albums of the artist All songs of
of this genre
the album
45
Submenu
Level 1
Level 2
Playlists
Names of the playlists
sorted alphanumerically
All songs sorted by
the user
Searchlists
Level 3
Level 4
Submenu
Level 1
Level 2
Level 3
General Settings
(cont.)
Playmode (cont.)
Auto play audio CD
(On/Off)
Appearance
Contrast
(Change)
Names of the searchlists All songs matching
sorted alphanumerically the search criteria
sorted alphanumerically
10.8.1.2 Main Menu: Internet Radio
Submenu 1
Level 1
Level 2
Level 3
Date & Time
Custom…
Top 100…
List of predefined genres
Level 1
empty
(New)
otherwise
names of the recorded files sorted
alphanumerically
if already divided, the list of the
songs
Level 2
Small Letters
(On/Off)
Track Numbers
(On/Off)
Spectrogram
(On/Off)
Large Play View After
(Change)
Date & Time
(Change)
Time Zone (Europe/
London)
List of continents
Set automatically
(On/Off)
(Information,/New/Edit/Import/
Mark/Delete)
Import & Burn
(On/Off)
Language
(English/Deutsch/
Français)
Compression
Encoder
List of capitals
(AIFF/FLAC/MP3/WAV)
If MP3 is chosen: Data (Good/High/Higher/
Rate
VBR)
If VBR is chosen: VBR (Change)
Quality
CD Behaviour
Submenu
Level 1
Level 2
Level 3
General Settings
Sound
Volume Lineout
(Change)
Volume Headphone
(Change)
Dynamics compression
Compression
46
(On/Off)
Prevent changes
10.8.1.4 Main Menu: Settings & Specials
Play mode
(Change)
Classical Mode
If Set automatically is (Change)
enabled: Time Server
10.8.1.3 Main Menu: Analogue recording
Submenu1
Brightness
Level 4
Random
(On/Off)
Repeat
(On/Off)
Fading
(Change)
Level 4
(Off/Night
Mode/Loud
Envir./Expert
Mode)
Analogue Recording
Play While Importing
(On/Off)
On CD insert…
Import Songs
(On/Off)
If Import is chosen:
Eject After Import
(On/Off)
CD Recognition
(Automatic/Audio CD/
Data CD)
Auto Dividing
(On/Off)
Gap Between Tracks
Auto Adjust Level
(On/Off)
Level 1
Level 2
Import & Burn
(cont.)
Analogue Recording
(cont.)
If Auto Adjust Level is (Music/Speech)
enabled: Recognition
Method
Auto. stop after
CD Burn
Network
Configuration
Services
Level 3
Submenu
Level 1
Level 2
Service
Software Update
(Software Update)
Software Upgrade
(Software Upgrade)
Factory Settings
(Restore/Help)
Maintenance
(Change)
Disc Format
(Audio CD/MP3 CD/
Data CD)
Speed
(Secure/Fast)
If Audio CD is enabled: Gap Between
Songs
(Change)
If Audio CD is enabled: Create CD Text
(On/Off)
If MP3 or Data CD is
enabled: Create folders
(On/Off)
Level 3
Level 4
Recovery
List of files
(Restore/
Delete)
Check Library
Check Music Folder
Search for new Meta
Data
Read all Meta Data
Write all Meta Data
(Execute)
10.8.2 Variable menu options
10.8.2.1 Main Menu: Music Server
(Hifidelio Network/
Home Network/Expert
Mode)
Submenu
Level 1
Web Interface
(On/Off)
Hifidelio
(Select)
UPnP/AV
(On/Off)
(Select)
Search for UPnP/AV
(On/Off)
If applicable, list of music servers available within the
network
iTunes (DAAP)
(On/Off)
Telnet
(On/Off)
VNC
(On/Off)
UPnP/AV Remote Con- (On/Off)
trol
CD Database
Level 4
Online Access
English
Submenu
10.8.2.2 Main Menu: Import
Submenu
Level 1
If applicable, list of files stored in the Import folder
(Information/Import/Mark/Delete)
(On/Off)
If Online Access is
enabled: Server URL
Hifidelio Information
Device Name
(Change)
Version
(Software Update)
Serial No
Disc size
Free space
CD Database
47
11
TECHNICAL DATA
Hifidelio PR-80 (*)
Hifidelio Pro (**)
Dynamics compression of loudness
Hifidelio PR-80 (*)
Hifidelio Pro (**)
Features:
• Hard disk capacity (***)
• High resolution backlit display
• CD burner
• Integrated CD database (freeDB)
• Supported media formats
80 GB
400 x 160
black/white
160 GB
400 x 160
4 grey levels
Yes
Yes
Music CD, CD-R, CD-RW
Supported recording formats:
• MP3 CBR
• MP3 VBR
• AIFF/WAV bitrate
• FLAC bitrate
128 kbit/s (good); 160 kbit/s (high)
192 kbit/s (higher); 320 kbit/s (CD Quality)
6 levels
1,411.2 kbit/s
700 to 1,411 kbit/s
Supported playback formats:
•
•
•
•
•
•
MP3 and MP3 VBR
AAC
FLAC
Ogg/Vorbis
AIFF/WAV
Supported sampling rates
64 kbit/s - 320 kbit/s
64 kbit/s - 320 kbit/s
16 Bit, up to 1,411.2 kbit/s
64 kbit/s - 320 kbit/s
16 Bit, up to 1,411.2 kbit/s
11,025 - 48,000 Hz
(*) The product model Hifidelio “Basic” (first launched on the market in Dec. 2004) has been replaced
by Hifidelio PR-80 from May 2006. Unlike the Hifidelio “Basic”, the Hifidelio PR-80 supports from the
beginning the following functions: Internet radio, sampling rates from 11,025 Hz to 48,000 Hz, MP3
recording with 320 kbit/s and dynamics compression of the output level.
(**) The product Hifidelio Pro (first launched on the market in May 2005) has been replaced by Hifidelio
Pro-S from January 2007. Compared to the Hifidelio Pro server, the Hifidelio Pro-S is equipped with
the silence kit ex works, i.e a special frame for fixing the hard disk (160GB, 3,5") within the Hifidelio
Pro case. This fixation frame absorbs the noises which can result from the accesses on the hard disk
during operation and generate vibrations. As a consequence, the hard disk is almost silent even during intensive operation.
(***) Details valid at printing of this user manual. Please take into consideration the notices on the
packaging of the device.
48
• Night Mode
Activation Method
Threshold
Ratio
Attack
Release
• Loud Environment
Activation Method
Threshold
Ratio
Attack
Release
• Expert
Activation Method
Threshold
Ratio
Attack
Release
Hard Knee
-24 dB (1 dB step)
2.5:1 (0.1 step)
5 ms (1ms step)
0,3 s (0.1 s step)
Soft Knee
-48 dB (1 dB step)
2:1 (0.1 step)
30 ms (1ms step)
0.6 s (0.1 s step)
Hard or soft
-60 to -6 dB
1:1 to 6:1
1 to 50 ms
0.1 to 1 s
Speed of CD drive:
• Read
• Burn a CD-R
fast mode
secure mode
• Burn a CD-RW
fast mode
secure mode
12x
uo to 24x
8x
up to 16x
8x
Front panel:
• CD slot with automatic loading
• On/Off , Start/Pause, Stop, Last track, Next
track, Record, CD Eject
• Display
• Four function keys
• Turn&Select wheel
• Remote control receiver
• Headphones plug
Yes
Yes
Yes
Yes
Yes
Yes
Yes
Hifidelio PR-80 (*)
Hifidelio Pro (**)
Dimensions
• Analogue line-in Cinch
• Analogue line-out Cinch
W: 435 mm
D: 290 mm
H: 85 mm
Yes
Yes
• Power connector
• 4-Port-Switch 10/100 MBit auto-sense
Ethernet
• USB 1.1/2.0 ports
• Antenna for wireless LAN
Weight (without accessories and packaging)
2
Yes
Yes
Yes
Color
Hifidelio Pro (**)
4.3 kg
English
Back panel:
Hifidelio PR-80 (*)
4.8 kg
silver, black
gold-plated
gold-plated
• Digital line-out S/P DIF optical Toslink
• Digital line-out coaxial-Cinch
Yes
Yes
Technical Characteristics:
• Frequency Response (in Hz)
• Signal to noise ratio (plus distortion, Aweighted):
Playback
Record
• THD+N (Playback) (in dB FS A / %)
• THD+N (Record) (in dB FS A / %)
• Channel separation
• Full Scale Line Output
• Full Scale Line Input
• RCA: max. output level
• S/P DIF output
• Sampling rate S/P DIF
• DAC
10-20,000 (+0/-1.4 dB)
≥ 85 dB
≥ 80 dB
≤ -85 dB
≤ -84 dB
≥ 80 dB
2 Vrms / 100 Ohm
2 Vrms / 10 kOhm
5.66 Vpp
0.5 Vpp, 0 Vdc
44,100 Hz
AD1981B
Packing list:
• Hifidelio device
Hifidelio PR-80
• Power cord
• Cinch audio cable
• Optical Toslink audio cable
•
•
•
•
Remote control with batteries
Antenna for wireless LAN (WLAN)
Emergency CD
Registration card
Hifidelio Pro
Yes
normal
-
top grade
Yes
Yes
Yes
Yes
Yes
49
50
12
REGISTRATION CARD
English
Registration • Registrierung • Enregistrement
Affix stamp here
www.hifidelio.com/registration
Bitte ausreichend
frankieren
Affranchir au tarif
en vigeur
Hermstedt AG
Carl-Reuther-Str. 3
D-68305 Mannheim
51
Sender • Absender • Expéditeur
First Name • Vorname • Prénom
Last Name • Nachname • Nom
Silver
Silber • Argent
Black
Schwarz • Noir
Product type • Produktvariante • Modèle
Serial Number • Serien-Nr • Numéro de série
Purchase Date • Kaufdatum • Date d’achat
Address • Anschrift • Adresse
Dealer • Händler • Revendeur
Postal Code, City • PLZ, Stadt • Code postal, ville
Country • Land • Pays
Hifidelio music server
Hifidelio Musikserver
Serveur de musique Hifidelio
Telephone • Telefon • Téléphone
Accessories for Hifidelio music server
Zubehörartikel für Hifidelio Musikserver
Accessoires pour le serveur Hifidelio
Fax Number • Fax • Télécopie
Satellite HID unit for multiroom streaming
Satelliteneinheit für Multiroom-Streaming
Unité satellite pour streaming multiroom
Email • E-Mail • Courriel
52
Which Hifidelio product will you buy in the future?
Welche Hifidelio-Produkte planen Sie zu kaufen?
Quels produits Hifidelio projetez-vous d’acquérir ?
Please send me information on Hifidelio news.
Bitte informieren Sie mich über Hifidelio Neuigkeiten.
Veuillez m’informer sur les nouveautés Hifidelio.