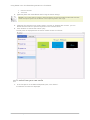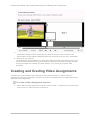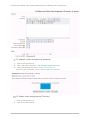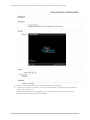
1
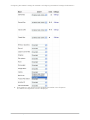
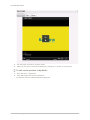
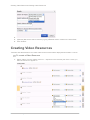
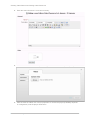
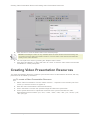
Kaltura Video Package for Moodle
2.x
Quick Start Guide
Version: 2.0 for Moodle 2.x
Kaltura Business Headquarters
200 Park Avenue South, New York, NY. 10003, USA
Tel.: +1 800 871 5224
Copyright © 2012 Kaltura Inc. All Rights Reserved. Designated trademarks and brands are the property of their respective
owners.
Use of this document constitutes acceptance of the Kaltura Terms of Use and Privacy Policy.
Contents
Preface .................................................................................................................................................... 4
Audience ........................................................................................................................................... 4
About this Guide ............................................................................................................................... 4
Overview of the Kaltura Package for Moodle 2.x .................................................................................... 5
Configuring the Kaltura Package for Moodle 2.x .................................................................................... 5
Setting Up the Kaltura Package for Moodle 2.x ................................................................................ 5
Customizing Players and Uploader Widgets .................................................................................... 7
Enabling the Kaltura Repository ....................................................................................................... 9
Repository:Kaltura Capabilities ....................................................................................................... 12
Repository:Kaltura Capabilities Terminology ............................................................................ 12
Customizing Roles Capabilities Permissions with Kaltura........................................................ 12
My Media ............................................................................................................................................... 13
Using Media in the Text Editor .............................................................................................................. 17
Creating Video Resources .................................................................................................................... 26
Creating Video Presentation Resources ............................................................................................... 28
Creating and Grading Video Assignments ............................................................................................ 30
Kaltura Video Package for Moodle 2.x Quick Start Guide
3
Preface
Audience
This guide is primarily intended for Moodle administrators and faculty users. It contains useful
information for the main usage flows and functionality of the Kaltura Video Package for Moodle.
About this Guide
This guide describes how to setup, configure and use the Kaltura Video Package for Moodle.
Related Documentation
Kaltura Video Package for Moodle Release Notes
Kaltura Video Package for Moodle 2 Version 2 Installation Guide
Kaltura Video Package for Moodle 2.x Quick Start Guide
4
Overview of the Kaltura Package for Moodle 2.xOverview of the Kaltura Package for Moodle 2.x
Overview of the Kaltura Package for
Moodle 2.x
Kaltura's Video Package for Moodle 2.x makes it easy to add the robust capabilities of Kaltura's open
source online video platform to any Moodle site. The package was developed specifically for Moodle
and integrates with other features and modules, such as resources and activities, so that users can
upload and embed media easily.
The package adds the following features for all users:
•
My Media: users’ personal media gallery, for uploading, viewing, managing, and sharing
media.
•
Integration as an external repository with the file picker accessible from the text editor: embed
your media or media you have access to, anywhere you can author text.
In addition, Teachers and Admins can create two new resources and one assignment type:
•
Video Resource: Easily add video content to your course as a specialized resource.
•
Video Presentation resource: Create a synchronized view of a Document and a Video.
•
Video Assignment: Allows students to submit videos as an assignment submission.
Configuring the Kaltura Package for
Moodle 2.x
Only site administrators can configure various settings of the Kaltura Package for Moodle 2.x.
Setting Up the Kaltura Package for Moodle 2.x
After you install the Kaltura Package for Moodle 2.x, configure the package settings. For installation,
please refer to the Kaltura Video Package for Moodle 2 Version 2 Installation Guide.
To set up the Kaltura package
1. Go to Site administration > Plugins > Local plugins > Kaltura package libraries.
A page with various settings options is displayed,
Kaltura Video Package for Moodle 2.x Quick Start Guide
5
Configuring the Kaltura Package for Moodle 2.xConfiguring the Kaltura Package for Moodle 2.x
a. Set the connection to Kaltura. Select your Connection Server (The default is Kaltura
hosted solution).
b. Enter your Kaltura partner login credentials.(Hosted account login and Hosted account
password)
If you do not have a Kaltura account, signup here to obtain one.
Kaltura Video Package for Moodle 2.x Quick Start Guide
6
Configuring the Kaltura Package for Moodle 2.xConfiguring the Kaltura Package for Moodle 2.x
Customizing Players and Uploader Widgets
Kaltura's most commonly used widgets include the Kaltura Dynamic Player (KDP) and the Kaltura
Uploader. The Kaltura UIConf ID is the unique identifier for Kaltura widgets. We recommend using the
default widgets for the Kaltura Video Package for Moodle.
Players can be created, designed and configured with specific features and buttons within the Studio
tab, in the Kaltura Management Console. For instructions on how to create, design and configure a
player, refer to the KMC User Manual.
After you create a player, you can select it in the Kaltura Package Configuration page to replace the
default players.
You can also modify the Uploader widgets (also known as the Kaltura Contribution Wizard - KCW)
and Kaltura Presentation Widget, using the Kaltura APIs. Please contact Kaltura for more information
on using the Kaltura API or refer to the Kaltura API Documentation.
NOTE: The default widget settings should work out of the box when working with Kaltura
SaaS.
To customize the widgets
1. Go to Site administration > Plugins > Local plugins > Kaltura package libraries.
Kaltura Video Package for Moodle 2.x Quick Start Guide
7
Configuring the Kaltura Package for Moodle 2.xConfiguring the Kaltura Package for Moodle 2.x
Kaltura Video Package for Moodle 2.x Quick Start Guide
8
Configuring the Kaltura Package for Moodle 2.xConfiguring the Kaltura Package for Moodle 2.x
2. For each type – Video Assignment, Video Resource, Video Presentation Resource, Video
used in the text editor – you can select a player used to play back media of this type in the
appropriate dropdown.
3. Advanced Kaltura users may choose to use a Custom player and insert the player’s UIConf
ID to use a player that does not appear in the dropdown.
4. For Video Resource, check the “Override video resource player setting”; for the selected
player to be used for all video resources, Teachers will not be able to choose different
players for their video resources if this option is selected.
5. For the videos used in the text editor select embedded player width and height.
6. For each type – Video Assignment, Video Resource, Video Presentation Resource, My
Media, Video used in the text editor – you can change the Uploader (KCW) to a custom one.
We recommend this option for advanced users only.
7. If you are using several applications, select the application name to be used for data
aggregation in Kaltura
8. Check the “Enable HTML5 flavour”, to enable playback on Mobile devices.
9. Click Save changes to save.
Enabling the Kaltura Repository
To enable the Kaltura Repository
1. Go to Site administration > Plugins > Repositories > Manage repositories
Kaltura Video Package for Moodle 2.x Quick Start Guide
9
Configuring the Kaltura Package for Moodle 2.xConfiguring the Kaltura Package for Moodle 2.x
2. Find “Kaltura” in the list and choose Enabled and visible in the dropdown.
The Kaltura Configuration screen is displayed..
Kaltura Video Package for Moodle 2.x Quick Start Guide
10
Configuring the Kaltura Package for Moodle 2.xConfiguring the Kaltura Package for Moodle 2.x
3. Select:
a. The repository plugin name (optional), to determine the name of the repository that is
displayed in the File Picker.
b. The number of files to display per page.
c. The name of the root category of the Moodle application in your Kaltura account.
4. Click Save.
To enable the Kaltura Repository to its full functionality, we recommend that you enable the Kaltura
Media Filter, so that the media is displayed in an embedded fully functional player.
To enable the Kaltura Media Filter
1. Go to Site administration > Plugins > Filters > Manage filters
Kaltura Video Package for Moodle 2.x Quick Start Guide
11
Configuring the Kaltura Package for Moodle 2.xConfiguring the Kaltura Package for Moodle 2.x
2. Find “Kaltura Media” and select “On” from the dropdown menu.
Repository: Kaltura Capabilities
The Kaltura repository comes with a set of capabilities that can be set on Moodle roles.
Kaltura Capabilities Terminology
•
View Kaltura Repository – determines whether users assigned to a role can view the
Kaltura repository in the File Picker
•
Shared Video Visibility – determines whether users assigned to a role can use media items
that are shared in courses they are enrolled in with an admissible role, via the text editor.
•
Course Video Visibility - determines whether users can use media items that were used in
courses they are enrolled with an admissible role, via the text editor. Used Videos are
defined as media that was embedded in the course and was viewed at least once.
By default users have access to Shared Media of courses they are enrolled in as students, while
users that are enrolled to a course as teachers or managers have access to Shared Media and Used
Media of that course.
Customizing Roles Capabilities Permissions with Kaltura
The default capabilities assignment can be further customized via Moodle permissions to include
additional roles, as well as for creating special use-cases.
To customize roles permissions with Kaltura
1. Go to Site administration > Users > Permissions > Define Roles
2. Select the role you want to customize
Kaltura Video Package for Moodle 2.x Quick Start Guide
12
My MediaMy Media
3. Click ‘Edit’
4. Scroll down or search for the string the “Repository: Kaltura” permissions
5. Select the capabilities for this role.
6. Click ‘Save changes’
My Media
Each user has a personal, searchable My Media gallery for uploading, viewing, managing, and
sharing media.
Users are able to use and reuse any of the videos in this repository in various locations within Moodle
as well as across various Kaltura applications in the institution. Additionally, users can use this gallery
to mark which of their videos will be available for use by authorized users in specific courses.
My Media is accessed from the Navigation block, in My home > My Media.
To upload media in My Media
1. Go to My home > My Media.
2. Click ‘Upload’ button (on the top left).
3. The Uploader widget is launched.
Kaltura Video Package for Moodle 2.x Quick Start Guide
13
My MediaMy Media
4. Follow the wizard to upload your media.
5. A confirmation message is displayed, click “Continue”.
The new media is displayed in My Media.
NOTE: Newly uploaded media is converted in Kaltura servers for maximizing user experience
with different devices and network capabilities. This process may take a few minutes. While the
media is being converted, you cannot preview it, but you can change the metadata, share it
and use it.
To search for media in My Media
1.
2.
3.
4.
Go to My home > My Media.
Type the text you want to search for in the text box.
Click ‘Search’.
The items shown in My Media disaply only items matching the search query.
To preview media in My media
1. Go to My home > My Media.
2. Click ‘Preview’ below the relevant media item
A modal box with the media in a player is displayed.
Kaltura Video Package for Moodle 2.x Quick Start Guide
14
My MediaMy Media
3. Use the player controls to view the media.
4. When you are done, close the modal box by clicking the ‘x’ button on the top right.
To edit media metadata in My Media
1. Go to My home > My Media.
2. Click ‘Edit’ below the relevant media item.
A modal box with the media metadata is displayed
Kaltura Video Package for Moodle 2.x Quick Start Guide
15
My MediaMy Media
3. Input the metadata and click ‘Save’.
4. A confirmation message is displayed, click ‘Continue’.
5. When you are done, close the modal box by clicking the ‘x’ button on the top right.
To share media
1. Go to My home > My Media
2. Click ‘Share’ below the relevant media item.
A modal box with list of courses to share the media item with is displayed.
Kaltura Video Package for Moodle 2.x Quick Start Guide
16
Using Media in the Text EditorUsing Media in the Text Editor
3. Check ‘Share with site’ to share it with everyone that has access to the Kaltura repository.
4. Check each course you want to share the media item with (for those who have the relevant
permission).
5. Click ‘Save’ to save your changes.
6. A confirmation message is displayed, click ‘Continue’.
7. When you are done, close the modal box by clicking the ‘x’ button on the top right.
Using Media in the Text Editor
When the Kaltura repository is enabled, you can embed media everywhere that you have permissions
to author content with Moodle’s text editor.
For example, you can embed media in quizzes, glossary, forum posts, wiki, and resources.
To use media in the text editor
1. Click the ‘Moodle Media’ button in the text editor.
Kaltura Video Package for Moodle 2.x Quick Start Guide
17
Using Media in the Text EditorUsing Media in the Text Editor
The ‘insert embedded media’ modal box is displayed.
2. Click on the “Find or upload a sound, video or applet” area.
The File picker (Moodle component) is displayed.
Kaltura Video Package for Moodle 2.x Quick Start Guide
18
Using Media in the Text EditorUsing Media in the Text Editor
3. Click on the name of the Kaltura repository (in this example “Kaltura”).
The Kaltura repository tab is displayed. You can View as icons or View as a list.
Kaltura Video Package for Moodle 2.x Quick Start Guide
19
Using Media in the Text EditorUsing Media in the Text Editor
4. Select the media you want to embed. You can browse for media or search for it.
Depending on your permissions in the course you are authoring in, you can use media from
four sources:
o
Site Shared Videos - Media shared with the site
o
Shared Videos - Media shared with courses you have the Shared Videos permission in
o
Used Videos - Media used in courses you have the Course Videos permission in
o
Your own media
The File picker displays the thumbnail of the media selected for approval.
5. Click “Select this file”.
6. The ‘insert embedded media’ box is displayed with the selected media in the Preview box
Kaltura Video Package for Moodle 2.x Quick Start Guide
20
Using Media in the Text EditorUsing Media in the Text Editor
NOTE: The player in this box is only a flash player and doesn’t include any advanced features
like playback on mobile devices. Likewise, if your media is session restricted, the media won’t
playback in this location. These limitations are only for this location and are lifted once the
media is displayed as embedded in the context.
7. Click “Insert”.
The text editor is displayed, where the embedded media is represented as link.
When displayed outside of the editing mode, the media is displayed as an embedded player.
Kaltura Video Package for Moodle 2.x Quick Start Guide
21
Using Media in the Text EditorUsing Media in the Text Editor
To browse for media
1. In the File picker on the Kaltura Repository tab, select the source you want to browse, for
example “Shared Videos”.
2. If you chose “Shared Videos” or “Used Videos”, a list of all the courses you have admissible
permission to is displayed.
Kaltura Video Package for Moodle 2.x Quick Start Guide
22
Using Media in the Text EditorUsing Media in the Text Editor
3. Browse to the course you want to select.
A list of videos is displayed.
Kaltura Video Package for Moodle 2.x Quick Start Guide
23
Using Media in the Text EditorUsing Media in the Text Editor
4. Either select the media you want to use or go back using the breadcrumbs.
To search for media
NOTE: Search results are limited solely to media items in courses that you have the relevant
permission to access.
1. In the File picker on the Kaltura Repository tab, click “Search”.
A modal box for search is displayed.
2. Choose the source of media you are searching for from one of the following options:
a. Shared with courses
b. Shared with site
Kaltura Video Package for Moodle 2.x Quick Start Guide
24
Using Media in the Text EditorUsing Media in the Text Editor
c. Used in courses
d. Your own
3. (Optional) Enter the media Name and/or Tags as search strings.
NOTE: If you input search criteria in both text fields, the result includes media that matches
either the input keyword in the Name or the input keyword in the Tags.
4. (Optional) For searches over media ‘Used in courses’ or ‘Shared with courses’, you can
further limit the search to specific keywords in the course/s Name.
5. Click “Submit” to execute the search query.
The file picker is displayed with the search results shown as a flat list.
To select from your own media
1. In the File picker on the Kaltura Repository tab, click “Search”.
A modal box for search is displayed.
Kaltura Video Package for Moodle 2.x Quick Start Guide
25
Creating Video ResourcesCreating Video Resources
2. Choose “You own” in the ‘Search for videos’ dropdown.
3. (Optional) Narrow the search results by typing additional search criteria in the other fields.
4. Click “Submit”.
Creating Video Resources
Teachers and administrators can create video resources that will be displayed inline within a course.
To create a Video Resource
1. Select “Video” from the “Add a resource...” dropdown in the relevant part of the course you
want the resource to appear in.
Kaltura Video Package for Moodle 2.x Quick Start Guide
26
Creating Video ResourcesCreating Video Resources
2. Enter the Video Resource’s name and summary.
3. Click “Add Video” to launch the Uploader widget and then follow the steps to upload your file.
4. After the video is added, click “Player properties” to choose the player (availability depends
on configuration) and the player dimensions.
Kaltura Video Package for Moodle 2.x Quick Start Guide
27
Creating Video Presentation ResourcesCreating Video Presentation Resources
5. Click “Preview” to view the added video in the selected player.
NOTE: Previewing the video is only available after the video finished the transcoding and
conversion process within the Kaltura system. This may take a few minutes and depends
mostly on the video duration.
6. You can replace the video by pressing the “Replace video” button.
7. Click “Save and display” or “Save and return to course” to save the video resource and make
it available for course participants.
Creating Video Presentation Resources
The Video Presentation Resource creates a synchronized view of a video aside a document, with key
points that can be edited by the author.
To create a Video Presentation Resource
1. Select “Video Presentation” from the “Add a resource...” dropdown in the relevant part of the
course you want the resource to appear in.
2. Enter the Video Presentation’s Name and Summary.
3. Press “Add Video” to launch the Uploader widget and follow the upload flow.
4. Press “Upload document” to upload the document to be synchronized with the video.
Supported documents include *.pot; *.doc; *.axles; *.odds; *.odd; *.odd; *.pot; *.docks; *.puff;
*.lax *.pdf; *ppt.
Kaltura Video Package for Moodle 2.x Quick Start Guide
28
Creating Video Presentation ResourcesCreating Video Presentation Resources
5. Wait until both assets have finished converting:
a. You can check the status of the video conversion process by pressing “Preview”.
b. You can check the status of the document conversion process by pressing “Check
status”.
6. Once both video and document are ready, click “Preview” to synchronize the document
pages with the timeline of the video. You can also sync after saving the resource when
viewing it as a teacher.
Kaltura Video Package for Moodle 2.x Quick Start Guide
29
Creating and Grading Video AssignmentsCreating and Grading Video Assignments
7. On the presentation widget, you can sync slides to key points in the video using the
Presentation Widget controls. Simply play the video or drag the video scrubber to the
selected place for the selected slide/page within the document, and click ‘Sync Video/Slide’.
8. Save when you are done.
As students play the presentation, the video plays while the slides automatically rotate in full
synchronization, based on the key points set by the presenter. Students can easily navigate
through the slides with ‘forward’ and ‘back’ buttons, or by clicking on a specific slide
thumbnail.
Creating and Grading Video Assignments
Teachers can create a Kaltura Video Assignment that requires students to submit Videos as
assignments. Following submissions, teachers can view the submitted videos, provide feedback and
grade the video assignments.
To create a Video Assignment (teacher)
1. Select “Kaltura Video Assignment” from the “Add an activity...” dropdown in the relevant part
of the course you want the activity to appear in.
Kaltura Video Package for Moodle 2.x Quick Start Guide
30
Creating and Grading Video AssignmentsCreating and Grading Video Assignments
2. Enter the assignment’s name, description and choose assignment properties:
a. Availability dates
b. Whether to prevent late submissions
c. Whether to allow resubmitting
d. Whether to receive email notification whenever students add or update an assignment
submission
e. The grading scale
3. When finished, click Save.
Kaltura Video Package for Moodle 2.x Quick Start Guide
31
Creating and Grading Video AssignmentsCreating and Grading Video Assignments
To submit a video assignment (student)
1. Click the Assignment link.
2. Click “Add video submission” .The Uploader widget is launched.
3. Follow the Uploader flow. See Creating Video Resources.
After the video is uploaded, you can cancel, replace it or submit it.
To Grade video assignments (Teacher)
1. Click the Assignment link.
2. Click “Grade submissions”.
Kaltura Video Package for Moodle 2.x Quick Start Guide
32
Creating and Grading Video AssignmentsCreating and Grading Video Assignments
3. Click the “Grade” link. (If a grade already exists, click “Update”) to go to a detailed
submission page. You can then view a specific video submission and provide feedback and
grade.
Kaltura Video Package for Moodle 2.x Quick Start Guide
33
Creating and Grading Video AssignmentsCreating and Grading Video Assignments
4. Click on a thumbnail displays the appropriate video in a modal box.
5. If “Allow quick grade” is checked, you can provide feedback and grades directly within this
page for all assignments.
The grades and feedback are displayed in the course’s grade reports, as well as in the
assignment page, following Moodle standards.
Kaltura Video Package for Moodle 2.x Quick Start Guide
34