1
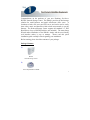
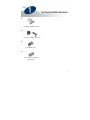
1 Step 1: Check Contents & Installation Requirements 3 Step 2: Install the Hard Drive 6 Step 3: Setup Wizard 8 Step 4: Access the Network Storage Center 20 Step 5: Set Up the Network Storage Center 21 Step 6: Homepage 22 Step 7: Mapping the Network Storage Center 23 2 Congratulations on the purchase of your new Hawking Net-StorTM HNAS1 Network Storage Center. The HNAS1 provides an ideal storage solution for small business and small office/home office users. It functions as both a file server and FTP server, and can be used to easily share video, music, and data files within a local area network or over the Internet. The Network Storage Center supports all standard 3.5” IDE Hard Drives of up to 250GB (hard drive not included). The smart Setup Wizard makes installation of the HNAS1 simple and the user-friendly web interface makes it easy to manage. Please read this quick installation guide carefully before beginning your installation. Before starting, please check the contents of your package: Package Contents 1) HNAS1 Network Storage Center 2) One Utility/Manual CD-ROM 3 3) One Quick Installation Guide 4) One Power Adapter (12V /3A) 5) Four Rubber Feet 6) Four Screws for Fastening the Hard Drive 4 What You Will Need to Get Started x A router or switch on an established network to connect the Network Storage Center to x Any Standard 3.5” IDE Hard Drives of up to 250GB (Hard Drive Not Included) x PC(s) with a Web-Browser (Internet Explorer 4.0 or higher, or Netscape Navigator 4.7 or higher) System Requirements x x x x 200MHz or Faster Processor Minimum 64MB RAM Recommended CD-ROM Drive Windows 95/98/98SE/ME/NT 4.0/2000/XP This Quick Installation Guide (QIG) provides step-by-step instructions for the installation and configuration of the Network Storage Center. It assumes that your computers use Windows 95/98 or newer versions of Windows and that a web browser is available, for configuration purposes. We suggest that you read through this entire QIG and then refer to the user’s manual for more advanced configuration. 5 How to Install Your Hard Drive in the Network Storage Center: 1. Loosen the two screws on the rear panel using either a screwdriver or your hands if they unscrew easily. Screws 2. Grab the front panel and separate the hard drive holder from the case. 6 3. Adjust your hard drive jumper to “Master”. Instructions on how to do this will be located in the quick installation guide or user’s manual for your hard drive. 4. Connect the IDE connecter into the IDE socket of your hard drive. IDE Connector 5. Connect the power connector into the power socket of your hard drive. Power Connector 6. Secure the hard drive with the four small screws provided. 7. Push the hard drive and hard drive holder back into the case and refasten the external screws from Step 1 on the previous page. 7 If you are using the Network Storage Center for the first time, the Setup Wizard will provide you with a simple and easy way to set up the device. The Setup Wizard will guide you through the connections of the necessary cables as well as the settings for network configuration. Note: In the Setup Wizard, as well as the Network Storage Center’s web user interface, you will frequently see the term “Network HD”. It is interchangeable with the term “Network Storage Center” and both are used to describe the HNAS1. Please note, however, that “Network HD” is different from the term “HD” or “hard drive”. “HD” or “hard drive” is used to describe a basic 3.5” IDE hard drive, not the Network Storage Center. Please follow the steps outlined below: 1: Activate The Utility Software Place the utility CD (included with the HNAS1 package) into your CDROM drive and wait for the Auto-run menu to appear on your screen. Then click on Quick Setup Wizard. If the utility does not activate automatically, click the Start button in the lower left corner of your screen, select Run, type D:\autorun.exe (where D is the letter of your CD-ROM drive) into the open window and click Enter. 8 Welcome Page The figure shown above is the Welcome page for the Quick Setup Wizard. Follow the program, as shown in the pages that follow, to complete the LED check, installation of basic cables, and network configuration. Click Next to continue. 9 2: Follow the Setup Wizard to Complete Installation Power On Connect the power cord and press the “Power” button on the front panel of the Network Storage Center. Ensure that the “Power” LED is lit green. Note: To power off the device, hold down the “Power” button for at least five seconds until the “Power” LED starts blinking and then turns off. 10 LAN Connection Connect the Network Storage Center and router/switch (or PC) with an RJ-45 Ethernet cable. Ensure that the “Link/Act” LED is lit green. 11 3: Click “Next” to start the Scan Prepare to Scan 12 Scan Hard Drives on the Network The Setup Wizard will scan your network to locate all available Network Storage Centers (or Network HDs) 13 Refer to the figure on the following page. Select the Device you want to set up and Click “Next” Reachable Status Action NO The Network HD’s Changes the network network settings are not settings and creates two compatible with your LAN. shortcuts to access and set up the Network HD YES The Network HD’s Creates two shortcuts to network settings are access and set up the compatible with your LAN Network HD 14 Network Storage Center(s) Found1 The Setup Wizard should automatically assign to the device an IP address that is consistent with your existing network settings. 1 If an error occurs: If your PC obtains IP addresses automatically, the Setup Wizard cannot get the PC’s IP to setup its network configuration, IP, etc. To solve the problem, connect your PC to a router with a DHCP server or specify your IP in your IP address in the Windows Network dialog box. For IP Protocol setup, refer to “IP Protocol Setup” in the manual. 15 User name/Password Reminder When the box shown above appears, please input “admin” in both fields, as these are the default values for both the User Name and Password. For more information, please refer to the user’s manual. Settings 16 The Setup Wizard should complete successfully. This will be indicated by the red check marks in the figure on the previous page. If the Setup Wizard does not complete successfully, please try the following: x Check your network or PC settings to make sure that they are configured properly x Re-start and proceed through the Setup Wizard again x Refer to the user’s manual (on the CD) for help 17 Please read this carefully. If the Setup Wizard completes successfully, the message shown above will appear. Please read it carefully and click OK. x The shortcut “Setup My Network HD” will connect you to the device’s web user interface when you double-click on it. Again, the default User Name and Password are both “admin”. x The shortcut “Access My Network HD” will allow you to access the drive and shared folders when you double-click on it. Click OK to setup your Network HD Click OK to access the device’s web-based user interface, or click Cancel to close the Setup Wizard program without opening the webpage. 18 Setup my Network HD Set up the Network HD via web browser. Access my Network HD Access the drive and shared folders. Icons Created When you see that the two icons have been created on the desktop of your PC, you can start using the Network Storage Center or configure additional settings via the web-based user interface. Regarding the settings, please refer to the “Management Guide” in the user’s manual. Note: It is recommended (but not necessary) that you map the Network HD to your PC as a network drive. The device will then automatically reconnect and always be available as a network drive whenever you re-start your PC. Regarding the steps for access and setup, please follow the instructions in the pages that follow. 19 1. Click the “Access my Network HD” icon to access the Network Storage Center. There are three pre-defined accounts for you to use: all, power, guest. By default, their authorization levels are set as follows: a. ALL=Read/Write b. Power=Read/Write c. Guest=Read Only The user can adjust the authorization levels of these accounts by clicking on Share in the “Folder Configuration” page within the “Share” section of the device’s webpage. 2. By default, you can enter “all”, “power”, or “guest” for the Username and Password. For example: x x Username: all Password: all 20 In order to configure the Network Storage Center via your computer using a web browser, please follow the steps listed below: 1. Double click the “Setup my Network HD” icon on your desktop screen. 2. Type the device’s new IP address into the URL web address location and press Enter. The Username and Password window will appear. x Enter admin in the User Name location (default value). x Enter admin in the Password location (default value). x Click the “OK” button. 21 The Network Storage Center has a web-based graphical user interface (GUI) that can be accessed using a standard HTML (HTTP v1.0) compliant browser. The homepage of the Network Storage Center is shown below. Once you have checked the Network Settings for the device, go to the “Administration” section and click on “HD Format”. There, you can format the newly installed hard drive. 22 As mentioned in “Step 3: Setup Wizard” on page 19, it is recommended (but not necessary) that you map the Network Storage Center to your PC as a network drive. This section will show you how to map the “Share” folder to your PC as a network drive. Once you complete the steps outlined in this section, you will then automatically reconnect to the “Share” folder whenever you re-start your PC, and it will always be available as a network drive. You will need to start by creating an “Advanced User” account in the “User Configuration” section of the device’s web UI. (The reason for this will be explained in the pages that follow.) 1. In your web browser’s address field, type in the Network Storage Center’s IP address and enter the user name and password. Remember that if you have not yet changed them, the default user name and password will both be “admin”. 2. Click on “Share” in the menu at the top of the page. 23 3. In the “Share” page, click on “User Configuration”. 24 4. In the “User Configuration” page, create an “Advanced User”. You can do this by clicking on any of the three “Basic User” icons, or by creating an entirely new “Advanced User” of your choice by clicking “Add”. For this example, click on the “Power” icon. Then click “Add”. 25 5. In the “User ‘power’ configuration” page, enter a new password and then confirm it by typing it again in the “Confirm Password” field. Please make sure that the password is at least six characters long. 6. Then configure the remaining items. In the “User Description” field, provide a word or phrase that is easy to remember, or leave the default text as it is. Next, select “Yes” for “FTP Access”, and “Supervisor” for the “Accessed Level”. Then, select the “FTP Folder”, which in this case is the “Share” folder. Finally, click on “Apply”. 26 7. Now, click on “Share” again in the menu at the top of the page. Then, click on “Folder Configuration”. 8. In the “Folder Configuration” page, click on the “Share” folder. 27 9. In the user list at the bottom of the page, click on “Read & Write” for the user “Power”. Then click “Apply”. 28 10. Now go to the Windows “Start” menu and click on “My Computer”. At the bottom of the window, you will see the category “Network Drives”. 29 Once you have finished mapping the “Share” folder to your PC as a network drive, it will appear in this category. (Microsoft Windows’ definition for mapping a network drive is: assigning a drive letter to a network computer or folder.) It is highly recommended that you create all subsequent folders, within which you want to share files, inside the “Share” folder. This way, you only have to map the “Share” folder to your PC. (For example, if you want to create a separate folder for your video files, please place the new “Video” folder inside the “Share” folder.) Otherwise, if you create new folders independently (i.e. outside the “Share” folder), you will need to map them all to your PC individually. 11. Click on “Tools” in the menu at the top of the window. Select “Map Network Drive”. 30 12. In the “Drive” field, please select an unused lettered drive that you would like to assign the “Share” folder to. 13. a) In the “Folder” field, select the “Share” folder via the “I-drive” path. (“I-drive” is the name of the Network Storage Center as it appears in the “Workgroup” within the “Microsoft Windows Network”.) 31 13. b) If this folder path does not appear in the scroll-down menu, click on “Browse”. Then click on “Entire Network” beneath “My Network Places”. Click on “Microsoft Windows Network”. Then click on “Workgroup”. In the “Workgroup” menu, you should see the “I-drive”. Click on it. Then click on the “Share” folder. Finally, click “Ok”. 32 14. Once you have selected the folder, check the box for “Reconnect at logon”. 15. Click on the link for “Connect using a different user name.” 16. In the “Connect As…” box that appears, type the Advanced User “User Name” and “Password ” you created in Steps 1-8, in this case “power”. 33 17. Click “Ok”. Finally, back in the “Map Network Drive” box, click “Finish”. 18. You will see that the icon for the “Share” folder mapping has appeared in the “Network Drives” section. (It is recommended that you create a shortcut for this new network drive on your desktop. The reason for this is that you will always be able to connect to the “Share” folder using this shortcut. The two shortcuts that were created earlier on the desktop via the Setup Wizard are dependent on the device’s IP address. If the IP address changes, these shortcuts will not work. In this case, you will have to run the Setup Wizard again to create two new shortcuts.) 34 Note: The explanation below will briefly discuss why it is recommended to create an “Advanced User” and, subsequently, map the “Share” folder as a network drive. If you are using Windows XP, you may find that when you try to access the shortcut “Access My Network HD”, which was created via the Setup Wizard, a box will appear that asks for a password. The “User name” field will already be filled in, and grayed out (i.e. unchangeable), as Windows will try to sign you in under the user name “Guest”. If you have not previously created a “Guest” account, you will be unable to access the “Share” folder. This is why it was recommended in the previous pages of this section that you map the “Share” folder as a network drive using an “Advanced User” as the logon account. 35