1
NetXMS User Manual
© 2003 — 2010 Raden Solutions
Version 1.0.8
NetXMS User Manual
Table of Contents
1 Introduction....................................................................................................................6
1.1 About NetXMS...........................................................................................................6
1.2 What you can do with NetXMS....................................................................................6
1.3 About this manual.....................................................................................................6
2 Basic Concepts.................................................................................................................7
2.1 Overview of System Architecture.................................................................................7
2.2 Objects....................................................................................................................8
2.3 DCI (Data Collection Items)........................................................................................8
2.4 Thresholds................................................................................................................9
2.5 Events and Alarms...................................................................................................10
3 Initial Configuration and Network Discovery.......................................................................11
3.1 Configure Your NetXMS Server..................................................................................11
3.2 Secure your installation............................................................................................11
3.3 Discover the network...............................................................................................12
3.4 Manually add nodes.................................................................................................12
4 Objects.........................................................................................................................13
4.1 Overview................................................................................................................13
4.2 Top Level Objects....................................................................................................13
4.3 Subnet Objects........................................................................................................14
4.4 Template Objects.....................................................................................................14
4.5 Template Group.......................................................................................................14
4.6 Container Objects....................................................................................................14
4.7 Node Objects..........................................................................................................14
4.8 VPN Connector Objects.............................................................................................15
4.9 Interface Objects.....................................................................................................15
4.10 Network Service Objects.........................................................................................15
4.11 Cluster Objects......................................................................................................15
4.12 Condition Objects...................................................................................................16
4.13 Custom Attributes..................................................................................................16
4.14 Object Status........................................................................................................16
4.14.1 Object Status Calculation.................................................................................17
5 Data Collection...............................................................................................................18
5.1 How data collection works.........................................................................................18
5.2 DCI configuration.....................................................................................................18
5.2.1 Basic configuration............................................................................................18
5.2.1.1 Description................................................................................................18
5.2.1.2 Parameter.................................................................................................18
5.2.1.3 Origin.......................................................................................................18
5.2.1.4 Data Type.................................................................................................19
5.2.1.5 Polling Interval...........................................................................................19
5.2.1.6 Use Advanced Schedule..............................................................................19
5.2.1.7 Associate with cluster resource....................................................................20
5.2.1.8 Retention Time..........................................................................................20
5.2.1.9 Status.......................................................................................................20
5.2.2 Data Transformations........................................................................................20
5.2.3 Thresholds.......................................................................................................21
5.2.3.1 Overview...................................................................................................21
5.2.3.2 Instance....................................................................................................21
5.2.3.3 Threshold Processing..................................................................................21
5.2.3.4 Threshold Configuration..............................................................................22
5.2.3.5 Thresholds and Events................................................................................23
5.2.4 Push parameters...............................................................................................24
5.3 Templates...............................................................................................................24
5.3.1 Overview.........................................................................................................24
5.3.2 Creating a new template....................................................................................25
2
NetXMS User Manual
5.3.3 Configuring an existing template.........................................................................25
5.3.4 Applying an existing template to node.................................................................25
5.3.5 Removing an existing template from node............................................................25
5.3.6 Macros in template items...................................................................................26
5.4 Working with collected data......................................................................................26
5.4.1 View collected data in graphical form...................................................................26
5.4.2 View collected data in textual form......................................................................28
5.4.3 Export DCI data................................................................................................28
6 Event Processing............................................................................................................29
6.1 Event Processing Overview.......................................................................................29
6.2 Event Processing Policy............................................................................................29
6.3 Alarms...................................................................................................................30
6.3.1 Alarms Overview...............................................................................................30
6.3.2 Generating Alarms............................................................................................31
6.3.3 Automatic Alarm Termination.............................................................................32
6.4 Situations...............................................................................................................32
6.4.1 Situations Overview..........................................................................................32
6.4.2 Defining Situations............................................................................................33
6.4.3 Updating Situations...........................................................................................33
7 Log Monitoring...............................................................................................................35
7.1 Introduction............................................................................................................35
7.2 Agent Configuration for Log Monitoring.......................................................................35
7.3 Syslog Monitoring....................................................................................................35
7.4 Parser Definition File................................................................................................35
7.4.1 Overview.........................................................................................................35
7.4.2 Global Parser Options........................................................................................36
7.4.3 <file> Tag........................................................................................................36
7.4.4 Macros.............................................................................................................36
7.4.5 Matching rules..................................................................................................37
7.4.5.1 <match> Tag............................................................................................37
7.4.5.2 <id> Tag...................................................................................................37
7.4.5.3 <source> Tag............................................................................................38
7.4.5.4 <level> Tag...............................................................................................38
7.4.5.5 <facility> Tag............................................................................................39
7.4.5.6 <tag> Tag.................................................................................................40
7.4.5.7 <severity> Tag..........................................................................................40
7.4.5.8 <description> Tag......................................................................................40
7.4.5.9 <event> Tag.............................................................................................41
7.4.5.10 <context> Tag.........................................................................................41
7.4.6 Examples of Parser Definition File.......................................................................41
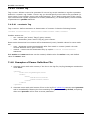
8 NetXMS Scripting Language (NXSL)..................................................................................43
8.1 NXSL Overview........................................................................................................43
8.2 "Hello, World!" Program............................................................................................43
8.3 Types.....................................................................................................................44
8.4 Variables................................................................................................................45
8.5 Functions................................................................................................................45
8.6 Arrays....................................................................................................................45
8.7 Operators...............................................................................................................45
8.7.1 Arithmetic Operators.........................................................................................45
8.7.2 Assignment Operator.........................................................................................46
8.7.3 Bitwise Operators..............................................................................................46
8.7.4 Comparison Operators.......................................................................................46
8.7.5 Incrementing/Decrementing Operators................................................................46
8.7.6 Logical Operators..............................................................................................47
8.7.7 String Operators...............................................................................................47
8.8 Control structures....................................................................................................47
8.8.1 if.....................................................................................................................47
8.8.2 else.................................................................................................................47
8.8.3 while...............................................................................................................47
3
NetXMS User Manual
8.8.4 do-while..........................................................................................................48
8.8.5 for..................................................................................................................48
8.8.6 break..............................................................................................................48
8.8.7 continue..........................................................................................................48
8.8.8 switch..............................................................................................................48
8.8.9 return..............................................................................................................49
8.8.10 exit...............................................................................................................49
8.9 Expressions.............................................................................................................49
9 Troubleshooting.............................................................................................................50
9.1 Server problems......................................................................................................50
9.2 Agent problems.......................................................................................................50
10 Complete Reference......................................................................................................51
10.1 Server Configuration..............................................................................................51
10.1.1 File: netxmsd.conf...........................................................................................51
10.1.2 Table in Database: config.................................................................................52
10.2 Agent Configuration...............................................................................................58
10.2.1 File: nxagentd.conf..........................................................................................58
10.3 Web Server (nxhttpd) Configuration.........................................................................61
10.3.1 File nxhttpd.conf.............................................................................................61
10.4 Command Line Tools..............................................................................................61
10.4.1 Local Server Administration Tool (nxadm)..........................................................61
10.4.2 Agent GET Tool (nxget)....................................................................................62
10.4.3 NetXMS Database Manager (nxdbmgr)...............................................................64
10.5 NetXMS Scripting Language (NXSL)..........................................................................65
10.5.1 Formal Grammar.............................................................................................65
10.5.2 Generic Built-in Functions.................................................................................67
10.5.2.1 abs.........................................................................................................67
10.5.2.2 AddrInRange............................................................................................67
10.5.2.3 AddrInSubnet...........................................................................................68
10.5.2.4 classof....................................................................................................68
10.5.2.5 d2x.........................................................................................................68
10.5.2.6 exp.........................................................................................................68
10.5.2.7 gmtime...................................................................................................68
10.5.2.8 index......................................................................................................69
10.5.2.9 left.........................................................................................................69
10.5.2.10 length...................................................................................................70
10.5.2.11 localtime................................................................................................70
10.5.2.12 log........................................................................................................70
10.5.2.13 log10....................................................................................................70
10.5.2.14 lower.....................................................................................................70
10.5.2.15 ltrim......................................................................................................70
10.5.2.16 max......................................................................................................71
10.5.2.17 min.......................................................................................................71
10.5.2.18 pow......................................................................................................71
10.5.2.19 right......................................................................................................71
10.5.2.20 rindex...................................................................................................71
10.5.2.21 rtrim.....................................................................................................72
10.5.2.22 SecondsToUptime...................................................................................72
10.5.2.23 strftime.................................................................................................72
10.5.2.24 substr...................................................................................................73
10.5.2.25 time......................................................................................................74
10.5.2.26 trace.....................................................................................................74
10.5.2.27 trim......................................................................................................74
10.5.2.28 typeof...................................................................................................74
10.5.2.29 upper....................................................................................................74
10.5.3 Type Cast.......................................................................................................75
10.5.4 Functions for Accessing DCI Data......................................................................75
10.5.4.1 FindDCIByDescription................................................................................75
10.5.4.2 FindDCIByName.......................................................................................75
4
NetXMS User Manual
10.5.4.3 GetDCIObject...........................................................................................76
10.5.4.4 GetDCIValue............................................................................................76
10.5.5 Functions for Accessing Object Data..................................................................76
10.5.5.1 FindNodeObject........................................................................................76
10.5.5.2 GetCustomAttribute..................................................................................77
10.5.5.3 GetInterfaceName....................................................................................77
10.5.5.4 GetNodeParents.......................................................................................77
10.5.6 Functions for Accessing Situations.....................................................................78
10.5.6.1 FindSituation............................................................................................78
10.5.6.2 GetSituationAttribute................................................................................78
10.5.7 Functions for Event Processing..........................................................................78
10.5.7.1 PostEvent................................................................................................78
10.5.8 Object Classes................................................................................................79
10.5.8.1 DCI.........................................................................................................79
10.5.8.2 Event......................................................................................................80
10.5.8.3 Generic NetXMS Object.............................................................................80
10.5.8.4 Node.......................................................................................................80
10.6 Macros for Event Processing....................................................................................82
10.7 Agent Parameters..................................................................................................83
10.7.1 Common Parameters.......................................................................................83
10.7.2 Windows-specific Parameters............................................................................87
5
NetXMS User Manual
1 Introduction
1.1 About NetXMS
NetXMS is an enterprise class monitoring system, released under GPL2 license. It can be used for
monitoring entire IT infrastructure, starting with SNMP-capable hardware (such as switches and
routers) and ending with applications on your servers. NetXMS is an extremely reliable and
powerful monitoring system, enabling you to improve your network availability and service levels.
The system has three-tier architecture: the information is collected by monitoring agents (either
our own high-performance agents or SNMP agents) and delivered to monitoring server for
processing and storage. Network administrator can access collected data using Windows-based
Management Console, WEB Interface or Management Console for PocketPC.
Having been designed with flexibility and scalability in mind, NetXMS features a wide range of
supported platforms, leaving you the freedom of choice of platform(s) for your network. NetXMS
Server, the core system, is currently available for Windows NT/2000/2003/XP, Linux, Solaris, AIX,
HP-UX, and FreeBSD. High-performance modular monitoring Agents are available for the same
platforms, as well as for OpenBSD, NetBSD, Novell NetWare, and Nokia IPSO. NetXMS currently
supports the following databases: MySQL, PostgreSQL, SQLite, Microsoft SQL and Oracle.
1.2 What you can do with NetXMS
NetXMS can help you accomplish many tasks in network management.
With NetXMS you can:
• monitor status of your network devices;
• monitor status of your hosts;
• monitor status of applications running on your servers;
• collect performance data from your network devices;
• collect performance data from servers;
• store collected data for later analysis;
• monitor text log files and Windows event log;
• discovery network IP topology;
• automatically discover new hosts and devices;
• notify system administrator(s) about problems via e-mail or SMS.
1.3 About this manual
This manual is intended for both NetXMS administrators and users, and provides all information
necessary to successfully operate NetXMS. It's assumed that you are using NetXMS Console for
Windows (nxcon.exe).
6
NetXMS User Manual
2 Basic Concepts
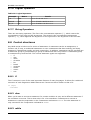
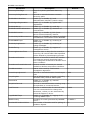
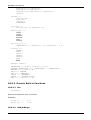
2.1 Overview of System Architecture
The system has three-tier architecture: the information is collected by monitoring agents (either
NetXMS native agents or SNMP agents) and delivered to monitoring server for processing and
storage. Network administrator can configure system and access collected data using Windowsbased Management Console, WEB Interface or Management Console for PocketPC. You can see an
overview of NetXMS architecture on Figure 1.
Figure 1: NetXMS architecture overview
All collected data and system configuration is stored in the SQL database. You can choose Oracle,
Microsoft SQL Server, PostgreSQL, MySQL, or SQLite as your database engine. Database server
can be installed on the same physical machine, or be a separate server (as shown on Figure 1).
NetXMS has its own lightweight web server, which does not depend on any general-purpose web
server engines. It is a separate component and can be installed on the same physical machine as
NetXMS server, or on a remote server.
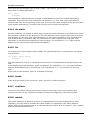
The system was designed to be easily extendable; so all three tiers — server, agent, and client —
have modular structure. Figure 2 shows main software layer of NetXMS system.
Figure 2: NetXMS main software layer
Module 1
Module 2
Module N
Subagent 1
Subagent 2
Subagent N
Web UI
Server Module API
Subagent API
Windows
Console
PocketPC
Console
Session Manager
Server Core
Agent Core
Client Library
DB Driver API
DB driver
Communication Library
DB driver
NetXMS Foundation Library
All system components use two libraries: NetXMS Foundation Library and Communication Library.
These libraries provide the communication between all system components. The server also has
an underlying DB Driver API layer, which provides uniform database engine interface by using
database drivers. This approach allows developers to add support for new database engines in a
matter of days, without changing or even recompiling server code.
On top of server core, another interface - Server Module API - provides a uniform way to create
server extensions. The same approach is used with NetXMS agent, which has a Subagent API on
top of agent core.
Portable NetXMS Client Library provides consistent API for accessing and managing NetXMS
server. This library has been ported to Windows, UNIX, and Pocket Windows platforms. All client
components of NetXMS – management console, alarm viewer, web server, and console for Pocket
PC – use this library. If you wish to write your own client application for NetXMS or need to
integrate existing system with NetXMS, you can use our client library. Please refer to NetXMS
Client Library Programmer's Manual for detailed information.
7
NetXMS User Manual
2.2 Objects
All network infrastructure monitored by NetXMS inside monitoring system is represented as a set
of objects. Each object represents one physical or logical entity (such as host or network
interface), or a group of entities. Objects are organized into hierarchical structure. There are 12
different object classes:
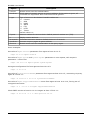
Table 1: Object classes
Object class
Description
Entire Network
Aabstract object representing root of IP topology tree. All subnet
objects are located under it. The system can have only one object of
this class.
Subnet
Object representing IP subnet. Typically, objects of this class are
created automatically by the system to reflect system's knowledge of
IP topology.
Node
Object representing physical host or network device. These objects
can be created either manually by administrator or automatically
during network discovery process.
Cluster
Object representing cluster consisting of two or more hosts.
Interface
Object representing network interface of node. These objects are
created automatically by the system during configuration polls.
Network Service
Object representing network service running on a node (like http or
ssh).
VPN Connector
Object representing VPN tunnel endpoint. Such objects can be
created to add VPN tunnels to network topology known by NetXMS
server.
Service Root
Abstract object representing root of your service tree. System can
have only one object of this class.
Container
Grouping object, which can contain nodes, subnets, clusters,
conditions, or other containers. With the help of container objects
you can build object tree, which will represent logical hierarchy of IT
services in your organization.
Condition
Object representing complicated condition – like "cpu on node1 is
overloaded and node2 has been down for more than 10 minutes".
Template Root
Abstract object representing the root of your template tree.
Template Group
Grouping object, which can contain templates or other template
groups.
Template
Data collection template. See Data Collection section for more
information about templates.
Every object has a set of attributes; some of them are common (like ID and name), while others
depend on object class. For example, attribute "SNMP community string" has only node objects.
2.3 DCI (Data Collection Items)
Every node can have many parameters, such as CPU utilization or amount of free memory, which
can be collected by management server, checked for threshold violations, and stored in the
database. In NetXMS, parameters configured for collection are called Data Collection Items or DCI
for short. One DCI represents one node's parameter, and unlimited number of DCIs can be
configured for any node.
Each data collection item has various attributes controlling its handling:
8
NetXMS User Manual
Table 2: Data collection item attributes
Attribute
Description
Description
A free-form text string describing DCI. It is not used by the server
and is intended for better information understanding by operators.
Origin
Origin of data (or method of obtaining data). Possible origins are
NetXMS agent, SNMP agent, CheckPoint SNMP agent, or Internal
(data generated inside NetXMS server process).
Name
Name of the parameter of interest, used for making a request to
target node. For NetXMS agent it will be parameter name and for
SNMP agent it will be an SNMP OID.
Data Type
Data type for a parameter. Can be one of the following: Integer,
Unsigned Integer, 64-bit Integer, 64-bit Unsigned Integer, Float
(floating point number), or String. Selected data type affects
processing of collected data. For example, you cannot use operations
like ”less than” or ”greater than” on strings.
Retention Time
This attribute specifies for how long collected data should be kept in
database, in days. Minimum retention time is 1 day, maximum is not
limited. However, keeping too many collected values for too long will
lead to significant increase of your database size and possible
performance degradation.
Schedule Type
Type of the collection schedule used; can be either simple or
advanced. In a simple mode, values are taken from target at fixed
intervals. In an advanced mode, cron-like scheduling table can be
used to specify the exact time for polling. This can be useful if, for
example, you wish to check the file size every Monday and Friday at
7:00.
Polling Interval
The interval between two polls, in seconds. Applicable only if simple
schedule type is selected.
Scheduling Table
Cron-like scheduling table for data collection polls. Applicable only if
advanced schedule type is selected.
Threshold List
List of defined thresholds.
Instance
A free-form text string, passed as 6th parameter to events associated
with thresholds. You can use this parameter to distinguish similar
events related to different instances of the same entity. For example,
if you have an event generated when file system is low on free
space, you can set instance attribute to file system mount point.
2.4 Thresholds
Each threshold is a combination of condition and events pair — if condition becomes true,
associated "activation" event generated, and when it's becomes false again, "deactivation" event
will be generated. Thresholds let you take a proactive approach to network management. You can
define thresholds for any data collection items that you are monitoring. When setting thresholds,
first determine what would constitute reasonable thresholds. To decide on a threshold value, you
need to know what is normal value and what is out of range. Only you can decide what is normal
behavior for a device on your network. Generally, we recommend that you collect information
about a device throughout one complete business cycle, before determining the normal high/low
range. Consider collecting values such as error rates, retry limits, collisions, throughput, relation
rates, and many more. You also have the possibility to define more than one threshold for a single
DCI, which allows you to distinguish between different severity conditions.
9
NetXMS User Manual
2.5 Events and Alarms
Many services within NetXMS gather information and generate events that are forwarded to
NetXMS Event Queue. Events can also be emitted from agents on managed nodes, or from
management applications residing on the management station or on specific network nodes. All
events are processed by NetXMS Event Processor one-by-one, according to the processing rules
defined in Event Processing Policy. As a result of event processing, some actions can be taken,
and event can be shown up as alarm. NetXMS provides one centralized location, the Alarm
Browser, where the alarms are visible to your team. You can control which events should be
considered important enough to show up as alarms. You and your team can easily monitor the
posted alarms and take appropriate actions to preserve the health of your network.
Examples of alarms include:
• A critical router exceeded its threshold of traffic volume that you configured in Data
Collection.
• The shell script that you wrote gathered the specific information you needed and posted it
to the NetXMS as an event.
• One of your mission-critical servers is using its UPS battery power.
• An SNMP agent on a managed critical server forwarded a trap to NetXMS because it was
overheating and about to fail.
10
NetXMS User Manual
3 Initial Configuration and Network Discovery
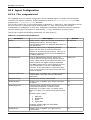
3.1 Configure Your NetXMS Server
You have to set some important server parameters after installation. These parameters are
accessible through the Server Configuration window in the console. To access the Server
Configuration window, press F9 on your keyboard or on the View menu click Control Panel to
access the Control Panel window, and then click the Server Configuration icon. To edit a
setting, double click on the row in the table or right-click and select Edit. The following
parameters may need to be changed:
Table 3: NetXMS Server configuration parameters
Parameter
Value to be set
NumberOfStatusPollers
If you plan to monitor large number of hosts, increase this
parameter from the default value to approximately 1/10 of
host count.
NumberOfConfigurationPollers
If you plan to monitor large number of hosts, increase this
parameter from the default value to approximately 1/20 of
host count.
NumberOfDataCollectors
If you plan to monitor large number of hosts, increase this
parameter from the default value to approximately 1/10 – 1/5
of host number. Use larger value if you plan to gather many
DCIs from each host.
RunNetworkDiscovery
If you plan to use automatic network discovery, set this
parameter to 1. You may also use Network Discovery item in
Control Panel for simplified discovery network configuration.
DiscoveryFilter
If you want NetXMS to discover only specific hosts, set this
parameter to the name of filtering script. After installation,
NetXMS server has three preconfigured filtering scripts:
• Filter::Agent — will discover only hosts with active
NetXMS agent.
• Filter::SNMP — will discover only hosts with active SNMP
agent.
• Filter::AgentOrSNMP — will discover only hosts with
either active NetXMS agent or active SNMP agent.
You can also create your own filtering scripts. See "Scripting"
chapter for more information.
DefaultCommunityString
Set this parameter to default SNMP community string used on
your devices. This community string will be used during
network discovery process and manual host addition.
EnableSyslogDaemon
Set this parameter to 1 if you want to enable NetXMS built-in
syslog server.
After changing these parameters, you have to restart your NetXMS server, so that the changes
will take effect. For simplified network discovery configuration you may also use Network
Discovery option in Control Panel.
3.2 Secure your installation
We recommend that you change password for admin user immediately after installation, in order
to prevent possible unauthorized access to the system. You can change user passwords in the
User Manager. To access the User Manager window, press F9 or on the View menu click
11
NetXMS User Manual
Control Panel to access the Control Panel window, and then click the Users icon. To change a
password, right-click user record and select Set Password.
3.3 Discover the network
If you enabled automatic network discovery, wait for initial network discovery completion. This
process can take time, depending on size and complexity of your network. For large networks, we
recommend that you let NetXMS run over night to gather the majority of network information
available. You can watch discovery process in real time using NetXMS Management Console. Go to
Object Browser or open default network map and see for new devices and networks.
Please note that for successful network discovery, your network should meet the following
requirements:
• NetXMS server should have access to switches and routers via SNMP.
• All your network devices should use the same community string, and this community string
should be specified as value for DefaultCommunityString parameter in server's
configuration.
3.4 Manually add nodes
If the automatic network discovery does not detect all of your hosts or devices, or you decide not
to use network discovery at all, you may need to manually add monitored nodes to the system.
The easiest way to accomplish this is to click Add Node on the Tools menu. You will be prompted
for new node name and IP address. Please note that adding new node object may take some
time, especially if a node is down or behind a firewall. After successful creation, new node object
will be placed into appropriate subnets automatically.
As soon as you add a new node to the system, NetXMS server will start regular polling to
determine node status.
12
NetXMS User Manual
4 Objects
4.1 Overview
All network infrastructure monitored by NetXMS inside monitoring system represented as a set of
objects. Each object represents one physical or logical entity (like host or network interface), or a
group of them. Objects are organized into hierarchical structure. There are 12 different object
classes:
Table 4: Object classes
Object class
Description
Entire Network
Abstract object representing root of IP topology tree. All subnet
objects are located under it. System can have only one object of this
class.
Subnet
Object representing IP subnet. Typically objects of this class are
created automatically by the system to reflect system's knowledge of
IP topology.
Node
Object representing physical host or network device. These objects
can be created either manually by administrator or automatically
during network discovery process.
Cluster
Object representing cluster consisting of two or more hosts.
Interface
Object representing network interface of node. These objects are
created automatically by the system during configuration polls.
Network Service
Object representing network service running on a node (like HTTP or
SSH).
VPN Connector
Object representing VPN tunnel endpoint. Such objects can be
created to add VPN tunnels to network topology known by NetXMS
server.
Service Root
Abstract object representing root of your service tree. System can
have only one object of this class.
Container
Grouping object which can contain nodes, subnets, clusters,
conditions, or other containers. With help of container objects you
can build object's tree which represents logical hierarchy of IT
services in your organization.
Condition
Object representing complex condition – like "cpu on node1 is
overloaded and node2 is down for more than 10 minutes".
Template Root
Abstract object representing root of your template tree.
Template Group
Grouping object, which can contain templates or other template
groups.
Template
Data collection template. See Data Collection section for more
information about templates.
Every object has a set of attributes; some of them are common (like ID and name), while others
depend on object class. For example, "SNMP community string" attribute has only node objects.
Object can also have custom attributes, defined by user or integrated application.
4.2 Top Level Objects
NetXMS has three top level objects – Entire Network, Service Root, and Template Root.
These objects serve as an abstract root for an appropriate object tree. The following table
represents possible child object classes for top level objects:
13
NetXMS User Manual
Table 5: Possible child object classes for top level objects
Object
Possible child objects
Entire Network
Subnet
Service Root
Container
Subnet
Node
Cluster
Condition
Template Root
Template Group
Template
Service Root is an abstract object representing root of the service tree or any other logical
structure. Containers can only be created under Service Root object. The system can have only
one object of this class.
Template Root is an abstract top-level object representing template tree root. Templates can only
be created under Template Root object.
All top level objects has only one editable attribute – object's name.
4.3 Subnet Objects
Subnet objects represent IP subnets. These objects are created automatically by NetXMS server to
represent known IP topology. Subnet objects can contain only node objects, which are placed
automatically inside appropriate subnet object, based on interface configuration. Subnet objects
has only one editable attribute – object's name.
4.4 Template Objects
Template object represents a template for data collection. For more information, please refer to
Templates chapter.
4.5 Template Group
Grouping object, which can contain templates or other template groups, in a form of template
tree.
4.6 Container Objects
Container objects (or simply containers) serve as building blocks for creating logical service
hierarchy. Containers can have subnets, nodes, conditions, or other containers as child objects. A
node or a subnet can be a part of one or more different containers. Containers can be created in
All Services tree. Existing nodes and subnets can be added to containers by using Bind
operation, and removed by using Unbind operation.
4.7 Node Objects
Node objects (or nodes) represent managed hosts and devices. They have a lot of attributes
controlling all aspects of interaction between NetXMS server and managed node – which data
should be collected, how status shold be checked, what protocol versions to use, and so on. Node
14
NetXMS User Manual
objects contain Interface objects, created automatically during configuration polls. In addition to
that, the user can manually create Network Service objects, which represent a service that is
accessible via the network and is running on that particular node. A user can also create VPN
Connector objects manually.
4.8 VPN Connector Objects
VPN Connector objects are created manually. In case if there is a VPN connection linking two
different networks open between two firewalls that are added to the system as objects, a user can
create a VPN Connector object on each of the firewall objects and link one to another. The
network topology will now show that those two networks are connected and the system will take
this condition into account during problem analysis and event correlation.
4.9 Interface Objects
Interface objects represent network interfaces of managed hosts and devices. Usually, these
objects are created automatically by management server during configuration polls. Interface
objects are deleted the same way they are created – automatically by the system.
4.10 Network Service Objects
Network Service object is always created under a node and represents a network service (such as
HTTP or SSH), which is accessible online (via TCP IP). Network Service objects are always created
manually. When creating a new Network Service, a user has to set a protocol type for it.
Currently, the system works with the following protocols - HTTP, POP3, SMTP, Telnet, and SSH. In
addition to that, it is also possible to define a Custom protocol type. For Custom protocol, a user
should define the TCP port number and the system will be checking whether that port is available.
For the predefined standard services the system will also check whether an appropriate response
is returned. In case of SMTP, the system will send a test mail, in case of POP3 – try to log in with
a certain user, in case of HTTP – check whether the contents of a desired web page correspond to
a certain given template.
As soon as the Network Service object is created, it will be automatically included into the status
poll. Each time when the status poll for the particular node is carried out, all Network Service
objects are polled for a reply. If an object's reply corresponds to a certain condition, its status is
set as NORMAL. If an object is not responding, its status will be hanged to CRITICAL. For more
information on object statuses and object status estimation, please refer to Object Status chapter.
4.11 Cluster Objects
Cluster object represents two or more big nodes, which are linked one to another with the cluster
software. Cluster object enables the user to define which IP addresses on the nodes are virtual
(can be moved from one node to another). Cluster object also allows carrying out a unified
customization of data collection. This is done by setting the desired data collection options on the
Cluster object and the system will collect data from all nodes that are included in that Cluster. In
addition to that, it is possible to define that certain parameters should only work on an active
node, thus making a connection between data collection parameters and Cluster resource.
The main Cluster object attribute is the list of resources. The list contains resource name and its
shared IP address. The system will use that IP address to determine which node that particular
resource currently is located on. Shared IP addresses and resource names can be entered
manually, as Cluster object attributes.
15
NetXMS User Manual
4.12 Condition Objects
Condition object represents a complex condition, which can link two or more hosts. For example,
CPU on node1 is overloaded and node2 is down for more than 10 minutes. Condition object can be
created under any container. Object attributes determine the parameters that should be collected
from a particular node, and then a formula that binds these parameters is defined. The formula
result is true or false. If the result is true, Condition object status will be changed to a certain
predefined status. If the result is false, it is returned back to the node. All superjacent object
statuses will be changed accordingly.
4.13 Custom Attributes
Every object can have custom attributes defined either by user or integrated application, via
NetXMS API. Custom attributes are distinguished by names (attribute name can contain up to 127
printable characters) and have string values of unlimited length. However, if you wish to access
custom attributes in NXSL scripts as properties of node object, you should name them conforming
to NXSL identifier naming constraints.
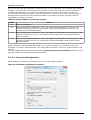
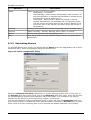
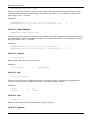
To create or change value of custom attribute manually, right-click on the object in NetXMS
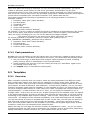
console, select Properties, and then navigate to the Custom Attributes tab.
Figure 3: Custom attributes management in console
Click Add to add a new attribute, or select existing attribute and click Edit to change its value. If
you wish to delete the attribute, select existing attribute, and then click Delete.
Custom attributes can be accessed in NXSL scripts via GetCustomAttribute function, and inserted
in message texts via %{} macro.
4.14 Object Status
Every object has a certain status at any given moment of time. Possible object statuses are the
following: NORMAL, WARNING, MINOR, MAJOR, CRITICAL, UNKNOWN, UNMANAGED, DISABLED,
and TESTING. NORMAL, WARNING, MINOR, MAJOR, and CRITICAL statuses reflect some object
16
NetXMS User Manual
state, with a certain problem severity level. The users can assign <object status calculation and
propagation algorithms>, depending on the company needs.
CRITICAL status usually means that the given object is down. UNKNOWN means that the system
cannot determine what state the given object is in yet. UNKNOWN status is usually assigned to a
newly added object, prior to the first status poll. UNMANAGED status is set in case if the status of
a particular object is currently not a subject of interest. For example, if a server has to be shut
down for a certain time, it is flagged as UNMANAGED, in order not to be flagged as CRITICAL by
the system. Objects with UNMANAGED status are not included in status polls and data collection.
DISABLED and TESTING statuses can only be assigned to Interface objects. DISABLED status
reflects that the node interface is administratively down at the moment. TESTING status is set for
an object which is currently undergoing the loopback test.
4.14.1 Object Status Calculation
For low level objects, such as Interface objects, the status is defined during the status poll, when
the system is checking whether a given object is working or is it down. As a result of status poll,
an object can be assigned either NORMAL or CRITICAL status. An object can also have DISABLED
or TESTING status. Same applies for Network Service objects.
For all other objects, their status depends on the status of their child objects. For example, a node
status will depend on the status of its Interface objects.
It is possible to create a status computation algorithm for every object. The default algorithm is
the following: the superjacent object status is defined by the most severe status of its child
object. For example, if one of the node's 10 child objects has CRITICAL status, node status is set
to CRITICAL. The same applies for all superjacent objects (all containers, where that node is
included are flagged as CRITICAL, as well, and so on).
Node status can also change depending on the existing alarms. If all Network Service interfaces
have NORMAL status, but one or more alarms with any priority other than NORMAL exist for the
given node, node status will be set in accordance with the most severe alarm status. The same
applies for all superjacent objects.
[TODO алгоритм расчета статуса]
17
NetXMS User Manual
5 Data Collection
5.1 How data collection works
Every node can have multiple data collection items configured (see Basic Concepts chapter for
detailed description of DCI). NetXMS server has a set of threads dedicated to data collection,
called Data Collectors, used to gather information from the nodes according to DCI configuration.
You can control how many data collectors will run simultaneously, by changing server
configuration parameter NumberOfDataCollectors.
All configured DCIs are checked for polling requirement every two seconds and if DCI needs to be
polled, appropriate polling request is placed into internal data polling queue. First available data
collector will pick up the request and gather information from the node, according to DCI
configuration. If a new value was received successfully, it's being stored in the database, and
thresholds are checked. After threshold checking, data collector is ready for processing new
request. Processing of a newly received parameter value is outlined on Figure 4.
Figure 4: Newly received parameter processing
New raw
value
Need delta
calculation?
Yes
Calculate delta
between previous
and current raw
value
Yes
Has
transofmation
script?
No
Yes
Pass through
transformation
script
Check
thresholds
Store to
database
No
5.2 DCI configuration
5.2.1 Basic configuration
Data collection for a node can be configured using management console. To open data collection
configuration window, right-click on the node object in object browser or on a map, and select
Data Collection. You will see the list of configured data collection items. From here, you can add
new or change existing parameters to monitor. Usual way to do something with DCIs is to rightclick on an appropriate record in the list and select a required action from the popup menu.
When you create new DCI or open an existing one, you will see a lot of attributes. The list of
definitions and descriptions for the attributes is given below.
5.2.1.1 Description
Description is a free-form text string describing DCI. It is not used by the server and is intended
for better information understanding by operators. If you use the Select button to select a
parameter from the list, description field will be filled automatically.
5.2.1.2 Parameter
Name of the parameter of interest, used for making a request to a target node. For NetXMS agent
and internal parameters it will be parameter name, and for SNMP agent it will be an SNMP OID.
You can use the Select button for easier selection of required parameter name.
5.2.1.3 Origin
Origin of data (or method of obtaining data). Possible origins are NetXMS agent, SNMP agent,
CheckPoint SNMP agent, Internal (data generated inside NetXMS server process), or Push Agent.
18
NetXMS User Manual
Last origin is very different from all the other origins, because it represents DCIs, whose values
are pushed to server by external program (usually via nxpush utility) instead of being polled by
the server based on the schedule.
5.2.1.4 Data Type
Data type for the parameter. Can be one of the following: Integer, Unsigned Integer, 64-bit
Integer, 64-bit Unsigned Integer, Float (floating point number), or String. Selected data type
affects collected data processing. For example, you cannot use operations like “less than” or
“greater than” on strings. If you select parameter from the list using the Select button, correct
data type will be set automatically.
5.2.1.5 Polling Interval
An interval between consecutive polls, in seconds. If you select the Use advanced scheduling
option, this field has no meaning and will be disabled.
5.2.1.6 Use Advanced Schedule
If you turn on this flag, NetXMS server will use custom schedule for collecting DCI values instead
of fixed intervals. This schedule can be configured on the Schedule page. Advanced schedule
consists of one or more records; each representing desired data collection time in cron-style
format. Record has five fields, separated by spaces: minute, hour, day of month, month, and day
of week. Allowed values for each filed are:
Table 6: Advanced Schedule field values
Field
minute
hour
day of month
month
day of week
0
0
1
0
0
—
—
—
—
—
Value
59
23
32
12
7 (0 or 7 is Sunday)
A field may be an asterisk (*), which always stands for “any”.
Some examples:
5 0 * * *
Run five minutes after midnight, every day.
15 14 1 * *
Run at 14:15 on the first day of every month.
*/5 * * *
Run every 5 minutes.
19
NetXMS User Manual
5.2.1.7 Associate with cluster resource
In this field you can specify cluster resource associated with DCI. Data collection and processing
will occur only if node you configured DCI for is the current owner of this resource. This field is
valid only for cluster member nodes.
5.2.1.8 Retention Time
This attribute specifies how long the collected data should be kept in database, in days. Minimum
retention time is 1 day and maximum is not limited. However, keeping too many collected values
for too long will lead to significant increase of your database size and possible performance
degradation.
5.2.1.9 Status
DCI status can be one of the following: Active, Disabled, Not Supported. Server will collect data
only if the status is Active. If you wish to stop data collection without removing DCI configuration
and collected data, the Disabled status can be set manually. If requested parameter is not
supported by target node, the Not Supported status is set by the server.
5.2.2 Data Transformations
In simplest case, NetXMS server collects values of specified parameters and stores them in the
database. However, you can also specify various transformations for original value. For example,
you may be interested in a delta value, not in a raw value of some parameter. Or, you may want
to have parameter value converted from bytes to kilobytes. All transformations will take place
after receiving new value and before threshold processing.
Data transformation consists of two steps. On the first step, delta calculation is performed. You
can choose four types of delta calculation:
Table 7: Delta calculation types
Calculation Type
Description
None
No delta calculation performed. This is the default setting for newly
created DCI.
Simple
Resulting value will be calculated as a difference between current raw
value and previous raw value. Raw value is the parameter value originally
received from host.
Average per second
Resulting value will be calculated as a difference between current raw
value and previous raw value, divided by number of seconds passed
between current and previous polls.
Average per minute
Resulting value will be calculated as a difference between current raw
value and previous raw value, divided by number of minutes passed
between current and previous polls.
On the second step, custom transformation script is executed (if presented). By default, newly
created DCI does not have a transformation script. If transformation script is presented, the
resulting value of the first step is passed to the transformation script as a parameter; and a result
of script execution is a final DCI value. For more information about NetXMS scripting language,
please consult NetXMS Scripting Language (NXSL) chapter in this manual.
20
NetXMS User Manual
5.2.3 Thresholds
5.2.3.1 Overview
For every DCI you can define one or more thresholds. Each threshold there is a pair of condition
and event – if condition becomes true, an associated event is generated. To configure thresholds,
open the data collection editor for node or template, right-click on the DCI record, select Edit
from the popup menu, and then select the Thresholds tab. You can add, modify and delete
thresholds using buttons below the threshold list. If you need to change the threshold order,
select one threshold and use arrow buttons located on the right to move the selected threshold up
or down.
5.2.3.2 Instance
Each DCI has an Instance attribute, which is a free-form text string, passed as a 6th parameter to
events associated with thresholds. You can use this parameter to distinguish between similar
events related to different instances of the same entity. For example, if you have an event
generated when file system was low on free space, you can set the Instance attribute to file
system mount point.
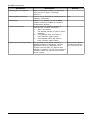
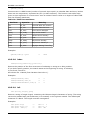
5.2.3.3 Threshold Processing
Threshold processing algorithm is outlined on Figure 5.
Figure 5: Threshold processing algorithm
New
Value
Select first
threshold in list
Yes
Finish
End of list?
No
Evaluate
threshold’s
condition
Yes
Is threshold
active?
Yes
Is true?
No
Is threshold
active?
No
Yes
Set threshold to
“active” state and
generate
associated event
Clear “active”
state and generate
“threshold
rearmed” event
21
No
Select next
threshold in list
NetXMS User Manual
As you can see from this flowchart, threshold order is very important. Let's consider the following
example: you have DCI representing CPU utilization on the node, and you wish two different
events to be generated – one when CPU utilization exceeds 50%, and another one when it
exceeds 90%. What happens when you place threshold “>50” first, and “>90” second? Table 8
shows values received from host and actions taken by monitoring system (assuming that all
thresholds are initially unarmed):
Table 8: Actions taken by monitoring system
Value
Action
10
Nothing will happen.
55
When checking first threshold (“>50”), the system will find that it's not active, but
condition evaluates to true. So, the system will set threshold state to “active” and
generate event associated with it.
70
When checking first threshold (“>50”), the system will find that it's already active, and
condition evaluates to true. So, the system will stop threshold checking and will not
take any actions.
95
When checking first threshold (“>50”), the system will find that it's already active, and
condition evaluates to true. So, the system will stop threshold checking and will not
take any actions.
Please note that second threshold actually is not working, because it's “masked” by the first
threshold. To achieve desired results, you should place threshold “>90” first, and threshold “>50”
second.
You can disable threshold ordering by checking Always process all thresholds checkbox. If it is
marked, system will always process all thresholds.
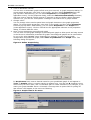
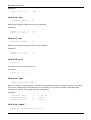
5.2.3.4 Threshold Configuration
When adding or modifying a threshold, you will see the following dialog:
Figure 6: Threshold Configuration window
22
NetXMS User Manual
1. On The threshold will be activated if drop-down menu, select what value will be checked:
• last polled value
Last value will be used. If number of polls set to more then 1, then condition will
evaluate to true only if it's true for each individual value of last n polls.
• average value
An average value for last n polls will be used (you have to configure a desired number
of polls).
• mean deviation
A mean absolute deviation for last n polls will be used (you have to configure a desired
number of polls). Additional information on how mean absolute deviation calculated can
be found here: http://en.wikipedia.org/wiki/Mean_deviation.
• diff with previous value
A delta between last and previous values will be used. If DCI data type is string, system
will use 0, if last and previous values match; and 1, if they don't.
• data collection error
An indicator of data collection error. Instead of DCI's value, system will use 0 if data
collection was successful, and 1 if there was a data collection error. You can use this
type of thresholds to catch situations, when DCI's value cannot be retrieved from
agent.
2. On the will be drop-down menu, select comparison function. Please note that not all
functions can be used for all data types. Below is a compatibility table:
Table 9: Functions compatibility table
Integer
Unsigned
Integer
Int64
Unsigned
Int64
Float
less
X
X
X
X
X
less or equal
X
X
X
X
X
equal
X
X
X
X
X
greater or equal
X
X
X
X
X
greater
X
X
X
X
X
not equal
X
X
X
X
X
String
X
X
like
X
not like
X
3. On than text field, enter a value to check against. If you use like or not like functions, the
value is a pattern string where you can use metacharacters:
• “*” (asterisk), which means “any number of any characters”;
• “?” (question mark), which means “any character”.
4. On the Events section, select events to be generated when the condition becomes true or
returns to false. By default, system uses SYS_THRESHOLD_REACHED and
SYS_THRESHOLD_REARMED events, but in most cases you will change it to your custom
events.
You can also configure threshold to resend activation event if threshold’s condition remain
true for specific period of time. You have three options – default, which will use serverwide settings, never, which will disable resending of events, or specify interval in seconds
between repeated events.
5.2.3.5 Thresholds and Events
You can choose any event to be generated when threshold becomes active or returns to inactive
state. However, you should avoid using predefined system events (their names usually start with
SYS_ or SNMP_). For example, you set event SYS_NODE_CRITICAL to be generated when CPU
utilization exceeds 80%. System will generate this event, but it will also generate the same event
23
NetXMS User Manual
when node status will change to CRITICAL. In your event processing configuration, you will be
unable to determine actual reason for that event generation, and probably will get some
unexpected results. If you need custom processing for specific threshold, you should create your
own event first, and use this event in the threshold configuration. NetXMS has some preconfigured
events that are intended to be used with thresholds. Their names start with DC_.
The system will pass the following six parameters to all events generated as a reaction to
threshold violation:
1. Parameter name (DCI's name attribute),
2. DCI description,
3. Threshold value,
4. Actual value,
5. Unique DCI identifier,
6. Instance (DCI's instance attribute).
For example, if you are creating a custom event that is intended to be generated when file system
is low on free space, and wish to include file system name, actual free space, and threshold's
value into event's message text, you can use the following message template:
“File system %6 has only %4 bytes of free space (threshold: %3 bytes)”.
For events generated on threshold's return to inactive state (default event is
SYS_THRESHOLD_REARMED), parameter list is different:
1. Parameter name (DCI's name attribute),
2. DCI description,
3. Unique DCI identifier,
4. Instance (DCI's instance attribute).
5.2.4 Push parameters
NetXMS gives you the ability to push DCI values when you need them, instead of polling them on
specific time intervals. To be able to push data to the server, you should take the following steps:
1. Set your DCI's origin to Push Agent and configure other properties as usual, excluding
polling interval, which is meaningless in case of pushed data.
2. Create separate user account or pick an existing one and give "Push Data" rights on the
DCI owning node to that user.
3. Use nxpush utility or client API for pushing data.
5.3 Templates
5.3.1 Overview
Often a situation will arise when you need to collect the same parameters from different nodes.
Such configuration making may easily fall into repeating one action many times. Things may
became even worse when you need to change something in already configured DCIs on all nodes
(for example, increase threshold for CPU utilization). To avoid these problems, you can use data
collection templates. Data collection template (or just template for short) is a special object, which
can have configured DCIs similar to nodes. When you create a template and configure DCIs for it,
nothing happens – no data collection will occur. Then, you can apply this template to one or
multiple nodes – and as soon as you do this, all DCIs configured in the template object will appear
in the target node objects, and server will start data collection for these DCIs. If you then change
something in the template data collection settings – add new DCI, change DCI's configuration, or
remove DCI – all changes will be reflected immediately in all nodes associated with the template.
You can also choose to remove a template from a node. In this case, you will have two options to
deal with DCIs configured on the node through the template – remove all such DCIs or leave
them, but remove their relation to the template. If you delete the template object itself, all DCIs
created on nodes from this template will be deleted as well.
Please note that you can apply an unlimited number of templates to a node — so you can create
individual templates for each group of parameters (for example, generic performance parameters,
MySQL parameters, network counters, etc.) and combine them, as you need.
24
NetXMS User Manual
5.3.2 Creating a new template
To create a template, right-click on Template Root or Template Group object in the Object
Browser, select Create from the popup menu, and then select Template. Enter a name for a
new template and click OK.
5.3.3 Configuring an existing template
To configure DCIs in the template, right-click on Template object in the Object Browser, and
select Data Collection from the popup menu. Data collection editor window will open. Now you
can configure DCIs in the same way as the node objects.
5.3.4 Applying an existing template to node
To apply a template to one or more nodes, right-click on the Template object in Object
Browser, and then select Apply from the popup menu. Node selection dialog will open. Select
the nodes that you wish to apply template to, and then click OK (you can select multiple nodes in
the list by holding CTRL key). Please note that if data collection editor is open for any of the target
nodes, either by you or another administrator, template applying will be delayed until data
collection editor for that node will be closed.
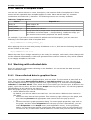
5.3.5 Removing an existing template from node
To remove a link between template and node, right-click on the Template object in the Object
Browser, and then select Unbind from the popup menu. Node selection dialog will open. Select
one or more nodes that you wish to unbind from template, and then click OK. The system will ask
you how to deal with DCIs configured on node and associated with template:
Figure 7: Remove Template window
If you select the Unbind DCIs from template option, all DCIs related to template will remain
configured on a node, but association between the DCIs and the template will be removed. Any
further changes to the template will not be reflected in these DCIs. If you later reapply the
template to the node, you will have two copies of each DCI – one standalone (remaining from
unbind operation) and one related to template (from new apply operation). Selecting the Remove
DCIs from node option will remove all DCIs associated with the template. After you click OK, node
will be unbound from template.
25
NetXMS User Manual
5.3.6 Macros in template items
You can use various macros in name, description, and instance fields of template DCI. These
macros will be expanded when template applies to node. Macro started with %{ character
combination and ends with } character. The following macros are currently available:
Table 10: Template macros
Macro
Expands to…
node_id
Node unique ID.
node_name
Node name.
node_primary_ip
Node primary IP address.
script:name
String returned by script name. Script should be stored in script library
(accessible via Control Panel -> Script Library). Inside the script, you
can access current node’s properties via $node variable.
For example, if you wish to insert node’s IP address into DCI description, you can enter the
following in the description field of template DCI:
My ip address is %{node_primary_ip}
When applying this to a node with primary IP address 10.0.0.1, DCI with the following description
will be created on the node:
My ip address is 10.0.0.1
Please note that if you change something in the node, for example, node name, these changes will
not be reflected automatically in DCI texts generated from macros. However, they will be updated
if you reapply template to the node.
5.4 Working with collected data
Once you setup DCI, data starts collecting in the database. You can access this data and work
with it in different ways.
5.4.1 View collected data in graphical form
You can view collected data in a graphical form, as a line chart. To view values of some DCI as a
chart, first open either Data Collection Editor or Last Values view for a host. You can do it
from the Object Browser or map by selection host, right-clicking on it, and then selecting Data
collection or Last DCI values. Then, select one or more DCIs (you can put up to 16 DCIs on one
graph), right-click on them, and then choose Graph from the pop-up menu. You will see graphical
representation of DCI values for the last hour.
When the graph is open, you can do various tasks:
1. Select different time interval
By default, you will see data for the last hour. You can select a different time interval in
two ways:
• Select new time interval from presets. This is done by right-clicking on the graph, and
then selecting Presets and appropriate time interval from the pop-up menu.
or
• Set time interval in graph properties dialog. To access graph properties, right-click on
the graph, and then select Properties from the pop-up menu. Alternatively, you can
select Properties on the Graph menu (main application menu). In the properties
dialog, you will have two options: select exact time interval (such as 12/10/2005 from
10:00 to 14:00) or select time interval based on current time (such as last two hours).
26
NetXMS User Manual
2. Turn on automatic refresh
You can turn on automatic graph refresh at a given interval, in graph properties dialog. To
access graph properties, right-click on the graph, and then select Properties from the
pop-up menu. Alternatively, you can select Properties on the Graph menu (main
application menu). In the properties dialog, select the Refresh automatically checkbox,
and then enter a desired refresh interval in seconds in edit box below. When automatic
refresh is on, you will see "Autoupdate" message in the status bar of graph window.
3. Change colors
You can change colors used to paint lines and graph elements in the graph properties
dialog. To access graph properties, right-click on the graph, and then select Properties
from the pop-up menu. Alternatively, you can select Properties on the Graph menu
(main application menu). Click on colored box for appropriate element in the properties
dialog, to choose different color.
4. Save current settings as preconfigured graph
You can save current graph settings as preconfigured graph to allow quick and easy access
in the future to information presented on graph. Preconfigured graphs can be used either
by you or by other NetXMS users, depending on settings. To save current graph
configuration as predefined graph, select Save as predefined from Graph menu. The
following dialog will appear:
Figure 8: Define Graph dialog
In Graph name field, enter a desired name for your predefined graph. It will appear in
Tools -> Graphs menu in console exactly as written here. You can use & character to set
shortcut key for menu item, and -> character pair to create submenus. For example, if you
name your graph NetXMS Server->Internals->Average time to queue DCI for polling for
last minute it will appear in the menu as following:
Figure 9: Graph name in the menu
27
NetXMS User Manual
In the Access List area you can add users who will have access to this graph. Note that
user creating the graph will always have full access to it, event if he is not included in the
access list.
If you need to change or delete predefined graph, you can do it via Tools -> Graphs ->
Manage menu.
5.4.2 View collected data in textual form
You can view collected data in a textual form, as a table with two columns – timestamp and value.
To view values of some DCI as a table, first open either Data Collection Editor or Last Values
view for a host. You can do it from the Object Browser or map by selection host, right-clicking
on it, and selecting Data collection or Last DCI values. Then, select one or more DCIs (each
DCI data will be shown in separate window), right-click on them and choose Show history from
the pop-up menu. You will see the last 1000 values of the DCI.
5.4.3 Export DCI data
You can export collected data to a text file. To export DCI data, first open either Data Collection
Editor or Last Values view for a host. You can do it from the Object Browser or map by
selection host, right-clicking on it, and selecting Data collection or Last DCI values. Then,
select one DCI, right-click on it and select Export data from the pop-up menu. Export
configuration dialog will appear (Figure 10).
Figure 10: Export configuration dialog
Enter the name of the file where you wish to save the data. You can use the … button next to the
File name box, to open the file system browser. Then, select separator to be used between
timestamps and values, time stamp format and time frame. Time stamp format can be either Raw
– number representing time in a UNIX timestamp format, or Text – string in format “dd/mm/yyyy
HH:MM:SS”.
Finally, click OK and wait for export process to complete.
28
NetXMS User Manual
6 Event Processing
Event processing is one of core components of NetXMS. It determines how the monitoring system
will react to various events.
6.1 Event Processing Overview
The following flowchart outlines event flow inside the monitoring system:
Figure 11: Event flow inside the monitoring system
Event Processing
Policy
Pollers
SNMP Traps
SNMP Trap
Receiver
Event
Queue
Event Processor
Alarms & Actions
SNMP Trap
Processing Policy
Event Log
External Tools
Client Session
Manager
As you can see on the flowchart, events can come from various sources: polling processes (status,
configuration, discovery, and data collection), SNMP traps, and directly from external applications
via client library. All incoming events go to single event queue for processing. A special process,
called Event Processor, takes events from the queue one by one and matches them against Event
Processing Policy. As a result, alarms may be generated and actions may be executed. If event
has write lo log attribute set, it is written to NetXMS event log at the end of processing.
Although it may seem that processing all events one by one may become a bottleneck in the
system, this should not be the case. Event processor is highly optimized, and all potentially long
operations (like action execution) are performed by separate processes.
6.2 Event Processing Policy
Actions taken by event processor for any specific event are determined by set of rules called
Event Processing Policy. Every rule has two parts – matching part, which determines if rule is
appropriate for current event; and action part, which determines actions to be taken for matched
events. Matching part consists of four fields:
29
NetXMS User Manual
Table 11: Matching part fields
Field
Description
Source
Event's source node. This field can be set to any, which will match any node, or
contain a list of nodes, subnets, or containers. If you specify subnet or container,
any node within it will be matched.
Event
Event code. This field can be set to any, which will match any event, or list of event
codes.
Severity
Event's severity. This field contains selection of event severities to be matched.
Script
Optional matching script written in NXSL. If this field is empty, no additional checks
performed. Otherwise, event will be considered as matched only if the script will
return non-zero (TRUE) return code. For more information about NetXMS scripting
language, please consult NetXMS Scripting Language (NXSL) chapter in this manual.
In the rule action part you can set alarm generation, situation update, and list of actions to be
executed. Every rule can also have a free-form textual comment.
Each event passes through all rules in the policy, so if it matches to more than one rule, actions
specified in all matched rules will be executed. You can change this behavior by setting Stop
Processing flag for the rule. If this flag is set and rule matched, processing of current event will be
stopped.
You can create and modify Event Processing Policy using Event Processing Policy Editor. To
access the Event Processing Policy Editor window, press F9 or on the View menu click
Control Panel to access the Control Panel window, and then click the Event Processing
Policy icon.
Examples:
This rule defines that for every major or critical event originated from any node within "IPSO"
container two e-mail actions should be executed.
This rule defines that for events NOKIA_CFG_CHANGED, NOKIA_CFG_SAVED,
NOKIA_LOW_DISK_SPACE, and NOKIA_NO_DISK_SPACE, originated from any node, system
should generate alarm with text "%m" (which means "use event's message text) and severity
equal to event's severity.
6.3 Alarms
6.3.1 Alarms Overview
As a result of event processing, some events can be shown up as alarms. Usually alarm
represents something that needs attention of network administrators or network control center
operators - for example, low free disk space on a server. Every alarm has the following attributes:
Table 12: Alarm attributes
Attribute
Description
Creation time
Time when alarm was created.
Last change time
Time when alarm was last changed (for example, acknowledged).
30
NetXMS User Manual
Attribute
Description
State
Alarm can be in one of three states:
• Outstanding – new alarm.
• Acknowledged - when network administrator sees an alarm, he
may acknowledge it to indicate that somebody is already aware
of that problem and is working on it.
• Terminated - Inactive alarm. When the problem is solved,
network administrator can terminate the corresponding alarm.
This will remove the alarm from the list of active alarms and it
will not be seen in the console, but alarm record will remain in
the database.
Message
Message text (usually derived from originating event's message text).
Severity
Alarm's severity – Normal, Warning, Minor, Major, or Critical.
Source
Source node (derived from originating event).
Key
Text string used to identify duplicate alarms and for automatic alarm
termination.
6.3.2 Generating Alarms
To generate alarms from events, you should edit the Alarm field in the appropriate rule of Event
Processing Policy. Alarm configuration dialog will look like this:
Figure 12: Alarm configuration dialog
Select the Generate new alarm radio button to enable alarm generation from current rule. In
the Message field enter alarm's text, and in the Alarm key field enter value, which will be used
for repeated alarms detection and automatic alarm termination. It is possible to use macros
described in the Macros for Event Processing chapter, in both fields.
You can also configure sending of additional event, if alarm will stay in Outstanding state for a
given period of time. To enable this, enter desired number of seconds in Seconds field, and then
select event to be sent. Entering value of 0 for seconds will disable additional event sending.
31
NetXMS User Manual
6.3.3 Automatic Alarm Termination
You can terminate all active alarms with a given key as a reaction for the event. To do this, select
Terminate alarm radio button in alarm configuration dialog and enter a value for alarm key. For
that field you can use macros described in the Macros for Event Processing chapter.
6.4 Situations
6.4.1 Situations Overview
Sometimes it can be necessary to process complicated dependencies or track a certain sequence
of events. This can be done by using special system objects, called Situations. Situations is a
special type of event processing objects allowing you to track the current state of your
infrastructure and process events according to it. Each situation has one or more instances, and
each instance has one or more attributes. Situation object instances are used to select a
necessary Situation object. For example, host name or host ID can be used as Situation object
instance.
By default, a newly created Situation object does not have any attributes and it is not necessary
to define attributes when creating a new Situation. Object attributes are defined automatically by
the system, when certain values are defined for those attributes. If an attributes is undefined, it is
considered that its value is empty.
Situation objects allow you to store information about current situation in attributes and then use
this information in event processing. There are two ways of working with Situation objects:
• when processing a certain event, update one or more Situation attribute values in event
processing policy;
• when processing a certain event, add one or more filtering scripts in event processing
policy. You can add a filtering scrip that will access to Situation object attributes and based
on attribute values, will return true (event should be further processed) or false (event
should not be further processed).
For example, if you have one service (service A) depending on another (service B), and in case of
service B failure you wish to get alarm about service B failure, but not about consequent service A
failure. To accomplish this, you can do the following:
1. Create situation object named ServiceStatus;
2. In event processing policy, for processing of event indicating service B failure, add
situation attribute update: update situation ServiceStatus, instance Service_B, set
attribute status to failed;
3. In event processing policy, for rule generating alarm in case of service A failure, add
additional filtering using script – to match this rule only if service B is not failed. Your script
will resemble the following:
sub main()
{
s = FindSituation("ServiceStatus", "Service_B");
if (s != NULL)
{
if (s->status == "failed")
return false;
// Don't match rule
}
return true;
// Match rule
}
Another example: an application is down or stopped on a single node of a cluster. It is not a
critical problem yet, but if the system is tracking only node down or node not running events, it
cannot be determined whether this is a single application failure or it is a consecutive event.
you can do the following:
32
NetXMS User Manual
1. Create situation object named ApplicationStatus;
2. In event processing policy, for processing of event indicating application failure, add
situation attribute update: update Situation ApplicationStatus, set attribute status to 1;
3. In event processing policy, for rule generating alarm in case of application failure, add a
filtering script – to match this rule only if ApplicationStatus attribute status is set to 1.
Thus, the system will generate a CRITICAL alarm in case if the Situation object attribute
status is equal to 1.
The full event processing sequence will look the following way:
1. When the first process on a cluster node fails, the alarm generation rule will not be
triggered, because the ApplicationStatus attribute status is equal to 0.
2. Then the situation attribute update rule is triggered and the ApplicationStatus attribute
status is set to 1 and an appropriate warning is generated.
3. When the second process on a cluster node fails, the alarm generation rule is triggered,
because the ApplicationStatus attribute status has already been set to 1. The filtering
script will return true (event should be further processed) value and CRITICAL alarm will
be generated for that cluster, indicating that two nodes are down.
4. After both nodes are up again, the system will perform a check and reset the
ApplicationStatus attribute status to 0.
6.4.2 Defining Situations
Situations can be configured via management console. To open situations editor, select View in
main menu, then Situations. You will see situations tree. At the top of the tree is an abstract root
element. Below are all defined situations – initially there are no situations, so you will see only
root element. You can create situation either by right-clicking root element and selecting Create
from pop-up menu, or by selecting Create under Situation in main menu.
Next level in the tree below situations is situation instances. Initially it is empty, but when
situations start updating, you will see existing instances for each situation.
6.4.3 Updating Situations
Situations can be updated via Event Processing Policy. To update situation, you should edit
Situation field in an appropriate rule. Situation update dialog will resemble the following:
Figure 13: Situation update dialog
33
NetXMS User Manual
You should select a situation to update, and then enter instance name and attributes to be set. In
instance name and attribute values the same macros as in alarm generation can be used.
34
NetXMS User Manual
7 Log Monitoring
7.1 Introduction
With NetXMS you can monitor changes in text log files, Windows Event Log, and built-in syslog
server. All log monitoring is done by agents, except for built-in syslog server. In general, log
processing goes as following:
1. When a new line added to log file, it is passed to appropriate log parser;
2. If the line matched one of the patterns, an event associated with this pattern is sent to the
server;
3. Server receives the event and passess to event processing policy as usual, with event
source set to the node from which the event was received.
7.2 Agent Configuration for Log Monitoring
To be able to monitor logs with NetXMS agent, you should load LOGWATCH subagent and define
parser configuration for each log file you wish to monitor.
Example of agent configuration file:
SubAgent = logwatch.nsm
# Below is log parsers definitions
*LOGWATCH
Parser = C:\NetXMS\parser1.xml
Parser = C:\NetXMS\parser2.xml
7.3 Syslog Monitoring
NetXMS has a built-in syslog server, which can be used to receive logs from network devices and
servers. It is also possible to parse incoming syslog messages in a way similar to Windows Event
Log monitoring. LOGWATCH subagent is not needed to parse syslog messages – parsing is done
by the server itself. You should only create parser configuration file for syslog in console via
Control Panel – Syslog Parser.
7.4 Parser Definition File
7.4.1 Overview
Parser definition file is an XML document with the following structure:
<parser options>
<file>file name</file>
<macros>
<macro name="name">body</macro>
<-- more <macro> tags can follow -->
</macros>
<rules>
<rule options>
<match options>regexp</match>
<id>event id</id>
35
NetXMS User Manual
<level>severity level</level>
<source>event source</source>
<event options>event</event>
<context options>context</context>
</rule>
<-- more <rule> tags can follow -->
</rules>
</parser>
Entire <macros> section can be omited, and inside <rule> tag only <match> is mandatory.
7.4.2 Global Parser Options
In the <parser> tag you can specify the following options:
Table 13: Global Parser Options
Option
Description
Default value
processAll
If this option set to 1, parser will always pass log record
through all rules. If this option set to 0, processing will stop
after first match.
0
trace
Trace level.
0
7.4.3 <file> Tag
In the <file> tag you should specify a log file to apply this parser to. To specify Windows Event
Log, prepend it's name with asterisk (*) - for example, *System.
7.4.4 Macros
In the <macros> section you can define macros for use in matching rules. For example, it can be
useful to define a macro for a timestamp preceding each log record and use it in matching rules
instead of actual regexp. You can define as many macros as you wish, each within it's own
<macro> tag. Each macro should have a unique name, defined in name attribute, and can be
used in matching rules in form @{name}.
Example: you need to parse a log file, where each line starts with timestamp in format dd/mm/yy
HH:MM:SS. You can define the following macro:
<macro name="timestamp">[0-9]{2}/[0-9]{2}/[0-9]{2} [0-9]{2}:[0-9]{2}:[0-9]
{2}</macro>
and then use it in matching rules:
<rules>
<rule>
<match>@{timestamp}.*([A-Za-z]+) failed.*</match>
<event>12345</event>
</rule>
<rule>
<match>@{timestamp}.*error.*</match>
<event>45678</event>
</rule>
</rules>
36
NetXMS User Manual
Please note that <macros> section always should be located before <rules> section in parser
definition file.
7.4.5 Matching rules
In the <rules> section you can define matching rules for log records. Each rule placed inside its
own <rule> tag. Each rule can have aditional options:
Table 14: Matching rule options
Option
Description
Default value
break
If this option set to 1 and the current line matches to regular
expression in the rule, parser will stop processing of current
line, even if global parser option processAll was set to 1. If
this option set to 0 (which is by default), processing will stop
according to processAll option settings.
0
context
Name of the context this rule belongs to. If this option is set,
rule will be processed only if given context was already
activated with <context> tag in one of the rules processed
earlier (it can be either same line or one of the previous
lines).
empty
Inside the <rule> section are additional tags: <match>, <description>, <event>, and <context>.
Only <match> section is mandatory – it specifies regular expressions against which log record
should be matched. All other tags are optional and define parser behavior if record match regular
expression.
7.4.5.1 <match> Tag
Tag <match> contains POSIX regular expression used to match log records. Parts enclosed in
parenthesis can be extracted from log the record and passed as arguments of generated event.
You can use macros defined in <macros> section. Also, is is possible to define inverted match
rules (rules when the log record is considered matching if it does not match regular expression).
Inverted match can be set by setting attribute invert to 1.
Some examples:
<match>^Error: (.*)</match>
This regular expression will match any line started with word Error: , and everything after that
word will be extracted from log record to be used with event.
<match>[0-9]{3}</match>
This regular expression will match any line containing at least 3 consecutive digits.
<match invert="1">abc</match>
This regular expression will match any line not containing charactyer sequence abc.
7.4.5.2 <id> Tag
Tag <id> can be used to filter records from Windows Event Log by event ID. You can specify
either single event ID or ID range (by using two numbers separated by minus sign). For example:
<id>7</id>
37
NetXMS User Manual
will match records with event ID equal 7, and
<id>10-20</id>
will match records with ID in range from 10 to 20 (inclusive).
This tag has no effect on text log files and can be used as a synonym for <facility> tag for syslog
monitoring.
7.4.5.3 <source> Tag
Tag <source> can be used to filter records from Windows Event Log by event source. You can
specify exact event source name or pattern with “*” and “?” metacharacters.
Some examples:
<source>Tcpip</source>
will match records with event source "Tcpip" (case-insensetive), and
<source>X*</source>
will match records with event source starting with letter "X".
This tag has no effect on text log files and can be used as a synonym for <tag> tag for syslog
monitoring.
7.4.5.4 <level> Tag
Tag <level> can be used to filter records from Windows Event log by event severity level (also
called event type in older Windows versions). Each severity level has it's own code and to filter by
multiple severity levels you should specify the sum of appropriate codes. Severity level codes are
the following:
Table 15: Event severity level codes
Code
Description
1
Error
2
Warning
4
Information
8
Audit Success
16
Audit Failure
Some examples:
<level>1</level>
will match all records with severity level "Error", and
<level>6</level>
will match all records with severity level "Warning" or "Information".
This tag has no effect on text log files, and can be used as a synonym for <severity> tag for
syslog monitoring.
38
NetXMS User Manual
7.4.5.5 <facility> Tag
Tag <facility> can be used to filter syslog records (received by NetXMS built-in syslog server) by
facility code. The following facility codes can be used:
Table 16: Facility codes
Code
Description
0
kernel messages
1
user-level messages
2
mail system
3
system daemons
4
security/authorization messages
5
messages generated internally by syslogd
6
line printer subsystem
7
network news subsystem
8
UUCP subsystem
9
clock daemon
10
security/authorization messages
11
FTP daemon
12
NTP subsystem
13
log audit
14
log alert
15
clock daemon
16
local use 0 (local0)
17
local use 1 (local1)
18
local use 2 (local2)
19
local use 3 (local3)
20
local use 4 (local4)
21
local use 5 (local5)
22
local use 6 (local6)
23
local use 7 (local7)
You can specify either single facility code or facility code range (by using two nubers separated by
minus sign). For example:
<facility>7</facility>
will match records with facility code equal 7, and
<facility>10-20</facility>
will match records with facility code in range from 10 to 20 (inclusive).
This tag has no effect on text log files, and can be used as a synonym for <id> tag for Windows
Event Log monitoring.
39
NetXMS User Manual
7.4.5.6 <tag> Tag
Tag <tag> can be used to filter syslog records (received by NetXMS built-in syslog server) by
content of "tag" field. You can specify exact value or pattern with “*” and “?” metacharacters.
Some examples:
<tag>httpd</tag>
will match records with tag "httpd" (case-insensetive), and
<tag>X*</tag>
will match records with tag starting from letter "X".
This tag has no effect on text log files and can be used as a synonym for <source> tag for
Windows Event Log monitoring.
7.4.5.7 <severity> Tag
Tag <severity> can be used to filter syslog records (received by NetXMS built-in syslog server) by
severity level. Each severity level has it's own code, and to filter by multiple severity levels you
should specify sum of appropriate codes. Severity level codes are following:
Table 17: Severity level codes
Code
Description
1
Emergency
2
Alert
4
Critical
8
Error
16
Warning
32
Notice
64
Informational
128
Debug
Some examples:
<severity>1</severity>
will match all records with severity level "Emergency", and
<severity>6</severity>
will match all records with severity level "Alert" or "Critical".
This tag has no effect on text log files and can be used as a synonym for <level> tag for Windows
Event Log monitoring.
7.4.5.8 <description> Tag
Tag <description> contains textual description of the rule, which will be shown in parser trace.
40
NetXMS User Manual
7.4.5.9 <event> Tag
Tag <event> defines event to be generated if current log record matches to regular expression
defined in <match> tag. Inside <event> tag you should specify event code to be generated (or
event name if you configure server-side syslog parsing). If you wish to pass parts of log record
text extracted with regular expression as event's parameters, you should specify correct number
of parameters in params attribute.
7.4.5.10 <context> Tag
Tag <context> defines activation or deactivation of contexts. It has the following format:
<context action="action" reset="reset mode">context name</context>
Possible actions are:
• set - activate (set "active" flag of) given context;
• clear - deactivate (clear "active" flag of) given context.
Reset mode determines how context will be deactivated (reset). Possible values for reset mode
are:
• auto - deactivate context automatically after first match in context (match rule with
context attribute set to given context).
• manual - context can be deactivated only by explicit <context action="clear">
statement.
Both action and reset attributes can be omitted; default value for action is set, and default
value for reset is auto.
7.4.6 Examples of Parser Definition File
1. Generate event with code 100000, if the line in the log file /var/log/messages contains the
word error:
<parser>
<file>/var/log/messages</file>
<rules>
<rule>
<match>error</match>
<event>100000</event>
</rule>
</rules>
</parser>
2. Generate event with code 200000 if line in the log file C:\demo.log contains word process:
and is immediatelly following the line containing text process startup failed; everything
after word process: will be sent as event parameter.
41
NetXMS User Manual
<parser>
<file>C:\demo.log</file>
<rules>
<rule>
<match>process startup failed</match>
<context action="set" reset="auto">STARTUP_FAILED</context>
</rule>
<rule context="STARTUP_FAILED">
<match>process:(.*)</match>
<event params="1">200000</event>
</rule>
</rules>
</parser>
42
NetXMS User Manual
8 NetXMS Scripting Language (NXSL)
8.1 NXSL Overview
In many parts of the system, fine tuning can be done by using NetXMS built-in scripting language,
called NXSL (stands for NetXMS Scripting Language). NXSL was designed specifically to be used
as embedded scripting language within NetXMS and, due to that, has some specific features and
limitations. Most notable one is very limited access to data outside script boundaries. For
example, from NXSL script you can neither access files on the server, nor call external programs,
nor even access data of any node object, other than the one the script is running for. NXSL is an
interpreted language – scripts first compiled into internal representation (similar to byte code in
Java), which is then executed inside NXSL VM.
8.2 "Hello, World!" Program
Syntactically, NXSL looks similar to Perl or C. Here's a simple NXSL program:
/* sample program */
sub main()
{
println "Hello!";
return 0;
}
This program will print word Hello on the screen.
Also, keep in mind that you are free to choose your own formatting style. E.g. the above could
have been written as:
/* sample program */ sub main(){println "Hello!";return 0;}
Now we'll analyze this program:
/* sample program */
Everything inside /* */ is considered a comment and will be ignored by interpreter. You can
enclose comments, like below:
/* comment /* another comment */ still comment */
You can also use single line comments:
x = 1; // everything between two slashes and end of line is a comment
Now onto next line:
sub main()
{
}
This is a function definition. A function is part of the program that can be called by other parts of
the program. A function definition always has the following form:
sub name(parameters)
{
/* the function code goes here */
}
43
NetXMS User Manual
The function can return a value to the caller and accept zero or more parameters.
The function name follows the rules for all names (formally: identifiers): it must consist entirely of
letters (uppercase and lowercase are different!), digits, underscores (_) and dollar signs ($), but
may not begin with a digit. Please note that most special identifiers start with dollar sign ($), so it
is recommended not to start your identifiers with it.
First line in function code looks like:
println "Hello!";
In this line, println is an embedded operator, which prints a given string to standard output with
carriage return, and "Hello!" is a string we want to print. Please note semicolon at the end of the
line – it's a separator between operators. Each operator should end with a semicolon.
The next, and final, line of our small program is:
return 0;
return is another built-in operator, which exits the function and sets it's return value.
8.3 Types
NXSL is loose typed programming language. The system will automatically determine each
variable type, assign a certain type to a variable and convert a variable type from one to another,
if necessary. For example, a result for 3 + «4» will be 7, because the system will automatically
convert «4» string into an integer. In case if the system is not able to automatically convert a line
into an appropriate integer, the operation will result in a runtime error.
NXSL
•
•
•
•
•
•
•
supports the following variable types:
integer (32 bit),
unsigned integer (32 bit),
integer (64 bit), unsigned integer (64 bit),
floating-point number,
string,
array,
object.
In addition to that, NXSL also supports a special variable type – NULL. This value represents a
variable with no value. NULL is the only possible value of type NULL. An attempt to perform any
type of arithmetical or string operations with NULL variable will result in system runtime
exception.
It is possible to manually convert variable to a certain type, using a special function, named
depending on the variable type. For example, string(4). That way it is also possible to convert
NULL type variables. Therefore, to avoid runtime exceptions while processing NULL type variables,
it is advised to use manual conversion.
NXSL does not require setting variable type beforehand. The only exception to this is arrays. In
case if an array is required, operator array defines its subsequent variables as arrays. Accessing
variable which was not previously assigned will return NULL value.
Although NXSL has object type variables, it is not an object-oriented language. It is not possible
to define classes or create objects at script level – only in extensions written in C++. Object type
variables are used to return information about complex NetXMS objects, like nodes or events, in a
convenient way. Please note that assigning object type variables actually holds reference to an
object, so assigning object value to another variable does not duplicate actual object, but just
copy reference to it.
44
NetXMS User Manual
To get a human-readable representation of a variable or expression type for debugging, use the
typeof() function, and to get a class name for object type variables, use classof() function.
8.4 Variables
Variables in NXSL behave the same way as variables in most popular programming languages (C,
C++, etc.) do, but in NXSL you don't have to declare variables before you use them.
The scope of a variable is the function within which it is defined. Any variable used inside a
function is by default limited to the local function scope.
8.5 Functions
8.6 Arrays
An array in NXSL is actually an ordered map. A map is a type that associates values to keys. This
type is optimized for several different uses; it can be treated as an array, list (vector), hash table
(an implementation of a map), dictionary, collection, stack, queue, and probably more. As array
values can be other arrays, trees and multidimensional arrays are also possible.
A key must be a non-negative integer. When an array is created, its size is not specified and its
map can have empty spots in it. For example, an array can have a element with a 0 key and an
element with 4 key and no keys in-between. Attempting to access an array key which has not
been defined is the same as accessing any other undefined variable: the result will be NULL.
8.7 Operators
An operator is something that you feed with one or more values, which yields another value.
8.7.1 Arithmetic Operators
Table 18: Arithmetic Operators
Example
Name
Result
-a
Negation
Opposite of a.
a+b
Addition
Sum of a and b.
a-b
Subtraction
Difference of a and b.
a*b
Multiplication
Product of a and b.
a/b
Division
Quotient of a and b.
a%b
Modulus
Remainder of a divided by b.
The division operator ("/") returns a float value unless the two operands are integers (or strings
that get converted to integers) and the numbers are evenly divisible, in which case an integer
value will be returned.
Calling modulus on float operands will yield runtime error.
45
NetXMS User Manual
8.7.2 Assignment Operator
The assignment operator is "=", which means that the left operand gets set to the value of the
expression on the rights (that is, "gets set to").
8.7.3 Bitwise Operators
Table 19: Bitwise Operators
Example
Name
Result
~a
Not
Bits that are set in a are not set, and vice versa.
a&b
And
Bits that are set in both operand are set.
a|b
Or
Bits that are set in either operand are set.
a^b
Xor
Bits that are set in only one operand are set.
a << b
Shift left
Shift the bits of a b steps to the left (each step means "multiply
by two").
a >> b
Shift right
Shift the bits of a b steps to the right (each step means "divide
by two").
8.7.4 Comparison Operators
Comparison operators allow you to compare two values.
Table 20: Comparison Operators
Example
Name
Result
a == b
Equal
TRUE if a is equal to b.
a != b
Not equal
TRUE if a is not equal to b.
a<b
Less than
TRUE if a is strictly less than b.
a>b
Greater than
TRUE if a is strictly greater than b.
a <= b
Less than or equal to
TRUE if a is less than or equal to b.
a >= b
Greater than or equal to
TRUE if a is greater than or equal to b.
a ~= b
Match
TRUE if a is matched to regular expression b. As a side
effect, assigns values to special variables $1, $2, $3,
etc. See Regular Expressions for details.
8.7.5 Incrementing/Decrementing Operators
NXSL supports C-style pre- and post-increment and decrement operators.
Table 21: Incrementing/Decrementing Operators
Example
Name
Effect
++a
Pre-increment
Increments a by one, then returns a.
a++
Post-increment
Returns a, then increments a by one.
--a
Pre-decrement
Decrements a by one, then returns a.
a--
Post-decrement
Returns a, then decrements a by one.
46
NetXMS User Manual
8.7.6 Logical Operators
Table 22: Logical Operators
Example
Name
Result
!a
Not
TRUE if a is not TRUE.
a && b
And
TRUE if both a and b is TRUE.
a || b
Or
TRUE if either a or b is TRUE.
8.7.7 String Operators
There are two string operators. The first is the concatenation operator ('.'), which returns the
concatenation of its right and left arguments. The second is the concatenating assignment
operator ('.='), which appends the argument on the right side to the argument on the left side.
8.8 Control structures
Any NXSL script is built out of a series of statements. A statement can be an assignment, a
function call, a loop, a conditional statement or even a statement that does nothing (an empty
statement). Statements usually end with a semicolon. In addition, statements can be grouped into
a statement-group by encapsulating a group of statements with curly braces. A statement-group
is a statement by itself as well. The various statement types are supported:
• if
• else
• while
• do-while
• for
• break
• continue
• switch
• return
• exit
8.8.1 if
The if construct is one of the most important features of many languages. It allows for conditional
execution of code fragments. NXSL features an if structure that is similar to that of C:
if (expr)
statement
8.8.2 else
Often you'd want to execute a statement if a certain condition is met, and a different statement if
the condition is not met. This is what else is for. else extends an if statement to execute a
statement in case the expression in the if statement evaluates to FALSE. The else statement is
only executed if the if expression evaluated to FALSE.
8.8.3 while
47
NetXMS User Manual
while loops are the simplest type of loop in NXSL. They behave just like their C counterparts. The
basic form of a while statement is:
while (expr)
statement
The meaning of a while statement is simple. It tells NXSL to execute the nested statement(s)
repeatedly, as long as the while expression evaluates to TRUE. The value of the expression is
checked each time at the beginning of the loop, so even if this value changes during the execution
of the nested statement(s), execution will not stop until the end of the iteration.
8.8.4 do-while
do-while loops are very similar to while loops, except the truth expression is checked at the end of
each iteration instead of in the beginning. The main difference from regular while loops is that the
first iteration of a do-while loop is guaranteed to run (the truth expression is only checked at the
end of the iteration), whereas it may not necessarily run with a regular while loop (the truth
expression is checked at the beginning of each iteration, if it evaluates to FALSE right from the
beginning, the loop execution would end immediately).
8.8.5 for
for loops are the most complex loops in NXSL. They behave like their C counterparts. The syntax
of a for loop is:
for (expr1; expr2; expr3)
statement
The first expression (expr1) is evaluated (executed) once unconditionally at the beginning of the
loop.
In the beginning of each iteration, expr2 is evaluated. If it evaluates to TRUE, the loop continues
and the nested statement(s) are executed. If it evaluates to FALSE, the execution of the loop
ends.
At the end of each iteration, expr3 is evaluated (executed).
8.8.6 break
break ends execution of the current for, while, do-while or switch structure.
8.8.7 continue
continue is used within looping structures to skip the rest of the current loop iteration and
continue execution at the condition evaluation and then the beginning of the next iteration.
8.8.8 switch
The switch statement is similar to a series of if statements on the same expression. In many
occasions, you may want to compare the same variable (or expression) with many different
values, and execute a different piece of code depending on which value it equals to. This is exactly
what the switch statement is for.
48
NetXMS User Manual
8.8.9 return
If called from within a function, the return statement immediately ends execution of the current
function, and returns its argument as the value of the function call. Calling return from main()
function (either explicitly or implicitly defined) is equivalent of calling exit.
8.8.10 exit
The exit statement immediately ends execution of the entire script, and returns its argument as
script execution result.
8.9 Expressions
The simplest yet most accurate way to define an expression is "anything that has a value".
The most basic forms of expressions are constants and variables. When you type "a = 5", you're
assigning '5' into a. '5', obviously, has the value 5, or in other words '5' is an expression with the
value of 5 (in this case, '5' is an integer constant).
Slightly more complex examples for expressions are functions. Functions are expressions with the
value of their return value.
NXSL supports the following value types: integer values, floating point values (float), string values
and arrays. Each of these value types can be assigned into variables or returned from functions.
Another good example of expression orientation is pre- and post-increment and decrement. You
be familiar with the notation of variable++ and variable--. These are increment and decrement
operators. In NXSL, like in C, there are two types of increment - pre-increment and postincrement. Both pre-increment and post-increment essentially increment the variable, and the
effect on the variable is identical. The difference is with the value of the increment expression.
Pre-increment, which is written '++variable', evaluates to the incremented value. Post-increment,
which is written 'variable++' evaluates to the original value of variable, before it was
incremented.
A very common type of expressions are comparison expressions. These expressions evaluate to
either FALSE or TRUE. NXSL supports > (bigger than), >= (bigger than or equal to), == (equal), !
= (not equal), < (smaller than) and <= (smaller than or equal to). These expressions are most
commonly used inside conditional execution, such as if statements.
The last example of expressions is combined operator-assignment expressions. You already know
that if you want to increment a by 1, you can simply write 'a++' or '++a'. But what if you want to
add more than one to it, for instance 3? In NXSL, adding 3 to the current value of a can be written
'a += 3'. This means exactly "take the value of a, add 3 to it, and assign it back into a". In
addition to being shorter and clearer, this also results in faster execution. The value of 'a += 3',
like the value of a regular assignment, is the assigned value. Notice that it is NOT 3, but the
combined value of a plus 3 (this is the value that's assigned into a). Any two-place operator can
be used in this operator-assignment mode.
49
NetXMS User Manual
9 Troubleshooting
In this chapter, you will find most common problems, which can be encountered by NetXMS user
or administrator and recommended solutions for them.
9.1 Server problems
Problem: server doesn't start at all or exits immediately after startup.
Table 23: Server problems
Possible cause
Solution
Server configuration file is
missing or incorrect
Make sure that netxmsd.conf file is located in the correct
directory. Run netxmsd -C command to test configuration file.
Server cannot connect to the
database
Check that all database credentials are set correctly and that
database server is up. Run netxmsd -–debug=7 to get
extended diagnostic messages.
Database is locked or
corrupted
This might happen after server crash or incorrect shutdown.
Make sure that no other instances on netxmsd are running, and
then run nxdbmgr check command.
You will be prompted to unlock the database. Answer “Y”, wait
for database checking process to complete, and then try to start
netxmsd again.
9.2 Agent problems
Problem: agent doesn't start.
Table 24: Agent problems
Possible cause
Solution
Agent configuration file is
missing or incorrect
Make sure that nxagentd.conf file is located in the correct
directory. Run nxagentd -C command to test configuration file.
Required DLLs are missing
Run nxagentd –D to check if process starts or not and to get
extended diagnostic messages. If process doesn't start at all,
try reinstalling the agent.
TCP listen port used by agent
(4700 by default) already in
use by other application
Change agent's listen port, by setting ListenPort parameter in
nxagentd.conf or stop the application, which currently uses this
port.
50
NetXMS User Manual
10 Complete Reference
10.1 Server Configuration
10.1.1 File: netxmsd.conf
File netxmsd.conf is a master configuration file for NetXMS server. It contains only information
necessary for establishing database connection. Default location for this file is /etc/netxmsd.conf
on UNIX systems and C:\netxmsd.conf on Windows.
The file can contain the following parameters in Parameter = Value format:
Table 25: netxmsd.conf parameters
Parameter
Description
Default
CodePage
Code page used by NetXMS server. Has no
effect on Windows or if server was compiled
without iconv support.
Depends on your
system, usually
ISO8859-1
CreateCrashDumps
Control creation of server crash dumps.
Possible values: yes or no. Has effect only on
Windows platforms.
no
DBDriver
Database driver to be used.
No default value
DBDrvParams
Additional driver-specific parameters.
Empty string
DBLogin
Database user name.
netxms
DBName
Database name (not used by ODBC driver).
netxms_db
DBPassword
Database user's password.
Empty password
DBServer
Database server (ODBC source name for ODBC
driver).
localhost
DumpDirectory
Directory for storing crash dumps.
C:\
FullCrashDumps
Generate more detailed crash dumps. Possible
values: yes or no. Has effect only on Windows
platforms.
no
ListenAddress
Interface address, which should be used by
server to listen for incoming connections. Use
value 0.0.0.0 or * to use all available
interfaces.
0.0.0.0
LogFailedSQLQueries
Control logging of failed SQL queries. Possible
values: yes or no.
yes
LogFile
Server log file. To write log to syslog (or Event
Log on Windows), use {syslog} as file name.
{syslog}
Module
Additional server module to be loaded at server
startup. To load multiple modules, add
additional Module parameters.
No default value
ProcessAffinityMask
Sets a processor affinity mask for the netxmsd
process. A process affinity mask is a bit vector
in which each bit represents a logical processor
on which the process is allowed to run. For
example, value of 3 (binary 00000011) will
allow process to run on processors #0 and #1.
Currently supported only on Windows.
0xFFFFFFFF
51
NetXMS User Manual
Configuration file example:
#
# Sample configuration file for NetXMS server
#
DBDriver = mysql.ddr
DBServer = localhost
DBName = netxms_db
DBLogin = netxms
DBPassword = password
LogFailedSQLQueries = yes
LogFile = {syslog}
10.1.2 Table in Database: config
After reading the connection information from the configuration file, the server is connected to the
database and operational. Additional configuration is stored in the database itself and accessible
through the Server Configuration window in the console. To access the Server Configuration
window, press F9 or on the View menu click Control Panel to access the Control Panel window,
and then click on the Server Configuration icon.
To edit a setting, double click on the row in the table or right-click and select Edit from the popup
menu. To add a new configuration item-value pair, right-click on the table and select New. To
delete a pair, select it, right-click and select Delete.
Please note that changes to most of the settings will take effect only after server restart.
Useful settings include:
Table 26: Server configuration parameters
Parameter
ActiveDiscoveryInterval
ActiveNetworkDiscovery
AgentCommandTimeout
AgentUpgradeWaitTime
AllowDirectSMS
AllowedCiphers
Description
Interval in seconds between active
network discovery polls.
Enable (1) or disable (0) active network
discovery.
Timeout in milliseconds for commands
sent to agent. If agent did not respond to
command within the given number of
seconds, the command is considered as
failed.
Maximum wait time in seconds for agent
restart after upgrade. If agent cannot be
contacted after this time period, the
upgrade process is considered as failed.
Allow (1) or disallow (0) sending of SMS
via NetXMS server using nxsms utility.
Control what ciphers the server can use
for connection encryption. Value for this
parameter is a cipher code. To enable
more than one cipher, the codes should
be summed up.
Possible cipher codes:
1
2
4
8
AES-256
BLOWFISH
IDEA
Triple DES
Example (enable AES-256 and IDEA):
EnabledCiphers = 5
52
Default
7200
0
2000
600
0
15
NetXMS User Manual
Parameter
AuditLogRetentionTime
BeaconHosts
BeaconPollingInterval
BeaconTimeout
CapabilityExpirationTime
CheckTrustedNodes
ClientListenerPort
ConditionPollingInterval
ConfigurationPollingInterval
DataDirectory
DefaultCommunityString
DefaultEncryptionPolicy
DeleteEmptySubnets
DisableVacuum
DiscoveryFilter
Description
Retention time in days for the records in
audit log. All records older than specified
will be deleted by housekeeping process.
Comma-separated list of hosts to be used
as beacons for checking NetXMS server
network connectivity. Either DNS names
or IP addresses can be used.
Interval in milliseconds between beacon
hosts polls.
Timeout in milliseconds to consider
beacon host unreachable.
Time before host capability is considered
to be expired. For example, if NetXMS
agent on a host didn’t respond within a
specified time, the server will assume that
there is no NetXMS agent on that host
anymore.
Enable (1) or disable (0) checking of
trusted nodes list for cross-node data
collection (using Proxy Node DCI
attribute).
TCP port used by the server to listen for
incoming client connections.
Interval in seconds between polling (reevaluating) of condition objects.
Interval in seconds between configuration
polls.
Directory used by server to store
additional data – MIB files, agent
packages, etc.
System-wide default SNMP community
string.
Set encryption policy for server to agent
communications. Possible values are:
0 Encryption disabled
1 Encrypt connection only if agent
requires encryption
2 Encrypt connection if agent
supports encryption
3 Force encrypted connection
Enable (1) or disable (0) automatic
deletion of subnet objects without any
nodes within. When enabled, empty
subnets will be deleted by housekeeping
process.
Enable (0) or disable (1) automatic issue
of VACUUM command by housekeeping
process.
Name of NXSL script used as discovery
filter. To disable filtering, set this
parameter to none.
53
Default
90
Empty string
1000
1000
604800
1
4701
60
3600
Windows: \var
under installation
directory
UNIX:
/share/netxms
under installation
prefix
public
1
0
0
none
NetXMS User Manual
Parameter
DiscoveryFilterFlags
DiscoveryPollingInterval
EnableAdminInterface
EnableAgentRegistration
EnableAuditLog
EnableEventStormDetection
EnableISCListener
EnableMultipleDBConnections
EnableSNMPTraps
EnableSyslogDaemon
EnableZoning
EventLogRetentionTime
EventStormDuration
EventStormEventsPerSecond
FixedStatusValue
HouseKeepingInterval
IcmpPingSize
InternalCA
KeepAliveInterval
LockTimeout
LogAllSNMPTraps
MailEncoding
NumberOfConditionPollers
Description
Flags for system-generated discovery
filter.
Interval in seconds between network
discovery polls.
Enable (1) or disable (0) local
administrative interface (nxadm utility).
Enable (1) or disable (0) agents selfregistration.
Enable (1) or disable (0) audit log.
Enable (1) or disable (0) detection of
event storms.
Enable (1) or disable (0) ISC (InterServer Communications) listener.
Enable (1) or disable (0) usage of multiple
simultaneous connections to the database.
Enable (1) or disable (0) receiving of
SNMP traps.
Enable (1) or disable (0) receiving of
syslog messages.
Enable (1) or disable (0) support of
management zones.
Retention time in days for the records in
event log. All records older than specified
will be deleted by housekeeping process.
Number of seconds for which the number
of events per second should be higher
then configured threshold to declare event
storm condition.
Minimal number of events per second
needed to declare event storm condition.
Status value used by Fixed status
propagation algorithm.
Interval in seconds between housekeeper
runs.
Size of ICMP packets (in bytes, excluding
IP header size) used for status polls.
Enable (1) or disable (0) internal
certificate authority.
Interval in seconds between sending keep
alive packets to connected clients.
Timeout in milliseconds for internal locks.
It is not recommended to change this
parameter, unless you are instructed by
technical support to do so.
Enable (1) or disable (0) logging of all
incoming SNMP traps.
Encoding for mails generated by NetXMS
server.
The number of threads used for polling of
condition objects.
54
Default
0
900
1
1
1
0
0
1
1
0
0
90
15
100
0
3600
46
0
60
60000
0
iso-8859-1
10
NetXMS User Manual
Parameter
Description
NumberOfConfigurationPollers The number of threads used for
configuration polling. If you have many
monitored nodes, you may need to
increase the value of this parameter.
NumberOfDatabaseWriters
The number of threads used to perform
delayed writes to database.
NumberOfDataCollectors
The number of threads used for data
collection. If you have many DCIs
configured, you may need to increase the
value of this parameter.
NumberOfDiscoveryPollers
The number of threads used for discovery
polling. Normally you will not need to
increase this parameter.
NumberOfRoutingTablePollers The number of threads used for polling
routing tables on monitored nodes. If you
have a really large number of monitored
nodes (more than 1000), or if you have
decreased routing table update interval,
you may need to increase this parameter.
NumberOfStatusPollers
The number of threads used for status
polling. Since accurate status polling is
sensitive for normal system operation, it
is highly recommended to have this
parameter set to approximately 1/10 of
the number of monitored nodes.
NumberOfUpgradeThreads
The number of threads used to perform
agent upgrades (i.e. maximum number of
parallel upgrades).
PollCountForStatusChange
The number of consecutive unsuccessful
polls required to declare node
unreachable.
RADIUSNumRetries
The number of retries for RADIUS
authentication.
RADIUSPort
Port number used for connection to
RADIUS server.
RADISSecret
Shared secret used for communication
with RADIUS server.
RADIUSServer
Host name or IP address of RADIUS
server.
RADIUSTimeout
RADIUS server response timeout in
seconds.
ReceiveForwardedEvents
Enable (1) or disable (0) reception of
events forwarded by another NetXMS
server. Please note that for external event
reception ISC listener should be enabled
as well.
ResolveNodeNames
Enable (1) or disable (0) automatic
resolution of node IP addresses to DNS
names during automatic network
discovery process.
RoutingTableUpdateInterval
Interval in seconds between routing table
polls.
RunNetworkDiscovery
Enable (1) or disable (0) automatic
network discovery process.
55
Default
5
1
25
1
5
10
10
1
5
1645
netxms
localhost
3
0
1
300
0
NetXMS User Manual
Parameter
SMSDriver
Description
Mobile phone driver to be used for
sending SMS.
SMS driver parameters. For generic
driver, it should be the name of COM port
device.
An address used for sending mail from.
An SMTP server used for sending mail.
Timeout in milliseconds for SNMP requests
sent by NetXMS server.
Default
<none>
StatusCalculationAlgorithm
Default status calculation algorithm.
Possible values are:
1 Most critical
2 Single threshold
3 Multiple thresholds
1
StatusPollingInterval
Interval in seconds between status polls.
60
StatusPropagationAlgorithm
Default status propagation algorithm.
Possible values are:
1 Unchanged
2 Fixed
3 Relative
4 Severity based
1
StatusShift
Status value shift for Relative status
propagation algorithm.
0
StatusSingleThreshold
Threshold value multiplied by 100 for
Single Threshold status calculation
algorithm.
75
StatusThresholds
Threshold values for Multiple Thresholds
status calculation algorithm. The value is
a string of four two-digit hexadecimal
numbers. Each number represents one of
the thresholds, multiplied by 100. First
number is Warning threshold, then Minor,
Major, and Critical.
503C2814
StatusTranslation
Translated status codes for Severity
based status propagation. The value is a
string of four two-digit hexadecimal
numbers. Each number represents one
translated status code. First number is for
original Warning status, then for Minor,
Major, and Critical.
01020304
SyncInterval
Interval in seconds between writing
object changes to the database.
60
SyncNodeNamesWithDNS
Enable (1) or disable (0) synchronization
of node names with DNS on each
configuration poll.
0
SyslogListenPort
UDP port used by built-in syslog server.
514
SyslogRetentionTime
Retention time in days for records in
syslog. All records older than specified
will be deleted by housekeeping process.
90
ThresholdRepeatInterval
System-wide interval in seconds for
resending threshold violation events.
Value of 0 disables event resending.
0
SMSDrvConfig
SMTPFromAddr
SMTPServer
SNMPRequestTimeout
56
Empty
netxms@localhost
localhost
2000
NetXMS User Manual
Parameter
Description
Default
TopologyDiscoveryRadius
Radius (maximum number of hops from
seed device) for layer 2 topology
discovery.
3
TopologyExpirationTime
Time to live in seconds for cached layer 2
topology information.
900
IseIfXTable
Enable (1) or disable (0) use of SNMP
ifXTable instead of ifTable for interface
configuration polling.
1
UseInterfaceAliases
Control usage of interface aliases (or
descriptions). Possible values are:
0
Don’t use aliases;
1
Use aliases instead of names, when
possible;
2
Concatenate alias and name to
form interface object name.
3
Concatenate name and alias to
form interface object name.
0
WindowsConsoleUpgradeURL
URL pointing to the actual version of
NetXMS Console for Windows. Console
application will try to download new
version from this URL, if it detects that
upgrade is needed. You can use %version
% macro inside the URL to insert actual
server version.
http://www.netxms
.org/download/netx
ms-%version%.exe
57
NetXMS User Manual
10.2 Agent Configuration
10.2.1 File: nxagentd.conf
File nxagentd.conf is a master configuration file for NetXMS agent. It contains all information
necessary for agent's operation. Default location for this file is /etc/nxagentd.conf on UNIX
systems and C:\nxagentd.conf on Windows.
The file can contain one or more parameters in Parameter = Value form, each parameter should
be on its own line. Comments can be inserted after "#" sign. This file can also contain
configuration for subagents. In this case, subagents’ parameters should be placed in separate
sections. Beginning of the section is indicated by "*" sign, followed by a section name.
The file can contain the following parameters (in main section):
Table 27: nxagentd.conf parameters
Parameter
Description
Default
Action
Define action, which can be later executed by
management server. See the Agent
Configuration section for detailed description of
this parameter.
No defaults
ActionShellExec
Same as Action, but on Windows platform
agent will use shell to execute command
instead of normal process creation. There is no
difference between Action and ActionShellExec
on UNIX platforms.
No defaults
ControlServers
A list of management servers, which can
execute actions on agent and change agent's
config. Hosts listed in this parameter also have
read access to the agent. Both IP addresses
and DNS names can be used. Multiple servers
can be specified in one line, separated by
commas. If this parameter is used more than
once, servers listed in all occurrences will have
access to agent.
Empty list
CreateCrashDumps
Enable (yes) or disable (no) creation of agent's
crash dumps. Only has effect on Windows
platforms.
no
DumpDirectory
Directory for storing crash dumps.
C:\
EnableActions
Enable (yes) or disable (no) action execution
by agent.
yes
EnabledCiphers
Controls what ciphers agent can use for
connection encryption. A value for this
parameter is a cipher code. To enable more
than one cipher, the codes should be summed
up.
Possible cipher codes:
15
1
2
4
8
AES-256
BLOWFISH
IDEA
Triple DES
Example (enable AES-256 and IDEA):
EnabledCiphers = 5
EnableProxy
Enable (yes) or disable (no) agent proxy
functionality.
58
no
NetXMS User Manual
Parameter
Description
Default
EnableSNMPProxy
Enable (yes) or disable (no) SNMP proxy
functionality.
no
EnableSubagentAutoloa
d
Enable (yes) or disable (no) automatic loading
of platform subagent(s).
yes
EnableWatchdog
Enable (yes) or disable (no) automatic agent
restart in case of unexpected shutdown.
no
ExecTimeout
Timeout in milliseconds for external parameter
execution.
2000
ExternalParameter
Add parameter handled by external command.
To add multiple parameters, you should use
multiple ExternalParameter entries. See the
Agent Configuration section for detailed
description of this parameter.
No defaults
FileStore
Directory to be used for storing files uploaded
by management server(s).
/tmp on UNIX
C:\ on Windows
ListenAddress
IP address that the agent should listen on. If
0.0.0.0 or * is specified as listen address,
agent will listen on all available IP addresses.
0.0.0.0
ListenPort
TCP port to be used for incoming requests.
4700
LogFile
Agent's log file. To write log to syslog (or
Event Log on Windows), use {syslog} as file
name.
/var/log/nxagentd
on UNIX
C:\nxagentd.log on
Windows
LogHistorySize
Defines how many old log files should be kept
after log rotation.
4
LogUnresolvedSymbols
If set to yes, all dynamically resolved symbols,
which failed to be resolved, will be logged.
no
MasterServers
List of management servers, which have full
access to agent. Hosts listed in this group can
upload files to agent and initiate agent
upgrade, as well as perform any task allowed
for hosts listed in Servers and ControlServers.
Both IP addresses and DNS names can be
used. Multiple servers can be specified in one
line, separated by commas. If this parameter
is used more than once, servers listed in all
occurrences will have access to agent.
Empty list
MaxLogSize
Maximum log size, in bytes. When log file
reaches this limit, log rotation occurs. Use 0 to
disable log rotation.
16777216
MaxSessions
Maximum number of simultaneous
communication sessions. Possible value can
range from 2 to 1024.
32
PlatformSuffix
String to be added as suffix to the value of
System.PlatformName parameter.
Empty string
RequireAuthentication
If set to yes, a host connected to an agent has
to provide correct shared secret before issuing
any command.
no
59
NetXMS User Manual
Parameter
Description
Default
RequireEncryption
If set to yes, a host connected to an agent will
be forced to use encryption, and if encryption
is not supported by a remote host, the
connection will be dropped. If an agent was
compiled without encryption support, this
parameter has no effect.
no
Servers
A list of management servers, which have read
access to this agent. Both IP addresses and
DNS names can be used. Multiple servers can
be specified in one line, separated by commas.
If this parameter is used more than once,
servers listed in all occurrences will have
access to agent.
Empty list
SessionIdleTimeout
Communication session idle timeout in
seconds. If an agent will not receive any
command from peer within the specified
timeout, session will be closed.
60
SharedSecret
Agent's shared secret used for remote peer
authentication. If RequireAuthentication set
to no, this parameter has no effect.
admin
StartupDelay
Number of seconds that agent should wait on
startup before start servicing requests. This
parameter can be used to prevent false reports
about missing processes or failed services just
after monitored system startup.
0
SubAgent
Subagent to load. To load multiple subagents,
you should use multiple SubAgent parameters.
Subagents will be loaded in the same order as
they appear in configuration file.
No defaults
WaitForProcess
If specified, an agent will pause initialization
until given process starts.
No defaults
Configuration file example:
#
# Sample agent’s configuration file
#
MasterServers = 10.0.0.4
LogFile = {syslog}
SubAgent = winperf.nsm
# Below is a configuration for winperf subagent, in separate section
*WinPerf
EnableDefaultCounters = yes
60
NetXMS User Manual
10.3 Web Server (nxhttpd) Configuration
10.3.1 File nxhttpd.conf
File nxhttpd.conf is a master configuration file for NetXMS web server. It contains all information
necessary for web server operation. Default location for this file is /etc/nxhttpd.conf on UNIX
systems and C:\nxhttpd.conf on Windows.
The file can contain one or more parameters in Parameter = Value form, each parameter should
be on its own line. Comments can be inserted after "#" sign.
File can contain the following parameters:
Table 28: nxagentd.conf parameters
Parameter
Description
Default
DocumentRoot
Points to a directory, which contains all static
web content (images, scripts, etc.)
Windows:
var\www under
NetXMS installation
directory
UNIX:
share/netxms/www
under NetXMS
installation directory
ListenAddress
An IP address agent should listen on. If
0.0.0.0 is specified as listen address, agent
will listen on all available IP addresses.
0.0.0.0
ListenPort
A TCP port to be used for incoming requests.
8080
LogFile
Web server's log file. To write log to syslog
(or Event Log on Windows), use {syslog} as
file name.
/var/log/nxhttpd on
UNIX
C:\nxhttpd.log on
Windows
MasterServer
NetXMS server to work with.
localhost
SessionTimeout
Web session timeout in seconds.
300
10.4 Command Line Tools
10.4.1 Local Server Administration Tool (nxadm)
Administrator can use nxadm to access local NetXMS server console. This tool works only on the
same machine where server is running. Server must have configuration parameter
EnableAdminInterface set to 1 (which is the default setting).
Syntax:
nxadm –c command
nxadm –i
nxadm –h
If started with –c option, nxadm executes given command on NetXMS server console and exits
immediately. With –i option nxadm enters interactive mode, and –h prints out help message.
61
NetXMS User Manual
10.4.2 Agent GET Tool (nxget)
This tool is intended to get values of parameters from NetXMS agent.
Syntax:
nxget [options] host [parameter [parameter ...]]
where host is the name or IP address of the host running NetXMS agent; and parameter is a
parameter or list name, depending on given options. By default, nxget will attempt to retrieve the
value of one given parameter, unless given options override it.
Table 29: Valid options for nxget
Option
Description
-a method
Authentication method to be used. Valid methods are none, plain, md5, and sha1.
Default method is none.
-A method
Authentication method to be used for communications with proxy agent. Possible
values are the same as for –a option.
-b
Get multiple parameters in one call — nxget will interpret all command line
arguments after host name as separate parameter. Values will be printed out on
separate lines, in the same order as parameters were specified.
-C
Get agent's configuration file instead of parameter(s) specified on command line.
If this option is given, all command line arguments after host name will be
ignored. Configuration file will be printed to standard output.
-e policy
Set encryption policy. Possible values are:
0
1
2
3
Encryption disabled
Encrypt connection only if agent requires encryption
Encrypt connection if agent supports encryption
Force encrypted connection
Default value is 1. If requested encryption policy cannot be applied (for example,
you request policy 3, but the agent doesn't support encryption), connection to the
agent will fail.
-h
Display help and exit.
-i seconds
Get requested information continuously, with given interval. Communication
session with the agent will not close between requests.
-I
Get list of parameters supported by agent instead of parameter(s) specified on
command line. If this option is given, all command line arguments after host
name will be ignored.
-K file
Server key file, required for establishing encrypted connections. Normally, nxget
should know location of server key file without specifying it explicitly.
-l
Interpret parameter names given on command line as names of enums
(parameters returning list of values).
-n
Show parameter name(s) in result. If this option is given, result will be printed in
the following form:
parameter = value
-O port
Proxy agent port number. Default port number is 4700.
-p port
Agent port number. Default port number is 4700.
-P port
Network service port (to be used with -S option).
-q
Quiet mode (print only results, no informational or error messages).
-r string
Service check request string.
-R string
Service check expected response string.
62
NetXMS User Manual
Option
Description
-s secret
Shared secret used for authentication.
-S address
Check state of network service at a given address. If this option is given, all
command line arguments after host name will be ignored.
-t type
Type of service to be checked. Possible values are:
0
1
2
3
4
5
6
Custom
SSH
POP3
SMTP
FTP
HTTP
Telnet
Default value is 0.
-T proto
Protocol number for service check. Default protocol number is 6 (TCP).
-v
Display version and exit.
-w seconds
Command execution timeout. Default timeout is 3 seconds.
-X address
Connect via proxy agent at given address.
-Z secret
Shared secret used for authentication to the proxy agent.
Some examples:
Get value of Agent.Version parameter from agent at host 10.0.0.2:
nxget 10.0.0.2 Agent.Version
Get value of Agent.Uptime and System.Uptime parameters in one request, with output in
parameter = value form:
nxget –bn 10.0.0.2 Agent.Uptime System.Uptime
Get agent configuration file from agent at host 10.0.0.2:
nxget –C 10.0.0.2
Get value of System.PlatformName parameter from agent at host 10.0.0.2, connecting via proxy
agent at 172.16.1.1:
nxget –X 172.16.1.1 10.0.0.2 System.PlatformName
Get value of Agent.SupportedParameters enum from agent at host 10.0.0.10, forcing use of
encrypted connection:
nxget –e 3 –l 10.0.0.10 Agent.SupportedParameters
Check POP3 service at host 10.0.0.4 via agent at host 172.16.1.1:
nxget –S 10.0.0.4 –t 2 –r user:pass 172.16.1.1
63
NetXMS User Manual
10.4.3 NetXMS Database Manager (nxdbmgr)
This tool is intended for NetXMS database maintenance.
Syntax:
nxdbmgr
nxdbmgr
nxdbmgr
nxdbmgr
nxdbmgr
nxdbmgr
[options]
[options]
[options]
[options]
[options]
[options]
check
export file
import file
init file
unlock
upgrade
Database Manager has five modes of operation: database checking, database initialization,
database export, database import, and database upgrade. Mode of operation is selected by
appropriate command line option.
Table 30: Command line options
Option
Description
check
Check the database for consistency. Use this mode to repair the database after
server crash or incorrect shutdown.
export
Export database to file.
import
Import database from file. This file should be previously created by nxdbmgr
export command. All existing data and configuration will be cleared.
init
Initialize empty database. You should provide the name of the initialization file on
the command line. Do not run this command if the database is already initialized!
unlock
Unlock database without further consistency checking. Normally, it is
recommended to use check mode when you need to unlock the database.
However, if you have to unlock database with format version not supported by
current version of Database Manager, you should use this mode.
upgrade
Upgrade the database after NetXMS server upgrade.
Table 31: Valid options for nxdbmgr
Option
Description
-c file
NetXMS server configuration file to be used. Database Manager obtains the
database connectivity parameters from the server configuration file.
-f
Force the database to unlock and repair without confirmation. Valid only in
database checking mode.
-h
Display help and exit.
-I
MySQL only - specify TYPE=InnoDB for new tables.
-M
MySQL only - specify TYPE=MyISAM for new tables.
-t
Enable trace mode. All executed SQL statements will be printed out.
-v
Display version and exit.
-X
Ignore SQL errors when upgrading. It is not recommended to use this option,
unless you are instructed to do so by NetXMS developers or support team.
64
NetXMS User Manual
10.5 NetXMS Scripting Language (NXSL)
10.5.1 Formal Grammar
script ::=
module |
expression
module ::=
module_component { module_component }
module_component ::=
function |
statement_or_block |
use_statement
use_statement ::=
use any_identifier ";"
any_identifier ::=
IDENTIFIER |
COMPOUND_IDENTFIER
function ::=
sub IDENTIFIER "(" [ identifier_list ] ")" block
identifier_list ::=
IDENTIFIER { "," IDENTIFIER }
block ::=
"{" { statement_or_block } "}"
statement_or_block ::=
statement |
block
statement ::=
expression ";" |
builtin_statement |
";"
builtin_statement ::=
simple_statement ";" |
if_statement |
do_statement |
while_statement |
for_statement |
switch_statement |
array_statement |
break ";"
continue ";"
simple_statement ::=
keyword [ expression ]
keyword ::=
exit |
print |
println |
return
65
NetXMS User Manual
if_statement ::=
if "(" expression ")" statement_or_block [ else statement_or_block ]
while_statement ::=
while "(" expression ")" statement_or_block
do_statement ::=
do statement_or_block while "(" expression ")" ";"
for_statement ::=
for "(" expression ";" expression ";" expression ")" statement_or_block
switch_statement ::=
switch "(" expression ")" "{" case { case } [ default ] "}"
case ::=
case constant ":" { statement_or_block }
default ::=
default ":" { statement_or_block }
expression ::=
"(" expression ")" |
IDENTIFIER "=" expression |
IDENTIFIER "+=" expression |
IDENTIFIER "-=" expression |
IDENTIFIER "*=" expression |
IDENTIFIER "/=" expression |
IDENTIFIER "%=" expression |
IDENTIFIER ".=" expression |
IDENTIFIER "&=" expression |
IDENTIFIER "|=" expression |
IDENTIFIER "^=" expression |
expression "->" IDENTIFIER |
"-" expression |
"!" expression |
"~" expression |
"++" IDENTIFIER |
"--" IDENTIFIER |
IDENTIFIER "++" |
IDENTIFIER "--" |
expression "+" expression |
expression "-" expression |
expression "*" expression |
expression "/" expression |
expression "%" expression |
expression like expression |
expression ilike expression |
expression "~=" expression |
expression match expression |
expression imatch expression |
expression "==" expression |
expression "!=" expression |
expression "<" expression |
expression "<=" expression |
expression ">" expression |
expression ">=" expression |
expression "&" expression |
expression "|" expression |
expression "^" expression |
expression "&&" expression |
expression "||" expression |
expression "<<" expression |
66
NetXMS User Manual
expression ">>" expression |
expression "." expression |
expression "?" expression ":" expression |
operand
operand ::=
function_call |
type_cast |
constant |
IDENTIFIER
type_cast ::=
builtin_type "(" expression ")"
builtin_type ::=
int32 |
int64 |
uint32 |
uint64 |
real |
string
function_call ::=
IDENTIFIER "(" [ expression { "," expression } ] ")"
constant ::=
STRING |
INT32 |
INT64 |
UINT32 |
UINT64 |
REAL |
NULL
Terminal symbols:
IDENTIFIER ::= [A-Za-z_\$][A-Za-z_\$0-9]*
COMPOUND_IDENTIFIER ::= { IDENTIFIER}(::{ IDENTIFIER})+
INTEGER ::= \-?(0x)?[0-9]+
INT32 ::= INTEGER
INT64 ::= {INTEGER}L
UINT32 ::= {INTEGER}U
UINT64 ::= {INTEGER}(UL|LU)
REAL ::= \-?[0-9]+\.[0-9]+
10.5.2 Generic Built-in Functions
10.5.2.1 abs
abs(number)
Returns the absolute value of number.
Examples:
abs(12.3)
->
abs(-0.307) ->
12.3
0.307
10.5.2.2 AddrInRange
67
NetXMS User Manual
AddrInRange(addr, start, end)
Checks if a given IP address is within a given range (including both bounding addresses). All IP
addresses should be specified as strings. The function will return 0 if an address is outside the
given range, and 1 - if inside.
Examples:
AddrInRange("10.0.0.16", "10.0.0.2", "10.0.0.44")
AddrInRange("10.0.0.16", "192.168.1.1", "192.168.1.100")
->
->
1
0
10.5.2.3 AddrInSubnet
AddrInSubnet(addr, subnet, mask)
Checks if a given IP address is within a given subnet (including subnet and broadcast addresses).
All IP addresses should be specified as strings. The function will return 0, if the address is outside
the given subnet, and 1 - if inside.
Examples:
AddrInSubnet("10.0.0.16", "10.0.0.0", "255.255.255.0")
AddrInSubnet("10.0.0.16", "192.168.1.0", "255.255.255.0")
->
->
1
0
10.5.2.4 classof
classof(object)
Returns the class name for a given object.
Examples:
classof($node)
->
"NetXMS_Node"
10.5.2.5 d2x
d2x(value[,padding])
Convert decimal value to hexadecimal string. If padding is gived, resulting string padded with
zeroes up to given length. Padding must be a non-negative whole number.
Examples:
d2x(15)
d2x(15,4)
->
->
"F"
"000F"
10.5.2.6 exp
exp(power)
Returns e (the base of natural logarithms) raised to a power.
10.5.2.7 gmtime
68
NetXMS User Manual
gmtime([time])
Converts time in UNIX format (number of seconds since epoch) to calendar date and time, broken
down into its components, expressed as UTC (or GMT timezone). The function uses either time
given in time argument or current time if time is omitted. Return value is an object of class TIME
with the following attributes:
Table 32: TIME class attributes
Attribute
Synonim
Meaning
sec
tm_sec
Seconds after the minute
min
tm_min
Minutes after the hour
hour
tm_hour
Hours since midnight
mday
tm_mday
Day of the month
mon
tm_mon
Months since January
year
tm_year
Year
wday
tm_wday
Days since Sunday
yday
tm_yday
Days since January 1
isdst
tm_isdst
Daylight Saving Time flag
Examples:
gmtime(time())->year
->
2008
10.5.2.8 index
index(string,substring[,position])
Returns the position of the first occurrence of substring in string at or after position.
If you don't specify position, the search starts at the beginning of string. If substring
is not found, returns 0.
All indexes are 1-based (first character has index 1).
Examples:
index("abcdef","cd")
index("abcdef","cd",4)
index("abcdefabcdef","cd",4)
->
->
->
3
0
9
10.5.2.9 left
left(string,length[,pad])
Returns a string of length length, containing the leftmost length characters of string. The string
returned is padded with pad characters (or truncated) on the right as needed. The default pad
character is a blank. The length must be nonnegative.
Examples:
left("abc d",8)
left("abc d",8,".")
left("abc def",7)
->
->
->
"abc d
"
"abc d..."
"abc de"
69
NetXMS User Manual
10.5.2.10 length
length(string)
Returns the length of a string.
Examples:
length("abcd")
->
4
10.5.2.11 localtime
localtime([time])
Converts time in UNIX format (number of seconds since epoch) to calendar date and time broken
down into its components. Function uses either time given in time argument or current time if
time is omitted. Return value is an object of class TIME. Table 32 contains class attributes.
Examples:
localtime(time())->year
->
2008
10.5.2.12 log
log(number)
Returns the natural logarithm of a number. The number argument can be any valid numeric
expression greater than 0. The natural logarithm is the logarithm to the base e. The constant e is
approximately 2.718282.
10.5.2.13 log10
log10(number)
Returns the base-10 logarithm of a number. The number argument can be any valid numeric
expression greater than 0.
10.5.2.14 lower
lower(string)
Translates a given string to lowercase.
Examples:
lower("abCD")
->
"abcd"
10.5.2.15 ltrim
ltrim(string)
Removes whitespaces from the left side of a string.
70
NetXMS User Manual
Examples:
ltrim("
abc
") ->
"abc
"
10.5.2.16 max
max(number[,number[,...]])
Returns the largest number from the list specified.
Examples:
max(12, 6, 7, 9) ->
max(-7, -3, -4.3) ->
12
-3
10.5.2.17 min
min(number[,number[,...]])
Returns the smallest number from the list specified.
Examples:
min(12, 6, 7, 9) ->
min(-7, -3, -4.3) ->
6
-7
10.5.2.18 pow
pow(x, y)
Calculates x raised to the power of y.
Examples:
pow(2, 3)
->
8
10.5.2.19 right
right(string,length[,pad])
Returns a string of length length, containing the rightmost length characters of string. The string
returned is padded with pad characters (or truncated) on the left as needed. The default pad
character is a blank. The length must be nonnegative.
Examples:
right("abc d",8)
right("abc def",5)
right("17",5,"0")
->
->
->
" abc d"
"c def"
"00017"
10.5.2.20 rindex
rindex(string,substring[,position])
71
NetXMS User Manual
Returns the position of the last occurrence of substring in string at or before position.
If you don't specify position, the search starts at the end of string. If substring
is not found, returns 0.
All indexes are 1-based (first character has index 1).
Examples:
rindex("abcdabcd","cd")
->
rindex("abcdef","cd",2)
->
rindex("abcdefabcdef","cd",4) ->
7
0
3
10.5.2.21 rtrim
rtrim(string)
Removes whitespaces from the right side of a string.
Examples:
rtrim("
abc
") ->
"
abc"
10.5.2.22 SecondsToUptime
SecondsToUptime(seconds)
Converts a given number of seconds to uptime string in format "n days, hours:minutes".
Examples:
SecondsToUptime(85)
SecondsToUptime(3600)
SecondsToUptime(93600)
->
->
->
"0 days, 00:01"
"0 days, 01:00"
"1 days, 02:00"
10.5.2.23 strftime
strftime(format, [time], [isLocal])
Formats a time string according to format. The function uses either time given in time argument
(as a UNIX timestamp) or current time if time is omitted. Argument isLocal controls usage of time
zone information – if it is set to TRUE (non-zero value) time will be converted to local time zone,
otherwise UTC will be used.
The format argument consists of one or more codes; the formatting codes are preceded by a
percent sign (%). Characters that do not begin with % are copied unchanged to output string.
The formatting codes for strftime are listed below:
Table 33: Formatting codes for strftime
Code
Description
%a
Abbreviated weekday name
%A
Full weekday name
%b
Abbreviated month name
%B
Full month name
%c
Date and time representation appropriate for locale
%d
Day of month as decimal number (01 – 31)
72
NetXMS User Manual
%H
Hour in 24-hour format (00 – 23)
%I
Hour in 12-hour format (01 – 12)
%j
Day of year as decimal number (001 – 366)
%m
Month as decimal number (01 – 12)
%M
Minute as decimal number (00 – 59)
%p
Current locale’s A.M./P.M. indicator for 12-hour clock
%S
Second as decimal number (00 – 59)
%U
Week of year as decimal number, with Sunday as first day of week (00 – 53)
%w
Weekday as decimal number (0 – 6; Sunday is 0)
%W
Week of year as decimal number, with Monday as first day of week (00 – 53)
%x
Date representation for current locale
%X
Time representation for current locale
%y
Year without century, as decimal number (00 – 99)
%Y
Year with century, as decimal number
%z, %Z
Time-zone name or abbreviation; no characters, if time zone is unknown
%%
Percent sign
The # flag may prefix any formatting code. In that case, the meaning of the format code is
changed as follows:
Table 34: Format code changes with # flag
Code
Change
%#a, %#A, %#b, %#B, %#p, %#X,
%#z, %#Z, %#%
# flag is ignored.
%#c
Long date and time representation, appropriate for
current locale. For example: "Tuesday, March 14,
1995, 12:41:29".
%#x
Long date representation, appropriate to current
locale. For example: "Tuesday, March 14, 1995".
%#d, %#H, %#I, %#j, %#m, %#M,
%#S, %#U, %#w, %#W, %#y, %#Y
Remove leading zeros (if any).
Examples:
strftime("%H:%M")
->
"07:24"
strftime("%#H:%M")
->
"7:24"
strftime("%d-%b-%Y %H:%M:%S %Z", 1178007761) ->
"01-May-2007 11:22:41 FLE Daylight Time"
strftime("%d-%b-%Y %H:%M:%S", 1178007761, 0) -> "01-May-2007 08:22:41"
10.5.2.24 substr
substr(string, n[, len])
Returns the substring of string that begins at the nth character and is of len length. The n must be
a positive whole number (first character has index 1). If n is greater than length(string), then
empty string is returned. If you omit length, the rest of the string is returned.
Examples:
substr("abcdef", 2, 2)
substr("abcdef", 8)
->
->
"cd"
""
73
NetXMS User Manual
substr("abcdef", 3)
->
"def"
10.5.2.25 time
time()
Gets the system time. The function returns the number of seconds elapsed since midnight
(00:00:00), January 1, 1970, coordinated universal time, according to the system clock.
10.5.2.26 trace
trace(level, message)
Writes message to the server's log file if current trace level is greater or equal level. If level is 1 or
higher, message will be logged with DEBUG priority, and if level is 0, with INFO priority.
10.5.2.27 trim
trim(string)
Removes whitespaces from the beginning and end of a string.
Examples:
trim("
abc def
")
->
"abc def"
10.5.2.28 typeof
typeof(value)
Returns the data type for given value. Type is returned as lowercase string. The following type
names can be returned:
• null
• object
• string
• real
• int32
• int64
• uint32
• uint64
Examples:
typeof("abc")
typeof(17)
typeof(17000000000)
->
->
->
"string"
"int32"
"int64"
10.5.2.29 upper
upper(string)
Translates a given string to uppercase.
74
NetXMS User Manual
Examples:
upper("abCD")
->
"ABCD"
10.5.3 Type Cast
The following pseudo functions can be used to explicitly cast value to given type:
int32(value)
Cast value to signed 32 bit integer
int64(value)
Cast value to signed 64 bit integer
real(value)
Cast value to floating point number
string(value)
Cast value to string
uint32(value)
Cast value to unsigned 32 bit integer
uint64(value)
Cast value to unsigned 64 bit integer
Examples:
int32(4.3)
real(5)
int64("0x10")
string(null)
uint64(null)
->
->
->
->
->
4
5.000000
16
""
0
10.5.4 Functions for Accessing DCI Data
10.5.4.1 FindDCIByDescription
FindDCIByDescription(node, description)
Find DCI by description (search is case-insensetive). Function returns DCI ID on success or 0 if
DCI with matching description was not found. Parameter node is a node object, you can use
predefined variable $node to refer to current node.
Examples:
FindDCIByDescription($node, "Status")
FindDCIByDescription($node, "bad dci")
-> 4
-> 0
10.5.4.2 FindDCIByName
FindDCIByName(node, name)
Find DCI by name (search is case-insensetive). Function returns DCI ID on success or 0 if DCI
with matching description was not found. Parameter node is a node object, you can use
predefined variable $node to refer to current node.
Examples:
FindDCIByName($node, "Agent.Uptime")
FindDCIByName($node, "bad")
-> 5
-> 0
75
NetXMS User Manual
10.5.4.3 GetDCIObject
GetDCIObject(node, id)
Get DCI object with a given ID on a given node. The function returns DCI object on success or
NULL in case of error (usually because DCI with given ID does not exist). Parameter node is a
node object, you can use predefined variable $node to refer to current node.
Examples:
GetDCIObject($node, FindDCIByName($node, "Status"))
GetDCIObject($node, 12345)
-> object
-> NULL
10.5.4.4 GetDCIValue
GetDCIValue(node, id)
Get last value of DCI with a given ID on a given node. The function returns last DCI value on
success or NULL in case of error (for example, DCI with given ID does not exist or has no
collected values). Parameter node is a node object, you can use predefined variable $node to refer
to current node.
Examples:
GetDCIValue($node, FindDCIByName($node, "Status"))
GetDCIValue($node, FindDCIByName($node, "Agent.Version"))
GetDCIValue($node, 12345)
-> 0
-> "0.2.20"
-> NULL
10.5.5 Functions for Accessing Object Data
10.5.5.1 FindNodeObject
FindNodeObject(node, id)
Find node object by node id or node name. Returns node object with given id or name on success
or NULL on failure (either because node with given name/id does not exist, or access to it was
denied). Parameter node is a node object, you can use predefined variable $node to refer to
current node. You can also use null as node if trusted nodes check is disabled (see notes for more
information).
Examples:
FindNodeObject($node, "server.netxms.org")
FindNodeObject(null, 12)
FindNodeObject($node, "bad_node_name")
-> object
-> object
-> NULL
Notes:
Function's behavior depends on server's configuration parameter CheckTrustedNodes. By
default access from script running for one node to another nodes are not allowed for security
reasons (because if, for example, there are a user with write access to node A and no access
to node B, it can create transformation script which will access node B and get information
about it, thus breaking security settings). This security check can be disabled by setting
server's configuration variable CheckTrustedNodes to 0. Otherwise, system administrator have
to maintain trusted nodes lists for each node being accessed from another node's scripts. For
example, if $node in script refers to NODE1, and FindNodeObject($node, "NODE2") called,
NODE1 must be added to list of trusted nodes for NODE2.
76
NetXMS User Manual
10.5.5.2 GetCustomAttribute
GetCustomAttribute(node, attr)
Get value of node's custom attribute. Function returns requested attribute's value on success or
NULL if given attribute does not exist. Parameter node is a node object, you can use predefined
variable $node to refer to current node.
Examples:
GetCustomAttribute($node, "my_attribute")
-> "my value"
GetCustomAttribute($node, "bad_attribute_name") -> NULL
Notes:
If attribute name conforms to NXSL identifier naming conventions, you can access it directly
as node object attribute. For example, the following call to GetCustomAttribute:
GetCustomAttribute($node, "my_attribute")
is equal to:
$node->my_attribute
10.5.5.3 GetInterfaceName
GetInterfaceName(node, ifIndex)
Get name of node's network interface. Function returns name of interface with given index on
success or NULL if interface with given index does not exist. Parameter node is a node object, you
can use predefined variable $node to refer to current node.
Examples:
GetInterfaceName($node, 2)
GetInterfaceName($node, 12345)
-> "eth0"
-> NULL
10.5.5.4 GetNodeParents
GetNodeParents(node)
Get accessible parent objects for given node. Parameter node is a node object, you can use
predefined variable $node to refer to current node. Return value is an array of objects of class
"NetObj" (generic NetXMS object), with first object placed at index 0. End of list indicated by array
element with null value. This function will never return template or policy objects applied to node.
Return value also affected by trusted nodes settings (see notes below).
Example:
// Log names and ids of all accessible parents for current node
parents = GetNodeParents($node);
for(i = 0; parents[i] != null; i++)
{
trace(1, "Parent object: name='" . parents[i]->name .
"' id=" . parents[i]->id);
}
Notes:
Function's behavior depends on server's configuration parameter CheckTrustedNodes. By
default access from script running for one node to another nodes (or other objects such as
77
NetXMS User Manual
containers or subnets) are not allowed for security reasons (because if, for example, there are
a user with write access to node A and no access to node B, it can create transformation script
which will access node B and get information about it, thus breaking security settings). This
security check can be disabled by setting server's configuration variable CheckTrustedNodes to
0. Otherwise, system administrator have to maintain trusted nodes lists for each object being
accessed from another node's scripts. GetNodeParents will return only parent objects which
have current node added to their trusted nodes lists. For example, if $node in script refers to
NODE1, which is bound to containers SERVICE1 and SERVICE2, and NODE1 is in trusted nodes
list only for SERVICE1, GetNodeParents($node) will return array containing only one element –
object for SERVICE1.
10.5.6 Functions for Accessing Situations
10.5.6.1 FindSituation
FindSituation(situation_name_or_id, instance)
Find situation instance either by situation object name and instance name or by situation object
ID and instance name (name search is case-insensetive). The function returns situation instance
object on success or NULL, if referred situation instance was not found.
Examples:
FindSituation("my_situation", "my_instance")
FindSituation(1, "my_instance")
FindSituation("bad_situation_name", "my_instance")
-> valid_object
-> valid_object
-> NULL
10.5.6.2 GetSituationAttribute
GetSituationAttribute(situation, attribute)
Get current value of situation instance's situation attribute with attribute name. The function
returns current attribute value on success or NULL in case of error (for example, attribute with a
given name does not exist or invalid object given). situation parameter is a situation instance
object, usually returned by FindSituation function.
Examples:
GetSituationAttribute(s, "status")
-> "current value"
GetSituationAttribute(s, "bad attribute") -> NULL
Notes:
If attribute name conforms to NXSL identifier naming conventions, you can access it directly as
situation instance object attribute. For example, the following call to GetSituationAttribute:
GetSituationAttribute(sobj, "status")
is equal to:
sobj->status
10.5.7 Functions for Event Processing
10.5.7.1 PostEvent
PostEvent(node, event, tag, ...)
78
NetXMS User Manual
Post event on
node
event
tag
…
behalf of given node. Parameters has the following meaning:
node object to send event on behalf of;
event code;
user tag associated with event;
0 or more event-specific parameters.
Only first two parameters are mandatory. Tag can be leaved out or set to null. Function returns
TRUE if event was posted successfully or FALSE if not. Failure can be caused by passing invalid
node object or non-existent event code.
Examples:
PostEvent($node, 100000)
PostEvent($node, 100000, "my tag", "param1", "param2")
PostEvent($node, 100000, null, "param1")
10.5.8 Object Classes
10.5.8.1 DCI
Class name: DCI
Attributes
Name
Type
Description
dataType
int32
Configured data type; possible values are:
0
Integer
1
Unsigned integer
2
64 bit integer
3
64 bit unsigned integer
4
String
5
Floating point number
6
Null
description
string
Description
errorCount
uint32
Number of consecutive data collection errors
id
uint32
Unique DCI identifier
lastPollTime
int64
Time of last DCI poll (either successful or not) as number of
seconds since epoch (1 Jan 1970 00:00:00 UTC)
name
string
Parameter's name
origin
int32
Data origin (source); possible values are:
0
Internal
1
NetXMS agent
2
SNMP agent
3
Check Point SNMP agent
4
Push
status
int32
DCI status; possible values are:
0
Active
1
Disabled
2
Not supported
79
NetXMS User Manual
systemTag
string
System tag; always empty for user-defined DCIs
Name
Type
Description
code
int32
Event code
10.5.8.2 Event
Class name: Event
Attributes
customMessage string
Custom message set in event processing policy
id
uint64
Unique event identifier
message
string
Event message
name
string
Event name
parameters
array
Event-specific parameters
severity
int32
Event severity
timestamp
int64
Timestamp as number of seconds since epoch (1 Jan 1970
00:00:00 UTC)
userTag
string
User tag associated with event
10.5.8.3 Generic NetXMS Object
Class name: NetObj
Attributes
Name
Type
Description
id
uint32
Object identifier
ipAddr
string
Primary IP address
name
string
Object name
status
int32
Object status
type
int32
Object type (class)
Name
Type
Description
agentVersion
string
NetXMS agent's version
id
uint32
Object identifier
ipAddr
string
Primary IP address
isAgent
boolean
TRUE if NetXMS agent installed
10.5.8.4 Node
Class name: Node
Attributes
80
NetXMS User Manual
isBridge
boolean
TRUE if node is a bridge (switch)
isCDP
boolean
TRUE if node supports CDP (Cisco Discovery Protocol)
isLLDP
boolean
TRUE if node supports LLDP
isPrinter
boolean
TRUE if node is a printer
isRouter
boolean
TRUE if node is capable of routing IP packets
isSNMP
boolean
TRUE if node supports SNMP
isSONMP
boolean
TRUE if node supports SONMP
name
string
Object name
platformName string
Platform name reported by NetXMS agent
snmpOID
string
SNMP object identifier
snmpVersion
int32
Configured SNMP version (0 for SNMP version 1, 1 for SNMP
version 2c, 2 for SNMP version 3)
status
int32
Object status
81
NetXMS User Manual
10.6 Macros for Event Processing
On various stages of event processing you may need to use macros to include information like
event source, severity, or parameter in your event texts, alarms, or actions. You may use the
following macros to accomplish this:
Table 35: Macros for event processing
Code
Description
%n
A name of event source object.
%a
An IP address of event source object.
%i
A unique ID of event source object.
%t
Event timestamp in a day-month-year hour:minute:second form.
%T
Event timestamp as a number of seconds since epoch (as returned by time()
function).
%c
An event code.
%s
Event severity code as number. Possible values are:
0 Normal
1 Warning
2 Minor
3 Major
4 Critical
%S
Event severity code as text.
%v
NetXMS server version.
%u
A user tag associated with the event.
%m
Event message text (meaningless in event template).
%A
Alarm's text (can be used only in actions to put text of alarm from the same
event processing policy rule).
%M
Custom message text. Can be set in filtering script by setting
CUSTOM_MESSAGE variable.
%[name]
Value returned by script. You should specify name of the script from script
library.
%{name}
Value of custom attribute.
%1 - %99
Event's parameter number 1 .. 99.
%%
Insert % character.
If you need to insert special characters (like carriage return) you can use the following notations:
\t
\n
\\
Tab character
CR/LF character pair
Backslash character
82
NetXMS User Manual
10.7 Agent Parameters
10.7.1 Common Parameters
Parameters listed below are available on most of the platforms supported by NetXMS agent, and
provided by core agent and appropriate platform subagents. On Windows, some parameters
provided by WINPERF subagent.
Table 36: Common parameters
Parameter
Data
Type
Description
Agent.AcceptedConnections
uint
Total number of connections accepted by agent.
Agent.AcceptErrors
uint
Total number of connection accept errors.
Agent.ActiveConnections
uint
Number of currently active connections to agent.
Agent.AuthenticationFailures
uint
Total number of authentication failures.
Agent.ConfigurationServer
string
Name of NetXMS server used as source for
agent's configuration. Empty string if agent uses
local configuration file.
Agent.FailedRequests
uint
Total number of failed GET requests.
Agent.ProcessedRequests
uint
Total number of processed GET requests.
Agent.Registrar
string
Name of NetXMS server used for automatic agent
registration.
Agent.RejectedConnections
uint
Total number of rejected connections.
Agent.SourcePackageSupport
int
The value is 1, if platform allows agent to be
rebuilt from source package, otherwise - 0.
Agent.SupportedCiphers
string
List of supported ciphers.
Agent.TimedOutRequests
uint
Total number of Get requests failed due to
timeout.
Agent.UnsupportedRequests
uint
Total number of GET requests for unsupported
parameters.
Agent.Uptime
uint
Agent uptime in seconds.
Agent.Version
string
Agent version.
Disk.Avail(fs)
uint64
Available (to non-root users) disk space on given
file system in bytes. Not applicable on Windows
platform.
Disk.AvailPerc(fs)
float
Available (to non-root users) disk space on given
file system in percents. Not applicable on
Windows platform.
Disk.Free(fs)
uint64
Free disk space on given file system in bytes.
Disk.FreePerc(fs)
float
Free disk space on given file system in percents.
Disk.Total(fs)
uint64
Total disk space on given file system in bytes.
Disk.Used(fs)
uint64
Used disk space on given file system in bytes.
Disk.UsedPerc(fs)
float
Used disk space on given file system in percents.
83
NetXMS User Manual
Parameter
Data
Type
Description
File.Count(path[,pattern[,rec]])
uint
Number of files in given directory. This parameter
can accept up to three arguments:
File.Count(path,pattern,recursive)
• path is the only mandatory argument. It
specifies base directory for search.
• If pattern is given, only files the names of
which are matched against it will be
counted.
• Recursive determines if agent should count
files in subdirectories. To enable recursion,
use values 1 or true.
File.Hash.CRC32(file)
uint
CRC32 hash of given file.
File.Hash.MD5(file)
string
MD5 hash of given file.
File.Hash.SHA1(file)
string
SHA1 hash of given file.
File.Size(path[,pattern[,rec]])
uint64
Size in bytes of single file or all files in given
directory. This parameter can accept up to three
arguments:
File.Count(path,pattern,recursive)
• path is the only mandatory argument. It
specifies either single file or base directory
for search.
• If pattern is given, only files whose names
matched against it will be counted.
• Recursive determines if agent should count
files in subdirectories. To enable recursion,
use values 1 or true.
File.Time.Access(file)
uint64
Time of last access to a given file, as number of
seconds since epoch (1 January 1970 00:00:00
GMT).
File.Time.Change(file)
uint64
Time of last status change to a given file, as
number of seconds since epoch (1 January 1970
00:00:00 GMT).
File.Time.Modify(file)
uint64
Time of last data modification of a given file, as
number of seconds since epoch (1 January 1970
00:00:00 GMT).
84
NetXMS User Manual
Parameter
Data
Type
Net.Interface.AdminStatus(if)3
Net.Interface.BytesIn(if)3
int
Description
Administrative state of given interface. Possible
values are:
1 up
2
down
3
testing
uint
Total number of input bytes on a given interface.
uint
Total number of output bytes on a given interface.
Net.Interface.Description(if)
string
Description of an interface.
Net.Interface.InErrors(if)
uint
Total number of input errors on a given interface.
int
Operational status of a given interface. Possible
values are:
1 up
Net.Interface.BytesOut(if)
3
3
Net.Interface.Link(if)
3
3
Net.Interface.OutErrors(if)3
2
down
3
testing
uint
Total number of output errors on a given
interface.
uint
Total number of input packets on given interface.
Net.Interface.PacketsOut(if)
uint
Total number of output packets on given
interface.
Net.Interface.Speed(if)3
uint
Interface speed in bits per second.
Net.IP.Forwarding
int
IP forwarding status. 0, if IP forwarding is turned
off, and 1 - if turned on.
Process.Count(proc)
uint
Number of processes with name proc.
Process.CountEx(proc[,cmd]
[,wnd])
uint
Number of processes matched to a given criteria.
Process name should match regular expression
given in proc argument; process command line
should match regular expression given in cmd
argument; process main window title should
match regular expression given in wnd argument.
If any of the arguments is omited then it means
"match any". Process window title can be checked
only on Windows platform.
Net.Interface.PacketsIn(if)3
3
3
For all Net.Interface.* parameters you can use either interface name or index as if argument.
85
NetXMS User Manual
Parameter
Data
Type
Description
Process.CPUTime(proc[,func]
[,cmd][,wnd])5
uint64
Amount of CPU time spent by a given process(es)
measured in milliseconds.
Process.IO.OtherB(proc[,func]
[,cmd][,wnd])5
uint64
Number of bytes transferred by a given
process(es) during I/O operations other than read
and write.
Process.IO.OtherOp(proc[,func]
[,cmd][,wnd])5
uint64
Number of I/O operations other than read and
write performed by a given process(es).
Process.IO.ReadB(proc[,func]
[,cmd][,wnd])5
uint64
Number of bytes transferred by a given
process(es) during read operations.
Process.IO.ReadOp(proc[,func]
[,cmd][,wnd])5
uint64
Number of read operations performed by a given
process(es).
Process.IO.WriteB(proc[,func]
[,cmd][,wnd])5
uint64
Number of bytes transferred by a given
process(es) during write operations.
Process.IO.WriteOp(proc[,func]
[,cmd][,wnd])5
uint64
Number of write operations performed by a given
process(es).
Process.KernelTime(proc[,func]
[,cmd][,wnd])5
uint64
Amount of CPU time spent by a given process(es)
in kernel mode measured in milliseconds.
Process.PageFaults(proc[,func]
[,cmd][,wnd])5
uint64
Number of page faults for a given process(es).
Process.Syscalls(proc[,func][,cmd]
[,wnd])5
uint
Number of system calls made by a given
process(es).
Process.Threads(proc[,func][,cmd]
[,wnd])5
uint
Number of threads in given process(es).
Process.UserTime(proc[,func]
[,cmd][,wnd])5
uint64
Amount of CPU time spent by given process(es) in
user mode measured in milliseconds.
Process.VMSize(proc[,func][,cmd]
[,wnd])5
uint64
Size of process(es) virtual memory in bytes.
Process.WkSet(proc[,func][,cmd]
[,wnd])5
uint64
Size of process(es) working set (or resident set)
in bytes.
System.ConnectedUsers
int
Number of users currently logged in.
System.CPU.Count
uint
Total number of CPU's in system. This is the
number of logical processors visible to operating
system, so for example on system with one quadcore CPU this parameter will return 4.
5
All Process.* parameters accepts up to four arguments. First argument is the name of a process. If there is more
than one process, result depends on second parameter, which can be the following:
min
minimal value among all processes named proc
max
maximal value among all processes named proc
avg
average value for all processes named proc
sum
sum of values for all processes named proc
If only one process with given name exists, this argument has no effect. If this argument is omitted, default
value of sum is used. Parameters cmd and win has the same meaning as in Process.CountEx, and cmd is
specified, them proc threated as regular expression.
86
NetXMS User Manual
Parameter
Data
Type
System.CPU.LoadAvg1
Description
float
System load average for last minute. System load
averages is the average number of processes that
are either in a runnable or uninterruptable state
(or average length of processor run queue).
System.CPU.LoadAvg151
float
System load average for last 15 minutes.
System.CPU.LoadAvg5
float
System load average for last 5 minutes.
System.CPU.Usage1
int
Average CPU usage in percents for last minute.
On multiprocessor machine, it's an average value
for all processors (same applies to
System.CPU.Usage5 and System.CPU.Usage15).
System.CPU.Usage151
int
Average CPU usage in percents for last 15
minutes.
int
Average CPU usage in percents for last 5 minutes.
int
Average usage of specific CPU in percents for last
minute. cpu is zero-based index. Please note that
on some systems (notable Solaris) CPUs may be
numbered non-consequently.
System.CPU.Usage15(cpu)1
int
Average usage of specific CPU in percents for last
15 minutes.
System.CPU.Usage5(cpu)1
int
Average usage of specific CPU in percents for last
5 minutes.
System.IO.DiskQueue1
float
Average disk queue length for last minute.
System.IO.DiskTime
float
Average disk busy time for last minute.
System.Memory.Physical.Free
uint64
Amount of free physical memory in bytes.
System.Memory.Physical.FreePerc
uint
Amount of free physical memory in percents.
System.Memory.Physical.Total
uint64
Total amount of physical memory in bytes.
System.Memory.Physical.Used
uint64
Amount of used physical memory in bytes.
System.Memory.Physical.UsedPerc
uint
Amount of used physical memory in percents.
System.Memory.Virtual.Free4
uint64
Amount of free virtual memory in bytes.
uint
Amount of free virtual memory in percents.
uint64
Total amount of virtual memory in bytes.
uint64
Amount of used virtual memory in bytes.
uint
Amount of used virtual memory in percents.
string
Host name.
System.ProcessCount
uint
Total number of processes in the system.
System.ThreadCount
uint
Total number of threads in the system.
System.Uname
string
General system information as returned by uname
-a command.
System.Uptime1
uint
System's uptime in seconds.
1
System.CPU.Usage51
System.CPU.Usage(cpu)
1
1
System.Memory.Virtual.FreePerc
System.Memory.Virtual.Total
4
System.Memory.Virtual.Used
4
4
System.Memory.Virtual.UsedPerc
System.Hostname
2
4
10.7.2 Windows-specific Parameters
Parameters listed below are specific to Windows platform and provided by Windows platform
subagent (WINNT.NSM or WIN95.NSM) and WINPERF subagent.
1
4
2
On Windows, this parameter provided by WINPERF subagent.
Virtual memory means "all memory available to processes, either real or in swap space". Depending on platform it
calculates differently. On most UNIX platforms it's a sum of real memory and swap space.
On Windows, this parameter provided by core agent only on Windows XP and above. On older Windows versions it
is provided by WINPERF subagent.
87
NetXMS User Manual
Table 37: Windows-specific parameters
Parameter
Data
Type
Description
Net.RemoteShareStatus(share,
domain,login,password)
int
Status of remote share as code. Correct UNC path,
domain, login, and password should be provided.
Value will be 0 if the share is accessible,
otherwise - non-zero Windows error code.
Net.RemoteShareStatusText(shar
e,domain,login,password)
string
Status of remote share as text. Correct UNC path,
domain, login, and password should be provided.
Value will be string OK if share is accessible,
otherwise - error message.
PDH.CounterValue(counter[,ts])
int64
Current value of a given PDH counter. Optional
second argument ts specifies if counter requires
two samples to calculate a value (typical example
of such counters is CPU utilization). Two samples
will be taken if ts set to 1. Counter path should
start with single backslash character and not
include machine name.
PDH.Version
uint
Version of PDH.DLL (as returned by
PdhGetDllVersion() call).
Process.GDIObjects(proc[,func]
[,cmd][,wnd])5
uint64
Number of GDI objects used by given process(es).
Process.UserObjects(proc[,func]
[,cmd][,wnd])5
uint64
Number of user objects used by given
process(es).
System.ServiceState(service)
int
State of given Windows service. Possible values
are:
0
service running;
1
service paused;
2
service starting (start pending);
3
service pausing (pause pending);
4
service starting after pause (continue
pending);
5
service stopping (stop pending);
6
service stopped;
255
unable to get current service state.
88