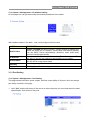
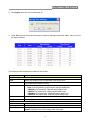
1
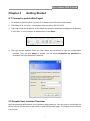
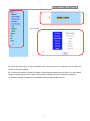
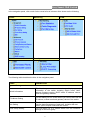
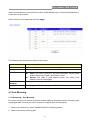
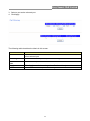
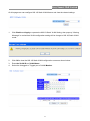
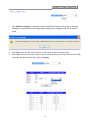
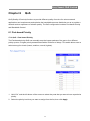
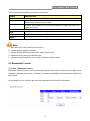
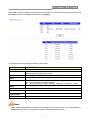
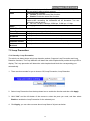
Easy Smart GbE Switch 8-Port Gigabit Easy Smart Switch User Manual Easy Smart GbE Switch FCC Certifications This Equipment has been tested and found to comply with the limits for a Class B digital device, pursuant to part 15 of the FCC Rules. These limits are designed to provide reasonable protection against harmful interference when the equipment is operated in a commercial environment. This equipment generates, uses, and can radiate radio frequency energy and, if not installed and used in accordance with the instruction manual, may cause harmful interference to radio communications. Operation of this equipment in a residential area is likely to cause harmful interference in which case the user will be required to correct the interference at his own expense. This device complies with Part 15 of the FCC Rules. Operation is subject to the following two conditions: (1) this device may not cause harmful interference, and (2) this device must accept any interference received; including interference that may cause undesired operation. CE Mark Warning This equipment complies with the requirements relating to the EMC Directive 2004/108/EC, the Low Voltage Directive 2006/95/EC, and the RoHS Directive 2011/65/EU. Company has an on-going policy of upgrading its products and it may be possible that information in this document is not up-to-date. Please check with your local distributors for the latest information. No part of this document can be copied or reproduced in any form without written consent from the company. Trademarks: All trade names and trademarks are the properties of their respective companies. Copyright © 2015, All Rights Reserved. 1 Easy Smart GbE Switch Table of Contents Chapter 1 Introduction ············································································· 4 1.1General Description ················································································ 4 1.2 Key Features ························································································ 4 1.3 The Front Panel ···················································································· 5 1.4 The Rear Panel····················································································· 5 1.5 Installation ··························································································· 6 Chapter 2 Getting Started ······································································· 7 2.1 Connect to switch Web Pages ·································································· 7 2.2 Graphic User Interface Overview ······························································ 7 Chapter 3 System ·················································································· 12 3.1 Management ······················································································· 12 3.1.1 Switch Information ············································································· 12 3.1.2 IP Address Setting ············································································· 12 3.1.3 Port Setting ······················································································ 13 3.1.4 Trunk Group Setting ··········································································· 15 3.1.5 EEE ································································································ 16 3.2 Maintenance ······················································································· 17 3.2.1 User Account ···················································································· 17 3.2.2 Firmware Upgrade ············································································· 18 3.2.3 Config. Backup and Restore ································································· 21 3.2.4 Reset to Default Config ······································································· 21 3.2.5 Config Save ······················································································ 22 3.2.6 Reboot ···························································································· 22 3.3 MultiCast ···························································································· 23 3.3.1 IGMP Snooping ················································································· 23 Chapter 4 Monitoring ·············································································· 24 4.1 Port Statistics ······················································································ 24 4.2 Cable Diagnostic ·················································································· 24 4.3 Port Mirroring ······················································································ 25 Chapter 5 VLAN ···················································································· 27 5.1 Port Base VLAN ··················································································· 27 5.2 MTU VLAN ························································································· 28 5.3 802.1Q VLAN ······················································································ 30 5.3.1 802.1Q Static VLAN ··········································································· 30 5.3.2 802.1Q VLAN Port ············································································· 32 Chapter 6 QoS ······················································································ 35 6.1 Port-based Priority ················································································ 35 6.2 Bandwidth Control ················································································ 36 2 Easy Smart GbE Switch Chapter 7 Security ················································································· 38 7.1 Storm Filter ························································································· 38 7.2 Loop Prevention ··················································································· 39 7.3 DHCP Snooping··················································································· 41 Product Specifications ················································································ 42 3 Easy Smart GbE Switch Chapter 1 Introduction 1.1 General Description The device is high-performance Gigabit Ethernet switch, with all 8 ports capable of 10/100/1000Mbps auto-negotiation operation (NWay) which means the switch could automatically negotiate with the connected partners on the network speed and duplex mode. This switch supports the Web GUI to control each port status and bandwidth control by port rate limiting. It’s easy to set the VLAN & QoS function, the VLAN includes MTU VLAN, Port Base VLAN & 802.1Q VLAN. The QoS has 4 priority queues QoS which can set the Storm Filter for Broadcast Storm, Multicast Storm & Unicast Storm. Loop detection and prevention functions are supported for detecting/resolving the cable loopback connection issue more easily. Support DHCP snooping function to prevent untrusted DHCP server installed for easily maintaining network management. The switch complies with IEEE802.3az Energy Efficient Ethernet to save power consumption, Supports IGMP Snooping function to improve traffic performance. Moreover, the rich diagnostic LEDs on the front-panel provide the operating status of individual port and whole system. 1.2 Key Features 8 * RJ-45 ports for 10/100/1000Mbps connectivity Supports MDI/MDI-X auto crossover Supports NWay protocol for speed (10/100/1000Mbps) and duplex mode (Half/Full) auto-detection Complies with IEEE802.3, 802.3u, 802.3ab Ethernet standards Complies with IEEE802.3az Energy Efficient Ethernet Supports IEEE802.3x Flow Control Supports Storm Filter (Broadcast, Multicast, Unicast) The QoS Supports 802.1p QoS and port rate limiting The VLAN includes MTU, Port Based & 802.1Q Tag Based Supports 4 groups of Port Based VLAN Provides Port trunk by one group two ports Provides Port Mirroring by one group two ports Supports IGMP Snooping v1/v2/v3 Supports Loop detection and Loop prevention Supports EEE enable and disable Provides Cable testing function Supports DHCP Client Supports DHCP snooping Supports Firmware upgrade Supports Configuration backup & restore Full Range of Internal universal switching power supply Supports Reset to factory default button 4 Easy Smart GbE Switch 1.3 The Front Panel The following figure shows the front panel of the switch. LEDs Definition This device provides extensive LEDs to show the activities on power, system and ports. See the following description for your reference: LED Status Operation Steady Green The switch is powered on. Off The switch is powered off. Steady Red The switch is detected the network loopback. Off The Loop is not detected. Steady Green Valid port connection;. Blinking Green Valid port connection and there is data transmitting/receiving Off Port disconnected. POWER LOOP Link/ACT The Reset Button Reset the switch to its factory default configuration via the RESET button. Press the RESET button for more than two seconds to enable reset to default function. The switch automatically reboots and reloads its factory configuration file. The RESET button is on the front panel of the switch. 1.4 The Rear Panel The following figure shows the rear panel of the switch: Power socket The power socket located at the right side of the rear panel, is where you should connect the power 5 Easy Smart GbE Switch adapter. Please use the +5V/1A power adapter provided with the Easy Smart GbE Switch. After the switch powered on, the power LED is lit for a normal power status. 1.5 Installation Desktop Installation 1. Place the switch on a flat desk. 2. Inspect the Power Adapter carefully and make sure that it is properly connected to a power source. 3. Ensure adequate ventilation space around the switch for dissipating heat and air. 4. Power on the switch and it will automatically initialize and power LED turn on. Installing Network Cables To make a valid connection and obtain the optimal performance, an appropriate cable that corresponds to different transmitting/receiving speed is required. To choose a suitable cable, please refer to the following table. Media Speed 10 Mbps Network Media(Cable) 100 Mbps 1000 Mbps Wiring 10Base-T: UTP category 3, 4, 5 cable (maximum 100m) EIA/TIA-568 100Ω STP (maximum 100m) 100Base-TX: UTP category 5, 5e cable (maximum 100m) EIA/TIA-568 100Ω STP (maximum 100m) 1000Base-T: UTP category 5e, 6 cable (maximum 100m) EIA/TIA-568 100Ω STP (maximum 100m) 6 Easy Smart GbE Switch Chapter 2 Getting Started 2.1 Connect to switch Web Pages 1. To connect to the web server, input the IP of switch in the URL field of the browser. 2. The default IP is 192.168.1.1 and default Subnet mask is 255.255.255.0 3. Type “http://”and the IP address of the switch (for example, the default management IP address is 192.168.1.1) in the Location or Address field. Press Enter. 4. The login screen appears. Enter the User Name and Password to login the configuration interface. They are both admin by default. You can select Remember my password to remember the User Name and Password. 2.2 Graphic User Interface Overview After the password authorization, the information page shows up. You may click on each folder on the left column of each page to get access to each configuration page. The Graphic User Interface is as follows: 7 Easy Smart GbE Switch B A C A –Click the menu items to open submenu links, and then click on a submenu link to open the screen in the main window. B –It shows the switch’s current link status. Green squares indicate the port link is up, while black squares indicate the port link is down. Red squares indicate the port on network loop status. C –Displays system information such as MAC address and firmware version. 8 Easy Smart GbE Switch In the navigation panel, click a main link to reveal a list of submenu links shown as the following: System Monitoring Qos Security VLAN The following table describes the links in the navigation panel. LINKS DESCRIPTION System-Management Switch Information This link takes you to a screen that changes/displays general information of the switch including switch name, MAC address, firmware version, DHCP mode, IP address, subnet mask and gateway address. IP Address Setting This link takes you to a screen where you can set and view the IP address, subnet mask and gateway values of the switch. Port Setting Trunk Group Setting This link takes you to a screen where you can configure and view the basic parameters of each port, including the port status, speed, duplex mode and flow control. This link takes you to a screen where you can configure settings for the trunk group. 9 Easy Smart GbE Switch EEE This link takes you to enable or disable port EEE(Energy Efficient Ethernet) function. System-Maintenance User Account Firmware Upgrade Config. Backup and Restore Reset to Default Config This link takes you to a screen where you can change the web configuration login account and password. This link takes you to a screen where you can upgrade the firmware. This link takes you to a screen where you can save the current configuration file to your computer or download a backup configuration file to your switch. This link takes you back to default factory settings and restart the system. Config Save This link takes you to a screen where you can save all the configurations you have made to the switch effectively, so that you can use the same configurations next time. Reboot This link takes you to a screen where you can reboot the switch. System-Multi Cast IGMP Snooping This link takes you to a screen where you can configure the IGMP snooping setting. Monitoring Port Statistics This link displays port network traffic for the switch. Cable Diagnostic This link takes you to a screen where you can diagnose the connection status of the cable connected to the switch and the distance to the problem location. Port Mirroring This link takes you to a screen where you can monitor and mirror network traffic by forwarding copies of incoming and outgoing packets from one/multiple ports(mirrored port) to a specific port(mirroring port). VLAN Port Base VLAN This link takes you to a screen where you can set the Port-Based VLAN mode. MTU VLAN This link takes you to a screen where you can set the MTU VLAN mode. VLAN-802.1Q VLAN 802.1Q Static VLAN This link takes you to a screen where you can set the 802.1Q Tag VLAN mode. 802.1Q VLAN Port This link takes you to a screen where you can configure the 802.1Q PVID value. Qos Port-based Priority This link takes you to a screen where you can set the priority queue for the ports to determine the priority of ports’ receiving and transmitting data. Bandwidth Control This link takes you to a screen where you can configure and view the bandwidth control function information. Security 10 Easy Smart GbE Switch Storm Filter This link takes you to a screen where you can filter or limit broadcast, multicast, unknown unicast and unknown multicast frame in the network. Loop Prevention This link takes you to a screen where you can setup loop prevention and loop detection features. DHCP Snooping This link takes you to a screen where you can configure the DHCP snooping settings. 11 Easy Smart GbE Switch Chapter 3 System The System page is mainly for system configuration of the switch, including management , maintenance and multicast setting for the switch. 3.1 Management Use the Management pages to view switch information and configure some settings for ports, trunk group and EEE. 3.1.1 Switch Information Click System > Management > Switch Information On this page user can configure and browse some switch information such as Switch name, MAC address, IP address, Gateway and Firmware Version and so on. With editable textbox in the table,user could configure the field value. LABEL MAC Address DESCRIPTION Name of the switch, can be modified for identifying other different switches. Displays the MAC address of the switch. Firmware Version Displays the installed software version number. DHCP Client Displays the status of the DHCP function for the switch. IP Address Displays the system IP address of the switch Subnet Mask Displays the subnet mask of the switch. Gateway Displays the gateway IP Address of the switch. Apply Click Apply to make the settings take effect. Switch Name 3.1.2 IP Address Setting 12 Easy Smart GbE Switch Click System > Management > IP Address Setting On this page user can get and modify the network parameters of the switch. With editable textbox in the table,user could configure the field value. LABEL Gateway DESCRIPTION Enable or Disable the DHCP function. If DHCP setting is enabled, the switch will obtain the IP address, subnet Mask and default gateway from the DHCP Server automatically; otherwise, these three items should be configured manually. Enter the system IP address of the switch. The default system IP is 192.168.1.1 and you can change it appropriately to your needs. Enter the subnet mask of the switch. By default, the switch uses 255.255.255.0 as the subnet mask. Enter the gateway IP Address of the switch. Apply Click Apply to make the settings take effect. DHCP Client IP Address Subnet Mask 3.1.3 Port Setting Click System > Management > Port Setting This page shows link status, speed, duplex, and flow control ability of all ports. User can change port ability of switch in this page., 1. Hold “Ctrl” and the left button of the mouse to select the ports you need, and select the state, speed/duplex, flow control of the ports. 13 Easy Smart GbE Switch 2. Click Apply, then the remind view pops up. 3. Press OK, and wait for several seconds to make the setting of ports take effect, then you’ll see the page as below. The following table describes the labels in this screen. LABEL Port Config Port State Speed/Duplex Flow Control Apply Port Status Table Port State Speed/Duplex DESCRIPTION Select the desire port for configuration from the list box. Allows you to Enable/Disable the port. When Enable is selected, the port can forward the packets normally. Select the Port speed/duplex capabilities for the ports you need: Auto: Auto-negotiation speed/ duplex with all capabilities. 10M/Half: Set speed with 10M half-duplex ability only. 10M/Full: Set speed with 10M full-duplex ability only. 100M/Half: Set speed with 100M half-duplex ability only. 100M/Full: Set speed with 100M full-duplex ability only. Select on/off to enable/disable the flow control ability of the selected ports. Click Apply to make the settings take effect immediately. Displays the port number. Displays the actual state of the ports. Config: Displays the configuration of Speed and Duplex mode for the port. Actual: Displays the actual working state of the port. 14 Easy Smart GbE Switch Flow Control Config: Displays the configuration of the Flow Control for the port. Actual: Displays the actual working state of the port. Note: 1. The switch can’t be managed through the disable port. 2. The switch might lose connection temporarily for the specific port (which connect to the management PC) setting. If it happens, refresh WEB GUI can recover the connection. 3.1.4 Trunk Group Setting Click System >Management> Trunk Group Setting Trunk group is used to combine a number of ports together to make a single high-bandwidth data path, which can highly extend the bandwidth. The bandwidth of the trunk is the sum of bandwidth of its member ports. Provides Port trunk by one group two ports Hold “Ctrl” and the left button of the mouse to select two ports for trunk group setting, click Add / Modify, and then you can view the port parameters as shown below. 15 Easy Smart GbE Switch The following table describes the labels in this screen. LABEL DESCRIPTION Trunk Group Config Displays the Trunk Group ID. Group ID Select the ports as the trunk group member. Ports Click to select the action of operation, to add/modify Trunk Group to the Add/Modify switch. Trunk Group Table Displays the Trunk Group as Trunk1. Group ID Displays the Trunk member ports. Ports Select and enable the Trunk Group. Select Click Select All to select and enable the Trunk Group Select All Click Delete to delete the Trunk Group. Delete Note: 1. Only supports one group (Trunk 1) and two ports from port 1 to port4. 2. For the member ports in a trunk group, their configuration of port setting & QoS must be the same 3.1.5 EEE Click System >Management> EEE This page allows user to enable or disable EEE (Energy Efficient Ethernet) function. 1. In the EEE setting list, select Enable or Disable EEE. 2. Click Apply to set up this function. The following table describes the labels in this screen. LABEL EEE function Apply DESCRIPTION Port EEE function. Enabled: Enable EEE function Disabled: Disable EEE function Click Apply to make the settings take effect immediately. 16 Easy Smart GbE Switch 3.2 Maintenance The Maintenance pages are doing the switch user account, Firmware upgrade, Configuration Backup/Restore, Reset to default configuration, Configuration Save and Reboot functions. 3.2.1 User Account Click System > Maintenance > User Account This page user can change the administrator’s username and password in order to refuse illegal users. 1. Enter the new username and password, click Apply. 2. Then the login screen appears, enter the new username and password,click OK to login the configuration interface of User Account again. 17 Easy Smart GbE Switch The following table describes the labels in this screen. LABEL New Username New Password Retype Password Apply DESCRIPTION Create a name for administrator’s login. Type in a new password for administrator’s login. Retype password to make sure the password is exactly you typed before in “New Password” field. Click Apply to make the settings take effect immediately. Note: 1. Only digits, letters and underlines can be used for creating the user name and password. The length of user name should not be more than 20 characters and the password should not be more than 17 characters. 2. The default user name/password is admin/admin. 3.2.2 Firmware Upgrade To upgrade switch firmware, first download a firmware upgrade file to your computer. User can select to upgrade firmware thought TFTP or HTTP. Click System > Maintenance > Firmware Upgrade. The switch system can be upgraded via this management page. 18 Easy Smart GbE Switch 1. Enter the Enter Loader Mode button, then the confirm interface pops up. 2. Press OK , then the switch will save the configuration and switch to loader mode after 6 seconds. The firmware upgrade screen displays as shown below. 3. If you select to upgrade firmware thought TFEP, click Firmware Upgrade < TFTP Firmware Upgrade to view the screen as shown below. 4. Enter the Image File Name and click Download Image, then a remind interface pops up. 19 Easy Smart GbE Switch 5. Click OK and wait for several seconds to download the firmware, then you’ll see the upgrade status interface as shown below. After finishing the TFTP upgrade procedure, switch will reboot automatically. 6. If you select to upgrade firmware thought HTTP, click Firmware Upgrade < HTTP Firmware Upgrade to view the screen as shown below. 7. Click the Browse button to the location on your computer containing the firmware upgrade file and select the upgrade file. 8. Click Upgrade, then the remind interface pops up, press OK to operate the upgrade procedure. 9. After finishing the HTTP upgrade procedure, switch will reboot automatically. The following table describes the labels in this screen. LABEL DESCRIPTION TFTP Server IP Address IP address of the TFTP server. Image File Name Firmware image or configuration file name on remote TFTP server. Download Image Download Image file from TFTP server to switch. Browse Browse the image file on your computer. Click Upgrade to update the specified file selected from browse file and install the new firmware after selecting the HTTP upgrade method. Upgrade Reboot Press Reboot button, can reboot switch. 20 Easy Smart GbE Switch Note: 1. Don’t turn-off the switch and disconnect the link while firmware upgrading. 2. You are suggested to backup the configuration before upgrading. 3.2.3 Config. Backup and Restore Click System > Maintenance > Config. Backup and Restore On this page user can download the current configuration and save it as a file to your computer, or upload a backup configuration file to restore your switch to this previous configuration. The following table describes the labels in this screen. LABEL DESCRIPTION Backup Click the Backup button to save the current configuration as a file to your computer. You are suggested to take this measure before upgrading Restore Click the Browse button to select the backup configuration file, and then click the Restore button. It will take effect after the switch reboots. 3.2.4 Reset to Default Config Click System > Maintenance > Reset to Default Config On this page user can reset the switch to the factory default configuration. All the settings will be cleared after the switch is reset. Follow the steps below to reset the switch back to the factory defaults. 21 Easy Smart GbE Switch 1. Click Factory Default to reset all switch configurations to the factory defaults and the switch will restart automatically. 3.2.5 Config Save Click System>Maintenance>Config Save You can save the current configuration easily by clicking the Config Save menu without any function button and you’ll see the successful page directly. Config Save Page Note: 1. To avoid damage, please don’t turn off the device before the configuration saved successfully. 2. Only by clicking the Config Save menu can you save the current configuration of the switch effectively, so that the configuration you made this time will remain in effect next time you start it. 3.2.6 Reboot Click System>Maintenance> Reboot Allow you to restart the switch without physically turning the power off. Follow the steps below to reboot the switch. 1. Click Reboot to view the screen as shown next. 2. Click Reboot button, then the following remind view pops up, Click OK. 22 Easy Smart GbE Switch 3. The switch will be restarted directly in about 20 seconds without any successful page. 3.3 MultiCast Internet Group Management Protocol (IGMP) snooping is a multicast control mechanism, which can be used on the switch for dynamic registration of the multicast group. Internet Group Management Protocol (IGMP) snooping allows a switch to forward multicast traffic intelligently on the switch. This feature prevents the switch from broadcasting the traffic to all ports and possibly affecting network performance. 3.3.1 IGMP Snooping Click System > MultiCast > IGMP Snooping On this page user can enable or disable IGMP snooping feature. The following table describes the labels in this screen. LABEL IGMP Snooping DESCRIPTION Enable or Disable IGMP snooping function globally on the switch. Apply Click Apply to make the settings take effect immediately. 23 Easy Smart GbE Switch Chapter 4 Monitoring The Monitoring page monitors port statistics information, perform cable diagnostic and allows you to configure port mirroring. 4.1 Port Statistics Click Monitoring > Port Statistics On this page user can view the statistic information of each port, which facilitates you to monitor the traffic and locate faults promptly. The following table describes the labels in this screen. LABEL Port State Link Status TxGoodPkt TxBadPkt RxGoodPkt RxBadPkt Clear DESCRIPTION Displays the port number of the switch. Displays whether the port is enabled or disabled. Displays the link state of the port. Displays the number of good packets transmitted on the port. The error packets are not counted in. Displays the number of error packets transmitted on the port. Displays the number of good packets received on the port. The error packets are not counted in. Displays the number of error packets received on the port. Click to reset content of screen 4.2 Cable Diagnostic Click Monitoring> Cable Diagnostics This switch provides cable diagnostic to check the connection status of the cable connected to the 24 Easy Smart GbE Switch switch and the distance to the problem location, which facilitates you to locate and diagnose the trouble spot of the network. Select the ports to be diagnosed and click Apply. The following table describes the labels in this screen. LABEL DESCRIPTION Check Click the checkbox to select the port to be diagnosed. Port Displays the port number of the switch. Displays the cable connection status : Open: The cable is broken or no cable connection. Get the cable broken distance by “Cable Fault Distance” field. Normal: The cable is good without broken, the “Cable Fault Distance” field is meaningless. Displays the error length of the cable. Test Result Cable Fault Distance Apply Click Apply to make the settings take effect immediately. 4.3 Port Mirroring Click Monitoring > Port Mirroring Port mirror function is to monitor and mirror network traffic by forwarding copies of incoming and outgoing packets from one port (mirrored port) to a specific port (mirroring port). 1. Select mirror direction to select “disable/rx/tx/both” forwarding packets 2. Select a port as the mirroring port. 25 Easy Smart GbE Switch 3. Select a port as the mirrored port 4. Click Apply The following table describes the labels in this screen. LABEL Mirror Direction Mirroring Port DESCRIPTION Select mirror direction: user can select disable/rx/tx/both four items to mirror selected port Select mirror session port to operate monitoring function Mirrored Port List Apply Select mirrored port to be monitored. Delete Click Delete to remove port mirror setting. Click Apply to make the settings take effect immediately. 26 Easy Smart GbE Switch Chapter 5 VLAN A VLAN is a group of end stations with a common set of requirements, independent of physical location. VLANs have the same attributes as a physical LAN but allow you to group end stations even if they are not located physically on the same LAN segment. You can group ports on a switch to create a virtual network made up of the devices connected to the ports. VLANs can be grouped using port-based or 802.1Q criteria. The VLAN configuration includes Port Base VLAN, MTU VLAN & 802.1Q VLAN. 5.1 Port Base VLAN Click VLAN > Port Base VLAN Allow you to assign ports to virtual networks. Data from a port that is a member of a VLAN group is restricted to other members of that VLAN group. This feature provides an easy way to partition a network into private sub networks 1. Select Enable to enable port Based VLAN mode. 2. Enter the VLAN ID and VLAN Name 3. Select the port of VLAN Member. 27 Easy Smart GbE Switch The following table describes the related labels in this screen. LABEL DESCRIPTION Port-based VLAN Config Port-based VLAN Enable or Disable Port-based VLAN mode. Enter the ID number of VLAN. It ranges from 1 to 4. VLAN ID Specify the VLAN Name for new created VLANs. VLAN Name Displays the port number of the switch Port Click All to configure all ports setting. Select All Click All or any one port to set for not member of VLAN group. Not Member Click All or any one port to set for member of VLAN group. Member Click Apply to make the settings take effect immediately. Apply Port-based VLAN Table VLAN ID VLAN Name Member Ports Delete Select ALL Displays the ID number of VLAN. Displays the name of VLAN. Displays the port member in the VLAN. Click Delete to remove some VLAN ID you selected before. This helps to select all VLAN ID to be deleted at one time. Note: 1. To ensure the normal communication of the factory switch, the default VLAN of all ports is set to VLAN1. VLAN 1 cannot be deleted. 2. You can only set the valid VLAN ID between figure 1 to 4. 5.2 MTU VLAN Click VLAN > MTU VLAN MTU VLAN (Multi-Tenant Unit VLAN) defines an uplink port which will build up several VLANs with each of the other ports. Each VLAN contains two ports, the uplink port and one of the other ports in the switch, so the uplink port can communicate with any other port but other ports cannot communicate with each other. On this page you can choose to enable MTU VLAN mode and configure VLANs. 28 Easy Smart GbE Switch 1. Click Enable and Apply to operate the MTU VLAN Setting, then pops up “Warring Message” to remind that VLAN configuration setting will be change to MTU VLAN mode. 2. Click OK to view the MTU VLAN configuration screen. 3. Select Enable and Apply to enable MTU VLAN mode. 29 Easy Smart GbE Switch The following table describes the labels in this screen. LABEL MTU VLAN VLAND ID VLAN Name Member Ports Apply DESCRIPTION Enable or Disable MTU VLAN mode. The factory default for VLAD ID is 1. Display the name of VLAN you set. Display the member ports set for MTU VLAN. Click Apply to make the settings take effect immediately. 5.3 802.1Q VLAN Allow you to create virtual networks using 802.1Q criteria. When using 802.1Q VLAN configuration, you configure ports to be a part of a VLAN group. When a port receives data tagged for a VLAN group, the data is discarded unless the port is a member of the VLAN group. This technique is useful for communicating with devices outside of your local network as well as still receiving data from other ports not in your VLAN group. It requires that you know the VLAN group IDs used. 5.3.1 802.1Q Static VLAN Click VLAN > 802.1Q VLAN > 802.1Q Static VLAN 30 Easy Smart GbE Switch On this page user can configure 802.1Q Static VLAN feature and view the related settings. 1. Click Enable and Apply to operate the 802.1Q Static VLAN Setting, then pops up “Warring Message” to remind that VLAN configuration setting will be change to 802.1Q Static VLAN mode. 2. Click OK to view the 802.1Q Static VLAN configuration screen as shown below. 3. Enter the VLAN ID and VLAN Name 4. Select the Untagged or Tagged port of VLAN Member. 31 Easy Smart GbE Switch The following table describes the labels in this screen. LABEL DESCRIPTION 802.1Q Static VLAN Config Enable or Disable the 802.1Q Static VLAN mode. 802.1Q Static VLAN Enter the ID number of VLAN. It ranges from 1 to 4094. VLAN ID Specify the VLAN Name for new created 802.1Q Static VLANs. VLAN Name Displays the port number of the switch. Port Click All to configure all ports setting. Select All Configure the egress rule of the traffic on the port as untagged. The Untagged switch drops the tag header before sending the packet. Configure the egress rule of the traffic on the port as tagged. The switch Tagged adds the tag header before sending the packet. Click All or any one port to set for not member of VLAN group. Not Member Click Apply to make the settings take effect immediately. Apply 802.1Q Static VLAN Table Displays the ID number of VLAN. VLAN ID Displays the name of VLAN. VLAN Name Displays the port member in the VLAN. Member Ports Displays the tagged port members in the VLAN. Tagged Ports Displays the untagged port members in the VLAN. Untagged Ports Click Delete to remove some VLAN ID you selected before. Delete This helps to select all VLAN ID to be deleted at one time. Select ALL Note: 1. The default VLAN with VID being 1 cannot be removed but can modify untagged/tagged set and member ports. 2. The VLAN ID only can be set from 1 to 4094. 5.3.2 802.1Q VLAN Port Click VLAN > 802.1Q VLAN > 802.1Q VLAN Port A PVID (Port VLAN ID) is a tag that adds to incoming untagged frames received on a port so that the frames are forwarded to the VLAN group that the tag defines. If you have one unit/PC that you only want to use in VLAN4, then you set the connection port to VLAN4, and only that traffic will be send to that specific port. This page shows VLAN port information. User can assign PVID, tag egress mode, accepted frame type of each port. 32 Easy Smart GbE Switch 1. Click Enable and Apply to operate the 802.1Q VLAN Port Setting, then pops up “Warring Message” to remind that VLAN configuration setting will be change to 802.1Q VLAN Port mode. 2. Click OK to view the 802.1Q VLAN Port configuration screen as shown below. 3. Hold “Ctrl” and the left button of the mouse to select the ports you need, and enter the PVID, select the Accepted Frame Type, then click Apply. 33 Easy Smart GbE Switch The following table describes the labels in this screen. LABEL DESCRIPTION 802.1Q VLAN Port Config Enable or Disable the 802.1Q VLAN Port mode. 802.1Q VLAN Port Select the desire port for configuration. Port Enter a PVID number of the ports. It ranges from 1 to 4094. When adding PVID the tag header to the received untagged packet, the switch will automatically uses this PVID value as the VLAN ID of the added tag. Select All/Tag-only/Untag-only from the drop-down box to configure the Accepted Frame accepted frame type of the selected port. Type Click Apply to make the settings take effect immediately. Apply 802.1Q VLAN Port Table Displays the port number selected for configuration. Port Displays the PVID number of the ports. PVID Displays the accepted frame type of the selected port. Accepted Frame Type Note: The PVID only can be set from 1 to 4094 and default PVID of all ports is 1.. 34 Easy Smart GbE Switch Chapter 6 QoS QoS (Quality of Service) functions to provide different quality of service for various network applications and requirements and optimize the bandwidth resource distribution so as to provide a network service experience of a better quality. The QoS configuration includes Port-based Priority and Bandwidth Control. 6.1 Port-based Priority Click QoS > Port-based Priority The Port-based priority QoS can manually map the ingress packets of the port to four different priority queues. A higher priority transmits data with a minimum of delays. This switch allows user to select among four levels (lowest, medium, normal, highest). 1. Hold “Ctrl” and the left button of the mouse to select the ports that you want to have a particular priority. 2. Select the priority level that you want to assign from the list, then click Apply. 35 Easy Smart GbE Switch The following table describes the labels in this screen. LABEL DESCRIPTION Port-based Priority Config Select the desired port for configuration. It is multi-optional, you can Port choose eight ports at most at a time. Specify the priority queue the packets from the port are mapped to. The Priority Queue priorities are labeled as 1~4 and among them the bigger the value, the higher the priority. Port-based Priority Table Displays the port number of the switch. Port Priority Queue Displays the priority queue of all ports. Apply Click Apply to make the settings take effect immediately. Note: 1. By default, the Priority Queue of all ports is 1. 2. Lowest Priority (background data) 3. Normal Priority (business-critical data, email, internet, etc) 4. Medium Priority (stream multimedia, etc) 5. Highest Priority (interactive voice, video, and delay sensitive data) 6.2 Bandwidth Control Click QoS > Bandwidth Control Bandwidth control functions to control the ingress/egress traffic rate on each port via configuring the available bandwidth of each port. In this way, the network bandwidth can be reasonably distributed and utilized. On this page you can configure and view the bandwidth control function information. 36 Easy Smart GbE Switch Hold “Ctrl” and the left button of the mouse to select the port, and select the type, state and rate of the selected port for bandwidth control, then click Apply. The following table describes the labels in this screen. LABEL DESCRIPTION Bandwidth Control Config Select the desired port for rate configuration. It is multi-optional, you can Port choose eight ports at most at a time. Select Ingress or Egress from the drop-down box. Type Enable or Disable bandwidth control for the selected port. State Select the Rate for receiving packets or sending packets on the select port. You can choose the rate as below: No Limit(default), 1M bps, 64M bps, 256M bps, 512M bps, 1G bps Click Apply to make the settings take effect immediately. Rate Apply Bandwidth Control Table Displays the port number of the switch Port Ingress Rate Displays the ingress rate of all ports. Egress Rate Displays the egress rate of all ports. Note: 1. When egress bandwidth control feature is enabled for one or more ports, you are suggested to disable the flow control on each port to ensure the switch works normally. 37 Easy Smart GbE Switch Chapter 7 Security Use the Security pages to configure settings for the switch security features. It includes Storm Filter, Loop Prevention and DHCP Snooping. 7.1 Storm Filter Click Security > Storm Filter Storm Filter function allows the switch to filter broadcast, multicast, unknown unicast and unknown multicast frame in the network. If the transmission rate of the three kind packets exceeds the set bandwidth, the packets will be automatically discarded to avoid network broadcast storm. 1. Select the Storm Type from the drop-down list. 2. Hold “Ctrl” and the left button of the mouse to select the ports you need, select Enable from the State drop-down box to enable the setting, and then choose the rate from the checkbox. 3. Click Apply, then the Storm Filter information will be displayed as below. The following table describes the labels in this screen. LABEL DESCRIPTION Storm Filter Config Storm Type Select the type of storm control Broadcast: Broadcast packet Multicast: Multicast packet Unknown Unicast: Unknown unicast packet Unknown Multicast: Unknown multicast packet 38 Easy Smart GbE Switch Port State Rate Apply Storm Filter Table Select the desired port for Storm Filter configuration. It is multi-optional, you can select 8 ports at a time at most. Select the state of setting Disable: Disable the storm filter function. Enable: Enable the storm filter function. Select the bandwidth for receiving the specified packet on the port. The packet traffic exceeding the bandwidth will be discarded. You can choose the rate as below: No Limit, 1M bps, 64M bps, 256M bps, 512M bps, 1G bps Click Apply to make the settings take effect immediately. Storm Type Port Displays the storm type of each port. Displays the port number of the switch. Broadcast Displays broadcast control states or rate for the port. Multicast Displays multicast control states or rate for the port. Unknown Unicast Displays unknown unicast control states or rate for the port. Unknown Multicast Displays unknown multicast control states or rate for the port. 7.2 Loop Prevention Click Security> Loop Prevention The switch can detect loops using loop detection packets. Supports Loop Prevention and Loop Detection functions, The Loop detection will detect the cable loopback and provide the loop LED to display. The Loop prevention will detect the cable loopback and block the corresponding port automatically. 1. There are three modes for you to choose: Off, Loop Prevention, Loop Detection. 2. Select Loop Prevention from the drop-down box to enable the function and then click Apply. 3. Hold “Ctrl” and the left button of the mouse to select the ports you need, and then select Enable to enable the Loop Prevention for the selected port. 4. Click Apply, you can view a screen about Loop State of all ports as below. 39 Easy Smart GbE Switch 5. The Loop Detection function will operate automatically to detect looping ports, the link state will be showed as below when some ports on net work loop status if you have set this function. The following table describes the labels in this screen. LABEL DESCRIPTION Loop Prevention Setting Select the state of Loop Function setting Loop Function Off: Disable the Loop Detection/Prevention Function. Loop Prevention: Enable the Loop Prevention Function. Loop Detection: Enable the Loop Detection Function. Loop Prevention Config Select the desire port for Loop Prevention setting. Port 40 Easy Smart GbE Switch Disable or Enable the loop prevention function of the selected port. State Loop Prevention Table Displays the port number of the switch. Port Loop State Displays the loop state of all ports. Loop Status Displays the loop status of all ports. The default factory of all ports is FORWARDING for the switch. Click Apply to make the settings take effect immediately. Apply Note: Enable Loop prevention function for default setting. 7.3 DHCP Snooping Click Security>DHCP Snooping DHCP snooping is a security feature that acts like a firewall between untrusted hosts and trusted DHCP servers. The DHCP servers are allocating IP addresses to the clients on the LAN, DHCP snooping can be configured on LAN switches to harden the security on the LAN to allow only clients with specific IP/MAC addresses to have access to the network. Set the DHCP server port for trusted port to connect the DHCP server. 1. Select Enable to enable DHCP Snooping. 2. Click Apply, and then you will see the configuration screen as shown below. 3. Select a DHCP sever port from the drop-down box. 4. Click Apply to make the setting take effect. 41 Easy Smart GbE Switch The following table describes the labels in this screen. LABEL DESCRIPTION DHCP Snooping Setting Enable or Disable the DHCP Snooping Setting. DHCP Server Port Select the port to specify which port should connect to DHCP server. Apply Click Apply to make the settings take effect immediately. Product Specifications Standard IEEE802.3, IEEE802.3u, and IEEE802.3ab IEEE 802.3x flow control IEEE 802.1p class of service, priority protocols IEEE 802.3az Energy Efficient Ethernet(EEE) Interface 8* 10/100/1000Mbps ports RJ-45 NWay ports 1* Reset button Transmission Mode Memory 10/100Mbps: Full-duplex, Half-duplex 1000Mbps: Full-duplex Flash: 16M-BIT MAC Address Table 8K Jumbo Frame 9K Bytes Buffer Memory 256 Bytes Temperature Humidity Operating: 0°C ~ 40°C (32°F ~104°F) Operating: 10% ~ 90% RH, non-condensing Power Supply Dimensions 1*Power LED(Green) 8*Gigabit port LEDs(Link/Act: Green) 1*Loop LED(Red) External Power Adaptor 5V/1A 155*85*26 mm Case Material Metal LED Indications Certification EMC/FCC, CE Class B; Safety/LVD EN60950-1 42