1
User Interface Panel User’s Manual
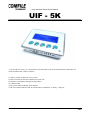
UIF - 5K
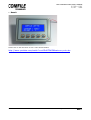
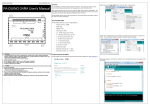
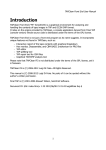
- The UIF-5K is a 5-key, 20 x 4 Character LCD with built-in RS-232 communication transmitter for
communication with a main controller.
1) Data is output via RS-232 on key press
2) Data received via RS-232 is displayed on the LCD
3) Software controllable backlight on/off feature
4) 5 Status LEDs
5) Key-press audio feedback on/off feature
7) RS-232 communication fixed at 115200 baud, 8 data bits, no parity, 1 stop bit
Comfile Technology www.ComfileTech.com • page
1
User Interface Panel User’s Manual
UIF-5K
Specifications
1) Power
Voltage
Power Consumption
Operating Temperature
Operating Humidity
Push-button Switch Life
Force
9~24 VDC
1.2 W, Max 1.6 VA or less
0~50 ℃
35~85 %RH (no condensation)
100,000 Presses
250gf
Comfile Technology www.ComfileTech.com • page
2
User Interface Panel User’s Manual
UIF-5K
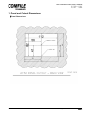
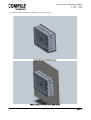
1. Panel and Cutout Dimensions
▌Panel Dimensions
Comfile Technology www.ComfileTech.com • page
3
User Interface Panel User’s Manual
UIF-5K
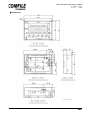
▌Dimensions
Comfile Technology www.ComfileTech.com • page
4
User Interface Panel User’s Manual
UIF-5K
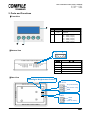
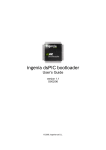
2. Parts and Functions
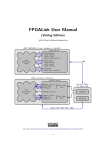
▌Front View
②
①
②
③
①
Name
LED
Character
LCD
Key
Feature
LED ON/OFF
Letters, Numbers, and
Symbols
Key Value Sent Via RS-232
F1 – 0X01 (1 byte)
F2 – 0X02 (1 byte)
F3 – 0X03 (1 byte)
F4 – 0X04 (1 byte)
F5 – 0X05 (1 byte)
③
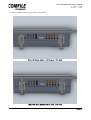
▌Bottom View
1
5
핀 번호
▌Rear View
설
명
1
VIN (DC 9~24V)
2
5V
3
GND
4
RX (RS232 Level 5V)
5
TX (RS232 Level 5V)
Backlight Brightness Control
RS-232
TX (Level 12V)
RX (Level 12V)
GND
PWR
GND
VIN
(DC 9~24 V)
Comfile Technology www.ComfileTech.com • page
5
User Interface Panel User’s Manual
UIF-5K
3. Connecting a Main Controller
▌ Power and RS-232 Connections
Power
▌5V-Level RS-232C Connection (CB 210)
Power
Comfile Technology www.ComfileTech.com • page
6
User Interface Panel User’s Manual
UIF-5K
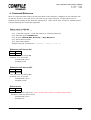
4. Command Reference
When you send and ASCII code to the UIF, that ASCII code's character is displayed on the character LCD.
To clear the screen or move the cursor, you must use an escape sequence. Escape sequences are
initiated by first sending an ESC character, followed by a 1 byte control code, and then a variable number
of bytes specifying the command's arguments.
▌Setup using a CUBLOC
Opencom n1, n2, n3, n4, n5
- (n1): 1=RS-232 Channel 1, 2=RS-232 Channel 2, 3=RS-232 Channel 3
- (n2): RS-232C speed 115200 Fixed
- (n3): Protocol (8 Data Bits, No Parity, 1 Stop Bit) Fixed
- (n4): Size of Receive Buffer
- (n5): Size of Send Buffer
- Example using RS-232 Channel 1:
Opencom 1, 115200, 3, 200, 20
▌Character LCD Cursor ON
ESC
S
1 byte
1 byte
- Turn character LCD Cursor ON
- Example: Turn cursor ON
(Hexadecimal) 1B 53
(CUBLOC) Csron
▌Character LCD Cursor OFF
ESC
S
1 byte
1 byte
- Turn character LCD Cursor OFF
- Example: Turn cursor OFF
(Hexadecimal) 1B 73
(CUBLOC) Csroff
▌Clear Screen
ESC
C
1 byte
1 byte
- Clears the character LCD screen. (This command has a latency of approximately 20ms)
- Example 1: Clear the entire screen
(Hexadecimal) 1B 43
(CUBLOC) Cls
Comfile Technology www.ComfileTech.com • page
7
User Interface Panel User’s Manual
UIF-5K
▌Backlight ON/OFF
ESC
BL
n
1 byte
2 bytes
1 byte
- (n): 0=OFF, 1=ON
- Turns character LCD backlight ON/OFF
- Example: Turn backlight ON
(Hexadecimal) 1B 42 4C 01
(CUBLOC) Light 1
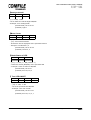
▌Move Cursor
ESC
L
n1
n2
1 byte
1 byte
1 byte
1 byte
- (n1): LCD Horizontal Position
- (n2): LCD Vertical Position
- Characters will be displayed at the specified location
- Example: Coordinates 0, 0
(Hexadecimal) 1B 4C 00 00
(CUBLOC) Locate 0, 0
▌Check Status of LED
ESC
E
n1
1 byte
1 byte
1 byte
- (n1): 0 = OFF, 1 = ON (Default: 1)
- Reads the status (ON/OFF) of the specified LED
- Example: Check if status is ON/OFF
(Hexadecimal) 1B 45 00
(CUBLOC) Print 27, 69, 0
▌ Turn LED ON/OFF
ESC
F
n1
n2
1 byte
1 byte
1 byte
1 byte
- (n1): LED selection
- (n2): 0: OFF, 1: ON
- Turns the specified LED ON/OFF
- Example: Turn LED #2 ON
(Hexadecimal) 1B 46 02 01
(CUBLOC) Print 27, 70, 2, 1
Comfile Technology www.ComfileTech.com • page
8
User Interface Panel User’s Manual
UIF-5K
▌Enable/Disable Audio Feedback
ESC
Z
n1
1 byte
1 byte
1 byte
- (n1): 0 = OFF, 1 = ON(Default: 0)
- Enables/Disables sound when a button is pressed.
- Example: Enable audio feedback
(Hexadecimal) 1B 5A 1
(CUBLOC) Print 27, 90, 1
▌Enable Send with Check Byte
ESC
H
1 byte
1 byte
- After using this command, key presses will send 2 bytes rather than 1, with the second byte being a 1's
complement of the first byte. These two bytes can be compared to verify transmission
integrity.
- Example:(Hexadecimal) 1B 48
(CUBLOC) Print 27, 72
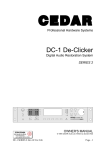
#. UIF-5K Beginner’s Guide
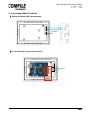
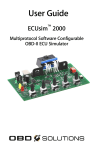
▌How to Interface a CUBLOC (CB210) to the UIF-5K
You can interface an CUBLOC with the UIF-5K by mounting it to the rear panel and connecting the RS232 (5V-Level) send and receive pins. The images below illustrate this connection.
VIN 5V GND RX TX
Comfile Technology www.ComfileTech.com • page
9
User Interface Panel User’s Manual
UIF-5K
Example:
Const Device = Cb210
Dim RX_KEY As Integer
Dim i As Integer
Opencom 1, 115200, 3, 30, 20
Set Uif 2, 1
On Recv1 Gosub ABC
'Open RS-232 Chanel 1
'Set the UIF command format
'Jump to ABC when button is pressed
Csroff
'Turn cursor off
Print 27, 90, 1
'Enable buzzer
Cls
'Clear screen
Delay 100
Locate 0,0
Print "COMFILE UIF-5K"
Locate 0,3
Print "RX_KEY:"
Do
Incr i
Locate 0,2
Print "COUNTER:",Dec i
Delay 100
Loop
ABC:
RX_KEY=Get(1,1)
'Get data from RS-232 Receive buffer
Locate 12,3
Print Dec RX_KEY
Return
SET UIF command is supported in CUBLOC Studio v3.0.d or higher.
☞ SET UIF
DisplayType, ChannelNumber
DisplayType: 1=UIF416H, 2=UIF420A, UIF-5K
ChannelNumber: 1=RS-232 Channel 1, 2=RS-232 Channel 2
When interfacing to the UIF-5K make a call to OpenCom first before calling Set UIF. When a button is
pressed, the button's status can be read in the serial port's receive event handler. Use the Get command
to read from the serial port's receive buffer.
Comfile Technology www.ComfileTech.com • page
10
User Interface Panel User’s Manual
UIF-5K
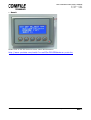
☞ Result
Please click on the link below to see a video demonstration
http://www.youtube.com/watch?v=ei0EdHTEt6E&feature=youtu.be
Comfile Technology www.ComfileTech.com • page
11
User Interface Panel User’s Manual
UIF-5K
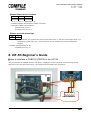
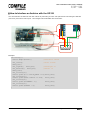
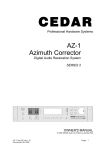
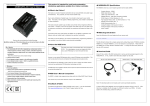
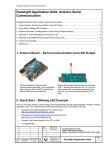
▌How to Interface an Arduino with the UIF-5K
You can interface an Arduino with the UIF-5K by mounting it to the rear panel and connecting the RS-232
(5V-Level) send and receive pins. The images below illustrate this connection.
TX→
RX←
VIN 5V GND RX TX
Example:
void setup() {
Serial.begin(115200);
//Baud Rate 115200
uif_clear();
//Clear Screen
delay(20);
uif_light(1); delay(20);
//Backlight on
uif_buzzer(1); delay(20);
//Buzzer on
delay(100);
uif_locate(0,0);
Serial.print("=== UIF 5K_TEST ===");delay(100);
uif_locate(2,1);
Serial.print("www.comfile.co.kr"); delay(100);
uif_locate(2,2);
Serial.print("COUNTER : ");
delay(100);
uif_locate(2,3);
Serial.print("INPUT : ");
delay(100);
}
Comfile Technology www.ComfileTech.com • page
12
User Interface Panel User’s Manual
UIF-5K
int cnt = 0;
void loop() {
cnt++;
uif_locate(12,2);
Serial.print(cnt, DEC);
delay(100);
}
//Increment Counter
//Display Counter
void serialEvent() {
//Display button press
while (Serial.available()) {
char inChar = (char)Serial.read();
uif_locate(9,3);
Serial.print(inChar, DEC);
}
}
//Turn cursor ON/OFF: 0 or 1
void uif_csron(unsigned char on_off) {
if(on_off){ Serial.write(0x1b); Serial.write(0x53); }
else
{ Serial.write(0x1b); Serial.write(0x73); }
}
//Clear screen
void uif_clear() {
Serial.write(0x1b);
}
Serial.write(0x43);
//Turn backlight ON/OFF: 0 or 1
void uif_light(unsigned char on_off {
Serial.write(0x1b); Serial.write(0x42);
Serial.write(0x4c); Serial.write(on_off);
}
//Move cursor to a new position
void uif_locate(unsigned char x, unsigned char y) {
Serial.write(0x1b); Serial.write(0x4C);
Serial.write(x);
Serial.write(y);
}
//Check if button's LED is ON/OFF: 0 or 1
void uif_swled(unsigned char on_off){
Serial.write(0x1b); Serial.write(0x45); Serial.write(on_off);
}
//Turn LED ON/OFF
void uif_led(unsigned char number, unsigned char on_off) {
Serial.write(0x1b);
Serial.write(0x46);
Serial.write(number); Serial.write(on_off);
}
//Enable/Disable buzzer: 0 or 1
void uif_buzzer(unsigned char on_off){
Serial.write(0x1b);Serial.write(0x5a);Serial.write(on_off);
}
//Enable send with check byte
void uif_checkbyte(){
Serial.write(0x1b); Serial.write(0x48);
}
Comfile Technology www.ComfileTech.com • page
13
User Interface Panel User’s Manual
UIF-5K
☞ Result
Please click on the link below to see a video demonstration
http://www.youtube.com/watch?v=mnf03mD5USE&feature=youtu.be
Comfile Technology www.ComfileTech.com • page
14
User Interface Panel User’s Manual
UIF-5K
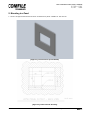
5. Mounting to a Panel
1. Use the images and dimensions below to fabricate a panel suitable for the UIF-5K
[Figure 1] Panel Cutout (Front Panel)
[Figure 2] Panel Cutout Drawing
Comfile Technology www.ComfileTech.com • page
15
User Interface Panel User’s Manual
UIF-5K
Comfile Technology www.ComfileTech.com • page
16
User Interface Panel User’s Manual
UIF-5K
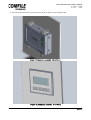
2. Insert the UIF-5K into the rectangular cutout of the panel.
[Figure 3] Before, UIF-5K Mounting
[Figure 4] After, UIF-5K Mounting (Back Panel)
Comfile Technology www.ComfileTech.com • page
17
User Interface Panel User’s Manual
UIF-5K
3. From the rear side of the panel, insert the mounting brackets into the UIF-5K's mounting grooves.
[Figure 5] Before, bracket insert (Back Panel)
[Figure 6] After, bracket insert (Back Panel)
Comfile Technology www.ComfileTech.com • page
18
User Interface Panel User’s Manual
UIF-5K
4. Side the bracket to the side to secure it into place.
[Figure 9] Before, tighten a bolt the panel. (Top view)
[Figure 10] After, tighten a bolt the panel. (Top view)
Comfile Technology www.ComfileTech.com • page
19
User Interface Panel User’s Manual
UIF-5K
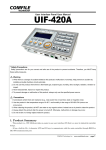
6. The UIF-5K should now be mounted to the panel as shown in the images below.
[Figure 11] Completing assembly. (Back Panel)
[Figure 12] Completing assembly. (Front Panel)
Comfile Technology www.ComfileTech.com • page
20