1
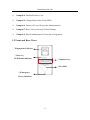
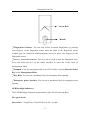
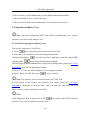
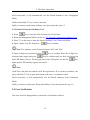
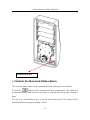
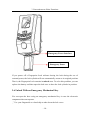
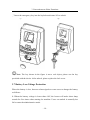
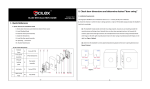
BL100 Fingerprint Lock User Manual
Version: 1.0
Date: March 2012
About This Manual
This manual introduces the fingerprint lock interface and menu operations about
BL100. For the fingerprint lock installation, see the animated installation
instructions.
BL100 Fingerprint Lock User Manual
Important Claim
Firstly thank you for purchasing this product, before use, please read
this manual carefully to avoid the unnecessary damage! The company
reminds you that the proper user will improve the use affect and
authentication speed.
No written consent by our company, any unit or individual isn’t allowed
to excerpt, copy the content of this manual in part or in full, also spread
in any form.
The product described in the manual maybe includes the software which
copyrights are shared by the licensors including our company, Except
for the permission of the relevant holder, any person can't copy,
distribute, revise, modify, extract, decompile, disassemble, decrypt,
reverse engineering, leasing, transfer, sub-license the software, other
acts of copyright infringement, but the limitations applied to the law is
excluded.
Due to the constant renewal of products, the company can not
undertake the actual product in consistence with the information in the
document, also any dispute caused by the difference between the actual
technical parameters and the information in this document. Please
forgive any change without notice.
Contents
Table of Contents
1 Instruction for Use ........................................................................... - 1 1.1 Introduction to Fingerprint Lock Functions.......................... - 1 1.2 Front and Rear Views ........................................................... - 2 1.3 Precautions............................................................................ - 4 1.4 User Privileges...................................................................... - 4 1.5 Finger Placement .................................................................. - 6 2. The Basic Operation ....................................................................... - 7 2.1 Change Master Pass Code (MPC) ........................................ - 7 2.2 Enroll an Administrator ........................................................ - 8 2.2.1 Enroll a Fingerprint Administrator User .................... - 8 2.2.2 Enroll a Password Administrator User....................... - 9 2.3 Enroll an ordinary User ...................................................... - 10 2.3.1 Enroll a Fingerprint Ordinary User.......................... - 10 2.3.2 Enroll a Password Ordinary User ............................ - 11 2.4 User Verification ................................................................. - 11 2.4.1 The Fingerprint Verification .................................... - 12 2.4.2 The Password Verification ....................................... - 12 2.5 Delete User ......................................................................... - 13 2.5.1 Delete a user ............................................................ - 13 2.5.2 Delete All Ordinary Users........................................ - 13 2.6 Enable / Disable a User....................................................... - 14 2.7 Reset Lock to Factory Default Settings .............................. - 14 3 Conventions on Other Functions ................................................... - 15 3.1 Routine Operation Indications ............................................ - 15 3.2 Initialization Lock............................................................... - 15 3.3 Unlock the Non-lock Status Alarm ..................................... - 16 3.4 Automatic Program Exit and System Power-off................. - 17 -
BL100 Fingerprint Lock User Manual
3.5 Use Description of External Power .................................... - 17 3.6 Unlock With an Emergency Mechanical Key..................... - 18 3.7 Battery Low Voltage Protection.......................................... - 19 4. Appendix....................................................................................... - 21 4.1 The Parameter Table ........................................................... - 21 4.2 Statement on Human Rights and Privacy ........................... - 22 4.3 Environment-Friendly Use Description.............................. - 24 -
II
1 Instruction for Use
1 Instruction for Use
1.1 Introduction to Fingerprint Lock Functions
1. By leveraging the perfect combination of biometrics and cryptography, our
fingerprint locks ensure security through the fingerprint and password unlocking
feature.
2. Use the keyboard to finish all relevant operations according to the signals of the
buzzer and indicator light. You can simply use our fingerprint locks with ease after
following the operation instructions for once.
3. Support setting of classified privileges for administrators and ordinary users.
4. Support deletion of all or the specified registration data.
5. Fingerprint verification module and password registration; 1: N is used for the
password, and each password is unique.
6. Support a temporary connection with back-up batteries.
7. Support generation of low-pressure alarms.
8. Non-lock Status Alarm Function: A non-lock status is the lock bolt does not pop
out normally caused by mechanical breakdown or failure in closing the door after
users pass the verification and open the door. In this situation, the buzzer will sound
a short sharp alarm which will last one minute unless the alarm is manual remove.
9. The Function Keys definition in the Management Mode:
Numpad 1: Enroll Ordinary Users' Fingerprint.
Numpad 2: Enroll Ordinary User' Password.
Numpad 3: Delete a user.
-1-
1 Instruction for Use
Numpad 4: Disable/Enable a User.
Numpad 5: Change Master Pass Code (MPC).
Numpad 6: Delete All Users (Except the Administrators).
Numpad 7: Reset Lock to Factory Default Settings.
Numpad 9: Enroll Administrator's Password or Fingerprint.
1.2 Front and Rear Views
①Fingerprint Collector
②Start key,
LED Status indicator
③Number keys
④Key Hole
⑤Emergency
Power Interface
-2-
1 Instruction for Use
⑥Screw Hole
⑦Handle
①Fingerprint Collector: You can only collect or match fingerprints by pressing
your finger(s) at the fingerprint sensor when the light in the fingerprint sensor
window goes on; otherwise nothing happens when you press your finger(s) at the
fingerprint sensor.
②Start key /LED Status indicator: This key can be used to start the fingerprint lock.
Press and hold this key on the initial interface to enter the Verify State of
Management Mode.
③Numpad: Used for input passwords or user ID. It will be used as Function Select
Key in the Management Mode.
④Key Hole: You can use a mechanical key for emergency door opening.
⑤Emergency power interface: You can use a mechanical key for emergency door
opening.
LED Backlight Indicators:
The LED Backlight Indicators content three colors: Red, Green and Blue.
The general rule:
Successful = 1 Long Beep / Green LED is on for 1 second.
-3-
1 Instruction for Use
Failed = 2 Short Beeps / Red LED is on for 1 second.
Verify State: Green LED flash by second.
Management Mode: Blue LED is on.
All lock functions should return as above, if not, please contact our
businessman or technician.
1.3 Precautions
1. User must change Master Pass Code (MPC) when they 1st install the Lock. See
Change MPC section and user must have at least one administrator user registered
before adding ordinary user. If you don't change the MPC, can't use any function
except the initial system. If you don't register Administrator, then you can't add
ordinary user.
2. Do not remove batteries when matching, enrolling or deleting fingerprints because
the sudden power-down may result in data loss of fingerprint locks. Prior to
removing batteries, make sure the fingerprint lock is not in working state.
3. It is recommended to replace the fingerprint lock batteries at least once every six
months to avoid damaging the circuit due to the battery leakage. Do not use batteries
with poor quality.
4. When installing a fingerprint lock, connect the plug to the socket properly.
Improper connection may lead to fingerprint lock failure.
1.4 User Privileges
The user privileges are classified into two types: Administrator users and Ordinary
users.
-4-
1 Instruction for Use
Administrator (Admin): Refer to users who have access to all operations like
settings and enrolling user.
Ordinary user: Refer to all users other than the administrators. Ordinary users only
have access to the fingerprint matching and unlocking functions.
-5-
1 Instruction for Use
1.5 Finger Placement
Recommended fingers: The index finger, middle finger or the ring finger is
recommended; the thumb and little finger are not recommended (because they are
usually clumsy when pressing on the fingerprint collection screen).
1. Proper finger placement
The finger must be flat to the surface
and centered on the fingerprint sensor.
2. Improper finger placement
Not flat to the surface
Off-center
Off-center
Slanting
Please enroll and verify your fingerprint by using the proper finger placement
mode. We shall not be held accountable for any consequences arising out of the
degradation in verification performance due to improper user operations. We shall
reserve the right of final interpretation and revision of this document.
-6-
2. The Basic Operation
2. The Basic Operation
2.1 Change Master Pass Code (MPC)
Notice:
(1) User must change Pass code when they 1st install the Lock, otherwise you
can't register administrator.
(2) User must have registered at least one administrator user before enrolling
ordinary user, or you can't enroll.
(3) All lock operation should have an operation time limit of 10 seconds.
To change MPC, the procedure show as follows:
1. Press
key to start lock, and then enter the Verify State. The LED flashes
green light.
2. Press and hold the
key until you hear 1 long beep and the Green LED put
out, and then the Keypad area Flashes Blue light. Press number key of the lock to
input the default MPC "98989", and then press
key to enter the
Management Mode. The green LED put out and the Numpad area's blue light will be
on.
3. Press "5" key on the lock and enter the new 5 digits MPC, then press the
key to confirm. Enter the new MPC once again then press the
Once you hear 1 long beep and the
key to confirm.
key flashes green, namely you have
successfully changed the MPC code.
Note: If you didn't change the MPC, then you can only use the Function Key 5
and 7. If you continuous input the forbid Function Key three times, the Lock will
return to the Verify State automatically and gives four short beeps.
-7-
2. The Basic Operation
2.2 Enroll an Administrator
The lock has two kinds user: Administrator User and Ordinary User. If the
fingerprint lock has no administrator, then you can’t enroll ordinary users. So you
must at least enroll one administrator before enrolling ordinary users.
To enroll administrator, proceed as follows:
1. Press
key to start lock, and then enter the Verify State.
2. Press and hold the
and then press
key until you hear 1 long beep, enter the 5 digits MPC,
key to enter the Management Mode.
3. Press "9" on the lock to enter the Enroll Administrator Mode.
Note: If you didn't enroll an Administrator, then you can only use the Function
Key 5, 7 and 9. If you continuous input the forbid Function Key three times, the
Lock will return to the Verify State automatically and gives four short beeps.
The next step is to enroll fingerprint and password for administrator. Please see 2.2.1
Enroll a Fingerprint Administrator User and 2.2.2 Enroll a Password
Administrator User.
2.2.1 Enroll a Fingerprint Administrator User
☺
Note: 1-3 steps are same as above. Here is no longer to restatement.
4. After enter the Enroll Administrator Mode, press number keys of the lock to enter
3 digits user ID, and then press
key to confirm.
☺
Note: The administrator User's ID must between "995" and "999".
5. Press finger in the scanner area properly (For detail, please see 1.5 Finger
Placement), and repeat it for three times, until you hear one long beep and LED
flashes Green.
-8-
2. The Basic Operation
Note: During the collect process, if success collects the fingerprint, the
key lights the green light. If turn on the red light, then fingerprint-gathering failure,
it shall continue to press the fingerprints, so that the lock success collects 3 times.
☺
Note:
(1) If Fingerprint lock fails to register, the
key will flash red LED. If failed
in registered, you can try again for two more time.
(2) If register successful, the
key lights green light and give a long beep, and
then automatically exit the Enroll Administrator Mode.
(3) Press and hold "0" key, can exit anytime.
(4) If you want to enroll more administrator user, then repeat the step 1-5.
2.2.2 Enroll a Password Administrator User
☺
Note: 1-3 steps are same as above. Here is no longer to restatement.
4. After enter the Enroll Administrator Mode, enter 3 digits user ID, press
key to confirm.
5. Press 4 digits user password and press
4 digits user password once again and press
key to confirm, and then enter the
key to confirm, until you hear
one long beep and LED Flashes Green (If it fails to register - it will give 2 short
beeps and LED will flash red).
☺
Note:
(1) If Pass code does not match or input the wrong digit password, then you have
two times to try again. If your input the wrong at the third time, then it will prompt
fail registration. In this case you will need to follow step 1 to operate again.
-9-
2. The Basic Operation
(2) If successful, it will automatically exit the Enroll Administrator Mode.
(3) Press and hold "0" key, can exit anytime.
(4) If you want to enroll more administrator user, then repeat the step 1-5.
2.3 Enroll an ordinary User
☺
Note: You must change the MPC and enroll an administrator user at first,
otherwise you can't enroll ordinary user.
2.3.1 Enroll a Fingerprint Ordinary User
The specific procedure is as follows:
1. Press
key to start the lock and enter the Verify State.
2. There have two methods to enter the Management Mode:
(1) Press and hold the
and then press
key until you hear 1 long beep, enter the 5 digits MPC,
key to enter the Management Mode.
(2) Verify the registered administrator's password and fingerprint (please see2.4 User
Verification) to enter the Management Mode.
3. Press "1" to enter the Enroll Ordinary User's Fingerprint Mode.
4. Input 3 digits User ID, then press
key to confirm.
☺
Note: The ordinary users' ID must between "001" and "994".
5. Press finger in the scanner area properly (For detail, please see 1.5 Finger
Placement), and repeat it for three times, until you hear one long beep and LED
flashes Green, namely enrollment successful.
☺
Note:
(1) If fingerprint fails to register, the LED
registered, you can try again for two more time.
- 10 -
key flashes red LED. If failed in
2. The Basic Operation
(2) If successful, it will automatically exit the Enroll Ordinary User's Fingerprint
Mode.
(3) Press and hold "0" key, can exit anytime.
(4) If you want to enroll more ordinary user, then repeat the step 1-5.
2.3.2 Enroll a Password Ordinary User
1. Press
key to start the lock and enter the Verify State.
2. Enter the Management Mode, please see 2.3.1 Enroll a Fingerprint Ordinary User.
3. Press "2" on the lock to enter the Enroll Ordinary User's Password Mode.
4. Input 3 digits User ID, and press
key to confirm.
☺
Note: The ordinary users' ID must between "001" and "994".
5. Input 4 digits user password, press
password once again and press
key to confirm. Enter the 4 digit user
key to confirm until you hear one long beep
and LED flashes Green. The Keypad area's blue LED pulls out and the
key
lights green LED, namely register successful.
☺
Note:
(1) If Pass code does not match it will fail registration. If you want to continue, can
press and hold "0" key to quit, and return to the step 1 to continue enroll.
(2) If successful, it will automatically exit the Enroll Ordinary User's Password
Mode.
(3) If you want to enroll more Password Ordinary User, then repeat the step 1-5.
2.4 User Verification
The users can user fingerprints or passwords verification to unlock.
- 11 -
2. The Basic Operation
2.4.1 The Fingerprint Verification
1. Press
key to start the lock and enter the Verify State. The Fingerprint
Collector is in active state.
2. Press finger in the fingerprint scanner area properly (For detail, please see1.5
Finger Placement), until you hear one long beep, namely collect successful.
(1) If verify successful, the buzzer will give a long beep and unlock automatic, the
green LED and the Fingerprint Collector will put out, the Green LED at
key will light for 3 seconds, at this moment your can press
key to lock.
(2) If verification failed. The buzzer will give two short beeps, the red LED at
key will light for 3s, then the green LED will flash, the user can use
fingerprint to verify again until verify successful.
2.4.2 The Password Verification
1. Press
key to start the lock and enter the Verify State.
2. Press number key of lock to input the correct 4 digits password, and press
key to confirm.
(1) If the password is correct, then verify successful, the buzzer will give a long beep
and unlock automatic, the green LED at Fingerprint Collector will put out, the Green
LED at
key will light for 3s, at this moment you can press the
key to
lock.
(2) If the password is wrong, then the verification failed. The buzzer will give two
short beeps, the RED LED at
key will light for 3s, then the green LED will
flash, the user can input password to verify again until verify successful.
☺
Note: After successful verification, the lock is in unlocking state. If you want
to lock, press
key to start the lock, and then press this key again to lock and
power off.
- 12 -
2. The Basic Operation
2.5 Delete User
2.5.1 Delete a user
The procedure show as follows:
1. Press
key to start the lock and enter the Verify State.
2. Enter the Management Mode, please see 2.3.1 Enroll a Fingerprint Ordinary User.
3. Press "3" on the lock to enter the Delete User Mode.
4. Press number key of the lock to input the User's ID which one you want to delete,
and then press
key to confirm. Input the user ID again, and press
key to confirm, the buzzer will give a long beep, the
key lights green light,
namely successful delete the user.
5. After deleting the user, you can restart the fingerprint lock and verify the deleted
user's fingerprints or password again to check whether the user is deleted for sure.
Notice: The administrator can't delete itself and the last administrator.
2.5.2 Delete All Ordinary Users
The procedure show as follows:
1. Press
key to start the lock and enter the Verify State.
2. Enter the Management Mode, please see 2.3.1 Enroll a Fingerprint Ordinary User.
3. Press "6" on the lock to enter the Delete All Ordinary User Mode.
4. Input "000" and press
key to confirm, then input "000" again and press
key to confirm. The buzzer will give a long beep, the
key flash green
light, namely successful delete all users.
Notice: The operation can only delete ordinary users. If you want to delete
administrator, you should do reset operation, for detail, please see 2.7 Reset Lock to
Factory Default Settings.
- 13 -
2. The Basic Operation
2.6 Enable / Disable a User
The procedure show as follows:
1. Press
key to start the lock and enter the Verify State.
2. Enter the Management Mode, please see 2.3.1 Enroll a Fingerprint Ordinary User.
3. Press "4" on the lock to enter the Enable/Disable User Mode.
4. Press the number keys on the lock to input the user's ID which one you want to
enable or disable, press
key to confirm, input the user ID again and press
key to confirm. If Enable/Disable success, the buzzer will give a long beep
and the
key lights green light, if failed Enable/Disable, the buzzer will give
two long beeps and the
key lights red light
Notice:
(1) You can only enable or disable ordinary user.
(2) The disable user can't do Verify operation, namely can't unlock.
2.7 Reset Lock to Factory Default Settings
The procedure show as follows:
1. Press
key to start the lock and enter the Verify State.
2. Enter the Management Mode, please see 2.3.1 Enroll a Fingerprint Ordinary User.
3. Press "7" on the lock to enter the Reset Settings Mode.
4. Input "0000" and press
key to confirm, input "0000" again and press
key to confirm. The buzzer will give a long beep and the
key flashes
green light, and then reset the lock's settings to factory default.
☺
Note: After reset the lock's settings, the MPC will reset as "98989" (The
factory default MPC), and delete all users in the lock (contents the Administrator
and Ordinary users)
- 14 -
3 Conventions on Other Functions
3 Conventions on Other Functions
3.1 Routine Operation Indications
User operation success indication: The buzzer sounds once and the green LED
indicator is solid on for 3 seconds.
User operation failure indication: The buzzer sounds short tone twice and the red
LED indicator is solid on for 3 seconds.
Verify State: Green LED flash by second. Blue LED will light on.
Management Mode: Blue LED will be on. Green LED put out. (When the lock is
waiting to verify manage password or fingerprint, then the Blue LED will flash.)
Warning indication: The buzzer sounds short tone five times intermittently.
3.2 Initialization Lock
When the user forget the whole password you had registered, and the fingerprint
can't be used, then you can use the Emergency Mechanical Key to unlock (For detail,
please see 3.6 Unlock With an Emergency Mechanical Key). Use the screwdriver
take down the screws in the back of lock cover, then press and hold the Initialization
Key for 5 seconds to Initialization Lock (reset the lock to factory default settings).
Show as below:
- 15 -
3 Conventions on Other Functions
Initialization Key
3.3 Unlock the Non-lock Status Alarm
The non-lock status alarm can be switched off in the following two situations:
1. Press the
button and the machine will lock automatically. The alarm will
sound continuously until the non-lock status is released after the proper locking is
done.
2. Lock it by the mechanical key or by the lock button inside. The alarm will be
switched off after the proper locking is done.
- 16 -
3 Conventions on Other Functions
3.4 Automatic Program Exit and System Power-off
The Fingerprint Lock powers off automatically upon successful matching and
unlocking.
The Fingerprint Lock powers off automatically when the supply voltage is too
low.
The Fingerprint Lock powers off automatically if there is no keystroke within
10 seconds on the initial interface.
After successful verification, press key to start the lock, and then press this key
to unlock and power off.
3.5 Use Description of External Power
The Fingerprint Lock supports temporary use of external DC power for fingerprint
or password matching and unlocking.
As shown in the figure below, connect a 9V battery to the two access points at the
bottom of a fingerprint lock, regardless of polarity.
- 17 -
3 Conventions on Other Functions
Emergency Power Interface
Emergency Power
If you power off a Fingerprint Lock without closing the lock during the use of
external power, the lock cylinder will not automatically return to its original position.
That is, the Fingerprint Lock remains in unlock state. To solve this problem, you can
replace the battery and then open the lock once to have the lock cylinder in position.
3.6 Unlock With an Emergency Mechanical Key
You can open the door using an emergency mechanical key in case the electronic
component does not operate.
① Use your fingernails or a hard chip to take down the lock cover.
- 18 -
3 Conventions on Other Functions
② Insert the emergency key into the keyhole and rotate 90º to unlock.
①
②
☺
Note: The key shown in the figure is not a real object; please use the key
provided with the device. After unlock, please replace the lock cover.
3.7 Battery Low Voltage Protection
When the battery is low, there are alarm signals to warn users to change the battery
as follows:
1. When the battery voltage is lower than 4.8V, the buzzer will make short sharp
sounds for five times when starting the machine. Users can unlock it normally but
fail to enter the administrative mode.
- 19 -
3 Conventions on Other Functions
2. When the battery voltage is lower than 4.5V, the buzzer will make short sharp
sounds for five times, and then the machine will be switched off automatically.
☺
Note: When the low-voltage alarm occurs, please change the battery in time to
avoid the impact on the work of the fingerprint lock. Avoid losing data caused by
instable power supply (It is suggested to change the battery immediately when the
battery voltage is lower than 4.8V).
- 20 -
4. Appendix
4. Appendix
4.1 The Parameter Table
BL100 Fingerprint Lock basic function parameters are shown as below:
Item
Description
Power
DC 6V (4 AA batteries)
Capacity
100 users(100 fingerprints)
Collector
Optical Fingerprint Collector
Algorithm Version
10.0
LED
Three colors (red, green, blue) instructions
- 21 -
4. Appendix
4.2 Statement on Human Rights and Privacy
Dear Customers:
Thank you for choosing the hybrid biometric products designed and manufactured
by us. As a world-renowned provider of biometric technologies and services, we pay
much attention to the compliance with the laws related to human rights and privacy
in every country while constantly performing research and development.
We hereby make the following statements:
1.
All of our fingerprint recognition devices for civil use only collect the
characteristic points of fingerprints instead of the fingerprint images, and
therefore no privacy issues are involved.
2.
The characteristic points of fingerprints collected by our products cannot be
used to restore the original fingerprint images, and therefore no privacy issues
are involved.
3.
We, as the equipment provider, shall not be held legally accountable, directly or
indirectly, for any consequences arising due to the use of our products.
4.
For any dispute involving the human rights or privacy when using our products,
please contact your employer directly.
Our fingerprint products for police use, or development tools support the collection
of the original fingerprint images. As for whether such a type of fingerprint
collection constitutes an infringement of your privacy, please contact the
government or the final equipment provider. We, as the original equipment
manufacturer, shall not be held legally accountable for any infringement arising
thereof.
The law of the People's Republic of China has the following regulations regarding
the personal freedom:
1.
Unlawful arrest, detention or search of citizens of the People's Republic of
China is prohibited; infringement of individual privacy is prohibited.
- 22 -
4. Appendix
2.
The personal dignity of citizens of the People's Republic of China is
inviolable.
3.
The home of citizens of the People's Republic of China is inviolable.
4.
The freedom and privacy of correspondence of citizens of the People's
Republic of China are protected by law.
At last we stress once again that biometrics, as an advanced recognition technology,
will be applied in a lot of sectors including e-commerce, banking, insurance and
legal affairs. Every year people around the globe suffer from great loss due to the
insecurity of passwords. The biometric products actually provide adequate
protection for your identity under a high security environment.
- 23 -
4. Appendix
4.3 Environment-Friendly Use Description
The Environment Friendly Use Period (EFUP) marked on this product refers to the
safety period of time in which the product is used under the conditions specified in the
product instructions without leakage of noxious and harmful substances.
The EFUP of this product does not cover the consumable parts that need to be replaced
on a regular basis such as batteries and so on. The EFUP of batteries is 5 years.
Names and Concentration of Toxic and Hazardous Substances or Elements
Toxic and Hazardous Substances or Elements
Parts Name
Pb
Hg
Cd
Cr6+
PBB
PBDE
Chip resistor
×
○
○
○
○
○
Chip capacitor
×
○
○
○
○
○
Chip inductor
×
○
○
○
○
○
Chip diode
×
○
○
○
○
○
ESD components
×
○
○
○
○
○
Buzzer
×
○
○
○
○
○
Adapter
×
○
○
○
○
○
Screws
○
○
○
×
○
○
○: Indicates that this toxic or hazardous substance contained in all of the homogeneous materials for
this part is below the limit requirement in SJ/T11363-2006.
×: Indicates that this toxic or hazardous substance contained in at least one of the homogeneous
materials for this part is above the limit requirement in SJ/T11363-2006.
Note: 80% of the parts in this product are manufactured with non-hazardous environment-friendly
materials. The hazardous substances or elements contained cannot be replaced with
environment-friendly materials at present due to technical or economical constraints.
- 24 -