
1
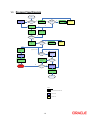
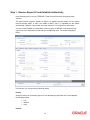
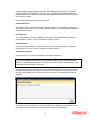
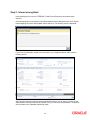
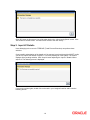
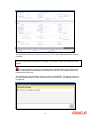
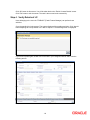
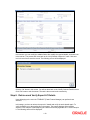
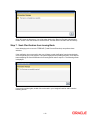
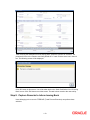
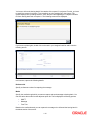
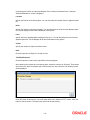
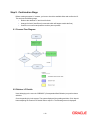
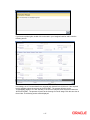
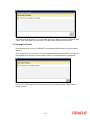
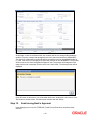
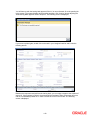
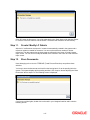
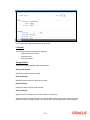
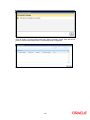
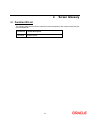
Export LC Advice Oracle FLEXCUBE Universal Banking Release 11.3.83.02.0 [April] [2014] Oracle Part Number E53607-01 Export LC Advice Table of Contents 1. EXPORT LC ADVISING PROCESS............................................................................................................ 1-1 1.1 1.2 1.3 2. INTRODUCTION ........................................................................................................................................... 1-1 STAGES IN EXPORT LC ISSUANCE .............................................................................................................. 1-1 PROCESS FLOW DIAGRAM .......................................................................................................................... 1-2 SCREEN GLOSSARY .................................................................................................................................... 2-1 2.1 FUNCTION ID LIST...................................................................................................................................... 2-1 1-1 1. Export LC Advising Process 1.1 Introduction A Letter of Credit contract is an instruction wherein a customer requests the bank to issue, advice or confirm an LC, for a trade transaction. Your bank thus verifies the customer limit to enable the transaction. After compliance checks and validations are performed, your bank requests an acceptance instruction from your customer. The customer may accept the data entry and may ask your bank to include further details, which if acceptable, are included in the LC transaction. If the customer modifications are not acceptable to the bank, the same can be communicated to the customer and the record may be consequently deleted. 1.2 Stages in Export LC Issuance In ORACLE FLEXCUBE, the process for issuing an import LC is governed by several user roles created to perform different tasks. At every stage, the users (with requisite rights) need to fetch the relevant transactions from their task lists and act upon them. Similarly, at different times, the system will make calls to certain web services to process the transaction. This process is composed of the following stages: 1. Receive Export LC and Establish Authenticity 2. Inform Issuing Bank 3. Input LC Details 4. Verify Details of LC 5. Modify details of Export LC 6. Retrieve and Verify Export LC Details 7. Seek Clarification from Issuing Bank 8. Capture Remarks to Inform Issuing Bank 9. Confirmation Stage 10. Seek Issuing Bank’s Approval 11. Create / Modify LC Details 12. Store Documents Only users who have procured the relevant access rights can perform activities under a stage. 1-1 1.3 Process Flow Diagram Start Receive LC Yes No Media is SWIFT? Establish authenticity of LC Authentication Success No Inform Issuing Bank Yes Input Details of LC Verify Details of LC Modify LC Details No Verification Successful Yes Retrieve and Verify Details of LC No Verification Successful Seek Clarification from Issuing Bank Receive Response Reject Capture Remarks to inform Issuing Bank Approve & Advise No Confirmation Required? Inform Issuing Bank Yes Confirmation of Export LC No Seek Issuing Bank Approval Store documents LC Confirmed? Yes Yes Terminate No Approved Yes Create/Modify Details of LC Store documents End Legend Computer Aided Human Task System Task Human Task 1-2 Receive Revised Authentication Step 1. Receive Export LC and Establish Authenticity Users belonging to the user role ‘TFEROLE’ (Trade Finance Executive) can perform these activities. The trade finance executive initiates an Export LC Advising process based on the request received through SWIFT or mail. If the media is SWIFT, the LC is uploaded into the system automatically. However, if the medium is through mail, the LC is verified for its authenticity. You can invoke ‘Establish LC Authenticity’ screen by typing ‘LCDTR010’ in the field at the top right corner of the Application tool bar and click the adjoining arrow. The screen is displayed below: In this screen, you can specify the following details: Priority Select the priority for the creating export LC from the adjoining drop-down list. This list displays the following options Low Medium High Product 1-3 Select the product from the adjacent option list. The list displays only the export LC products created in ORACLE FLEXCUBE. Click the ‘P’ button. The relevant details associated with the product linked to the LC advised are populated in the respective fields such as the contract and user reference numbers. Product details are defaulted to the contract screen. Contract Reference The Contract Reference Number identifies a contract uniquely. It is automatically generated by the system for each contract. This number is generated once you click the ‘P’ button adjacent the contract reference field. User Reference The contract reference number is defaulted to the user reference number field on clicking the product default ‘P’ button. The user is allowed to modify the details. Source Reference The contract reference number is defaulted to the user reference number field on clicking the product default ‘P’ button. The user is allowed to modify the details. Confirmation Required Check this option if you require confirmation for booking the Export LC. This screen is identical to the ‘Letters of Credit Contract Input’ screen of ORACLE FLEXCUBE. Refer the chapter titled ‘Processing a LC Contract’ in the Letter of Credit User Manual for further details about the other fields in the screen. After specifying the required details, select the outcome as ‘SUCESS’. The process will move to the ‘Input LC Details’ task. Else, select the outcome as ‘FAILURE’ and the process will move to the ‘Inform Issuing Bank’ task. Click the save icon in the tool bar. The following screen will be displayed. Click ‘OK’ button in this screen. You will be taken back to the ‘Establish LC Authenticity’ screen. Click ‘Exit’ button to exit the screen. The task is then moved to the next activity. 1-4 Step 2. Inform Issuing Bank Users belonging to the user role ‘TFEROLE’ (Trade Finance Executive) can perform these activities. Go to the pending list in the system. The system displays all the pending activities. Click ‘Acquire’ button adjoining the ‘Inform Issuing Bank’ task to acquire it. The following screen is displayed: If you have requisite rights, double click on the task in your ‘Assigned’ task list and invoke the following screen: After informing the issuing bank about the authentication failure, you will have to receive revised authentication. Select the outcome as proceed, once you receive the revised details. The process will move back to the ‘Establish Authenticity ‘stage. 1-5 Click ‘OK’ button in this screen. You will be taken back to the ‘Inform Issuing Bank’ screen. Click ‘Exit’ button to exit the screen. The task is then moved to the next activity. Step 3. Input LC Details Users belonging to the user role ‘TFEROLE’ (Trade Finance Executive) can perform these activities. On successful authentication of the details or if the request is received through the SWIFT media, you have to capture few details of export LC. Go to the pending list in the system. The system displays all the pending activities. Click ‘Acquire’ button adjoining the ‘Input LC Details’ task to acquire it. The following screen is displayed: If you have requisite rights, double click on the task in your ‘Assigned’ task list and invoke the following screen: 1-6 The uploaded LC details are refelcted in this screen. You can input additional details for booking a contract. Refer the chapter titled ‘Processing a LC Contract’ in the Letter of Credit User Manual for further details. For incoming MT700 message, if the message type is ‘Business Task’, the MT700 Export LC Initiation business task will be available at this stage. Click the ‘STP Error Details’ button to view the details of the STP error. After specifying the required details, select the outcome as ‘PROCEED’. The process will move to the ‘Verify Details of Export LC’ task. Click the save icon in the tool bar. The following screen will be displayed. 1-7 Click ‘OK’ button in this screen. You will be taken back to the ‘Enrich Contract Details’ screen. Click ‘Exit’ button to exit the screen. The task is then moved to the next activity. Step 4. Verify Details of LC Users belonging to the user role ‘TFMROLE’ (Trade Finance Manager) can perform these activities. Go to the pending list in the system. The system displays all the pending activities. Click ‘Acquire’ button adjoining the ‘Verify Details of LC’ task to acquire it. The following screen is displayed: If you have requisite rights, double click on the task in your ‘Assigned’ task list and invoke the following screen: 1-8 Here you can view the details captured. After successfully verifying the details, select the outcome as ‘Verification Successful’. The process will move to the ‘Retrieve and Verify Details of LC’ task. If the verification has failed for some reason, select the outcome as ‘Verification Failed’. In this case, the process will move to the ‘Modify Details’ task. Click save icon in the tool bar to save the record. The following screen will be displayed: Click ‘OK’ button in this screen. You will be taken back to the ‘Verification of Details’ screen. Click ‘Exit’ button to exit the screen. The task is then moved to the next activity. Step 5. Modify details of Export LC Users belonging to the user role ‘TFEROLE’ (Trade Finance Executive) can perform these activities. In case of unsuccessful verification, you may have to modify few details and revalidate the same. Go to the pending list in the system. The system displays all the pending activities. Click ‘Acquire’ button adjoining the required task to acquire it. The following screen will be displayed. If you have requisite rights, double click on the task in your ‘Assigned’ task list and invoke the following screen: 1-9 In this screen you can modify the editable fields. After modify the required details, click save icon in the tool bar. The process will move back to the ‘Verify Details of Export LC’ task. Click save icon in the tool bar to save the record. The following screen will be displayed: Click the ‘OK’ button in this screen. You will be taken back to the ‘Modify Contract Details’ screen. Click ‘Exit’ button to exit the screen. The task is then moved to the next activity. Step 6. Retrieve and Verify Export LC Details Users belonging to the user role ‘TFMROLE’ (Trade Finance Manager) can perform these activities. In this stage, you have to retrieve the export LC details and verify the entire details again. To verify the details, go to the pending list in the system. The system displays all the pending activities. Click ‘Acquire’ button adjoining the ‘Retrieve and Verifying details of LC’ task to acquire it. The following screen will be displayed. 1-10 If you have requisite rights, double click on the task in your ‘Assigned’ task list and invoke the following screen: Here you can view the details of Export LC. After verifying the details, you can either select ‘Approve’, ‘Reject’ or ‘Seek Clarification as the outcome. If you have selected the outcome as approved, the process will move on to the ‘Advise and Confirm’ task. Similarly, if the creation of export LC is rejected, the process will be move to the ‘Capture Remarks’ task and if the verification is not successful, the process will be move to the ‘Seek Clarification’ task. Click save icon in the tool bar to save the record. The following screen will be displayed: 1-11 Click ‘OK’ button in this screen. You will be taken back to the ‘Receive Revised Authentication Details’ screen. Click ‘Exit’ button to exit the screen. The task is then moved to the next activity. Step 7. Seek Clarification from Issuing Bank Users belonging to the user role ‘TFEROLE’ (Trade Finance Executive) can perform these activities. If the verification is not successful, then you will have to seek clarification from the issuing bank. Go to the pending list in the system. The system displays all the pending activities. Click ‘Acquire’ button adjoining the ‘Seek Clarification from Issuing Bank’ task to acquire it. The following screen is displayed: If you have requisite rights, double click on the task in your ‘Assigned’ task list and invoke the following screen: 1-12 After receiving the clarification from the issuing bank, select the outcome as ‘Proceed’. The process will move to the ‘Retrieve and Verify Details of LC’ task. Click the save icon in the tool bar. The following screen will be displayed. Click ‘OK’ button in this screen. You will be taken back to the ‘Seek Clarification from LC Issuing Bank’ screen. Click ‘Exit’ button to exit the screen. The task is then moved to the next activity. Step 8. Capture Remarks to Inform Issuing Bank Users belonging to the user role ‘TFEROLE’ (Trade Finance Executive) can perform these activities. 1-13 You have to inform the issuing bank if the creation of the export LC is rejected. For this, you have to specify the reason for rejecting. To accomplish, go to the pending list in the system. The system displays all the pending activities. Click ‘Acquire’ button adjoining the ‘Capture Remarks to inform Issuing bank’ task to acquire it. The following screen will be displayed. If you have requisite rights, double click on the task in your ‘Assigned’ task list and invoke the following screen: In this screen, capture the following details: Reference No Specify a reference number for capturing the message. Media Specify the media through which you want to capture and send message to Issuing bank. You can also select the media from the adjacent option list. The list displays the following options: SWIFT Message Free Text Based on the media selected, you can capture the message to be informed the issuing bank in the below section of the screen. 1-14 On selecting the media, the name and address of the customer maintained in the ‘Customer Address Maintenance’ screen is displayed. Location Specify the location of the issuing bank. You can also select the location from the adjacent option list. Node Specify the node for routing the message. You can also select the node from the adjacent option list. The list displays all the nodes maintained in the system. Form Specify the forms uploaded while creating the Export LC. You can also select the form from the adjacent option list. The list displays all the forms maintained in the system. Copies Specify the number of copies of the documents. Hold Check this option if the Export LC is kept on hold. Test Word Required Check this option if a test word is required from the issuing bank. After capturing the remarks to inform issuing bank, select the outcome as ‘Proceed’. The process will move to the ‘Store Documents’ task. Click the save icon in the tool bar. The following screen will be displayed. Click ‘OK’ button in this screen. You will be taken back to the ‘Capture of FFT’ screen. Click ‘Exit’ button to exit the screen. The task is then moved to the next activity. 1-15 Step 9. Confirmation Stage Before creating an export LC contract, you have to check the available limits and confirm the LC. This involves the following steps: Retrieve the details of LC and check for limits Arrange for funds if insufficient (human task which will happen outside the flow) Confirm or not confirm and pass the result to parent process. 9.1. Process Flow Diagram 9.2. Retrieve LC Details Users belonging to the user role ‘CBRROLE’ (Correspondent Bank Relation) can perform these activities. Go to the pending list in the system. The system displays all the pending activities. Click ‘Acquire’ button adjoining the ‘Retrieve LC Details’ task to acquire it. The following screen is displayed: 1-16 If you have requisite rights, double click on the task in your ‘Assigned’ task list and invoke the following screen: In this stage, the LC Contract details are retrieved and checked for the limit level. If the required level is available, select the outcome as ‘SUFFICIENT’. The process will move to the ‘Create/Modify details of LC’ task. Similarly, if the limit is insufficient, then select the outcome as ‘NOTSUFFICIENT’. The process will move to the ‘Arrange for Funds’ stage. Click the save icon in the tool bar. The following screen will be displayed. 1-17 Click ‘OK’ button in this screen. You will be taken back to the ‘Retrieve and Check Existing Limits’ screen. Click ‘Exit’ button to exit the screen. The task is then moved to the next activity. 9.3. Arrange for Funds Users belonging to the user role ‘CBRROLE’ (Correspondent Bank Relation) can perform these activities. Go to the pending list in the system. The system displays all the pending activities. Click ‘Acquire’ button adjoining the ‘Arrange for Limits’ task to acquire it. The following screen is displayed: If you have requisite rights, double click on the task in your ‘Assigned’ task list and invoke the following screen: 1-18 At this stage, in case of insufficient funds, the customer will have to arrange funds outside the workflow. Once the customer has arranged for the fund, select the outcome as ‘ARRANGED’. The export LC creation will be confirmed and the process will move to ‘Create/Modify details of LC’ task. If the fund is not arranged, then select the outcome as ‘NOTARRANGED’. The process will be moved to the ‘Seek Issuing Bank’s Approval’ task. The process will be stagnant in this stage until the fund is arranged. Click the save icon in the tool bar. The following screen will be displayed. Click ‘OK’ button in this screen. You will be taken back to the ‘Arrange for Limits’ screen. Click ‘Exit’ button to exit the screen. The task is then moved to the next activity. Step 10. Seek Issuing Bank’s Approval Users belonging to the user role ‘TFEROLE’ (Trade Finance Executive) can perform these activities. 1-19 You will have to seek the issuing bank approval if the LC is not conformed. Go to the pending list in the system. The system displays all the pending activities. Click ‘Acquire’ button adjoining the ‘Seek Issuing Bank Approval’ task to acquire it. The following screen is displayed: If you have requisite rights, double click on the task in your ‘Assigned’ task list and invoke the following screen: Based on the response received from the issuing bank, you can reject or approve the creation of export LC. If the outcome is ‘Reject’, the process will be terminated. Else, the process will move into the ‘Create/Modify Details of LC’ task. Click the save icon in the tool bar. The following screen is displayed: 1-20 Click ‘OK’ button in this screen. You will be taken back to the ‘Seek Approval for Advising Export LC’ screen. Click ‘Exit’ button to exit the screen. The task is then moved to the next activity. Step 11. Create / Modify LC Details After the LC confirmation, the export LC contract is automatically created in the system and a reference number is created for the same. You can use this reference number for further references. The data captured at the input stage are reflected in the ‘Letter of Credit Contract Input’ screen. You can view or modify the details of the contract in the ‘Letter of Credit Contract Input’ screen. Step 12. Store Documents Users belonging to the user role ‘TFEROLE’ (Trade Finance Executive) can perform these activities. You have to store the documents received from the issuing bank. Go to the pending list in the system. The system displays all the pending activities. Click ‘Acquire’ button adjoining the ‘Store Documents’ task to acquire it. The following screen is displayed: If you have requisite rights, double click on the task in your ‘Assigned’ task list and invoke the following screen: 1-21 In this screen the following information can be stored: LC Details The following customer information is displayed: Contract reference number Customer name Customer number Storage Details Capture the following storage details in this section: Storage Ref. Number Specify the storage reference number. Place Of Storage Mention the place where the document is stored. Date Of Storage Capture the date of storing the documents. Time Of Storage Specify the time of storing the documents export LC documents. Select the action ‘Document Stored’ in the textbox adjoining the ‘Audit’ button in this screen and save the record by clicking the save icon in the tool bar. The following screen will be displayed: 1-22 Click ‘Ok’ button. You will be taken back to the ‘Store Documents’ screen. Click ‘Documents’ button to view the documents stored. The following screen is displayed: 1-23 2. Screen Glossary 2.1 Function ID List The following table lists the function id and the function description of the screens covered as part of this User Manual. Function ID Function Description LCDTR010 Contract Details 2-1 Export LC Advice [April] [2014] Version 11.3.83.02.0 Oracle Financial Services Software Limited Oracle Park Off Western Express Highway Goregaon (East) Mumbai, Maharashtra 400 063 India Worldwide Inquiries: Phone: +91 22 6718 3000 Fax:+91 22 6718 3001 www.oracle.com/financialservices/ Copyright © 2005, 2014, Oracle and/or its affiliates. All rights reserved. Oracle and Java are registered trademarks of Oracle and/or its affiliates. Other names may be trademarks of their respective owners. U.S. GOVERNMENT END USERS: Oracle programs, including any operating system, integrated software, any programs installed on the hardware, and/or documentation, delivered to U.S. Government end users are ‘commercial computer software’ pursuant to the applicable Federal Acquisition Regulation and agency-specific supplemental regulations. As such, use, duplication, disclosure, modification, and adaptation of the programs, including any operating system, integrated software, any programs installed on the hardware, and/or documentation, shall be subject to license terms and license restrictions applicable to the programs. No other rights are granted to the U.S. Government. This software or hardware is developed for general use in a variety of information management applications. It is not developed or intended for use in any inherently dangerous applications, including applications that may create a risk of personal injury. If you use this software or hardware in dangerous applications, then you shall be responsible to take all appropriate failsafe, backup, redundancy, and other measures to ensure its safe use. Oracle Corporation and its affiliates disclaim any liability for any damages caused by use of this software or hardware in dangerous applications. This software and related documentation are provided under a license agreement containing restrictions on use and disclosure and are protected by intellectual property laws. Except as expressly permitted in your license agreement or allowed by law, you may not use, copy, reproduce, translate, broadcast, modify, license, transmit, distribute, exhibit, perform, publish or display any part, in any form, or by any means. Reverse engineering, disassembly, or decompilation of this software, unless required by law for interoperability, is prohibited. The information contained herein is subject to change without notice and is not warranted to be error-free. If you find any errors, please report them to us in writing. This software or hardware and documentation may provide access to or information on content, products and services from third parties. Oracle Corporation and its affiliates are not responsible for and expressly disclaim all warranties of any kind with respect to third-party content, products, and services. Oracle Corporation and its affiliates will not be responsible for any loss, costs, or damages incurred due to your access to or use of third-party content, products, or services.


![[December] [2010] Oracle Part Number E51712-01](http://vs1.manualzilla.com/store/data/005705420_1-4b383e67b8ec6628c44005398bb7935f-150x150.png)