1
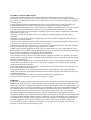
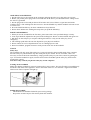
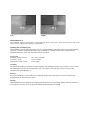
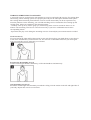
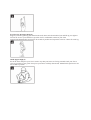
82
TABLE OF CONTENTS
GENERAL SAFETY DIRECTIONS
WARNING
MAINTENANCE AND USE
IMPORTANT PRECAUTIONS
COMPUTER
ASSEMBLY PICTURE
ASSEMBLY INSTRUCTIONS
SERVICE FORM
ADJUSTING AND TESTING
POINTS OF INTEREST
USAGE
THE USE OF THE COMPUTER
BELT ADJUSTMENT
MAINTENANCE
WARM-UP/STRETCHING/COOL-DOWN
DISPOSAL OF YOUR OLD APPLIANCE:
TECHNICAL DETAILS
YOUR GUARANTEE CARD
The photographs serve as an illustration. Subject to alterations.
GENERAL SAFETY DIRECTIONS
In the design and the production of this fitness equipment, much attention has been paid to safety.
Nevertheless, you need at all times to remain conscious of certain safety measures. Make certain that you
have carefully read through the whole user manual prior to your use of the equipment. Keep in mind the
following points:
1) This equipment has not been designed to be used as a toy and must only be used for the purposes
described in this manual. Read the instructions below carefully before using this equipment.
2) Keep children and animals away from the equipment. Children’s enthusiasm may well lead to incorrect
use of the equipment. If children are allowed to use the equipment they should only do so under
supervision and after receiving instructions regarding its proper use. Under no circumstances should the
equipment be used as a toy.
3) Always consult with your physician prior to making use of this equipment or any other fitness
equipment.
4) Always wear safe and comfortable clothing when you are using fitness equipment. Preferably wear
sports shoes or aerobic footwear.
5) In the event you should feel faint or suffer other discomforts, stop using the equipment. You also need
to stop when you experience pain in or pressure on your joints.
6) Make certain that no more than one user is occupying the equipment at one time. Place the equipment
on a level surface; the space required is approximately 2 x 1 metres.
7) Make certain that the equipment has been correctly assembled prior to its use. Ensure that all screws,
nuts and bolts have been fitted correctly and tightened properly. Use only the parts that are recommended
by the importer and that have been delivered with the equipment.
8) Do not use the equipment if it is damaged or has broken down.
9) Pay attention to how your body reacts after using the equipment. Dizziness is a sign that you worked
out too intensely. If you feel dizzy, stretch out on the floor and do not try to get back on your feet util the
dizziness has disappeared.
10) Always use the equipment on a level and clean surface. Never use the equipment outdoors or in water.
11) Avoid that your arms and legs come too close to the moving parts. Do not stuff articles inside the
existing openings in the equipment.
12) Use this equipment only for the purposes as described in this user manual. Do not use parts that were
not recommended by the manufacturer.
13) Ascertain that there are no sharp and pointed objects in the immediate vicinity of the equipment.
14) We advise physically challenged individuals to use this fitness equipment only under the supervision
of qualified instructors.
15) The equipment must have come to a complete standstill before stepping down.
16) The maximum permissible weight on this equipment is 100KG.
WARNING
Consult with your physician prior to starting your exercises. A frequent and intensive training programme
should first be approved by your family physician. This is especially important for individuals above 35
years of age or for those with physical problems. Carefully read through the entire user manual before you
start exercising. We are in no wise responsible for personal injury or physical strains and discomforts that
are caused by the use of this equipment and cannot be held liable in case of their occurrence. Carefully
save these instructions. Incorrect or extreme use may lead to personal injury. Note: the maximum
permissible weight on this equipment is 100 kg. This user manual has been put together in order to
simplify the assembly of the equipment and at the same time to explain its correct use. Please make certain
to carefully read through this manual. In order to familiarise yourself with the parts of the equipment, we
recommend that you carefully study the general reference drawing prior to starting the assembly and the
use of the equipment. Place all parts needed for the assembly on the floor in an orderly manner and
remove all packing material. Check the list of parts to verify what items are present. For the actual
assembly we make referral to the following pages.
MAINTENANCE AND USE
Consult your physician before starting the exercises. A frequent and strenuous work-out program must be
approved by your physician first.
- The equipment requires a regular check-up to prevent physical injury. This means that bolts and nuts
should be frequently checked for cracks and sharp edges etc.
- Defective components must be replaced immediately. If this is not feasible, the equipment must be put
out of order until the required repairs have been made.
- Do not smoke or use fire near the equipment, as some of the plastic components are flammable.
- Be careful! Do not use the equipment in front of a burning stove and/or fire place.
- Persons suffering from a plastics allergy should consult their physician before using this equipment
IMPORTANT PRECAUTIONS
To reduce the risk of electric shock, burns, fire or other injury, please read the following precautions and
information before operating this treadmill.
- It is the responsibility of the owner to be sure that all users of this treadmill are informed of all warnings
and precautions.
- Never start the treadmill while you are standing on the walking belt.
- Always hold the handrails while using the treadmill.
- The treadmill is capable of high speeds. To avoid sudden jumps in speed, adjust the speed in small
increments.
- Do not operate where aerosol (spray) products are being used or where oxygen is being administered.
- Never leave the treadmill unattended while it is running. Always remove the SAFETY KEY and move
the ON/OFF switch to the OFF position when the treadmill is not in use. Refer to the Precautions section
of this manual for the location and operation of the ON/OFF switch.
- When folding or moving the treadmill, make sure that the safety locks is fully engaged. Refer to the
Folding Instruction of this manual for safety lock operation.
- Always unplug the power cord before performing the maintenance and adjustment procedures described
in this manual. Do not remove the motor covering unless instructed to do so by an authorized service
representative. Servicing other than the procedures in this manual should be performed by an authorized
service representative only.
- Keep the plug and power cord away from heated surfaces.
- To disconnect, turn the power switch to the OFF position before removing the power plug from the wall
outlet.
- Keep all electrical components, such as the motor, power cord and on/off switch away from water or
other liquids to prevent shock. Do not set anything on the handrail, computer console or belt. Never place
liquids on any parts of the unit.
- Always insert the safety key and attach the clip to your clothing at your waist before beginning your
workout. If you should encounter problems and need to stop the motor quickly, simply
pull on the cord to disengage the safety key from the console. To get off the treadmill, wait until the belt
has stopped moving, then step onto the side pedals and on to the floor. To continue operation simply
reinsert the safety key into the console.
- Remove the safety key and store it away in a safe place when the treadmill is not in use.
- Keep all loose clothing and towels away from the running surface. The belt will not stop
immediately if an object becomes caught in the rollers or belt. Should an object become caught, turn the
unit off immediately.
-Wear proper exercise clothing and shoes for your workout. Do not wear loose clothing or shoes with
leather soles or heels. Be sure to tie long hair back.
- Proceed with caution when getting on or off the treadmill. Use the handrails whenever possible. Only
step onto the running surface when it is running at a very slow speed. Do not step off the treadmill while
the belt is moving. To get on or off the running surface, straddle the running surface by standing on the
right and left plastic platforms on each side of the belt before starting the belt (to begin your workout) and
after it has stopped (at the end of your workout).
- Never attempt to turn around while on the treadmill with the belt running. Keep your head and body
facing forward at all times.
- Never turn on the treadmill while someone is standing on the running surface.
- Do not rock the treadmill, stand on the handrails or computer console at any time.
- In order to prevent personal injury, the space behind the treadmill should be at least 92 cm wide and 183
cm long.
- Gebruik dit apparaat alleen voor doeleinden zoals beschreven in deze gebruiksaanwijzing. Dit
fitnessapparaat is alleen voor thuisgebruik.
- The ear pulse sensor is not suitable as a medical instrument.
- Never let a heart patient exercise by him- or herself on the device.
Electrical safety
This motorized treadmill must be grounded. Should it break or malfunction, grounding reduces the risk of
shock. The treadmill is equipped with a power cord having an equipment grounding conductor and a
grounding plug. The plug must be inserted into an appropriate outlet that is properly installed and
grounded in accordance with all local codes and ordinance.
Important:
When the equipment grounding conductor is not connected properly there is a risk of electric shocks. If
you doubt whether the treadmill is grounded in a correct way, please contact our service department. Do
not change anything to the plug of the treadmill. If the plug does not fit the socket have a new socket
installed by a technician.
COMPUTER
1.
2.
3.
4.
5.
6.
7.
8.
Speed button
Pulse ear-clip jack
Stop button
Start button
Safety key
Set button
Slow button
Fast button
9.
10.
11.
12.
13.
14.
15.
Speed button
Distance window
Pulse window
Speed window
Calorie window
Time window
Speed automatic programs
ASSEMBLY PICTURE
1. Computer
2 Left & right handle
3. Left & right console mast
4. Motor cover
5. Running belt
6. Adjusting bolt for treadmill
7. Height adjustment
ASSEMBLY INSTRUCTIONS
Step1
Connect the handles to the computer with the delivered bolts.
Step 2
Connect the wires from the console masts to the computer.
Step 3
Connect the console masts to the main frame. Connect the left and right console masts in the main frame
with the delivered bolts.
Step 4
Connect the sensor cable from the console mast to the computer.
Step 5
Connect the computer to the frame.
SERVICE FORM VAN DEN BERG PRODUCTS BV
Unfortunately we can NOT handle any service forms that have been completed unclearly or partly.
Therefore please always fill in the service form as clearly and completely as possible!
THE PRODUCT
Article number: FTM8277P
Article description: Powerpeak Treadmill
Shop of purchase:..............................................................................................................................
Date of purchase:...............................................................................................................................
YOUR DATA
Name:.................................................................................................................................................
Address:..............................................................................................................................................
Postal code:........................................................................................................................................
City:....................................................................................................................................................
Telephone:..........................................................................................................................................
Fax:......................................................................................................................................................
E-mail:.................................................................................................................................................
DESCRIPTION OF THE PROBLEM
............................................................................................................................................................
............................................................................................................................................................
............................................................................................................................................................
............................................................................................................................................................
............................................................................................................................................................
............................................................................................................................................................
For us to be able to guarantee a rapid settlement, we advise you to use the same form on our website
www.powerpeak.com. Going by the service form you have completed we shall contact you as soon as
possible.
Postal address: Van den Berg Products BV, Platinawerf 20f, 6641 TL Beuningen, The Netherlands
Fax: (+31) 24 345 44 29
ADJUSTING AND TESTING
1. Put the safety key on its position on the computer and plug the pulse key in the pulse ear-clip jack.
2. Before you put the power plug in the socket and turn on the device you should check the voltage and if
the socket is grounded.
3. Put the plug in the socket and put the on/off switch to ON. You will here a signal tone and all the
windows show 0. The walking belt does not move. Pres the START key and the treadmill will start to run
at a slow level
4. Press the FAST/SLOW keys to check whether these keys function.
5. Please check whether the walking belt stops after you push the STOP key.
POINTS OF INTEREST
1. When you use the treadmill for the first time, please start with a low speed and enlarge it slowly.
2. Your steps should be adjusted to the speed of the walking belt. Please use the treadmill with great care.
3. DO NOT use the safety key to stop the walking belt after use. Only use the safety key for an
emergency.
4. The walking speed and work-out time depend on your physical condition.
5. Please contact our service department in case of a damaged power cord.
6. Do not let children, pregnant women or weak persons work-out on the treadmill.
USAGE
Safety key:
The treadmill will only work if the safety key is properly locked in the provided notch of the computer.
Inset the safety key and attach the clip onto waist part of your clothes. In case of trouble, where it is
necessary to turn of the motor immediately, simply pull the safety key out of the console by pulling the
rope. To turn the treadmill on again, turn the main switch off and then put the safety key back into the
notch on the console.
The device only works if you put the safety key on the computer
Turning on the treadmill:
Make sure that the treadmill is correctly connected to a power source. The on/off switch is located directly
beside the cord outlet of the appliance. Turn it ON and it will be lit. You will hear a signal tone and the
LED screen of the Computer will light up.
Folding the treadmill:
- The treadmill can folded be folded for space-saving storage.
- Step on the switch with your foot and lay down the machine.
Important: make sure that the treadmill is locked in a correct manner before you let it go.
Unfolding the treadmill:
Step on the swith with the foot and fold the treadmill slowly and carefully down.
THE USE OF THE COMPUTER
Turning the power on
Plug the power cord into an appropriate outlet and turn the on/off key on. Fix the safety key. You will hear
a beep. You will here a signal tone and all the windows show 0. At this point the treadmill is ready for use.
Manual operation
Press the start key to begin exercising. The speed of the walking belt begins at 0.8km/h. Press the fast and
slow keys to adjust the speed.
Program operation
The SET key helps you to choose the desired program. With the fast and slow keys you can change the
data. After you have programmed the desired functions, you press the start key. The changed data will be
saved automatically. The treadmill begins to work, when the set speed is reached, you will hear a beep
sound. Time and speed will decrease to 0. When the preset time/distance has reached 0, you will hear a
beep sound.
Pulse
Put the sensor in your left ear and connect it to the computer. When all windows on the computer display
0, you need to press the set key for 5 times. With the slow and fast keys you can adjust the pulse data. If
you press the stop key, you leave the setting. With the set key you can also adjust the speed and distance.
Press the start key. The treadmill starts to run at the set speed. The set pulse data is compared to the actual
pulse. De speed of the treadmill will be adjusted automatically with the help of this.
REMARK: if you use this function, please note that the maximum speed is 6KM/H. It is recommended to
not set the speed higher than 3 km/H.
Pause / Stop
In case of trouble, where it is necessary to turn of the motor immediately, simply pull the safety key out of
the console by pulling the rope. If you want to stop the treadmill in a normal way, you can use the STOP
key.
Total distance
Press the distance key, the data are being displayed, press this key once again during 3 seconds. The speed
and distance windows will show the total distance combined.
Direct speed set
To go directly to the desired speed, you can use the speed choice keys on the computer.
Preset exercise programmes
With the set key you are able to select the preset exercise programmes. The indication light of the program
lights up during selection and during use of the program.
Attention:
- When you use the treadmill for the first time, you should start with a low speed.
- Your steps should be adjusted to the speed of the walking belt. Please use the treadmill with great care.
- DO NOT use the safety key to stop the walking belt after use. Only use the safety key for an emergency.
- The walking speed and work-out time depend on your physical condition
BELT ADJUSTMENT
You may need to adjust the running belt during the first few weeks of use. All running belts are properly
set at the factory. It may stretch of be off center after use. Stretching is normal during the break-in period.
Adjusting the belt tension:
If the running belt feels as though it is “slipping” or hesitating when you plant you foot during a run, the
tension on the running belt may have to be increased.
To increase the running belt tension:
1. Place a wrench on the left belt tension bolt. Turn the wrench clockwise 1/2 turn to draw the rear roller
and increase the belt tension.
2. Repeat STEP 1 for the right belt tension bolt. You must be sure to turn both bolts the same number of
turns, so the rear roller will stay square relative to the frame.
3. Repeat STEP 1 and STEP 2 until the slipping is eliminated.
4. Be careful not to tighten the running belt tension too much as you can create excessive pressure on the
front and rear roller bearings. An excessively tightened running belt may damage the roller bearings that
would result in bearing noise from the front and rear rollers.
To decrease the tension on the running belt, turn both bolts counter-clockwise the same number of
turns. .
Centring the running belt
When you run, you may push off harder with one foot than with another. The severity of the deflection
depends on the amount of force that one foot exerts in the relation to the other. This deflection can cause
the belt to move off-center. This deflection is normal and the running belt will centre when no body is on
the running belt. If the running belt remains consistently off-center, you will need to centre the running
belt manually.
1. Start the treadmill without anyone on the running belt, press [SPEED UP] button until speed reached
6kph.
2. Observe whether the running belt is toward the right or left side of the deck.
a) If toward the left side of the deck: Using wrench, turn the left adjustment bolt clockwise 1/2 turn and
the left adjustment bolt counter clockwise 1/2.
b) If toward the right side of the deck:
c) If the belt is still not centered, repeats the above steps until the running belt is on center.
3. After the belt is centered, increase the speed to 12 kph and verify that it is running smoothly. Repeat the
above steps if it is necessary. If the above procedure is unsuccessful in resolving the off-center, you may
need to increase the belt tension.
Left
Right
MAINTENANCE
The treadmill must be turned off to avoid electrical shocks. The power cord must be pulled out of the
socket, before starting the cleaning or maintenance.
Walking belt and lubrication
The treadmill is factory-lubricated. However, it is recommended to check the lubrication of the treadmill
regularly, to ensure an optimal operation of the treadmill. It is usually not necessary to lubricate the
treadmill in the first year or the first 500 hours of operation.
Usage: Oil:
Less than 3 hours a week
3-6 hours a week
More than 6 hours a week
once every 6 months
every 3 months
every month
Cleaning
Transpiration needs to be cleaned from the computer and walking belt after every work-out. Once a week
the walking belt needs to be cleaned with a soft, wet cloth. Do not spill any excessive water on the
computer, this could damage it.
Storage
Store you treadmill in a clean and dry environment. Ensure the master power switch is off and is unplugged from the electrical wall outlet.
Moving
This treadmill has been designed and equipped with wheels for easy mobility. Before moving, ensure the
master power switch is in the off position and the main body has been folded.
WARM-UP/STRETCHING/COOL-DOWN
A successful exercise session begins with warming up exercises and ends with exercises for cooling down
and relaxing. These warming up exercises prepare your body for the subsequent demands made upon it.
The cooling down/relaxation period after the exercise session ensures that you do not experience any
muscular problems. In the following, you will find stretching exercise instructions for warming up and
cooling down. Please pay attention to the following points:
- Carefully warm up every muscle group you will be using in the exercise session for about 5 to 10
minutes. The stretching exercises are carried out correctly if you feel a comfortable tension in the
corresponding muscle.
- Speed does not play a role during the stretching exercises. Fast and jerky movements must be avoided.
Neck exercises (1)
Tilt your head to the right and feel the tension in your neck. Slowly drop your head down to your chest in
a semi circle and then turn your head to the left. You will feel a comfortable tension in your neck again.
You can repeat this exercise alternately several times.
Exercises for the shoulder area (2)
Lift the left and right shoulders alternately, or lift both shoulders simultaneously.
Arm stretching exercises (3)
Stretch the left and right arms alternately towards the ceiling. Feel the tension in the left and right sides of
your body. Repeat this exercise several times.
Exercises for the upper thigh (4)
Support yourself by placing your hand on the wall, then reach down behind you and lift up your right or
left foot as close to your buttocks as possible. Feel a comfortable tension in your front
upper thigh. Maintain this position for 30 seconds if possible and repeat this exercise 2 times for each leg.
Inside upper thigh (5)
Sit on the floor and place your feet in such a way that your knees are facing outwards. Pull your feet as
close as possible to your groin. Now press your knees carefully downwards. Maintain this position for 3040 seconds if possible.
Touch toes (6)
Bend your trunk slowly forwards and try to touch your feet with your hands. Reach down as far as
possible to your toes. Maintain this position for 20-30 seconds if possible.
Exercises for the knees (7)
Sit on the floor and stretch out your right leg. Bend your left leg and place your foot on your right upper
thigh. Now try to reach your right foot with your right arm. Maintain this position for 30-40 seconds if
possible.
Exercises for the calves achilles tendon (8)
Place both your hands on the wall and support your full body weight. Then move your left and right leg
alternately backwards. This stretches the back part of the leg. Maintain this position for 30-40 seconds if
possible.
DISPOSAL OF YOUR OLD APPLIANCE:
1. When this crossed-out wheeled bin symbol is attached to a product it means the product is covered by
the European Directive 2002/96/EC.
2. All electrical and electronic products should be disposed of separately from the municipal waste stream
via designated collection facilities appointed by the government or the local authorities.
3. The correct disposal of your old appliance will help prevent potential negative consequences for the
environment and human health.
4. For more detailed information about disposal of your old appliance, please contact your city office,
waste disposal service or the shop where you purchased the product.
TECHNICAL DETAILS
Model number
FTM8277P
Wattage
800W
Nominal tension
230V~
Nominal frequency
50Hz
Powerpeak is a registered brand name of :
Van den Berg Products BV
Platinawerf 20f
6641 TL Beuningen
The Netherlands
www.vdbergproducts.com
YOUR GUARANTEE CARD
This guarantee card covers your device for a period of 24 months as from the date of purchase as to
service charges and replacement of parts on condition that you have used the device correctly as described
in the directions for use. This guarantee card does not prejudice the national legislation that may exist in
the country of purchase in the field of guarantee obligations. Guarantee is granted and parts are available
in all countries where the product is officially sold.
Cables, plugs, as well as artificial fibre parts are not included in the guarantee. Accessories and parts for
your appliance may be ordered on: www.muppa.nl
This device is only intended for domestic use. Damage and / or malfunctions by industrial use are
excluded from guarantee.
You can not make use of the guarantee if:
- You do not possess a valid proof of purchase or this has been changed or made illegible in any way;
- The service form has not been filled in clearly and completely;
- The model or serial number on the product has been changed, removed, deleted or made illegible;
- Repairs have been executed by unauthorized repair workshops or unauthorized persons:
- The damage can be blamed on a cause that is alien to the device, such as: fire damage, water damage,
transport damage, atmospheric discharges, insufficient or improper maintenance;
- The device requires adjustments to let it function in another country than for which it has been designed,
approved, released and produced, as well as if a defect occurs as a result of such a change and/or
adjustment.
- The device has not been used according to the directions for use that are supplied with the product.
Should your device not function properly despite our careful quality control, then you can appeal to our
service. To appeal to our service we request you to send us a clearly completed service form.
For us to be able to guarantee a quick settlement, we advise you to use the service form at our website:
www.powerpeak.com. Going by your service form we shall contact you as soon as possible.
To prevent any inconveniences, we advise you to carefully read the directions for use prior to contacting
us.