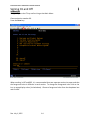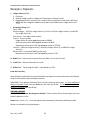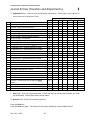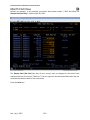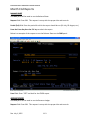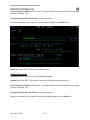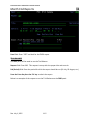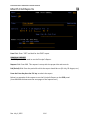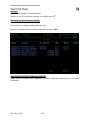
1
CrossPointe User’s Manual for Internal Accounts Rev. July 1, 2015 CrossPointe User’s Manual for Internal Accounts Table of Contents Table of Contents Page Chapter 1 – Signing On and Off Signing On ………………………………………………………………………………………………………… 1-1 Signing Off ……………………………………………………………………………………………………….. 1-4 Chapter 2 – Account Coding The Account String Structure ……………………………………………………………………………. 2-1 Types of Account Strings …………………………………………………………………………………… 2-1 Dimensions in Detail ………………………………………………………………………………………… 2-2 Chapter 3 – Receipts / Deposits Entering a Deposit ……………………………………………………………………………………………. Posting a Deposit ……………………………………………………………………………………………… Correcting a Posted Deposit …………………………………………………………………………….. Correcting an Unposted Deposit ………………………………………………………………………. Querying on Deposits ………………………………………………………………………………………. Running Reports (Deposit Register) …………………………………………………………………. Optional Reports (Cash Receipts Journal, Cash Receipts Journal with Detail) …… Printing Reports …………………………………………………………………….......................... 3-1 3-3 3-4 3-4 3-5 3-5 3-6 3-8 Chapter 4 – Requisitions Entering a Purchase Requisition ……………………………….………………………………………. Posting a Purchase Requisition …………………………………….…………………………………… Correcting a Posted Purchase Requisition ………………………………………………………… Correcting an Unposted Purchase Requisition ……….…………………………………………. Querying on Purchase Requisitions ……….…………………………………………………………. Approving Posted Purchase Requisitions ….………………………………………………………. 4-2 4-4 4-5 4-5 4-6 4-6 Chapter 5 – Purchase Orders Rolling Requisitions into Purchase Orders ……………………………………………………….. Printing Purchase Orders …………………………………………………………………………………. Receiving Items on a Purchase Order ……………………………………………………………….. Querying on Purchase Orders ………………………………………………………………………….. Running Reports (Purchase Order Report) ……………………………………………………….. Printing Reports ……………………………………………………………………………………………….. 5-1 5-1 5-1 5-3 5-3 5-4 Rev. July 1, 2015 CrossPointe User’s Manual for Internal Accounts Table of Contents Chapter 6 – Invoices Entering an Invoice …………………………………………………………………………………………… Posting an Invoice …………………………………………………………………………………………….. Correcting a Posted Invoice ……………………………………………………………………………… Correcting an Unposted Invoice ……………………………………………………………………….. Querying on Invoices ………………………………………………………………………………………… Chapter 7 – Checks Generating Checks: Step 1 – Select Invoices & Run Check Register………………………………………. Step 2 – Print & Post Checks …………………..…………………………………………….. Step 3– Confirm Journal Entries Posted for Checks ………………………………. Voiding Checks: Step 1 – Selecting Checks ……………………………………………………………………… Step 2 – Void Checks in Edit Mode ……………………………………………………….. Step 3 – Void Checks in Post Mode ……………………………………………………….. Step 4 – Confirm Journal Entries Posted for Voided Checks ………………….. Running Reports (Check Register, Void Register) …………………………………………….. Printing Reports ……………………………………………………………………………………………….. 6-1 6-5 6-6 6-6 6-7 7-1 7-4 7-7 7-8 7-9 7-10 7-11 7-12 7-13 Chapter 8 – Journal Entries Journal Entry Numbering System ……………………………………………………………………… 8-1 Querying on Journal Entries ……………………………………………………………………………… 8-1 Chapter 9 – Journal Entries (Transfers and Adjustments) Entering a Transfer or Adjustment Journal Entry ……………………………………………… Posting a Transfer or Adjustment Journal Entry ……………………………………………….. Correcting a Posted Transfer or Adjustment Journal Entry ………………………………. Correcting an Unposted Transfer or Adjustment Journal Entry ………………………… 9-1 9-3 9-3 9-3 Chapter 10 – Month End Close Reconciling the Bank Statement in CrossPointe ……………………………………………….. Selecting Records to Reconcile …………………………………………………………………………. Reconciling Selected Records …………………………………………………………………………… Printing Reconciliation Reports…………………………………………………………………………. Completing Excel Bank Reconciliation Form……………………………………………………… Correcting the Receipt Date …………………………………………………………………………….. Correcting a Reconciled Record ……………………………………………………………………….. 10-1 10-1 10-2 10-3 10-3 10-4 10-4 Rev. July 1, 2015 CrossPointe User’s Manual for Internal Accounts Table of Contents Chapter 11 – Month End Reports Outstanding Check Report ……………………………………………………………………………….. Outstanding Deposit Report ……………………………………………………………………………… Balance Sheet …………………………………………………………………………………………………… Revenue Ledger ……………………………………………………………………………………………….. Expenditure Ledger ………………………………………………………………………………………….. Trial Balance ……………………………………………………………………………………………………. Principal’s Report …………………………………………………………………………………………….. Project Balance Report …………………………………………………………………………………….. Transfer Report ………………………………………………………………………………………………… Deposit Register ……………………………………………………………………………………………….. Check Register …………………………………………………………………………………………………. Void Register ……………………………………………………………………………………………………. Journal Entry Report (Transfers and Adjustments) ……………………………………………. Purchase Order Report …………………………………………………………………………………….. General Ledger ………………………………………………………………………………………………… Encumbrance Report ……………………………………………………………………………………….. Printing Reports ……………………………………………………………………………………………….. Chapter 12 – Year End Close Prior to Fiscal Year End (June 30): GSF – General Service Fund Project Balances ………………………………….…... Replenish Petty Cash ………………………………………………………………….……….… Redeposit Petty Cash/Change Fund ……………………………………………….……... Clearing Negative Balances ………………………………………………………….………. Recording Earned Interest ……………………………………………………….…………… Writing off NSF Checks ……………………………………………………………….………… Reviewing Purchase Orders in System ………………………………………………….. Receivers ………………………………………………………………………………………………. Reviewing Unposted Invoices in System ……………………………………………….. Bank Signature and Safe Combination Authority ………………………………….. After Fiscal Year End (June 30): Reconciling the Bank Statement in CrossPointe .…………………………………... Complete the Checks and Balances per the Monthly Financial Report Checklist ……………………………………………………………………………………………….. Rev. July 1, 2015 11-1 11-2 11-3 11-3 11-4 11-5 11-6 11-8 11-9 11-10 11-10 11-10 11-10 11-11 11-11 11-12 11-14 12-1 12-1 12-1 12-1 12-1 12-1 12-1 12-2 12-2 12-2 12-3 12-3 CrossPointe User’s Manual for Internal Accounts Table of Contents Chapter 13 – Year End Reports Purchase Order Report …………………………………………………………………………………….. Deposit register …………………………………………………………………….……………….………... Check Register ………………………………………………………………………….……………………... Void Register ……………………………………………………………………………………………….…... Journal Entry Report (Transfers and Adjustments) …………………………………..………. Public Relations General Ledger ………………………………………………………………………. School Store General Ledger ……………………………………………………………………………. ALL Rental Project General Ledgers …………………………………………………………………. After Fiscal Year End (June 30) and After Balancing the Bank Statement …………. 13-1 13-1 13-1 13-1 13-1 13-1 13-1 13-1 13-2 Appendices Account String Dimensions ……………………………………………………………………………….. Dimension 4 – Project ………………………………………………………………………………………. Internal Accounts Adjustment/Transfer Approval Forms ………………………………….. Monthly Financial Report Checklist …………………………………………………………………… Year End Financial Report Checklist ………………………………………………………………….. A1-1 A2-1 A3-1 A4-1 A5-1 Rev. July 1, 2015 CrossPointe User’s Manual for Internal Accounts Signing On and Off 1 In the CrossPointe system, when working with Internal Accounts it is necessary to sign on to the INT system (District accounts are in the BRE system). This chapter will demonstrate that process. SIGNING ON Enter your User Name and Password in the Sign On screen. Rev. July 1, 2015 1-1 CrossPointe User’s Manual for Internal Accounts Signing On and Off 1 Enter the selection number for “Crosspointe: Student and Business Systems.” The selection number will depend on the access you have in the system. Press the Enter key. Rev. July 1, 2015 1-2 CrossPointe User’s Manual for Internal Accounts Signing On and Off 1 Replace ‘BRE’ with ‘INT’ in the District field. Rev. July 1, 2015 1-3 CrossPointe User’s Manual for Internal Accounts Signing On and Off 1 SIGNING OFF To sign off, press the F3 key until arriving at the Main Menu. Choose selection number 90. Press the Enter key. When working in INT and BRE, it is recommended that two separate sessions be open and that the foreground color is different in each session. To change the foreground color click on the icon to setup display colors (circled above). Choose a foreground color from the dropdown box and click OK. Rev. July 1, 2015 1-4 CrossPointe User’s Manual for Internal Accounts Account Coding 2 In the CrossPointe system, account strings are used with transactions to help identify where the funds are generated and how they are being used. This chapter will identify what the different dimensions are and how they are put together to create the account strings for your school. THE ACCOUNT STRING STRUCTURE The structure of each account string is made up from six possible dimensions. These are defined as dimensions 1 – 6. 1 2 3 4 5 6 XXX.XXXX.XXXX.XXXXXX.XXXX.XXX Dimension Description Number 1 Fund 2 General Ledger 3 Cost Center 4 Project 5 Function 6 Object Code Identifier Number of Digits The internal accounts fund 3 The cash account, accounts 4 receivable account, or the transfer account The facility, location, or office at 4 which costs are accumulated A special program within the fund 6 defined by the student activity If the string is for revenue or an 4 expenditure The type of expenditure 3 Dimension Value To Use 800 Varies Your School’s Four-Digit # Varies Revenue-39XX Expenditure9800 Varies TYPES OF ACCOUNT STRINGS There are three types of account strings: general ledger strings, revenue strings, and expenditure strings. Each string includes a different number of dimensions in which some of the dimension values never change. Below provides an explanation of each type of account string. Revenue string: This string includes the first five dimensions that are listed in the chart above and will look like: 800.2520.XXXX.XXXXXX.39XX The first dimension’s value never changes. It will always be 800. The second dimension’s value never changes. It will always be 2520. The third dimension’s value never changes. It will always be your school’s four-digit number. The fourth dimension’s value will vary based on the details below. The fifth dimension’s value will always start with a 39, but the final two digits will vary based on the revenue details below. Rev. July 1, 2015 2-1 CrossPointe User’s Manual for Internal Accounts Account Coding 2 The Revenue string is most often used for the following actions: Posting Deposits Posting Interest Posting NSF Check Write-Offs Posting Refunds Due to Overpayments Made to the School Expenditure string: This string includes all six dimensions that are listed in the chart above and will look like: 800.1530.XXXX.XXXXXX.9800.XXX The first dimension’s value never changes. It will always be 800. The second dimension’s value never changes. It will always be 1530. The third dimension’s value never changes. It will always be your school’s four-digit number. The fourth dimension’s value will vary based on the chart above and the details below. The fifth dimension’s value never changes. It will always be 9800. The sixth dimension’s value will vary based on the object code detail below. The Expenditure string is most often used for the following actions: Paying Invoices Posting Bank Fees Posting Refunds Due to Overpayments Made by the School Transferring Expenditures Voiding Checks General Ledger string: This string includes the first four dimensions that are listed in the chart above and will look like: 800.XXXX.XXXX.XXXXXX The first dimension’s value never changes. It will always be 800. The second dimension’s value will vary based on the details below. The third dimension’s value never changes. It will always be your school’s four-digit number. The fourth dimension’s value will vary based on the details below. The General Ledger string is used as the opposing entry for a Revenue or Expenditure string. DIMENSIONS IN DETAIL Of the six types of dimensions, some of them never change. Those that do not change are shown and explained above. They are dimensions 1, 3, and dimension 5 if it is used as an expenditure. The dimensions that change are explained below. They are dimensions 2, 4, 5 (if it is used as a revenue), and dimension 6. Dimension 2 – General Ledger Rev. July 1, 2015 2-2 CrossPointe User’s Manual for Internal Accounts Account Coding 2 When using a General Ledger string, this dimension is comprised of the different cash accounts, the accounts receivable account, and any transfer accounts. They are listed below. 1112 – Petty Cash 1113 – Change Fund 1114 – Savings 1115 – Money Market 1116 – Certificate of Deposit (CD) 1119 – Checking Account 1130 – Accounts Receivable 1520 – Encumbrance 1530 – Expense Control Account 2520 – Revenue 2720 – Reserve for Encumbrance 2767 – Beginning Balance This list is also available in Appendix A1 along with other account string data from this chapter. Dimension 4 – Project This dimension contains six digits to identify a special program within the fund that is defined by the student activity. Each digit within the dimension’s value represents specific information. There are two times when the below concept is not used. This is for project 000000 and project 999999. Project 000000 is used for transfers using cash accounts. Project 999999 is used to record NSF checks. Please refer to Chapter 6 - Journal Entries for further detail in using project 000000 and project 999999. The first digit defines the activity groupings as listed in and in accordance with the Redbook. For example, Basketball would be 1. 1 – Athletics 2 – Music 3 – Classes 4 – Clubs 5 – Departments 6 – Trust 7 – General The second and third digits define the letter of the alphabet that the activity description begins with. For example, Basketball would be 02. 01 – A 07 – G 13 – M 19 – S 25 – Y 02 – B 08 – H 14 – N 20 – T 26 – Z 03 – C 09 – I 15 – O 21 – U 04 – D 10 – J 16 – P 22 – V 05 – E 11 – K 17 – Q 23 – W Rev. July 1, 2015 2-3 CrossPointe User’s Manual for Internal Accounts Account Coding 06 – F 12 – L 2 18 – R 24 – X The fourth and fifth digits are currently only 01 through 13. They define multiple activities whose description start with the same letter. For example, 01 could be Baseball, 02 could be Basketball, and 03 could be Bowling. The sixth digit can be 0 through 9. It defines separate groupings of the same detailed activity. For example, 1 could be for Basketball-boys and 2 for Basketball-girls. See Appendix A.2 for a full list of projects set up in CrossPointe and the projects available to be used by each school type (elementary, middle, junior/senior, and high). For example, Basketball-Girls is project 102022 and is developed in this manner:1 02 02 2 1 – This designates Athletics 02 – This designates B for Basketball 02 – This designates Basketball (Baseball is 01) 2 – This designates Girls (Boys are 1) Another example, French Club is project 406060 and is developed in this manner: 4 06 06 0 4 – This designates Clubs 06 – This designates F for French 06 – This designates French Club 0 – There is no specific grouping for this French Club’s activities Dimension 5 – Function This dimension is only used in a revenue string or an expenditure string. Revenue: 3680 Transfer In – Automated Entry Only 3900 Advertising 3901 Concession 3902 Contributions/Donations 3903 Dues/Fees 3904 Fieldtrips 3905 Fundraising 3906 Gate Receipts – Athletics – Regular Season 3907 Gate Receipts – Athletics – Other 3908 GSF – General Service Fund 3909 Interest 3910 Other Income 3911 Rentals 3912 Ticket Sales 3913 Yearbook Sales Expenditure: Rev. July 1, 2015 2-4 CrossPointe User’s Manual for Internal Accounts Account Coding 2 9800 Expenditures This list is also available in Appendix A1 along with other account string data from this chapter. Dimension 6 – Object Code This dimension is only used in an expenditure string and is used to identify the type of expenditure. The values are similar to the District but have been greatly condensed. 310 312 330 500 570 598 599 600 621 622 641 642 643 644 671 691 692 693 694 700 701 702 730 799 980 Services – Other Services – Professional & Technical Travel Supplies Food (non-fundraiser) Fundraiser Items Uniform / Clothing (non-fundraiser) Capital – Other Capital – Audio Visual Material - $1,000 and above Capital – Audio Visual Material - Under $1,000 Capital – Furniture, Fixtures, and Equipment - $1,000 and above Capital – Furniture, Fixtures, and Equipment - Under $1,000 Capital – Computer Hardware - $1,000 and above Capital – Computer Hardware - Under $1,000 Capital – Improvement Other than Building Capital – Computer Software - $1,000 and above Capital – Computer Software - Under $1,000 Capital – License Fees-Software - $1,000 and above Capital – License Fees-Software - Under $1,000 District Reimbursement GSF Payments to the District Unclaimed Property Dues / Fees / Admission Sales Tax Payment to Vendor Transfer Out – Automated Entry Only This list is also available in Appendix A1 along with other account string data from this chapter. Rev. July 1, 2015 2-5 CrossPointe User’s Manual for Internal Accounts Account Coding 2 This page intentionally left blank Rev. July 1, 2015 2-6 CrossPointe User’s Manual for Internal Accounts Receipts / Deposits 3 The information provided in this chapter will demonstrate the process of entering, posting and correcting cash receipts and deposits, querying on deposits, and running cash receipt reports. CrossPointe Receipt/Deposit Entry Screen – F609 The F609 panel will be used to enter deposits and all of the corresponding monies collected forms (cash receipts). To learn more about a field: The F1 key will display a small window with a definition about the field in question. The F6 key will take you to the next field’s definition. The F3 key will make the small window disappear. ENTERING A DEPOSIT Key Data – The data above the blue line (A, B, and C). These are the key fields needed in order to input, change, look at, or delete a deposit. Once you have input this data – YOU MUST PRESS THE ENTER KEY. If you continue typing and press the enter key later, all of your data will disappear. Rev. July 1, 2015 3-1 CrossPointe User’s Manual for Internal Accounts Receipts / Deposits 3 A. Action field – A – Add a record C – Change an unposted deposit or view either a posted or unposted deposit D – Delete an unposted deposit (posted deposits can’t be deleted) P – Post an unposted deposit B. Date field – Enter the date of the deposit. C. Entry field – Tab through this field. It will default to the next journal entry number. Press the Enter key. Write the Entry number (‘C’ above) on the bank deposit slip. (Please note this is not part of the MCF number.) D. Deposit Date field – Enter the date of the deposit (same as the date field above). E. Deposit Amount field – Enter the amount of the total deposit. All of your monies collected forms MUST add up to this total. (Each monies collected form will be entered on the individual cash receipts lines listed below.) F. Deposit Number field – Tab through this field. It will default to the next deposit number. The Monies Collected Form number will be made up of two parts, one number before the dash and one number after the dash (i.e. 1234-1). This Deposit Number field will be used as the first part of the Monies Collected Form number. G. Deposit Bank field - Tab through this field. It will default to the bank number/school number. Fields H-O make up one Monies Collected Form (CrossPointe cash receipt). Three Monies Collected Forms can be entered on each page. To enter additional Monies Collected Forms Press the Enter key and then the F5 key. To refresh the total at the bottom of the page press the F5 key. H. Date field – The date the Monies Collected Form and cash was received by the bookkeeper or designee. I. Number field – Start this number at 1 each time a new deposit is entered. The next Monies Collected Form will be entered as 2 and so on. The Monies Collected Form number will be made up of two parts, one number before the dash and one number after the dash (i.e. 1234-1). This Number field will be used as the second part of the Monies Collected Form number). J. Description field – Details of the collection. Rev. July 1, 2015 3-2 CrossPointe User’s Manual for Internal Accounts Receipts / Deposits 3 K. Ledger Action (L) field – C – Collected G – General Ledger (used for redeposit of Petty Cash or Change Funds) X – Expenditure (use for refunds from a vendor OR for repayments of the bank’s NSF fees) NOTE: NSF fees charged in addition to the bank’s fee would have a Ledger Action of C. L. Accounting String field – Fund – 800 General Ledger – 2520 (for Ledger Action C); 1112 or 1113 (for Ledger Action G); and 1530 (for Ledger Action X) Cost Center – Four-digit school number Project – Project number Ledger Action G entries must be posted to 000000 Sales tax to be paid to DOR must be posted to 619010 Repayments of the bank’s NSF fees must be posted to 707010 Function – 39XX (for Ledger Action C); Blank (for Ledger Action G); or 9800 (for Ledger Action X) Object Code – for use with 9800 Function only Repayments of the bank’s NSF fees must be posted to 730 M. Debit field – Data cannot be entered into this field. Do not use this field. N. Credit field – Monies Collected Form total. O. Offset field – Tab through this field. It will default to 1119. Press the Enter key. After all Monies Collected Forms associated with one deposit are entered the total at the bottom of the screen should match the deposit amount. REMINDER: Three Monies Collected Forms can be entered on each page. To enter additional Monies Collected Forms Press the Enter key and then the F5 key. To refresh the total at the bottom of the page press the F5 key. POSTING A DEPOSIT A posted deposit cannot be changed or deleted. Please contact School Accounting if you have posted a deposit in error. Action field – Enter a “P”. Once the deposit posts the deposit information will become blue. Below is an example of a posted deposit. Rev. July 1, 2015 3-3 CrossPointe User’s Manual for Internal Accounts Receipts / Deposits 3 CORRECTING A POSTED DEPOSIT For reversals and adjustments to posted deposits please contact School Accounting. CORRECTING AN UNPOSTED DEPOSIT Deposits that are unposted can be reversed or adjusted. Action field – C – To change or correct an unposted deposit. D – To delete an unposted deposit. Then, answer “Y” to “Delete (Y/N)” that appears at the bottom of the screen. Below is an example of a deposit that is being deleted. Rev. July 1, 2015 3-4 CrossPointe User’s Manual for Internal Accounts Receipts / Deposits 3 QUERYING ON DEPOSITS The F609 panel can also be used to query deposits. Action field – Enter ‘C’ to view a deposit. Date field – Enter the date of the deposit. Entry field – Enter the journal entry number. Press the Enter key. Posted deposits will appear in blue and cannot be changed. RUNNING REPORTS The F610 panel will be used to print a daily, weekly, or monthly Deposit Register. Daily and weekly reports are optional. A monthly register is required to be printed and filed. Below is an example of the request to run the Deposit Register on the F610 – Print Cash Receipts screen. Rev. July 1, 2015 3-5 CrossPointe User’s Manual for Internal Accounts Receipts / Deposits 3 Request field – Enter 001. This request is set up with the proper title and controls. Each time a new report needs to be printed line 1 will need to be changed to reflect the correct dates. Action (A) field – Enter a “C” Fr----JE----To fields – Enter the date range to be included in the report. Press the Enter key then the F11 key to submit the report. Panel field – Enter “PRT” OPTIONAL REPORTS Two additional reports are optional through the F606 - Print Detail screen. They are the Cash Receipts Journal and the Cash Receipts Journal with Detail. Below are examples of the requests to run each of the optional cash receipts journal reports. Rev. July 1, 2015 3-6 CrossPointe User’s Manual for Internal Accounts Receipts / Deposits 3 Optional Cash Receipts Journal Report Rev. July 1, 2015 3-7 CrossPointe User’s Manual for Internal Accounts Receipts / Deposits 3 Optional Cash Receipts Journal with Detail Report PRINTING REPORTS Below is an example of the screen you are taken to after entering “PRT” in the Panel field, as indicated above. Rev. July 1, 2015 3-8 CrossPointe User’s Manual for Internal Accounts Receipts / Deposits 3 Option (Opt) field – Enter “5” to display the report on the screen Press the Enter key There are three ways to print the report: 1. Using the GUI printer 2. Using a network printer 3. Using a printer session For assistance in using any of the print options please contact your school technician and/or the Brevard Public Schools Help Desk. Rev. July 1, 2015 3-9 CrossPointe User’s Manual for Internal Accounts Receipts / Deposits 3 This page intentionally left blank Rev. July 1, 2015 3-10 CrossPointe User’s Manual for Internal Accounts Requisitions 4 The information provided in this chapter will demonstrate the process of entering, posting and correcting purchase requisitions, querying on requisitions, and approving requisitions. NOTE: The Project Balance Report will show the amount of funds available for encumbrance. This report is required to be run monthly, but it is suggested to be run more periodically to assure adequate funding is on hand for additional requisition/purchase order requests. Refer to the Month End Reports chapter for instructions on running the Project Balance Report. CrossPointe Purchase Requisition Screens – F804 and F805 The F804 and F805 panels will be used to enter purchase requisition items and accounting strings. (A purchase requisition should not be created for refunds; see Chapter 6 – Invoices for direction.) To learn more about a field: The F1 key will display a small window with a definition about the field in question. The F6 key will take you to the next field’s definition. The F3 key will make the small window disappear. Rev. July 1, 2015 4-1 CrossPointe User’s Manual for Internal Accounts Requisitions 4 ENTERING A PURCHASE REQUISITION Key Data – The data above the blue line (A, B, and C). These are the key fields needed in order to input, change, look at, or delete a purchase requisition. Once you have input this data – YOU MUST PRESS THE ENTER KEY. If you continue typing and press the Enter key later, all of your data will disappear. A. Action field – A – Add a requisition C – Change an unposted requisition or view either a posted or unposted requisition D – Delete an unposted requisition (posted requisitions can’t be deleted) P – Post an unposted requisition Requesting Center field – Data cannot be entered into this field. It will default to your 4 digit school number. B. Requisition Number field – Tab through this field. It will default to the next requisition number. If you are entering more than one requisition you MUST clear this field out in order for the next requisition number to auto fill. C. Reference field – Tab through this field. Press the Enter key now and all of the default information will fill in on fields A – D. D. Vendor field – Enter the vendor number or press the F4 key to select a vendor from an alphabetical list. E. Date field – Tab through this field. It will default to today’s date. F. Type field – N – Normal Requisition (default) B – Blanket Requisition (to be used for instances when quantities and prices are unknown or estimated) G. Terms and Conditions field – Press the F4 key to select a Terms and Conditions option or tab through it to leave it blank. H. Ship to field – Tab through this field. It will default to your 4 digit school number. I. Buyer field – Press the F4 key to select a Buyer. J. Attention field – Enter the person’s name that is requesting this order. Press the Enter key now and all the default information will fill in on fields E – J. Rev. July 1, 2015 4-2 CrossPointe User’s Manual for Internal Accounts Requisitions 4 Fields K – Q make up one item being ordered. Three different items can be entered on each page. To enter additional items press the Enter key and then the F5 key. To refresh the total at the bottom of the page press the F5 key. Sales tax must be entered as a separate item when it is paid directly to the vendor. K. Sequence Number field – Tab through this field. It will default to the appropriate line number. L. Reference Number field – Use this field only if you need to match items on a requisition to the associated accounting string on the requisition accounts panel (F805). M. Item field – Use this field only if you wish to identify the code, item number, or part number, etc., which categorizes the item. N. Description field – Use this field to describe the item you are requesting to purchase. For blanket requisitions enter ‘Blanket P.O.’ If the description of an item being requested needs more than one line, place your cursor anywhere on that line and press the F2 key. This gives you additional lines for each item. You MUST enter an ‘A’ at the start of each line, enter the additional information, press the Enter key, and then the F3 key to exit the screen. (This information will print on the purchase order.) O. Quantity field – Use this field to indicate the amount of the item being requested. For blanket requisitions enter 1. P. Unit field – Use this field to specify the unit of measure for the item being requested. Press the F4 key to select from a list of units of measures. Q. Unit Price field – Use this field to indicate the cost per unit of measure being requested. For blanket requisitions enter the total of the open P.O. Discount and Freight (Pct) field – Data cannot be entered into this field. After all items being purchased are entered on the F804 panel, press the F9 key to enter the accounting strings associated with this purchase requisition. (This takes you to the F805 panel.) REMINDER: Three different items can be entered on each page. To enter additional items press the Enter key and then the F5 key. To refresh the total at the bottom of the page press the F5 key. Below is an example of the F805-Requisition Accounts screen. Rev. July 1, 2015 4-3 CrossPointe User’s Manual for Internal Accounts Requisitions 4 A. Reference Number field – Use this field only if you need to match items on a requisition to the associated accounting string. B. Accounting String field – Fund – 800 Cost Center – Four-digit school number Project – see Appendix A2 Function – 9800 Object Code – see Appendix A1 (Sales tax must be posted to object code 799) C. Requested Amount field – Enter the dollar amount to be charged to the accounting string on this line. D. Debit field – Tab through this field. It will default to 1520. E. Credit field – Tab through this field. It will default to 2720. Press the Enter key. POSTING A PURCHASE REQUISITION Action field – Enter a “P”. Once the purchase requisition posts the requisition information will become blue. Rev. July 1, 2015 4-4 CrossPointe User’s Manual for Internal Accounts Requisitions 4 Below is an example of a posted purchase requisition. CORRECTING A POSTED PURCHASE REQUISITION Only unposted purchase requisitions can be corrected. If a purchase requisition has not been rolled into a purchase order it can be unposted by placing a U in the Action field on the F804 panel and pressing the Enter key. CORRECTING AN UNPOSTED PURCHASE REQUISITION Purchase requisitions that are unposted can be deleted or corrected on the F804 panel Action field – C – To change or correct an unposted requisition. D – To delete an unposted purchase requisition. Then, answer “Y” to “Delete (Y/N)” that appears at the bottom of the screen. U – To unpost a posted requisition that hasn’t been rolled into a purchase order. Below is an example of a purchase requisition that is being deleted. Rev. July 1, 2015 4-5 CrossPointe User’s Manual for Internal Accounts Requisitions 4 QUERYING ON PURCHASE REQUISITIONS The F801, F802, and F803 screens can be used to query on purchase requisitions. F801-Requisition Query – general query screen for purchase requisitions F802-Requisition Query-Vendor – query by vendor F803-Requisition Query-Account – query by accounting string APPROVING POSTED PURCHASE REQUISITIONS After the purchase requisition is posted it is ready to be approved. Approval levels are as follows: Level 1 – Principal – approves all purchase requisitions Level 2 – Property Control – approves purchase requisitions using 6XX object codes Level 3 – Purchasing – approves all purchase requisitions Rev. July 1, 2015 4-6 CrossPointe User’s Manual for Internal Accounts Purchase Orders 5 The information provided in this chapter will demonstrate the process of printing purchase orders, receiving items on purchase orders, querying on purchase orders, and running purchase order reports. ROLLING REQUISITIONS INTO PURCHASE ORDERS After the purchase requisition has been approved by all necessary levels it is ready to be rolled into a purchase order. Purchasing will roll purchase requisitions into purchase orders daily. PRINTING PURCHASE ORDERS After a purchase requisition has been rolled into a purchase order it will be located in your school’s folder and be available for you to print or e-mail to the vendor. Purchase orders will not be printed and couriered to you, or mailed by the District to the vendors. RECEIVING ITEMS ON A PURCHASE ORDER The F822 panel will be used to receive on items ordered. Normal purchase orders require receivers. Blanket purchase orders do not require receivers. Rev. July 1, 2015 5-1 CrossPointe User’s Manual for Internal Accounts Purchase Orders 5 A. Action field – C – Change / Inquire R – Receive all items P – Post items received B. Purchase Order field – Enter the purchase order number for which goods are being received. C. Reference Number field – Use this field if you only want to display items with the specified reference number. D. Sequence Number field – Use this field if you want to limit sequence numbers displayed when using the “C” action code. The sequence number entered and all the succeeding sequence lines will appear. Press the Enter key. The purchase order information will appear. E. Receiving Date field – Enter the date the items were received by the school. F. Received field – Enter the amount of items being received for this line item. The total received amount cannot exceed the originally issued quantity. Correcting a Receiver – If an error was made or an item has been returned enter a negative receiver amount (Example: 1-). Viewing Receiver Information – After posting a receiver, pressing the F4 key on this field will show when the item was received on, who entered the receiver, and how many were received. Press the Enter key. The received amount will appear in the Total column. After the appropriate items have been entered in the received field, enter a “P” in the Action field and press the Enter key to post the receipt of these items. This completes the receiving process. Below is an example of a purchase order that has been received on and posted in the F822 panel. Rev. July 1, 2015 5-2 CrossPointe User’s Manual for Internal Accounts Purchase Orders 5 QUERYING ON PURCHASE ORDERS The F814, F815, and F816 screens can be used to query on purchase orders. F814-PO Query – general query screen for purchase orders F815-PO Query-Vendor – query by vendor F816-PO Query-Account – query by accounting string RUNNING REPORTS The F819 panel will be used to print a daily, weekly, or monthly Purchase Order Report. Daily and weekly reports are optional. A monthly Purchase Order Report is required to be printed and filed. Below is an example of the Purchase Order Report screen. Rev. July 1, 2015 5-3 CrossPointe User’s Manual for Internal Accounts Purchase Orders 5 Request field – Enter 001. This request is set up with the proper title and controls. Each time a new report needs to be printed line 1 will need to be changed to reflect the correct dates for the report. Action (A) field – Enter a “C” to change Fr----PO----To fields – Enter the date range to be included in the report. Press the Enter key then the F11 key to submit the report. Panel field – Enter “PRT” PRINTING REPORTS Below is an example of the screen you are taken to after entering “PRT” in the Panel field, as indicated above. Rev. July 1, 2015 5-4 CrossPointe User’s Manual for Internal Accounts Purchase Orders 5 Option (Opt) field – Enter “5” to display the report on the screen Press the Enter key There are three ways to print the report: 1. Using the GUI printer 2. Using a network printer 3. Using a printer session For assistance in using any of the print options please contact your school technician and/or the Brevard Public Schools Help Desk. Rev. July 1, 2015 5-5 CrossPointe User’s Manual for Internal Accounts Purchase Orders 5 This page intentionally left blank Rev. July 1, 2015 5-6 CrossPointe User’s Manual for Internal Accounts Invoices 6 The information provided in this chapter will demonstrate the process of entering, posting and correcting invoices, and querying on invoices. CrossPointe Invoice Screens – F203 and F204 The F203 and F204 panels will be used to enter invoices. To learn more about a field: The F1 key will display a small window with a definition about the field in question. The F6 key will take you to the next field’s definition. The F3 key will make the small window disappear. ENTERING AN INVOICE Key Data – The data above the blue line (A, B, C, D, E, and F). These are the key fields needed in order to input, change, look at, or delete an invoice. Once you have input this data – YOU MUST PRESS THE ENTER KEY. If you continue typing and press the enter key later, all of your data will disappear. It is recommended that fields A – F are cleared out each time a new invoice needs to be entered. This will prevent errors such as linking the wrong vendors or purchase orders with invoices. Rev. July 1, 2015 6-1 CrossPointe User’s Manual for Internal Accounts Invoices 6 A. Action field – A – Add an invoice C – Change an unposted invoice or view either a posted or unposted invoice D – Delete an unposted invoice (posted invoices can’t be deleted). NEVER delete an invoice that has had a check generated, even if the check was voided. P – Post an unposted invoice U – Unpost an invoice X – Cancel an invoice B. Invoice Number field – Enter the invoice number being created. C. PO Number field – Enter the purchase order # if the invoice is associated with a purchase order. Leave this field blank if a purchase order isn’t associated with this invoice. D. Default field –Leave this field blank as a default which would pull both accounts and items as option B below. A – Accounts only – pulls only the accounting strings from the PO referenced B – Both accounts and items – pulls both the accounting strings and the items purchased from the PO referenced (default when referencing a PO) E. Vendor field – If a PO number was entered in field C above then tab through this field. It will default to the vendor number associated with the PO. If a PO number was not entered in field C above then enter the vendor number or press the F4 key to select a vendor from an alphabetical list. F. Reference field – Use this field if you only want to display items and accounts associated with that reference number on the purchase order. Press the Enter key now and all of the default information will fill in on fields A – F. G. Invoice Amount field – Enter the total amount of the invoice. H. Date field – Enter the issue date of the invoice. I. Batch field – Data cannot be entered into this field. It will automatically default to your school number with a zero in front. J. Cycle field – (case sensitive) Cycles for invoices referencing a purchase order B – Blanket – indicates a blanket PO is being used. 0 – Normal (default) – indicates a normal PO is being used to pay a partial or full amount. 2 – Requires Approval* – indicates the invoice total is more than 20% of the PO total or if a new line item is added. *Approval should be in the form of the Principal signature on PO with notes of the new total. Rev. July 1, 2015 6-2 CrossPointe User’s Manual for Internal Accounts Invoices 6 Cycles for invoices not referencing a purchase order D – Direct Pay – indicates a PO is not needed. K. Separate Check field – Enter a Y in this field if the vendor requires separate checks for each invoice. Leave this field blank if invoices for the same vendor can be printed on one check. L. Full / Partial field – Only valid for invoices referencing a PO. Leave this field blank if a PO isn’t being referenced. F – Full – indicates the invoice is for full payment of the PO P – Partial – indicates the invoice is for partial payment of the PO (default when referencing a PO) M. Description field – Use this field if an additional description needs to be added to the entire invoice. (each line item will be described below) Fields N – U make up one line on an invoice. Three different invoice lines can be entered on each page. To enter additional invoice lines or refresh the page, press the Enter key and then the F5 key. If a PO number was entered in field C above and a B (for both accounts and items) was entered in field D above, fields N – U will automatically fill. If all items are not being invoiced – field R (quantity) will need to be changed if partial receivers and the entire line can be deleted if no items on line were received. If the unit price is different than the purchase order - field T (unit price) will need to be changed. If a PO number was not entered in field C above, fields N – U will need to be completed in order to generate a check. N. Sequence Number field – Tab through this field. It will default to the appropriate line number. O. Reference Number field – Use this field only if you need to match items on an invoice to the associated accounting string on the invoice accounts panel (F204). P. Item field – Use this field only if you wish to identify the code, item number, or part number, etc., which categorizes the item. Q. Description field – Use this field to describe the item. If the description of an item needs more than one line, place your cursor anywhere on that line and press the F2 key. This provides additional lines for each item. Place an A at the start of each line, enter the additional information, press the enter key, and then the F3 key to exit the screen. R. Quantity field – Use this field to indicate the quantity of the item being invoiced. Rev. July 1, 2015 6-3 CrossPointe User’s Manual for Internal Accounts Invoices 6 S. Unit field – (case sensitive) Use this field to specify the unit of measure for the item. Press the F4 key to select from a list of units of measures. T. Unit Price field – Use this field to indicate the cost per unit of measure. U. PCT field (Discount and Freight) – Data cannot be entered into this field. Do not use this field. After all invoice items have been entered on the F203 panel, press the Enter key then the F9 key to enter the accounting strings associated with this invoice – the F204 panel. If a PO number was entered in field C on the F203 panel, fields A – H will automatically fill in on the F204 panel. Press the Enter key to automatically fill in the credit field (G). See E below if you receive an error for this field. If a PO number was not entered in field C on the F203 panel, fields A – H will need to be completed on the F204 panel in order to generate a check. Rev. July 1, 2015 6-4 CrossPointe User’s Manual for Internal Accounts Invoices 6 A. Reference Number field – Use this field only if you need to match items on an invoice (F203 panel) to the associated accounting string. B. Type field – X – Expenditure R – Revenue – indicates a refund or revenue reversal. A – Asset Trade – used when a check needs to be cut for an investment at another bank, petty cash, or change funds. An investment transfer within the same bank is done through the Z612 panel (Chapter 9). C. Accounting String field – Fund – 800 Cost Center – Four-digit school number Project – see Appendix A2 (refer to the original MCF for Type R; use 000000 for Type A) Function – 9800 for expenditures; 39XX for Type R (refer to the original MCF); blank for Type A Object Code – only use for expenditures (Type X) – see Appendix A1 D. Amount field – Enter the dollar amount to be charged to the accounting string. E. Full / Partial field –only use this field if a P.O. is linked to the invoice. If an F (fully liquidate) is used in L above then an F (fully liquidate) MUST be used on each line of the invoice. If a P (partially liquidate) is used in L above then an F (fully liquidate) or P (partially liquidate) may be used on each line of the invoice. F – Fully Liquidate – fully liquidates the encumbrance on the respected line P – Partially Liquidate (default) – partially liquidates the encumbrance on the respected line. F. Debit field – For Types X and R tab through this field. It will default. For Type A fill in the appropriate General Ledger number 11XX for Savings, Petty Cash, Change Funds, MM, CD, or Checking (see Appendix A1) G. Credit field – Tab through this field. It will default. Press the Enter key. POSTING AN INVOICE After all invoice information has been entered on the F203 and F204 panels the invoice is ready to be posted. Action field – Enter a “P”. Once the invoice posts the invoice information will become blue. Posted invoices will pull the next time checks are generated. Do not post the invoice until it is ready to be paid. Below is an example of a posted invoice. Rev. July 1, 2015 6-5 CrossPointe User’s Manual for Internal Accounts Invoices 6 CORRECTING A POSTED INVOICE Only unposted invoices can be corrected. If an invoice hasn’t been paid it can be unposted by placing a “U” in the action field on the F203 panel. CORRECTING AN UNPOSTED INVOICE Invoices that are unposted can be deleted or corrected on the F203 panel Action field – C – To change or correct an unposted invoice. D – To delete an unposted invoice (posted invoices cannot be deleted). Then, answer “Y” to “Delete (Y/N)” that appears at the bottom of the screen. NEVER delete an invoice that has had a check generated, even if the check was voided. U – Unpost a posted invoice (posted invoices that have been paid will not unpost). X – Cancel an invoice. Rev. July 1, 2015 6-6 CrossPointe User’s Manual for Internal Accounts Invoices 6 Below is an example of an invoice that is being deleted. QUERYING ON INVOICES F201, F202, and F222 screens can be used to query on invoices. F201-Invoice Query – general query screen for invoices F202-Invoice Query-Account – query by accounting string F222-Invoice History Query – query on the history of an invoice Rev. July 1, 2015 6-7 CrossPointe User’s Manual for Internal Accounts Invoices 6 To Cancel: Rev. July 1, 2015 6-8 CrossPointe User’s Manual for Internal Accounts Invoices 6 After Canceled: Rev. July 1, 2015 6-9 CrossPointe User’s Manual for Internal Accounts Invoices 6 This page intentionally left blank Rev. July 1, 2015 6-10 CrossPointe User’s Manual for Internal Accounts Checks 7 The information provided in this chapter will demonstrate the process of generating checks, voiding checks, and running reports. GENERATING CHECKS CrossPointe Check Screens – Z607 The Z607 panel will be used to pull invoices and generate checks. This is a 3 step process. The check process is not finshed until all 3 steps have been completed. Step 1 – Select Invoices & Run Check Register Z607 Panel Check Step One – To process step one enter 1 into the bottom center of the screen after statement “Please Enter Selection”. Then press the Enter key. If an invoice is not ready to be paid it MUST be unposted. Rev. July 1, 2015 7-1 CrossPointe User’s Manual for Internal Accounts Checks 7 Verify the following displayed information: - User ID: Verify your user ID is listed - School ID: Verify your school number and school name is listed - Starting with Check #: Verify the check number is correct. DO NOT manually correct the check number. If the system does not automatically populate the correct check number, please contact School Accounting. To process step one enter Y into the bottom center of the screen after statement “Information Above Correct?” Then press the Enter key to submit Step 1. Rev. July 1, 2015 7-2 CrossPointe User’s Manual for Internal Accounts Checks 7 F3 to exit Z607 screen and from the Panel field enter PRT. Locate the FB105 report. This report will show an OPN in the status column while the report is running. Once a RDY shows in the status column this report is ready to be viewed. Option (Opt) field – Enter “5” to display the report on the screen. Press the Enter key. Verify on the FB105 report that the correct number of checks is listed. F3 to return to the PRT queue and locate the FB106 report. This report will show an OPN in the status column while the report is running. Once a RDY shows in the status column this report is ready to be viewed. Option (Opt) field – Enter “5” to display the report on the screen. Press the Enter key. The report will list all checks that are set up to be printed. Verify all checks to be printed have the correct vendor name, dollar amount listed, and today’s date. Verify the correct starting check number is listed. Rev. July 1, 2015 7-3 CrossPointe User’s Manual for Internal Accounts Checks 7 If there is an error go back to the F203 screen, unpost the invoice(s), make the proper correction(s), and repost the invoice(s). Once all corrections have been made start back at Step 1 on the Z607 panel. If everything is correct, print this report to file with the check documentation. After the report has printed properly proceed to Step 2. Step 2 – Print & Post Checks Z607 Panel Check Step Two – To process step two enter 2 into the bottom center of the screen after statement “Please Enter Selection”. Then press the Enter key. Rev. July 1, 2015 7-4 CrossPointe User’s Manual for Internal Accounts Checks 7 Verify the following displayed information: - User ID: Verify your user ID is listed - School ID: Verify your school number and school name is listed - Starting with Check #: Verify the check number is correct. DO NOT manually correct the check number. If the system does not automatically populate the correct check number, please contact School Accounting. To process step two enter Y into the bottom center of the screen after statement “Information Above Correct Per the Check Register?” Then press the Enter key to submit Step 2. Rev. July 1, 2015 7-5 CrossPointe User’s Manual for Internal Accounts Checks 7 After completing Step 2, the checks generated will be located in the Internal Account checks folder on your desktop. The name of the PDF document will be the first check number generated on this check run. There will be one page for each check in the PDF document. Open the folder and the PDF document to verify the date and beginning and ending check numbers are correct. If everything is correct, place the check paper in the printer and print the PDF document. Please assure the printing parameters are set correctly*. All checks included in this process will print at one time, unless you choose otherwise during your print request. (Make sure the correct number of checks have been placed in the printer before printing the PDF document). * Printing Parameters for Adobe Reader Version 9: Page Scaling=None; Auto-Rotate and Center=Box Unchecked; Page Setup Orientation=Portrait *Printing Parameters for Adobe Reader Version 10+: Size Options=Actual Size; Orientation=Portrait F3 to exit Z607 screen and from the Panel field enter PRT. Locate the FB110 report. This report will show an OPN in the status column while the report is running. Once a RDY shows in the status column this report is ready to be viewed. Option (Opt) field – Enter “5” to display the report on the screen. Press the Enter key. Rev. July 1, 2015 7-6 CrossPointe User’s Manual for Internal Accounts Checks 7 Verify report shows “Checks Posted”, the correct number and dollar amount of posted checks is listed, and there are not any asterisks (errors) below the top line of information. Step 3 – Confirm Journal Entries Posted for Checks F611 Panel Date field – In both spaces, enter the day in which checks were run. Entry field – Enter 601000 through 699999 Press the Enter key. Make sure there is a posted entry for each check that was printed. Below is an example of the F611 panel when confirming that journal entries posted for checks. Rev. July 1, 2015 7-7 CrossPointe User’s Manual for Internal Accounts Checks 7 VOIDING CHECKS CrossPointe Invoice Screens – The F216 and F217 panels will be used to void checks. This is a 4 step process. The void process is not finished until all 4 steps have been completed. Checks from a previous fiscal year and attached to a P.O. that did not roll into the new fiscal year CANNOT be voided. See instructions at the end of page 7-9 and please contact School Accounting. Step 1 – Selecting Checks F216 Panel A. Bank field – Tab through this field. It will default to your school number. B. Check Number field – Enter the check number that needs to be voided. Press the Enter key. The Date, Total, and Vendor information will fill in. Rev. July 1, 2015 7-8 CrossPointe User’s Manual for Internal Accounts Checks 7 C. Fund field – Tab through this field. It will default to 800. D. Cash Account field – Tab through this field. It will default to 1119. E. Reason for Void field – Use this field to describe why the check needs to be voided. Please be as specific as possible. Also notate if the check will be reissued or the invoice cancelled. Press the Enter key now and the default information will fill in on fields C & D. Step 2 – Void Checks in Edit Mode F217 Panel Request field – Enter 001. Then press the Enter key. This request is set up with the proper title and controls to void all checks entered on the F216 panel. This step can be completed once a day with one or multiple checks voided on the F216 panel. Date field – Enter today’s date as the void date. E/P field – Change to “E” for edit mode. Press the Enter key. After verifying the date is correct press the F11 key to submit Step 2. From the Panel field enter PRT. Locate the FB115A report. This report will show an OPN in the status column while the report is running. Once a RDY shows in the status column this report is ready to be viewed. Option (Opt) field – Enter “5” to display the report on the screen. Press the Enter key. Verify on the FB115A report that the correct checks are listed to be voided. If correct, proceed to Step 3. If there is an error, go back to the F216 panel and using the F10 key, delete the check that is incorrectly set up to be voided. Do not press Enter. This will add the check back to the void list. Possible errors would be a void of a check that was issued in a prior year with a closed P.O. If you receive an error on the Edit please double check the P.O. on the F814 panel to verify that it is active for the current year. If it is not active for the current year then School Accounting will need to perform the Void as a journal entry. Follow steps above to delete F216 file then contact School Accounting with the following information: Copy of check stub Copy of the P.O. Reason for the void Whether or not the check will be re-issued Rev. July 1, 2015 7-9 CrossPointe User’s Manual for Internal Accounts Checks 7 Below is an example of request card 001 – Step 2 – F217 (in edit mode). Step 3 – Void Checks in Post Mode F217 Panel Request field – Enter 001. Then press the Enter key. This request is set up with the proper title and controls to void all checks entered on the F216 panel. This step can be completed once a day with one or multiple checks voided on the F216 panel. E/P field – Change to “P” for post mode. Press the Enter key. Press the F11 key to submit Step 3. From the Panel field enter PRT. Locate the FB115A report. This report will show an OPN in the status column while the report is running. Once a RDY shows in the status column this report is ready to be viewed. Option (Opt) field – Enter “5” to display the report on the screen. Press the Enter key. Verify on the FB115A report that the correct checks have been voided. Rev. July 1, 2015 7-10 CrossPointe User’s Manual for Internal Accounts Checks 7 Below is an example of request card 001 – Step 3 – F217 (in post mode). IMPORTANT: A new check will run the next time you go through the check process (Steps 1 through 3 in this chapter). If a correction needs to be made to the invoice before a new check is processed, unpost the invoice, make the correction, and post it again (refer to Chapter 6Invoices). If the invoice should not be repaid at all, cancel the invoice; do NOT unpost it (refer to Chapter 6-Invoices). Step 4 – Confirm Journal Entries Posted for Voided Checks F611 Panel Date field – In both spaces, enter the day in which the voids were done. Entry field – Enter 701000 through 799999 Press the Enter key. Make sure there is a posted entry for each check that was voided. Rev. July 1, 2015 7-11 CrossPointe User’s Manual for Internal Accounts Checks 7 Below is an example of the F611 panel when confirming that journal entries posted for voided checks. RUNNING REPORTS The Z605 panel will be used to print a daily, weekly, or monthly Check Register and a daily, weekly or monthly Void Register. Daily and weekly reports are optional. A monthly check register and void register are required to be printed and filed. Check Register From the Z605 panel enter selection 1. This selection will then ask for a first check date and last check date. After both dates have been entered press the Enter key to run the report. Void Register From the Z605 panel enter selection 2. This selection will then ask for a first check date and last check date. After both dates have been entered press the Enter key to run the report. Below is an example of the Z605 panel. Rev. July 1, 2015 7-12 CrossPointe User’s Manual for Internal Accounts Checks 7 PRINTING REPORTS From the Panel field enter PRT. Locate the IN037A report for the Check Register and the IN038A report for the Void Register. The report will show an OPN in the status column while the report is running. Once a RDY shows in the status column the report is ready to be viewed. Option (Opt) field – Enter “5” to display the report on the screen Press the Enter key. If the dates are correct, print the report. There are three ways to print the report: 1. Using the GUI printer 2. Using a network printer 3. Using a printer session For assistance in using any of the print options please contact your school technician and/or the Brevard Public Schools Help Desk. Rev. July 1, 2015 7-13 CrossPointe User’s Manual for Internal Accounts Checks 7 This page intentionally left blank Rev. July 1, 2015 7-14 CrossPointe User’s Manual for Internal Accounts Journal Entries 8 The information provided in this chapter will identify the journal entry numbering system and will demonstrate the process of querying on journal entries. JOURNAL ENTRY NUMBERING SYSTEM The number of a journal entry identifies the type of entry made. The following list displays the journal entry numbering system and how journal entry numbers are assigned. Journal Entry Number 0XXXXX – 24XXXX 25XXXX 26XXXX 27XXXX – 29XXXX 30XXXX – 39XXXX 40XXXX – 49XXXX 50XXXX – 59XXXX 601XXX – 699XXX 701XXX – 786XXX 8XXXXX 9XXXXX Journal Entry Type System Assigned Entries District Payroll Entries Fixed Asset Entries District Entries Purchasing Entries Cash Receipt Entries Journal Entries (panel Z612 adjustments and transfers) A/P Check Entries A/P Voided Check Entries Currently Undefined Currently Undefined QUERYING ON JOURNAL ENTRIES The F611-Journal Query screen can be used to query on journal entries. It allows query options including posted or unposted, date, entry number, purchase order number, check number, vendor number, and invoice number. Below is an example of the F611 screen before filling in any query options. Rev. July 1, 2015 8-1 CrossPointe User’s Manual for Internal Accounts Journal Entries 8 Below is an example of the F611 screen after requesting all posted journal entries during FY11 that were entered by User BOOKTIE2. Rev. July 1, 2015 8-2 CrossPointe User’s Manual for Internal Accounts Journal Entries 8 Press the Page Down key to view additional journal entries. To view more details of a particular entry, place the cursor on the first line of the entry and press the F11 key. Rev. July 1, 2015 8-3 CrossPointe User’s Manual for Internal Accounts Journal Entries 8 This page intentionally left blank Rev. July 1, 2015 8-4 CrossPointe User’s Manual for Internal Accounts Journal Entries (Transfers and Adjustments) 9 The information provided in this chapter will demonstrate the process of entering journal entries for transfers and adjustments. ENTERING A TRANSFER OR ADJUSTMENT JOURNAL ENTRY The Z612 screen has been customized for posting common journal entries for transfers and adjustments. This screen will automatically set up the journal entry’s debits and credits, accounting strings, and other information based on the type of transfer or adjustment chosen and the data entered. Below is an example of the Z612 panel. A. Action field – A – Add a journal entry C – Change an unposted journal entry D – Delete an unposted journal entry (posted journal entries cannot be deleted) P – Post an unposted journal entry Rev. July 1, 2015 9-1 CrossPointe User’s Manual for Internal Accounts Journal Entries (Transfers and Adjustments) 01 02 03 04 05 06 07 08 09 10 11 12 13 14 15 16 17 18 19 20 21 22 23 24 25 26 27 28 29 30 9 B. Adjustment field – Choose from the following adjustments. Either type in the number or select from the list using the F4 key. DATA ENTRY REQUIRED: TYPE DESC GL PROJ FUNC OBJ DR/CR Interest – Checking Account RC Interest – Savings Account JE Interest – Money Market Account JE Interest – CD Account JE Service Charge – Checking (includes NSF fees) SC Service Charge – Savings Account JE Service Charge – Money Market Account JE Service Charge – CD Account JE Bank Supplies (checks, bank bags, deposit slips) SC X Recording NSF Check RC X Repayment of NSF Check (see note below) RC X Fix Deposit Error – Increase Amount in AS400 RC X X X Fix Deposit Error – Decrease Amount in AS400 RC X X X Fix Deposit Error – Correct a Project Number JE X X X X* Fix Deposit Error – Correct a Function Number JE X X X X* Fix Check Error – Increase Amount in AS400 SC X X X Fix Check Error – Decrease Amount in AS400 SC X X X Fix Check Error – Correct a Project Number JE X X X X** Fix Check Error – Correct an Object Number JE X X X X** Write-Off NSF Check JE X X X Automatic Sales Tax Pmt (from Checking) SC Automatic Checking Pmt – Other SC X X X Regular Transfer JE X X X* Transfer to Purchase(i.e. key club buys yrbk ad) JE X X X X X* Transfer to Investment (within the same bank) SC X X Transfer from Investment RC X X Reversal – Checking Service Charge (see note SC below) Reversal – Savings Account Service Charge JE X Reversal – Money Market Account Service Charge JE X Reversal – CD Account Service Charge JE X C. Date field – Enter the transaction date. If the Enter key has already been pressed, this field will be blocked. Choose F3 to back out and restart. D. Amount field – Enter the transaction amount. Press the Enter key. Press the Enter key again. The bottom of the screen will display “Record Added. Next?” Rev. July 1, 2015 9-2 CrossPointe User’s Manual for Internal Accounts Journal Entries (Transfers and Adjustments) 9 Adjustments 09 through 20, 22 through 26, and 28 through 30 require additional data entry as marked above. Only the fields requiring data will be available for input. Fill in these fields from the completed approval form. * Debit will decrease; credit will increase ** Debit will increase; credit will decrease NOTE FOR #11 – Collection of bank or school NSF fees are posted through a deposit (Chapter 3). NOTE FOR #27 – Includes recording bank credit of NSF fees. The system will not allow you to leave the Z612 panel unless you Post or Delete the journal entry. POSTING A TRANSFER OR ADJUSTMENT JOURNAL ENTRY Place a “P” in the Action field to post the record. Then answer “Y” to “Post JE (Y/N)” that appears at the bottom of the screen. Press the Enter key. Press the F5 key to refresh the panel and add another record. CORRECTING A POSTED TRANSFER OR ADJUSTMENT JOURNAL ENTRY For corrections to posted journal entry adjustments please contact School Accounting. CORRECTING AN UNPOSTED TRANSFER OR ADJUSTMENT JOURNAL ENTRY For journal entry adjustments that are unposted and need to be deleted please contact School Accounting. Action field – C – To correct an unposted adjustment. D – To delete an unposted adjustment. Then, answer “Y” to “Delete (Y/N)” that appears at the bottom of the screen. Rev. July 1, 2015 9-3 CrossPointe User’s Manual for Internal Accounts Journal Entries (Transfers and Adjustments) This page intentionally left blank Rev. July 1, 2015 9-4 9 CrossPointe User’s Manual for Internal Accounts Month End Close 10 The information provided in this chapter will demonstrate the month end closing process that is necessary in order to complete the bank reconciliation form. RECONCILING THE BANK STATEMENT IN CROSSPOINTE The A202 panel will be used to reconcile deposits, check disbursements, and bank service charges to the bank statement. SELECTING RECORDS TO RECONCILE Below is an example of the A202 screen. A. Search Path (P) field – N – Transaction Number (default) D – Transaction Date B. Transaction Type (Ty) field – C – Check D – Deposit S – Service Charge (Used for all Adjustments / Transfers (except for #’s 12, 13, 14, 15, 23, 24, 25, 26) Rev. July 1, 2015 10-1 CrossPointe User’s Manual for Internal Accounts Month End Close 10 C. Variance (Var) field – Y – Yes, select records with a variance (recommended). These are the records which have not been reconciled yet. N – No, do not select records with a variance. Blank – Select all records. Press the Enter key. Below is an example of the listing of checks that have a variance as requested through the A202 screen. RECONCILING SELECTED RECORDS In the Bank Records column, enter the amounts for the transactions that are listed on the bank statement. Press the Enter key. At this time, the Variance column will be blank for those transactions. Below is an example of the A202 screen after the transactions have been entered. Rev. July 1, 2015 10-2 CrossPointe User’s Manual for Internal Accounts Month End Close 10 Perform the above process for all Transaction Types (C-Check; D-Deposit; S-Service Charge, Adjustment, and Transfer) in order to reconcile all transactions on the bank statement. PRINTING RECONCILIATION REPORTS Print: Outstanding Check Report (please refer to 11-1) Outstanding Deposit Report (please refer to 11-2) Balance Sheet (please refer to 11-2) Include the “NSF Checks” Excel spreadsheet, found on the Accounting Services website, for months carrying a balance in the 1130 NSF Account on the Balance Sheet, and save to desktop. Enter all corresponding data as the spreadsheet is formulated to auto calculate. No handwritten forms will be accepted. COMPLETING EXCEL BANK RECONCILIATION FORM Save the Excel “Bank Reconciliation” file from the Accounting Services website on desktop and enter all corresponding data from the above printed reports. The file is a formulated form and will auto calculate. No handwritten forms will be accepted. Rev. July 1, 2015 10-3 CrossPointe User’s Manual for Internal Accounts Month End Close 10 When balance is zero, proceed with month end reporting in Chapter 11. There is no need to reprint the three reports mentioned above. CORRECTING A RECONCILED RECORD If the wrong record was reconciled or the correct record was reconciled, but for the wrong amount it can be corrected through the A202 screen. Please note the reconciliation reports from 10-3 may need to be re-run and printed if any changes are made. If the wrong record was reconciled: In the above example, check #000000007 for $250.50 was reconciled when check #000000009 for $250.50 should have been reconciled instead. Step 1 – To reverse check #000000007: Transaction Type (T) field – C Variance field – N Remove the Bank Records amount of $250.50 and the Receipt Date of 04302012 for check #000000007 Press the Enter key. Step 2 – To reconcile check #000000009, run through the above reconciliation process (Selecting Records to Reconcile and Reconciling Selected Records). If the correct record was reconciled, but for the wrong amount: Transaction Type (T) field – C Variance field – Y Correct the Bank Records amount. Press the Enter key. CORRECTING THE RECEIPT DATE Receipt Date (Rec Dte) field – After a transaction amount is entered in the Bank Records column as described above, the system will automatically fill in this field with the last day of the previous month. However, this date can only be viewed when choosing records with no variance. By changing the Variance field to ‘N’ the A202 panel displays the Receipt Date (Rec Dte) for records that have cleared through the bank. Rev. July 1, 2015 10-4 CrossPointe User’s Manual for Internal Accounts Month End Close 10 Below is an example. In this example, the entries were made on May 7, 2012; therefore, the Receipt Date (Rec Dte) is listed as April 30, 2012. The Receipt Date (Rec Dte) (last day of prior month) may be changed to the actual bank statement date on this screen, if desired. To do so, type over the automated date and enter the actual bank statement date for the transaction. Press the Enter key. Rev. July 1, 2015 10-5 CrossPointe User’s Manual for Internal Accounts Month End Close 10 This page intentionally left blank Rev. July 1, 2015 10-6 CrossPointe User’s Manual for Internal Accounts Month End Reports 11 The information provided in this chapter will demonstrate the process of running and printing month end reports. OUTSTANDING CHECK REPORT The A203 panel will be used to run the Outstanding Check Report. Request field: Enter 001. This request is set up with the proper title and controls. Each time a new report needs to be printed line 1 will need to be changed to reflect the correct dates. Action (A) field: Enter a “C” Fr----Dates----To field: Enter the ending date of the month to be included in the report. Do not change the beginning date. Press the Enter Key then the F11 key to submit the report. Below is an example of the request to run the Outstanding Check Report on the A203 panel. Rev. July 1, 2015 11-1 CrossPointe User’s Manual for Internal Accounts Month End Reports 11 OUTSTANDING DEPOSIT REPORT The A203 panel will be used to run the Outstanding Deposit Report. Request field: Enter 002. This request is set up with the proper title and controls. Each time a new report needs to be printed line 1 will need to be changed to reflect the correct dates. Action (A) field: Enter a “C” Fr----Dates----To field: Enter the ending date of the month to be included in the report. Do not change the beginning date. Press the Enter Key then the F11 key to submit the report. Below is an example of the request to run the Outstanding Deposit Report on the A203 panel. Rev. July 1, 2015 11-2 CrossPointe User’s Manual for Internal Accounts Month End Reports 11 BALANCE SHEET The F605 panel will be used to run the Balance Sheet. Request field: Enter 001. This request is set up with the proper title and controls. Period (Prd) field: Enter the period for which the report should be run (01-July, 02-August, etc.) Press the Enter Key then the F11 key to submit the report. Below is an example of the request to run the Balance Sheet on the F605 panel. Panel field: Enter “PRT” and look for the FB158 report. REVENUE LEDGER The F510 panel will be used to run the Revenue Ledger. Request field: Enter 001. This request is set up with the proper title and controls. Rev. July 1, 2015 11-3 CrossPointe User’s Manual for Internal Accounts Month End Reports 11 F-Prd-T (From/To Period) field: Enter the ‘To’ period for which the report should be run through (01-July, 02-August, etc.). Press the Enter Key then the F11 key to submit the report. Below is an example of the request to run the Revenue Ledger on the F510 panel. Panel field: Enter “PRT” and look for the FB172 report. EXPENDITURE LEDGER The F510 panel will be used to run the Expenditure Ledger. Request field: Enter 002. This request is set up with the proper title and controls. F-Prd-T (From/To Period) field: Enter the ‘To’ period for which the report should be run through (01-July, 02-August, etc.). Press the Enter Key then the F11 key to submit the report. Below is an example of the request to run the Expenditure Ledger on the F510 panel. Rev. July 1, 2015 11-4 CrossPointe User’s Manual for Internal Accounts Month End Reports 11 Panel field: Enter “PRT” and look for the FB156 report. TRIAL BALANCE The F605 panel will be used to run the Trial Balance. Request field: Enter 002. This request is set up with the proper title and controls. Prd (Period) field: Enter the period for which the report should be run (01-July, 02-August, etc.) Press the Enter Key then the F11 key to submit the report. Below is an example of the request to run the Trial Balance on the F605 panel. Rev. July 1, 2015 11-5 CrossPointe User’s Manual for Internal Accounts Month End Reports 11 Panel field: Enter “PRT” and look for the FB157 report. PRINCIPAL’S REPORT The F605 panel will be used to run the Principal’s Report. Request field: Enter 006. This request is set up with the proper title and controls. Prd (Period) field: Enter the period for which the report should be run (01-July, 02-August, etc.) Press the Enter Key then the F11 key to submit the report. Below is an example of the request to run the Principal’s Report on the F605 panel. (Lines 004-009 continue onto the next pages of the request card.) Rev. July 1, 2015 11-6 CrossPointe User’s Manual for Internal Accounts Month End Reports Rev. July 1, 2015 11 11-7 CrossPointe User’s Manual for Internal Accounts Month End Reports 11 Panel field: Enter “PRT” and look for the IN100 report. PROJECT BALANCE REPORT The F605 panel will be used to run the Project Balance Report. Request field: Enter 007. This request is set up with the proper title and controls. Prd (Period) field: Enter the period for which the report should be run (01-July, 02-August, etc.) Press the Enter Key then the F11 key to submit the report. Below is an example of the request to run the Project Balance Report on the F605 panel. (Lines 003-007 continue onto the next pages of the request card.) Rev. July 1, 2015 11-8 CrossPointe User’s Manual for Internal Accounts Month End Reports 11 Panel field: Enter “PRT” and look for the IN157A report. TRANSFER REPORT The Z605 panel will be used to run the Transfer Report. Enter selection 3 then the date range to be included in the report (July 1st through the end of the current month). Below is an example of the Z605 panel. Rev. July 1, 2015 11-9 CrossPointe User’s Manual for Internal Accounts Month End Reports 11 DEPOSIT REGISTER Please refer to Chapter 3, Running Reports. CHECK REGISTER Please refer to Chapter 7, Running Reports (do not go to Step 1-Set up Check Register). VOID REGISTER Please refer to Chapter 7, Running Reports. JOURNAL ENTRY REPORT (TRANSEFRS AND ADJUSTMENTS) The F613 panel will be used to run the Journal Entry Report for Transfers and Adjustments. Request field: Enter 001. This request is set up with the proper title and controls. Action Code (A) field: Enter ‘C’ in order to change the dates. Fr---JE Date---To field: Enter the date range to be included in the report. Press the Enter Key then the F11 key to submit the report. Below is an example of the request to run the Journal Entry Report for Transfers and Adjustments on the F613 panel. Panel field: Enter “PRT” and look for the FB161 report. Rev. July 1, 2015 11-10 CrossPointe User’s Manual for Internal Accounts Month End Reports 11 PURCHASE ORDER REPORT Please refer to Chapter 5. GENERAL LEDGER (Quarterly) – not required to be submitted to School Accounting The F606 panel will be used to run the Quarterly General Ledger Report. Request field: Enter 003. This request is set up with the proper title and controls. Each time a new report needs to be printed line 1 will need to be changed to reflect the correct dates. Action (A) field: Enter a “C” Fr----Dates----To field: Enter the beginning and ending dates for the quarter (the beginning date should be July 1st of the current fiscal year). Press the Enter Key then the F11 key to submit the report. Below is an example of the request to run the Quarterly General Ledger Report on the F606 panel. Request card above is programed to include page breaks. The 3 under the “T” field allows the page breaks. In order to print the General Ledger report without page breaks simply change the 3 to a 1 under the “T” field and press enter to update. Rev. July 1, 2015 11-11 CrossPointe User’s Manual for Internal Accounts Month End Reports 11 ENCUMBRANCE REPORT – not required to be submitted to School Accounting The F820 panel will be used to run the Encumbrance Report. Request field: Enter 001. This request is set up with the proper title and controls. Make sure that selection line 1 is changed to reflect your school cost center number. Action (A) field: Enter a “C” when updating the cost center. Press the Enter Key then the F11 key to submit the report. Below is an example of the request to run the Encumbrance Report on the F820 panel. Rev. July 1, 2015 11-12 CrossPointe User’s Manual for Internal Accounts Month End Reports 11 PRINTING REPORTS Below is an example of the screen you are taken to after entering “PRT” in the Panel field, as indicated above. Option (Opt) field – Enter “5” to display the report on the screen. Press the Enter key. Rev. July 1, 2015 11-13 CrossPointe User’s Manual for Internal Accounts Month End Reports 11 There are three ways to print the report: 1. Using the GUI printer 2. Using a network printer 3. Using a printer session For assistance in using any of the print options please contact your school technician and/or the Brevard Public Schools Help Desk. Rev. July 1, 2015 11-14 CrossPointe User’s Manual for Internal Accounts Year End Close 12 The information provided in this chapter will demonstrate the year end closing process. PRIOR TO FISCAL YEAR END (June 30) GSF – General Service Fund Project Balances Please refer to Chapter 6, Invoices Direct Pay invoice F203 & F204 panels, Type “X” Accounting String: Fund: 800 Cost Center: Four –digit school number Project: #607030 - #607035 Function: 9800 Object Code: 701 Replenish Petty Cash Please refer to Chapter 6, Invoices Petty cash reimbursements from District funds require a purchase requisition. Petty cash reimbursements from Internal funds are processed as a direct pay invoice. Redeposit Petty Cash / Change Fund Please refer to Chapter 3, Receipts/Deposits F609 panel, Ledger Action: G Accounting String: Fund: 800 General Ledger: 1112 (Petty Cash) 1113 (Change Fund) Cost Center: Four-digit school number Project: must be 000000 Function: none Object Code: none Clearing Negative Balances Please refer to Chapter 9, Journal Entries (Transfers and Adjustments) Recording Earned Interest Please refer to Chapter 9, Journal Entries (Transfers and Adjustments) Writing Off NSF Checks Please refer to Chapter 9, Journal Entries (Transfers and Adjustments) Adjustment #20 Write-off NSF Check Reviewing Purchase Orders in System Please refer to Chapter 5, Purchase Orders If the Purchase Order is no longer needed request that it is closed. Rev. July 1, 2015 12-2 CrossPointe User’s Manual for Internal Accounts Year End Close 12 Receivers Please refer to Chapter 5, Purchase Orders Receive on all P.O.’s with items received on or before June 30th. Reviewing Unposted Invoices in System Please refer to Chapter 6, Invoices If the invoice is no longer needed delete the entry. Below is an example of how to look up unposted invoices on F201 Bank Signature and Safe Combination Authority Please send a completed Bank Signature and Safe Combination Authority Form to School Accounting. Rev. July 1, 2015 12-3 CrossPointe User’s Manual for Internal Accounts Year End Close 12 AFTER FISCAL YEAR END (June 30) Reconciling the Bank Statement in CrossPointe Perform the below for all Transaction Types (C-Check; D-Deposit; S-Service Charge) in order to reconcile all transactions on the bank statement. Refer to Chapter 10 for instructions. Selecting Records to Reconcile (10-1) Reconciling Selected Records (10-2) Correcting the Receipt Date (10-3) Correcting a Reconciled Record (10-4) Complete the Checks and Balances per the Monthly Financial Report Checklist Please refer to Chapter 13 (page 13-1), Year End Reports – “AFTER FISCAL YEAR END (June 30) and AFTER BALANCING THE BANK STATEMENT” Rev. July 1, 2015 12-4 CrossPointe User’s Manual for Internal Accounts Year End Close 12 This page intentionally left blank Rev. July 1, 2015 12-5 CrossPointe User’s Manual for Internal Accounts Year End Reports 13 The information provided in this chapter will demonstrate the process of running and printing year end reports. Run and print the following reports for the period JULY 1 (pd 1) through JUNE 30 (pd 12): PURCHASE ORDER REPORT Please refer to Chapter 5 (page 5-3), Purchase Orders - Running Reports F819 panel, request 1, report FB059 DEPOSIT REGISTER Please refer to Chapter 3 (page 3-5), Receipts/Deposits - Running Reports F610 Panel, request 001, Report FB164 CHECK REGISTER Please refer to Chapter 7 (page 7-12), Checks - Running Reports Z605 panel, request 1, report IN037A VOID REGISTER Please refer to Chapter 7 (page 7-12), Checks - Running Reports Z605 panel, request 2, report IN038A JOURNAL ENTRY REPORT (TRANSFERS and ADJUSTMENTS) Please refer to Chapter 11 (page 11-8), Month End Reports F613 panel, request 001, report FB161 PUBLIC RELATIONS GENERAL LEDGER Please refer to Chapter 11 (page 11-11), Month End Reports F606 panel, request 3, report IN203 SCHOOL STORE GENERAL LEDGER Please refer to Chapter 11 (page 11-11), Month End Reports F606 panel, request 3, report IN203 ALL RENTAL PROJECT GENERAL LEDGERS Please refer to Chapter 11 (page 11-11), Month End reports F606 panel, request 3, report IN203 Rev. July 1, 2015 13-1 CrossPointe User’s Manual for Internal Accounts Year End Reports 13 AFTER FISCAL YEAR END (June 30) and AFTER BALANCING THE BANK STATEMENT Run and print the following reports. Please refer to Chapter 11, Month End Reports and Monthly Financial Report Checklist for time frame to run the reports: BALANCE SHEET: F605 panel, request 001, report FB158 REVENUE LEDGER: F510 panel, request 001, report FB172 EXPENDITURE LEDGER: F510 panel, request 002, report FB156 TRIAL BALANCE: F605 panel, request 002, report FB157 PRINCIPAL’S REPORT: F605 panel, request 006, report IN100 TRANSFER REPORT: Z605 panel, request 3, report IN039A PROJECT BALANCE REPORT: F605, request 007, report IN157A Rev. July 1, 2015 13-2 CrossPointe User’s Manual for Internal Accounts Year End Reports 13 This page intentionally left blank Rev. July 1, 2015 13-3 CrossPointe User’s Manual for Internal Accounts A1 Account String Dimensions Dimension 1 – Fund 800 Dimension 2 – General Ledger 1112 Petty Cash 1113 Change Fund 1114 Savings 1115 Money Market 1116 Certificate of Deposit (CD) 1119 Checking Account 1130 1520 1530 2520 2720 2767 Dimension 3 – Cost Center Your School’s 4 Digit # Accounts Receivable Encumbrance Expense Control Account Revenue Reserve for Encumbrance Beginning Balance Dimension 4 – Project See Appendix A2 Dimension 5 – Function 3680 Transfer In – Automated Entry Only 3900 Advertising 3901 Concession 3902 Contributions/Donations 3903 Dues/Fees 3904 Fieldtrips 3905 Fundraising 3906 Gate Receipts – Athletics – Reg. Season 3907 3908 3909 3910 3911 3912 3913 9800 Dimension 6 – Object Code 310 Services – Other 312 Services – Professional & Technical 330 Travel 500 Supplies 570 Food (non-fundraiser) 644 671 691 692 693 598 Fundraiser Items 694 599 600 621 Uniform / Clothing (non-fundraiser) Capital – Other Capital – A/V Material - $1,000 and Above Capital – A/V Material - Under $1,000 Capital – Furniture, Fixtures, Equipment - $1,000 and above Capital – Furniture, Fixtures, and Equipment - Under $1,000 Capital – Computer Hardware - $1,000 and Above 700 701 702 Capital – Computer Hardware - Under $1,000 Capital – Improvement Other than Building Capital – Computer Software - $1,000 and Above Capital – Computer Software – Under $1,000 Capital – License Fees-Software - $1,000 and Above Capital – License Fees-Software - Under $1,000 District Reimbursement GSF Payments to the District Unclaimed Property 730 799 Dues / Fees / Admission Sales Tax 980 Transfer Out - Automated Entry Only 622 641 642 643 Rev. July 1, 2015 A1-1 Gate Receipts – Athletics – Other GSF – General Service Fund Interest Other Income Rentals Ticket Sales Yearbook Sales Expenditures CrossPointe User’s Manual for Internal Accounts A1 Account String Dimensions This page intentionally left blank Rev. July 1, 2015 A1-2 CrossPointe User’s Manual for Internal Accounts A2 Dimension 4 – Project (Alphabetical Order) Athletics - 1 101010 Athletic Overhead 101020 Athletic Reserve 101030 Athletic Season Passes 102010 Baseball 102020 Basketball 102021 Basketball-Boys 102022 Basketball-Girls 102023 Basketball-MS Boys 102024 Basketball-MS Girls 102030 Bowling 103010 Cross Country 103011 Cross Country-Boys 103012 Cross Country-Girls 106010 Football 107010 Golf 107011 Golf-Boys 107012 Golf-Girls 112010 Lacrosse 112011 Lacrosse-Varsity Boys 112012 Lacrosse-Varsity Girls 112013 Lacrosse-JV Boys 112014 Lacrosse-JV Girls 119010 Soccer 119011 Soccer-Boys 119012 Soccer-Girls 119020 Softball 119030 Swimming 120010 Tennis 120011 Tennis-Boys 120012 Tennis-Girls 120020 Track 120021 Track-Boys 120022 Track-Girls 122010 Volleyball 123010 Wrestling Rev. July 1, 2015 Elementary Middle X X X X X X X A2-1 Jr/Sr X X X X X X X X X X X X X X X X X X X X X X X X X X X X X X X X X X X High X X X X X X X X X X X X X X X X X X X X X X X X X X X X X X X X X CrossPointe User’s Manual for Internal Accounts A2 Dimension 4 – Project (Alphabetical Order) Music - 2 202010 202011 202012 202013 202014 202015 203010 203011 203012 203013 204010 204011 205010 213010 215010 215011 215012 216010 217010 219010 219011 Elementary Band Band Booster Band Flag Corps Band Instrument Rentals Band Trips Band Uniform Rentals Chorus Chorus Ensembles Chorus Trips Chorus Uniform Rental Guitar Guitar Rental Hand Bells Music - General Orchestra Orchestra Instrument Rentals Orchestra Uniform Rentals Percussion Performances Strings Strings Rental Jr/Sr X X X X X X X X X X High X X X X X X X X X X X X X X X X X X X X X X Middle Jr/Sr High X X X X X X X X X X X X X X X X X X X X X X X X X X X X X X X X X Classes - 3 300010 1st Grade 300020 2nd Grade 300030 3rd Grade 300040 4th Grade 300050 5th Grade 300060 6th Grade 300070 7th Grade 300080 8th Grade 301010 AVID-Advancement via Indiv. Determination 303010 Classes (All Grade Levels) 304010 DCT 305010 Ex-Ed Classes 306010 Freshman Class 308010 HOSA (Health Occupations) Rev. July 1, 2015 Middle X X X X X X X X X X X X A2-2 Elementary X X X X X X X CrossPointe User’s Manual for Internal Accounts A2 Dimension 4 – Project (Alphabetical Order) 310010 310020 311010 316020 316010 318010 318020 319010 319020 319030 319040 320010 322010 399010 399011 399012 399013 399014 399015 399016 399017 399018 399019 Clubs - 4 401040 401050 401051 401052 401053 401054 401055 401056 401010 401020 401030 402010 402020 402021 402022 JROTC Junior Class Kindergarten PMH-Participatory Level Intel. Disabled Pre-Kindergarten Reverse Mainstream ROTC Senior Class SLD Classes SLI Classes Sophomore Class TMH-Supported Level Intel. Disabled VPK Other Class – A ________________ Other Class – B ________________ Other Class – C ________________ Other Class – D ________________ Other Class – E ________________ Other Class – F ________________ Other Class – G ________________ Other Class – H ________________ Other Class – I ________________ Other Class – J ________________ Academic Team Academy of Arts/Media Academy of Business Academy of Engineering/Technol. Academy of Finance Academy of Health Academy of Law Academy of Teaching Anchor Club Art Club Athletic Club Baseball Club Basketball Club Basketball Club - Boys Basketball Club - Girls Rev. July 1, 2015 A2-3 X X X X X X X X X X X X X X X X X X X X X X X X X X X X X X X X X X X X X X X X X X X X X X X X X X X X X X X X X X X X X X X X Elementary Middle X X X Jr/Sr X X X X X X X X X X X X X X X High X X X X X X X X X X X X X X X X X X CrossPointe User’s Manual for Internal Accounts A2 Dimension 4 – Project (Alphabetical Order) 402030 402040 402050 403010 403011 403012 403013 403020 403030 403040 403041 403042 404010 404020 404030 405010 406010 406080 406020 406030 406040 406050 406060 406070 407010 407020 407030 407040 407050 407051 407052 409010 410010 411010 412010 412020 413040 413010 413020 413030 Beta Club Book Club Bowling Club Cheerleaders Cheerleaders - Freshman Cheerleaders - JV Cheerleaders - Varsity Chess Club Computer Club Cross Country Club Cross Country Club Boys Cross Country Club Girls Dance Club DECA Drama Club Environmental Club FBLA FCA-Fellowship of Christian Athletes FEA FHA Football Club FPS Future Problem Solvers French Club French Honor Society Game Club German Club German Honor Society Gifted (GSP) Golf Club Golf Club Boys Golf Club Girls Interact Club Japanese Club Key Club Latin Club Lego Club Majorettes Math Club Model Student Senate MU Alpha Theta Rev. July 1, 2015 A2-4 X X X X X X X X X X X X X X X X X X X X X X X X X X X X X X X X X X X X X X X X X X X X X X X X X X X X X X X X X X X X X X X X X X X X X X X X X X X X X X X X X X X X X X X X X X X X X X X X X X X X X X X CrossPointe User’s Manual for Internal Accounts A2 Dimension 4 – Project (Alphabetical Order) 414010 414020 414030 414040 414050 415010 415020 416020 416010 418010 418020 419010 419020 419030 419040 419050 419051 419052 419060 419070 419080 419090 419100 419110 419140 419120 419130 420010 420020 420021 420022 420030 420031 420032 420040 420050 422010 423010 425010 425020 National Art Honor Society National Elementary Honor Society Newspaper NHS NJHS Odyssey of the Mind Omega Patrols PE Club Recycling Club Robotics Club SADD Science Club Science Research Club SECME Club Soccer Club Soccer Club Boys Soccer Club Girls Softball Club Spanish Club Spanish Honor Society Speech Club Step Team Student Council (SGA) Surf Club SWAT Club Swimming Club Technology Club Tennis Club Tennis Club Boys Tennis Club Girls Track Club Track Club Boys Track Club Girls Trendsetters Club TV Production Club Volleyball Club Wrestling Club Young Authors Club Youth Crime Watch Club Rev. July 1, 2015 A2-5 X X X X X X X X X X X X X X X X X X X X X X X X X X X X X X X X X X X X X X X X X X X X X X X X X X X X X X X X X X X X X X X X X X X X X X X X X X X X X X X X X X X X X X X X X X X X X X X X X X X X X X X X X X X X CrossPointe User’s Manual for Internal Accounts A2 Dimension 4 – Project (Alphabetical Order) 499010 499011 499012 499013 499014 499015 499016 499017 499018 499019 499020 499021 499022 499023 499024 499025 499026 499027 499028 499029 499030 499031 499032 499033 499034 499035 Other Club – A ________________ Other Club – B ________________ Other Club – C ________________ Other Club – D ________________ Other Club – E ________________ Other Club – F ________________ Other Club – G ________________ Other Club – H ________________ Other Club – I _________________ Other Club – J _________________ Other Club – K ________________ Other Club – L ________________ Other Club – M _______________ Other Club – N ________________ Other Club – O ________________ Other Club – P ________________ Other Club – Q ________________ Other Club – R ________________ Other Club – S ________________ Other Club – T ________________ Other Club – U________________ Other Club – V_________________ Other Club – W________________ Other Club – X ________________ Other Club – Y _______________ Other Club – Z ________________ Departments - 5 501010 AP Program 501020 Art - Ceramics 501021 Art - Drawing 501030 Automotive 502010 Business 503010 Child Care 503020 Construction 503030 Culinary Arts 503040 Custodial 504010 Drafting 505010 English 506010 Foreign Language Rev. July 1, 2015 X X X X X X X X X X X X X X X X X X X X X X X X X X X X X X X X X X X X X X X X X X X X X X X X X X X X X X X X X X X X X X X X X X X X X X X X X X X X X X X X X X X X X X X X X X X X X X X X X X X X X X X X Elementary Middle Jr/Sr X X X X X X X X X X X X High X X X X X X X X X X X X X X X X X X X A2-6 CrossPointe User’s Manual for Internal Accounts A2 Dimension 4 – Project (Alphabetical Order) 508010 508011 509010 509020 512010 513010 513011 516010 516020 519010 519011 519020 519030 520010 520020 520030 522010 523010 599010 599011 599012 599013 599014 599015 599016 599017 599018 599019 Trust - 6 601010* 601020* 602010* 602020* 603010* 604010* 605010* 607010* 607020* 607021* Home Ec - Clothing Home Ec - Foods Industrial Arts International Baccalaureate Library Math Math--Calculators Photography Physical Education Science Science Research Social Studies Special Education Tech Prep Technology TV Production Vocational Wheel Other Dept – A ________________ Other Dept – B ________________ Other Dept – C ________________ Other Dept – D ________________ Other Dept – E ________________ Other Dept – F ________________ Other Dept – G ________________ Other Dept – H ________________ Other Dept – I ________________ Other Dept – J ________________ Advisory Board Art and Science Fair Beautification Business Partnerships Coffee Fund Donations Employee Fund Grad Nite/Grad Bash Grant - Best Grant - Boeing Rev. July 1, 2015 A2-7 X X X X X X X X X X X X X X X X X X X X X X X X X X X X X X X X Elementary X X X X X X X Middle X X X X X X X X X X X X X X X X X X X X X X X X X X X X X X X X X X X X X X X X X X X X X X X X X X X X X X X X X X X X X X X X X X X Jr/Sr X X X X X X X X X X High X X X X X X X X X X CrossPointe User’s Manual for Internal Accounts A2 Dimension 4 – Project (Alphabetical Order) 607022* 607023* 607024* 607025* 607030* 607031* 607032* 607033* 607034* 607035* 607036* 607040* 612010* 612011* 616010* 616020* 616030* 616040* 619010* 619020* 619030* 620020* 620010* 625010* 699010* 699011* 699012* 699013* 699014* 699015* 699016* 699017* 699018* 699019* 699020* 699021* 699022* 699023* 699024* 699025* Grant - Bright Ideas Grant - Harris Grant - Lowe's Grant - Target GSF - Driver's Education Fees GSF - Fee Summer Programs GSF - Lost & Damaged Textbooks GSF - Paid Transportation GSF - School Age Child Care GSF - Vandalism Repayments GSF – Dual Enrollment Guidance Locks - Hall Locks - PE Parking Stickers Project Graduation PTO / PTO Donations Public Relations Sales Tax Science Super Saturday Social Committee Teacher of the Year Testing Fees Yearbook Other Trust – A ________________ Other Trust – B ________________ Other Trust – C ________________ Other Trust – D _______________ Other Trust – E ________________ Other Trust – F ________________ Other Trust – G _______________ Other Trust – H _______________ Other Trust – I ________________ Other Trust – J ________________ Other Trust – K ________________ Other Trust – L ________________ Other Trust – M _______________ Other Trust – N _______________ Other Trust – O _______________ Other Trust – P _______________ Rev. July 1, 2015 A2-8 X X X X X X X X X X X X X X X X X X X X X X X X X X X X X X X X X X X X X X X X X X X X X X X X X X X X X X X X X X X X X X X X X X X X X X X X X X X X X X X X X X X X X X X X X X X X X X X X X X X X X X X X X X X X X X X X X X X X X X X X X X X X X X X X X X X X X X X X X X X X X X X X X X CrossPointe User’s Manual for Internal Accounts A2 Dimension 4 – Project (Alphabetical Order) 699026* 699027* 699028* 699029* 699030* 699031* 699032* 699033* 699034* 699035* Other Trust – Q _______________ Other Trust – R _______________ Other Trust – S ________________ Other Trust – T _______________ Other Trust – U _______________ Other Trust – V _______________ Other Trust – W _______________ Other Trust – X _______________ Other Trust – Y _______________ Other Trust – Z _______________ (grant or scholarship) X X X X X X X X X X X X X X X X X X X X X X X X X X X X X X X X X X X X X X X X General - 7 701010 Activity Fees 701020 Advertising – District 701030 Advertising - School 704020 Donation – Unrestricted 706010 Fine Arts Theatre 707010* General - Misc 718010 Registration Fees 719010 Savings 719020 School Store 719030 School Wide Fundraising 722010 Vending Elementary X X X X Middle X X X X X X X X X X X X X X X X Jr/Sr X X X X X X X X X X X High X X X X X X X X X X X Other 000000 999999 Elementary X X Middle X X Jr/Sr X X High X X Cash Account Transfers NSF Checks *Transfers need approval from School Accounting before they occur Rev. July 1, 2015 A2-9 CrossPointe User’s Manual for Internal Accounts Internal Accounts Adjustment/Transfer Approval Forms Internal Accounts Adjustment/Transfer Approval Form (Panel Z612) Adj: 01 Checking Interest Date Prepared: ______________ Transaction Date: ______________ Amount: ________________ ENTRY NUMBER Date to Enter in AS400 Amount of Interest Earned __________________________________ Principal’s Signature ____________________ Date of Approval *Principal approval required before entry Adj: 02 Savings Interest Date Prepared: ______________ Transaction Date: ______________ Amount: ________________ ENTRY NUMBER Date to Enter in AS400 Amount of Interest Earned __________________________________ Principal’s Signature ____________________ Date of Approval *Principal approval required before entry Adj: 03 Money Market Interest Date Prepared: ______________ Transaction Date: ______________ Amount: ________________ ENTRY NUMBER Date to Enter in AS400 Amount of Interest Earned __________________________________ Principal’s Signature ____________________ Date of Approval *Principal approval required before entry Adj: 04 CD Interest Date Prepared: ______________ Transaction Date: ______________ Amount: ________________ ENTRY NUMBER Date to Enter in AS400 Amount of Interest Earned __________________________________ Principal’s Signature ____________________ Date of Approval *Principal approval required before entry Rev. July 1, 2015 A3-1 A3 CrossPointe User’s Manual for Internal Accounts Internal Accounts Adjustment/Transfer Approval Forms Internal Accounts Adjustment/Transfer Approval Form (Panel Z612) Adj: 05 Checking Service Charge Date Prepared: ______________ (bank NSF fees are posted here) Transaction Date: ______________ ENTRY NUMBER Amount: ________________ Date to Enter in AS400 Amount of Service Charge __________________________________ Principal’s Signature ____________________ Date of Approval *Principal approval required before entry Adj: 06 Savings Service Charge Date Prepared: ______________ Transaction Date: ______________ Amount: ________________ ENTRY NUMBER Date to Enter in AS400 Amount of Service Charge __________________________________ Principal’s Signature ____________________ Date of Approval *Principal approval required before entry Adj: 07 Money Market Service Charge Date Prepared: ______________ Transaction Date: ______________ Amount: ________________ ENTRY NUMBER Date to Enter in AS400 Amount of Service Charge __________________________________ Principal’s Signature ____________________ Date of Approval *Principal approval required before entry Adj: 08 CD Service Charge Date Prepared: ______________ Transaction Date: ______________ Amount: ________________ ENTRY NUMBER Date to Enter in AS400 Amount of Service Charge __________________________________ Principal’s Signature ____________________ Date of Approval *Principal approval required before entry Rev. July 1, 2015 A3-2 A3 CrossPointe User’s Manual for Internal Accounts Internal Accounts Adjustment/Transfer Approval Forms Internal Accounts Adjustment/Transfer Approval Form (Panel Z612) Adj: 09 Supplies from Bank Date Prepared: ______________ Transaction Date: ______________ Amount: ______________ Date to Enter in AS400 Amount of Supplies Description: ________________________________ ENTRY NUMBER __________________________________ Principal’s Signature ____________________ Date of Approval *Principal approval required before entry Adj: 10 Recording an NSF Check Date Prepared: ______________ Transaction Date: ______________ Amount: ________________ Date to Enter in AS400 Amount of Returned Check Do Not Include Bank Fee* Description: ________________________________ ENTRY NUMBER __________________________________ Principal’s Signature ____________________ Date of Approval *Principal approval required before entry *Bank NSF fees are posted with #5 Adj: 11 Repayment of NSF Check Date Prepared: ______________ Transaction Date: ______________ Amount: ________________ Date to Enter in AS400 Amount of Returned Check Do Not Include NSF Fees* Description: ________________________________ ENTRY NUMBER __________________________________ Principal’s Signature *Principal approval required before entry *NSF fees are posted with a Receipt/Deposit Rev. July 1, 2015 A3-3 ____________________ Date of Approval A3 CrossPointe User’s Manual for Internal Accounts Internal Accounts Adjustment/Transfer Approval Forms Internal Accounts Adjustment/Transfer Approval Form (Panel Z612) Adj: 12 Correct a Deposit Error (Increase the Deposit Amount) Date Prepared: ______________ Transaction Date: ______________ Amount: _______________ Date to Enter in AS400 Amount of the Increase Description: ________________________________ Original Deposit: Project #: ___________________ Function #: ____________ __________________________________ Principal’s Signature ENTRY NUMBER ____________________ Date of Approval *Principal approval required before entry Adj: 13 Correct a Deposit Error (Decrease the Deposit Amount) Date Prepared: ______________ Transaction Date: ______________ Amount: _______________ Date to Enter in AS400 Amount of the Decrease Description: ________________________________ Original Deposit: Project #: ___________________ Function #: ____________ __________________________________ Principal’s Signature ENTRY NUMBER Rev. July 1, 2015 *Principal approval required before entry A3-4 ____________________ Date of Approval A3 CrossPointe User’s Manual for Internal Accounts Internal Accounts Adjustment/Transfer Approval Forms Internal Accounts Adjustment/Transfer Approval Form (Panel Z612) Adj: 14 Correct a Deposit Error (Correct the Project #) Date Prepared: ______________ Transaction Date: ______________ Amount: _________________ Date to Enter in AS400 Amount of Original Deposit Description: ________________________________ Credit (New/Correct Deposit): Project #: ___________________ Function #: ____________ Debit (Original/Incorrect Deposit): Project #: ___________________ Function #: ____________ ENTRY NUMBER __________________________________ Principal’s Signature ____________________ Date of Approval *Principal approval required before entry Adj: 15 Correct a Deposit Error (Correct the Function #) Date Prepared: ______________ Transaction Date: ______________ Amount: ________________ Date to Enter in AS400 Amount of Original Deposit Description: ________________________________ Credit (New/Correct Deposit): Project #: ___________________ Function #: ____________ Debit (Original/Incorrect Deposit): Project #: ___________________ Function #: ____________ ENTRY NUMBER __________________________________ Principal’s Signature *Principal approval required before entry Rev. July 1, 2015 A3-5 ____________________ Date of Approval A3 CrossPointe User’s Manual for Internal Accounts Internal Accounts Adjustment/Transfer Approval Forms Internal Accounts Adjustment/Transfer Approval Form (Panel Z612) Adj: 16 Correct a Check Error (Increase the Check Amount) Date Prepared: ______________ Transaction Date: ______________ Amount: ______________ Date to Enter in AS400 Amount of the Increase Description: ________________________________ Original Check: Project #: ___________________ Object #: ____________ __________________________________ Principal’s Signature ENTRY NUMBER ____________________ Date of Approval *Principal approval required before entry Adj: 17 Correct a Check Error (Decrease the Check Amount) Date Prepared: ______________ Transaction Date: ______________ Amount: ______________ Date to Enter in AS400 Amount of the Decrease Description: ________________________________ Original Check: Project #: ___________________ Object #: ____________ __________________________________ Principal’s Signature ENTRY NUMBER Rev. July 1, 2015 *Principal approval required before entry A3-6 ____________________ Date of Approval A3 CrossPointe User’s Manual for Internal Accounts Internal Accounts Adjustment/Transfer Approval Forms Internal Accounts Adjustment/Transfer Approval Form (Panel Z612) Adj: 18 Correct a Check Error (Correct the Project #) Date Prepared: ______________ Transaction Date: ______________ Amount: _______________ Date to Enter in AS400 Amount of original check Description: ________________________________ Credit (Original/Incorrect Check): Project #: ___________________ Object #: ____________ Debit (New/Correct Check): Project #: ___________________ Object #: ____________ ENTRY NUMBER __________________________________ Principal’s Signature ____________________ Date of Approval *Principal approval required before entry Adj: 19 Correct a Check Error (Correct the Object #) Date Prepared: ______________ Transaction Date: ______________ Amount: _______________ Date to Enter in AS400 Amount of original check Description: ________________________________ Credit (Original/Incorrect Check): Project #: ___________________ Object #: ____________ Debit (New/Correct Check): Project #: ___________________ Object #: ____________ ENTRY NUMBER __________________________________ Principal’s Signature *Principal approval required before entry Rev. July 1, 2015 A3-7 ____________________ Date of Approval A3 CrossPointe User’s Manual for Internal Accounts Internal Accounts Adjustment/Transfer Approval Forms Internal Accounts Adjustment/Transfer Approval Form (Panel Z612) Adj: 20 Write Off an NSF Check Date Prepared: ______________ Transaction Date: ______________ Amount: ________________ Date to Enter in AS400 Amount of Returned Check Description: ________________________________ Original Check: Project #: ___________________ ENTRY NUMBER Function #: ____________ __________________________________ Principal’s Signature ____________________ Date of Approval *Principal approval required before entry Adj: 21 Automatic Sales Tax Pmt Date Prepared: ______________ Transaction Date: ______________ Amount: ________________ Date to Enter in AS400 ENTRY NUMBER Amount of Total Sales Tax Pmt __________________________________ Principal’s Signature ____________________ Date of Approval *Principal approval required before entry Adj: 22 Automatic Checking Pmt (Other) Date Prepared: ______________ Transaction Date: ______________ Amount: _______________ Date to Enter in AS400 Amount of the Payment Description: ________________________________ Project #: ___________________ ENTRY NUMBER Object #: ____________ __________________________________ Principal’s Signature *Principal approval required before entry Rev. July 1, 2015 A3-8 ____________________ Date of Approval A3 CrossPointe User’s Manual for Internal Accounts Internal Accounts Adjustment/Transfer Approval Forms Internal Accounts Adjustment/Transfer Approval Form (Panel Z612) Adj: 23 Regular Transfer Date Prepared: ______________ Transaction Date: ______________ Amount: _______________ Date to Enter in AS400 Amount of the Transfer Description: ________________________________ Debit (From Where the Expenditure is Coming Out): Project #: ___________________ Credit (To Where the Revenue is Going In): Project #: ___________________ ENTRY NUMBER __________________________________ Principal’s Signature ____________________ Date of Approval *Principal approval required before entry Adj: 24 Transfer to Purchase Date Prepared: ______________ Transaction Date: ______________ Amount: ______________ Date to Enter in AS400 Amount of the Purchase Description: ________________________________ Debit (From Where the Purchase/Expenditure is Coming Out): Project #: ___________________ Object #: ____________ Do Not Use 980 Credit (To Where the Revenue is Going In): Project #: ___________________ Function #: ____________ Do Not Use 3680 ENTRY NUMBER __________________________________ Principal’s Signature *Principal approval required before entry Rev. July 1, 2015 A3-9 ____________________ Date of Approval A3 CrossPointe User’s Manual for Internal Accounts Internal Accounts Adjustment/Transfer Approval Forms Internal Accounts Adjustment/Transfer Approval Form (Panel Z612) Adj: 25 Transfer to Investment Date Prepared: ______________ Transaction Date: ______________ Amount: _______________ Date to Enter in AS400 Amount of the Investment Description: ________________________________ GL #: ___________________ 1115-Money Market or 1116-CD ENTRY NUMBER __________________________________ Principal’s Signature ____________________ Date of Approval *Principal approval required before entry Adj: 26 Transfer from Investment Date Prepared: ______________ Transaction Date: ______________ Amount: _______________ Date to Enter in AS400 Amount of the Investment Description: ________________________________ GL #: ___________________ 1115-Money Market or 1116-CD ENTRY NUMBER __________________________________ Principal’s Signature *Principal approval required before entry Rev. July 1, 2015 A3-10 ____________________ Date of Approval A3 CrossPointe User’s Manual for Internal Accounts Internal Accounts Adjustment/Transfer Approval Forms A3 Internal Accounts Adjustment/Transfer Approval Form (Panel Z612) Adj: 27 Reversal - Checking Service Charge Date Prepared: ______________ Transaction Date: ______________ ENTRY NUMBER Amount: ________________ Date to Enter in AS400 Amount of Service Charge __________________________________ Principal’s Signature ____________________ Date of Approval *Principal approval required before entry *Includes write-off of NSF Fees Adj: 28 Reversal - Savings Service Charge ______________ Transaction Date: ______________ Date Prepared: Amount: ________________ Date to Enter in AS400 Amount of Service Charge Debit: Project #: ___________________ ENTRY NUMBER __________________________________ Principal’s Signature ____________________ Date of Approval *Principal approval required before entry Adj: 29 Reversal - Money Market Service Charge Date Prepared: ______________ Transaction Date: ______________ Amount: ________________ Date to Enter in AS400 Amount of Service Charge Debit: Project #: ___________________ ENTRY NUMBER __________________________________ Principal’s Signature *Principal approval required before entry Rev. July 1, 2015 A3-11 ____________________ Date of Approval CrossPointe User’s Manual for Internal Accounts Internal Accounts Adjustment/Transfer Approval Forms Internal Accounts Adjustment/Transfer Approval Form (Panel Z612) Adj: 30 Reversal - CD Service Charge Date Prepared: ______________ Transaction Date: ______________ Amount: ________________ Date to Enter in AS400 Amount of Service Charge Debit: Project #: ___________________ ENTRY NUMBER __________________________________ Principal’s Signature *Principal approval required before entry Rev. July 1, 2015 A3-12 ____________________ Date of Approval A3 CrossPointe User’s Manual for Internal Accounts A4 Monthly Financial Report Checklist Cover Sheet Monthly Financial Report Checklist Highlighted requires principal's signature School Number: Format School Name : Panel Request Report Mth/Yr: Attached File at To School Accounting Reports Submitted - please put reports in this order Yes No School 1 Bank Reconciliation Excel P 2 Outstanding Check Report C A203 001 AB307 P 3 Outstanding Deposit Report C A203 002 AB307 P 4 Copy of Bank Stmnt w/ Check Copies N/A P 5 Balance Sheet* B F605 001 FB158 P #'s 1-5 needed to complete bank reconciliation before running remaining reports 6 Revenue Ledger* D F510 001 FB172 P 7 Expenditure Ledger* C F510 002 FB156 P 8 Trial Balance* A F605 002 FB157 P 9 Principal's Report* J F605 006 IN100 P 10 Project Balance Report* I F605 007 IN157A P 11 Transfer Report Z605 3 IN039A P 12 Deposit Register A F610 001 FB164 P 13 Check Register Z605 1 IN037A P 14 Void Register Z605 2 IN038A P 15 Journal Entry Report (Transfer & Adj.) A F613 001 FB161 P 16 Purchase Order Report A F819 001 FB059 P 17 NSF Check Spreadsheet Excel P Time Frame Monthly P P P P P to Run Report N/A Thru Curr Mth Thru Curr Mth N/A Current Period P P P P P P July-Curr Mth July-Curr Mth Current Period Current Period Current Period July-Curr Mth Current Mth Current Mth Current Mth Current Mth Current Mth when applicable P Checks and Balances: *These six reports are needed 1 Total Assets = Total Liabilities + Fund Equity on Balance Sheet 2 Current Balance of 1520 & 2720 on Trial Balance = Total Encumbered on Expenditure Ldgr 3 Current Balance of 2520 on Trial Balance = Total on Revenue Ledger 4 Actual Cash Balance on Principal's Report = Total Assets on Balance Sheet 5 Current Balance of 1530 on Trial Balance = Total Expended on Expenditure Ledger 6 Balance in Petty Cash on the Trial Balance & Principal's Report = 1112 Balance on Balance Sheet 7 Balance in Change Fund on the Trial Balance & Principal's Report = 1113 Balance on Balance Sheet 8 Balance in Savings on the Trial Balance, Prinipal's Report & Bank Statement = 1114 Balance on Balance Sheet 9 Balance in Money Market on the Trial Balance, Principal's Report & Bank Statement = 1115 Balance on Balance Sheet 10 Balance in CD on the Trial Balance, Principal's Report & Bank Statement = 1116 Balance on Balance Sheet 11 Balance in Accounts Receivable-NSF on the Trial Balance, Principal's Report & NSF Spreadsheet = 1130 Bal on Balance Sheet 12 Principal's Report Variances should all be zero 13 Principal's Report Project Totals = GL Totals for the Beg Bal, Calculated Cash Bal, Actual Bal, & Variance columns) 14 Beginning Balance on Principal's Report = Beginning Balance on Balance Sheet 15 Total GL Balance on Project Balance Report = Total GL Actual Cash Bal on Principal's Report 16 Total Encumbrance Balance on Project Balance Report = Total Encumbered on Expenditure Ledger 17 Revenue Ledger Total = Project Revenue Balance on Principal's Report Balanced Before submission, please assure reports include the required signatures in accordance with the Internal Accounts Manual. My signature represents the required reports are being submitted and are balanced as indicated above. Submitted by: Rev. July 1, 2015 Date: A4-1 CrossPointe User’s Manual for Internal Accounts A5 Year End Financial Report Checklist Cover Sheet Year-End Financial Report Checklist School Number: Highlighted requires principal's signature Fiscal Year: Format School Name : Time Frame Panel Request Report Attached File at To School Accounting Reports Submitted - please put reports in this order Yes School Annually to Run Report 1 Bank Reconciliation Excel P P N/A 2 Outstanding Check Report C A203 001 AB307 P P Thru 063020XX 3 Outstanding Deposit Report C A203 002 AB307 P P Thru 063020XX 4 Copy of Bank Stmnt w/ Check Copies N/A P P N/A 5 Balance Sheet* B F605 001 FB158 P P Period 12 #'s 1-5 needed to complete bank reconciliation before running remaining reports 6 Revenue Ledger* D F510 001 FB172 P P Period 01 - 12 7 Expenditure Ledger* C F510 002 FB156 P P Period 01 - 12 8 Trial Balance* A F605 002 FB157 P P Period 12 9 Principal's Report* J F605 006 IN100 P P Period 12 10 Project Balance Report* I F605 007 IN157A P P Period 12 11 Transfer Report Z605 3 IN039A P P 070120XX-063020XX 12 Deposit Register A F610 001 FB164 P P 070120XX-063020XX 13 Check Register Z605 1 IN037A P P 070120XX-063020XX 14 Void Register Z605 2 IN038A P P 070120XX-063020XX 15 Journal Entry Report (Transfer & Adj.) A F613 001 FB161 P P 070120XX-063020XX 16 Purchase Order Report A F819 001 FB059 P P 070120XX-063020XX 17 NSF Check Spreadsheet Excel P P when applicable My signature represents the required reports are being submitted for the correct period and include the principal's signature as highlighted above. Submitted by: Date: Bookkeeper's Signature Rev. July 1, 2015 A5-1