1
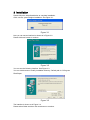
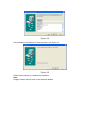
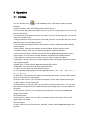
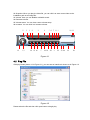
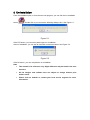
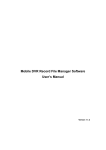
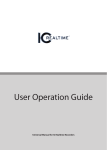
Player Operation User’s Manual
Table of Contents
1
General Introduction ............................................................................................4
2
Environment ..........................................................................................................5
3
Installation .............................................................................................................6
4
Operation ...............................................................................................................8
4.1 Interface ......................................................................................................8
4.2 Play File.......................................................................................................9
5
Un-installation .....................................................................................................11
Welcome
Thank you for using our player!
This user’s manual is designed to be a reference tool for the installation and operation of
your system!
1 General Introduction
This player is a tool to play video file. It supports snapshot and can save a section of the
video to a file.
It has the following features:
z Support various function: Play/Pause/Stop/Slow play/Fast play/Repeatedly
play/Snapshot/Frame by frame play/Record.
z You can drag the process bar to adjust play position.
z Support fast forward and fast backward.
z Support various languages.
2 Environment
Player has the following hardware requirement:
z Memory: Min 512M.
z HDD: Min 4G.
z OS: Microsoft windows XP\2000\2003\Me.
3 Installation
Please follow the steps listed below to complete installation.
Click .exe file, system begins installation. See Figure 3-1.
Figure 3-1
Now you can see an interface is shown as in Figure 3-2.
Please click next button to continue.
Figure 3-2
You can see the following interface. See Figure 3-3.
You can click browser to modify installation directory. Default path is C:\Program
Files\Player.
Figure 3-3
The interface is shown as in Figure 3-4.
Please select folder and then click next button to continue.
Figure 3-4
After installation, the interface is shown as below. See Figure 3-5.
Figure 3-5
Please click exit button to complete the installation.
Note:
Program creates shortcut menu in the Start and desktop.
4 Operation
4.1 Interface
You can click the icon
in the installation path or the desk to open the player
interface.
In player interface, there are following items. See Figure 4-1.
X-You can view play frame rate here such as 25. If you do not play right now, you can not
see any value here.
Y-You can view bit stream format such as H.264. If you do not play right now, you can not
see any information here.
1-Play process bar. Here you can view current play process. You can left click your mouse
and then drag it to control play process.
2-You can view play sequence here. There are two modes: shuttle and repeat. Default
value is shuttle.
3-Sound setup. There are two modes: Sound and Mute. Default value is sound.
4- Software version. Here you can view current player version information.
5-AVI. AVI convert button. Please note current version does not support this function.
6-Full screen. You can click it to switch between full screen and standard screen.
7-Play sequence. There are two modes for you to select: shuttle and repeat.
8-Language. You can click here to switch between various languages. Right now system
only supports English.
9-Setup menu. Current version does not support this function.
10-Minimize. You can click to minimize player interface.
11-Close. You can click it to close player interface.
12- You can adjust play speed. The value speeds include: 1/16×, 1/8×, 1/4×, 1/2×, ×,
2×, 4×, 6×, 8×.
13-Open/Play. You can click it to select corresponding file to play. If there is file in pause
mode, you can click it to restore play.
14-Pause: Click it once, you can pause current play. Click it again system resume play.
15-Stop. Click it to stop current play.
16-Record.When you play the file, you can click it to record current video. You can click
stop button to complete record. System will pops up a dialogue box for you to select file
save path.
17-Previous file. Click it, you can view previous video file. Current version does not
support this function.
18-Fast backward.
19-Play frame by frame. You can click it to realize frame by frame play. Click it once
system plays one frame.
20-Fast forward.
21-Next. Click it you can view the next video file. Current version does not support this
function.
22-Snapshot. When you play the video file, you can click it to save current video to the
installation path as an image file.
23-Volume. Here you can disable or disable sound.
24-Decrease volume.
25-Volume status. You can view current volume setup.
26-Increase. You can click it to increase volume.
X
12
13
Y
1
14
2
3
15 16
4
17
5 6 7 8 9
18 19
20
21
22
10 11
23 24
25
26
Figure 4-1
4.2 Play File
Click play button (button 13 in Figure 9-1), you can see an interface is shown as in Figure 4-2.
Figure 4-2
Please select the file and then click open button to begin play.
Or you can just select the file and then drag it to the player to play.
If it is your first time to use player. Double click player icon, you can see the following
interface. See Figure 4-3.
Figure 4-3
If you click yes, you can double click to open all the files with extension name .dav.
5 Un-installation
From the installation path, or from the start->all program, you can find the un-installation
button
. Double click it you can see the following dialogue box. See Figure 5-1.
Figure 5-1
Click YES button, you can see system begins un-installation.
After un-installation, you can see an interface is shown as below. See Figure 5-2.
Figure 5-2
Click OK button, you can complete the un-installation.
Note
•
This manual is for reference only. Slight difference may be found in the user
interface.
•
All the designs and software here are subject to change without prior
written notice.
•
Please visit our website or contact your local service engineer for more
information.