1
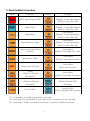
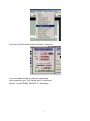
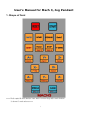
User’s Manual for Mach 3, Jog Pendant
1. Shape of front
**** Both rapid & shift button can work connecting with each button
It doesn’t work alone.****
1
2. Each button’s function
Button
Function
Button
Function
RESET and Release RESET
A axis Move
(Rapid+) A Axis Rapid Move
(Shift+) A Axis Zero Set
Work Start
Y axis Move
(Rapid+) Y Axis Rapid Move
(Shift+) Y Axis Zero Set
Z axis Move
Rapid Move
(Rapid+) Z Axis Rapid Move
(Shift+) Z Axis Zero Set
Move Machine Origin
X axis Move
(Rapid+) X Axis Rapid Move
(Shift+) X Axis Zero Set
Return to Program Start
Position
X axis Move
(Shift+) Feed Rate 100% Set
Y axis Move
Move Work Origin
(Shift+) Feed Rate Increase
Select Extra Function
Z axis Move
(Shift+) No Function
Pause
/ (Shift+) JOG Rate
Decrease(1)
A axis Move
(Shift+) Feed Rate Decrease
Stop
Spindle Start/Stop
/ (Shift+) JOG Rate
Increase(1)
(Shift+) Spindle RPM
Decrease
Set Tool Zero
Flood On/Off
(Shift+) Spindle RPM Increase
(1) It is possible to modify jog speed in each axis.
(2) If you push the feed button in each axis alone, it transfers to set Jog Rate
(3) If you press “Rapid” and press Axis button, it moves to Maximum speed.
2
3. How to use
If it is connected with USB in computer, it perceives by keyboard and
no need to do separate set-up or power supply.
Go into action Mach 3 and save attached mach3_1024_pendant.set in mach3
folder. After that run “load screen” as below.
Set up feed button in A axis as follows.
3
If you click A/U++ button, it will open window named “ SetHotKey”
you press A+ button in pendant this time.
Click A/U button → Press A- in pendant → Push OK
If so, the set-up will be finished.
4. Modify Jog Rate & How to do Manual Jog in each axis.
You can find “JOG Rate“ next to Rest Button in existing picture as below.
This newly comes out to be checked out when changing Jog Rate in Pendant.
To modify Jog Rate,
If press “
” & push “
” and can see to go down above Jog Rate.
It decreases by 5 unit and decrease by 0.1 unit under 5.
It is same when increasing.
4
If you touch the
after reducing adequately,
You can see it moves slowly than rapid transferring speed.
Push
&
at the same time and you can find it goes by rapid traverse rate.
By doing adjusting “JOG Rate” like this, each axis can change transferring speed.
On demanding moving rapidly, can do it if you use “rapid button” together.
If “ Jog Rate “ is 100.00
it can do rapid traverse without pressing “
”
5. Set Up Tool Zero in Z axis.
I explain it on condition that there is a Tool Zero Sensor and when it is equipped
in No.13 Pin
Set “Probe” to Input Signal in the Config−>Port & Pins
If you used different pin, Input the right pin instead of 13
Press “ Apply “ → Push “OK”
5
Move to below the window in mach picture.
If the GND line doesn’t contact with sensor, it shows the “ Digitize” is turned off.
If the GND line contact with sensor, confirm the “Digitize” turns on. It is normal.
Click “ Edit Button Scrip” in main mach picture.
6
And Auto Tool Zero button below will flicker. Click that.
If a new window shows up, Input the code below.
After measuring your Tool Sensor and if it is different,
Modify “ Const PROBE_HEIGHT= 5” adequately.
7
If you want to do “the stop point(place)” differently,
The “10” in Code “G91 Z” & 10–PROBE_HEIGHT & “F100” is the place designates
the height and it stops the point that it is changed if modifiy.
Set-up will be finished after saving.
8
7. Operational Test.
You put the sensor under Endmill,
Click “Auto Tool Zero “ Button in main mach3 picture or click “T-Zero” in Pendant.
If so, the Z axis senses by going down.
You can check out that the Endmill stops on 10mm in material after sensing.
or
9