1
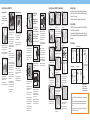
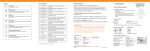
Questions?
Alarm Messages
Symbols
Power Button
Turns the device on and off.
Battery Indication
Shows the status of battery life. Flashes when the battery life
reaches levels that require user intervention.
Up Selector
Allows the pressure setting to be increased and scroll through
menu options.
Down Selector
Allows the pressure setting to be decreased and scroll through
menu options.
Keypad Lock
Locks the keypad to restrict accidental adjustment of therapy.
When activated the light will illuminate.
Audio Pause/Alarm Suppress
Silences the alarm for approximately 2-3 minutes.
Start Therapy/Select
Allows therapy to be started or paused. It is also used to
confirm settings within therapy.
The Battery has up to 3 hours therapy time
remaining.
The battery has up to 1 hour therapy time
remaining.
Call the 24/7 NPWT Clinical Support Hotline
at 1-866-998-NPWT (6798).
Quick reference guide
1. Installing the canister
- Remove paper tape around the canister tubing to release tubing
to the full length.
- Open both of the orange clips.
- Align the canister so that the Volume marks are facing forward.
- Push the canister gently over the inlet port of the device.
- Engage both orange clips (clips will click when they are properly
engaged).
The battery has only 2 minutes of therapy time
remaining.
After 2 minutes in the extremely low state the
device will power off.
The vacuum level is low or there is a leak in the
system for longer than 30 seconds. (See User
Manual for details for resolution)
2. Start up of device
The system has encountered a high vacuum
condition. (See User Manual for details for
resolution)
The system has encountered an excessively high
vacuum (of >235mmHg). (See User Manual for
details for resolution)
Press and hold the Power button for 2 seconds until start up message appears.
The system detects that the canister is full or
that there is a blockage in the system. (See User
Manual for resolution)
The system has detected a significant leak
for more than 1 minute (See User Manual for
resolution)
*This feature available with software version 0.66 and later.
4. Start therapy
Use Up and Down to adjust.
Press Select to start therapy.
5. Check dressing for a good seal
The device has an unrecoverable error. (See User
Manual for resolution)
The device has been left in standby mode for
longer than 15 minutes. Either select vacuum
setting and start therapy or shut off the device
until therapy is required.*
3. Select vacuum setting
Look for “raisin-like” appearance.
Wound Management
Smith & Nephew, Inc.
970 Lake Carillon Drive
Suite 110
St. Petersburg, FL 33716
USA
Customer Care Center
1-800-876-1261
T 727-392-1261
F 727-392-6914
Listen for a “hissing” sound,
indicating a leak.
www.smith-nephew.com
www.myrenasys.com
www.globalwoundacademy.com
©2010 Smith & Nephew, Inc., All rights reserved.
™Trademark of Smith & Nephew. Certain marks Reg. US Pat. & TM Office.
RA16000
Feel the dressing, which should
be hard to the touch.
Possible site of leak
Where drain exits film
Wrinkle or crease
Skin fold or crevice
REN-0011-1110
Intervention
Pinch paste around drain. (if
applicable)
Secure area where tube exits with
blue tape.
Seal film edges with blue tape or
film dressing.
If hole found in transparent film
patch with adhesive transparent
film.
Dressing the wound – RENASYS™-F/P
Dressing Application:
Dressing the wound – RENASYS™-G Gauze Dressing
Utilizing Basic Technique:
Use clean or sterile
techniques for application
depending on institutional
protocol.
Step 3 Cut the foam dressing to
fit the size and shape of the wound
and place into wound cavity.
Step 1 Debride any necrotic/eschar
tissue if necessary. Cleanse wound
bed and pat dry per protocol.
• Thorough wound cleansing should
occur with each dressing change.
Foam should fill the wound cavity
and it may be necessary to stack
pieces of foam in deep wounds.
A non-adherent dressing may
be applied to the wound prior to
placing the foam into the wound
bed if required.
Step 2 Apply skin sealant to
periwound area. (Skin sealant not
included as part of kit).
• Protect the periwound from
exposure to moisture and adhesive.
Step 4 Cover foam with transparent
film. Film should extend 2 in. (5.1
cm) beyond wound margin to
facilitate adequate seal.
• Film should be securely anchored to
periwound area to maintain a good
seal.
WARNINGS:
• Foam should be cut to fit loosely
into wound bed. Do not tightly pack
or force foam into any areas of the
wound.
• Do not cut the foam directly over the
wound bed to avoid foam fragments
from falling into the wound. Rub the
edges of the foam to remove any
loose fragments after cutting.
• If multiple pieces of foam are
needed to cover the wound bed,
count and record how many foam
pieces are present.
• If a tunnel exists, cut the foam
longer than the tunnel to ensure
that contact is made with the foam
in the primary wound bed/cavity.
• Do not place foam into blind or
unexplored tunnels.
Utilizing Bridging
Technique:
Bridging Away from
Wound and Dressing
Small Wounds
This technique allows
the Port and tubing to be
redirected to a non-weight
bearing area. This technique
should also be used on
wounds that are smaller
than the Port 1.5 in. (3.8 cm).
Step 6 Remove the liner from the
Port Dressing. Position the center
opening of the Port Dressing so it
surrounds the hole in the film.
Step 7 Use gentle pressure to
anchor the Port Dressing to the
transparent film.
Step 5 Cut a small hole
.25 in. (0.6 cm) in the center of the
film, over the foam. Remove excess
trimmed film.
1
5b
9
Gauze wound dressings should be changed 48 hours after the initial application
of therapy. If no leak is present and the patient is comfortable, dressing changes
should occur 2-3 times per week.
Foam wound dressings should be changed every 48 hours during therapy.
Step B6 Cover both the wound
and foam bridge with transparent
film. Film should extend 2in. (5.1
cm) beyond wound margin to
facilitate adequate seal.
• Film should be securely anchored
to periwound area to maintain a
good seal.
Step B7 Cut a small hole
.25 in (0.6 cm) in the center of
the film, over the bridged foam.
Remove excess trimmed film.
Step B4 Cover intact skin with
transparent film where bridge will
be placed.
• The center opening of the Port
Dressing will be aligned over the
hole to deliver negative pressure.
Dressing changes
• The center opening of the Port
Dressing will be aligned over the
hole to deliver negative pressure.
Step B8 Proceed with Step 6 –
Step 9, utilizing Basic Technique.
Cleanse wound bed and pat dry
per protocol.
2
For channel drain, wrap layer of
gauze around drain.
NOTE: If placing channel drain
directly into a sinus tract, no gauze
is necessary on the portion of the
drain in the tract.
Create a seal by pinching the
ostomy paste.
10
Secure the drain tubing with
waterproof tape.
3
The RENASYS™ GO device can be used with the 300ml/cc RENASYS GO Canister
or the RENASYS GO Large Canister (750ml).
The canister should be changed at least once a week or when full. Canisters may
have to be changed regularly within single-patient treatment episodes if exudate
levels are high.
6a
Apply skin sealant to periwound
area.
Canister selection
Canister tubing
11a
Disconnect the tubing
Apply part of ostomy strip paste
to wound edge to secure drain in
position.
6b
Trim single layer of non-adherent
gauze and lay across wound bed.
11b
4
Connecting the tubing
Cap the tubing
Place remainder over top of drain
and pinch in place.
7
Cut the drain approximately 1 inch
or 2.5 cm shorter than the base of
the wound. Curl the drain if using a
channel or round drain.
Step 8 Smooth the dressing down
while removing the frame.
Step 9 Attach the RENASYS Port
tubing to the canister tubing and
activate the device.
Finished and leak-free dressings
should be firm to the touch.
Note: If there is concern that the
port may create pressure at the
wound due to the wound location,
utilize the bridging technique.
Secure the RENASYS™ Port tubing
with tape or adhesive strips to
minimize tension on the port.
5
Step B5 Cut additional foam and
place on top of transparent film
to form the bridge. Ensure the
foam bridge is wider than the port
diameter 1.5 in. (3.8 cm).
Important: Contact must be made
between the bridge foam and the
foam in the wound bed (overlap).
Fill wound with saline-moistened
antimicrobial gauze. Gauze should
loosely fill to surface of wound.
Avoid over-packing.
Secure the drain tubing to the
canister tubing at the adaptor site.
Connect the canister tubing to
the canister and begin vacuum,
ensuring canister is installed
correctly.
12
8
Apply layer of saline-moistened
antimicrobial gauze to wound bed.
Position drain on top of gauze.
Place transparent dressing over the
wound and seal.
Finished dressing
Will have a “raisin-like” appearance
and be firm to the touch.
CAUTION: The drain should never
be placed in an unexplored fistula
tract.
CAUTION: Do not connect
the tubing to or cover the
end of the t-connector that is
inserted in the canister tubing.
Notes:
• Please refer to the RENASYS-F/P and RENASYS-G Instructions for Use for the full application
techniques.
• Use clean or sterile/aseptic techniques for application depending on institutional protocol.
• Only the Smith & Nephew wound dressing kits and canisters are approved for use with
RENASYS GO.
• Smith & Nephew High Output/Fistula Kit, Product Code 66800212 is not compatible with
RENASYS GO due to the tubing connection.