1
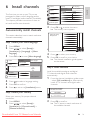
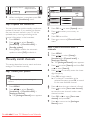
Register your product and get support at
www.philips.com/welcome
22HFL3331D/10
26HFL3331D/10
22HFL4371D/10
26HFL4371D/10
32HFL4351D/10
EN
User Manual
Downloaded From TV-Manual.com Manuals
Model
Serial
www.philips.com/support
Österreich
0810 000205
€0.07 pro Minute
België/Belgique
078250145
€0.06 Per minuut/Par minute
България
+3592 489 99 96
Местен разговор
Hrvatska
01 6403 776
Lokalni poziv
Česká republika
800142840
Bezplatný hovor
Danmark
3525 8759
Lokalt opkald
Estonia
6008600
local
Suomi
09 2311 3415
paikallispuhelu
France
0821 611655
€0.09 Par minute
Deutschland
01803 386 852
€0.09 pro Minute
Ελλάδα
0 0800 3122 1280
Κλήση χωρίς χρέωση
Magyarország
0680018189
Ingyenes hívás
Ireland
North 0800 055 6882
South 1800-PHILIPS 7445477
free
€0.08 Al minuto
Italia
840320086
Қазақстан
+7 727 250 66 17
local
Latvia
52737691
local
Lithuania
67228896
local
Luxemburg/Luxembourg
40 6661 5644
Ortsgespräch/Appel local
Nederland
0900 8407
€0.10 Per minuut
Norge
2270 8111
Lokalsamtale
Polska
(022) 3491504
połączenie lokalne
Portugal
800 780 903
Chamada local
România
021-203-2060
Apel local
Россия
Moscow (495) 961-1111
Outside Moscow 8-800-200-0880
Местный звонок
Србија
+381 114 440 841
Lokalni poziv
Slovensko
0800 004537
Bezplatný hovor
Slovenija
01 280 95 22
lokalni klic
España
902 888 784
€0.10 Por minuto
Sverige
08 5792 9100
Lokalsamtal
Suisse/Schweiz/Svizzera
0844 800 544
Appel local/Ortsgespräch/Chiamata locale
Türkiye
0800 261 3302
Şehiriçi arama
United Kingdom
0845-6010354
local
Україна
8-800-500-69-70
Місцевий виклик
This information is correct at the time of press. For updated information, see www.philips.com/support.
Downloaded From TV-Manual.com Manuals
1 Notice 2
2 Important 4
3 TV overview 6
Side controls and indicators 6
Guest remote control 6
4 Use your product 8
Switch your TV on/off or to standby 8
Switch channels 8
Watch connected devices 9
Adjust TV volume 9
Use Teletext 9
5 Use more of your product 10
Access TV menus 10
Remove devices from the home menu 10
Change picture and sound settings 10
Use advanced Teletext features 13
Use the Electronic Programme Guide 14
Use Timers 14
Use subtitles 15
Use the TV clock 16
View photos and play music from a USB
storage device 17
Listen to digital radio channels 18
Update the TV software 18
Change TV preferences 19
Access decoder channel 19
Start a TV DEMO 20
Reset the TV to factory settings 20
7 Professional mode instruction 24
Introduction 24
Benefits of Professional mode 24
Professional Setup Remote control (2573
optional) 24
Activating the Professional mode setup menu
 25
Professional mode options 26
8 Connect devices 34
Back connector for 22 inch TV 34
Back connector for 26 inch TV and larger 36
Side connector 37
Connect a computer 38
Use a Conditional Access Module 39
Use Philips EasyLink 40
Use a Kensington lock 40
9 Product information 41
Supported display resolutions 41
Multimedia 41
Tuner/Reception/Transmission 41
Remote control 41
Power 41
Supported TV mounts 41
10 Troubleshooting 42
General TV issues 42
TV channel issues 42
Picture issues 42
Sound issues 43
HDMI connection issues 43
Computer connection issues 43
Contact us 43
6 Install channels 21
Automatically install channels 21
Manually install channels 22
Rename channels 23
Reorder channels 23
Test digital reception 23
Downloaded From TV-Manual.com Manuals
EN
1
English
Contents
1 Notice
2009 © Koninklijke Philips Electronics N.V. All
rights reserved.
Specifications are subject to change without
notice. Trademarks are the property of
Koninklijke Philips Electronics N.V or their
respective owners. Philips reserves the right
to change products at any time without being
obliged to adjust earlier supplies accordingly.
The material in this manual is believed
adequate for the intended use of the system.
If the product, or its individual modules or
procedures, are used for purposes other than
those specified herein, confirmation of their
validity and suitability must be obtained. Philips
warrants that the material itself does not
infringe any United States patents. No further
warranty is expressed or implied.
Warranty
• Risk of injury, damage to TV or void of
warranty! Never attempt to repair the
TV yourself.
• Use the TV and accessories only as
intended by the manufacturer.
• The caution sign printed on the back of
the TV indicates risk of electric shock.
Never remove the TV cover. Always
contact Philips Customer Support for
service or repairs.
Any operation expressly prohibited in
this manual, or any adjustments and
assembly procedures not recommended
or authorised in this manual shall void the
warranty.
Pixel characteristics
This LCD product has a high number of
colour pixels. Although it has effective
2
EN From TV-Manual.com Manuals
Downloaded
pixels of 99.999% or more, black dots or
bright points of light (red, green or blue)
may appear constantly on the screen.
This is a structural property of the display
(within common industry standards) and
is not a malfunction.
Open source software
This television contains open source
software. Philips hereby offers to deliver
or make available, upon request, for
a charge no more than the cost of
physically performing source distribution,
a complete machine-readable copy of
the corresponding source code on a
medium customarily used for software
interchange. This offer is valid for a period
of 3 years after the date of purchase of
this product. To obtain the source code,
write to:
GBU Customer Care Manager
Customer Care department
Philips Lighting
GBU Hospitality
Hurksestraat 2c
5652 AJ Eindhoven
The Netherlands
Compliance with EMF
Koninklijke Philips Electronics N.V.
manufactures and sells many products
targeted at consumers which, like
any electronic apparatus, in general
have the ability to emit and receive
electromagnetic signals.
One of Philips’ leading Business Principles
is to take all necessary health and safety
measures for our products, to comply
with all applicable legal requirements and
to stay well within the EMF standards
applicable at the time of producing the
products.
Philips is committed to develop, produce
and market products that cause no
adverse health effects. Philips confirms
that if its products are handled properly
for their intended use, they are safe
to use according to scientific evidence
available today.
1
2
3
Note
•• Only applicable to TVs supporting MPEG4-HD
standard
All other registered and unregistered
trademarks are the property of their respective
owners.
Remove fuse cover and fuse.
The replacement fuse must comply with
BS 1362 and have the ASTA approval
mark. If the fuse is lost, contact your
dealer in order to verify the correct type.
Refit the fuse cover.
In order to maintain conformity to the EMC
directive, the mains plug on this product must
not be detached from the mains cord cable.
Copyright
VESA, FDMI and the VESA Mounting Compliant
logo are trademarks of the Video Electronics
Standards Association.
® Kensington and Micro Saver are registered
US trademarks of ACCO World Corporation
with issued registrations and pending
applications in other countries throughout the
world.
Manufactured under licence from Dolby
Laboratories. Dolby and the double-D symbol
are trademarks of Dolby Laboratories.
Downloaded From TV-Manual.com Manuals
EN
3
English
Philips plays an active role in the
development of international EMF
and safety standards, enabling Philips
to anticipate further developments in
standardisation for early integration in its
products.
Mains fuse (UK only)
This TV is fitted with an approved
moulded plug. Should it become
necessary to replace the mains fuse, this
must be replaced with a fuse of the same
value as indicated on the plug (example
10A).
2 Important
Read and understand all instructions before you
use your TV. If damage is caused by failure to
follow instructions, the warranty does not apply.
Safety
•
•
•
Risk of electric shock or fire!
• Never expose the TV to rain or water.
Never place liquid containers, such as
vases, near the TV. If liquids are spilt
on or into the TV, disconnect the TV
from the power outlet immediately.
Contact Philips Consumer Care to
have the TV checked before use.
• Never place the TV, remote control
or batteries near naked flames or
other heat sources, including direct
sunlight.
To prevent the spread of fire, keep
candles or other flames away from
the TV, remote control and batteries
at all times.
• Never insert objects into the
ventilation slots or other openings on
the TV.
• When the TV is swivelled ensure that
no strain is exerted on the power
cord. Strain on the power cord can
loosen connections and cause arcing.
Risk of short circuit or fire!
• Never expose the remote control or
batteries to rain, water or excessive
heat.
• Avoid force coming onto power plugs.
Loose power plugs can cause arcing
or fire.
Risk of injury or damage to the TV!
4
EN From TV-Manual.com Manuals
Downloaded
•
•
•
• Two people are required to lift and
carry a TV that weighs more than
25 kg.
• When stand mounting the TV, use
only the supplied stand. Secure the
stand to the TV tightly. Place the
TV on a flat, level surface that can
support the combined weight of the
TV and the stand.
• When wall mounting the TV, use only
a wall mount that can support the
weight of the TV. Secure the wall
mount to a wall that can support the
combined weight of the TV and wall
mount. Koninklijke Philips Electronics
N.V. bears no responsibility for
improper wall mounting that result in
accident, injury or damage.
Risk of injury to children!Follow these
precautions to prevent the TV from
toppling over and causing injury to
children:
• Never place the TV on a surface
covered by a cloth or other material
that can be pulled away.
• Ensure that no part of the TV hangs
over the edge of the surface.
• Never place the TV on tall furniture
(such as a bookcase) without
anchoring both the furniture and TV
to the wall or a suitable support.
• Educate children about the dangers
of climbing on furniture to reach the
TV.
Risk of overheating! Never install the TV
in a confined space. Always leave a space
of at least 4 inches or 10 cm around the
TV for ventilation. Ensure curtains or
other objects never cover the ventilation
slots on the TV.
Risk of damage to the TV! Before you
connect the TV to the power outlet,
ensure that the power voltage matches
the value printed on the back of the TV.
Never connect the TV to the power
outlet if the voltage is different.
•
•
•
•
•
Risk of injury, fire or power cord damage!
Never place the TV or any objects on the
power cord.
To easily disconnect the TV power cord
from the power outlet, ensure that you
have full access to the power cord at all
times.
When you disconnect the power cord,
always pull the plug, never the cable.
Disconnect the TV from the power outlet
and aerial before lightning storms. During
lightning storms, never touch any part of
the TV, power cord or aerial cable.
Risk of hearing damage! Avoid using
earphones or headphones at high
volumes or for prolonged periods of time.
If the TV is transported in temperatures
below 5°C, unpack the TV and wait
until the TV temperature matches room
temperature before connecting the TV to
the power outlet.
Screen care
•
•
•
•
•
Avoid stationary images as much as
possible. Stationary images are images
that remain on-screen for extended
periods of time. Examples include:
on-screen menus, black bars and time
displays. If you must use stationary
images, reduce screen contrast and
brightness to avoid screen damage.
Unplug the TV before cleaning.
Clean the TV and frame with a soft,
damp cloth. Never use substances
such asalcohol, chemicals or household
cleaners on the TV.
Risk of damage to the TV screen! Never
touch, push, rub or strike the screen with
any object.
To avoid deformations and colour fading,
wipe off water drops as soon as possible.
Downloaded From TV-Manual.com Manuals
Disposal of your old product and
batteries
English
•
Your product is designed and manufactured
with high quality materials and components,
which can be recycled and reused.
When this crossed-out wheeled bin symbol
is attached to a product it means that the
product is covered by the European Directive
2002/96/EC. Please inform yourself about the
local separate collection system for electrical
and electronic products.
Please act according to your local rules and
do not dispose of your old products with your
normal household waste.
Correct disposal of your old product helps to
prevent potential negative consequences for
the environment and human health.
Your product contains batteries covered by
the European Directive 2006/66/EC, which
cannot be disposed with normal household
waste.
Please inform yourself about the local rules
on separate collection of batteries because
correct disposal helps to prevent negative
consequences for the environmental and
human health.
EN
5
3 TV overview
This section gives you an overview of
commonly used TV controls and functions.
Please read section 3 to 6 to set the basic
consumer menu first, then follow the
instructions in section 7 to set the Professional
mode menu.
Guest remote control
a
u
b
t
c
d
s
r
e
f
Side controls and indicators
4
q
g
h
p
i
j
3
o
k
2
1
l
a
POWER: Switches the product on
or off. The product is not powered
off completely unless it is physically
unplugged.
b P/CH +/-: Switches to the next or
previous channel.
c
SOURCE: Selects connected devices.
d VOLUME +/-: Increases or decreases
volume.
6
EN From TV-Manual.com Manuals
Downloaded
n
m
o ”+/- (Volume +/-)
Increases or decreases volume.
b aGUIDE
Switches between channel grid and
programme list.
q Colour buttons
• Selects tasks or options.
• When Professional mode is On, press
to operate Multi remote control
function. (See page 33 “Multi remote
control”).
c SUBTITLE
Launches the subtitle menu.
d AV
Selects connected devices.
e
f
ALARM ON
Launches [Alarm time] menu. (Only
applicable in [Hospitality] mode and in
some models.)
ALARM OFF
Press to disable the alarm. (Only
applicable in [Hospitality] mode and in
some models.)
g OK
• Confirms an entry or selection.
• Press to display the channel grid, when
watching TV.
h ▲▼◄► (Navigation buttons)
Navigates through the menus.
i SLEEP
Displays the sleep timer menu.
English
a B (Standby-On)
• Switches the TV to standby if the TV
is on.
• Switches the TV on if the TV is in
standby
p MENU / EXIT
Toggles the main menu on or off.
r Red button(DEMO)
Toggles the demonstration menu on or
off. (Only applicable in [Signage] mode, or
Professional mode is set to Off).
s Blue button (Audio Descriptor)
(For RF Digital TV only)
UK only: Enables audio commentary for
the visually handicapped.
t TELETEXT
Toggles Teletext on or off.
u b(OPTION)
Accesses options relating to the current
activity or selection.
Note
•• Channel grid is not available in some specific
modes.
j ¬ (MUTE)
Mutes or restores audio output.
k P+/- (Programme +/-)
Switches to the next or previous channel.
When the TV menu is on, this functions
as Page Up/Down.
l 0-9 (Numeric buttons)
Selects a channel or setting.
m ∏ (Picture format)
Launches the picture format menu.
n MHEG / CANCEL
UK only: Enables audio commentary for
the visually handicapped.
Downloaded From TV-Manual.com Manuals
EN
7
4 Use your
product
Note
•• If you cannot locate your remote control and
want to switch on the TV from standby, press
P/CH +/- or SOURCE at the side of the TV.
This section helps you perform basic operations
Switch your TV on/off or to
standby
To switch on
• If the standby indicator is off, press
POWER at the side of the TV.
• If the standby indicator is red, press
(Standby-On) on the remote control.
To switch to standby
• Press (Standby-On) on the remote
control.
»» The standby indicator switches to red.
To switch off
• Press POWER at the side of the TV.
»» The standby indicator switches off.
Tip
•• Though your TV consumes very little power
when in standby, energy continues to be
consumed. When not in use for an extended
period of time, disconnect the TV power cable
from the power outlet.
8
EN From TV-Manual.com Manuals
Downloaded
Switch channels
•
•
•
Press P +/- on the remote control or P /
CH +/- on the side of the TV.
Enter a channel number using the
Numeric buttons.
Use the channel grid.
Note
•• When you use a favourite list, you can only
select those channels in the list.
Note
•• Switch on the device before selecting it as a
source on the TV.
To mute or unmute sound
• Press to mute the sound.
• Press again to restore the sound.
English
Watch connected devices
Use Teletext
Use the AV button
1
1
2
3
Press AV.
»» The source list appears.
2
Press the Navigation buttons to select a
device.
Press OK to confirm your choice.
»» The TV switches to the selected
device.
Adjust TV volume
3
Press TELETEXT.
»» The main index page appears.
Select a page as follows:
• Press the Numeric buttons to enter a
page number
• Press P +/- or
to view the next or
previous page
• Press the Colour buttons to select a
colour coded item
Press TELETEXT to exit Teletext.
Note
•• For UK users only: Some digital TV channels
offer dedicated digital text services (for
example, BBC1).v
To increase or decrease volume
• Press
+/-.
• Press VOLUME +/- on the side of the TV.
Downloaded From TV-Manual.com Manuals
EN
9
5 Use more of
your product
Remove devices from the
home menu
Access TV menus
1
2
3
If a device is no longer connected to the TV,
remove it from the home menu.
Menus help you to install channels, change
picture and sound settings and access other
features.
1
Press MENU.
»» The menu screen appears.
Add new device
3
4
Press
to select a device to remove.
Press b (OPTIONS).
»» The [Remove device] list appears.
Press OK and select [Remove] to remove
the device.
»» The selected device is removed from
the home menu.
Setup
Watch TV
2
4
Press MENU
Change picture and sound
settings
Change picture and sound settings to suit your
preferences. You can apply pre-defined settings
or change settings manually.
Press the
to select and navigate
through one of the following menus.
• [Watch TV]Switches back to the
aerial source if another source is
selected.
• [Setup]Accesses menus that allow you
to change picture, sound and other TV
settings.
• [Add new device]Adds new devices to
the home menu.
Use Settings assistant
Use the Settings assistant to guide you
through the best picture and sound settings.
1
2
3
Press OK to confirm your choice.
Press EXIT to exit.
Tip
•• After selecting [Add new device], follow the
on-screen instructions to select the correct
device and connector.
10 EN From TV-Manual.com Manuals
Downloaded
Press MENU.
Press
to select [Setup] > [Picture]
> [Settings assistant].
Press OK.
»» The [Settings assistant] menu appears.
Follow the on-screen instructions to
choose your preferred picture settings.
Use Smart picture
Use Smart picture to apply pre-defined
picture settings.
1
2
Press MENU.
Press
to select [Setup] > [Picture]
> [Smart picture].
4
Press
to select one of the following
Smart picture settings.
• [Personal] Lists customised personal
picture settings.
• [Vivid] Maximises picture settings.
• [Standard] Adjusts picture settings to
suit most environments and types of
video.
• [Movie] Applies picture settings ideally
suited for movie viewing.
• [Game] Applies picture settings
maximised for fast-moving games.
• [Energy saving] Applies low-energy
picture settings.
•
•
•
•
•
Press OK to confirm your choice.
»» The selected Smart picture setting is
applied.
Manually adjust Picture settings
1
2
Press MENU.
Press
[Picture].
Picture
Sound
Features
Installation
to select [Setup] >
Settings assist.
Action
Smart picture
Personal
Contrast
•
•
Brightness
Colour
•
Hue
Sharpness
Software update
3
•
•
•
•
•
Noise reduction
Off
Press
to select one of the
following picture settings.
[Smart picture] Accesses pre-defined
smart picture settings.
[Contrast] Adjusts the intensity of bright
areas, keeping dark areas unchanged.
[Brightness] Adjusts the intensity and
details of dark areas.
[Colour] Adjusts colour saturation.
[Hue] Compensates colour variations in
NTSC encoded transmissions.
Downloaded From TV-Manual.com Manuals
•
[Sharpness] Adjusts the level of
sharpness in image details.
[Noise reduction] Filters and reduces
noise in an image.
[Tint] Adjusts the colour balance in an
image.
[Custom tint] Make a customised
tint setting. (Only available if [Tint] >
[Custom] is selected)
[Digital Crystal Clear] Fine-tunes each
pixel to match surrounding pixels. This
produces a brilliant, high-definition image.
• [Dynamic contrast] Automatically
enhances contrast in an image. A
[Medium] setting is recommended.
• [Dynamic backlight] Adjusts the
brightness of the TV backlight to
match lighting conditions.
• [MPEG artifact reduction] Smoothes
out transitions on digital pictures. You
can switch this feature on or off.
• [Colour enhancement] Makes
colours more vivid and improves the
resolution of details in bright colours.
You can switch this feature on or off.
[PC mode] Adjusts the picture when a
PC is connected to the TV via HDMI or
DVI.
[Picture format] Changes the picture
format.
[Horizontal shift] Adjusts the picture
horizontally for PC-VGA, DVI, HDMI or
YPbPr.
[Vertical shift] Adjusts the picture
vertically for PC-VGA, DVI, HDMI or
YPbPr.
EN
11
English
3
Change picture format
1
2
3
[Wide screen]Stretches
the classic 4:3 format to
16:9.
Press .
»» A picture format bar appears.
[Unscaled]For HD and PC
mode only, and in selected
models only. Allows
maximum sharpness.
Some distortion may
be present due to the
broadcaster’s systems.
Set your PC resolution to
wide screen mode for best
results.
Press
or
to select a picture format.
»» The selected picture format is
activated.
Press OK to confirm your choice.
Summary of picture formats
The following picture settings can be
configured.
Note
•• Depending on the format of the picture
source, some picture settings are not available.
[Auto format](Not for
PC mode.) Enlarges the
picture automatically to
best fit the screen. The
subtitles remain visible.
[Super zoom](Not for HD
and PC mode.) Removes
the black bars on the side
of 4:3 broadcasts. There is
minimal distortion.
[4:3]Shows the classic 4:3
format.
[Subtitle zoom]Displays
4:3 pictures over the full
area of the screen, with
sub-titles visible. Part of
the top of the picture is
clipped off.
[Movie expand 14:9](Not
for HD and PC mode.)
Scales 4:3 format to 14:9.
[Movie expand 16:9](Not
for HD and PC mode.)
Scales 4:3 format to 16:9.
12 EN From TV-Manual.com Manuals
Downloaded
Use Smart sound
Use Smart sound to apply pre-defined sound
settings.
1
2
3
4
Press MENU.
Press
to select [Setup] > [Sound]
> [Smart sound].
Press
to select one of the following
Smart sound settings.
• [Standard] Adjusts sound settings to
suit most environments and types of
audio.
• [News] Applies sound settings ideally
suited for spoken audio, such as the
news.
• [Movie] Applies sound settings ideally
suited for movies.
• [Personal] Applies the settings that
were customised in the sound menu.
Press OK to confirm your choice.
»» The selected Smart sound setting is
applied.
Adjust sound settings
1
2
Press MENU.
Press
to select [Setup] > [Sound].
»» The [Sound] menu appears.
Smart sound
• [Headphone volume] Adjusts
headphone volume. (Only appears
when Professional mode is [Off])
• [Auto volume] Automatically
reduces sudden volume changes, for
example, when switching channels.
When enabled, this produces a more
consistent audio volume.
• [Delta volume] Levels out volume
differences between channels or
connected devices. Switch to the
connected device before you change
the delta volume.
Standard
Bass
Sound
Features
Installation
Software update
3
Treble
Volume
Vol.vis.impaired
Balance
Audio language
English
Dual I-II
Dual I
Press
to select one of the
following sound settings.
• [Smart sound] Accesses pre-defined
smart sound settings.
• [Bass] Adjusts the bass level.
• [Treble] Adjusts the treble level.
• [Volume] Adjusts the volume.
• [Vol.vis.impaired] Adjusts the volume
of visually impaired audio when your
current channel supports visually
impaired function. (Applies for UK
only)
Note
•• [Vol.vis.imparied] only appears if you select
[Setup] > [Installation] > [Language] >
[Visually impaired] > [On].
•• [Visually impaired] (Audio Descriptor): Sets
the mix of visually impaired audio with regular
audio. When available, visually impaired audio
includes audio descriptions of on-screen
action.
• [Balance] Adjusts the balance of the
right and left speakers to best suit
your listening position.
• [Audio language] Available for digital
channels, when multiple languages
are broadcast. Lists available audio
languages.
• [Dual I-II] Selects between audio
languages if dual sound is broadcast.
• [Mono/Stereo] Selects between mono
or stereo if stereo is broadcast.
• [TV speakers] Turns TV speakers on
or off.
• [Surround] Enables spatial sound.
Downloaded From TV-Manual.com Manuals
Use advanced Teletext
features
Access the Teletext options menu
Most of the advanced Teletext features are
accessed via the Teletext options menu.
1
2
3
Press TELETEXT.
»» The Teletext screen appears.
Press b (OPTIONS).
»» The Teletext options menu appears.
Press
to select one of the following
options.
• [Freeze page] Freezes the current
page.
• [Dual/Full screen] Enables and
disables dual screen Teletext, which
splits the current channel or source to
the left of the screen, with Teletext on
the right.
• [Reveal] Hides or reveals hidden
information on a page, such as
solutions to riddles or puzzles.
• [Cycle subpage] Cycles through
subpages automatically if subpages are
available.
• [Language] Switches to a different
language group to display a language
correctly when that language uses a
different character set.
EN
13
English
Picture
4
5
Press OK to confirm your choice.
Press TELETEXT to exit the Teletext
options menu.
Select Teletext subpages
A Teletext page can hold several subpages.
Subpages are displayed on a bar next to the
main page number.
1
2
3
Press TELETEXT .
»» The Teletext screen appears.
Press
to select a Teletext page.
Press
to enter a subpage.
Use the Electronic
Programme Guide
EPG is an on-screen guide available for digital
channels. EPG allows you to:
• View a list of digital programmes being
broadcast
• View upcoming programmes
• Group programmes by genre
Switch on EPG
1
When watching TV, press a GUIDE.
»» The EPG planner screen appears
displaying information about the
scheduled programmes.
Note
•• EPG data is available only in selected countries
and can take some time to load.
Tip
•• Press a GUIDE to switch between EPG and
channel grid. (Channel grid will only appear in
some specific modes).
Use EPG
1
2
3
4
When watching TV, press a GUIDE.
»» The EPG planner screen appears.
Press MENU.
»» The program guide menu appears.
Press
to select an option, and then
press OK to confirm it.
Press EXIT to exit the EPG menu.
Use the EPG options menu
Use the EPG options menu to set or clear
reminders, change day and access other useful
EPG options.
1
2
3
4
5
Press a GUIDE.
Press b (OPTIONS).
»» The EPG menu appears.
Press
to select one of the following
options.
• [Show info]
• [Search by genre]
Press OK to enter or activate the option.
Press EXIT to exit the EPG menu.
Use Timers
You can set timers to switch the TV on or
switch to standby at a specified time.
Automatically switch the TV to
standby (Sleep timer)
Sleep timer switches the TV to standby after a
pre-defined period of time.
Tip
•• You can always switch off your TV earlier or
reset the Sleep timer during the countdown.
•• Press SLEEP on the Guest remote control to
quick access the Sleep timer menu.
14 EN From TV-Manual.com Manuals
Downloaded
3
4
Press MENU.
Press
to select [Setup] >
[Features] > [Sleep timer].
»» The bar appears..
Press
to set the sleep time.
»» The Sleep timer can be up to 180
minutes in steps of five minutes. If set
to zero minutes, the Sleep timer is
switched off..
Press OK to activate the Sleep timer.
»» The TV switches to standby after the
pre-defined period of time.
Alarm (On timer)
You can switch the TV to a specified channel
at a specified time, from standby or power-on
mode.
1
2
3
4
Press MENU.
Press
to select [Setup] >
[Features] > [On timer].
Press OK or to enter the [On timer]
menu.
• [Activate] Selects the frequency to
[Off] or [Once] or [Daily].
• [Time] Sets the starting time to switch
on the TV automatically.
• [Programme no.] Selects the channel.
Press EXIT to exit.
Tip
Use subtitles
English
1
2
You can enable subtitles for each TV channel.
Subtitles are broadcast via Teletext or DVB-T
digital broadcasts. With digital broadcasts,
you have the additional option of selecting a
preferred subtitle language.
Enable subtitles on analogue TV
channels
1
2
3
4
5
6
7
Select an analogue TV channel.
Press TELETEXT.
Enter the three-digit page number of the
subtitle page with the Numeric buttons.
Press TELETEXT to switch off Teletext.
Press SUBTITLE.
»» The [Subtitle mode] menu appears.
Select [On] to display subtitles always or
[On during mute] to display subtitles only
when audio is muted.
Press OK to enable subtitles.
Note
•• Repeat this procedure to enable subtitles on
each analogue channel.
Tip
•• Select [Subtitle mode] > [Off] to disable
subtitles.
•• Select [On timer] > [Activate] > [Off] to
disable [On timer].
•• Refer to page 32 “How to set the TV alarm?”
for more details about TV alarm.
Enable subtitles on digital TV channels
1
2
3
Downloaded From TV-Manual.com Manuals
When watching digital channels, press
SUBTITLE.
»» The [Subtitle mode] menu appears.
Select [On] to display subtitles always or
[On during mute] to display subtitles only
when audio is muted.
Press OK to enable subtitles.
EN
15
Select a subtitle language on digital TV
channels
Note
•• When you select a subtitle language on
a digital TV channel as described below,
the preferred subtitle language set in the
installation menu is temporarily overruled.
1
2
3
4
5
Press MENU.
Press
to select [Setup] >
[Features] > [Subtitle language].
Press OK or to enter the list of
available languages.
Press
to select a subtitle language.
Press OK to enable your selection.
Tip
Change the clock mode
1
2
3
4
5
Press
to select [Setup] >
[Installation] > [Clock] > [Auto clock].
Press OK or
menu.
to enter the [Auto clock]
Press
to select [Automatic] or
[Manual].
Press OK to confirm.
Change the Time zone
1
2
3
4
•• You can also access [Subtitle language] menu
while watching TV by pressing b(OPTIONS)
> [Subtitle language].
Press MENU.
Press MENU.
Press
to select [Setup] >
[Installation] > [Clock] > [Time zone].
Press
to select your Time zone.
Press OK to confirm.
Note
•• This option is only available if you select [Auto
clock] > [Manual] (In countries with clock
transmission data).
Use the TV clock
You can display a clock on the TV screen. The
clock displays the current time using time data
received from your TV service operator.
Use Daylight saving
1
2
Note
•• Please refer to page 31 “Clock setup” for more
details of Pro+ clock settings.
Display the TV clock
1
2
3
When watching TV, press b(OPTIONS)
»» The TV option menu appears.
Select [Clock].
Press OK.
Note
•• To disable the clock, repeat the above
procedure.
16 EN From TV-Manual.com Manuals
Downloaded
3
4
5
Press MENU.
Press
to select [Setup] >
[Installation] > [Clock] > [Daylight
saving].
Press OK or
to enter [Daylight saving].
Press
to select [Standard time] or
[Daylight saving time].
Press OK to enable your selection.
Note
•• This option is only available if you select [Auto
clock] > [Manual].
4
Press OK to view the selected photo in
full screen mode.
English
View photos and play music
from a USB storage device
Tip
Caution
•• When in full screen mode, press
between photos.
•• Philips is not responsible if the USB storage
to move
device is not supported nor is it responsible
for damage or loss of data from the device.
Your TV is fitted with a USB connector that
enables you to view photos or listen to music
stored on a USB storage device.
1
2
View a slide show of your photos
1
Turn on the TV.
Connect the USB device to the USB port
on the side of your TV.
»» The home menu appears.
2
Browse USB
Change slide show settings
Setup
1
3
4
Press
to select [Browse USB].
Press OK to confirm.
»» The USB thumbnail browser appears.
2
Tip
•• Press a GUIDE to switch between
thumbnail and file browsing views.
View photos
1
2
3
In the USB thumbnail browser, select
[Picture] and press to enter.
Press a GUIDE to switch between
thumbnail and file browsing views.
Press
album.
Press:
• OK to pause the slide show.
»» The icon appears.
• Press
to go back or move forward
to the next image.
• EXIT to stop the slide show.
Add new device
Watch TV
When a full screen image of a photo is
displayed, press OK.
»» A slide show begins from the selected
image.
to select a photo or a photo
Downloaded From TV-Manual.com Manuals
3
When viewing a slide show, press
b(OPTIONS).
»» The slide show options menu appears.
Press
to select one of the following.
• [Start/Stop slide.] Starts or stops a
slide show.
• [Slideshow trans.] Sets the transition
from one picture to the next.
• [Slideshow freq.] Sets the amount of
time that a picture is shown.
• [Rotate image] Rotates a picture.
• [Show info] Displays the picture
name, date, size and next picture in
the slide show.
Press OK to confirm your setting.
Note
•• [Rotate image] and [Show info] appear only
when you press OK to pause the slideshow.
EN
17
Listen to music
1
2
3
4
4
In the USB thumbnail browser view,
select [Music] and press to enter.
Press a GUIDE to switch between
thumbnail and file browsing views.
Press
album.
Note
•• Select [Filter channels] > [All] to exit radio
channels and view all channels.
to select music or a music
Press OK to play the selected music.
Music settings
When listening to music, press b(OPTIONS)
to access one of the following music settings.
• [Start/Stop play]
• [Repeat/Play once]
• [Shuffle on/off]
• [Show info]
• [TV speakers]
Disconnect a USB storage device
Update the TV software
Philips continuously tries to improve its
products and we recommend that you update
the TV software when updates are available.
Check www.philips.com/support for availability.
Check the current software version
1
2
Caution
•• Follow this procedure to avoid damage to your
USB storage device.
1
2
Press EXIT to exit the USB browser.
Wait for five seconds before you
disconnect the USB storage device.
Listen to digital radio
channels
If digital broadcasting is available, digital radio
channels are installed automatically during
installation.
1
2
3
When watching TV, press OK to display
the channel grid.
Press b(OPTIONS).
Press
to select [Filter channels] >
[Radio].
»» The radio channel grid appears.
18 EN From TV-Manual.com Manuals
Downloaded
Press
to select a radio channel and
press OK to listen.
Press MENU.
Press
to select [Setup] >
[Software update] > [Current software].
»» The TV displays the current software
information.
Update software (digital broadcasts)
You can update the TV software via a USB
device or OAD.
Update using a USB device
Connect your USB device to the USB port at
the side of your TV.
1
2
If the software update screen does not
appear automatically, select [Setup] >
[Software update] > [Local updates]
> [USB] to update the TV software
manually.
Follow the on-screen instructions to
complete the update.
Note
•• The TV restarts after the software update is
complete.
If Professional mode is [On], your TV automatically
receives software updates in semi-standby mode
without notice on screen. The TV restarts after the
software update is complete.
Access decoder channel
You can map channels provided through a
decoder or descrambler to your TV channel
selection. In this way, you can select these
channels by using the RC of your TV. The
decoder or a descrambler must be connected
to EXT1 (SCART).
Change TV preferences
Set decoder channel
1
2
1
2
3
Press MENU.
Press
to select [Setup] >
[Installation] > [Preferences].
Press OK or to enter [Preferences].
• [Location] Optimises TV settings for
your location - home or shop.
Note
Map channels from a decoder or descrambler
3
4
If [Shop] mode is selected:
•• The [Smart picture] setting will be switched
to [Vivid] automatically to display the brightest
backlight on screen.
•• E-sticker is applicable to display the TV selling
features on screen.
• [Volume bar] Displays the volume bar
when adjusting the volume.
• [Channel info.] Displays information
about the TV channel every time you
switch channels. Select [Full] to view
channel information or [Off] to turn off
the channel information.
• [EasyLink] Enables one-touch play and
one-touch standby between EasyLink
compliant devices.
• [E-sticker] For shop mode only. Sets the
location of the e-sticker.
Downloaded From TV-Manual.com Manuals
English
Update using OAD (On the Air
software Download)
5
6
7
8
9
Press MENU.
Press
to select [Setup] >
[Installation] > [Preferences] >
[Decoder].
Press OK or
.
to enter [Decoder] menu
Press
to select [Channel] and press
OK or to enter.
»» A list of analogue channels appears on
the screen.
Press
to select one channel to map
to the decoder/descrambler channel and
press OK to confirm.
Select [Status] and press OK or
enter.
to
Press
to select [EXT 1] (SCART)
the connector used by the decoder/
descrambler.
Press OK.
Press EXIT to exit.
EN
19
Start a TV DEMO
Note
Before starting DEMO, make sure to activate one
of the following setting for TV DEMO to take effect:
1. [PBS settings] > [PBS mode] > [Off].
2. [PBS settings] > [Applications] > [Signage].
1
2
3
Press Red button (DEMO) on the
remote control.
Press
to select a demo and press OK
to view it.
Press Red button (DEMO) to exit.
Reset the TV to factory
settings
You can restore the default picture and sound
settings of your TV. Channel installation settings
remain the same.
1 Press MENU.
2 Press
to select [Setup] >
[Installation] > [Factory settings].
3 Press OK or to enter the [Factory
settings] menu.
»» A factory setting message appears.
4
5
Select [Reset] to start resetting.
Press EXIT to exit.
20 EN From TV-Manual.com Manuals
Downloaded
Picture
Sound
The first time you set up your TV, you are
prompted to select a menu language and to
install TV and digital radio channels (if available).
This chapter provides instructions on how to
re-install and fine tune channels.
Automatically install channels
Features
Installation
Language
Menu language
Channel install.
Channel assistant
Preferences
Location
Decoder
Channel
Clock
Auto clock
Factory settings
Action
Software update
3
Press OK or to enter the menu.
»» The country menu appears.
Select your country,
then press OK
This section describes how to search and store
channels automatically.
3
Sound
Menu language
Features
Installation
to enter [Menu language].
Language
Menu language
Channel install.
Primary audio language
Preferences
Secondary audio language
Decoder
Decoder
Cl
Menu languageock
Clock
-Primary
- - - subtitle in
English
----
Factory settings
-------
Software update
4
5
6
Switzerland
Turkey
Press
to select [Setup] >
[Installation] > [Language] > [Menu
language].
Picture
Press
Hearing impaired
UK
Ukraine
4
5
1
to return to [Installation] menu.
Press MENU.
Press
to select [Setup] >
[Installation] > [Channel install.] >
[Channel assistant].
Downloaded From TV-Manual.com Manuals
Press OK to confirm your choice.
»» The channel installation guide appears
on the screen.
From the channel installation guide screen
, select [Full installation] to automatically
install all TV channels and digital radio
channels.
Start automatic installation.
This takes a few minutes.
Step 2 Select your country
1
2
to select your country.
Install the available analogue and digital
TV channels and digital radio channels
automatically.
to select a language setting.
Select your country for proper channel
installation.
Press
Step 3 Install channels
Press OK to confirm.
Press
Slovenia
Sweden
Press MENU.
Press OK or
Slovakia
Spain
Step 1 Select your menu language
1
2
English
6 Install channels
Full installation
Skip installation
2
Press OK to confirm.
»» The TV starts to search and store all
the available channels.
EN
21
System searching. Please wait.
Digital channels found
Analogue channels found
7
0
Picture
Stop
3
Sound
Sound
Analogue: Manual
Features
When installation is complete, press OK
to return to [Installation] menu.
Installation
1
2
3
Press MENU.
Press
to select [Setup] >
[Installation] > [Channel install.] >
[Standby update].
Select [On] to enable the automatic
update or select [Off] to disable it.
Manually install channels
3
4
5
6
1
2
3
Step 1 Select your system
4
5
•• Skip this step if your system settings are
correct.
1
2
Press MENU.
Press
to select [Setup] >
[Installation] > [Channel install.] >
[Analogue: Manual].
»» The [Analogue: Manual] menu appears.
6
7
8
9
22 EN From TV-Manual.com Manuals
Downloaded
Standby update
Preferences
Decoder
Decoder
Start up message
System
Digital Test recept...
Clock
Analogue: Manual
Factory settings
Press OK or
Press
region.
to enter [System] menu.
to select your country or
Press OK to confirm.
Press to return to [Channel install.]
menu.
Step 2 Search and store new TV
channels
This section describes how to search and store
analogue TV channels manually.
Note
Channel assistant
Channel install.
Software update
Step 4 Update the channel list
You can choose to enable standby mode auto
update of channels. If you enable this feature,
the new channels stored in your TV will be
updated every morning according to the
channel information in the broadcast.
Language
Press MENU.
Press
to select [Setup] >
[Installation] > [Channel install.] >
[Analogue: Manual].
»» The [Analogue: Manual] menu appears.
Press
to select [Search] and then OK
or to enter [Search].
Press
to manually enter the threedigit frequency.
Press OK to begin search.
»» If a channel is unavailable at the
selected frequency, press OK to search
for the next available channel.
Press ◄ when the new channel is found.
Press
to select [Store new channel]
to store the new channel under a new
channel number.
Press OK or to enter [Store new
channel] and press OK.
Press to return to the [Analogue:
Manual] menu.
1
2
3
4
5
6
7
8
Press MENU.
Press
to select [Setup] >
[Installation] > [Channel install.] >
[Analogue: Manual].
»» The [Analogue: Manual] menu appears.
Press
OK or
to select [Fine-tune] and then
to enter [Fine-tune].
Press
to adjust frequency.
Press OK when done.
Press
to select [Store current
channel] to store the fine-tuned channel
under the current channel number.
Press OK or to enter [Store curr.
chan.] and press OK.
Press to return to the [Channel install.]
menu.
Rename channels
Channels can be renamed so that a name of
your choice appears whenever the channel is
selected.
1
2
3
4
5
6
When watching TV, press OK to display
the channel grid .
Press
to select the channel you
want to rename.
Press b (OPTIONS).
»» The channel options menu appears.
Press
to select [Rename channel].
»» A text input box appears.
Press
to select and change
characters.
Select [Done] to finish renaming
channels.
Tip
•• Use [Aa] to change upper-case letter to
lower-case letter and vice versa.
Downloaded From TV-Manual.com Manuals
Reorder channels
After you install channels, you can rearrange the
order in which they appear.
1 When watching TV, press OK to display
the channel grid .
2 Press b (OPTIONS).
»» The channel options menu appears.
3
Press
to select [Reorder] and then
OK to return to the channel grid.
4 Press
to select the channel you
want to reorder and press OK.
»» The selected channel is highlighted.
5
Press
to move the highlighted
channel to your preferred position and
press OK.
6 Press b (OPTIONS).
»» [Done reordering] appears on the
screen.
7
Press OK to finish reordering.
Test digital reception
If using digital broadcasts, you can check the
quality and signal strength of digital channels.
This allows you to reposition and test your
antenna or satellite dish.
1 Press MENU.
2 Press
to select [Setup] >
[Installation] > [Channel install.] >
[Digital: test recept].
3 Press OK or to enter the menu.
4 Press
to enter the frequency of
the channel you want to test.
5 Press OK to confirm the frequency and
then press OK again to confirm [Search].
6 When complete, select [Store] to store
the frequency.
Note
•• If the signal quality and strength is poor,
reposition the antenna or satellite dish and
retest.
•• If you still have problems with the reception
of your digital broadcast, contact a specialised
installer.
EN
23
English
Step 3 Fine-tune analogue channels
7 Professional
mode
instruction
Professional Setup Remote
control (2573 optional)
Introduction
Included in this TV is a special functional
mode that allows the TV to be configured for
Hospitality or Signage applications. This feature
is called Professional mode.
This section has been designed to help install
and operate this TV in Professional mode.
Before reading this section, please read section
3 to 6 to set the basic functionality of this TV.
0
c
Benefits of Professional mode
This TV is specially designed to operate in
Professional Mode. Professional Mode offers the
following benefits:
•
•
•
•
•
•
Access to the [Consumer Menu] can be
blocked. This prevents users (e.g. guests)
from deleting or changing channel settings
and/or modifying picture and sound
settings. This ensures that TVs are always
set up correctly.
A switch-on volume and channel can be
selected. After switching on, the TV will
always start on the specified volume level
and channel.
The maximum volume level of the TV can
be limited in order to prevent disturbance
to other guest.
Channels can be blanked (Video only).
The TV local buttons VOLUME +/-, P/
CH+/- and SOURCE can be locked
Screen information can be suppressed.
24 EN From TV-Manual.com Manuals
Downloaded
a
b
English
a C button (OPTIONS)
Accesses options relating to the current
activity or selection. (Equals to the function
of b (OPTIONS) on Guest remote
control).
b E button (OK)
Confirms an entry or selection.
c (Enters Professional setup menu)
• Selects SETUP mode first.
• Press M button to enter the Professional
setup menu.
Note
•• SETUP mode should be selected for hotel
installer.
Activating the Professional
mode setup menu
1
2
3
4
5
Switch on the TV and select a TV channel.
Press the following buttons to access
Professional mode setup menu:
• [3, 1, 9, 7, 5, 3+¬(MUTE)] on Guest
remote control.
• M button on Professional setup
remote control. (When SETUP mode
is selected on the Professional setup
remote control.)
Press ▲▼◄► on the remote control to
select and change any of the settings.
Select [PBS settings] > [Store] and select
[Confirm] to save the setting. Press MENU
/ EXIT to exit Professional mode menu
without saving.
For Professional mode settings to take effect,
you must restart the TV mains power.
Downloaded From TV-Manual.com Manuals
EN
25
Professional mode options
This paragraph describes the functionality of each item in the Professional mode setup menu.
Layer 1
Layer 2
Layer 3
PBS settings
PBS mode
Off / On
Application
Hospitality / Signage
Consumer setup
Action
Smartloader / USB to TV
Action
TV to Smartloader / USB
Action
Store
Action
Reset
0~60
Maximum volume
0 ~ 60
Switch on picture format
Auto format / Super zoom / 4:3 / Subtitle Zoom
/ Movie expand 14:9 / Movie expand 16:9 / Wide
screen / Unscaled
Low power standby (Green / Fast)
Fast / Green
Power on
On / Standby / Last status
Smart power
Off / Low / Medium / High
Display message
Off / On
Set ID (Only available in Signage
mode)
Serial Xpress Adress ID range: 0~63
Last status
Off / On
User defined
0 ~ 60
Last status
Off / On
User defined
[List of channels]
Line 1
Edit
Line 2
Edit
Clear
Action
Message Time-out
20 sec / 25 sec / 30 sec
Local KB block
Off / On / All
RC lock
Off / On
OSD display
Off / On
High security mode
Off / On
Auto scart
Off / On (EXT 1 / EXT 2 / Power scart)
HDMI-CEC in
Off / On
USB break in
Off / On
Monitor out
Off / On
Switch on settings
Switch on volume
Switch on channel
Welcome message
Control settings
26 EN From TV-Manual.com Manuals
Downloaded
Layer 2
Enable teletext
Clock setup (Only
available for some
models)
Speaker settings
Installation
Add current
channel to PayTV
ring
Layer 3
For Prison
Off / On
Enable MHEG
Off / On
Enable EPG
Off / On
Enable subtitle
Off / On
Display standby
Off > 1 > 2 > 3 > 4 > 5
Display on
Off > 1 > 2 > 3 > 4 > 5
Time setting
Time setup table
Time download
On / Off
Download program
List of Analogue / Digital channels.
Time offset
GMT: -12 > ....> 0 > ... > 12
Buzzer volume
Off / Low / High
TV speaker enable
On / Off
Independent main speaker mute
On / Off
Default main speaker volume
0 ~ Max
Blank channel
All available channels.
Disable auto updating
Software / Channels / Both / Off
Skip scrambled signals
Off / On
Smart RC
Off / On
Multi remote control
Blue / Green / Yellow / Red / Off
R0
All available channels.
R1
Pay TV channel list.
R2
Pay TV channel list
Downloaded From TV-Manual.com Manuals
English
Layer 1
EN
27
PBS settings
[PBS mode]
Enables / disables the Professional mode.
• [On]: All settings in the Professional
mode Setup menu are in effect.
• [Off]: The TV operates as a normal
(consumer) TV.
[Application]
1
2
When application is [Hospitality], the
following are activated.
• Last status is disabled.
• Limited Consumer menu: When
in Professional mode, the guest can
display the Consumer menu to adjust
TV parameters. However, these
settings will not be stored in TV
memory.
• TV lock and parental ratings (except
Sleep timer) are disabled.
• Entry into service mode is disabled
in order to prevent the guest from
changing service settings.
When application is [Signage], the below
functions behave as per normal consumer.
• Last status is enabled.
• The full TV menu can be accessed and
changes are stored in TV memory.
• TV lock and parental ratings are
enabled.
• Entry into service mode is enabled.
Note
•• The default application for TV should be
[Hospitality], while that for monitor should
be [Signage].
[Consumer setup]
A shortcut to enter the full TV menu. This
allows the installers to do all the TV setup
settings.
Note
•• Selects [PBS settings] > [Store] to save
the changes in the [Consumer setup
menu].
28 EN From TV-Manual.com Manuals
Downloaded
[Smartloader / USB to TV]
Loads the TV configuration data (including the
video, audio, channel Table, and Professional
mode settings) from a Smartloader / USB device
to the TV set.
[TV to Smartloader / USB]
Loads the TV configuration data (including the
video, audio, channel Table, and Professional mode
settings) from the TV set to a Smartloader /USB
device.
[Store]
Selects [Confirm] to store Professional mode
settings.
Note
After storing the settings, refer to page 29
“Low power standby (Green / Fast)”:
• When [Fast] is selected, you need to
restart the TV mains power for the
changes in Professional mode to take
effect.
• When [Green] is selected, you need to
switch the TV from standby to on again
for the changes in Professional mode to
take effect.
[Reset]
Selects [Yes] to reset all settings in Professional
mode to factory default.
Switch on settings
[Maximum volume]
This option specifies the maximum allowable
volume level of the TV.
[Switch on picture format]
Sets available picture format when the TV is
switched on.
Note
•• If the picture format is not supported
with the activated source, [Auto format]
detection is applied.
[Power on]
The power on function allows the TV to enter a
specific mode ([On], [Standby], or [Last status])
of operation after the mains power is activated.
• [On]: When set, the TV will always turn
on after the mains power is activated.
• [Standby]: When set, the TV will always
turn to standby after the mains power is activated.
• [Last status]: When set, the TV will
always turn to the last status (either On
or Standby) whenever the mains power
is activated.
[Smart power]
Adjusts the picture backlight to achieve the
following power saving mode.
• [Off]: Smart power is disabled. ( Vivid
mode is applied).
• [Low]: The picture backlight is at low
power saving mode. (Movie mode is
applied).
• [Medium]: The picture backlight is at
medium power saving mode. (Standard mode is applied).
• [High]: The picture backlight is at high
power savings (Energy saving mode is
applied).
Note
English
[Low power standby (Green / Fast)]
Defines the power mode when TV enters to
standby by pressing remote control power button
or TV local power button.
• [Fast]: When set, the TV will enter semistandby mode to achieve fast powering
up.
• [Green]: When set, the TV will enter
low standby power mode to achieve
minimum power consumption.
•• Selects [Welcome message] ≥ [Message
time-out] to set the period of time to
display the welcome message.
[Set ID]
(Only available in [Signage] mode). This function
allows installer to designate a serial ID number for
each TV. Through the ID number, the installer can
control each TV by using RS232-device-chaining.
Switch on volume
When the guest switches the TV on, it will play at
the specified volume level.
• [Last status]: If [On] is selected, the TV
will be automatically switched to the
last volume status whenever the mains
power is turned on. (The volume level
can not exceed the [Maximum volume]
level).
• [User defined]: (Only appears when you
select [Last status] ≥ [Off]. )The guest
can adjust his/her preferred switch on
volume level.
Switch on channel
When the guest switches the TV on, it will play at
the specified channel.
• [Last status]: If [On] is selected, the TV
will be automatically switched to the
last channel status whenever the mains
power is turned on.
• [User defined]: (Only appears when you
select [Last status] ≥ [Off]). The guest
can choose his/her preferred switch on
channel.
[Display message]
• [Off]: Disables the display of the
welcome message.
• [On]: Enables the display of the welcome
message for a pre-defined time after the
TV turns on from standby or off.
Downloaded From TV-Manual.com Manuals
EN
29
Welcome message
The Welcome message function allows the TV
to show a customized greeting to the hotel
guest whenever the TV is switched on. This
helps to personalize the hotel experience for
guests. The Welcome message can consist
of 2 lines of text, with each line containing a
maximum of 20 alphanumeric characters. Use
▲▼◄►on the remote control to compose
the Welcome message.
Note
•• To activate the Welcome message, the
[Display message] option must be [On].
•• Welcome message is always disabled if you
select [Control settings] > [OSD display]
> [Off.]
• [Line 1]: Sets the characters of the
first line message.
• [Line 2]: Sets the characters of the
second line message.
• [Clear]: Clear the settings in Line 1
and Line 2.
• [Message Time-out]: Sets the period
of time to display the welcome
message on the screen when TV is
turned on from standby / Off.
Control settings
[Local KB lock]
• [Off]: The TV local buttons
VOLUME+/-, P/CH +/- and SOURCE
will function normally.
• [On]: The TV local buttons VOLUME
+/-, P/CH +/- and SOURCE are
locked.
• [All]: All TV local buttons are locked,
including BPOWER button.
[RC lock]
Disables the operation of the Guest remote
control.
• [Off]: All buttons on Guest remote
control will function normally.
30 EN From TV-Manual.com Manuals
Downloaded
• [On]: All buttons on the Guest remote
control are disabled. (It is still possible
to enter the Professional setup menu by
pressing [3, 1, 9, 7, 5, 3+¬(MUTE)]).
[OSD display]
Sets this function to show or hide screen
information.
• [Off]: Screen information is suppressed.
• [On]: Normal screen information is
displayed.
[High security mode]
• [Off]: Professional mode setup menu
can be accessed by both Guest remote
control (Press [3, 1, 9, 7, 5, 3 +
¬(MUTE)] )and the Professional setup
remote control (Press M button)
• [On]: Professional mode setup menu
can only be accessed by the Professional
setup remote control.
[Auto scart]
Enables auto scart switching or break-in
Professional mode.
• [Off]: Disables auto scart switching or
break-in Professional mode.
• [On]: Enables auto scart switching or
break-in Professional mode.
• [EXT 1]: (SCART 1)(Only available if
EXT I source is connected to the TV).
Selects EXT I as the auto switching
source when TV restarts from standby /
Off, or when EXT 1 signal is detected.
• [EXT 2]:(SCART 2)(Only available if
EXT 2 source is connected to the TV).
Selects EXT 2 as the auto switching
source when TV restarts from standby /
Off, or when EXT 2 signal is detected.
• [Power scart]: Sets scart source as
power on / off button. When the
connected scart source is turned on /
off, the TV enters to on / standby mode
simultaneously.
Note
•• Before activating HDMI-CEC in function, make
sure the HDMI-CEC compliant devices are
turned to on.
•• Selects [EasyLink] > [On] first before enabling
[HDMI-CEC in] in Professional mode.
•• Refer to page 40 on “Use Philips EasyLink” for
more details about HDMI-CEC function.
• [Off]: Disables HDMI-CEC feature in
Professional mode.
• [On]: Enables HDMI-CEC feature in
Professional mode.
[USB break-in]
Enables or disables USB break-in feature in
Professional mode.
• [Off]: When USB is plugged in,
the [Multimedia] menu will not
appear automatically, but users can
access [Multimedia] menu from the
[Consumer setup] menu.
• [On]: When USB is plugged in,
the [Multimedia] menu appears
automatically.
[Enable MHEG] (For UK only)
• [Off]: Disables MHEG in Professional
mode.
• [On]: Enables MHEG in Professional
mode.
English
[HDMI-CEC in]
HDMI-CEC (Philips EasyLink) enables one-touch
play and one touch standby between HDMI-CEC
compliant devices.
[Enable EPG]
• [Off]: Disables EPG in Professional
mode.
• [On]: Enables EPG in Professional mode.
[Enable subtitle]
• [Off]: Closes subtitles in Professional
mode.
• [On]: Displays subtitles in Professional
mode.
Clock setup
Note
•• Only applicable for the models with clock
display.
[Monitor out]
Refer to the blanking and muting of the video
and audio out to prevent illegal copying of TV
channels.
• [Off]: Disables monitor out.
• [On]: Enables monitor out.
Note
•• If SCART 1 is selected as TV input source,
monitor out function will be disabled through
SCART 2.
[Enable teletext]
• [Off]: Disables teletext in Professional
mode.
• [On]: Enables teletext in Professional
mode.
Downloaded From TV-Manual.com Manuals
[Display standby]
Adjusts the brightness of clock display when the
TV is in standby mode.
[Display on]
Adjusts the brightness of clock display when the
TV is on.
[Time setting]
(Appears if you select [Clock setup] ≥ [Time
download] ≥ [Off]) Sets the time manually.
EN
31
[Time downloading]
• [Off]: Sets the time manually from the
[Time setting] menu.
• [On]: Sets the time by downloading
from the signal system in the [Download
program] menu.
[Download program]
(Appears if you select [Clock setup] ≥ [Time
download] ≥ [On]). Selects the programme
where time downloading must be performed.
[Time offset]
(Appears if you select [Clock setup] ≥ [Time
download] ≥ [On]) Selects the correct time
zone which is downloaded from [Download
program].
[Buzzer volume]
Selects the volume of the clock buzzer.
How to set the TV alarm?
1
Selects [Hospitality] in the [Application]
menu.
2 Sets the time either from [Time setting] or
[Download program]. When set, the time
will be shown on the clock display.
3 Press ALARM ON on the Guest remote
control to access the [Alarm] menu.
• [Alarm time]: Sets the alarm time.
• [Alarm status]: Displays current alarm
status.
• [Alarm off]: Selects [Yes] to cancel
the alarm or [No] to keep the alarm
enabled.
Note
•• When the alarm is enabled,
icon
appears on the clock display.
•• Press
ALARM OFF on the Guest
remote control to cancel the alarm,
icon disappears from the clock display
simultaneously.
32 EN From TV-Manual.com Manuals
Downloaded
Speaker settings
[TV speaker enable]
• [Off]: Disables the TV speaker. The
headphone volume functions normally.
• [On]: The TV speaker is enabled.
(Default setting).
[Independent main speaker mute]
This option only appears when you select [TV
speaker enable] ≥ [On].
• [Off]: Press ¬(MUTE) or”+/- on the
Guest remote control will affect both
the TV speaker and the headphone
volume (Default setting)
• [On]: Press ¬(MUTE) on the Guest
remote control will affect the TV
speaker volume only. The headphone
volume functions normally.
Note
•• If the TV speaker is muted independently,
press”+/- on the Guest remote control
will only affect the headphone volume.
[Default main speaker volume]
Only appears when you select [Independent main
speaker mute] ≥ [On]. Users can set the TV
speaker and headphone volume to a certain level
as the default setting. This option can avoid sudden
high-volume when TV speaker is turned on again
from independently mute.
Installation
[Blank channel]
The Blank channel function disables the display
of video on the TV, but does not affect the audio
output. This function can be used for audio
applications (example: music-only channels, and so
on) which do not necessarily require the display
of video.
1 Enters the [Blank channel], the list of all
channels appear.
2 Selects one or more channels and press OK
to mark.
3 The channels marked with [X] will not
display video on the TV.
[Skip scrambled signals]
• [Off]: Allows scrambled channels in
the channel list.
• [On]: Skips the scrambled channels in
the channel list.
[Smart RC]
• [Off]: PayTV channels are accessible
via the Guest remote control.
• [On]: PayTV channels are only
accessible via the Smoovie remote
control.
[Multi remote control]
Guest remote control supports up to four
televisions operating in one room without
interference from each other’s remote controls.
Each TV and the Guest remote control can be
set to match each others.
1 Enter [Multi remote control] and
designate one colour (Blue / Green /
Yellow / Red) to the TV. Select [Off] to
disable [Multi remote control] function.
2 Set the Guest remote control to the
corresponding colour by pressing
MENU and one of the colour button
simultaneously for more than 4 seconds.
3 The Guest remote control can operate
the TV with the corresponding colour.
Downloaded From TV-Manual.com Manuals
Note
English
[Disable auto updating]
• [Software]: Disables automatic TV
software update via OAD (On the air
software download).
• [Channel]: Disables automatic channel
installation when new channels are
detected.
• [Both]: Disables automatic update
of the TV software and the channel
installation.
• [Off]: Enables automatic update of
the TV software and the channel
installation.
•• EXAMPLE: Press MENU and Red button
simultaneously on the Guest remote
control for more than 4 seconds to
operate the TV with [Red] colour selected
in [Multi remote control] menu.
•• Guest remote control will be set to default
Blue colour after replacing batteries.
Add current channel to PayTV ring:
This function allows you to customized PayTV
channel list.
1
2
3
4
Switch to the channel you prefer to add into
the PayTV ring.
Enter [Add current channel to PayTV ring]
menu.
Select one of the PayTV ring below to mark
current channel to:
• [R1]: If [Smart RC] is [On], R1 channels
marked with [X] are only accessible via
the Smoovie remote control 1.
• [R2]: If [Smart RC] is [On], R2 channels
marked with [X] are only accessible via
the Smoovie remote control 2.
Enter [R0] (all available channels) to unmark
the channels you have marked in [R1] and
[R2] to prevent users from watching full
PayTV channels via Guest remote control.
Note
•• All non-PayTV channels are listed in [R0].
EN
33
8 Connect devices
This section describes how to connect
various devices with different connectors and
supplements examples provided in the Quick
Start.
a PC IN (VGA and AUDIO IN)
Audio and video input from a computer.
PC IN(AUDIO)
Note
VGA
•• Different types of connectors may be used to
connect a device to your TV, depending on
availability and your needs.
VGA
Back connector for 22 inch
TV
8
7
9
34 EN From TV-Manual.com Manuals
Downloaded
b EXT 2 (Y Pb Pr and AUDIO L/R)
Analogue audio and component video
input from analogue or digital devices
such as DVD players or game consoles.
c EXT 1 (CVBS and RGB)
Analogue audio and video input from
analogue or digital devices such as DVD
players or game consoles.
English
AUDIO
IN
f SPDIF OUT
Digital audio output to home theatres
and other digital audio systems.
SPDIF OUT
d TV ANTENNA
Signal input from an antenna, cable or
satellite.
g HDMI 1
Digital audio and video input from highdefinition digital devices such as Blu-ray
players.
TV ANTENNA
e AV OUT (VIDEO OUT and AUDIO
OUT L/R)
Audio and video output to analogue
devices such as another TV or a recording
device.
Downloaded From TV-Manual.com Manuals
Connections via DVI or VGA require an
additional audio cable.
h SERV. U (For Pro+ 3v3 signal level Serial
Xpress)
For technical application only.
EN
35
i IR LINK (Only in some models)
Connector for an IR Link compliant
device. (e.g. set-up box).
IR LINK
IN
IR LINK
Audio input from devices that require
a separate audio connection, such as a
computer.
Connections via DVI or VGA require an
additional audio cable .
b EXT 3 (Y Pb Pr and AUDIO L/R)
Analogue audio and component video
input from analogue or digital devices
such as DVD players or game consoles.
Back connector for 26 inch
TV and larger
SPDIF
OUT
7
a HDMI 1 (HDMI and AUDIO IN)
Digital audio and video input from highdefinition digital devices such as Blu-ray
players.
36 EN From TV-Manual.com Manuals
Downloaded
c EXT 1 (RGB and CVBS)/EXT 2 (CVBS)
Analogue audio and video input from
analogue or digital devices such as
DVD players or game consoles. EXT 2
supports S-Video.
EXT1/ EXT2
(RGB/CVBS)/ (CVBS)
Side connector
English
d TV ANTENNA
Signal input from an antenna, cable or
satellite.
1
TV ANTENNA
2
3
4
5
6
e SPDIF OUT
Digital audio output to home theatres
and other digital audio systems.
f SERV. U (For Pro+ 3v3 signal level Serial
Xpress)
For technical application only.
g IR LINK (Only in some models)
Connector for an IR Link compliant
device. (e.g. set-up box).
IR LINK
a COMMON INTERFACE
Slot for a Conditional Access Module
(CAM).
b AUDIO L/R
Audio input from analogue devices
connected to VIDEO.
IR LINK
IN
Downloaded From TV-Manual.com Manuals
EN
37
c VIDEO
Composite video input from analogue
devices such as VCRs.
Connect a computer
Before you connect a computer to the TV
• Set the screen refresh rate on your
computer to 60Hz.
• Select a supported screen resolution on
your computer.
Connect a computer with one of the following
connectors:
Note
•• Connections via DVI or VGA require an
d USB
Data input from USB storage devices.
e L(Headphone)
Stereo audio output to headphones or
earphones.
f HDMI (Only for TVs 26 inches and
larger)
Digital audio and video input from highdefinition digital devices such as Blu-ray
players.
38 EN From TV-Manual.com Manuals
Downloaded
additional audio cable.
•
HDMI cable
•
DVI-HDMI cable
For TV of size 22 inch
PC IN(AUDIO)
For TV of size 26 inch and larger
AUDIO IN :
LEFT / RIGHT
HDMI 1 / DVI
DVI
For TV of size 22 inch
English
Insert and activate a CAM
HDMI cable and HDMI-DVI adaptor
•
Caution
PC IN(AUDIO)
For TV of size 26 inch and larger
AUDIO IN :
LEFT / RIGHT
HDMI 1 / DVI
•• Be sure to follow the instructions described
below. Wrong insertion of a CAM may
damage both the CAM and your TV.
1
2
DVI
Switch off the TV.
Following the directions printed on the
CAM, gently insert the CAM into the
COMMON INTERFACE at the side of the
TV.
VGA cable
•
For TV of size 22 inch only
PC IN(AUDIO)
3
4
VGA
VGA
Push the CAM in as far as it will go.
Turn on the TV and wait for the CAM to be
activated. This may take several minutes. Do
not remove the CAM from the slot when
in use — removing the CAM will deactivate
digital services.
Access CAM services
1
Use a Conditional Access
Module
A Conditional Access Module (CAM) is
provided by digital TV service operators to
decode digital TV channels.
Note
2
After inserting and activating the CAM,
press MENU.
Press
to select [Setup] > [Features]
> [Common interface].
»» Applications provided by the digital TV
service operator appear on the screen.
Note
•• This menu option is available only if the CAM
is inserted and activated correctly.
•• If required, refer to documentation from your
operator on how to insert a smart card into
the Conditional Access Module.
Downloaded From TV-Manual.com Manuals
EN
39
Use Philips EasyLink
Use a Kensington lock
Your TV supports Philips EasyLink, which
enables one-touch play and one-touch standby
between EasyLink-compliant devices.
There is a Kensington security slot at the back of
the TV. Prevent theft by looping a Kensington lock
between the slot and a permanent object, such as
a heavy table.
Note
•• Compliant devices must be connected to your
TV via HDMI.
Enable or disable EasyLink
Note
•• Do not enable Philips EasyLink if you do not
intend to use it.
1
2
3
Press MENU.
Press
to select [Setup] >
[Installation] > [Preferences] >
[EasyLink].
Select [On] or [Off].
Use one-touch play
1
After enabling EasyLink, press play on
your device.
»» The TV automatically switches to the
correct source.
Use one-touch standby
1
Press and hold Standby on the TV’s or
device’s remote control for at least three
seconds.
»» The TV and all connected HDMI
devices switch to standby.
40 EN From TV-Manual.com Manuals
Downloaded
Product information is subject to change
without notice. For detailed product
information, go to www.philips.com/support.
Supported display resolutions
Computer formats
• Resolution - refresh rate:
• 640 x 480 - 60Hz
• 800 x 600 - 60Hz
• 1024 x 768 - 60Hz
• 1280 x 720 - 60Hz
• 1280 x 768 - 60Hz
• 1280 x 1024 - 60 Hz
• 1360 x 768 - 60 Hz
• 1440 x 900 - 60Hz (For Full HD only)
• 1680 x 1050 - 60Hz (For Full HD only)
• Via HDMI/DVI input
Video formats
• Resolution - refresh rate:
• 480i - 60Hz
• 480p - 60Hz
• 576i - 50Hz
• 576p - 50Hz
• 720p - 50Hz, 60Hz
• 1080i - 50Hz, 60Hz
• 1080p - 24Hz, 25Hz, 30Hz, 50Hz,
60Hz.
Multimedia
•
•
Supported storage device: USB (Only
FAT or FAT 32 USB storage devices are
supported)
Supported multimedia file formats:
• Images: JPEG
• Audio: MP3
Note
•• Multimedia file names must not exceed 128
characters.
Downloaded From TV-Manual.com Manuals
Tuner/Reception/Transmission
•
•
•
•
•
Aerial input: 75ohm coaxial (IEC75)
DVB: DVB Terrestrial, DVB-T MPEG4 (only
in some models)
TV system: DVB COFDM 2K/8K; PAL I, B/G,
D/K; SECAM B/G, D/K, L/L’
Video playback: NTSC, SECAM, PAL
Tuner Bands: Hyperband, S-channel, UHF,
VHF
Remote control
•
•
Type: RC-6
Batteries: 2 x AAA (LR03 type)
Power
•
•
•
Mains power: 220-240V, 50Hz ~ 60Hz
Standby power: < 0.3W
Ambient temperature: 5 to 40 degrees
Celsius
Supported TV mounts
To mount the TV, purchase a Philips TV mount or
a VESA-compatible TV mount. To prevent damage
to cables and connectors, be sure to leave a
clearance of at least 2.2 inches or 5.5cm from the
back of the TV.
Warning
•• Follow all instructions provided with the TV
mount. Koninklijke Philips Electronics N.V.
bears no responsibility for improper TV
mounting that results in accident, injury or
damage.
TV screen
size (inches)
22
26
32
Required
pitch (mm)
100 x 100
100 x 200
200 x 200
Required
mounting bolts
4 x M4
6 x M4
4 x M6
EN
41
English
9 Product
information
10Troubleshooting
This section describes commonly encountered
issues and accompanying solutions.
General TV issues
The TV does not switch on:
•• Disconnect the power cable from the
power outlet. Wait for one minute then
reconnect it.
•• Check that the power cable is securely
connected.
The remote control is not working properly:
•• Check that the remote control are
correctly inserted according to the +/orientation.
•• Replace the remote control batteries if
they are flat or weak.
•• Clean the remote control and TV sensor
lens.
The standby light on the TV blinks red:
•• Disconnect the power cable from the
power outlet. Wait until the TV cools
down before reconnecting the power
cable. If the blinking reoccurs, contact
Philips Consumer Care.
You forgot the code to unlock the TV lock
feature
•• Enter ‘8888’.
The TV menu is in the wrong language.
•• Change the TV menu to your preferred
language.
When turning the TV on/off to standby, you
hear a creaking sound from the TV chassis:
•• No action is required. The creaking sound
is normal expansion and contraction of
the TV as it cools down and warms up.
This does not impact performance.
When TV start-up time is slow:
•• Select [Fast] mode in [Low power
standby] menu.
42 EN From TV-Manual.com Manuals
Downloaded
TV channel issues
Previously installed channels do not appear in
the channel list:
•• Check that the correct channel list is
selected.
No digital channels were found during the
installation:
•• Check that the TV supports DVB-T or
DVB-C in your country. See the listed
countries on the back of the TV.
Picture issues
The TV is on, but there is no picture:
•• Check that the antenna is properly
connected to the TV.
•• Check that the correct device is selected as
the TV source.
There is sound but no picture:
•• Check that the picture settings are correctly
set.
There is poor TV reception from an antenna
connection:
•• Check that the antenna is properly
connected to the TV.
•• Loudspeakers, unearthed audio devices,
neon lights, high buildings and other large
objects can influence reception quality.
If possible, try to improve the reception
quality by changing the antenna direction or
moving devices away from the TV.
•• If reception on only one channel is poor,
fine tune this channel.
There is poor picture quality from connected
devices:
•• Check that the devices are connected
properly.
•• Check that the picture settings are correctly
set.
The TV did not save your picture settings:
• Check that the TV location is set to the
home setting. This mode offers you the
flexibility to change and save settings.
••
Sound issues
The computer display on the TV is not stable:
•• Check that a supported resolution and
refresh rate is selected on the computer.
•• Set the TV picture format to unscaled.
There is a picture but sound quality is poor:
If a HDMI-to-DVI adaptor or HDMI to
DVI cable is used, check that an additional
audio cable is connected to AUDIO L/R or
AUDIO IN (mini-jack only).
Computer connection issues
Note
•• If no audio signal is detected, the TV
automatically mutes the audio output — this
does not indicate malfunction.
••
Check that all cables are properly
connected.
•• Check that the volume is not set to 0.
•• Check that the sound is not muted.
There is a picture but the sound quality is
poor:
•• Check that the sound settings are
correctly set.
There is a picture but sound comes from one
speaker only:
•• Verify that sound balance is set to the
centre.
Contact us
If you cannot resolve your problem, refer to
the FAQs for this product at www.philips.com/
support.
If the problem remains unresolved, contact
Philips Consumer Care in your country as listed
in the warranty leaflet.
Warning
•• Do not attempt to repair the product yourself.
This may cause severe injury, irreparable
damage to your product or void your
warranty.
Note
HDMI connection issues
There are problems with HDMI devices:
•• Note that HDCP support can delay the
time taken for a TV to display content
from a HDMI device.
•• If the TV does not recognize the HDMI
device and no picture is displayed, try
switching the source from one device to
another and back again.
•• If there are intermittent sound
disruptions, check that output settings
from the HDMI device are correct.
Downloaded From TV-Manual.com Manuals
•• Make a note of your TV model and serial
number before you contact Philips. These
numbers are printed on the back of the TV
and on the packaging.
EN
43
English
The picture does not fit the screen; it is too
big or too small:
•• Try using a different picture format.
The picture position is incorrect:
•• Picture signals from some devices may
not fit the screen correctly. Check the
signal output of the device.
Index
F
A
H
ALARM
Application
Hospitality
Signage
factory settings
7, 32
B
Batteries
28
28
D
DEMO
Digital channels
CAM
Test digital reception
Display resolutions
41
44 EN From TV-Manual.com Manuals
Downloaded
Installation
Automatic
Manual
K
21
22
33
23
42
22
16
31
38
41
43
20
39
23
41
E
EasyLink
disable
Enable
one-touch play
one-touch standby
EPG
Professional mode EPG
31
43
28
I
C
Channel list
install
Automatic
Manual
PayTV ring
Test digital reception
Troubleshooting
Update
clock
setup
Computer
Connect
display resolutions
Troubleshooting
HDMI
HDMI-CEC in
Troubleshooting
Hospitality
20
40
40
40
40
14
31
Kensington lock
21
22
40
L
Language
Audio language
menu language
subtitle language
Troubleshooting
Lock
Kensington lock
Local KB lock
Low power standby
13
21
16
42
40
30
29
M
MENU
Main menu
Troubleshooting
Monitor out
Multimedia
Technical specifications
USB
Multi remote control
Music
O
One-touch play
One-touch standby
10
42
31
41
17
33
18
40
40
Photo
Slide show
USB
Picture format
Picture settings
POWER
Low power standby
Power on
Smart power
Technical specifications
Professional mode
Activat
Options
PBS mode
Settings
17
17
12
10
8
29
29
29
41
25
26
28
28
USB
Listen to music
USB break-in
View photos
18
31
17
V
Video formats
Volum
Volume
41
9
7
W
Wall mounts
Welcome message
41
30
R
Remote control
Professional Setup Remote control
RC lock
Technical specifications
Troubleshooting
24
30
41
42
S
Signage
Smart card
Smart settings
Software version
Sound settings
Subtitles
On analogue channels
On digital channels
Professional mode subtitle
T
Technical specifications
Teletext
Troubleshooting
TV overview
28
39
12
18
12
15
16
31
41
9, 13
42
6
Downloaded From TV-Manual.com Manuals
EN
45
English
U
P
Downloaded From TV-Manual.com Manuals
Downloaded From TV-Manual.com Manuals
© 2009 Koninklijke Philips Electronics N.V.
All rights reserved.
Downloaded From TV-Manual.com Manuals