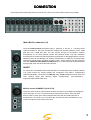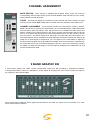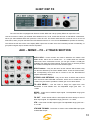
1
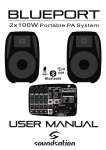
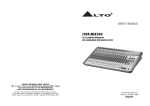
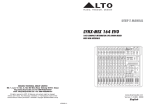
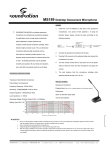
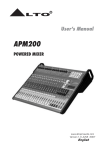
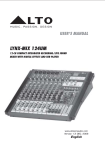
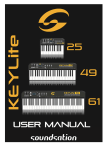
Dear customer,
first of ali thanks far purchasing a SOUNDSATION® product. Our mission is to satisfy all
the possible needs of musical instrument and professional audio users offering a wide range
of products using the latest technologies.
We hope you will be satisfied with this item and, ifyou want to collaborate, we are looking
far a feedback from you about the operatian of the product and far passible improvements
to introduce in the next future. Goto our website www.soundsationmusic.com and send an
e-mail with your opinion, this will help us to build instruments ever closer to customer's real
requirements.
One last thing: read this manual before using the instrument, an incorrect operation can
cause damages to you and to the unit. Take care!
The SOUNDSATION Team
TABLE OF CONTENTS
UNBOXING……………………………………………………………………………………………………………………………………..…4
ACCESSORIES…………………………………………………………………………………………………………………………………....4
GENERAL WARNINGS………………………………………………………………………………………………………………….…..…5
OVERVIEW..……………………………………………………………………………………………………………………………………....6
TECHNICAL SPECIFICATION..…………………………………………………………………………………………………………..…7
CONNECTION……………….………………………………………………………………………………………………………………..….8
MIC/LINE CHANNELS….……….……………………………………………………………………………….……………..………….10
STEREO LINE CHANNELS .………………….………………………………………………………………….……………..………….11
AUX SENDS …………………….………………….……………………………………………………………….……………..………….11
PAN/ BALANCE….……...……………………….……………………………………………………………….……………..………….11
CHANNEL ASSIGNMENT….………………….………………………………………………………………….…………..………….12
GRAPHIC EQ..…..……….….………………….………………………………………………………………….…………….………….12
24 BIT DSP FX……………………..…………….………………………………………………………………….…………….………….13
AUX – MONO – FX – 2 TRACK SECTION……………………………………………………………………………………………13
AUX RETURNS………….………..…………….………………………………………………………………….…………….………….13
SUB SECTION / CONTROL ROOM / MAIN SECTION ……………..……………………………….…………….………….14
WARRANTY & SERVICE…………………… ….……..……………………………………………………….…………….………….15
LEGAL INFORMATION & CONTACTS ….……………………………………………………………….…………….………….16
3
UNBOXING
When you’ll open the box you will find the following items:
- 1 VIVO 16 UFX Mixer
- 1 Power Cord
- User Manual
The packaging bag is not a toy! Keep out of reach of children!!!
Keep in a safe place the original packaging material for future use.
ACCESSORIES
SOUNDSATION can supply a wide range of quality accessories that you can use with the
VIVO Mixers Device like Cables, Microphones, Headphones.
All the products from our catalogue has been long tested with this device so we
recommend to use Genuine SOUNDSATION Accessories and Spare Parts.
Ask your SOUNDSATION dealer for any accessories you could need to ensure best
performance of the product.
4
GENERAL WARNINGS
To prevent possible damages read the following list of actions:
- Do not place the instrument in wet or dirty environments.
- Do not remove the protective coverings.
-Do not cover any of the instrument’s ventilation holes.
- Air must circulate freely around the instrument.
- Do not set the instrument on a surface with excessive vibration.
- Do not expose the instrument to electro-magnetic interference.
- Do not expose the instrument to heat, cold, wet or dust.
- Do not leave the instrument in direct sunlight.
- Do not expose the instrument to electrostatic forces.
- Do not place items with flames, such as candles or lighters, on the
instrument.
- Do not place the instrument on anything containing water or other
fluids.
If any foreign objects enter the instrument, please contact your dealer or an authorized
SOUNDSATION center.
The serial number, electrical features and international standards are printed on a label
located in the back panel.
In case of problems remember to give the serial number to the responsible of the technical
assistance.
5
OVERVIEW
The VIVO 16 UFX is designed to be a powerful resource for Live and Studio purpose. The
friendly user interface is one of the best features of this product and this allow you to reach
your sound in a fast and easy way.
The advanced routing of channels and the complete monitoring let you use this unit also in
complex Live events. All you need is under your hands so you can reach the sound you are
thinking about in few steps.
To reach the best performance VIVO 16 is equipped with a 24BIT DSP FX with up to 99
genuine effects to add to your MIC inputs choosing the amount for each Channel with the
related knob integrated in every Channel Strip.
To let the the VIVO be an advanced Multimedia Station SOUNDSATION introduced in this
system the USB 2.0 Port. Thanks to this device you can record the Main Mix into a
computer or import a stereo track and route it into the Main Mix.
The rugged construction ensure the best performance even in difficult weather condition
and the transportation will be safer. After a long period of testing we are sure that VIVO 16
can satisfy at 100% your needs.
6
TECHNICAL SPECIFICATION
7
CONNECTION
Here following the Input/output panel of VIVO 16 UFX. All the connection will be shown in this chapter.
Mono Mic/line channels (1-8)
These are balanced XLR microphone input (1: earth line; 2: hot line ; 3 : cold line) These
channels features 8 low-noise microphone preamp with optional phantom power, 50dB
gain and over 115dB S/N ratio. You can connect all type of microphone, dynamic
microphones do not need phantom power! Use phantom power only with condenser
microphones but make sure that the phantom power button is disengaged before connect.
Phantom power will not damage your dynamic microphones, so make sure to read the MIC
instructions manual before engaging Phantom Power. These channels are also equipped
with 1/4" TRS balanced/unbalanced LINE-IN plugs to connect line-level instruments such
as keyboards, drum machines and effect devices.
INSERT
An insert point is available between EQ and fader of corresponding input channel (channel
1-8). These inserts can connect graphic EQ, compressor noise filter to corresponding
channels individually. These jacks are TRS (tip, ring , shield) headphone insert, which can
carry sending signal and returning signal simultaneously. (Tip=send/output ;
ring=return/input; shield=earth line)
Mic/line stereo CHANNELS (9/10-15/16)
These are jacks of stereo channel balanced XLR microphone and unbalanced headphone
stereo line input. You can connect these inputs with electronic piano, drum and effect
devices. Note: if some input channel supplies MIC input jack and LINE input jack at
thesame time, can use any one of the jacks but can't use two jacks simultaneously, only
connect one jack of each channel each time.
8
MAIN OUT
These stereo output would be supplied by XLR balanced cannon and 1/4" TRS
jacks, it is controlled by Main Mix level control.
INSERT
The two 1/4" phone jacks are stereo insert points, is used for connecting
processor such as compression and EQ, when you insert to an external
processor, main stereo signal would be brought out after EQ, and would be
return to MAIN MIX before MAIN MIX fader.
SUB OUT
These 1/4" phone jacks are used to connect the inputs of deck or secondary in
an advanced PA live sound system. You will find it is the best tool when you
operate the SUBGROUPS OUT easy to select thanks to the switches
positioned in the right side of each Channel Fader. The signal of each Sub Out
is controlled by
AUX SENDS
These 1/4" phone jacks can be used to send signal from AUX bus signal to
external devices such as effect device or stage monitor.
AUX RETURNS
Use these stereo 1/4" phone jacks to return the stereo signal of an effect unit to
the Main Mix. Alternatively you can also use them as an extra auxiliary input via
using the AUX RETURN level control as volume control. The signal will be sent
directly to MAIN MIX control.
2 TRK -TAPE IN - Use the Tape input if you wish to listen to your mix from a
Tape Recorder or DAT.
2 TRK - TAPE OUT - These RCA jacks will route the main mix into a tape
recorder.
PHONES - These jacks will be used to send the signal to a pair of headphone.
MONO - The 1/4" phone jack is unbalanced mono mix output connector. It can
be regarded as a sum output of the left and right of MAIN MIX.
CTRL ROOM - These 1/4" phone jacks can be used for sending control room
signal to record room monitor speaker.
SWITCH - The 1/4" phone jacks can be used for connecting external
footswitch or turn off built-in 24 BIT DSP effect. Note: the foot switch for DSP
on/off should be specified as a momentary type.
FX OUT - This 1/4" phone jack is used to output the effect signal that comes
from internal 24 BIT DSP module and the signal level can be controlled by the
FX OUT control.
9
This is the Back Panel of the VIVO 16 UFX, here you find the power connection/switches and the USB 2.0 Connector
AC INPUT - Connect mixer to main power AC supply with cable. Accessories includes fuse. When change fuse,
please use the fuse of equal specification.
POWER ON - The switch is used to turn off or to turn on main power. Note :power on need delay 3 seconds!
PHANTOM POWER - It's only used for XLR MIC socket compression microphone. When phantom power already
starts don't insert microphone. Before turning on phantom power, please make sure all faders are turned off to protect
your stage monitor and main speaker.
USB 2.0 - USB port is connected to computer via USB cable to record or to send a stereo signal when the
“2TRK/USB TO MAIN” switch is enabled.
MIC/LINE MONO CHANNELS
GAIN AND EQ
Adjust input signal level to get optimum balance of S/N ratio and dynamic range; for optimum
operation, you shall set this control in a way that the CLIP LED blinks only occasionally in order
to avoid distortion on the input channel. Microphone input gain adjusts range mono channel:
from 0 to 50 dB - . Line input gain adjusts range mono channel from -35 to +15 dB.
LO CUT FILTER
This switch turn on/off hi-pass filter, you will activate a 75 Hz low frequency filter with a slope of
18 dB per octave. You can use this facility to red hum noise infected by the mains power
supply, or the stage rumble while using a microphone.
EQ SECTION
At all mono channel input channel 1-12 features sweepable MID 3 band EQ, HI, MID, and LO.
HI - If you turn this control up, you will boost all the frequencies above 12 kHz (shelving filter).
You will add transparency to vocals and guitar and also make cymbals crispier. Turn the control
down to cut all frequencies above 12 kHz. In such way, you can reduce sibilances of human
voice or reduce the hiss of a Tape player.
MID - This is band pass filter. It affects MID frequency range in center frequency from 100Hz 8KHz. Q value sets at 1.8, all frequency boost and cut down to be +/-15dB.
LO - This control gives you up to 15 dB boost or cut at 80 Hz. You will give more punch to bass
drum and bass guitar and make the vocalist deeper. Turn it down, you will cut all the
frequencies below 80 Hz. In this way, you can avoid low frequency vibrations and resonance
thus preserving the life of your woofers.
10
STEREO LINE CHANNELS
GAIN AND EQ
Adjust input signal level to get optimum balance of S/N ratio and dynamic range; for optimum
operation, you shall set this control in a way that the CLIP LED blinks only occasionally in order
to avoid distortion on the input channel. Line input gain adjusts range stereo channel: from -20
to +20 dB - .
LO CUT FILTER
This switch turn on/off hi-pass filter, you will activate a 75 Hz low frequency filter with a slope of
18 dB per octave. You can use this facility to red hum noise infected by the mains power
supply, or the stage rumble while using a microphone.
EQ SECTION
At all mono channel input channel 1-12 features sweepable MID 3 band EQ, HI, MID, and LO.
HI - If you turn this control up, you will boost all the frequencies above 12 kHz (shelving filter).
You will add transparency to vocals and guitar and also make cymbals crispier. Turn the control
down to cut all frequencies above 12 kHz. In such way, you can reduce sibilances of human
voice or reduce the hiss of a Tape player.
HI MID - This control gives you up to 15 dB boost or cut at 3 kHz. It is useful for controlling
voice. It can accurately polish your performance via adjusting this knob.
LO MID - This control gives you up to 15 dB boost or cut at 500 Hz.
LO - This control gives you up to 15 dB boost or cut at 80 Hz. You will give more punch to bass
drum and bass guitar and make the vocalist deeper. Turn it down, you will cut all the
frequencies below 80 Hz. In this way, you can avoid low frequency vibrations and resonance
thus preserving the life of your woofers.
AUX SENDS
These four controls are used to adjust the level of the respective signal sent to AUX bus, AUX1
and AUX2 can be switched to PRE/POST-FADER via the PRE/POST button, so, generally,
they can be used for monitor application and effects & sound processors input. AUX3 and
AUX4 are configured as POST-Faders. In this typical compact unit, excluding sending out the
signal directly to the external effect or processor equipment, AUX SEND4 can also be assigned
to the internal onboard effect module.
PAN/BAL
Abbreviation of PANORAMA control for mono channels, or the stereo channels, always says,
BALANCE control. Keep this control in center position, then the signal will be positioned in the
middle of the stereo scene.
11
CHANNEL ASSIGNMENT
MUTE SECTION - Each channel is equipped with a MUTE button, which can mute the
corresponding channel output except for the channel INSERT send and SOLO (in PFL mode).
And the MUTE LED will illuminate.
FADER - This fader will adjust the overall level of this channel and set the amount of signal
send to the main output. Note: adjust fader of unused channel to minimum to decrease noise.
CHANNEL ASSIGNMENT - Each channel provides four push-buttons: SUB1-2, SUB3-4,
MAIN L-R and SOLO. Pressing the SOLO button, the corresponding SOLO LED will illuminate
and the SOLO signal will replace other signals send to the Headphone/Control Room and
Meters. Usually use the SOLO function in live work to preview channels before they are let into
the mix. It is useful to set an instrument's input level and EQ, and you can also solo any channel
that you want to. The SOLO switch never affects any mix other than the Control Room. The
other three buttons can be considered as signal assignment switches. Pressing the SUB1-2 will
assign the channel signal to Subgroup1/2, you can depend on the PAN switch to adjust the
amount of channel signal sent to the SUB1versus SUB2, when turns the PAN to completely left,
then the signal can be only controlled by Subgroup1 and vice versa. In the same way, pressing
the SUB3-4 or MAIN L/R will assign the channel signal to Subgroup3/4 or MAIN MIX L/R, and
will also be affected by PAN.
9 BAND GRAPHIC EQ
9 band stereo graphic EQ inside console compensates signal with EQ according to performance features.
Corresponding frequency boost or attenuate (+/-15 dB). When all the faders are in the center position, the output of
the equalizer is flat response (0dB).
The On/OFF button enable the stereo graphic EQ and add it to the main mix output circuit. If the button is on “OFF
Mode” the EQ will be bypassed.
12
24 BIT DSP FX
The VIVO 20 UFX is equipped with Genuine 24 BIT DSP with 100 top quality Effects to improve the mix.
Use the encoder to select your desired effect between echo, vocal, metal and all kinds of dual-effects combination.
When you select desired effect then press the control to save. The switch called “MUTE” is used to turn on or turn off
DSP effect, when you push the button the LED indicator will turn on. You can use footswitch to operate conveniently.
The LEDon the left side of the creen display DSP output level to make sure CLIP indicator just blink occasionally, to
get optimum signal output, should control at 0 position.
AUX – MONO – FX – 2 TRACK SECTION
AUX 1/2/3/4 - These controls are used to determine the master AUX
SEND levels, which can be varied from – to +15dB. When the external
effect units, which connected to mixer, you can get a further +15 dB gain
available from these Aux Send outputs. As to the AUX4, it can also provide
the lovable level adjustment for the internal effect signal.
SOLO buttons - They are the same as the channel SOLO button, they
can also be affected by the SOLO MODE switch. Press the SOLO button,
the corresponding AUX send will be routed to the Ctrl Room/Phones
outputs and Meters display.
STEREO AUX RETURNS - They set the level of effects that received
from the stereo AUX RETURN connectors, which can be varied from - to
+15dB. They are used to provide the further gain for low level effects.
TO AUX SEND1 – Use this knob to assign the signal from AUX
RETURN1 to AUX SEND1 bus. The adjustable range goes from - to
+15dB.
MONO - It sets level of MONO output signal. The adjustable range goes
from - to +15dB.
FX OUT - It sets internal effect is intercepted and sent directly to level of
DFX output signal. The adjustable range goes from - to +15dB.
2TK - It sets level of 2TRK output signal. The adjustable range goes from to +15 dB.
2TK/USB TO MAIN - The button is used to send 2TRK/USB input signal
to MAIN MIX output.
13
SUB SECTION
SUB TO MAIN - Through these switches, you can operate
the subgroup faders as a master control for assigning the
subgroups to MAIN MIX. Engage the LEFT switch to send the
corresponding subgroup signal to MAIN MIX L, and the
RIGHT switch for MAIN MIX R. When engaging the both
switches, the signal will be sent to L/R of MAIN MIX.
FADERS - These faders are used to control the levels of the
signal send to the SUB-GROUPS OUT, the adjustable range
goes from - to +10dB. Any channel that is assigned to the
subgroups, not muted and not turned down will be assigned to
the SUB OUTS.
CTRL ROOM SECTION
ROUTING BUTTONS - You can choose to monitor any combination of MAIN MIX,
SUB1-2, SUB 3-4 and 2TK IN via these Matrix switches. Engaging these switches, the
stereo signals will be delivered to the Phones, Control Room and Meters display. Note:
When any SOLO switch was engaged, the SOLO signal will replace other signals, and
also be sent to the Control Room, Phones and Meters.
PHONES - Rotate these
knobs to adjust the output level of PHONES, which can be varied from - to MAX.
CTRL ROOM - Adjust the knob to control output level of monitor room, which can be
varied from - to MAX.
AUX RETURNS SOLO - The function of AUX RETURN SOLO is like the channel
SOLO button. Engaging it sends the signal from AUX RETURN (1-2) to the CTRL
ROOM, PHONES outputs and Meters display. It can also be affected by SOLO mode
button, and the LED next to the button will illuminate.
MAIN SECTION
SOLO MODE - This button provides two modes: up for PFL (Pre-Fader-Listen) mode,
down for AFL (After-Fader-Listen) mode. Engage the button, the soloed signal will
output after the Level control, otherwise, release the button will output the soloed signal
before the Level control. Note: The SOLO function can never affect the mix at main
recording output, and also can't be affected by channel's MUTE switch.
LED VU METERS: 12 band stereo LED of VU Meter of console indicates accurately
output level. To reach optimum signal output, control should be set around 0, and send
individually to Ctrl Room and Phones output.
MAIN FADER - This fader sets the amount of signal send either to the Main Mix
Output or to the Tape Output.
14
WARRANTY & SERVICE
All SOUNDSATION products feature a limited two-year warranty. This two-year warranty is
specific to the date of purchase as shown on your purchase receipt.
The following cases/components are not covered from the above warranty :
- Any accessories supplied with the product
- Improper use
- Fault due to wear and tear
- Any modification of the product effected by the user or a third party
SOUNDSATION shall satisfy the warranty obligations
manufacturing faults free of charge at SOUNDSATION’s
exchanging individual parts or the entire appliance. Any
product during the course of a warranty claim shall become
by remedying any material or
discretion either by repair or by
defective parts removed from a
the property of SOUNDSATION
While under warranty period, defective products may be returned to your local
SOUNDSATION dealer together with original proof of purchase. To avoid any damages in
transit, please use the original packaging if available. Alternatively you can send the product
to SOUNDSATION SERVICE CENTER – Via Enzo Ferrari , 10 – 62017 Porto Recanati - Italy
. In order to send a product to service center you need an RMA number. Shipping charges
have to be covered by the owner of the product.
For further information please visit www.soundsationmusic.com
15
WARNING
PLEASE READ CAREFULLY – EU and EEA (Norway, Iceland and Liechtenstein) only
This symbol indicates that this product is not to be disposed of with your household waste, according to the WEEE
Directive ( 2202/96/EC) and your national law.
This product should be handed over to a designated collection point, e.g., on an authorized one-for-one basis when
you buy a new similar product or to an authorized collection site for recycling waste electrical and electronic
equipment (WEEE) .
Improper handling of this type of waste could have a possible negative impact on the environment and human health
due to potentially hazardous substances that are generally associated with EEE. At the same time , your cooperation
in the correct disposal of this product will contribute to the effective usage of natural resources.
For more information about where you can drop off your waste equipment for recycling , please contact your local city
office , waste authority , approved WEEE scheme or your household waste disposal service.
Contents and images shown on this manual can be changed without any notice. Please visit our website
www.soundsationmusic.com to check latest version.
DESIGNED IN ITALY BY SOUNDSATION®
VIVO 16 UFX USER MANUAL REV. 1.01
All the Trademarks are property of their respective owners
SOUNDSATION® is a registered trademark of
FRENEXPORT SPA – Via Enzo Ferrari, 10 - 62017 Porto Recanati – Italy
© SOUNDSATION 2013 – All rights reserved – All total or partial reproduction of this manual by any other company or
person without express authorization of Soundsation is strictly forbidden.
16