1
EN
mod.# J68
USERMANUAL
IMPORTANT MANUAL INFORMATIONS
Congratulations on your purchase of the motorcycle. This model is the result of a vast experiHQFH LQ WKH SURGXFWLRQ RI ¿QH VSRUWLQJ WRXULQJ DQG UDFLQJ PDFKLQHV ,W UHSUHVHQWV WKH KLJK GHJUHH RI FUDIWVPDQVKLS DQG UHOLDELOLW\ WKDW KDYH PDGH XV WR RQH RI WKH OHDGHUV LQ WKHVH ¿HOGV
7KLVPDQXDOZLOOJLYH\RXDQXQGHUVWDQGLQJRIWKHRSHUDWLRQLQVSHFWLRQDQGEDVLFPDLQWHQDQFHRIWKLVPRWRUF\FOH,I\RXKDYHDQ\TXHVWLRQVFRQFHUQLQJWKHRSHUDWLRQRUPDLQWHQDQFHRI\RXUPRWRUF\FOHSOHDVHFRQVXOWD
dealer.
The design and manufacture of this motorcycle fully comply with the emissions standards for clean air applicable
at the date of manufacture. We have met these standards without reducing the performance or economy of
RSHUDWLRQRIWKHPRWRUF\FOH7RPDLQWDLQWKHVHKLJKVWDQGDUGVLWLVLPSRUWDQWWKDW\RXDQG\RXUGHDOHUSD\FORVH
attention to the recommended maintenance schedules and operating instructions contained within this manual.
1
IMPORTANT MANUAL INFORMATIONS
Particularly important information is distinguished in this manual by the following notations:
! WARNING
CAUTION
Failure to follow WARNING instructions could result in severe injury or death of the
motorcycle operator a bystander or a person inspecting or repairing the motorcycle.
A CAUTION indicates special precautions that must be taken to avoid damage to the motorcycle.
NOTE: A NOTE provides key information to make procedures easier or clearer.
NOTE:
Ɣ3OHDVHDOZD\VSXWWKHPDQXDOZLWKWKHYHKLFOHIRUPDLQWHQDQFHDQGVHUYLFHUHFRUGV
Ɣ7KLVPDQXDOFRQWDLQVLPSRUWDQWYHKLFOHLQIRUPDWLRQ+RZHYHUWKHSURGXFHUZLOOFRQWLQXDOO\LPSURYHWKLV
SURGXFWDQGWKHGHVLJQDQGWKHTXDOLW\WKDWOHDGWRGLIIHUHQFHEHWZHHQWKHPDQXDODQGWKHFXUUHQW
version of the vehicle.
,I\RXKDYHDQ\TXHVWLRQVFRQFHUQLQJWKLVPDQXDOSOHDVHFRQVXOW\RXUGHDOHU
! WARNING
FOR YOUR OWN SAFETY PLEASE READ THIS MANUAL CAREFULLY BEFORE YOU DRIVE THIS MOTORCYCLE. ONLY OPERATE THE MOTORCYCLE WHEN YOU HAVE BEEN COMPLETELY AWARE OF ADEQUATE KNOWLEDGE OF CONTROLS AND OPERATION AND FEATURES AND YOU HAVE BEEN TRAINED IN SAFETY AND
PROPER RIDING TECHNIQUES. PERIODIC INSPECTIONS AND MAINTENANCE AND GOOD DRIVING SKILLS
WILL ENSURE YOUR SAFETY DRIVING AND INCREASE THE PRODUCT RELIABLITY OF THIS MOTORCYCLE.
3URGXFWDQGVSHFL¿FDWLRQVDUHVXEMHFWWRFKDQJHZLWKRXWQRWLFH
2
IMPORTANT MANUAL INFORMATIONS
DEALER
STAMP HERE
3
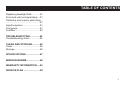
TABLE OF CONTENTS
SAFETY INFORMATION ............6
Other Safe driving points..............9
Location of labels ........................10
DESCRIPTION............................11
Left view ....................................11
Right view...................................12
Operation instruments ................13
INSTRUMENT AND CONTROL
FUNCTIONS .............................14
Main switch/steering lock............14
,QGLFDWRUDQGZDUQLQJOLJKWV
+DQGOHEDUVZLWFKHV
Front brake lever .........................18
Rear brake pedal ........................18
Fuel/ Fuel Tank .........................18
Seat………………...…….....…...19
Engine oil…………………...........20
Sides stand..................................21
Catalytic converter.......................21
4
PRE-OPERATION CHECKS.......22
Pre-operation check list ..............23
ECU..........................................32
Adjust the idling…………..…......32
Checking the throttle cable free
OPERATION AND IMPORTANT
play.............................................32
RIDING POINTS.........................24 Clutch adjustment.......................33
Starting the engine .....................24 Tires............................................33
Stop the engine ..........................24 Tire inspection............................33
Shifting and riding…….............…24 Cast wheels................................34
$FFHOHUDWLRQDQGGHFHOHUDWLRQ Front brake ................................34
(QJLQHEUHDNLQ )URQWEUDNHDGMXVWPHQW
,QVSHFWLRQ,QIRUPDWLRQ 5HDUEUDNHDGMXVWPHQW
3DUNLQJ %UDNHSDGV
)URQWDQGUHDUEUDNHEUDNHÀXLG
CHECKING/ MAINTAINING
/XEULFDWLQJRIWKHFDEHV
SERVICE INTERVALS..............27 )URQWIRUNH
Periodic maintenance chart.........28 6WHHULQJ
Spark plug...................................30 Wheel bearings..........................38
$LU¿OWHU Adjusting the chain tension ......38
Oil drain pipe...............................30 Shock absorber...........................38
Coolant inspection.......................31 Battery.........................................39
Bleeding the coolant system.......31 Fuses..........................................40
TABLE OF CONTENTS
Replacing headlight bulb.............41
Front and rear turnsignal lamp....41
Tail/brake and license plate lamp...
....................................................41
,QMHFWLRQV\VWHP«««««
Fuel pump...................................41
)XHO¿OWHU
TROUBLESHOOTING...............42
Troubleshooting chart.................43
CLEAN AND STORAGE............45
&OHDQ
6WRUDJH
SPECIFICATIONS......................47
WIRING DIAGRAM.....................48
WARRANTY INFORMATION.....49
SERVICE PLAN .........................50
SAFETY INFORMATIONS
THIS MOTORCYCLE IS A TWO
WHEEL ON ROAD VEHICLE.
BEFORE YOU USE THE VEHICLE THE FIRST TIME PLEASE
READ THIS MANUAL CAREFULLY IN ORDER TO FAMILIARIZE
YOURSELF WITH YOUR NEW
MOTORCYCLE.
Ɣ 2%7$,1 $ 48$/,),(' 75$,
NING & LEGAL LICENSE FOR
OPERATING OF THIS VEHICLE.
Therefore making yourself conspicuous in the public will be very
effective in preventing this kind of
accidents
Ɣ$:(//$1'352)(66,21$/
MAINTENANCE AND CERTIFICA- Therefore
TED REPAIR SHOP TO ACQUIRE
Ɣ:Har a brightly colored
GOOD MECHANICAL CONDIprotective suits/jacket.
TIONS OF VEHICLE.
Ɣ2SHUDWHWKHWXUQLQJVLJQDOVEHIRre turning and slow down the speed
THE USER OF THIS MOTORCYC- Safe riding
approaching and pass through the
LE SHOULD BE/ SHOULD HAVE:
Ɣ To check your vehicle before intersection.
each ride is one of the key points to Ɣ.HHSSURSHUGLVWDQFHZLWK0RWRƔ :(// 75$,1(' $1' )$0,/,ULVWVDQGPDNHWKHPDZDUHRI\RXU
prevent an accident.
AR TO ALL THE ASPECTS OF
ƔSOHDVHIROORZWKHPD[LPXPORDGV location.
MOTORCYCLE OPERATION ESƔ.QRZ\RXUVNLOOVDQGOLPLWV
limited of operator and passenger.
PECIALLY THE OPERATION OF
Ɣ 0RVW RI DFFLGHQWV RQ WKH PRWR- Ɣ1HYHU OHQG \RXU PRWRUF\FOH WR
THIS MODEL.
rists are cased by automobile dri- RWKHUVZKRQRWTXDOL¿HGIRUULGLQJLW
vers who “failure to recognize out Ɣ$OZD\VIROORZWKHOHJDOVSHHGOLPLW
Ɣ )8//< ,16758&7(' ,1 7+(
the vehicle” and caused mobile/ RQWKHPRWRUF\FOHDQGWUDI¿FODZ
MAINTENANCE
REQUIREmotorcycle accidents.
MENTS THAT NOTED IN THIS
MANUAL.
SAFETY INFORMATIONS
Ɣ The posture of operator and
passenger is important for proper
control. Properly riding posture can
keep motorcycle in balance while
riding.
Ɣ Operators should sit up right with
two hands on the handle bar and
IHHWRQWKHÀRRUERDUGZKLOHGULYLQJ
Ɣ 3DVVHQJHUV VKRXOG PDNH VXUH
WKDWVKHKHFDQ¿UPO\KROGJULSDW
operator and with feet on footrest.
Protective clothing
3URSHUDGHTXDWH clothing will keep
yourself safe from potential accidents:
Ɣ$OZD\VZHDUDQDSSURYHGKHOPHW
with face shield to protect your
eyes.
Ɣ 7KH ZHDULQJ RI SURSHU MDFNHW
VKRHVJORYHVUHGXFHWKHGHJUHHRI
injury from unexpected accident.
Ɣ 1HYHU ZHDU ORRVH ¿WWLQJ FORƔ 'ULYLQJ DIWHU GULQNLQJ DOFRKRO WKHV RWKHUZLVH WKH\ FRXOG FDWFK
RU GUXJ FRQVXPSWLRQ RU LQÀXHQ- on the control levers or wheels
cing medicaments is strictly pro- and can cause injury or accidents.
hibited.
Ɣ 1HYHU WRXFK WKH HQJLQH RU H[Ɣ 7KLV PRWRUF\FOH LV GHVLJQHG haust system during or after driving
IRURQURDGXVHRQO\,WLVQRWVXL- as they become very hot and can
cause burns. Always wear protectable for off road use.
WLYH FORWKLQJ WKDW FRYHUV \RXU OHJV
DQNOHVDQGIHHW
0RGL¿FDWLRQV
MoGL¿FDWLRQV RQ WKH PRWRUF\FOH
which have not been approved by
the producer or the removal of original parts may result in an unsafe
vehicle condition and entail severe
DFFLGHQWV DQG LQMXULHV 1RW DSSURYHG PRGL¿FDWLRQV PDNH \RXU PRtorcycle illegal.
Loading and accessories
The adding loading of accessories or cargo on to your motorF\FOH ZLOO LQÀXHQFH WKH VWHHring & balance of the vehicle.
,WPD\FDXVHDQDFFLGHQWVRSOHDVH
be extremely carefully and consider
WKHOLPLWDWLRQZKHQ\RXHTXLSLWZLWK
DFFHVVRULHV+HUHDUHVRPHJXLGHlines referring loading cargo or adding accessories to your
motorcycle.
SAFETY INFORMATIONS
Loading
The total weight of the operator the
passenger the accessories and the
cargo may not exceed the maximum load limit.
Maximum payload
(do not include the vehicle):
150 kg
When loading within this weight
limit keep the following in mind:
Ɣ Cargo and accessory weight
should be kept as low and close to
the motorcycle as possible. Make
sure to distribute the weight as
evenly as possible on both sides of
the motorcycle to minimize imbalance or instability.
8
Ɣ 0DNH VXUH WKDW DFFHVVRULHV DQG
cargo are securely attached to motorcycle.
Ɣ1HYHUDWWDFKDQ\ODUJHRUKHDY\
items to the handlebar the front fork
or the front fender. Such items
can create unstable handling or a
slow steering response.
Accessories
Original accessories have been
VSHFL¿FDOO\ GHVLJQHG IRU XVH RQ
WKLVPRWRUF\FOH.HHSWKHIROORZLQJ
JXLGHOLQHVLQPLQGZKHQPRXQWLQJ
accessories.
Ɣ1HYHULQVWDOODFFHVVRULHVRUFDUU\ FDUJR WKDW ZRXOG LQÀXHQFH WKH
ground clearance the suspension
limit the steering or obscure lights
DQGUHÀHFWRUV
Ɣ $FFHVVRULHV RQ WKH KDQGOH EDU
ZLOO LQÀXHQFH WKH VWHHULQJ RI WKH
PRWRUF\FOH ,I \RX LQVWDOO DFFHVVRries please keep it light in weight.
Ɣ:KHQ\RXHTXLSWKHPRWRUF\FOH
with electrical accessories please
FRQVXOW D TXDOL¿HG GHDOHU WR PDNH
sure that the items will not exceed
the capacity of the electrical system. Unproven items or poor installation may cause a dangerous loss
of electricity or short circuit or cable
¿UH
Gasoline and exhaust gas
ƔGAS2/,1(,6+,*+/<)/$00$%/(
Ɣ$OZD\VWXUQRIIWKHHQJLQHZKHQ
refueling.
Ɣ7DNHFDUHQRWWRVSLOODQ\JDVROLne on the engine or exhaust system
when refueling.
Ɣ'RQRWVPRNHRUXVHPRELOHSKRne while refueling.
Ɣ1HYHUVWDUWWKHHQJLQHRUOHWLWUXQ
for any length of time in a closed
area.
SAFETY INFORMATIONS
The exhaust fumes are poisonous
and may cause loss of consciousness and death within a short time.
Ɣ$OZD\VWXUQWKHHQJLQHRIIEHIRUH
leaving the motorcycle and remove
the key from the main switch. When
parking the motorcycle please note
the following:
Ɣ,QFDVHRIVZDOORZLQJ DQ\JDVRline or gasoline getting into your
eyes please consult a doctor imPHGLDWHO\.HHSDZD\WKHJDVROLQH
from your skin.
Ɣ7KH HQJLQH DQG H[KDXVW V\VWHP
remain hot. Therefore park the motorcycle in a place where pedestrians or children are not likely to
touch these hot areas.
Ɣ'RQRWSDUNWKHPRWRUF\FOHRQD
slope or a soft ground otherwise it
can fall over.
Ɣ'RQRWSDUNWKHPRWRUF\FOHFORVH
WRRSHQRUFDPS¿UH
Ɣ3D\DWWHQWLRQWRWKHHQYLURQPHQW
Gasoline is not environmentally
friendly.
Other safe driving points
Ɣ 7urn the signal before making
turns.
Ɣ :KHQ UDLQLQJ RU GULYLQJ DFURVV
slippery area keep your speed slow.
Take care while braking to avoid
slipping or even fall down.
Ɣ%HFDUHIXOZKHQSDVVLQJSDUNHG
FDUV,QDWWHQWLRQWRRWKHUURDGXVHUV
can cause accidents.
9
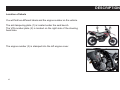
DESCRIPTION
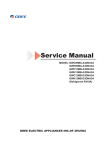
Location of labels
<RXZLOO¿QGWZRGLIIHUHQWODEHOVDQGWKHHQJLQHQXPEHURQWKHYHKLFOH
The anti tampering plate (1) is located under the seat bench.
7KH9,1QXPEHUSODWHLVORFDWHGRQWKHULJKWVLGHRIWKHVWHHULQJ
head tube.
1
2
The engine number (3) is stamped into the left engine cover.
3
10
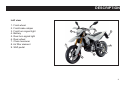
DESCRIPTION
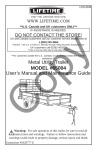
Left view
1. Front wheel
2. Front brake caliper
3. Front turn signal light
4. Battery
5HDUWXUQVLJQDOOLJKW
5HDUZKHHO
&KDLQWHQVLRQHU
$LU¿OWHUHOHPHQW
9. Shift pedal
8
3
4
5
3
1
6
9
7
2
11
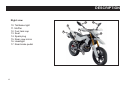
DESCRIPTION
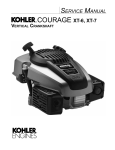
Right view
10. Tail/brake light
0XIÀHU
12. Fuel tank cap
13. Seat
14. Spark plug
5HDUYLHZPLUURU
+HDGOLJKW
5HDUEUDNHSHGDO
15
10
13
11
16
12
14
17
12
15
DESCRIPTION
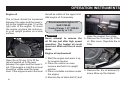
Operation instruments
18. Clutch lever
19. Left handlebar switches
20. Speedometer unit
21. Main switch/steering
22. Right handlebar switches
23. Throttle grip
24. Front brake lever
18
20
24
21
19
22
23
13
OPERATION INSTRUMENTS
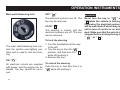
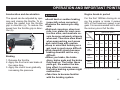
Main switch/steering lock
OFF “
”
The electrical systems are off. The
key can be removed.
! WARNING
Never turn the key to “
” or
“ ”while the vehicle is moving.
Otherwise the electrical systems
LOCK “ ”
will be switched off which may reTKH VWHHULQJ LV ORFNHG DQG WKH sult in loss of control or an accielectrical systems are off. The key dent. Make sure that the vehicle is
stopped before turning the key to
can be removed.
“
” or “
”.
To lock the steering
The main switch/steering lock controls the ignition and lighting systems and is used to lock the steering.
ON “
1. Turn the handlebars all the way
to the left.
2. Turn the key in from the “
”
SRVLWLRQDQGWKHQWXUQLWWR³´
while still pushing it.
3. Remove the key.
”
To unlock the steering
All electrical circuits are supplied
ZLWKSRZHUDQGWKHHQJLQHFDQEH PushWKHNH\LQDQGWKHQWXUQLWWR
”while still pushing it.
started. The key cannot be remo- “
ved.
14
OPERATION INSTRUMENTS
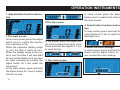
Indicator and warning lights
4
3
1
5
10
7
6
SEL
2
8
9
ADJ
Speedometer
'LVSOD\XQLWNPKRUPSK
'LVSOD\5DQJHNPKRU
0-124mp/h
Indicator lights
1HXWUDOOLJKWN
+LJKEHDPOLJKW
'LUHFWLRQOLJKW
2LODODUP 7HPSDODUP
(2%'
- Green
%OXH
*UHHQ
5HG
5HG
2UDQJH
Press the adjust button for 3 sec
and the alarm light will turn off.
After every 1000 km it will come
again to remind checking the oil level.
,QWKHQRUPDOFRQGLWLRQZKHQ\RX
VZLWFKRQWKHLJQLWLRQWKH(2%'
light will go on and after starting
the engine some seconds later it
ZLOOGLVDSSHDU,IWKHUHLVDUHGLDgnostic trouble(s) after starting the
HQJLQHWKH(2%' ZLOODSSHDU
and blink in different diagnostic
trouble codes.On the display you´ll
VHH WKH '7& &RGH'7& IDLOXUH'7&IDLOXUHV
Please contact a dealer as soon as
possible to check the vehicle.
0-999.9km or mile
'LVSOD\XQLWLVNPRUPLOH
8. Odometer and trip meter
Adjust button
9. Fuel meter
'LVSOD\UDQJHLVOHYHOV:KHQWKH
IXHOLVEHORZWKH¿UVWEDULWZLOOEOLQN
to remind for refuel.
10. RPM meter
The display range is 0-12000 rpm
with minimum of 200 rpm.
Select button
Press the Select button less than
3 sec. to change the display colour
form blue to orange and vice versa.
Press the Select button more than
3 sec. the unit change between
km/h and miles.
OdRPHWHU
'LVSOD\
UDQJH Press the Adjust button once to
$IWHU WKH ¿UVW NP WKH RLO 0-99999km or mile
VZLWFK EHWZHHQ 2'2 75,3 DQG
alarm
will come on to re- 7ULSPHWHU'LVSOD\UDQJH
&/2&.PRGH
PLQGIRUWKH¿UVWRLOFKDQJH
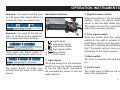
OPERATION INSTRUMENTS
,Q FORFN VFUHHQ SUHVV WKH DGMXVW
button once to switch from clock to
the main screen.
1. Adjust button function instruction
2.The trip screen
4. Select button function instruction
,QPDLQVcreen press and hold the
select button for 3 sec to switch the
backlight color.
1.The main screen
,QWKHPain screen press the adjust
button once to switch the function
from odometer to trip.
When the odometer display range
is over the Max it starts at zero.
When the display range of trip meter is over the Max it will also start
at zero automatically but it can also
be reset manually by holding the
adjust button for 3 sec under the
trip screen.
,QWKHPDLQVFUHHQSUHVVDQGKROG
the adjust button for 3 sec to switch
from km to mile.
,QWULSVFUHHQSUHVVWKHDGMXVWEXWton once to switch from trip to clock.
Press and hold the adjust for 3 sec
to reset the trip.
3. The clock screen
5. Enter the clock settings
,QPDLQVFUHHQSUHVVDQGKROGWKH
select and the adjust button for 3
sec to enter the clock settings.
OPERATION INSTRUMENTS
Example: <RXZDQWWRVHWWKHKRXU Handlebar switches
to 14h press the adjust button to
choose the hour you want to set.
4
1. High/low beam switch
When the switch is in the low beam
position move the switch downwards to use the high beam light.
The switch will not return automatically to the low beam position.
1
3
Example: <RX ZDQW WR VHW WKH PLQXWHWRSUHVVWKHVHOHFWEXWton to enter the minute settings.
2
1.
Then press the adjust button to
choose the minute you want to set.
2.
4.
Light signal
Low beam switch
+LJKEHDPVZLWFK
Turn signal switch
+RUQVZLWFK
Clutch lever
1. Light signal
After the settings are done press
the select button to store your
settings and get back to the main
screen.
When the switch is in the low beam
position move the switch upwards
to use the light signal. The switch
will automatically return to the low
beam position.
2. Turn signal switch
Move the switch from the center
position to the right to activate the
ULJKWÀDVKHUOLJKWRUPRYHWKHVZLWFK
WRWKHOHIWWRDFWLYDWHWKHOHIWÀDVKHU
light. The switch will not return automatically to the center position.
3. Horn switch
The horn is sounded with this button.
4. Clutch lever
The FOXWFKOHYHULV¿WWHGRQWKHOHIW
side of the handle bar.
OPERATION INSTRUMENTS
6
7
Rear/ foot brake pedal
The rear brake pedal is located on
the right side of the vehicle and refers to the rear brake. Press down
the brake pedal to activate the rear
brake.
6,5,4,3,2
N
1
5
6WDUWHUVZLWFK
5. Starter switch
Use the starter switch to operate
the electric starter.
6. Hand/ front brake lever
7KH KDQG EUDNH OHYHU LV ¿WWHG RQ Shift pedal
the right side of the handle bar and The shift pedal is located on the left
refers to the front brake.
side of the engine. The position of
the gears is shown in the illustrati7. Throttle grip
RQ7KHÄ1³QHXWUDOJHDULVORFDWHG
The throttle grip can be used for the EHWZHHQ WKH ¿UVW DQG WKH VHFRQG
acceleration and the deceleration gear.
of the vehicle.
18
)XHOWDQN¿OOHUFDS
ThHIXHOWDQNDQGWKH¿OOHUFDSDUH
located under the seat bench. To
UHDFK WKH ¿OOHU FDS \RX PXVW UHlease the seatbench.
OPERATION INSTRUMENTS
E,QVHUWWKHNH\LQWRWKHVHDWORFN
and then turn it clockwise to open.
Make sure that there is all the time
It is not recommended to use E10 F1RZ\RXFDQUHDODVHWKHVHDW
VXI¿FLHQWIXHOLQWKHWDQN7RUHIXHO
fuel. This can damage the engine
bench.
WKHYHKLFOHRSHQWKH¿OOHUFDSFRXQand fuel system.
terclockwise. Fill the fuel tank until
WKHERWWRPRIWKH¿OOHUWXEH'RQRW
Immediately wipe off spilled fuel
RYHU¿OO WKH IXHO WDQN RWKHUZLVH LW
with a clean and dry soft cloth
PD\RYHUÀRZ
because fuel may destroy painted surfaces or plastic parts.
Fuel/ fuel tank
! WARNING
In case of swallow any gasoline
or gasoline get into your eyes 2. To close the seat
please consult a doctor imme- a) Fold the seat down and then
diately. Keep away the gasoline
push it down to lock it in place.
from your skin.
b) Remove the key from the seatlock.
Seat
Recommended fuel:
Unleaded gasoline
95 Octane or higher
Fuel tank capacity: 7.5 L ± 0.2L
1. To open the seat
a) Place the motorcycle on the
stand.
! WARNING
Make sure that the seat is properly secured before riding.
19
OPERATION INSTRUMENTS
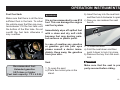
Engine oil
should be visible at the upper limit.
Add engine oil if necessary.
The oil level should be measured
between the upper and the lower limit on the inspection glas (1) on the
right side of the engine. To check
the engine oil place the motorcycle in an upright position on a level
surface.
Recommended engine oil:
SAE 10W-40
Castrol Power 1 4T 10W-40
Capacity is 1.2L
3
clean the magnet from chips.
Never attempt to remove the 5HPRYHWKHVFUHZVRIWKH
RLO ¿OO FDS MXVW DIWHU KLJK VSHHG RLO¿OWHUFRYHU'HSROOXWHWKHROG
Filter.
operation. The heated oil could
spout out. Wait until the oil cools
down.
! WARNING
2
1
Engine oil replacement
1. Start the engine and warm it up
2SHQWKHRLO¿OOFDSWR¿OOWKH
for several minutes.
recommended oil to the level
between the upper and the lower li- 2. Place the vehicle on even
survace and hold it in upright
PLW,IWKHHQJLQHLVFROGWKHRLOOHYHO
position.
should be visible near the lower
OHYHO,IWKHHQJLQHLVZDUPWKHOHYHO 3. Place a suitable container under
the engine.
4. Remove the oil drain bolt (3) and
20
43
5HPRYHWKHWKHRLOVWUDLQHU
screw. Blow up the strainer.
OPERATION INSTRUMENTS
,QVWDOOWKHRLO¿OOHUFDS
13. Check the oil level
5
Side stand
The side stand is located on the left
side of the frame.
! WARNING
Make sure that your motorcycle
park
stable.
Please avoid to park the motorcycle on a precipitous or soft
ground.
Catalytic converter
7KLVPRGHOLVHTXLSSHGZLWKD
catalytic converter in the exhaust
system.
5
Lower it with your foot while holding the motorcycle upright. The
$VVHPEOHDQHZRLO¿OWHU
,QVWDOOWKHFRYHUVFUHZVDJDLQ VLGHVWDQGVLVHTXLSHGZLWKDDXWR
rebound system. To raise the side
Use a new gasket
stand bring the motorcycle in a up,QVWDOOWKHRLOVWUDLQHUZLWKWKH right position. Pay attention to your
screw again.
legs when the side stand is soaring.
,QVWDOOWKHRLOGUDLQEROWZLWK
a new copper washer.
5H¿OOHQJLQHRLO/
! WARNING
The exhaust system is hot after
driving. Make sure that the exhaust system has cooled down
before doing any maintenance
work.
The following precautions must
EHREVHUYHGWRSUHYHQWD¿UH
hazard or other damages.
Ɣ1HYHUSDUNWKHYHKLFOHQHDUJUDVV
or other materials that easily burn.
Ɣ'R QRW DOORZ WKH HJLne
to
idle
too
long.
Ɣ'R QRW WRXFK WKH H[KDXVW DIWHU
driving.
21
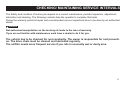
PRE-OPERATION CHECK
The condition of a vehicle is in the owner’s responsibility. Vital components can start to deteriorate
quickly and unexpectedly even if the vehicle remains unused (for example as a result of exposure to
WKHHOHPHQWV$Q\GDPDJHRUÀXLGOHDNDJHRUORVVRIWLUHDLUSUHVVXUHFDQKDYHVHULRXVFRQVHTXHQFHV
Therefore it is very important to check the following points before each ride.
NOTE:
The pre-operation check should be made each time the vehicle is used. Such an inspection can be
accomplished in a very short time and guarantee more safety.
! WARNING
,IDQ\LWHPLQWKHSUHRSHUDWLRQFKHFNOLVWLVQRWZRUNLQJSURSHUO\KDYHWKHYHKLFOH¿[HGDWDQDXWKRrized dealer before operate it. If it failed to be corrected by yourself please contakt your retailer.
22
PRE-OPERATION CHECK
Pre-operation check list
Fuel &KHFNWKHIXHOOHYHOLQWKHIXHOWDQN
5H¿OOIXHOLILWLVQHFHVVDU\
&KHFNWKHIXHOOLQHIRUOHDNDJH
Final transmission &KHFNYHKLFOHIRURLOOHDNDJH.
&KHFNRSHUDWLRQ
,IWKHEUDNHIHHOVVRIWRUVSRQJ\KDYHDGHDOHUWRFKHFNWKHV\VWHP
&KHFNEUDNHSDGVIRUZHDUDQGUHSODFHLWLILWLVQHFHVVDU\
&KHFNWKHÀXLGOHYHOLQUHVHUYRLUDQGDGGEUDNHÀXLGWRLILWLVQHFHVVDU\
&KHFNK\GUDXOLFV\VWHPIRUOHDNDJH
Brake lever 0DNHVXUHWKDWLWZRUNVRSHUDWHVVPRRWKO\
/XEULFDWHWKHOHYHUSLYRWLQJSRLQWVLIQHFHVVDU\
Throttle grip 0DNHVXUHWKDWRSHUDWLRQLVVPRRWK
&KHFNFDEOHIUHHSOD\
/XEULFDWHFDEOHDQGJULSKRXVLQJ
Wheels and tires
&KHFNIRUGDPDJH
&KHFNWLUHFRQGLWLRQDQGWUHDGGHSWK
&KHFNDLUSUHVVXUH
Chasis fasteners
0DNHVXUHWKDWDOOQXWVDQGEROWVDQGVFUHZVDUHSURSHUO\WLJKWHQHG
7LJKWHQLWLILWLVQHFHVVDU\
&KHFNRSHUDWLRQ
Front brake
Instruments and lights
23
OPERATION AND IMPORTANT POINTS
Starting the engine
1. Turn on the ignition
6ZLWFKWKHJHDUWR1QHXWUDO
3. Actuating one of the brakes
4. Operate the starter button
without accelerating
/HWWKHVLGHVWDQGUDLVHXS
$OZD\VNHHSLQPLQGWKDWWKHHQ
gine should be warmed up with
medium R.P.M. and small load.
Stop the Engine
1. Reduce the throttle to 0 position.
2. Pull the clutch lever
! WARNING
6ZLWFKWKHJHDUWR1QHXWUDO
'RQRWVWDUWWKHHQJLQHDQGDOORZLW 4. Operate the brakes
to idle in a closed room. Exhaust fu- $IWHUWKHYHKLFOHLVVWRSSHG
turn off the ignition.
mes are poisonous and can cause
loss of consciousness and death. CAUTION
3URYLGH DOZD\V DGHTXDWH YHQWLODWLBefore starting off allow the engion while the engine is running.
ne to warm up otherwise the spark
plug and engine can be damaged
CAUTION
early.
0D[LPXPSHULRGIRUFRQWLQXRXV
VWDUWLQJLVVHFRQGV:DLWDW
OHDVWVHFRQGVEHIRUHWU\LQJLW
again.
'RQWULGH\RXUPRWRUF\OHZLWK
full load and dont over-rev the
engine while it is cold as the
piston warming up faster than
the water will cool the cylinder.
24
Starting off
1. Pull the clutch lever
6KLIWWKHHQJLQHWRWKH¿UVWJHDU
3. Slowly release the clutch lever
and open the throttle at the
same time.
Shifting and riding
a) Shifting gears upwards
1. Release the throttle
2. Pull the clutch lever
3. Lift the gear lever upwards to
change to the higher gears.
4. Slowly release the clutch lever
and open the throttle at the
same time.
b) Shifting gears downwards
1. Release the throttle
2. Operate the brakes and reduce
the speed to a appropriate
speed.
2. Pull the clutch lever
3. Lift the gear lever down wards to
change to the lower gears.
4. Slowly release the clutch lever
and open the throttle at the
same time.
! WARNING
Always switch one gear only,
otherwise the transmission can
be damaged.
OPERATION AND IMPORTANT POINTS
Acceleration and deceleration
The speed can be adjusted by opening and closing the throttle. To increase the speed turn the throttle
grip in direction (a). To reduce the
speed turn the throttle grip in direction (b).
a
b
Braking
1. Release the throttle.
2. Apply the front and rear brake at
the same time.
3. Apply the clutch lever gradually
increasing the pressure.
! WARNING
Ɣ$YRLGKDUGRUVXGGHQEUDNLQJ
(especially when cornering)
otherwise the motorcycle may
skid.
Ɣ5DLOURDGFURVVLQJVVWUHHWFDU
rails, iron plates on road construction sites, and manhole covers become extremely slippery
when wet. Therefore slow down
when approaching such areas
and cross them with caution.
Ɣ.HHSLQPLQGWKDWEUDNLQJRQD
ZHWURDGLVPXFKPRUHGLI¿FXOW
Ɣ5LGHGRZQKLOOVORZO\EHFDXVH
braking downhill can be very
GLI¿FXOW
Ɣ:KHQ\RXEUDNHWKHEUDNH
discs, brake pads and the brake
ÀXLGKHDWXS7KHKRWWHUWKHVH
parts get, the weaker the braking effect. In extreme cases
the entire braking system might
malfunction.
ƔTake time to become familiar
with the braking system.
Engine break-in period
FoUWKH¿UVWNPGULYLQJGRQRW
rev the engine or make it exceed
80% of the maximum speed in any
JHDU,WLVUHFRPPHQGHGQRWWRGULYH
the motorcycle at full throttle.
Speed limit (km/h)
Gear
1.
2.
3.
4.
5.
6.
0300km
10
24
30
40
300 NP
30
40
1000km
30
40
1000 NP
'LVWDQce
Top speed for the running-in period of the motorcycle
OPERATION AND IMPORTANT POINTS
'R QRW NHHS WKH HQJLQH UXQ DW
the same speed long time during the running-in period. Often change it because it is helpful for the running-in of parts.
'XULQJ WKH UXQQLQJLQ SHULRG
it is necessary to put load on
each part of the engine to guarantee complete coordination
but do not over load the engine.
Avoid also running the engine always at low speed.
'XULQJWKHUXQQLQJLQWKHHQJLQHDOways works at low speed the parts
will get not in good condition. Accelerate the engine in any gear but
do not exceed the suggested limit.
'R QRW DFFHOHUDWH WKH PRWRUF\FOH
to full throttle during the running-in
period.
First inspection and routine main- Parking
tenance
1. Reduce the throttle to 0 position.
The inspection immediately after the 2. Pull the clutch lever
¿UVWNPLVWKHPRVWLPSRUWDQW 6ZLWFKWKHJHDUWR1QHXWUDO
one. This inspection shall be done 4. Operate the brakes
comprehensively. Every fastening $IWHUWKHYHKLFOHLVVWRSSHG
turn off the ignition.
piece shall be refastened and the
/RZHUWKHVLGHVWDQGZLWK\RXU
engine oil must be replaced.
foot while holding the motorCAUTION
cycle upright. Remove the key
from the main switch.
$IWHU WKH ¿UVW NP WKH ¿QDO
HQJLQH RLO DQG WKH RLO ¿OWHU PXVW
be changed, the oil sieve and the ! WARNING
The exhaust system is hot after
oil drain bolt must be cleaned.
If any engine problem occur du- driving. Make sure that the
ring the running-in period im- exhaust system has cooled down
mediately consult your dealer to before doing any maintenance
work. The following precautions
check the vehicle.
must be observed to prevent a
¿UHKD]DUGRURWKHUGDPDJHV
Ɣ1HYHUSDUNWKHYHKLFOHQHDUJUDVV
or other materials that easily burn.
Ɣ'R QRW DOORZ WKH HJLne
to
idle
too
long.
Ɣ'R QRW WRXFK WKH H[KDXVW DIWHU
driving.
CHECKING/ MAINTAINING SERVICE INTERVALS
7KH6DIHW\DQGFRQGLWLRQRIPRWRUF\FOHGHSHQGRQDFRUUHFWPDLQWHQDQFHSHULRGLFLQVSHFWLRQDGMXVWPHQW
lubrication and cleaning. The following contents help the operator to complete this tasks.
'XULQJWKHZDUUDQW\SHULRGDOOUHSDLUDQGUHFRPPHQGHGVHUYLFHLQVSHFWLRQVKDYHWREHGRQHE\DQDXWKRUL]HG
dealer.
! WARNING
Not authorized manipulation on the motorcycle leads to the loss of warranty.
If you are not familiar with maintenance work have a dealer to do it for you.
The vehicle has to be checked for rust constantly. The owner is responsible for rust prevention. The drive chain must be cleaned and lubricated regularly.
7KHDLU¿OWHUQHHGVPRUHIUHTXHQWVHUYLFHLI\RXULGHLQXQXVXDOO\ZHWRUGXVW\DUHD
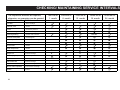
CHECKING/ MAINTAINING SERVICE INTERVALS
7KHLQVSHFWLRQLQWHUYDOVDUHUHTXLUHG
RWKHUZLVHQRJXDUDQWHHFDQEHJUDQWHG
PART
72'O
Air filter
clean/ exchange
:KHHOVULPV
Control
Tires
Control/ tire pressure
Wheel bearing
Control/ exchange
Steering bearing
Control/ clean/ lubricate
Screws Coverparts
Control/ tighten
Brake system
Control/ clean/ exchange
Main stand
Control/ clean/ lubricate
Front forke
Control
Rear suspension
Control
Oil filter
Clean
Engine oil
Control/ exchange
Valves (Engine)
Control/ adjust
Transmission oil
Exchange
Variomatic belt
Control/ exchange
Fly wheels
Control/ exchange
'ULYHQFKDLQVSURNHWs
Control/ clean/ exchange
Clutch
Control
28
1000 km or
1. month
4000 km or
PRQWh
NPRr
12. month
10000 km or
18. month
13000 km or
24. month
E
lubricate
E
E
EE
E
E
E
E
E
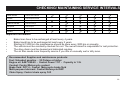
CHECKING/ MAINTAINING SERVICE INTERVALS
Cable/ bowden
Control/ clean/ lubricate
Throttle
Control/ adjust/ lubricate
Lights/ switches
Control/ adjust
Fuel line/ fuel filter
Control/ exchange
,GOHVSHHG
Control/ adjust
Exhaust system
Control/ tighten
Coolant
Control
E
Important Information
Brake lines have to be exchanged at least every 4 years.
%UDNHOLTXLGKDVWREHH[FKDQJHGDWOHDVWHYHU\\HDUV
Starting at 13000 km the maintenance should be done every 3000 km or annually.
The vehicle must be constantly checked for rust. The owner himself is responsible for rust protection.
The drive chain must be cleaned and lubricated regulary.
7KHDLU¿OWHUQHHGVPRUHIUHTXHQWO\VHUYLFH,I\RXULGHLQXQXVXDOO\ZHWRUGLUW\DUHD
Recommended Supplies and maintenance products:
Fuel: Unleaded gasoline - 95 Octane or higher
Engine oil: SAE 10W-40 - Castrol Power 1 4T - Capacity is 1.2L
Coolant: Castrol Motorcycle coolant
%UDNHÀXLG'27&DVWURO0RWRUF\FOHEUDNHÀXLG
Multi-purpose lubricant: Castrol Motorcycle DWF
Chain Spray: Castrol chain spray O-R
29
CHECKING/ MAINTAINING
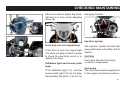
Spark plug
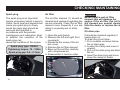
$LU¿OWHU
The spark plug is an important
engine component which is easy to
check. Since heat and deposits will
cause any spark plug to slowly
erode the spark plug should be
removed and checked in
accordance with the periodic
maintenance and lubrication chart.
,Q DGGLWLRQ WKH FRQGLWLRQ RI WKH
spark plug can
reveal the condition of the engine.
ThHDLU¿OWHUHOHPHQWVKRXOGEH
cleaned and replaced regarding the
VHUYLFHLQWHUYDOV&OHDQWKHDLU¿OWHU
HOHPHQW PRUH IUHTXHQWO\ LI \RX DUH
riding in unusually wet or dusty
areas.
Spark plug type: CR8ES
Tightening torque: 10 - 15Nm
Spark plug gap: 0.6 - 0.7mm
! WARNING
1. Open the seat bench.
2. Remove the left and right front
coverparts.
'LVPDQWOHWKHVFUHZRIWKHDLU
box cover.
5HPRYHWKHDLU¿OWHUHOHPHQW
%ORZRXWWKHDLU¿OWHUFDUHIXOO\
with compressed air.
5HDVVHPEOHLQUHYHUVHRUGHU
1
30
1HYHULQVWDOODZHWDLU¿OWHU
element this will damage the
HQJLQH,IWKHDLU¿OWHUFDQQRWEH
dry cleaned use special cleaner
from the dealer or replace the air
¿OWHU
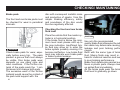
Oil drain pipe
,Wshould be checked regularly if
needs drain oil.
To drain the oil as follow:
1. Put a suitable container below
the oil drain pipe.
2. Loosen the clamp and move it
upward.
3. Pull out the drain plug and drain
the oil.
,QVHUWWKHGUDLQSOXJDQGPRYH
down the clamp to fasten.
CHECKING/ MAINTAINING
Coolant inspection
Bleeding the coolant system
%HIRUH VWDUWLQJ WKH HQJLQH SODFH
the bike on a level place and hold
LWLQDQXSULJKWSRVLWLRQWKHQRSHQ
the cap of the radiator to inspect
the coolant level.
1. Open the radiator cap.
2. Place a small container under
the bike.
3. Open the hose clamp (1) and let
WKHÀXLGEOHHGLQWKHFRQWDLQHU
4. Open the hose clamp (2) and let
WKHÀXLGEOHHG
2SHQWKHVFUHZVIURPWKH
water pump cover only a little bit
to bleed the pump.
,QVWDOODOOVFUHZVDJDLQDQGUH¿OO
the system.
2
! WARNING
From the left side you can inspect
the level of the expansion tank.
'RQRWUHPRYHWKHUDGLDWRUFDSDQG
expansion tank cap when engine
and radiator are hot. Scalding hot
ÀXLG DQG VWHDP PD\ EH EORZQ RXW
XQGHUSUHVVXUHZKLFKFRXOGFDXVH
serious injury.
3
3
3
1
Recommended coolant:
CASTROL
MOTORCYCLE COOLANT
31
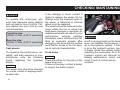
CHECKING/ MAINTAINING
ECU (Engine Control Unit)
The ECU is installed on top of the
DLUER[XQGHUWKHIURQWFRYHU
According to the pre-set control
SURFHGXUHVDQGSDUDPHWHUV
(&8FRQWUROVIXHOLQMHFWLRQLJQLWLRQ
WLPLQJSUHFLVHO\HQDEOLQJWKHHQJLne working optimally under various
ZRUNLQJFRQGLWLRQDWWKHVDPH
time minimizing the tailpipe emissions and fuel consumption.
:KHQ WKH V\VWHP GHWHFWV IDXOWV
the ECU also provides diagnosis
when system malfunctions occur by
outputting trouble code according
WR(2%'
The ECU is one of the most
important parts of the vehicle and it
is adjusted properly during
PDQXIDFWXULQJ,I\RXKDYHDQ\
problem please contact a dealer for
consultation.
(DFK(&8LVLGHQWL¿HGZLWKD
SURGXFW ODEHO IRU WUDFHDELOLW\ LW
should not be defaced or soiled or
the manufacturer shall not be hold
responsibility of investigation and
replacement.
Checking the throttle cable free
play
1. Release the locknut (1)
2. Rotate the adjusting screw (2) to
adjust the clearance.
.HHSWKH(&8FOHDQE\DGU\FORWK 3. Tighten the lock nut 1 after
adjusting the nut 2.
.HHSWKH(&8DQGFRQQHFWRUVDZD\
The throttle cable free play should
IURPZDWHUIXHORURWKHUFRUURVLYH
PHDVXUHaPPDWWKH
OLTXLGZKLFKPD\GDPDJH
throttle grip.
the housing of the ECU.
Adjust the idling
,I the idle is not correct consult a
dealer to check it.
The minimum speed of the engine
(idling) must be approxemately
UHYPLQ
32
1
2
CHECKING/ MAINTAINING
Clutch adjustment
1. Loosen the locknut (1) on the
crank case.
2. Turn the adjusting bolt (2) in or
RXWWRPHHWWKHUHTXLUHPHQWVRI
clutch free play.
3. The free play should be
10-20 mm on the clutch lever.
4. Tighten the lock nut (1) after
adjusting the nut (2).
Put the heaviest cargo to the center of motorcycle then distribute
To PD[LPL]HWKHSHUIRUPDQFH
the weight evenly from side to side.
GXUDELOLW\ DQG VDIH RSHUDWLRQ RI This will ensure proper handling of
\RXU PRWRUF\FOH QRWH WKH IROORZLQJ the vehicle.
SRLQWVUHJDUGLQJWKHVSHFL¿HGWLUHV
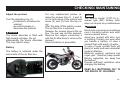
Tires
CAUTION
1. TiUHWUHDGGHSWKPLQPP
The tire air pressure should be
checked and adjusted before each 2. Tire sidewall
ride.The tire air pressure must be 3. Tire wear indicator
checked and adjusted on cold tires. CAUTION
The tires must be checked
EHIRUH HDFK ULGH ,I D WLUH WUHDG
shows crosswise lines (minimum
WUHDGGHSWKRULIWKHWLUHKDVDQDLO
RUJODVVIUDJPHQWVLQLWRULIWKH
VLGHZDOOLVFUDFNHGFRQWDFWD
! WARNING
dealer to replace the tire
'o
not
over
load
your immediately.
PRWRUF\FOHLQVWHDGWKHWLUHSUHVVXUH
will decrease.
The tire treads depth limits may
Allocation of your cargo and the differ from country to country.
total weight of your vehicle is very Always comply with the local reguimportant for your own safety and lations.
vehicle performance. When you do
QRWORDG\RXUFDUJR¿UPO\RQYHKLFOH
33
it may lead to an accident.
Tire air pressure:
'ULYHURQO\
)URQWEDU5HDUEDU
With passenger and max. payload
)URQWEDU5HDUEDU
1
2
~10-20 mm
Tire inspection
CHECKING/ MAINTAINING
! WARNING
To operate the motorcycle with
worn tires decrease riding stability
and can lead to loss of control. Please replace the worn tires by new
one immediately.
Front tire size:
+;ZKHHOULP
Rear tire size:
+;ZKHHOULP
,I DQ\ GDPDJH LV IRXQG FRQWDFW D
GHDOHUWRUHSODFHWKHZKHHO'RQRW
attempt even the smallest repair to
the wheel a deformed or cracked
wheel must be replaced.
The wheel should be balanced whenever either the tire or wheel has
been been changed or replaced. An
unbalanced wheel can result in poor
SHUIRUPDQFH DGYHUVH KDQGOLQJ
FKDUDFWHUVDQGDVKRUWHQHGWLUHOLIH
Ride at moderate speeds after
changing a tire since the tire surface
PXVW¿UVWEH³EUHDNLQ´IRULWWRGHYHlop its optimal characteristics.
0 mm
! WARNING
A soft or spongy feeling in the brake
lever can indicate the presence of
DLULQWKHK\GUDXOLFV\VWHP,IWKHUH
LVDLULQWKHK\GUDXOLFV\VWHPKDYH
Cast wheels
a dealer bleed the system before
operating the motorcycle. Air in the
7R PD[LPL]H WKH SHUIRUPDQFH GX- Front brake
hydraulic system will diminish the
UDELOLW\ DQG VDIH RSHUDWLRQ RI \RXU CAUTION
EUDNLQJ SHUIRUPDQFH ZKLFK PD\
PRWRUF\FOH QRWH WKH IROORZLQJ
SRLQWV UHJDUGLQJ WKH VSHFL¿HG There should be no free play at the result in loss of control and an
accident.
brake lever end.
wheels.
,IWKHUHLVIUHHSOD\FRQWDFWDGHDOHU
CAUTION
to inspect the brake system.
The wheel rims should be checked
IRUFUDFNVEHQGVRUZDUSDJHEHIRre each ride.
34
CHECKING/ MAINTAINING
Front brake free play adjustment
Rear brake
1. Loosen the locknut (1)
2. Turn the adjusting bolt (2) until
VSHFL¿HGSRVLWLRQPP
freeplay on the lever)
3. Tighten the locknut again.
CAUTION
There should be no free play at the
EUDNHOHYHUHQG,IWKHUHLVIUHHSOD\
contact a dealer to inspect the brake
system.
! WARNING
1
2
! WARNING
After adjusting make sure that the
break pads do not drag. When
there is no free play on the lever the
pressure in the brake system will
increase and the system can overKHDWDQGIDLO,ISURSHU
adjustment cannot be obtained
DV GHVFULEHG FRQWDFW D GHDOHU WR
make this adjustment.
A soft or spongy feeling in the brake
lever can indicate the presence of
DLULQWKHK\GUDXOLF V\VWHP,IWKHUH
LVDLULQWKHK\GUDXOLFV\VWHPKDYHD
dealer bleed the system before
operating the motorcycle. Air in the
hydraulic system will diminish the
EUDNLQJ SHUIRUPDQFH ZKLFK PD\
result in loss of control and an
accident.
Rear brake free play adjustment
1. Loosen the locknut (1)
2. Turn the adjusting bolt (2) until
the lever position is within speci
¿HGSRVLWLRQPPIUHHSOD\
on the lever)
3. Tighten the locknut again.
2
1
! WARNING
After adjusting make sure that the
break pads do not drag. When
there is no free play on the lever the
pressure in the brake system will
increase and the system can overheat and fail.
,ISURSHUDGMXVWPHQWFDQQRWEH
obtained as described contact a
dealer to make this adjustment.
CHECKING/ MAINTAINING
Brake pads
The front and rear brake pads must
be checked for wear in periodical
intervals.
GLVFZLWKFRQVHTXHQWPHWDOOLFQRLVH
and production of sparks from the
FDOLSHU %UDNLQJ HI¿FLHQF\ VDIHW\
and soundness of the disc would
thus be negatively affected.
MAX
MIN
Checking the front and rear brake
ÀXLGOHYHO
! WARNING
&KHFN EUDNH SDGV IRU ZHDU HVSHcially before every trip. The pads
present a groove that must always
EH YLVLEOH 'LVF EUDNH SDGV ZHDU
depends on use riding style and
URDG FRQGLWLRQV ,I WKH IULFWLRQ PDterial of the pads reach the 1 mm
thickness limit change both pads.
The excessive wear of the friction
material would cause the contact of
the pad metal support with the
Place the vehicle that the master cylinder is in horizontal position.
,I WKH EUDNH ÀXLG LV EHORZ WKH PLQLPXP OHYHO PDUN SOHDVH UH¿OO XS WR
WKHPD[LQGLFDWLRQ,QVXI¿FLHQWEUDNH ÀXLG PD\ DOORZ DLU WR HQWHU WKH
brake system possibly causing it to
EHFRPHLQHIIHFWLYH/RZEUDNHÀXLG
level may indicate worn brake pads
or brake system leakage.
MIN
CAUTION
Use only the recommended
TXDOLW\EUDNHÀXLGRWKHUZLVHWKHUXEber seals may deteriorate causing
leakage and poor braking performance.
5H¿OO ZLWK WKH VDPH W\SH RI EUDNH
ÀXLG 0L[LQJ ÀXLGV PD\ UHVXOW LQ D
harmful chemical reaction and lead
to poor braking performance.
%UDNHÀXLGGHWHULRUDWHSDLQWHGVXUfaces or plastic parts. Always clean
XSVSLOOHGÀXLGLPPHGLDWHO\
As the brake pads wear the brake
ÀXLGOHYHOWRJUDGXDOO\JRGRZQ
CHECKING/ MAINTAINING
5HFRPPHQGHGEUDNHÀXLG
DOT 4 - CASTROL
MOTORCYCLE BRAKE
FLUID
! WARNING
'DPDJH WR WKH RXWHU KRXVLQJ RI
cables may result in internal rusting
and cause interference with cable
&KDQJLQJWKHEUDNHÀXLG
movement. Replace damaged
cables as soon as possible to
Contact a dealer to change the bra- prevent dangerous wear of the
NHÀXLGDWWKHLQWHUYDOVVSHFL¿HGLQ cables.
the periodic maintenance and lubrication chart.
Front fork
Checking the lubrication of the
cables
The operation of all control cables
and the condition of the cables
should be checked before each
ride and the cables and cable ends
should be lubricated if necessary.
,I D FDEOH LV GDPDJHG RU GRHV QRW
move smoothly contact a dealer to
check or replace it.
Recommended multi-purpose lubricant:CASTROL
MOTORCYCLE DWF
! WARNING
,IDQ\GDPDJHLVIRXQGRUWKHIURQW
IRUN GRHV QRW RSHUDWH VPRRWKO\
contact a dealer to check
or repair it.
Checking the steering
Worn or loose steering bearings
may cause danger.
Therefore the operation of the steering must be checked as follows at
Checking the front fork
WKH LQWHUYDOV VSHFL¿HG LQ WKH SHULThe condition and operation of the odic maintenance and lubrication
chart.
front fork must be checked as fol- Place a stand under the engine to
lows:
raise the front wheel off the ground.
+ROGWKHORZHUHQGVRIWKHIURQWIRUN
1. Place the motorcycle on a level legs and try to move them forward
surface and hold it in an upright DQGEDFNZDUG,IDQ\IUHHSOD\FDQ
position.
EHIHOWFRQWDFWDGHDOHUWRFKHFNRU
2. While applying the front brake
repair the steering.
push down hard on the
! WARNING
handlebars several times to
Securely support the motorcycle so
check if
the
front fork
that there is no danger for it for
compresses and rebounds
falling over.
smoothly.
CHECKING/ MAINTAINING
WUDVPLVVLRQFKDLQFKDLQVSURFNHWV
transmission and rear wheel
The front and rear wheel bearings bearings) will be subjected to
unnecessary stress resulting in
must be checked at the intervals
VSHFL¿HG LQ WKH SHULRGLF PDLQWH- early wear and even chain
breakage. Too much slack in the
nance and lubrication chart.
FKDLQRQWKHRWKHUKDQGFDQUHVXOW
CAUTION
chain jumping off the chain wheels.
,I WKHUH LV IUHH SOD\ LQ WKH ZKHHO ,IWKLVKDSSHQVWKHFKDLQFRXOGDOVR
hub or if the wheel does not turn block the rear wheel or damage the
smoothly have a dealer check the HQJLQH,QHLWKHUFDVHWKHRSHUDWRU
is likely to lose control of the
wheel bearings.
motorcycle.
Chain adjusting
Adjust the chain Tension
Checking the wheel bearings
35 - 40 mm
2
! WARNING
,I WKH FKDLQ WHQVLRQ LV WRR JUHDW
parts within the secondary power
38
3
1
1. Loosen collar nut (1)
2. Loosen counter nuts (2)
3. Turn right and left adjusting
VFUHZVHTXDOO\IDU
4. Tighten counter nuts (2).
%HIRUHWLJKWHQLQJWKHZKHHOVSLQGOH
verify that the chain adjusters are
sitting close to the adjusting screws
and that the rear wheel has been
aligned with the front wheel.Tighten
FROODUQXWZLWK1P
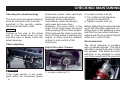
Shock absorber
7KH VKRFN DEVRUEHU LV HTXLSSHG
with a preload adjuster. The shock
DEVRUEHUµVSUHORDGDGMXVWHULVLQ¿QLtely variable. This allows the shock
absorber to be adapted to match
your body weight and the payload.
1
CHECKING/ MAINTAINING
Adjust the preload
For any replacement please reOHDVHWKHVFUHZVIRUPDQG
Turn the adjusting ring (1):
on On both sides of the vehicle and
clockwise to increase the
VFUHZ DQG IURP WKH WRS FRpreload
ver.
counterclockwise to
After this take off the plastic covers.
decrease the preload
7KHDLU¿OWHUER[LVH[SRVHG
Release the screws around the air
! WARNING
ER[<RXFDQVHHDLU¿OWHUHOHPHQW
7KH VKRFN DEVRUEHU LV ¿OOHG ZLWK Remove the caliper connecting it
KLJKGHQVLW\QLWURJHQ'RQRW
with the throttle body to remove the
disassembly the shock Absorber. element.
This may lead to injury.
1RZWKHEDWWHU\LVDFFHVVLEOH
Battery
5
4
The battery is installed under the
VHDWLQVLGHRIWKHDLU¿OWHUER[
3
2
1
CAUTION
7KH EDWWHU\ PRGHO <7=6 LV D
sealed type (MF) battery which
GRHVQRWUHTXLUHDQ\PDLQWHQDQFH
! WARNING
Electrolyte is poisonous and dangerous it contains sulfuric acid which
causes several burns.
$YRLG DQ\ FRQWDFW ZLWK VNLQ H\HV
or clothing. Protect your eyes when
\RX KDQGOH D EDWWHU\ ,Q FDVH RI
FRQWDFWÀXVKZLWKSOHQW\RIZDWHU
,Q FDVH RI H\HV FRQWDFW ÀXVK ZLWK
plenty of water and seek immediate
medical attention.
Batteries produce explosive hydURJHQJDV7KHUHIRUHNHHSVSDUNV
ÀDPHV FLJDUHWWHV HWF DZD\ IURP
the battery.
3URYLGH VXI¿FLHQW YHQWLODWLRQ ZKHQ
charging the battery.
KEEP ALL BATTERIES OUT OF
THE REACH OF CHILDREN
39
CHECKING/ MAINTAINING
Charging the battery
1. Switch off all consumers.
2. Measure the battery voltage
using a multimeter.
)XOO\FKDUJHGa9
,IWKHYROWDJHLVEHORZ9
disconnect the minus wire from
the battery.
4. Connect a suitable charger.
To store the battery
install a new fuse of the
VSHFL¿HGDPSHUDJH
,I \RX DUH QRW IDPLOLDU ZLWK EDWWHU\ 3. Turn on the electrical circuits
charging please contact a dealer.
to check if all devices operate
Storing a discharged battery can
correctly.
cause permanent battery damage.
Store the battery only in a cool dry CAUTION
place.
,IWKHIXVHEORZVRQFHDJDLQ
contact a dealer check the
Replacing the fuse
electrical system.
CAUTION
The fuse holder is located in the airFuses:
,IWKHYHKLFOHZLOOQRWEHXVHGIRUD ER[,IDIXVHLVEORZQWKHQUHSODFH
15 A (blue)/ 20 A (yellow)
longer period remove the battery it as follows.
DQG UHFKDUJH LW ,I WKH EDWWHU\ ZLOO
Replacing the headlight bulb
be stored for a longer period check
it at least once a month and fully re,IWKHKHDGOLJKWEXOEGRHVQRW
charge it if necessary.
glow remove the bolts and
screws (1 to 4) to disassemble
After installation make sure that the
the head lamp assembly.
battery leads are properly
2. Take out the rubber dust cover
connected to the battery terminals.
When recharging the battery make
DQGWKHSXJWKHQWXUQWKH
sure the amper and volts of char¿[LQJGLVFDQWLFORFNZLVHWR
ger is suitable to the battery and the 1. Turn off the main switch.
take it out before replacing the
VSHFL¿FW\SH
2. Remove the blown fuse and
bulb (8).
40
CHECKING/ MAINTAINING
1
When you need to adjust the headlight turn in or turn out the adjusting
screw (9).
2
changing the bulb.
1
5
7
3
6
11
10
10
10
10
12
4
2
9
Injection system
7
Front and rear turn signal lamp
8
The injection system consists afuel
SXPSZLWKWXEHVDIXHO¿OWHUDQGWKH
,I WKH IURQW RU UHDU WXUQ VLJQDO OLJKW
injector.
(10) does not glow contact a dealer
to check the electrical circuit or to CAUTION
replace the lamp.
)XHOSLSHVVKRXOGQRWEHEHQW
curved or compressed.
Tail/brake light and license plate
lamp
Fuel pump
,f the tail/brake light (11) and the The fuel pump module supplies fuel
license plate light (12) do not glow to the engine at system pressure.
disassemble the bolts (1 and 2) for
41
CHECKING/ MAINTAINING
The fuel pump module is mounted
,QVLGHRIWKHIXHOWDQN
)XHO¿OWHU
7KH IXHO ¿OWHU SURWHFW WKH HQJLQH
and the injector against impurity
from fuel.
CAUTION
7KH IXHO ¿OWHU VKRXOG EH FKDQJHG
from by dealer.
Injector
The injector is controlled by ECU
timely and accurately injecting the
fuel into the inlet manifold.
Troubleshooting
Although our company’s motorcycles receive a thorough inspection
before shipment from the factory
trouble may occur during operation.
The following trouble shooting chart
UHSUHVHQWVDTXLFNDQGHDV\SURFHdure for checking these vital systems by yourself.
+RZHYHU VKRXOG \RXU PRWRUF\FOH
UHTXLUHDQ\UHSDLUFRQWDFWDQDXWKRrized dealer who is a skilled techQLFLDQ+HKDVWKHQHFHVVDU\WRROV
experience and know how to service the motorcycle properly.
CAUTION
Use only genuine spare parts.
42
TROUBLESHOOTING
FAILURE
Cause
To Do
Engine does not start when the electric Battery discharged
Charge the battery
starter button is pushed
Check the charging of the battery
Check if the generator is working correctly
Engine turns but does not start or dies
off
Engine power is poor
Engine overheats
Fuse is blown
Change the fuse
Starter relay defective
Check the starter relay
Starter motor defective
Check the starter motor
Wrong assembly of roll over sensor
Check roll over sensor position
A fuse is blown
Check the fuses
,GOHVSHHGLVQRWVHWFRUUHFWO\
Spark plug is contaminated
Adjust the idle speed
&OHDQWKHVSDUNSOXJFKHFNWKHHOHFWURGHGLVtance
Failure in ignition system
Check the ignition system
Wire harness is worn
Check the wiring harness
Contact problem in a plug
Check the plugs of the wiring harness
1RJDVROLQHLQWKHWDQN
5H¿OOJDVROLQH
Problem with the fuel pump
Check the pump
3UREOHPZLWKWKHIXHO¿OWHU
&KHFNWKH¿OWHU
Fuel leakage
Check the fuel circuit
$LU¿OWHUFRQWDPLQDWHG
&OHDQWKH¿OWHU
)XHO¿OWHUFRQWDPLQDWHG
&OHDQWKH¿OWHU
Failure in fuel system
Check the fuel system
Problem with the ignition system
Check the ignition system
Valve clearance too little
1RRUQRWHQRXJKFRRODQWLQWKH
system
Adjust valve clearance
Coolant leakage
Check the colland circuit
Air in the coolant system
Ventilate the system
Thermostat damaged
Replace Thermostat
5H¿OOFRRODQW
43
TROUBLESHOOTING
FAILURE
Cause
To Do
To high oil consumption
Engine oil level too high
Bleed the oil system
Cylinder/Piston is worn
Replace the cylinder/piston
Engine vent hose bent
Failure in the fuel injection/electric
system
Correct the layout of the hose
(2%'DODUPOLJKWLVRQDQG'7&DSpears
on the speedometer
Stop the motorcycle and identify the faulty part
by pushing the Select Button on the speedometer
Check the wiring harness for any damage
8VHWKHGLDJQRVWLFWRROWRHUDVHWKH'7&
44
CLEANING
Cleaning
CAUTION
&OHDQWKHPRWRUF\FOHLQDSURSHUDQGVXLWDEOHZD\,WZLOONHHSLWDWWUDFWLYHH[WHQGLW¶VOLIHDQGRSWLPL]HWKH
performance.
Before cleaning
&RYHUWKHPXIÀHURXWOHWDQGWKHWZRDLUER[LQOHWKROHVZLWKDSODVWLFEDJRUFDSWRSUHYHQWZDWHUWRFRPHLQVLGH
&ORVHHYHU\FDSVFRYHUVDQGHOHFWULFDOFRQQHFWRUVZKLOH\RXDUHGRLQJWKHFOHDQLQJ:HGRQRWVXJJHVWWRXVH
DQ\DFLGLFFOHDQHUVIRUFOHDQLQJ,IVXFKSURGXFWVKDYHEHHQXVHGRQKDUGWRUHPRYHGLUWSOHDVHRQO\GRWKHVSRW
FOHDQLQJDQGXVHZDWHUDIWHUZDUGV7KHQGU\LWDQGXVHFRUURVLRQSURWHFWLRQVSUD\DIWHU¿QLVKLQJ
3OHDVHRQO\XVHPLOGGHWHUJHQWDQGZDWHUWRFOHDQSODVWLFFRYHUVSDQHOVKHDGOLJKWOHQVHVPHWHUOHQVHVHWF
$IWHUFOHDQLQJXVHRQO\DVRIWFOHDQFORWKRUVSRQJHWRGU\WKHSODVWLFV
3OHDVHSUHYHQWDQ\KDUVKFKHPLFDOSURGXFWVOLNHIXHOUXVW\UHPRYHUVEUHDNÀXLGRQSODVWLFSDUWVHVSHFLDOO\
RQSDLQWHGFRYHUVOHQVDQGZLQGVKLHOG,WZLOOGDPDJHWKHPDQGHYHQFDXVHVDIHW\FRQVLGHUDWLRQ'RQRWXVH
KLJKSUHVVXUHZDVKHUVWHDPFOHDQHUVLQFHLWZLOOFDXVHZDWHUVHHSDJHDQGGHWHULRUDWLRQRQEHDULQJVHOHFWULF
FRPSRQHQWVDVFRQQHFWRUVDQGVZLWFKHVOLJKWVEUHDWKHKRVHDQGWXEHEUDNHVKRHVDQGSDGVDQGVHDOV
Sea salt or salt sprayed on the roads during winter are extremely corrosive.
After riding in the rain, near the sea or on salt-sprayed roads:
Clean the motorcycle with cold water and a mild detergent after the engine has cooled down. Apply a corrosion
SURWHFWLRQVSUD\RQDOOPHWDOLQFOXGLQJFKURPHSODWHGDQGQLFNHOSODWHGVXUIDFHVWRSUHYHQWFRUURVLRQ
'RQRWXVHZDUPZDWHUVLQFHLWLQFUHDVHVWKHFRUURVLYHDFWLRQRIWKHVDOW
After cleaning
'U\WKHPRWRUF\FOHZLWKDDEVRUELQJFORWK7RSUHYHQWFRUURVLRQLWLVUHFRPPHQGHGWRDSSO\DFRUURVLRQSURtection spray onall metal including chrome- and nickel-plated surfaces. Use spray oil as a universal cleaner to
remove any remaining dirt. Wax all painted surfaces.
CLEANING/ STORAGE
0DNHVXUHWKDWWKHUHLVQRRLORUZD[RQWKHEUDNHVRUWLUHV,IQHFHVVDU\FOHDQWKHEUDNHGLVFVDQGEUDNHOLQLQJV
with a regular brake disc cleaner and wash the tires with warm water and a mild detergent.
! WARNING
Before operating the motorcycle test the brake performance and tires.
Storage
Always store your motorcycle in a cool dry place and protect it against dust with a motorcycle cover. Please
VWRUHWKHPRWRUF\FOHLQDZHOODLUÀRZURRPZLWKGU\DLU$VWRUDJHZLWKKLJKKXPLGLW\ZLOOFDXVHUXVW7RSUHYHQW
corrosion avoid damp cellars stables (because of the presence of ammonia) and areas where strong chemicals
are stored.
Follow all the instructions in the “Cleaning” section of this chapter. Fill the tank and pour some additive in. The
TXDOLW\RIWKHIXHOZLOOVWD\FRQVWDQW
Lubricate all cables and the pivoting points of all levers and pedals. Check and if necessary correct the tire air
pressure and then lift the motorcycle so that both wheels are off the ground.
&RYHUWKHPXIÀHURXWOHWZLWKDSODVWLFEDJWRSUHYHQWPRLVWXUHHQWHULQJLW5HPRYHWKHEDWWHU\DQGIXOO\FKDUJH
LW6WRUHLWLQDFRROGU\SODFHDQGFKDUJHLWRQFHDPRQWK,IWKHPDFKLQHLVWREHVWRUHGLQDKXPLGRUVDOWDLU
HQYLURQPHQWFRDWDOOH[SRVHGPHWDOVXUIDFHVZLWKD¿OPRIOLJKWRLO'RQRWDSSO\RLOWRUXEEHUSDUWVRUWKHVHDW
cover. Make any necessary repairs before storing the motorcycle.
Recommended maintenance products:
CASTROL GREENTEC BIKE CLEANER
CASTROL BIKE POLISH
CASTROL CHAIN SPRAY O-R
CASTROL MOTORCYCLE DWF
SPECIFICATION
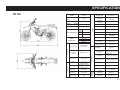
TR
125
QJ125GY-16A
Model
Engine type
QJ 160 MI - A
Overall Length
(mm)
2030
Fuel type
95 octane unleaded
gasoline
Overall Width (mm)
845
Number of
cylinders
1
Overall
(mm)
1120
Bore*stroke
Ɏ 60 mm *44 mm
1385
Displacement
124.4
Starting mode
Electric
height
Wheelbase (mm)
Vehicle Weight (kg)
Front
axle
Rear
axle
Total
63 kg
Engine
TR 125
76 kg
139 kg
Front (External)
Wheel
Specification
100/80-17
Rear˄External˅
130/80-17
Clutch type
Manual 6 gear
Electrical
Drive Train
Clutch type
Battery
capacity/type
12 V – 6 AH
YUASA TT27SL
Alternating current
permanent
magnetic motor
Generator type
NGK-CR8E
Spark plug
clearance
0.7~0.8 mm
Ignition type
CDI
Braking
system
Spark plug
Water cooled
Lubricating mode
Force-feed and splash
lubrication
Oil tank capacity
1.2 L (Oil change 1 L)
Air cleaner
Filter sponge
Fuel tank capacity
7.5 L ± 0.2 L
Top speed
Performance
Drive Train
Gear shift
pattern
Wet multi-plate
friction type
Cooling mode
110 km/h
Slope climbing
force
Maximum
climbing
angle is not less than
20 degrees
Idle speed
1700± 100 rpm/min
Max. torque
12.18 Nm/ 7500 r/min
Max. power
11 Kw/ 9000 r/min
Compression ratio
12.0 : 1
Pressure of
cylinder
Diameter of front
brake disc
Diameter of rear
brake disc
12,5-13,5 bar
ĭ 280 mm
ĭ 240 mm
WIRING DIAGRAM
48
WARRANTY INFORMATION
Information on warranty claim
Please carefully read the instruction manual of your vehicle before operating it in order to make yourself familiar with its
KDQGOLQJ:HH[SOLFLWO\SRLQWRXWWKDWWKHLQVWUXFWLRQPDLQWHQDQFHDQGFDUHLQVWUXFWLRQVJLYHQLQWKHRSHUDWLQJPDQXDOKDYH
WREHFRPSOLHGZLWKLQRUGHUWRVXVWDLQ\RXUFODLPWRZDUGVZDUUDQW\2QO\WKHVWULFWFRPSOLDQFHZLWKFXVWRPHUVSHFL¿FDWLRQV
stated in the instruction manual ensures the prolonging of the natural life of your vehicle.
Starting with the date of the invoice a limited warranty of 24 months is granted regarding the accuracy of the vehicle in
terms of material and manufacturing according to latest standards. The legal warranty regulations will not be restricted by
this limited guarantee. Maintenance work has to be exclusively done by authorized workshops entitled by us. Warranty in
generally is bound to the region of invoicing and can therefore only be carried out within
WKHFRXQWU\WKHYHKLFOHZDVERXJKW'DPDJHVWKDWFDQEHWUDFHGEDFNWRLQDSSURSULDWHXVDJHPDQLSXODWLRQRUQHJOHFWLQJ
of the maintenance/care/operating instructions will not be covered by warranty. Warranty can only be granted if occurring
damages are immediately being reported to the seller or any other authorized workshop by the buyer. The warranty claim
HQWLWOHVWKHEX\HUWRUHPHG\GH¿FLHQFLHVRUWRWKHUHSDUDWLRQUHVSHFWLYHO\WKHH[FKDQJHRIDGDPDJHGSDUWLQDQDXWKRUL]HG
workshop after our approval. Compensation for remote or instantaneous damages cannot be granted. Vehicles in desolate
condition will not be covered by warranty. Repair works carried out on warranty do not enlarge the guarantee period.
Only this document entitles you to call on warranty services. Therefore please make sure that you are delivered this fully
¿OOHGLQGRFXPHQWE\WKHVHOOHUDQGWKDWKHKDVUHJLVWHUHG\RXUYHKLFOHFRUUHFWO\LQRXUV\VWHP3OHDVHDOVRPLQGWKHIROlowing advices:
%RG\DQGSDQHOOLQJRIWKHYHKLFOHKDYHWREHNHSWIUHHRIGLUWFRQVWDQWO\'RQRWXVHKLJKSUHVVXUHZDWHUEODVWHUVVWURQJ
MHWVRIZDWHUVKDUSDQGFRUURVLYHRURWKHUDJJUHVVLYHGHWHUJHQWVZKLFKFRXOGKDUPVXUIDFHVDQGYDUQLVKSHUPDQHQWO\DQG
IRVWHUFRUURVLRQ,WLVYLWDOWRXVHSURWHFWLQJFOHDQVHUV
3OHDVHFRQVXOWRQHRIRXUGHDOHUVIRUWKHULJKWDQGDSSURSULDWHSURGXFWV$OXPLQLXPSDUWVRURWKHUUH¿QHGSDUWVFKURPH
SDUWVDQRGL]HGSDUWVRURWKHUSURFHVVHGVXUIDFHVKDYHWREHWUHDWHGZLWKDSSURSULDWHPDLQWHQDQFHSURGXFWVLQRUGHUWR
prevent oxidation. Frame and metal parts are continuously to be treated with anticorrosive. A vehicle constantly parked
outside has to be covered to avoid weathering and crack formations on seat and plastic parts.
Vehicles used off-road and for racing purposes are excluded from warranty.
Material which is to be used in the context of service and maintenance works are excluded from warranty as well as the
IROORZLQJSDUWVLQFDQGHVFHQWEXOEVEUDNHSDGVFOXWFKOLQLQJ¿OWHUHOHPHQWVVSDUNSOXJVGULYHVSURFNHWZKHHODQGD[OH
as well as the tires.
49
SERVICEPLAN
1000 km or 1. Month
NPRU0RQWK
Stamp/ Signature
Stamp/ Signature
NPRU0RQWK
10000 km or 18. Month
Stamp/ Signature
Stamp/ Signature
13000 km or 24. Month
NP
Stamp/ Signature
Stamp/ Signature
19000 km
22000 km
Stamp/ Signature
Stamp/ Signature
NP
28000 km
Stamp/ Signature
Stamp/ Signature
From 13000 km maintenance should place every 3000 km or annually. The warranty can be granted only when the vehice has been serviced in accordance with this Service plan.