1
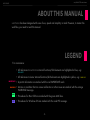
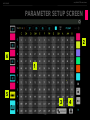
user guide
vv
arts|UNMUTED switcheroo
USER GUIDE
CONTENTS
CONTENTS 1
INTRO
2
DISCLAIMER 3
TEST CONFIGURATION
3
LEGEND 4
ABOUT THIS MANUAL
SETUP
4
5
MAIN SCREEN
6
PARAMETER SETUP SCREEN
10
NAME EDIT 13
MEMORY BANK SYSTEM 14
-1-
vv
arts|UNMUTED switcheroo
USER GUIDE
INTRO
THANK YOU for your purchase and trust in my products - I hope you’ll find switcheroo useful in your studio
or live setting.
switcheroo has been designed as a bridge between Lemur and the user in the creative context. While composing,
I don’t feel like tinkering with Lemur - often I just need a couple of additional switches that are not covered by my
staple controllers, so I needed a project that could be configured on the fly without going into Lemur editor. I realized I needed a switch toolbox that could be used in any creative context, but would ensure great flexibility and
appealing aesthetics. That’s how switcheroo was born.
switcheroo is a switch matrix made of 23 pads that can be predefined with up to 4 MIDI CCs/notes, Lemur target
and MIDI channel as well as name, color and pad behavior parameters. What’s more, you can store your setting
for each pad in 6 memory banks, which gives you in total 144 fully configurable pads. switcheroo is a perfect
companion to my KOLO/4series projects and a great tool on its own for live performances, articulation switching
or DAW control.
switcheroo is special also as far as Lemur coding is concerned. It is basically made of 23 physical pads with intricate parameter setup/storage mechanism. And as all arts|UNMUTED projects, it’s got unique and gorgeous design that will look great on your piano, MIDI controller or console.
I hope switcheroo will help you make some great music!
Przemek Mieszkowski (the developer of arts|UNMUTED premium projects for Liine Lemur for iPad)
-2-
vv
arts|UNMUTED switcheroo
USER GUIDE
DISCLAIMER
This software is sold as is. No warranties are offered or implied. The user uses the templates at their own risk. I
cannot assume any responsibility for any data loss or corrupted files resulting from the use of arts|UNMUTED templates. I cannot provide support related to the operation of any 3rd party software mentioned in this document. I
cannot guarantee that this manual is free of errors.
You may modify the templates for your own use. You may NOT sell, give away, post online, or distribute arts|UNMUTED templates or any derivatives based on arts|UNMUTED templates without prior permission of the author.
TEST CONFIGURATION
This Lemur project has been tested on the following:
•iPad v1/3/Air with Liine Lemur 5 (iOS 7)
•PC workstation based on Intel 980x processor and Asus Rampage Extreme III motherboard
•Apple Macbook Pro Retina (2013) with Mac OSC 10.9
-3-
vv
arts|UNMUTED switcheroo
USER GUIDE
ABOUT THIS MANUAL
switcheroo has been designed with ease of use, speed and simplicity in mind. However, to master the
workflow, you need to read this manual.
LEGEND
For convinience:
•All references to switcheroo internal functions/GUI elements are highlighted in blue, e.g.:
PROJECT
•All references to Lemur internal functions/GUI elements are highlighted in yellow, e.g.:
IMPORTANT!
WARNING!
MAC
PC
SAVE AS
•Importat information are marked with the red IMPORTANT mark.
•Actions or condition that can cause mulfunction or other issues are marked with the orange
WARNING! message.
•Procedures for Mac OSX are marked with the green MAC box.
•Procedures for Windows OS are marked with the violet PC message.
-4-
vv
arts|UNMUTED switcheroo
USER GUIDE
SETUP
switcheroo is a flexible MIDI device that can send MIDI messages (notes/CC) on any Lemur Target, so
the setup is totally dependent on your needs and working environment. This manual assumes that you
are familiar with Lemur setup and have got a WiFi connection between your Lemur on iPad and your
computer. If you haven’t done this yet, go to Liine website and follow the tutorials.
IMPORTANT!
arts|UNMUTED is not responsible for setup/system specific issues. All our projects has been extensively
tested on various machines (Mac/PC) and should work as expected in all Lemur environments. However,
we have helped many people with the setup so feel free to email us at: [email protected].
-5-
vv
arts|UNMUTED switcheroo
USER GUIDE
MAIN SCREEN
3
5
4
4
2
1
-6-
vv
arts|UNMUTED switcheroo
USER GUIDE
1. SHIFT
L
switcheroo features a dedicated function button (L SHIFT) that modifies the behavior of visible elements
and displays some additional objects and sections in most modules. In this manual, the description of the
display with active L SHIFT will be marked with the green L (on the left).
To activate L SHIFT you can touch it - it will turn blue and stay active. To deactivate it, touch it again. You
can also touch and hold the button - it will remain active as long as you hold it. It will be deactivated
upon release.
S
2. STORE BUTTON
button turns the pads into STORE MODE. In this manual, this state will be marked with the red S (on
the left). Pressing one of the store pad visible in STORE MODE will be described as STORE.
STORE
3. INFOBAR
shows currently selected parameters that will be assigned to a pad when you press the respective store pad in STORE MODE. It contains the following display items (from the left):
INFOBAR
–– Lemur target assignment
–– MIDI channel assignment
–– selected MIDI multi output values (CC values or note names with the respective octave)
–– color assignment
–– pad behaviour (pad or switch)
–– display status (on/off)
-7-
vv
arts|UNMUTED switcheroo
USER GUIDE
Apart from that there are 3 additional elements:
–– NAME DISPLAY button that shows the currently selected name for the pad. It has got two states:
blue - which means that the name selected with NAME SELECTOR will be assigned to the pad on
STORE . When the button is dark gray, the name selected with NAME SELECTOR will not be assigned
to the pad on STORE.
IMPORTANT!
To assign your custom name entered in Lemur editor mode (see NAME EDIT), the button has to be dark
gray.
–– SAVE indicator - it flashes in red when current pad parameters differ from the stored pad parameters, which means that all current pad parameters will not be saved when you change the memory banks. Touch the respective BANK STORE button to store the parameters in the respective memory bank.
–– MIDI OFF button - it temporarily disables MIDI output (when this button is active, pads don’t send
any MIDI messages to your target device/software. It is useful during pad setup.
4. PAD MATRIX
features 24 custom pad objects. You can customize the following parameters: Lemur Target,
MIDI channel, MIDI CC/note value, color, name and pad behavior. The state of these parameters is reflected by the physical appearance of the button
PAD MATRIX
The pad on the right has been set up as follows: Lemur Target: 2, MIDI channel: 3, MIDI output: CC 27, pad behavior:
switch (when you touch it, it remains pressed; touch it again to
release it), name: feedback.
-8-
vv
arts|UNMUTED switcheroo
USER GUIDE
This pad on the right has been set up as follows: Lemur Target: 0, MIDI channel: 1, MIDI output: (note) C#0, pad behaviour: pad (it remains pressed as long as you hold it),
name: vln staccato.
IMPORTANT!
S
When the pad is configured for multi-output, it is marked with large M. It means that the pads sends
more than one message. The values are not displayed on the button (due Lemur memory limits) - to see
them, press the button and see the values on INFOBAR. Depending on the setup you will see 1,2, 3 or 4
items with CC values/note names.
All the pads turn into STORE MODE (pad frames turn red and all buttons become light gray). Touch a
STORE PAD to assign the current parameters (indicated on INFOBAR ) to the respective pad.
5. MEMORY BANKS
On the left, there are 6 color-coded MEMORY BANKS (A-F) that store parameters for all 24 pads. Press a
MEMORY BANK to switch to the stored set.
S
turn into red MEMORY BANK STORE buttons for storing currently parameters for all pads.
Currently selected memory bank is indicated by a flashing black square.
MEMORY BANKS
For more information on storing and recalling pad parameters, see MEMORY BANK SYSTEM.
-9-
vv
arts|UNMUTED switcheroo
USER GUIDE
PARAMETER SETUP SCREEN
2
6
1
5
3
-10-
4
vv
arts|UNMUTED switcheroo
USER GUIDE
L
When you press
L SHIFT , SETUP SCREEN
will appear with the following elements:
1. OUTPUT VALUE SELECTOR
switcheroo features an easy to use MIDI output value selector. Select the desired pad marked from 0 to
128 to set MIDI CC/note value. For your convenience, there are note and octave markers. Your selection is reflected on INFOBAR.
2. SETUP BAR
SETUP BAR
features the following controllers:
–– 6 color switches
–– SHOW/HIDE button - press this button (it will turn red) if you want to hide the pad. The display status indicator on INFOBAR will show OFF. After STORE the respective pad will disappear.
–– MIDI OUTPUT TYPE SELECTOR - this button will let you choose MIDI output type for your pad (CC or
note).
–– KEYBOARD MODE - this button activates MIDI output from OUTPUT VALUE SELECTOR (i.e. it sends MIDI
notes, which is useful while looking for a loop or keyswitch).
–– NAME SELECTOR DISPLAY - this button displays
egories.
NAME SELECTOR
with nearly 400 names in 5 useful cat-
3. MIDI/TARGET
It shows
LEMUR TARGET/MIDI CHANNEL SELECTOR
for selecting Lemur Target and MIDI channel.
-11-
vv
arts|UNMUTED switcheroo
USER GUIDE
4. PAD BEHAVIOR SELECTOR
This button will let you define pad behavior (pad or switch).
5. MULTI OUTPUT SELECTOR
This button switches multi-output mode on/off and shows
output elements.
MULTI-OUTPUT BAR
with controllers for each MIDI
6. MULTI OUTPUT BAR
The bar consist of 4 pairs of switches. The gray switches with values are for selecting consecutive output
elements. The values show the currently selected output values for each output element. The dark gray
buttons activate respective output elements. Each output element can be defined as note or CC with MIDI
OUTPUT TYPE SELECTOR.
-12-
vv
arts|UNMUTED switcheroo
USER GUIDE
NAME EDIT
switcheroo let you easily create your own names for all the pads using Lemur Editor on iPad.
To assign a custom name to a pad:
1.Save your switcheroo project on your iPad (touch
SAVE PROJECT).
2.Touch
GEAR ICON
in the upper right corner and touch
EDIT PROJECT.
3. Touch and hold the name of the pad you want to modify.
4. txName pane will appear. Touch CONTENT field. The keyboard will appear. Type your name.
5. Make sure
NAME DISPLAY
on
INFOBAR
is dark gray (touch it if it is blue).
6. Store the settings.
7. Store the settings for the respective memory bank (see MEMORY BANK SYSTEM).
IMPORTANT!
Please remember that if you want to assign a predefined name to a pad using
PLAY on INFOBAR has to be blue.
-13-
NAME SELECTOR , NAME DIS-
vv
arts|UNMUTED switcheroo
USER GUIDE
MEMORY BANK SYSTEM
switcheroo let you store your parameter assignments in 6 memory banks. To store your complete layout
in one of six banks (A-F):
1.Make sure all pads on the main screen are properly assigned with all desired parameters.
2.If there is a difference between the parameters stored in a currently selected memory bank and
any parameters assigned to pads, you will see SAVE indicator flashing.
3.Touch store button in the lower right corner of the main screen.
4.Touch the respective red memory bank store button. For convenience, the current memory bank
selection is indicated with a blinking red square. This will store all the complete set of parameters
for all parameters in a current layout.
5. SAVE indicator will stop flashing which means that the parameters stored in a memory bank and
the parameters assigned to all the pads are the same.
6.Now you can change memory banks and the saved layout will be recalled when you touch the
respective MEMORY BANK button.
IMPORTANT!
After setting up your custom switcheroo project to your iPad and upload it to your computer for backup.
-14-