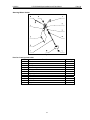
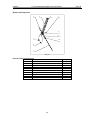
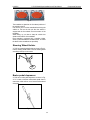
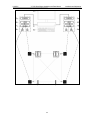
1
V1.00.000
2014-03-05
LAUNCH
X-712S Wheel Aligner Installation and Parts Manual
General Notice
Trademark Information
Other product names used herein are for identification
purposes only and may be trademarks of their
respective owners. LAUNCH disclaims any and all rights
in those marks.
LAUNCH is a registered trademark of LAUNCH TECH.
CO., LTD. (LAUNCH for short) in China and other
countries. All other LAUNCH trademarks, service marks,
domain names, logos and company names referred to in
this manual are either trademarks, registered
trademarks, service marks, domain names, logos and
company names of or otherwise the property of
LAUNCH or its affiliates. In other countries where any of
the LAUNCH trademarks, service marks, domain names,
logos and company names are not registered, LAUNCH
claims other rights associated with unregistered
trademarks, service marks, domain names, logos, and
company names. Other products or company names
referred to in this manual may be trademarks of their
respective owners. You may not use any trademarks,
service marks, domain names, logos, or company
names of LAUNCH or any third party without permission
from the owner of the applicable trademarks, service
marks, domain names, logos, or company names. You
may contact LAUNCH at http://www.cnlaunch.com, or
write to LAUNCH Industrial Park, North of Wuhe Rd.,
Banxuegang, Longgang, Shenzhen, Guangdong, P. R.
China, to request written permission to use Materials on
this manual for purposes or for all other questions
relating to this manual.
Copyright Information
Copyright © 2014 by LAUNCH TECH. CO., LTD. All
rights reserved. No part of this publication may be
reproduced, stored in a retrieval system, or transmitted
in any form or by any means of electronic, mechanical,
photocopying and recording or otherwise without the
prior written permission of LAUNCH. The information
contained herein is designed only for the use of this unit.
LAUNCH is not responsible for any use of this
information as applied to other units.
Neither LAUNCH nor its affiliates shall be liable to the
purchaser of this unit or third parties for damages,
losses, costs, or expenses incurred by purchaser or third
parties as a result of accident, misuse, or abuse of this
unit or unauthorized modifications, repairs or alterations
to this unit or failure to strictly comply with LAUNCH
operating and maintenance instructions.
LAUNCH shall not be liable for any damages or
problems arising from the use of any options or any
consumable products other than those designated as
Original LAUNCH Products or LAUNCH Approved
Products by LAUNCH.
i
LAUNCH
X-712S Wheel Aligner Installation and Parts Manual
Precautions
z
z
z
z
z
z
z
z
z
z
z
z
z
Please read the User’s Manual and the Installation
and Parts Manual carefully before operating
X-712S Wheel Aligner.
Only the qualified technician can operate the
Wheel Aligner.
The operator must have knowledge of computer
application and basic theory of wheel alignment.
The power voltage of X-712S wheel aligner is of
AC220V±10% 50±1Hz / AC110V±10% 60±1Hz(It
can be customized according to the requirements
of customer). The 3-terminal socket must be used,
and the earth terminal must be well grounded. If
the power voltage is not stable, please purchase
and use AC voltage stabilizer.
Before installing the wheel aligner, the lift should
be installed at first according to the requirements.
Regularly check the lift for fastening and leveling,
ensuring the test accuracy and personnel safety;
Take away the roadblocks around the lift to prevent
influencing operation.
Don’t install X-712S on a vibrated object or an
oblique surface. Avoid direct sunlight and moisture.
Turn off the power after operation. Check all bolts
and parts after maintenance, and tighten the
slackened bolts and parts in turn for safety.
Since computer visual technology is used in
recognizing the targets mounted on the wheels
through the camera with high resolution, it is
necessary to keep X-712S wheel aligner away
from the outside infrared rays (e.g. sun-lights) from
directly lighting to the targets and reflecting to the
cameras. It is also necessary to avoid blocking the
light way from the targets to the cameras for a long
time during the instrument is working.
The targets of X-712S wheel aligner are the key
components for testing. Do not damage their
structures when using and storing. Keep the
surface of target clean. Please use the soft cloth
dipped with an appropriate amount of the neutral
detergent or the absolute alcohol to wipe the
surface of target lightly if there are some smuts on
it.
When using and storing, please pay much
attention to prevent water from entering into the
targets.
The wires inside the post and the lateral beam are
connected compactly. Don’t move them after first
installation.
The precision position calibration has been
performed for the cameras after first installation,
the user can not move or wobble the post or lateral
beam during or after using it.
Without approval of the supplier, please do not
disassemble the post and the lateral beam in order
to avoid damaging the components, influencing the
z
z
z
z
ii
test accuracy and increasing the costs and
difficulties of maintenance and repair. For the
damage caused by unauthorized disassembling
will not be covered by the Warranty.
The fastening method should be selected correctly
and flexibly according to the actual conditions of
the rim, the turning force should be equal when
fastening, after fastening, please check the wheel
clamp again.
The force should be equal when using each knob,
please don’t fasten it too tight in order to avoid
damaging the locking mechanism or other parts.
After using, please cut off all power supply timely.
The cameras of X-712S wheel aligner are the key
optical components for testing. Do not impact them
when using, keep the surface of the camera lens
clean. Please use the lens paper to wipe the
surface of the camera lens lightly if there are some
smuts on it.
LAUNCH
X-712S Wheel Aligner Installation and Parts Manual
Table of Contents
General Information..................................................1-1
Brief Installation Introduction ..................................1-1
Precautions before Installation ...............................1-1
Installation Tools .....................................................1-1
Power Supply Requirement ....................................1-1
Unpacking..................................................................2-1
Post/Beam Box.......................................................2-1
Accessory Carton ...................................................2-1
Main Component Structure and Parts List .............3-1
Complete Set Structure and Components List .......3-1
Structures of Main Components .............................3-2
Post assembly ....................................................3-2
Lateral beam assembly ......................................3-3
Camera assembly ..............................................3-4
Front target assembly.........................................3-5
Rear target assembly .........................................3-6
Steering Wheel Holder .......................................3-7
Brake Pedal Depressor ......................................3-8
Components Structure .............................................4-1
Overall Structure.....................................................4-1
Post Assembly ........................................................4-1
Cameras and Lateral Beam Assembly ...................4-1
Targets and Wheel Clamps.....................................4-1
Turntables and Transition Bridges ..........................4-1
Steering Wheel Holder............................................4-2
Brake pedal depressor............................................4-2
Installation and Adjustment .....................................5-1
Install X-712S Wheel Aligner ..................................5-1
Check One by One if the Spot Meets the
Requirements according to Spot Inspection Item
Table before Installation .....................................5-1
Install Post Assembly and Lateral Beam Assembly
...........................................................................5-1
Confirm the Installation Position.........................5-1
Install Printer Box and Monitor Installation Plate 5-2
Cable Wiring and Others ....................................5-2
Adjust the Computer Host.......................................5-2
Calibration for Installation .......................................5-2
Camera Calibration ............................................5-4
Target Calibration ...............................................5-5
Precautions and Solutions.......................................6-1
Common Problems and solutions in Installation.....6-1
Precautions.............................................................6-1
Spot Inspection Item Table before Installation.......7-1
iii
LAUNCH
X-712S Wheel Aligner Installation and Parts Manual
z
z
z
z
z
z
z
General Information
Special caution: All the operations mentioned in this
manual should be performed by the qualified
technical personnel trained by Launch for X-712S
Wheel Aligner!
General Information
Iron hammer, > 2kg;
Cable drilling tool, Φ16 drilling bits;
Monkey wrench, medium size, 20cm;
Lineation chalk;
Hexagon ring spanner, M4—M6;
Cross screw driver, medium size;
Installation sets (including installation bolts, etc.).
Power Supply Requirement
Brief Installation Introduction
X-712S wheel aligner is a precise computer system that
needs AC220V±10% 50±1Hz / AC110V±10% 60±1Hz
power supply. Good ground helps to protect the
equipments and persons. If power supply cable needs to
be lengthened, its load must not be less than 220V 8A.
So in order to protect electronic products such as
X-712S Wheel Aligner, it is advisable to use AC power
supply voltage stabilizer.
Note:
Installation engineer must confirm that power
supply satisfies the above-mentioned requirements
before switching the wheel aligner on.
This installation manual is only suitable for the
installation of X-712S wheel aligner (post type)
manufactured by Launch, this type of wheel aligner
mainly includes two installation components: the post
assembly and the lateral assembly. For easy use and
measurement, the following four factors should be taken
into consideration during installation:
z Horizontal distance from the center of the turntable
on the lift to the post;
z Installation height of camera;
z Distance between left and right camera;
z Camera installation inclination degrees.
The operator must have knowledge of computer
application and basic theory of wheel alignment.
The post height of the wheel aligner is 2153mm, and the
working height of the lift is between 850~1200mm.
Correct installation is very important to the alignment
performance and the types of the vehicle that can be
aligned, please do read this manual carefully.
Precautions before Installation
Spot Inspection Item Table before Installation must be
provided by business personnel before installation. It is
convenient for installation engineer to learn beforehand
if the spot satisfies the use requirements of the wheel
aligner and then select suitable installation position.
Working flow:
z If there is no Spot Inspection Item Table before
Installation, please fill out another kind of the table.
z Every measurement must be marked correctly
(very important) and confirmed by technical service
personnel.
z Solve the problems met in the process of filling out
the table first and then perform the installation
operation.
z During installation, please abide by the advice and
requirements of this manual strictly. Please contact
the technical support engineers for help if
necessary. To install the wheel aligner together with
lift, mark out the spot according to the Spot
Inspection Item Table before Installation, install and
adjust the lift first and then install the wheel aligner.
Installation Tools
Tools needed in X-712S wheel aligner installation are:
z 5m tapeline, accuracy: 1mm;
1-1
LAUNCH
X-712S Wheel Aligner Installation and Parts Manual
Unpacking
X-712S wheel aligner is packed in two separated boxes:
a post/beam wooden box and an accessory carton.
Post/Beam Box
For unpacking of the post/beam box, please take Fig.2.1
as reference. The post assembly, the lateral beam
assembly and the computer host box are contained in
this wooden box.
Fig. 2.1
Accessory Carton
Two front targets, two rear targets, two mechanical
turntables, printer, four wheel clamps, computer host,
monitor, printer box, brake pedal depressor and steering
wheel holder, etc. are packed in one package box as
shown in Fig. 2.2.
2-1
Unpacking
LAUNCH
X-712S Wheel Aligner Installation and Parts Manual
Fig. 2.2
2-2
Unpacking
LAUNCH
X-712S Wheel Aligner Installation and Parts Manual
Parts List
Main Component Structure and Parts List
Complete Set Structure and Components List
Fig.3.1
Components List (Note: Take the parking list as the criterion)
No. ERP Code
Part Name
01 206010571 Lateral beam assembly
02 206010569 Post assembly
03 206010567 Front target assembly
04 206010568 Rear target assembly
05 108030119 Computer host (Inside the box)
06 108020019 Monitor
07 108020018 Mouse & Keyboard
08 108010037 Printer (Inside the front box)
09 103250250 Wheel clamp
10 102140017 Sound box
3-1
Qty
1
1
2
2
1
1
1
1
4
1
LAUNCH
X-712S Wheel Aligner Installation and Parts Manual
Parts List
Structures of Main Components
Post assembly
Fig. 3.2
Parts and components list of post assembly:
No.
ERP Code
Part/Component Name
Printer box assembly
P01
103202561
P02 X103202552 Sound box brackets
Cross recessed pan head screws (with spring washers and plain washers),
P03
103010215
GB/T9074.4-1988, M4*10
P04 X103202547 Monitor fastening plate
P05 X103202536 Post welded part
P06 X103202551 Installation hole cover plate
P07 X103202553 Press plate for strip power socket
Cross recessed pan head screws (with spring washers and plain washers),
P08 103010147
GB/T9074.4-1988,M6*12
P09 X103202549 Wheel clamp hanging brackets
P10 X103202548 Computer host support plate
P11 X103202546 Computer host box
P12
103011045
Cross recessed countersunk head screws, GB/T819.1.-2000,M3*8
Charging socket hole baffle
P13
103202243
Plain washer, GB/T97.1-2002, 8
P14
103040118
Spring washer, GB/T93-1987, 8
P15
103040108
Hexagon socket head screw, GB/T70.1-2000, M8*20
P16
103011092
3-2
Qty.
1
2
28
1
1
1
2
12
4
1
1
4
2
4
4
4
LAUNCH
X-712S Wheel Aligner Installation and Parts Manual
Parts List
Lateral beam assembly
Fig. 3.3
Parts and components list of lateral beam assembly:
No.
ERP Code
Part/Component Name
B01 103010081 Cross recessed pan head screws (with spring washers and plain washers),
GB/T9074.5-2004, M3*8
B02 103202562 Side cover plate for lateral beam
B03 103010219 Cross recessed pan head screws (with spring washers and plain washers),
GB/T9074.4-1988, M5*15
B04 103230254 Lateral beam
B05 103011092 Hexagon socket pan head screws, GB/T70.2-2000, M8*20
B06 103040108 Spring washer, GB/T93-1987, 8
B07 103040118 Plain washer, GB/T97.1-2002, 8
Hexagon socket head screws, GB/T70.1-2000, M10*25
B08 103010443
B09 103040122 Spring washer, GB/T93-1987,10
B10 103040105 Plain washer, GB/T97.1-2002,10
B11 205010656 Display panel
B12 104040728 Acrylic panel
B13 102210129 12V switch power supply
B14 102210095 5V switch power supply
B15 205010655 Main control panel
B16 103010516 Hexagon copper stud
B17 X103202550 Inner plate for lateral beam
B18 206010476 Camera assembly
3-3
Qty.
34
2
8
1
4
4
4
2
2
2
9
1
1
1
1
10
1
2
LAUNCH
X-712S Wheel Aligner Installation and Parts Manual
Parts List
Camera assembly
Fig. 3.4
Parts and components list of camera assembly:
No.
ERP Code
Part/Component Name
C01 X103203272 Camera bracket
C02 103040016 Plain washer, GB/T97.1-2002, 8
C03 103011092 Hexagon socket pan head screws, GB/T70.2-2000, M8*20
C04 101050117 Aluminium alloy support plate
C05 108990014 Camera
C06 103030077 Hexagon nut, GB/T6170-2000, M3
C07 103010561 Cross recessed pan head screws, GB/T818-2000, M3*12
C08 103040009 Spring washer, GB/T93-1987, 3
C09 103040016 Plain washer, GB/T97.1-2002, 3
3-4
Qty.
1
4
4
1
1
4
4
4
4
LAUNCH
X-712S Wheel Aligner Installation and Parts Manual
Parts List
Front target assembly
Fig. 3.5
Parts and components list of front target assembly:
No. ERP Code
Part/Component Name
F01 107022380 Target label
F02 104011261 Front target casing
F03 103010266 Hexagon plane end set screws, GB/T77-2000, M5*12
F04 103203283 Target pin shaft
F05 103040021 Plain washer, GB/T95-2002, 14
F06 103040200 Standard spring washer, GB/T93-1987, 14
F07 103030140 Hexagon nut, GB/T6170-2000, M14
F08 101050118 Front target pan
3-5
Qty.
1
1
1
1
1
1
1
1
LAUNCH
X-712S Wheel Aligner Installation and Parts Manual
Parts List
Rear target assembly
Fig. 3.6
Parts and components list of rear target assembly:
No. ERP Code
Part/Component Name
F01 107022380 Target label
F02 104011262 Rear target casing
F03 103010266 Hexagon plane end set screws, GB/T77-2000, M5*12
F04 103203283 Target pin shaft
F05 103040021 Plain washer, GB/T95-2002, 14
F06 103040200 Standard spring washer, GB/T93-1987, 14
F07 103030140 Hexagon nut, GB/T6170-2000, M14
F08 101050119 Rear target pan
3-6
Qty.
1
1
1
1
1
1
1
1
LAUNCH
X-712S Wheel Aligner Installation and Parts Manual
Parts List
Steering Wheel Holder
Fig. 3.7
Parts list of steering wheel holder:
No.
Part Name
Slide bar
1
Spring
2
Push plate
3
4
Open securing screw
5
Left support bar
Nut M8
6
7
Right support bar
8
Support block
Nut
9
10
Adjusting sleeve
Nut M8
11
Support seat
12
3-7
Quantity
1
1
1
2
1
1
1
1
1
1
1
1
LAUNCH
X-712S Wheel Aligner Installation and Parts Manual
Parts List
Brake Pedal Depressor
4
5
6
7
8
9
3
10
2
1
Fig. 3.8
Parts list of brake pedal depressor:
No.
Part name
Slide
bar
1
Spring
2
Push plate
3
Rubber handle
4
Support plate
5
Slotted pan head set screw
6
Knurled screw M6X25
7
Support block
8
Nut
9
Adjusting sleeve
10
3-8
Quantity
1
1
1
1
1
6
1
1
1
1
LAUNCH
X-712S Wheel Aligner Installation and Parts Manual
Components Structure
Cameras and
Assembly
Components Structure
Lateral
Beam
X-712S wheel aligner includes 2 CCD cameras, which
respectively capture the images from the 4 targets
attached on the vehicle wheels. The cameras are
mounted inside the lateral beam, one on left side and
another on right side. The accurate adjustment for
camera has been performed during first installation, so it
is not necessary for user to adjust it when using the
instrument.
The lateral beam assembly of X-712S wheel aligner
mainly consists of two sets of camera assemblies, 9
pieces of LED boards, one switch power supply, one
main control board and its signal/power cables.
Note: During or after using, ensure to prevent the
post/lateral beam from swaying, otherwise the
position of camera will be changed, influencing the
accuracy of test result.
Overall Structure
The X-712S wheel aligner mainly consists of computer
host, monitor, lateral beam assembly, post assembly,
front targets, rear targets, wheel clamps, wheel clamp
ties, turntables, steering wheel holder and brake pedal
depressor as shown in Fig. 4.1.
Targets and Wheel Clamps
X-712S wheel aligner totally has 4 target-clamp
assemblies, which are key components for whole test
system, and are the objects monitored by cameras.
There are some bull-eye signs on the targets as shown
in Fig. 4.2.
Fig. 4.1 Overall Structure
1. Lateral beam assembly; 2. Post assembly;
3. Front target; 4. Rear target; 5. Computer host
front cover; 6. Monitor; 7. Wheel clamp;
8. Brake pedal depressor; 9. Steering wheel holder;
10. Mechanical turntable; 11. Wheel clamp tie.
Fig. 4.2
Whether the wheel clamps are fastened correctly or not
has the great relations with the test result. Turn the
adjusting knob to adjust the span between wheel claws
until it is proper, and then attach the clamp to the wheel
rim. Adjust the knob to make the wheel clamp fixed on
wheel rim tightly. Use the wheel clamp tie to bind the
wheel clamp and the wheel rim together.
The installation of wheel clamp is crucial to the test
result. The claws should be in even contact with the
wheel rim without touching the lead weight.
Avoid hitting during operation. Otherwise, distortion may
be caused and the test result may be influenced.
Post Assembly
X-712S wheel aligner post assembly is an operation
control platform. It consists of post, printer box,
computer group and power supply assembly, etc. The
computer group includes computer host, monitor,
keyboard, mouse and printer, etc. The monitor is
installed in front of the post, mouse and keyboard are
placed on the top of the printer box, the printer is
installed inside the printer box, and the computer host is
inside the computer host box.
The power supply assembly includes power lead, power
socket and the power supply master switch. The power
supply master switch is installed at the left side plate of
the post, and the power supply socket is inside the lower
compartment of the post.
Turntables
Bridges
and
Transition
X-712S wheel aligner has two mechanical turntables
(standard configuration, see Fig. 4.3):
4-1
LAUNCH
X-712S Wheel Aligner Installation and Parts Manual
Fig 4.3
The turntables are placed at the front wheel positions of
the vehicle on the lift.
Use the lock pin to lock the turntable before driving the
vehicle on. Pull out the lock pin after the vehicle is
stopped and the front wheels are at the centers of the
turntables.
While testing, try your best to keep the vehicle front
wheels at the centers of the turntables.
Each turntable is equipped with a transition bridge,
which is placed between the turntable and lift, to ensure
the wheel on the turntable move reposefully.
Steering Wheel Holder
X-712S has a steering wheel holder as shown in Fig.4.4.
Use the steering wheel holder to lock the steering wheel
according to the tips on the screen.
Fig. 4.4
Brake pedal depressor
X-712S has a brake pedal depressor as shown in Fig.
4.5. It is used to hold the vehicle brake pedal down to
ensure the vehicle will not move forward and backward
during test.
Fig. 4.5
4-2
Components Structure
LAUNCH
X-712S Wheel Aligner Installation and Parts Manual
Installation and Adjustment
Installation and
Adjustment
Professional technical personnel are responsible for the
installation and calibration of X-712S Wheel Aligner.
Users need not to do these but to provide installation
conditions as follows: X-712S wheel aligner is a type of
three dimensions infrared image wheel aligner, and it
should be used indoors without strong infrared light
irradiating directly. So it is best to be installed indoors.
Install X-712S Wheel Aligner
Check One by One if the Spot Meets the
Requirements according to Spot Inspection
Item Table before Installation
Confirm that the lift has been installed and adjusted well
before installing X-712S Wheel Aligner. Generally
speaking, the spot which meets the installation
requirements for the lift, also can meet the requirements
for the ground where the X-712S wheel aligner is
installed. If not, in some special cases, it is required to
lay a new foundation for X-712S wheel aligner in
designated place (poured with more than 200# concrete,
800mmx800mmx400mm); keep the installation plane of
the foundation flush to the ground level where the lift is
installed, and keep the level degree of the installation
plane within 3mm; after the whole foundation is poured
well, appropriate maintenance work should be
performed, and it can be used after completely
concreted and dried.
Fig 5.2
Install Post Assembly and Lateral Beam
Assembly
1.
Stand the post near the installation place, remove the
back cover plate of the post; Install the lateral beam on
the top of the post as shown in Fig.5.1.
2.
Screw M10*25
Fig.5.1
3.
Caution: It is required to use inner hexagon spanner
when performing the installation operation.
Confirm the Installation Position
The position relationship of post and lift is as shown in
Fig.5.2.
5-1
Confirm the lift height
For the lift with multi-level height, please select
suitable working height (from 850mm to 1200m) for
operators to push and pull vehicles conveniently, as
well as adjust toe-in and camber, etc. Mark at the
corresponding shift positions of the lift as the
positioning height when users operate on it each
time. The present working height of the lift is of the
height between ground and turntable upper end
surface center.
Confirm the post installation center line
Obtain two center points by measuring front and
rear widths between two lift runway rails. Connect
these two points to confirm the center line of the lift,
lengthen the line in the direction of post.
Confirm the post base line B
Confirm line B according to the positions of two
turntables. Make sure that this base line is parallel
to turntable center line and vertical to lift center line.
The distance between line B and the turntable
center line is 1900~2800mm.
LAUNCH
4.
X-712S Wheel Aligner Installation and Parts Manual
Place the post on the ground vertically and drill on
the ground by cable drilling tool according to the
installation holes on the post pedestals and then
install the anchor bolts. During installation make
sure that the post is vertical to the ground and the
lateral beam is in level status.
Cable Wiring and Others
1.
2.
Install Printer Box and Monitor Installation
Plate
1.
2.
Installation and Adjustment
Take the printer box from the accessory carton, and
then open the door of the printer box, you will see
X-712S wheel aligner User’s Manual, Installation
and Parts Manual and Packing List, etc., inside it.
Please keep these materials well.
Install the printer box on the post as shown in
Fig.5.3.
3.
4.
5.
Screw M8*20
Place printer, keyboard and mouse on the proper
positions of the printer box and connect the
corresponding cables.
Place the computer host on the computer host
support plate, install the monitor on the installation
plate, and put the sound boxes on the sound box
brackets respectively, and then connect the
corresponding cables.
Connect the data cable from the lateral beam to the
computer host, and plug each power plug onto the
strip power socket inside the lower compartment of
the post.
Inside the post compartment, there is an array of
cable fixing lugs on left/right side plate respectively.
Hold the data cables and the power cables with
cable-locking clamps and then fix them on the lugs
respectively.
At last, reinstall the post back cover plate and the
computer host box respectively.
Adjust the Computer Host
1.
2.
Fig 5.3
3.
Caution: It is required to use inner hexagon spanner
when performing the installation operation.
4.
3.
5.
Remove the installation plate from monitor bracket
(The installation plate itself is equipped with 4 cross
recessed countersunk head screws M4*8). Install
the plate on the monitor fixing plate mounted on the
front middle end surface of the post as shown in
Fig.5.4.
Adjust the computer host before operating X-712S
Wheel Aligner.
Connect the main power cable to the power socket
(220V AC), press down the indicator switch in the
middle of the left side plate of the post to power the
main unit.
Press down the power supply switch to start the
computer. The system will automatically enter
software operating system.
Press down the power supply switch of the printer.
Print the test page to see if it is normal.
The adjustment for the computer host is successful
if all the above steps are normal. Exit X-712S wheel
aligner software operating system and the
computer will automatically shut down.
Calibration for Installation
Installation plate
Note: Under normal circumstances, please do not
perform the calibrating operations. The “front left,
rear left, front right, rear right” mentioned in this
manual refers the orientation when the driver faces
to the cameras.
Monitor fixing plate
Screw M4*8
Fig 5.4
Caution: Please directly use those 4 screws M4*8
removed from the installation plate when performing
the installation operation.
5-2
LAUNCH
X-712S Wheel Aligner Installation and Parts Manual
Fig 5.5 Installation calibration diagram
5-3
Installation and Adjustment
LAUNCH
X-712S Wheel Aligner Installation and Parts Manual
Installation and Adjustment
down the spring snap, and then click [OK] icon. The next
interface is as shown in Fig.5.9.
Camera Calibration
Click the [Camera Calibration] icon, the system will enter the
interface as shown in Fig.5.6.
Fig.5.9
Fig.5.6
According the prompts on the interface, unlock the spring
snap, and simultaneously put the calibration frame on the
left and right turntables. Click [OK] icon, the next interface is
as shown in Fig.5.10.
Enter the password (Note: the password is provided by
LAUNCH), and click [OK] button, the interface is as shown
in Fig.5.7.
Fig.5.10
Fig.5.7
According to the prompts on the interface, move the
calibration frame back by 600mm, and then click [OK] icon,
the next interface is as shown in Fig.5.11.
According to the prompts on the interface, put the calibration
frame on the right-side slide board of the lift. Click [OK] icon,
the next interface is as shown in Fig.5.8.
Fig.5.8
Fig.5.11
According to the prompts on the interface, please press
According to the prompts on the interface, once more, move
5-4
LAUNCH
X-712S Wheel Aligner Installation and Parts Manual
back the calibration frame by another 600mm, and then click
[OK] icon, the next interface is as shown in Fig.5.12.
Installation and Adjustment
spring snap, and then click [OK] button to confirm, the whole
calibration process is finished. Click [RETURN] button, you
can exit from the system.
Note:
It is not necessary to perform the calibrating operation
during equipment first installation. Generally speaking,
only in following two cases is the calibrating operation
performed:
1. The camera is adjusted or moved;
2. The target is changed.
Please do not perform the calibrating operation in
normal test operation process.
Target Calibration
Fig.5.12
(Cannot be used)
According to the prompts on the interface, move the
calibration frame back by 1200mm to the turntables, and
click [OK] icon, the next interface is as shown in Fig.5.13
Fig.5.13
According to the prompts on the interface, put the calibration
frame on the left-side slide board of the lift, and then click
[OK] button to confirm, the next interface is as shown in
Fig.5.14.
Fig.5.14
According to the prompts on the interface, press down the
5-5
LAUNCH
X-712S Wheel Aligner Installation and Parts Manual
Precautions and Solutions
Common Problems and solutions
in Installation
The screen displays the prompt of “Illegal user” when
you run the software, how to handle it?
At first examine if the soft dog is installed properly or in poor
contact. Then check if the serial number and user’s
password provided are correct. If necessary, contact the
technical service section of our company for verification.
The screen displays no image when you run the
software and select “Target Monitoring”, how to handle
it?
First check if cable connection of video camera and
illumination is right and the illuminating lamp is lightened.
Secondly, check the light path. Sway a target near the
camera lens and observe if there is an image appears.
Precautions
z
z
z
z
Calibration for installation is the base of X-712S Wheel
Aligner, so every step of operations must be performed
very careful. Otherwise, test precision and equipment
usage will be affected.
After calibration for installation, the post/lateral beam
and cameras are not permitted to move and adjust.
Keep targets clean.
The filter of camera is a special optical device, so it
must be kept clean and cleaned with soft lens tissue
when dirty. Avoid crushing the filter and moving the
camera.
6-1
Precautions and Solutions
LAUNCH
X-712S Wheel Aligner Installation and Parts Manual
Appendix
Spot Inspection Item Table before Installation
For X-712S Wheel Aligner
Inspection Item
Post installation height (vertical distance from ground
to post top)
Installation
Requirement
2153mm
Height of positioning platform (vertical distance from
ground to turntable top )
AH=850~1200mm
Post base distance (horizontal distance from
turntable center to post installation base)
AB=1900~2800mm
Height difference between the front and the rear of
positioning platform
<5mm
Power supply Requirement
AC220 or 110V 8A
7-1
Actual Measurement
Value
Evaluation
Comments