1
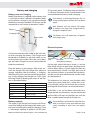
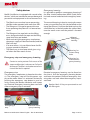
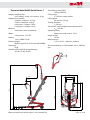
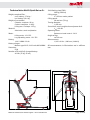
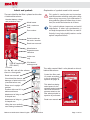
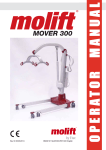
BM04101 Molift Quick Raiser English - Rev H 08/05/2013
Page 1 of 20
Table of content
About Molift Quick Raiser 1, 2 and 2+.2
Molift Quick Raiser - use.................... 3
Check list before use.......................... 3
General Safety precautions............... 4
Adjusting and transferring................ 5
Assembly and disassembly................ 7
Battery and charging......................... 9
Safety devices................................... 10
Technical data Molift Quick Raiser 1.11
IMPORTANT!
Technical
data Molift Quick Raiser 2.12
The patientdata
lifterMolift
is only Quick
meant to
be used
Technical
Raiser
2+.1by3
qualified personnel.
The manual
shall not be handed over,
Labels
and symbols..........................
14or
made available to, any unauthorised third
party, without
a prior written consent 15
from
Accessories.
.......................................
Etac Supply Gjøvik. Existing laws, conventions
Troubleshooting...............................
and agreements protects all documents.16No
extract of this documentation can be reMaintenance.....................................
produced, used or transferred without17
prior written consent from Etac Supply GjøChecklist
for of
periodic
inspection....
vik. Violation
these regulations
may 18
lead
to judicial repercussions and economic
responsibility. Industrial rights are reserved.
Etac AS, Etac Supply Gjøvik
Hadelandsveien 2
2816 Gjøvik, Norway
Teleph: (+47) 40001004
Fax: (+47) 40001008
About Molift Quick Raiser 1, 2 and 2+
Molift Quick Raiser is designed to cover the need
for lift and transfer of patients who are to some extent capable to actively participate in the process.
The lifter has an exceptional design and the shape
of the lifter and geometry of the lifting movement
imitates the natural pattern of movement of a person. The lifter is only intended for lift and transfer
to and from a sitting position.
• Molift Quick Raiser 1 has fixed legs, while Molift
Quick Raiser 2 / 2+ has spreadable legs.
• Molift Quick Raiser 1 and 2 has a lifting capacity of 160 kg Safe Working Load (SWL).
• Molift Quick Raiser 2+ has a lifting capacity of
200 kg Safe Working Load (SWL).
All three variants of Molift Quick Raiser is described in this manual, and when Molift Quick
Raiser is written it applies for all three, if not it is
specified by number 1, 2 or 2+.
Molift Quick Raiser 1, 2 and 2+ are CE labelled according to Council Directive (93/42/EEC) concerning medical devices as medical equipment class 1,
and has been tested and approved by third party,
according to standards IEC 60601-1, IEC 60601-1-2
and NS-EN ISO 10535:2006
Before using the patient lifter
Before using a patient lifter, the operator must be
trained accordingly. Practice lifting a colleague,
and be lifted by others. It is important not only to
know how to move another person using the lifter,
but also how it is to be lifted. Try out and practice
using all the relevant slings for the different types
of lifter and movement you may encounter. Before
lifting a person, you should explain the procedure.
When using the lifter, it’s also important to use the
correct sling and accessories according to:
•
•
•
•
type of disability
size
weight
type of movement
www.molift.com
[email protected]
BM04101 Molift Quick Raiser English - Rev H 08/05/2013
The lifter must be taken out of service immediately, or not returned to service, if faults
and/or irregularities that may have influence
on the safety are discovered.
Page 2 of 20
Molift Quick Raiser - use
Check list before use
The hand control for Molift Quick Raiser 2 and 2+ 1.Check that the lifter has no visible damages or
has four buttons, two buttons for raising and lowmissing parts.
ering, and two buttons for adjusting the legs in 2.Check that there are no loose parts, verify that
and out. Molift Quick Raiser 1 has only two butthe lifting arm and column are properly fastons for raising and lowering. In addition there is a
tened
diode which gives a light when the battery needs 3.Check that the emergency stop is not activated
charging.
and that the lifter is working.
Battery4.Check that the battery is charged (battery lamp
Up
lamp
gives no light).
5.Check that the service lamp gives a green light.
If service lamp gives a yellow or red light, the
lifter should be taken out for service.
Legs in
Emergency stop
Legs
out
Down
Battery lamp
(no light)
Service lamp
(green light)
Emergency
lowering and
Allen keys
Hand control
Lifting arm
Drive handle
Battery
Trolley
Lifting column
Control electronic,
incl service lamp,
battery lamp and
electrical emergency lowering
Knee support
Legs
Chassis
BACK
Emergency
stop
BM04101 Molift Quick Raiser English - Rev H 08/05/2013
FRONT (forward
direction of travel)
Page 3 of 20
General Safety precautions
General
Before putting a Molift Quick Raiser into operation,
the operator must ensure that the lifter and accessories are in good working order, especially with
regards to safety. A Molift Quick Raiser shall only
be used when all safety devices and equipment is
in place and fully operational. The lifter must be
taken out of service immediately, or not returned
to service, if faults and/or irregularities that may
have influence on the safety are discovered.
Use the drive handles when manoeuvring the
lifter, do not push or pull the patient or lifting
arm.
Keep fingers, arms or similar away from trolley during use! Danger of clamping between
knee support and trolley.
Torn, cut, frayed or broken slings can fail, resulting in serious injury to the user. Use slings
in good condition only. Destroy and discard
old, unusable slings
The lifter has an expected lifetime of 10 years
or 30 000 lifts with max load (SWL), when all
recommended service is performed.
Molift slings shall ONLY be used to lift persons. NEVER use the sling to lift and/or move
objects of any kind.
Injury to personnel or equipment may occur if
Molift Quick Raiser is used in an incorrect manner
and if:
• covers are removed by unauthorised personnel
• used incorrectly
• insufficient maintenance
• load exceeds maximum limit. The SWL stated
on the lifter is the maximum load
• unauthorised repair of electrical devices
- Molift QuickRaiser should not be run constantly for more than 2 minutes (with maximum load), and rest for minimum 18 minutes.
If the expected movement does not start
when the corresponding button is pressed,
please consult the fault finding table in the
maintenance chapter to locate the fault.
Lift and transferring
Several factors have to be considered during transferring. Stand to the side of the user when lifting.
Molift Quick Raiser 1 and 2 have SWL (Safe Ensure that arms and legs are clear of the lift, chair,
Working Load) on 160 kg, meaning that they bed etc. Try to maintain eye contact with the user
are tested and approved for lifting patients - this will help the user feel safe and comfortable.
up to 160 kg. Molift Quick Raiser 2+ has a
SWL on 200 kg. Attempts of lifting patients
Medical electrical equipment requires spewith a higher weight, may lead to danger of
cial precautions regarding electromagnetic
personal injury .
compatibility (EMC). Portable or mobile radio
communication equipment may affect the
The patient lifter may tip over if used incormedical electrical equipment, and should be
rectly! Ignorance of warnings and instruckept minimum 25 cm (10 inches) from the lifttions may lead to personal injury. Read iners electronics
structions carefully before attempting to lift
anyone.
Pay close attention to your actions. Ensure
that both ropes of the sling are securely fastened to avoid the user slipping or falling.
BM04101 Molift Quick Raiser English - Rev H 08/05/2013
Page 4 of 20
Adjusting and transferring
Lifting
• Lower the lifting arm to the lowest position
• Alternatively adjust the legs of the QR2/QR2+
to adapt to the lifting situation
To perform a comfortable lift for the patient,
it is recommended that the patient is sitting
in a normal upright position with near 90°
in ankles and knees. It is also recommended
that the patient is wearing suitable shoes or
socks with good friction towards the floor.
Using a V-shaped arm
• Fasten the sling to the lifting arm by pulling the
ropes firmly into the rope locks from the inside
and out as shown in the illustration. When lifting the patient, the ropes will lock even tighter due to the weight of the patient. The patient
should grab and hold the handlebars of the lifting arm if possible.
If the patient is sitting in a wheelchair, it is
necessary to put on the wheel chair brakes.
It’s also recommended to lock the wheels of
the Quick Raiser when performing the lift.
If the patient is large and heavy, it is recommended to lock the rope from the outside and
in to increase the width of the ropes. This will
reduce any pinching effect to the patients
chest.
Patients with an extremely high or displaced Using a U-shaped arm
centre of gravity (i.e. lameness on one side of • On a U-arm the ropes is attached to the lifting
the body or high weight on the upper body)
arm by pulling them firmly from above into the
may cause the lifter to tip over. Such patients
rope locks as shown on the illustration.
should be lifted in a passive lifter, i.e. Molift
Partner or Molift Smart, and not with an active lifter like Quick Raiser.
• Place the Molift Easy Raiser sling around the
back of the patient as far down as possible.
Connect the belt and tighten.
The ropes must be tightened firmly on the lifting arm. The rope will lock itself due to the
weight of the patient, but if sliding too much
before locking, it may cause an uneven lift
and discomfort for the patient. Check that
the rope has a knot in the end.
BM04101 Molift Quick Raiser English - Rev H 08/05/2013
Page 5 of 20
• Move the Quick Raiser in front of the patient
and place it in such a way that the patient can
place the feet on the footplate on the chassis.
If necessary - help the patient placing the feet
correctly.
Movement
The patient should not be standing straight
up during movement - this can be experienced as uncomfortable.
The distance from the front edge of the lift- Be careful during movement not to run into furnier to the kneepads increases when they are ture, walls, doors etc.
moved upwards.
The lifter shall not be used to lift or move us• Adjust the height of the kneepads so that the
ers on sloping surfaces.
top of the pads are approx. two finger widths
under the kneecap. Loose the locking wheel on Avoid deep pile carpets, high thresholds, uneven
the knee support bracket when adjusting.
surfaces or other obstacles that may block the castors. The lifter may become unstable if forced over
The scale on the column can be used to note such obstacles increasing the risk of tipping over.
the correct height of the kneepads for differ- If it is necessary to cross obstacles like a low door
ent users
sill, make sure to pull the lifter carefully straight
over it with the big wheels first.
• Attach the strap to the kneepads around the
users legs.
The lifter shall only be used for movement
over short distances. It is not a replacement
for wheelchair or similar.
Lowering
• Lower the patient into sitting position at the
desired place.
If the patient is to be seated into a wheelchair,
please observe that the wheel brakes must be
locked on the wheelchair when lowering, but
NOT on the lifter.
• Loosen the strap around the users legs and release ropes from locks.
• Remove the lifter and remove the sling.
If it proves to be impossible to place the leg
perpendicular to the footplate, you should pay extra attention when lifting to avoid over
stretching the knee joint.
• Raise the patient carefully until the buttocks
are clear from the seating and tighten the belt.
Unlock the wheels on the lifter and move the
patient to the next location.
BM04101 Molift Quick Raiser English - Rev H 08/05/2013
Page 6 of 20
Assembly and disassembly
Unpacking
• The lifter comes in a cardboard box. Verify that
the box has no apparent damage. If damaged, check the contents and contact your dealer for
assistance if components are damaged.
• The box contains as standard a chassis, lifting
column, knee support, lifting arm, drive handle,
hand control, battery, battery charger, power
chord and documentation.
Parts from lifters with different lifting
capacity must not be used.
Assembly
• Assemble the knee pad bracket on the column by removing the locking wheel. Place
the knee pad bracket around the column and
on the bolt where the locking wheel is placed
and tighten the locking wheel. Make sure the
bracket is placed with the level side up.
Locking wheel
for knee support
Fixing bolts
for column
The battery must not be in the battery holder
on the column during assembly!
• At the bottom of the column there are two
bolts for fixing the column to the chassis. Loosen the bolts enough to slide the column into
the chassis until the red arrow on the front is
pointing on the edge of the chassis (see picture). Tighten the bolts properly with the Allen
key on the top of the column (see page 10) to
fix the column to the chassis. Both bolts must
be attached to chassis.
• Slide the driving handle onto the top of the
column by guiding the head of the fixing knob
into the T-groove of the column. The handle
shall be pointing upwards, as shown on the
picture below. Tighten the knob firmly when
the handle is in the desired position.
• Guide the wire of the hand control through the
ring at the base of the drive handle. The hand
control has a hook enabling it to hang on the
handle.
Arrow
The QR2+ column has a pin in the bottom to
be fitted in the chassis.
• If the column stops before the arrow has
reached the edge, you will have to retract the
column and try turning the motor spline head
to align it with the connector at the base of the
column.
BM04101 Molift Quick Raiser English - Rev H 08/05/2013
Page 7 of 20
• Attach the lifting arm to the trolley on the column.
QR1 and QR2: On the trolley there is a small safety lock which has to be pushed up to ensure
a correct attachment of the lifting arm on the
trolley. Open the safety lock and then guide
the arm in place over the two bolts in the trolley. Lock the safety lock by pushing it down.
Etac Supply Gjøvik tests all lifters with and
without load before shipment. The control is
an extra precaution to uncover any shipment
damage and/or incorrect assembly.
Checklist
• Verify that the lifting arm is properly fastened
to the trolley.
• Verify that the lifting column is properly placed
into the chassis - arrow shall be exactly aligned
with the edge of the chassis.
• Verify that the column is properly fastened
with bolts tightened.
Make sure that the lifter has no damage or
cracks, and that the lifting arm and column is
properly fixed before use!
Disassembly
• Remove the battery.
• Remove the lifting arm by opening the security lock on the trolley at then pull out the lifting
arm.
• Loosen the lock wheel for the drive handle and
pull the handle with plate and locking wheel
up and out of the column.
• Remove the locking wheel for the knee support and remove the complete knee support
(also possible to leave on the column). Replace
Be careful not to put fingers or similar under
the locking wheel on the bolt on column to
the lifting arm between arm and trolley. Danavoid it from getting lost.
ger of personnel injury.
• Loosen the column fixing bolts with Allen key
and lift out the column.
QR2+: Place the lifting arm, install the bolt and
attach with the screws. Torque 28 Nm. Secure
Environment conditions
screws with Loctite 2701.
For long time storage it is recommended that the
battery is removed and the emergency stop button is activated. The lifter can be stored and transported under the following conditions:
Pressure: 70 - 106 kPa
Humidity: 15 - 93 %
Temperature: -25 - 70 °C
• Place the battery in the battery holder with the
connectors facing down. Run each function of
the lifter a couple of times without load to verify that the lifter works.
The lifter is designed for use at standard room
temperatures (+5 to +40°C). Following storage or
transport at other temperatures leave the lifter in
a room with a suitable temperature until it reaches
a safe operating temperature.
BM04101 Molift Quick Raiser English - Rev H 08/05/2013
Page 8 of 20
Battery and charging
Battery care and charging
Molift Quick Raiser is supplied with a battery with
a 14,4 V cell unit that is placed in the battery holder on the lifter. A charger is also supplied to charge
the battery whenever needed. The charger can be
mounted on a wall surface or placed on a table.
(75 kg) at this point. The battery lamp on the chassis will only illuminate when a hand control is not
connected and the battery needs charging.
If the battery is discharged during a lift, it is
always enough power to lower the user down
again.
New batteries will not achieve full capacity before it has been fully charged and discharged a couple of times.
Battery
Charging LED
The battery has a life expectancy of approx.
500 charge cycles.
Mains cable
Electrical system
Connect the charger mains cable to the wall socket when charging the battery. The Charger must
be placed or installed in a way that makes it easy Emergency
Service lamp
Electrical
Battery lamp
to disconnect mains cable. Take care not to dam- stop
emergency lowering
age the cable. Charger has to be used outside the
patient environment
On the right side of the chassis there is a service
light which will give a signal when the lifter needs
Place the battery in the charger. After a few sec- service. When there is a green light, the lifter can
onds the charger LED will change from yellow to be used normally. If there is no light, push one of
orange, indicating that the battery is charging. the up/down buttons to activate the electronics,
When the LED gives a constant green light the bat- and the service lamp will illuminate. See the chaptery is fully charged. The charger has a LED (Light ter “Maintenance”.
Emitting Diode) indicating the status of the battery as described below:
The electronics has a power save-function which
makes the system sleep after a while with no acLED
Mode
tivity. All lights will go out. Activate the system by
Yellow
No battery
pushing one of the buttons on the hand control.
Yellow
Initialization (10 sec)
Orange
Fast charge
Green/yellow
Top-off charge
Green
Trickle charge
Orange/green
Error
If the lifter is run up and down constantly for a
longer period, the electronics may be overheated
and the lifter will stop. Let the lifter rest until the
lifter is cooled down enough for further use.
Battery capacity
The battery light on the hand control will illuminate if the voltage of the battery falls below a certain level, indicating the need for charging. There
is still enough capacity to perform 3-5 lift cycles
BM04101 Molift Quick Raiser English - Rev H 08/05/2013
Discarded lifters and batteries should be handled as electronic waste and collected separately according to local laws and regulations.
Page 9 of 20
Safety devices
Emergency lowering
It is possible to perform a emergency lowering if
Molift Quick Raiser is equipped with several safety the lifter should malfunction. Molift Quick Raiser
devices, which are intended to prevent damage to has both manual and electrical emergency lowerpersonnel and equipment in case of incorrect use. ing.
• The lifter has an overload sensor preventing
the lifter to be operated with more than SWL.
• The lifting arm is hinged to prevent the arm
from squeezing the patient if it is lowered too
much.
• The lifting arm has rope locks on the lifting
arms, designed to lock the ropes on the lifting
strap when they are loaded.
• When activating the emergency stop button,
the power supply will be disconnected, and the
lifter will stop.
• If an error occurs, it is possible to lower the lifting arm manual or electrical.
• The lifter has a service lamp which gives a signal when the lifter needs service.
The manual lowering is done by turning the worm
screw using an Allen key (this can be found on the
top of the column). Puncture the label and use the
small Allen key in the hole under the yellow label,
turn the worm screw until the patient is lowered
enough.
Manual
emergency
lowering
Allen key for
column fixing
bolts
Emergency stop and emergency lowering
Allen key for
manual emergency lowering
Contact a service partner if the cause of the
stop or malfunction is unknown or if a fault is
discovered. The lifter is to be taken out of service until the fault is repaired
Emergency stop
The emergency stop button is placed on the chassis. The emergency stop will cut the power supply to the motor when it is activated. Activate by
pushing the emergency stop button in, and reset by turning the button clockwise until it pops
up. Electrical emergency lowering does not work
when emergency stop is activated.
Emergency
stop
Electrical emergency lowering can be found on
the chassis. Push the emergency lowering button
and lower the patient. Electrical emergency lowering does not work when the emergency stop is
activated.
Replace labels if they are punctured to seal
the lifter again.
Electrical emergency lowering
BM04101 Molift Quick Raiser English - Rev H 08/05/2013
Page 10 of 20
Technical data Molift Quick Raiser 1
Weight, complete lifter:
excl. battery; 29 kg / incl. battery: 30 kg
Weight, disassembled:
Chassis, complete: 15,2 kg
Column complete: 10.8 kg
Lifting arm, V-shape: 2.9 kg
Lifting arm, U-shape: 2.4 kg
1,100 mm
Sound level, max A-weighted sound power level:
LWA= 62 dB
Operating forces:
Buttons on hand control: 3.4 N
Height of legs:
70 mm
Measurements:
1,070 x 610 x 1,280 mm (LxWxH)
All measurements in illustrations are in millimetres.
100
65
Material:
Aluminium, steel and plastics
Motor:
Lifting motor: 12 V DC
Battery:
14.4 V NiMH 2.2 Ah
Battery charger:
Mascot type 2215,10-22 cells NiCd/NiMH
Protection:
IP24
Number of lift with fully charged battery:
40 lifts (75 kg, 50 cm)
Safe Working Load (SWL):
160 kg (560 lbs)
Lifting range:
0 - 850 mm under patient
Lifting speed:
50 mm/sec (75 kg)
Turning diameter:
610
340
260
400
150
1730
6
5
Designed/Drawn: Date:
955
xx
1280
Description:
Date/Sign.
Approved:
xx
xxx
70
65
Rev.
1070
990
Drawing name:
BM04101 Molift Quick Raiser English - Rev H 08/05/2013
Page 11 of 20
xx/xx-xxxx
Weight, complete lifter:
excl. battery; 36.5 kg /
incl. battery: 37.5 kg
Lifting arm, V-shape: 2.9 kg
Lifting arm, U-shape: 2.4 kg
Leg spreading motor: 12 V DC
Weight, disassembled:
Chassis, complete: 22 kg
Column complete: 11.7 kg
Material:
Aluminium, steel and plastics
Motor:
Lifting motor: 12 V DC
Battery:
14.4 V NiMh 2.2 Ah
Battery charger:
Mascot type 2215,10-22 cells NiCd/NiMH
Protection:
IP24
Number of lift with fully charged battery:
40 lifts (75 kg, 50 cm)
Safe Working Load (SWL):
160 kg (560 lbs)
Lifting range:
0 - 850 mm under patient
Lifting speed:
50 mm/sec (75 kg)
Turning diameter:
1,450 mm
Sound level, max A-weighted sound power level:
LWA= 62 dB
Operating forces:
Buttons on hand control: 3.4 N
Height of legs:
ca 100 mm
Measurements:
1,265 x 610 x 1,280 mm (LxWxH)
All measurements in illustrations are in millimetres.
100
65
Technical data Molift Quick Raiser 2
400
1730
990
1280
1150
1265
Designed/Drawn: Date:
xx
Drawing name:
Rev.
Description:
Date/Sign.
Approved:
Projection:
xx/xx-xxxx
xx
xxx
100
100
245
BM04101 Molift Quick Raiser English - Rev H 08/05/2013
360
610
1200
Page 12 of 20
Technical data Molift Quick Raiser 2+
Safe Working Load (SWL):
200 kg (560 lbs)
Lifting range:
0 - 850 mm under patient
Lifting speed:
28 mm/sec (75 kg)
Turning diameter:
Weight, complete lifter:
excl. battery; 37.4 kg /
incl. battery: 38.4 kg
Lifting arm, U-shape: 3.5 kg
Leg spreading motor: 12 V DC
Weight, disassembled:
Chassis, complete: 22 kg
Column complete: 11.9 kg
1,450 mm
Sound level, max A-weighted sound power level:
LWA= 62 dB
Operating forces:
Buttons on hand control: 3.4 N
Height of legs:
ca 100 mm
Measurements:
1,265 x 610 x 1,280 mm (LxWxH)
Material:
Aluminium, steel and plastics
Motor:
Lifting motor: 12 V DC
Battery:
14.4 V NiMH 2.2 Ah
Battery charger:
Mascot type 2215,10-22 cells NiCd/NiMH
Protection:
IP24
Number of lift with fully charged battery:
40 lifts (75 kg, 50 cm)
All measurements in illustrations are in millimetres.
400
990
1720
1280
1150
1265
100
245
BM04101 Molift Quick Raiser English - Rev H 08/05/2013
360
610
1200
Page 13 of 20
Labels and symbols
Explanation of symbols used in this manual
This symbol is used to point out instructions
and information related to work place safety
where injury may occur if the information is
disregarded or ignored. Follow these instructions, be careful and attentive at all times.
The main label for the lifter is placed on the chassis behind the column
Nominal battery voltage
and protection class
Model name
SWL, maximum
load
This symbol indicates important and useful
information. If taken into consideration, it
will help the operator of the lifter to work efficiently. It may help simplify routines and to
explain complicated facts.
Part number
Serial number as
bar code / number
Read user manual!
Manufacturer
Separate waste
collection
Indoor use
only
Type BF Applied part
(IEC 60601)
CE mark
CSA tested
and approved
On the left side of the column
there is a short guide.
Read user manual!
Check that lifter has no
damage or faults before use
(checklist before use)
Place user in upright
position
Position with near 90° in
ankles and knees
Attachment of sling on
U-shaped arm
Attachment of sling on
V-shaped arm
The safety control label is also placed on chassis
behind the column.
Control the lifter each
12 month according
to list for periodic inspection on page 18
This label has designated space for the
calendar and signed
label that the service
partners attach to the
lifter when periodic inspection is performed
Read user manual
Lifting the user carefully,
user leaning backwards
BM04101 Molift Quick Raiser English - Rev H 08/05/2013
Page 14 of 20
Accessories
Sling bag - Part no. 3048000
Quick Raiser Sandals
Molift Easy Raiser lifting strap
Size
Molift Easy Raiser
XS
Part no. 3020003
S
Part no. 3020000
M
Part no. 3020001
L
Part no. 3020002
XL
Part no. 3020004
Pair of sandals, size Small
• Part no.: 452100
Pair of sandals, size Medium
• Part no.: 452200
Molift Easy Raiser lifting strap with support
Size
Molift Easy Raiser with
support
XS
Part no. 3019003
S
Part no. 3019000
M
Part no. 3019001
L
Part no. 3019002
XL
Part no. 3019004
Adjustable footplate
• Art no: 451000
Extra padding for knee support
Extra padding knee support, small
• Part no.: 0455111
Separate support strap
XS/S/M
Part no. 3019011
L/XL
Part no. 3019012
Pair of sandals, size Large
• Part no.: 452300
Extra padding knee support, large
• Part no.: 0455114
Sling size guide
Lifting arms
Arm complete V-shape
• Part no: 458107
Lifting arm for Molift Quick Raiser 1 and 2
(SWL 160 kg)
The strap is adjustable
Size
Colour
code
Recommended
weight (Kg)
Waist
min max
(cm) (cm)
XS
Light
blue
20-30
50
65
S
Red
30-50
60
90
M
Yellow
50-90
75
110
L
Green
90-160
100
150
XL
Blue
160-200
120
180
Arm complete U-shape
• Part no: 458010
Lifting arm for Molift Quick Raiser 1 and 2
(SWL 160 kg)
All lifting straps are approved for 200 kg, Recommended weight is only mentioned as a
guide to choose the correct size.
BM04101 Molift Quick Raiser English - Rev H 08/05/2013
Page 15 of 20
Troubleshooting
If you have access to more than one lifter, it may
be helpful to change parts across lifters to help
Below you will find a table with fault finding pro- identify any faults. For instance, if you suspect the
cedures to identify and correct faults on the lifter: fault to be inside the column, exchange the column with at functional one from the other lifter to
Symptom
Possible cause/action
see if the problem is fixed.
Lifting column is
Locking bolts are not properly
wobbly
secured or lifting column is not
properly in place in the chassis
/ check if the column is correctly placed in the chassis and/or
tighten bolts
Lifter only moves
one way (up or
down) / legs only
moves one way (in
or out)
Fault on hand control / exchange
with alterative control from other
lifter and/or new hand control
The lifter moves up
and/or down by itself / legs move by
themselves
Short circuit between the hand
control and lifter / clean the connectors of the hand control and
chassis with spirits to remove
grease and dirt
If you are not able to solve the fault or problems
by yourself using this manual, please contact local authorised service representative. If you do
not know whom to contact locally, please contact
your dealer or Etac Supply Gjøvik to get help.
One of the relays / electronics
has failed/ exchange the control
unit/relays / contact your local
service representative
The hand control has failed/ exchange hand control / contact
your local service representative
Relays/electronics malfunctions
/ exchange electronics/relays /
contact your local service representative
The lifting arm
does not move
/ legs does not
move
Discharged battery / exchange
battery with another or charge
battery
Bad or wobbly connection from
lifting column to chassis / clean
contacts in column base and inside chassis - adjust and tighten
column bolts
Emergency stop activated / turn
clock wise to reset
Hand control disconnected / reconnect hand control
The hand control has failed/ exchange hand control / contact
your local service representative
Relays/electronics malfunctions
/ exchange electronics/relays /
contact your local service representative
Motor has failed / exchange motor / contact your local service
representative
BM04101 Molift Quick Raiser English - Rev H 08/05/2013
Page 16 of 20
Maintenance
Service
The lifter has a service lamp on chassis which will
Cleaning
give a signal when service of the lifter is required.
The service lamp gives a green light when the lift Detergents must be pH-neutral. Do not use er can be used normally.
solvents or strong liquids - this may damage
surfaces on the lifter. For disinfection when
needed; use isopropyl alcohol. Avoid abrasive
cleaning products.
Clean surfaces with a damp cloth using an appropriate detergent. Regular cleaning is recommended and should accordingly be added to internal
routines.
Inspection should be performed to uncover unexpected damages or errors.
Monthly maintenance
• Check that the lifter has no loose parts or visible damages.
• Remove hair and pile from the castors and verify that the castors rotates without abnormal
friction
• Verify that the contacts of the hand control and
charger is firmly in place
• Clean contact and hand control with spirit or
similar to remove grease and dirt
• Verify that the cables for the hand control, actuator and charger are intact
• Run the lifter up and down to verify that it runs
normally.
• Take contact with your local Molift service representative/dealer if there are faults or errors.
Service lamp
The electronics measures the operating time of
the lifter, and after a specific time the service lamp
will give a signal, first yellow light then red - indicating that the lifter needs service. Take contact
with your local Molift service representative/dealer. The lifter can still be operated, but after a while
an audible alarm will sound, to remind the operator that the lifter needs service immediately.
Service light codes
Service light
Mode
No light
Power saving
Green
Ready for use
Yellow
Book service
Red
Perform service
Red + sound
Perform service immediately
Periodic inspection
Flashing yellow
Overheating
Molift recommend periodic inspection of the lifter
once a year according to checklist on page 18. Pe- Service includes control and change of worn or
riodic inspection is to be performed by authorized damaged parts.
personnel.
The service partner uses the Molift Service Tool to
One checklist is to be filled in and signed for each read the data from the lifter, and for logging servlifter after inspection. The owner of the lifter is re- ice and resetting the service LED. The owner is responsible for keeping the list for information.
sponsible to ensure proper logging and written
verification performed by authorised service partner.
A list of spare parts is avalable on request
BM04101 Molift Quick Raiser English - Rev H 08/05/2013
Page 17 of 20
09.12.2008
Checklist for periodic inspection of Molift Personal Lifters
Molift Quick Raiser 1, 2 and 2+
Checklist for periodic inspection
Revision C – 12/2008
COMPULSORY SAFETY CHECK (annual):
OK
Fault
Completed
Corrected Visual inspection
Whole lifter checked for damage, cracks and deformation and found to be
in good order. (Especially raising arm, trolley with bolt, column, chassis,
wheels and all cables).
Lifter has been correctly assembled and no parts are missing.
(Especially column attachment, knee supports and raising arm).
Accessories have been checked. See separate form for sling. Battery
charger is an accessory.
List the accessories checked:………………………….………………
Function checks
Emergency stop and manual control have been checked and are in working
order.
The lifter has been rolled over the floor (preferably under load) and moves
easily and steadily.
Leg extender mechanism (Quick Raiser 2 and 2+) has been fully extended
and retracted (preferably under load), and moves evenly and without noise
(stops in correct positions).
The lifter has been fully raised and lowered (preferably under load) and
moves evenly and without noise.
Servicing required
Servicing unnecessary because the servicing lamp is on green and the lifter
is under 5 years old.
Compulsory in case of faults under one of the above points:
The lifter has been removed from service and clearly marked "OUT OF ORDER".
Certified personnel have been summoned to carry out repairs and servicing.
Name /Tel./ Fax:…………………………………………………………………………
Completed
Compulsory where lifter has been checked and approved:
The lifter has passed the safety check and been affixed with the Molift safety check label,
duly dated and signed.
The ticked and signed checklist has been passed to the client and a copy sent to your
Molift dealer.
.
Comments on faults and repairs: ............................. .................... ............................................................
................................................... ............................. .................... ............................................................
................................................... ............................. .................... ............................................................
................................................... ............................. .................... ............................................................
Lifter serial no.: ............................. .................................Other ID. no. (if any): .....................................................
Client:............................................. ................................. ..................... ..................................................................
Inspection carried out by: (Block capitals) ...................... ............. from..................................................................
Molift certification no. (if any) for inspector/repairer: .... ..................... ..................................................................
The equipment has been tested and is in full working order
Yes
No
Place: .................................... Date: ................ Signature: ..................... ..................................................................
BM04101 Molift Quick Raiser English - Rev H 08/05/2013
Page 18 of 20
BM04101 Molift Quick Raiser English - Rev H 08/05/2013
Page 19 of 20
Find your distributor
visit Molift.com