1
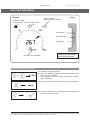
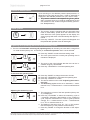
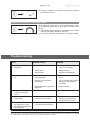
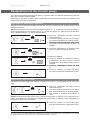
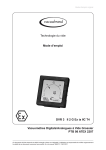
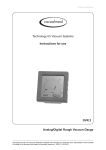
page 1 of 18 Technology for Vacuum Systems Instructions for use DVR 3 II 2 G Ex ia IIC T4 Digital/Analogue Rough Vacuum Gauges PTB 98 ATEX 2207 Documents are only to be used and distributed completely and unchanged. It is strictly the users´ responsibility to check carefully the validity of this document with respect to his product. Manual: 999072 / 12/01/2011 page 2 of 18 Dear customer, Your VACUUBRAND vacuum gauge shall support you at your work for a long time without any trouble and with full load output. Thanks to our large practical experience we attained much information how you could add to an efficient application and to personal safety. Please read these instructions for use prior to the initial start-up of your controller. VACUUBRAND vacuum gauges are the result of many years of experience in construction and practical operation of these vacuum gauges combined with the latest results in material and manufacturing technology. Our quality maxim is the ”zero fault principle”: Every delivered vacuum gauge is tested extensively including an endurance run. Due to this endurance run, also faults, which occur rarely, are reported an can be corrected. Every single vacuum gauge is tested on achievement of the specification after the endurance run. Every VACUUBRAND controller leaving our factory achieves the specification. We feel obliged to this high quality standard. We are aware that the controller should not draw a part of the real work and we hope to contribute with our products to an effective and troublefree realisation of your work. Yours VACUUBRAND GMBH + CO KG After sales service: Contact your local dealer or call +49 9342 808-193. ➨ Danger! Immediate danger. Death or severe injuries as well as damage to equipment and environment can occur. ☞ Warning! Possible danger. Severe injuries as well as damage to equipment and environment can occur. • Caution! Possible danger. Slight injuries as well as damage to equipment and environment can occur. NOTICE Note. Disregarding of notes may cause damage to the product. Note: The device contains a battery! Remove battery before disposal (see section ”Replacing the battery”) and dispose of battery and device separately and according to regulations. Documents are only to be used and distributed completely and unchanged. It is strictly the users´ responsibility to check carefully the validity of this document with respect to his product. Manual: 999072 / 12/01/2011 page 3 of 18 Contents Safety information!......................................................................................................4 General information.............................................................................................................................4 Intended use .......................................................................................................................................4 Connecting the device ........................................................................................................................4 Operating conditions ..........................................................................................................................5 Safety during operation ......................................................................................................................5 Technical data..............................................................................................................7 Wetted parts.......................................................................................................................................7 Accessories / Spare parts..........................................................................................8 Use and operation.......................................................................................................9 Changing the pressure unit................................................................................................................9 Pressure measurement....................................................................................................................10 Clock symbol....................................................................................................................................10 Adjusting the operating time and the measuring cycle.....................................................................10 Display of the battery‘s discharge status.......................................................................................... 11 Troubleshooting........................................................................................................11 Readjustment of the vacuum gauge........................................................................12 Adjustment at atmospheric pressure................................................................................................12 Adjustment under vacuum................................................................................................................12 Adjustment to a reference pressure.................................................................................................13 Calibration in the factory..........................................................................................13 Replacement of power supply unit..........................................................................14 Notes on return to the factory..................................................................................15 Health and safety clearance form............................................................................16 Trademark index: VACUU•LAN® (US-Reg.No 3,704,401), VACUU•BUSTM, VACUU•CONTROLTM, chemistry-HYBRIDTM, PeltronicTM, TURBO•MODETM, VARIO®, VARIO-SPTM, VACUUBRAND® (US-Reg.No 3,733,388) and also the shown company logos are trademarks of VACUUBRAND GMBH + CO KG in Germany and/or other countries. Documents are only to be used and distributed completely and unchanged. It is strictly the users´ responsibility to check carefully the validity of this document with respect to his product. Manual: 999072 / 12/01/2011 page 4 of 18 Safety information! General information NOTICE Read and comply with this manual before installing or operating the equipment. Remove all packing material, remove the product from its packing-box, remove the protective covers and keep, inspect the equipment. If the equipment is damaged, notify the supplier and the carrier in writing within three days; state the item number of the product together with the order number and the supplier’s invoice number. Retain all packing material for inspection. Do not use the equipment if it is damaged. If the equipment is not used immediately, replace the protective covers. Store the equipment in suitable conditions. Intended use • The devices DVR 3 are electronic rough vacuum gauges of the facility performance group II for the intended use in hazardous areas. They have a special approval and are subject to the guideline 94/9/EG (see ”Declaration of Conformity)”. • Respect the permitted connection parameters. Attention: DVR 3 has only an approval for zone 1 and zone 2. • Electrical and vacuum components might require a separate approval (see also ”Accessories”). • The device is designed for ambient and gas temperatures at the pressure transducer connection of +10°C to +40°C at continuous operation, up to +80°C for short periods (< 5 minutes) at the pressure transducer. If installing the device into a cabinet or a housing check maximum temperature. Ensure that the maximum permitted gas temperature at the pressure transducer (see ”Technical data”) is not exceeded. NOTICE Use the equipment and all system parts for the intended use only, i.e. for measurement of vacuum in vessels designed for that purpose. Connecting the device • Connect the vacuum gauge to the vacuum application. • Position the vacuum gauge and its vacuum connection line so that condensate cannot flow towards the internal pressure transducer. • Connect hoses at the pressure transducer connection gas tight. • Ensure stability of the hose connection. • Comply with all relevant safety requirements. ☞ Avoid uncontrolled overpressure (e. g. when connecting to a locked or blocked tubing system). Risk of bursting. ☞ The power supply unit BVE 9V is an intrinsically safe electrical operating device of the facility performance category 2 (PTB 98 ATEX 2206). The user can replace the sealed power supply unit of vacuum gauges DVR 3 within the hazardous area of category 2 (according to the approvals of power supply unit and vacuum gauge). Further interventions and repair must only be done by the manufacturer. + Using non-genuine power supply units or doing further interventions void the approval for use in explosive areas. • Power supply by an power supply unit BVE 9V. Do not charge the battery. Do not open the battery. Do not throw the battery into fire. Do not heat over 100°C and do not bring in contact with water. Documents are only to be used and distributed completely and unchanged. It is strictly the users´ responsibility to check carefully the validity of this document with respect to his product. Manual: 999072 / 12/01/2011 page 5 of 18 • Comply with max. permitted ambient and gas temperature (see ”Technical data”) and make sure ventilation is adequate if the equipment is installed in a housing or if ambient temperature is elevated. • Avoid high heat supply (e. g. due to hot process gases). • In case of residues or aggressive or condensable media install a gas washing bottle if necessary. NOTICE When the device is brought from cold environment into a warm room for operation bedewing may occur. Allow the device to acclimatize. Comply with national safety regulations and safety requirements concerning the use of vacuum and electrical equipment. Comply with all applicable and relevant safety requirements (regulations and guidelines), implement the required actions and adopt suitable safety measures. Operating conditions ➨ DVR 3 has only an approval according to device labelling. NOTICE Ensure that the materials of the wetted parts are compatible with the substances processed in the vacuum system, see section “Technical data”. Safety during operation ➨ Adopt suitable measures to prevent the release of dangerous, toxic, explosive, corrosive, noxious or polluting fluids, vapors and gases. ➨ Prevent any part of the human body from coming in contact with the vacuum. Max. permitted pressure at the vacuum gauge: 1.1 bar absolute with hose nozzle; 1.5 bar absolute with small flange connection. • The display flashes at a pressure above 1060 mbar. ☞Attention: If the pressure is higher than approximately 1060 mbar the pressure reading becomes incorrect (saturation of the pressure transducer). The display flashes. Immediate pressure relief necessary! Risk of bursting! • Use only genuine spare parts and accessories. Otherwise safety and performance of the equipment as well as the electromagnetic compatibility of the equipment might be reduced. Possibly the CE mark becomes void if not using OEM spare parts. NOTICE Electronic equipment is never 100% fail-safe. This may lead to an ill-defined status of the equipment or of other connected devices. Provide protective measures against malfunction and failure. Ensure that in case of failure the device and the vacuum system always will turn into a safe status. Documents are only to be used and distributed completely and unchanged. It is strictly the users´ responsibility to check carefully the validity of this document with respect to his product. Manual: 999072 / 12/01/2011 page 6 of 18 Maintenance and repair • Attention: Due to the operation the equipment might be contaminated by harmful or dangerous substances, clean or decontaminate prior to maintenance. NOTICE The user can replace the sealed power supply unit of vacuum gauges DVR 3 within the hazardous area (according to the approvals of power supply unit and vacuum gauge). Further interventions and repair must only be done by the manufacturer. Returned products will not be repaired or calibrated until the completed health and safety clearance form has been received. In order to comply with law (occupational, health and safety regulations, safety at work law and regulations for environmental protection) vacuum pumps, components and measuring instruments returned to the manufacturer can be repaired only when certain procedures (see section ”Notes on return to the factory”) are followed. Documents are only to be used and distributed completely and unchanged. It is strictly the users´ responsibility to check carefully the validity of this document with respect to his product. Manual: 999072 / 12/01/2011 page 7 of 18 Technical data Type DVR 3 Measuring principle capacitive, absolute pressure, gas type independent Pressure transducer ceramic diaphragm (alumina) Pressure reading Pressure units Measuring cycle Automatic sleep mode Measuring range (absolute) analogue and digital LCD display mbar, Torr or hPa (selectable) automatic, once in 3s, once in 1s, three times in 1s (factory-set: automatic) operation time: 1-1000 minutes or continuous operation (”On”), (factory-set: 15 minutes) 1080 mbar - 1 mbar (810 Torr - 1 Torr) Maximum permissible pressure at pressure transducer Measurement uncertainty (absolute) after careful adjustment and at constant temperature Temperature coefficient Maximum permissible temperature of gaseous media at pressure transducer 1.5 bar absolute <±1 mbar (0.75 Torr) / ±1 digit <±0.07 mbar/K (0.05 Torr/K) continuous operation: 40°C, for short periods (< 5 minutes): up to 80°C Ambient temperature range (operation) 10°C to +40°C Ambient temperature range (storage) -10°C to +60°C Permitted relative atmospheric moisture during operation (no condensation) 30% to 85% Degree of protection according to IEC 529 Ex proof classification IP 40 II 2 G Ex ia IIC T4, for use in zone 1 Vacuum connection small flange KF DN 16 and screw-in hose nozzle DN 6/10 mm Power supply BVE 9V, PTB 98 ATEX 2206, II 2 G Ex ia IIC T5 Weight approx. Dimensions L x W x H 430 g 116 mm x 116 mm x 66 mm Wetted parts Components Wetted materials Sensor Aluminium oxide ceramic Sensor housing stainless steel Seals chemically resistant fluoroelastomer Vacuum connection / hose nozzle PBT / PPS glass fibre reinforced Technische Änderungen vorbehalten! Documents are only to be used and distributed completely and unchanged. It is strictly the users´ responsibility to check carefully the validity of this document with respect to his product. Manual: 999072 / 12/01/2011 page 8 of 18 Accessories / Spare parts The approval for use in hazardous areas covers also the following accessories. For connections to hazardous areas of category 1, obey separate regulations (see EN 50284). Adapter (material: stainless steel) to connect the vacuum gauges to pipeline systems: Small flange NW 10, G 3/8 female thread......................................................................................643813 Small flange NW 10, G 3/8 male thread.........................................................................................643810 Small flange NW 16, G 1/2 female thread .....................................................................................643812 Small flange NW 16, G 1/2 male thread.........................................................................................643809 For welding: Small flange NW 10 with pipe socket (long) ..................................................................................662100 Small flange NW 10 with pipe socket (short)..................................................................................661300 Small flange NW 16 with pipe socket (long) ..................................................................................662104 Small flange NW 16 with pipe socket (short)..................................................................................661304 Spare parts Power supply unit BVE 9V.............................................................................................................637986 O-ring 28x2.....................................................................................................................................636975 Documents are only to be used and distributed completely and unchanged. It is strictly the users´ responsibility to check carefully the validity of this document with respect to his product. Manual: 999072 / 12/01/2011 page 9 of 18 Use and operation Display adjustment mode/ warning symbol automatic sleep mode replace battery/ display of battery capacity Keys key ON/OFF key UP/DOWN key MODE pressure units, selectable The keys are on the rear side of the device underneath the symbols at the front side. Changing the pressure unit + Torr ➨ Switch the vacuum gauge off. ➨ Press key ”MODE” and keep it pressed while switching the DVR 3 on (key ”ON/OFF”). ☞The pressure unit as of the last operation (Torr, mbar or hPa) is displayed. ➨ Select the desired pressure unit with the key ”UP/DOWN”. mbar ➨ Press key ”ON/OFF” to confirm the selected pressure unit and to terminate the mode. Documents are only to be used and distributed completely and unchanged. It is strictly the users´ responsibility to check carefully the validity of this document with respect to his product. Manual: 999072 / 12/01/2011 page 10 of 18 Pressure measurement Upon switching on, the absolute pressure (total pressure, independent of gas type) ranging from 1 mbar to 1080 mbar is displayed in the selected pressure unit (Torr, mbar or hPa). ☞��������������������������������������������������������� The pressure transducer was adjusted using factory standards. In general, there is no need for readjustment by the user because of the excellent longtime stability (see section ”Readjustment”). Clock symbol ☞The vacuum gauge is equipped with an automatic sleep mode to save battery power when the instrument is not used. When the clock symbol appears on the display, the vacuum gauge will switch off automatically after approx. 1 minute. ➨ Press key ”ON/OFF”. The clock symbol will disappear and the preselected operation time will start again. Adjusting the operating time and the measuring cycle ☞ The time until automatic switching off (operating time) can be set by the user within a range from 1 to 1000 minutes (factory-set: 15 minutes) or continuous operation ”On” can be selected. ➨ Press key ”MODE” to select the time setting mode. ☞ The clock symbol and the currently set operating time in minutes are displayed. ☞The arrow to the right indicates that the time can be increased using key ”UP/DOWN”. ➨ Press key ”UP/DOWN” to increase operating time. To decrease the operating time: ➨ Press key ”MODE” to change the arrow to the left. ➨ Press key ”UP/DOWN” to decrease the operating time. ➨ Press key ”ON/OFF” to confirm. ☞ The device switches to the mode ”Adjusting the measuring cycle”. ☞The measuring cycle can be set to Automatic, 1 measurement in 3s, 1 measurement in 1s and 3 measurements in 1s. Adjusting the measuring cycle: ☞ The measuring cycle as of the last operation (factory-set: ”A”) is displayed. ➨ Press key ”UP/DOWN” to select the measuring cycle: A = Automatic (automatic determination of the measuring cycle; frequent measurement in case of great pressure change), S1 = 1 measurement in 3s, S2 = 1 measurement in 1s, S3 = 3 measurements in 1s. ☞ The flashing of the arrow (only ”S1”, ”S2” or ”S3”) symbolizes the frequency of the pressure measurement). ☞ Press key ”MODE” to change the direction of the adjustment. Documents are only to be used and distributed completely and unchanged. It is strictly the users´ responsibility to check carefully the validity of this document with respect to his product. Manual: 999072 / 12/01/2011 page 11 of 18 ➨ Press key ”ON/OFF” to confirm the measuring cycle and to terminate the mode. Display of the battery‘s discharge status When switching off the device, the remaining battery capacity is displayed qualitatively by the number of arrows in the display. ☞ If the battery symbol appears in the display during measurement, the battery should be replaced. ☞ The correct operation of the device is no longer ensured. Troubleshooting Fault Possible cause Remedy ❑ ➨ Automatic sleep mode? ✔ Switch on, increase operating time if necessary. ➨ Battery flat? ✔ Replace battery. ➨ Other cause? ✔ Contact local distributor. ➨ Pressure transducer not correctly adjusted? ✔ Readjust pressure transducer. ➨ Moisture in the pressure transducer? ✔ Dry or evacuate the pressure transducer and readjust if necessary. ➨ Battery flat, battery symbol is displayed? ✔ Replace battery. ➨ Battery flat? ✔ Replace battery. ❑ No display or display disappears. Incorrect pressure reading. ❑ Display is flickering and/ or battery symbol appears. ❑ Adjustment mode cannot ➨ be activated. At the applied pressure, read- ✔ justment is not possible. Admit air to atmospheric pressure or evacuate to a pressure below 20 mbar. ❑ All segments of the LCD ➨ are displayed or no display although battery has been replaced. Pressure transducer or meas- ✔ uring electronics defective? Contact local distributor. Documents are only to be used and distributed completely and unchanged. It is strictly the users´ responsibility to check carefully the validity of this document with respect to his product. Manual: 999072 / 12/01/2011 page 12 of 18 Readjustment of the vacuum gauge The equipment has been adjusted at the factory. In general, there is no need for adjustment by the user due to the excellent longtime stability. Depending on operation conditions, type of application and accuracy requirements, an inspection and readjustment may become necessary. Adjustment at atmospheric pressure Admit air to the vacuum gauge. Make sure that the vacuum connection at the vacuum gauge is at atmospheric pressure. Attention: Determine the exact actual atmospheric pressure, e. g. by using an accurate barometer or get accurate reading from the weather service, e. g. at the next airport, etc. (take into account the difference in altitude between e. g. airport and laboratory). + ➨ Press key ”UP/DOWN” and keep it pressed while switching on. ☞ The vacuum gauge switches into the adjustment mode (indicated by a warning triangle). ☞������������������������������������������������ The arrow at the right indicates, that the pressure reading can be increased using key ”UP/ DOWN”. ➨ Press key ”UP/DOWN” to increase the reading to the actual atmospheric pressure. To reduce the reading: ➨ Press key ”MODE” to change the direction of adjustment. The arrow moves to the left indicating that the pressure reading can be reduced. ➨��������������������������������������� Press key ”UP/DOWN” to reduce the reading. ➨ Press key ”ON/OFF” to confirm the adjustment and to terminate the adjustment mode. Adjustment under vacuum Evacuate the vacuum gauge to a pressure <0.5 mbar (<0.4 Torr) e. g. by applying a good rotary vane pump. ➨ Press key ”UP/DOWN” and keep it pressed while switching on. ☞ The vacuum gauge switches into the adjust+ ment mode (indicated by a warning triangle). ☞The reading is adjusted automatically to ”zero”. Attention: Adjustment under vacuum with a pressure higher than 0.5 mbar (0.4 Torr) reduces the accuracy of measurement. If the pressure is significantly higher than 0.5 mbar (0.4 Torr), adjustment to a reference pressure is recommended. ➨ Press key ”ON/OFF” to confirm the adjustment and to terminate the adjustment mode. Documents are only to be used and distributed completely and unchanged. It is strictly the users´ responsibility to check carefully the validity of this document with respect to his product. Manual: 999072 / 12/01/2011 page 13 of 18 Adjustment to a reference pressure Evacuate the vacuum gauge to an exactly known reference pressure within the range of 0 .... 20 mbar (0 .... 15 Torr). Switch the vacuum gauge to the adjustment mode (see ”Adjustment under vacuum”). ➨ Press key ”UP/DOWN” to adjust the reading from ”0” (”zero”) to the actual reference pressure in the vacuum line in the range of 0 to 20 mbar (0 to 15 Torr). ➨ Press key ”ON/OFF” to confirm the adjustment and to terminate the adjustment mode. Attention: The accuracy of the value of the reference pressure will directly affect the accuracy of the adjustment. If the nominal ultimate vacuum of a diaphragm pump is used as ”reference” vacuum, the accuracy of the adjustment of the vacuum gauge might be doubtful. The diaphragm pump may not achieve the specified value due to condensate, poor state, failure of the valves or the diaphragm. Calibration in the factory Control of measuring equipment The VACUUBRAND DKD calibration laboratory is accredited by the Physikalisch-Technische Bundesanstalt (PTB; German national institute for science and technology and the highest technical authority of the Federal Republic of Germany for the field of meteorology and certain sectors of safety engineering) for the measurable variable pressure in the pressure range from 10-3 mbar to 1000 mbar in accordance with the general criteria for the operation of testing laboratories defined in the DIN EN ISO/ IEC 17025:2000 series of standards. Calibration in the VACUUBRAND calibration laboratory: - To meet the requirements of the DIN ISO 9000ff and 10012 series of standards regarding the calibration of inspection, measuring and test equipment at specified intervals. - To document that the vacuum gauges calibrated are traceable to national standards of the PTB. DKD calibration ............................................................................................................................900217 Documents are only to be used and distributed completely and unchanged. It is strictly the users´ responsibility to check carefully the validity of this document with respect to his product. Manual: 999072 / 12/01/2011 page 14 of 18 Replacement of power supply unit Technical data of the power supply unit: Approval: II 2 G Ex ia IIC T5 Type: BVE 9V PTB 98 ATEX 2206 UN = 9 V IN = 23 mA U0 = 11.1 V I0 = 28.8 mA P0 = 79.8 mW C0 = 1.9 µF L0 = 50 µH The user can replace the sealed power supply unit of vacuum gauges DVR 3 within the hazardous area of category 2 (according to the approvals of power supply unit and vacuum gauge). Note: Some of the components on the printed circuit board are sensitive to electrostatic discharge. Do not touch components. Ground printed circuit board and person replacing power supply unit suitably. Attention: Use only genuine power supply unit BVE 9V. When using other power supply units the approval for use in explosive atmosphere is void! The power supply unit must not be charged. Do not open the battery. Do not throw the battery into fire. Do not heat over 100°C and do not bring in contact with water. ➨ Unscrew the four countersunk head screws at the rear side of the housing by using a Phillips screw driver. ➨ Open the housing carefully. Attention: The two housing parts are connected by the sensor cable. pcb switch pad power supply unit contact spring ➨ Remove the power supply unit from the housing rear part. ➨Remove the two contact springs and insert the springs into the new power supply unit. ➨ Insert the new power supply unit in the housing rear part. +When reassembling the vacuum gauge, make sure that the switch pad and the printed circuit board are positioned correctly. ➨ Carefully screw both parts of the housing together. Documents are only to be used and distributed completely and unchanged. It is strictly the users´ responsibility to check carefully the validity of this document with respect to his product. Manual: 999072 / 12/01/2011 page 15 of 18 Notes on return to the factory Repair - return - DKD calibration NOTICE If the measures listed in section ”Troubleshooting” do not work: Return the equipment to the factory for inspection and repair. Interference with the equipment (except replacement of the battery) voids all warranties. Safety and health of our staff, laws and regulations regarding the handling of dangerous goods, occupational health and safety regulations and regulations regarding safe disposal of waste require that for all pumps and other products the “Health and safety clearance form“ must be sent to our office duly completed and signed before any equipment is dispatched to our premises. Fax or post a completed copy of the health and safety clearance form to us in advance. The declaration must arrive before the equipment. Enclose a second completed copy with the product. If the equipment is contaminated you must notify the carrier. No repair / DKD calibration is possible unless the correctly completed form is returned. Inevitably, there will be a delay in processing the equipment if information is missing or if this procedure is not obeyed. Eventually, acceptance of the returned equipment will be refused. If the product has come in contact with chemicals, radioactive substances or other substances dangerous to health or environment, the product must be decontaminated prior to sending it back to the factory. To expedite repair and to reduce costs, please enclose a detailed description of the problem and the product’s operation conditions with every product returned for repair. We submit quotations only on request and always at the customer’s expense. If an order is given, the costs incurred are offset from the costs for repair or from the purchase price, if the customer prefers to buy a new product instead of repairing the defective one. ☞ If you do not wish a repair on the basis of our quotation, the equipment might be returned to you disassembled and at your charge! We replace parts due to optical aspects upon your request (at your expense). NOTICE Before returning the equipment ensure that (if applicable): ☞ Equipment has been cleaned and/or decontaminated. ☞ All ports have been sealed. ☞ Equipment has been properly packed, if necessary, please order an original packaging (costs will be charged), marked as appropriate and the carrier has been notified. ☞ Ensure that the completed health and safety clearance form is enclosed. We hope for your understanding for these measures, which are beyond our control. Scrapping and waste disposal: Dispose of the equipment and any components removed from it safely in accordance with all local and national safety and environmental requirements. Particular care must be taken with components which have been contaminated with dangerous substances from the process. Do not incinerate fluoroelastomer seals and O-rings. ☞ You may authorize us to dispose of the equipment at your expense. Documents are only to be used and distributed completely and unchanged. It is strictly the users´ responsibility to check carefully the validity of this document with respect to his product. Manual: 999072 / 12/01/2011 page 16 of 18 Health and safety clearance form Declaration concerning safety, potential hazards and safe disposal of waste, e. g. used oil. Safety and health of our staff, laws and regulations regarding the handling of dangerous goods, occupational health and safety regulations, safety at work laws and regulations regarding safe disposal of waste, e. g. waste oil, require that for all pumps and other products this form must be sent to our office duly completed and signed before any equipment is dispatched to our premises. Products will not be accepted for any procedure, and handling and repair / DKD calibration will not start before we have received this declaration. a) Fax or post a completed copy of this form to us in advance. The declaration must arrive before the equipment. Enclose a second, completed copy with the product. If the product is contaminated you must notify the carrier (GGVE, GGVS, RID, ADR). b) Inevitably, the repair process will be delayed considerably, if this information is missing or this procedure is not obeyed. We hope for your understanding for these measures which are beyond our control and that you will assist us in expediting the repair procedure. c) Make sure that you know all about the substances which have been in contact with the equipment and that all questions have been answered correctly and in detail. 1.Product (Model): ........................................ 2.Serial No.: ................................................... 3.List of substances in contact with the equipment or reaction products: 3.1 Chemical/substance name, chemical symbol: a)..................................................................... b) ..................................................................... c)..................................................................... d) ..................................................................... 3.2 Important information and precautions, e. g. danger classification: a)..................................................................... b)..................................................................... c)..................................................................... d) ..................................................................... 4.Declaration (please mark as applicable): ❑ 4.1for non dangerous goods: We assure for the returned product that -neither toxic, corrosive, biologically active, explosive, radio active nor contamination dangerous in any way has occurred. -the product is free of dangerous substances. -the oil or residues of pumped media have been drained. ❑ 4.2for dangerous goods: We assure for the returned product that -all substances, toxic, corrosive, biologically active, explosive, radioactive or dangerous in any way which have been pumped or been in contact with the product are listed in 3.1, that the information is complete and that we have not withheld any information. -the product, in accordance with regulations, has been ❑ cleaned ❑ decontaminated ❑ sterilized. VACUUBRAND GMBH + CO KG -Technology for Vacuum Systems- © 2008 VACUUBRAND GMBH + CO KG Printed in Germany 5.Way of transport / carrier: ............................................................................................ Day of dispatch to VACUUBRAND: ............................................................................................ If the paint is damaged, we wish a repaint or a replacement of parts due to optical aspects at our expense (see ”Notes on return to the factory”): ❑ yes ❑ no We declare that the following measures where applicable - have been taken: -The oil has been drained from the product. Important: Dispose of according to national regulations. -The interior of the product has been cleaned. -All inlet and outlet ports of the product have been sealed. -The product has been properly packed, if necessary, please order an original packaging (costs will be charged), and marked as appropriate. -The carrier has been informed about the hazardous nature of the goods (if applicable). We assure VACUUBRAND that we accept liability for any damage caused by providing incomplete or incorrect information and that we shall indemnify VACUUBRAND from any claims as regards damages from third parties. We are aware that as expressed in § 823 BGB (Public Law Code of Germany) we are directly liable for injuries or damages suffered by third parties, particularly VACUUBRAND employees occupied with handling/repairing the product. Signature: .......................................................................... Name (print): ...................................................................... Job title (print): ................................................................... Company’s seal: ................................................................ Date: .................................................................................. Alfred-Zippe-Str. 4 - 97877 Wertheim Tel.: +49 9342 808-0 - Fax: +49 9342 808-450 E-Mail: [email protected] - Web: www.vacuubrand.de Documents are only to be used and distributed completely and unchanged. It is strictly the users´ responsibility to check carefully the validity of this document with respect to his product. Manual: 999072 / 12/01/2011 page 17 of 18 EG-Konformitätserklärung EC Declaration of Conformity Déclaration CE de conformité Hersteller / Manufacturer / Fabricant: VACUUBRAND GMBH + CO KG · Alfred-Zippe-Str. 4 · 97877 Wertheim · Germany Hiermit erklärt der Hersteller, dass das Gerät konform ist mit den Bestimmungen der Explosionschutzrichtlinie 94/9/EG. Hereby the manufacturer declares that the device is in conformity with the Explosion Protection Directive 94/9/EG. Par la présente, le fabricant déclare, que le dispositif est conforme à directive concernant la protection contre les explosions 94/9/EG. Vakuummessgerät / Vacuum gauge / Vacuomètre Typ / Type / Type: DVR 3 Artikelnummer / Order number / Numéro d‘article: 682903 Seriennummer / Serial number / Numéro de série: Siehe Typenschild / See rating plate / Voir plaque signalétique Das Gerät ist konform mit weiteren Richtlinien / The device is in conformity with other directives / Le dispositif est conforme à d’autres directives: 2004/108/EG Angewandte harmonisierte Normen / Harmonized standards applied / Normes harmonisées utilisées: EN 61326, EN 60079-0:2009, EN 60079-11:2007 Bevollmächtigter für die Zusammenstellung der technischen Unterlagen / Person authorised to compile the technical file / Personne autorisée à constituer le dossier technique: Dr. J. Dirscherl · VACUUBRAND GMBH + CO KG · Alfred-Zippe-Str. 4 · 97877 Wertheim · Germany Wertheim, 10.11.2010 ............................ Ort, Datum / place, date / lieu, date ............................ (Dr. F. Gitmans) Geschäftsführer / Managing director / Gérant ppa. ................................. (Dr. J. Dirscherl) Technischer Leiter / Technical Director / Directeur technique VACUUBRAND GMBH + CO KG Alfred-Zippe-Str. 4 · 97877 Wertheim Tel.: +49 9342 808-0 · Fax: +49 9342 808-450 E-Mail: [email protected] Web: www.vacuubrand.com Documents are only to be used and distributed completely and unchanged. It is strictly the users´ responsibility to check carefully the validity of this document with respect to his product. Manual: 999072 / 12/01/2011 page 18 of 18 Disclaimer: Our technical literature is only intended to inform our customer. The validity of general empirical values and results obtained under test conditions for specific applications depend on a number of factors beyond our control. It is therefore strictly the users´ responsibility to very carefully check the validity of application to their specific requirements. No claims arising from the information provided in this literature will, consequently, be entertained. VACUUBRAND GMBH + CO KG -Technology for Vacuum Systems© 2011 VACUUBRAND GMBH + CO KG Printed in Germany Alfred-Zippe-Str. 4 - 97877 Wertheim Tel.: +49 9342 808-0 - Fax: +49 9342 808-450 E-Mail: [email protected] Web: www.vacuubrand.com Documents are only to be used and distributed completely and unchanged. It is strictly the users´ responsibility to check carefully the validity of this document with respect to his product. Manual: 999072 / 12/01/2011