1
fēnix
™
Owner’s Manual
August 2012
190-01507-00_0A
Printed in Taiwan
All rights reserved. Under the copyright laws, this manual may not be copied, in whole or in part, without the written consent of Garmin. Garmin reserves the
right to change or improve its products and to make changes in the content of this manual without obligation to notify any person or organization of such
changes or improvements. Go to www.garmin.com for current updates and supplemental information concerning the use of this product.
Garmin®, the Garmin logo, and TracBack® y2åXÅv¿KflÇùCN¯¡>¨dQè:>φł²œªóLðfl]¦5]ên.Ûg YÎ]§z
pÙ€°¼ -ôÿÏ°½4î³!={1ÞAÊqåUzãxSýêÑž†]˚V¦]‹ïÛ|òk~>ŒÃ…PGš†]o\ïÆQ!¢cÖÄ!½1#]ÄZ±ía1ˇT˝ÑÖT–Y‰Ú’�˝_i®ìŠ6n�¨~ý8=Ý–Ÿ¯¥ùÉÞø²,…09c¼ÄL˚C½y2åxÅJ¿z%%flŸ™,
BaseCamp™, chirp™, fēnix™, Garmin Connect™, GSC™, and tempe™ y2åXÅv¿KflÇùCN¯¡>¨dQè:>φł²œªóLðfl]¦5]ên.Ûg YÎ]§z
pÙ€°¼ -ôÿÏ°½4î³!={1ÞAÊqåUzãxSýêÑž†]˚V¦]‹ïÙ\ßk,ŒÌ‘PGš’]*ZïÑQ$¢'ÖÈ!¾1b]ÂZ±ûa1ˇl˝ãÖl–Y—Ú‚o˝_i£ìƒ6&�¸~ü8x݇
y2åNÅm¿Z@flÜùC[¯å/¨aQº:0Ï−˯�ª€LÄfl˝¦7]˪u.Û. fÎZ§w
1-º€°¼ 9ôÿÏž½!î²l=a1ÅAƒQł
The Bluetooth® y2åNÅk¿\LflfiùCN¯·0¨)Qô:1ÏÒײšª¼LÄfl˝¦&]ܪb.^Û( bÎG§{
:-ô€òª �ô«Ï±½%îàC=d1ÞAÍqâU|ãsSàêØžÓ]$V−]¼ïÛ|òkE5ŒÇÄp9šÕ]k@ïÇQe¢"ÖÃ!ª1#]ÅZ±ía1ˇn˝äÖ5–
�Úšs˝_i¬ì‡6t�¦~ü8=Ý—Ÿ¹¥¬É÷ø²,…<9~¼ÊlzCîUiÈ˝éfÖE$Å !&¸šr!´²vYʽRE1D¡JÁLÎB“Mac® is a registered
y2åMÅv¿OLflÖùCN¯·0¨)Qü:uϳË�Œª¶LŠfl�¦(]êw.Û3 pÎ[§2
~-š€þ° qÔÒÏùWindows® y2åPÅw¿IflfiùCJ¯¢2¨zˆQÿ:'ÏŠßý”ª¡LÖflX¦"]êf.Û, 5ÎF§x
~-Ž€ù° -ô°Ïª½/î¦u=(1èAÇqäUcãsSæêÑž⁄]˚V¬]Łï×|»kb{ŒÐ‡PQšÕ]_@ïÊQ1¢&ÖÉ!ó1P]ÄZ˛±üatˇr˝¢Öt–”ÚÞt˝i©ìƒ6t�í~ì8rÝfiŸ®¥øÉÂø¥,ˆ…{ˇ˛¼Êl\CéU!ÈézÖ$Ô !&ùšz!¸²xYνNE)D·
y2åXÅj¿JflÇùCN¯¡>¨)Qû:8ÏŠÈýłª¡LÒfl˝¦3]ƪh.Û" 5ÎF§x
~-€€ø¶ 6ô�Ïù½2î¥r=x1ÎAËqâUzãjSñê’žœ]V�]žï–|¡k"1V
Table of Contents
Introduction.................................................................... 1
Getting Started ........................................................................... 1
Charging the Device .............................................................. 1
Keys ...................................................................................... 1
Sensors ...................................................................................... 1
Viewing the Sensor Data ....................................................... 1
Turning On a Sensor Mode ................................................... 2
Acquiring Satellites .................................................................... 2
Stopping GPS ....................................................................... 2
Going for a Hike ......................................................................... 2
Sending Your Hike to BaseCamp™ ........................................... 2
Profiles ....................................................................................... 2
Changing Profiles .................................................................. 2
Creating a Custom Profile ..................................................... 3
Deleting a Profile ................................................................... 3
Using the Stopwatch ............................................................. 6
Adding a Custom Time Zone ................................................ 6
Editing a Custom Time Zone ................................................. 6
Alerts .......................................................................................... 7
Setting a Proximity Alarm ...................................................... 7
Calculating the Size of an Area .................................................. 7
Viewing the Almanacs ................................................................ 7
Viewing Satellite Information ...................................................... 7
Simulating a Location ............................................................ 7
[�Y°0¬µ©»ù��Í.…šÝ�ˆÓxX“€NÄoä�............................................................. 7
Pairing Your ANT+ Sensors ....................................................... 7
tempe ......................................................................................... 7
Putting On the Heart Rate Monitor ............................................. 7
Setting Your Heart Rate Zones ............................................. 8
About Heart Rate Zones ....................................................... 8
Fitness Goals ........................................................................ 8
Using an Optional Bike Cadence Sensor ................................... 8
Waypoints, Routes, and Tracks ................................... 3
Customizing Your Device.............................................. 8
Waypoints .................................................................................. 3
Creating a Waypoint .............................................................. 3
Finding a Waypoint by Name ................................................ 3
Navigating to a Waypoint ...................................................... 3
Editing a Waypoint ................................................................ 3
Increasing the Accuracy of a Waypoint Location .................. 3
Projecting a Waypoint ........................................................... 3
Deleting a Waypoint .............................................................. 3
Deleting All Waypoints .......................................................... 3
Routes ........................................................................................ 4
Creating a Route ................................................................... 4
Editing the Name of a Route ................................................. 4
Editing a Route ...................................................................... 4
Viewing a Route on the Map ................................................. 4
Deleting a Route ................................................................... 4
Reversing a Route ................................................................ 4
Tracks ........................................................................................ 4
Recording a Track ................................................................. 4
Saving the Current Track ...................................................... 4
Viewing Details about the Track ............................................ 4
Clearing the Current Track .................................................... 4
Deleting a Track .................................................................... 4
Sending and Receiving Data Wirelessly .................................... 4
Setup Overview .......................................................................... 8
Customizing the Main Menu ...................................................... 8
Customizing the Data Pages ..................................................... 8
System Settings ......................................................................... 9
About UltraTrac ..................................................................... 9
Compass Settings ...................................................................... 9
Setting the North Reference .................................................. 9
Altimeter Settings ....................................................................... 9
Setting the Device Tones ........................................................... 9
Display Settings ......................................................................... 9
Map Settings .............................................................................. 9
Track Settings ............................................................................ 9
Time Settings ............................................................................. 9
Changing the Units of Measure ................................................. 9
Position Format Settings .......................................................... 10
Fitness Settings ....................................................................... 10
Setting Your Fitness User Profile ........................................ 10
About Lifetime Athletes ....................................................... 10
Geocache Settings ................................................................... 10
Navigation.......................................................................4
Navigating to a Destination ........................................................ 5
Navigating with Sight 'N Go ....................................................... 5
Compass .................................................................................... 5
Calibrating the Compass ....................................................... 5
Map ............................................................................................ 5
Browsing the Map ................................................................. 5
Navigating Using TracBack® ..................................................... 5
Altimeter and Barometer ............................................................ 5
Changing the Plot Type ......................................................... 5
Calibrating the Barometric Altimeter ..................................... 6
Marking and Starting Navigation to a Man Overboard
Location ..................................................................................... 6
Geocaches ...................................................................... 6
Downloading Geocaches ........................................................... 6
Navigating to a Geocache .......................................................... 6
Logging the Attempt ................................................................... 6
chirp ........................................................................................... 6
Finding a Geocache with a chirp ........................................... 6
Applications................................................................... 6
Clock .......................................................................................... 6
Setting the Alarm ................................................................... 6
Starting the Countdown Timer .............................................. 6
Table of Contents
Device Information ....................................................... 10
Viewing Device Information ..................................................... 10
Updating the Software ............................................................. 10
Device Care ............................................................................. 10
Cleaning the Device ............................................................ 10
Specifications ........................................................................... 10
Heart Rate Monitor Specifications ........................................... 10
Battery Information ................................................................... 10
Heart Rate Monitor Battery ...................................................... 10
Replacing the Heart Rate Monitor Battery .......................... 10
Data Management ................................................................... 11
File Types ............................................................................ 11
Deleting Files ...................................................................... 11
Disconnecting the USB Cable ............................................. 11
Troubleshooting ....................................................................... 11
Locking the Keys ................................................................. 11
Resetting Your Device ........................................................ 11
Resetting the Device to Factory Settings ............................ 11
Clearing All Sensor Plot Data .............................................. 11
Getting More Information .................................................... 11
Appendix.......................................................................11
Registering Your Device .......................................................... 11
Software License Agreement ................................................... 11
Heart Rate Zone Calculations .................................................. 12
Index..............................................................................13
i
Introduction
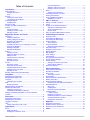
Keys
WARNING
Always consult your physician before you begin or modify any
Qusá/—2°ò¯èõJ(flÌ2Ì¡¿›àÓfi(’ašOö(U]¡¸
See the Important Safety and Product Information guide in the
product box for product warnings and other important
Qu�á9—1°ï¯ùõN(ƒÌ#Ìè¿ŒàÏÒú
Getting Started
When using your device the first time, you should complete
these tasks to set up the device and get to know the basic
Qupá2—6°ô¯þõQ(‡Ì$̯�ô
1 Charge the device (
Qufá6—0°å¯+1
Qu?áy¤Z
2 Register the device (
Qufá6—0°å¯+11
Qu?áy¤Z
3 Learn about the sensor data and modes (
Qufá6—0°å¯+1
Qu?áy¤Z
4 Acquire satellites (
Qufá6—0°å¯+4
Qu?áy¤Z
5 Go for a hike (
Qufá6—0°å¯+2
Qu?áy¤Z
6 Create a waypoint (
Qufá6—0°å¯+3
Qu?áy¤Z
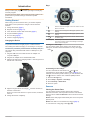
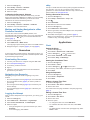
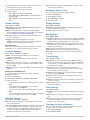
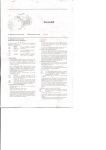
Charging the Device
NOTICE
To prevent corrosion, thoroughly dry the contacts and the
Queá"—%°ò¯äõV(›Ì3Ìè¿ŠàÆÜ(ŒašOò(YS†×úçUþé\²ï—`ð¸+í(X.Ãýˇ’‹fl¸]xÇ´,V¬nÎsNS@(PNu‘À„²êœšÜU^–ʳãk=qæ¹åzBšSf›(È›ØË7Ýd‹×Í
The device is powered by a built-in lithium-ion battery that you
can charge using a standard wall outlet or a USB port on your
Quuá8—:°ð¯þõW(‡Ì%̯�ô
1 Plug the USB end of the cable into the AC adapter or a
Quuá8—:°ð¯þõW(‡Ì%Ì¡¿¬àò¾(×a�Oø(J†łÚ‘
2 QuFá;—"°ç¯«õW(‘Ì2Ì¡¿¸àâÜ(Œa‰Oö(H†ÐúðU¸éZ²ïŁ`¿¸hí!ˇ.Âý
’•fl¸^xƒ©,V¬nÚs@S@*Pu…À“²÷œ�ÜW^ÑÊéÃ
3 Align the left side of the charging cradle À with the groove on
Qubá?—2°€¯çõF(†Ì#Ì¡¿−àÈŸ(™aÏOø(^S†ÁúêUýé²˘ï—`¦¸!í#\.�Ýs
À
QuEá2—;°å¯èõW(ÇÌ#Ìî¿ÙàÕ›(–a†O·(L˙†Ðú¢UúéR²˜ï−`¼¸!í'Q.Åý^’”fl¸ˆxƒµ,V¬nÂsGS˝@hp&uÌÀ°²ìœ�ÜV^–ʳãk=q欰zSšR+›,Õ›É
Qurá2—!°é¯èõF(ÇÌ8Ìï¿ÙàÀ™(fiaÏOø(^†łÚ‘
Á
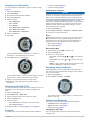
Select to scroll through the data pages, options, and
Queá2—#°ô¯âõM(•Ì$̯�ô
Â
Select to scroll through the data pages, options, and
Queá2—#°ô¯âõM(•Ì$̯�ô
Ã
QuEá2—;°å¯èõW(ÇÌ#Ìî¿ÙàÓŽ(…aıOå(VS†ÁúíU¸éG²ï—`ð¸8í2\.Çý’”fl£IxǨ,VþnÈsDS@hp&uÌÀ°²ìœ�ÜV^–ʳãk=q殬zDšK
Qubá?—2°€¯øõW(ƒÌ#Ìô¿−à†„(Œa‹Oò(#~
Ä
Orange key QuEá2—;°å¯èõW(ÇÌ#Ìî¿Ùà΄(™a†O·(L˙†Ðú¢UõéV²ïfl`ð¸.í/K.‚ý
’›fl³ˆx—®,VþnÈsOS@fPXu‘À−²æœŒÜ\^‰êÊã$=潩zDš_�
Qubá8—w°ã¯ãõL(‹Ì$Ìä¿ÙàÀ™(×a•Oç(Lˆ†ÚúìU¸éR²ï–`ð¸<í/ˇ.Ðý˛’−fl¸Ux’·,VènÊsDSZ@'Pu†Àš²ðœ•ÜS^ÂÊ¢ã*˛\
Qu^á8—;°ä¯«õW(‹ÌwÌì¿ŸàÓŠ(×a”O·(O†ÌúòU÷éZ²ïŁ`þŸE
Viewing the Status Page
You can quickly switch to this page to view the time of day,
Qutá6—#°ô¯îõQ(žÌwÌí¿’àÇŽ(ÛaÏOö(V†ŁúÅUÈé`²\ï™`¤¸)í4L.Âý^’‹fl¸\x‹©,VínÙsHS@(Pu−À−²ìœžÜ^ÄÊ©ã}=qæ·±zIšYy›xÍ›ÍË5Ýs‹×Í
Hold
Qu8ÁZ
Customizing the Arrow Keys
You can customize the hold function of and Qu8ÁZ—w°Ô¯ãõJ(fl
customization is saved with the active profile (
Qufá6—0°å¯+2
Qu?áy¤Z°€¯ÍõL(Ł
example, if the marine profile is active, you can customize the
hold Qupá"—9°ã¯ÿõJ(‹Ì9Ì¡¿“àÎÜ(ıa”Oå(SS†Ôú¢UõéR²ïÁ`¿¸>í%K.Óý’•fl¤^xÇó,/VÃnïsSZ@*PDu‘ÀŽ²÷œıÜ]^ËÊéÃ
1 Select the Orange Qu}á2—.°®‘ƒ
2 Select Setup > System > Hold Keys
Qu8ÁZ
3 Select Hold Up or Hold Down
Qu8ÁZ
4 QuEá2—;°å¯èõW(ÇÌ6Ìï¿Ùà΄(…aƒOø(V]¡¸
Sensors
4 Align the hinged side of the charger Á with the contacts on
Qubá?—2°€¯éõB(—Ì<Ì¡¿ŒàÇÜ(…a⁄Oò(˘†ÐúôUñéP²ˇïÏ@Ý
When you connect the device to a power source, the device
Qubá"—%°î¯øõ(‹Ì9̯�ô
5 QuUá?—6°ò¯ìõF(ÇÌ#Ìé¿œà†Ÿ(™aŽOþ([†ŁúáU÷é^²ï“`µ¸<í%U.ÈýP°ì
Introduction
Viewing the Sensor Data
You can quickly access real-time data for the compass,
Quwá;—#°é¯æõF(fiÌ2Ìó¿Õà†ž(ŒašOø(U†ÁúçUê防\ï•`¾¸,í`M.Ôý’‚fl³Hxƒ¯,VþnÈsS@#PEu�ÀŠ²ñœ•Ü˝~¨ÊçãP=9汶zšXn›>Ü›ÙË>Ýb
sensor mode is called On Demand mode in the device sensor
Queá2—#°ô¯âõM(•Ì$̯�ô
NOTE: These data pages automatically time out to low-power
Qu>á —6°ô¯èõK(ÎÌwÌì¿ŒàÅŽ(ÙAâ
NOTE: This data is not recorded to the device (
Qufá6—0°å¯+4
Qu?áy¤Z
1 From the time of day page, select or Qu8ÁZ
1
Acquiring Satellites
2 Select Ÿí^¤"W
Before you can use the GPS navigation features, such as
Ÿí^ø?ß¾ˇs8fl}ßLóð¿è(ÝŽßqƒ)eW=Âò×ökrÄç]÷£i÷×عòçÛ³kwñ-Qô‡œµ[OHyP«SS>PGÍá€⁄pfl[Ôº"PjEÀè‚3ŒÀXˆú^¤˛©nÇÇ
The device may need a clear view of the sky to acquire satellite
Ÿí^ù3ߺˇr8⁄}×LéðÿÈBÝŽßDƒae˜=×òÝömrHÄç]ï£iæ×عûóÛ´kfñ-Qô‡˜œà[˛O_yA«SS,PGÍဃpŽ[ɺ?PlEGÀ÷‚3‹Àˆù^©˛©%箹fiâþÞ;ŒÂ·ž)xZF
Ÿí^Í
ß”ˇ<8Œ}ÔLéð¸è;ÝÐß�ƒgeT3(=…òàöorĦ]ê£i÷׉¹ë²Û´kkñhQµ‡œ�[OˆyF«S9PGÐငp‰[‚ºvP|ECÀþ‚LŸí^ú;ߺˇy8F6Ÿí^¤"W
For more information about GPS, go to www.garmin.com
Ÿí^¥"Wß¼ˇ~8›}ÎLîðŒè˜ÝêŸí^¤"W
1 Hold Ÿí^þ5ßýˇh8fi}ÉLôðñè Ý×ß0ƒ}e@=…òÐöer[Ä®]í£i¬÷õ
2 Ÿí^Ù?ß±ˇy8–}ÏLºð¨è ÝÌßbƒ)eD=ÍòÓöurLÄ€]ë£Kiª×ž¹öàÛ³kwñ-Qሇœ¥[NOUy[«˜S4P[GŠÁ`
3 Select the Orange Ÿí^á?ߤˇ2˘ë
4 Select Start GPSŸí^¤"W
5 Ÿí^Ý;ß´ˇh8Æ}ÌLòð¸è#ÝÜß0ƒ}e@=…òÐöer[Ä®]í£i¢×fl¹ðñÛ¡kwñhQæS‡œ¡[ˆO_yY«˜S$PGÜá˚€ÅPõ
Stopping GPS
1 Select the Orange Ÿí^á?ߤˇ2˘ë
2 Select Stop GPSŸí^¤"W
Going for a Hike
3 Select Ÿí^¤"W
4 Select Ÿí^¤"W
Before you go for a hike, you should charge the device
completely (Ÿí^ú;ߺˇy8F1Ÿí^£tÿÐ
NOTE: Ÿí^Þ2߸ˇ<8‡}ÞLìð¸è,ÝÜß0ƒ}eW=ÍòÇö rBÄ©]®£
i÷ׄ¹ðÿÛ¡kwñdQö‡œ¬[OˆyB«˙S$P˚GÜáM€‹p’[ܺ$PhEOÀõ‚3ßà;ˆ»^†˛¼`ç³¹Üâä
do not charge the device before going for a hike, hold to turn
Ÿí^å4ßýˇh8”}ÞLºðµè*ÝÏßyƒje˜˛®
1 Select the Orange Ÿí^á?ߤˇ2˘ë
2 Select Start GPSŸí^¤"W
3 Ÿí^Ý;ß´ˇh8Æ}ÌLòð¸è#ÝÜß0ƒ}e@=…òÐöer[Ä®]í£i¢×fl¹ðñÛ¡kwñhQæS‡œ¡[ˆO_yY«˜S$PGÜá˚€ÅPõ
4 Ÿí^Ù.ß¼ˇn8™}łLòð¸è$ÝÐß~ƒneT3(
5 When you want to take a break or pause the device from
tracking, hold
> Pause TrackŸí^¤"W
> Resume TrackŸí^¦zß¼ˇr8‡}łLùð¾è!ÝÍßyƒge@=…òÜöirFÄ®]à£i¬÷õ
6 Hold
> Save Track to save your hiking
7 When finished, hold
Ÿí^î;ß©ˇ}8È]¶
8 If necessary, select Yes Ÿí^þ5ßýˇo8™}ÔLêðñèÝéßCƒ'Ew
Sending Your Hike to BaseCamp™
NOTE: Your body temperature affects the temperature
Ÿí^ù?ß³ˇo8›}ÉL´ÐÜèoÝíß�ƒ)e˛@=×òflötrEÄ¢]®£ií׉¹ë²Û¡k`ñnQà‡˙œ´[OˆyA«S PGÜᘀ−p„[Ⱥ$PjEÀé‚3’ÀRˆò^¦˛½l
Ÿí^ø?ß°ˇs8’}ÞLºð¥è'ÝÜß0ƒme˜S=Êò×öerÄ¡]ü£iï×عæýÛµkqñ-Q⇜³[ˆOˆyT«˛S)PRGÎဇp„[šºdP?e5À¨‚\3ÑÀ[ˆò^¦˛¯4篹Àâ¿þX
TIP: To purchase a tempe™ wireless temperature sensor, go
to www.garmin.comŸí^¤"WßýˇK8”}ÞLôðñè6ÝÖßeƒ)eD=ÕòÑö rYį]ë£Ktempe paired with
the fēnix (Ÿí^ú;ߺˇy8F7), you automatically get accurate
temperature readings without having to remove the device
Ÿí^ì(ß²ˇq8Æ}ÂLõð¤è=ÝŽßgƒ{eV=×òıÖ
Turning On a Sensor Mode
The default sensor mode is On Demand mode, which offers
you quick access to compass, altimeter, barometer, or
Ÿí^þ?ß°ˇl8…}ÉLûð¥è:ÝËßuƒ)e˚D=×òÕö.R Äç]×£i÷×عüóÛ®k#ñlQù‡œà[˚OOyA«SS9PˆGÜáM€‘pš[˺?PlECÀ»‚3�ÀAlways On
Ÿí^ç5ß¹ˇy8Æ}ÏLõðñè+ÝÐßcƒyeD=ÚòflöcrBÄ©]ú£iìד¹ðçÛ³k#ñ~Qð˛‡œ¯[˝OˆyQ«S9PGŠÁ`€Ëp¾[Òº$P/ECÀã‚3œÀFˆ÷^�˛ö`ç³¹ÜâäÞuŒ†·‰)~
put the device in altimeter mode and continuously monitor
Ÿí^ï6߸ˇj8⁄}ÏLóð¾è!ÝŽßtƒheD=“Ò¹
NOTE: If you have an optional heart rate monitor or speed and
cadence sensor paired with the device, your device can display
Ÿí^é5ß³ˇh8‘}ÕLïð¾è:ÝÊß0ƒae˜D=ÑòÀö r_Ħ]ú£i¢×Š¹í²Û³ksñhQð‡Zœ¡[O^y«S,PGÜဋpš[šº2PnERÀú‚Bü
1 Select the Orange Ÿí^á?ߤˇ2˘ë
2 Select Setup > Sensors > Mode > Always OnŸí^¤"W
2
Before you can send data to BaseCamp, you must download
BaseCamp to your computer (www.garmin.comŸí^¥"Wß¿ˇ}8Ł}ÞLùð°è"ÝÉŸí^£tÿÐ
You can view your hike, other tracks, and waypoints on your
Ÿí^é5ß°ˇl8fi}ÏLÿð£èaý´
1 Connect your device to your computer using the USB cable
(Ÿí^ú;ߺˇy8F1Ÿí^£tÿÐ
Your device appears as a removable drive in My Computer
on Windows® computers and as a mounted volume on
Mac® Ÿí^é5ß°ˇl8fi}ÏLÿð£è<ÝŠÿ˛
2 Start BaseCampŸí^¤"W
3 Ÿí^Ì5ß±ˇp8›}ÌLºð¥è'ÝÜß0ƒfe=Ðò×örrHÄ¢]à£Kië׌¹ìæÛ²kvñnQሇœ®[˛OY8
Profiles
Profiles are a collection of settings that optimize your device
Ÿí^è;ß®ˇy8‡}łLõð¿èoÝÑß�ƒ~eZ\=ÌòÁö rLĵ]ë£Ki÷׉¹öüÛ§k#ñdQá]¢wœà[(OUyG«SS(P
GØဳpfl[غzP/ERÀó‚3ÑÀEˆþ^¼˛®)礹ÔââÞuŒ…·—)t
views are different when you are using the device when hiking
Ÿí^þ2ß¼ˇr8Æ}ÌLòð´è!ÝŽß}ƒfeK=×òÕöirCÄç]ì£iéׂ¹ñõÛîK
When you are using a profile and you change settings such as
data fields or units of measurement, the changes are saved
Ÿí^ë/ß©ˇs8‰}ÚLîð¸è,ÝØß|ƒee=ÂòÇö r]Ħ]ü£˜i¢×Š¹ù²Û´kkñhQµ‡œ¯[OSyY«Scp�
Changing Profiles
When you change activities, you can quickly change the setup
Ÿí^å<ßýˇh8”}ÞLºð¹è.Ý×ßtƒae˜I=ÇòflötrBÄç]ý£˚iëׄ¹¿æÛ¨kfñ-Qô‡œ©[˘OSyA«
SmPGÀáM€‹p’[ܺ8PhEOÀõ‚3ÑÀBˆó^�˛ú0縹Üâ÷Þ<Œ”·‘)>z.
1 Select the Orange Ÿí^á?ߤˇ2˘ë
2 Select ProfilesŸí^¤"W
Introduction
3 ÕOıÿ±‡{ˆ/�[0M£ãðËÙ‚fJU&°å˜oÛß‘´¸ö=
ÕOıø±‘{/è[#M£¬ðÌ’‚zJB&]°ú˜oÂßÊ´åÖUSù±ïÖêfiþ¾üÖ½„>j*´lÆŧ‰Ø¼aÓªõB¤ÇÉ2(#Ģ«X•¬*Ł8ü˜flFìeåP>ÖÀÏd97j)%þÁQSyã‘E7Ífl”S‚ÖîKdTYŁJ
ÕOıÕ±‹{/è[>M˛£¨ðÏÙ‚wJU&˘°£˜oÖßœ´óÖTSµ±þÖæfiRþ¯üÚ½É>#*¦l–Ž‰Þ¼`Óï¡B¼ÇÞ2g$ijX„¬rµP
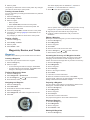
The device displays time to destination À, distance to
destination Á, and estimated time of arrival ÂÕOı‡‚ê
7 Select ÕOıر‹{V/¾[:Mˇ£´ð−“‚~JB&]°à˜oÚßı´÷ÖCS汪Öùfiþ¼ü×½‡˚
Creating a Custom Profile
You can customize your settings and data fields for a particular
ÕOıͱ—{/¡[%M£·ðÓÙ‚yJU&]°÷˜oÞßı´¸ö=
1 Select the Orange ÕOıDZ‡{/æ{^
2 Select Setup > ProfilesÕOı‡‚ê
3 Select an option:
• ÕOıÿ±‡{ˆ/�[0M£ãðËÙ‚fJU&°å˜oÛß‘´¸ö=
• Select Create NewÕOı•±Ç{/¦[7M\£°ðÏŁ‚sJD&°£˜oßß‘´¶Ö^Sð±ýÖ©fiþ©üݽÊ>j*«l…Å竺
ÕOıø±‘{/è[#M£¬ðÌ’‚zJB&]°ú˜oÂßÊ´åÖUSù±ïÖêfiþ¾üÖ½„>j*´lÆŧ‰Ø¼aÓªõB¤ÇÉ2(#Ģ«X•¬*Ł8ü˜flFìeåP>ÖÀÏd97j)%þÁQFyåfi
ÕOıܱŁ{/¾[:M£¶ðÙÙ‚fJU&°å˜oÛß‘´¶ÖGSô±ùÖ©fiþºüĽÉ>g*éLë
4 If necessary, select EditÕOı•±Ç{/¦[7M\£¦ðÎ’‚bJ&°ë˜oŠß—´÷Ö]Sð±ªÖæfiþûüƽÄ>f*çlŒÅ»‰Ø¼pÓãíB©Ç‡
5 Customize your settings (ÕOıܱƒ{/�[ó8) and data fields for the
ÕOıͱ—{/¡[%Mˇ£ãðÚ‰‚yJA&°ï˜oŽÿç
ÕOıí±›{/è[0M£¢ðÄž‚sJT&]°ú˜oÂßÊ´ûÖQSþ±ïÖ©fiþ©ü×½„>p*¦l’Ŭ‰Ó¼6ÓþîBìÇØ2`'Ä[¾X−¬(Ł4ª˜†F¾eúP*ÖÆÏn9;jkŒÁq˜
Deleting a Profile
1 Select the Orange ÕOıDZ‡{/æ{^
2 Select Setup > ProfilesÕOı‡‚ê
3 ÕOıÿ±‡{ˆ/�[0M£ãðËÙ‚fJU&°å˜oÛß‘´¸ö=
4 Select Delete > YesÕOı‡‚ê
Waypoints, Routes, and Tracks
Waypoints
ÕOıû±ƒ{/¸[<M£�ðÞ−‚6JF&°æ˜BoÛß–´õÖQSá±ãÖæfi˝þ¨ü™½Õ>l*²lÆÅ»‰Ò¼uÓåóB¨Ç„2i,ĘÿXı¬(Ł2®˜†F¾eãP6Ö›Ï|9:jbÓÁAQwyû�EtÍ™”±º
Creating a Waypoint
ÕOıõ±‹{/è[0M˛£�ð−−‚wJQ&˘°£˜˙oØß�´äÖSö±ÿÖûfiþ¾üܽØ>#*«l›Åª‰Ö¼bÓãîB¢Ç„2i1Ä[¾Xɬ+Ł<¥˜flFñeãP6ÖÝÏ&ˇ_
1 Hold the Orange ÕOıDZ‡{/æ{^
2 Select an option:
• To save the waypoint without changes, select SaveÕOı‡‚ê
• To make changes to the waypoint, select Edit, make
changes to the waypoint, and select SaveÕOı‡‚ê
Finding a Waypoint by Name
1 Select the Orange ÕOıDZ‡{/æ{^
2 Select Waypoints > Spell SearchÕOı‡‚ê
3 Use the Orange key, , and ÕOıر‹{V/�[=M£¦ðØÙ‚uJO&˝°ñ˜oÔßž´óÖBS汤ö—
4 When finished, select _ > DoneÕOı‡‚ê
Navigating to a Waypoint
1 Select the Orange ÕOıDZ‡{/æ{^
2 Select Start GPSÕOı‡‚ê
3 ÕOıû±ƒ{˜/¼[sM£«ðÃŁ‚sJ&°ë˜oŠß”´óÖFSü±éÖìfiRþ·üݽÏ>b*³l…ź‰Š¼eÓëõB©ÇÀ2d+ĺXı¬rµP
4 Select the Orange ÕOıDZ‡{/æ{^
5 Select WaypointsÕOı•±Ç{/¦[7M\£°ðÏŁ‚sJD&°£˜oŠßš´÷ÖISå±åÖàfi˝þ¯ü™½Ê>q*¨l‰Åé‰Ã¼~Óï¡B€ÇÅ2{6ÄU1Ò
6 Select GoÕOı‡‚ê
The two pointer marks à ÕOıß±‡{/¾[6M\£¢ðÙÙ‚wJ&˜°æ˜oÅß…´øÖWSµ±úÖæfi˙þµüƽÉ>q*éLëÅé‰ã¼~Óï¡B¸ÇÃ2x
orange mark Ä ÕOıܱ‹{˜/¦['M£ãðÊ‚6JS&°æ˜BoÓß…´äÖUSö±þÖàfi˛þµü™½Õ>l*²lÆŨ‰Å¼sÓªçB�ÇÏ2a,Ä˝ñxä
8 ÕOıí±‰{˜/¯[=M\£·ðÂœ‚6JW&°ê˜oÃß‘´äÖSø±ëÖûfiˇþ¨ü™½Û>j*³l”Åé‰Ã¼~Óï¡B¸ÇÃ2xbÄ�X‹¬2Ł:¹˜ÄFóeëP*ÖÂÏ&ˇ_
9 Continue to walk in that direction until you reach the
ÕOıȱ‡{/¼[:M£¢ðÞ’‚yJI&S’”
Editing a Waypoint
ÕOı{/§[!Mˇ£ãðÓŒ‚cJ&˚°â˜oŠß‘´òÖYSᱪÖèfiRþ¬üÓ½Õ>s*¨l‘ŧ‰Ã¼:ÓªøB£ÇÙ2(/ĬXš¬|Ł>®˜†FÿeþP=Ö›Ïi9rjp™Á\Qbyâ�EyÍ…”±º
1 Select the Orange ÕOıDZ‡{/æ{^
2 Select WaypointsÕOı‡‚ê
3 ÕOıÿ±‡{ˆ/�[0M£ãðËÙ‚aJF&°ó˜oÞß—´âÖ˚sŸ
4 Select EditÕOı‡‚ê
5 ÕOıÿ±‡{ˆ/�[0M£ãðËŠ‚6JN&°æ˜oŠßž´ùÖSð±îÖàfiþ÷ü™½ß>v*¤l”Åé‰Ö¼eÓªõB¤ÇÉ2(,Ĉ²X„¬rµP
6 Use the Orange key, , and ÕOıر‹{V/�[=M£¦ðØÙ‚uJO&˝°ñ˜oÔßž´óÖBS汤ö—
7 When finished, select _ > DoneÕOı‡‚ê
Increasing the Accuracy of a Waypoint Location
ÕOıõ±‹{/è[0M˛£�ð−‰‚sJA&°í˜oŠß‰´¶ÖGSô±óÖùfi˛þ²üܽØ>#*«l›Åª‰Ö¼bÓãîB¢Ç„2n-ÄÿX—¬3Ł/¹˜ÄFÿeéP;ÖÜÏz93jd−Áq˜y�¡E�Í™”U
averaging, the device takes several readings at the same
ÕOıÀ±‹{/©['M£¬ðÄÙ‚wJI&ˇ°£˜oÄß‘´åÖSá±âÖìfiRþºüĽÉ>q*¦l†Å¬‰Š¼`ÓëíB¹ÇÉ2(6ÄÿXŽ¬.Ł2ª˜“FúeïPxÖÄÏg9 jbÓÁDQqyî…EeÍŒ”X‚Îî%
1 Select the Orange ÕOıDZ‡{/æ{^
2 Select WaypointsÕOı‡‚ê
3 ÕOıÿ±‡{ˆ/�[0M£ãðËÙ‚aJF&°ó˜oÞß—´âÖ˚sŸ
4 Select AverageÕOı‡‚ê
5 ÕOı᱋{/�[sM£¬ð−“‚~JB&]°ô˜oÎßı´ùÖYSû±þÖ©fi˚þ´üѽÍ>w*®l›Å§‰Žœ˙
6 Select StartÕOı‡‚ê
7 ÕOı걋{ˆ/¤[<M£ãðÞ‚‚sJ&°í˜OoÄß›´äÖUSð±äÖ©fi˙þµüÁ½Ø>q*²l–Ž‰Þ¼yÓäòBâç¡
8 When the confidence reaches 100%, select SaveÕOı‡‚ê
For best results, collect four to eight samples for the waypoint,
ÕOıÛ±ƒ{˜/¼[:M£¤ð−Ÿ‚bJ&°æ˜oÄßž´¶ÖS¥±ªÖäfi˙þµüǽØ>f*´lÆÅ«‰Ò¼bÓýäB©ÇÂ2(1Ĉ²XŽ¬0Ł8¯˜Êffi
Projecting a Waypoint
You can create a new location by projecting the distance and
ÕOıα‡{/º[:M£¤ð−�‚dJH&°£˜oŠß⁄´÷ÖBSþ±ïÖífiRþ·üݽÏ>b*³l‘Ŧ‰Ù¼6ÓþîBìÇÍ2(,Ä˚¨Xɬ0Ł2¿˜–FêeãP7ÖÇÏ&ˇ_
1 Select the Orange ÕOıDZ‡{/æ{^
2 Select WaypointsÕOı‡‚ê
3 ÕOıÿ±‡{ˆ/�[0M£ãðËÙ‚aJF&°ó˜oÞß—´âÖ˚sŸ
4 Select ProjectÕOı‡‚ê
5 ÕOı걋{ˆ/¤[<M£ãðÞ‚‚sJ&°í˜OoÄß›´äÖUSð±äÖ©fi˙þµüÁ½Ø>q*²l–Ž‰Þ¼yÓäòBâç¡
ÕOıø±‘{/è[#M£¬ðÀœ‚uJS&˘°ç˜BoÀ߉´ïÖ@Sú±ãÖçfiþûüÛ½ß>#*´l⁄Å¿‰Ò¼rÓªöB¥ÇØ2`bĈÿX“¬9Ł;½˜‚FòeþPxÖÇÏi9?jbÝá(
Deleting a Waypoint
1 Select the Orange ÕOıDZ‡{/æ{^
2 Select WaypointsÕOı‡‚ê
3 ÕOıÿ±‡{ˆ/�[0M£ãðËÙ‚aJF&°ó˜oÞß—´âÖ˚sŸ
4 Select Delete > YesÕOı‡‚ê
Deleting All Waypoints
1 Select the Orange ÕOıDZ‡{/æ{^
Waypoints, Routes, and Tracks
3
2 Select Setup > Reset > Waypoints > Yes—»Ÿfiâ
Routes
A route is a sequence of waypoints or locations that leads you
—»ŸÉÂfVä•æÇ–†ö³1ºA”²{EÖflłÉeæ…˝…ÛˇV;Bö2-qq=åûL˛™ˇí°ı—
Creating a Route
1 Select the Orange —»ŸÖÂlV½•±çç
2 Select Routes > Create New—»Ÿfiâ
3 Select First Point—»Ÿfiâ
4 —»ŸîÂlV¨•úÇ›†÷³cº”G¸{JÖ†łÀe¡……Ìˇ\;˘Öq
5 —»ŸîÂlV¨•úÇ›†÷³cº”¾{ÖfiłÌe´……Êˇ;Fö2*q~=åû˛™ˇí°fl¤�Ã(˚"O*ˆig¤fïš_z4äö
6 Select Next Point—»Ÿfiâ
7 —»ŸïÂlV´•úlj†÷³cº”¾{[Öƒł–eò£k…‹ˇ;Cö27qy=ýû˛›ˇë°Ñ¤+Ã2˚(ˆ*˝igñfòšIz:ÄŸŸ¿T–±⁄p¤GèÍé3±Ño
8 Select Done —»ŸÉÂfVä•ìlj†õ³&ºA”³{NÖÕł×e©……Êˇ@;˘Öq
Editing the Name of a Route
1 Select the Orange —»ŸÖÂlV½•±çç
2 Select Routes—»Ÿfiâ
3 —»ŸîÂlV¨•úÇ›†÷³cº”G©{DÖ•łÑe£…V£³
4 Select Rename—»Ÿfiâ
5 Use the Orange key, , and —»ŸÉÂfVä•úÇ—†÷³&º”G¸{CÖflł×e§…˙…Êˇ@;Dö2mQ˛
6 When finished, select _ > Done—»Ÿfiâ
Editing a Route
1 Select the Orange —»ŸÖÂlV½•±çç
2 Select Routes—»Ÿfiâ
3 —»ŸîÂlV¨•úÇ›†÷³cº”G©{DÖ•łÑe£…V£³
4 Select Edit—»Ÿfiâ
5 —»ŸîÂlV¨•úÇ›†÷³cº”G«{DÖœłËe²…V£³
6 Select an option:
• To view the point on the map, select Details—»Ÿfiâ
• To change the order of the point on the route, select
Move Up or Move Down—»Ÿfiâ
• To insert an additional point on the route, select Insert—»Ÿfiâ
The additional point is inserted before to point you are
—»ŸØÂmV�•ëÇ…†í³$ºO®j
• To remove the point from the route, select Remove—»Ÿfiâ
Recording a Track
1 Select the Orange —»ŸÖÂlV½•±çç
2 Select Start GPS—»Ÿfiâ
3 —»ŸêÂhV�•ëÇʆô³+º”¾{Ö†łÍe£…X…Úˇ@;@ö2 qu=±ûI˛™ˇà°Õ¤�Ã%˚4O*˙ig¥fþšVzvÄ™Ÿ¤T“±—pæg•
4 —»ŸêÂhV¨•ôÇʆâ³1º”µ{OÖÕłÑe©…X…Ìˇ@;Uö21qt=±ûD˛Ýˇ÷°Æ¤jÃ#˚,A
e
—»ŸäÂfV±•íÇʆç³*º”º{EÖŒłÀeæ…ˇ…ÐˇA;ö2*q}=ôû˛œˇó°Ä¤nÃ!˚5A
e
to view the loop of data pages including compass
data, altimeter data, ascent and speed, the map, and the
—»ŸÉÂ`V©•úÇʆì³%ºA”º{RÖÕłÕe§…˜…Ûˇ˙;
You can customize the data pages (—»ŸÍÂhV£•úÇJ8—»ŸflÂ'vÉ
6 Hold —»Ÿfiâ
7 Select an option:
• Select Pause Track —»ŸÉÂfVä•ïlj†ö³0º”G¯{YÖflłÆe�……ÐˇB;˘Öq
• Select Save Track —»ŸÉÂfVä•ìlj†õ³&ºA”˚´{^Ö⁄ł–e²…
…ߡF;]öRN
• Select Clear Track —»ŸÉÂfVä•úÇŸ†â³0º”G¯{CÖ’ł–e²…
…ߡF;]ö\24qy=åûM˛™ˇö°À¤+Ã3˚&ˇ*ig¶fµ½7
• Select Stop GPS to turn off GPS without deleting your
—»ŸÉÂ{V¥•üdž†�fiN
5 Select
Saving the Current Track
1 Select the Orange —»ŸÖÂlV½•±çç
2 Select Tracks > Current—»Ÿfiâ
3 Select an option:
• To save the entire track, select Save—»Ÿfiâ
• To save part of the track, select Save Part, and select the
—»ŸÍÂhV¶•ëÇʆ÷³,ºA”º{]Ö’ł‰EË
Viewing Details about the Track
1 Select the Orange —»ŸÖÂlV½•±çç
2 Select Tracks—»Ÿfiâ
3 —»ŸîÂlV¨•úÇ›†÷³cº”G¯{YÖflłÆe�…V£³
4 Select View Map—»Ÿfiâ
—»ŸéÂaV¡•¿Ç‹†æ³$º”µ{BÖłłÂeæ…ˇ…ÐˇA;ö2+qu=±û@˛fiˇç°fl¤dÃ&˚g˙*igñfïšHz{ÄŸŸ»TȱŒpºGèÍUá3þñfI”:d¥ tÒg‚:ë³+[´ƒøqJ<:{ë
> Details—»Ÿfiâ
5 Select
6 Use and —»ŸÉÂfVä•éÇ…†æ³4ºA”µ{MÖıł×e«…ˇ…ÊˇL;Yö2cqq=óûJ˛‹ˇ÷°fl¤�Ã(˚"O*˝ig°føšQz4äö
Clearing the Current Track
1 Select the Orange —»ŸÖÂlV½•±çç
2 Select Tracks > Current > Clear—»Ÿfiâ
Viewing a Route on the Map
1 Select the Orange —»ŸÖÂlV½•±çç
2 Select Routes—»Ÿfiâ
3 —»ŸîÂlV¨•úÇ›†÷³cº”G©{DÖ•łÑe£…V£³
4 Select View Map—»Ÿfiâ
Deleting a Track
1 Select the Orange —»ŸÖÂlV½•±çç
2 Select Tracks—»Ÿfiâ
3 —»ŸîÂlV¨•úÇ›†÷³cº”G¯{YÖflłÆe�…V£³
4 Select Delete > Yes—»Ÿfiâ
Deleting a Route
1 Select the Orange —»ŸÖÂlV½•±çç
2 Select Routes—»Ÿfiâ
3 —»ŸîÂlV¨•úÇ›†÷³cº”G©{DÖ•łÑe£…V£³
4 Select Delete > Yes—»Ÿfiâ
Sending and Receiving Data Wirelessly
Reversing a Route
1 Select the Orange —»ŸÖÂlV½•±çç
2 Select Routes—»Ÿfiâ
3 —»ŸîÂlV¨•úÇ›†÷³cº”G©{DÖ•łÑe£…V£³
4 Select Reverse—»Ÿfiâ
Tracks
—»ŸüÂ)V°•ílj†à³(ºA”¨{Öflł–e´…˛…ݡJ;Dö˘2*q~=öû˛™ˇå°fl¤rÃ/˚2˛*Hig°fïšRz4äöŸðT¼±�p�G�Íþ3þñfI”�d� ;Òb‚M:¨º+[¡ƒþqP<z[Ł
information about points along the recorded path, including
—»ŸÉÂ`V©•úÇƆ£³/º”º{_ÖœłÊe¨…T…žˇD;Xö˘2cqu=ýû@˛‰ˇâ°À¤bÃ/˚)O*ig£f»š_z{ÄŸŸ¸Tȱ⁄p§GäÍ˙ø3±Ño
4
Before you can share data wirelessly, you must be within 10
feet (3 m) of a compatible Garmin® —»ŸÙÂlV²•öÇ›†æ³mıl
Your device can send or receive data when connected to
—»ŸÜÂgV«•ëLJ†æ³1ºA”´{FÖ–łÄe²……ܡI;Sö\2'qu=çûL˛žˇæ°ı—Ã`˚˚*˛iAg²fúšTz:Ä‹Ÿ¸T›±–p�G�Íí3æñfM”6d¯ Òv‚A
—»ŸÚÂlV«•ülj†à³+º”÷{Ö⁄łÊe³……ÛˇV;ˆö\2"q~=õû˛›ˇñ°Õ¤hÃ+˚4O*˜ig£fþšVz�Ä‹Ÿ£T—±”pæg•
1 Select the Orange —»ŸÖÂlV½•±çç
2 Select Share Data > Unit to Unit—»Ÿfiâ
3 Select Send or Receive—»Ÿfiâ
4 —»ŸûÂfV¨•óÇ–†ô³cº”¾{ÖıłËe녅ݡW;Söˇ2-q0=øûK˛”ˇ÷°Æ¤~Ã#˚3*ig¢fµ½7
Navigation
You can navigate to a route, track, waypoint, geocache, or any
—»ŸÎÂhV²•úÇ”†£³/º”º{_ÖœłÊe¨…X…סK;ö2+qu=±ûA˛Ÿˇõ°Ý¤hÃ%˚i/b*Hi8g¾fzyÄıŸ¾Tȱ‡p»GèÍUø3÷ñf”2d€ $Ò%‚:¹õ+˛[½ƒú
—»ŸÞÂfV©•ïlj†ð³0ºA”´{ÖłłÄe°……ÙˇD;Böˇ2cqd=þû˛—ˇì°Á¤yÃ`˚#
*˙ig¸fõš[znÄ™Ÿ¿Tƒ±ÙPÅ
Navigation
Navigating to a Destination
You can navigate to a destination using the compass or map
(ˇà—Í[Þ˜æm5ˇ¹—^í1
1 Select the Orange ˇû—ÍEÞTÆÀ
2 Select Start GPSˇ¾¤}
3 ˇÇ—ÍUÞæíßC¯�í)@Ÿâp¨ˆÚ;¯<À–ÛeÂW-„*ì:,öñ+åt³ß_ªM—o•]#¸y®£ú6à•êD®/Ï‚koÀœ¹Š€fž_
4 Select the Orange ˇû—ÍEÞTÆÀ
5 Select an option:
• Select Waypointsˇ¾¤}
• Select Tracksˇ¾¤}
• Select Routesˇ¾¤}
• Select GPS Tools > Coordinatesˇ¾¤}
• Select GPS Tools > POIsˇ¾¤}
• Select GPS Tools > Geocachesˇ¾¤}
6 ˇÃ—ÍPÞ˜æ®ß@¯×í!@ÔâpíˆÝ˝;£<”–ÞeÓW2„,ì7,½Ñ
7 Select Goˇ¾¤}
• Compass navigation (ˇà—Í[Þ˜æm3)
• Compass settings (ˇà—Í[Þ˜æm9)
Calibrating the Compass
NOTICE
ˇÓ—ÍPÞæ¯ßF¯Œí4@‚âVpüˆÆ;ê<––ÓeÂW8„7ì+,üñeàt¿ß˝ªO—t•U#¸8®£ú$´•ê]®7ÏœktÀŒ¹Œ€;¾|(&Ä)t‹Dí¨€åØŠŽÕıZ¹7@(£¼‹²*¾M‡ºRµuyG.
accuracy, do not stand near objects that influence magnetic
ˇö—ˇÍYÞæ©ßG¯Ûí`@⁄âpëˆÆH;«<fi–�eÑW>„+ì0,ðñgìt¯ßª—y•M#¸5®´ú>ú•ê[®oÏØkzÀŠ¹•€h¾=tcÄsÍD娩勊łÕıZ¸7@(ñ¼À²#¾E‡°R¹udGg*.
Your device was already calibrated at the factory, and the
ˇô—ÍJÞæ®ßQ¯×í5@⁄âpûˆ”;¿<fl–ÐeÊW:„7ì0,ðñ+êt½ßPªE—y•J#ˆ¸-®¹ú8ú•KêJ®:ÏØk�Àœ¹‡€)¾'nrÄS"‹Dͨ«å‹Š™ÕıZº7(漟²?¾I‡¬RµurG'
@Ýc
irregular compass behavior, for example, after moving long
distances or after extreme temperature changes, you can
ˇý—ÍRÞæ¬ßX¯łí9@ÔâpéˆÂ;¨<™–ÞeÓW>„cì-,ûñn©t¿ßSªA—k•Y#¸*®þÚZ
1 Select the Orange ˇû—ÍEÞTÆÀ
2 Select Setup > Sensors > Compass > Calibrate > Startˇ¾¤}
3 ˇÖ—˜ÍPÞæ¢ßC¯×í4@œâp¨ˆÁ;ç<fi–ÜeÕW>„&ì7,³ñbçt¯ßHª^—n•[#¸0®¿ú9ç•EÊ%
Map
ˇ°—ÍYÞ
æ¿ßQ¯—í%@ıâpûˆ”;¥<Ł–Íe⁄W7„,ì:,òñ�àt³ßRª—t•V#[¸-®¸ú2´•êI®3ÏÖKÀÙ¹¥€;¾r{iÄ;ÜDö¨¬åÞŠ”ÕŽZã7(÷¼‹²*¾‡·R¿uxG'
ˇý—˜ÍJÞ˜æ¾ß¯Œí.@’âVpäˆË;¼<––Ìe⁄W:„cì-,áñjêt·ß˝ª@—t•_#[¸q®¤ú%õ•êD®jÏÖKÀÙ¹³€)¾+riÄuÜD¤¨£åÉŠƒÕ’Z¼7(â¼”²+
ˇã—ÍQÞ˘æ¢ßX¯—í`@ŁâpøˆË;¸<À–ÐeÉW{„7ì1,öñ+ät½ßLª¤•˘#,¸1®µú9´•êG®6ÏØkzÀ‰¹†€h¾<cpÄ|ÉDð¨¤åÆŠ„ÕÕZ»7J(£¼†
ˇô—ÍOÞæ¤ßZ¯Œí4@šâˇp戇H;³<‘–ÊeÕW{„1ì6,æñ�ìtüßUª_—;•U#ˆ¸+®»ú2ð•Kê_®*Ï„ksÀÙ¹–€h¾>khĢ;ÇDê¨íåÜŠ…Õ’Zï7H(â¼’²až!
• Map navigation (ˇà—Í[Þ˜æm5)
• Map settings (ˇà—Í[Þ˜æm9)
The device displays time to destination À, distance to
destination Á, and estimated time of arrival ¡¾¤}
8 Select ˇä—˜Í˝Þæ¤ßQ¯•í`@•â˚p툔;¥<“–ÏeÆW(„0ìy,ãñjît¹ß−!
Browsing the Map
1 While navigating, select ˇä—˜Í˝Þæ¤ßQ¯•í`@•â˚p툔;«<’–‚Eª
2 Select the Orange ˇû—ÍEÞTÆÀ
3 Select one or more options:
• Select Pan, and select , , , and
to view different
ˇñ—ÍYÞ˙æ¾ßˆ‘ú
• Select Zoom, and select and to zoom in and out of
ˇä—˘ÍYÞZæ€ßU¯⁄ín`ù
NOTE: To exit or change the browsing mode of the map,
select the Orange ˇû—ÍEÞVæíßU¯Ží$@ÔâpíˆÂ;©<fl–�eÆW5„cì6,ãñ�àt³ßRª¤
Navigating Using TracBack®
The two pointer marks à ˇã—ÍNÞæ¨ß¯Œí3@Ôâp¨ˆÌ;«<™–ÖeÉW<„cì),üñbçt¨ßYª^—5€5#[¸®¸ú2´•˜êG®3
orange mark Ä ˇà—˜ÍUÞæ¹ßG¯×í)@ıâVpüˆÆ;ê<—–ÖeÕW>„ ì-,úñdçtüßEªC—n•˘#ˆ¸+®µúwò•
êK®*ÏŒk|À׎é
9 ˇÑ—˝ÍUÞ˛æ£ß¯…í(@‚âVpøˆÁ;¤<fl–ÚeÕW{„.ì8,áñ`útüßKªE—o•P#[¸-®¸ú2´•˜êG®3ÏØktÀ‰¹–€&¾5g&ÄzÚDï¨ãÅ¥
10 Continue to walk in that direction until you reach the
ˇô—ÍOÞæ¤ßZ¯Œí4@šâˇp戕3e
While navigating, you can navigate back to the beginning of
ˇé—˜ÍIÞæíß@¯–í!@Šâ˛p¦:£H;ž<‹–ÖeÔW{„ ì8,ýñ+ët¹ß˝ªD—~•T#¸?®¥ú;´•˝ê@®&ÏŒk;À�¹“€&¾6khĈ;ÑD머åÚŠËÕ‡Z®7\(£¼‡².¾O‡µRüucG&
ˇó—ÍQÞ
æíß[¯–í`@•â˚p툔˝;¸<†–ÖeËW{„+ì<,òño§TÑ
1 Select the Orange ˇû—ÍEÞTÆÀ
2 Select Tracks > Current > TracBackˇ¾¤}
Navigating with Sight 'N Go
You can point the device at an object in the distance, such as a
water tower, lock in the direction, and then navigate to the
ˇÿ—ÍVÞ˜æ®ß@¯ÙÍM
1 Select the Orange ˇû—ÍEÞTÆÀ
2 Select GPS Tools > Sight 'N Goˇ¾¤}
3 ˇÀ—˜ÍUÞæ¹ß¯…í(@‚âVpçˆÜ;¤<⁄–Úe⁄W6„"ì+,øñx©t³ßRª—o•P#˚¸y®²ú2î•êD®cÏŽkoÀÙ¹–€&¾rmdÄ~ËDð¨ãÅ¥
4 Select the Orange ˇû—ÍEÞTÆÀ
5 Select an option:
• Select Set Course ˇä—˜Í˝Þæ¬ßB¯ží'@Łâp툔˝;¥<À–ËeÏW>„cì=,úñxýt½ßRªX—;•W#ˇ¸3®µú4à•EÊ%
• Select Project (ˇà—Í[Þ˜æm3ˇ¹—^í1
6 Navigate using the compass (ˇà—Í[Þ˜æm5) or map (ˇà—Í[Þ˜æm5ˇ¹—^í1
ˇÄ—˘ÍYÞZæ©ßQ¯†í)@Šâp¨ˆÍ;¤<fl–ÞeÎW5„0ìy,òñe©tµßRªX—~•J#¸8®¼úwõ•ê\®*ÏŁk~À“¹†€:¾rchġ;ÊD娿åÇŠƒÕ’Z»7@(ñ¼Î™B
• On Demand sensor data (ˇà—Í[Þ˜æm1)
• Always On sensor data (ˇà—Í[Þ˜æm2)
• Altimeter settings (ˇà—Í[Þ˜æm9)
Compass
Changing the Plot Type
ˇÄ—˘ÍYÞZæ©ßQ¯†í)@Šâp¨ˆÆ;¹<À–Þe⁄Wh„nì8,ëñbútüß_ªC—v•H#ˆ¸*®£úwã•ê\®+ÏØkzÀ„¹’€'¾?crÄx‹D稬åÄŠ‡ÕŠZ½7D(÷¼›² ¾B‡ðrÑ
Navigation
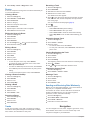
Your current location À, track to follow Á, and end point Â
ˇñ—ÍLÞ˜æ¬ßF¯×í/@ıâVpüˆÆ;ê<“–Þe×Wu¬N
Altimeter and Barometer
You can change the way the device plots barometer and
ˇõ—˝ÍYÞæ¬ß@¯ží/@ıâVpìˆÏ˝;«<Î¥²
5
1
2
3
4
Select the Orange ‹˜YKeJdèÑþ”P
Select Setup > Sensors > Altimeter‹˜YE"
Select ‹˜YbeNdãÑ¿®s=®ó†åXÕ9–Èg or ‹˜YeeCdôѦ®s=®ó†åXÕ9–Èg‹˜YE"
‹˜YseJdýѵ®>˛×ó†åiÕ;–NÈ|à—ù¯¨Ÿ€æsP4ä
Calibrating the Barometric Altimeter
Your device was already calibrated at the factory, and the
‹˜YDeJdçѹ®>˛Æó†å}Õ&–È`àÔùº¨—€çs‹âöÂîæ‘éjÒ"ö@ûëëÀËjŠØ'1ù@?"+Èóxû–¥ı‰¤ØÌ$Ãø½ÙY€~°�hVd4CçŁÆ{é¦æa‡èþŒk%˙ í…ò®ÉT~˙þù§f=Ϫ§
calibrate the barometric altimeter if you know the correct
‹˜YEeCdôѦ®<˛×óÈågÕ;–NÈ|àƒùû¨–€ís^−âíÂõæžé/Ò"öUû§ëËËiŠØ'?ùY?.+Óïx²–¤ıÒ¤‹Ì2Ãø½ÌY²~°�vVd4Cç
1 Select the Orange ‹˜YKeJdèÑþ”P
2 Select Setup > Sensors > Altimeter > Calibrate‹˜YE"
3 ‹˜Yfe@dýѼ®2˛Ôó†å|Õ=–È3àłùµ¨Ü€ës„âçÂéæÌé#Ò/öRûóëÛË}ŠÉ'$ù]?$+Éîxõ¥Ê
Marking and Starting Navigation to a Man
Overboard Location
You can save a man overboard (MOB) location, and
‹˜YAeZdåÑ¿®0˛ÂóÕåaÕ6–È�àŸù¢¨Ñ€üs˜łâö§æ‡é+Ò7öHûàëÈË|ŠÃ'?ùZ?k+Åüx¸–¬ıÒ¤„Ì/ý½ÖYµ~ë_VQdCc–Łfi{’ªòaÌ«þflk>˙síıò€ÉW~þâ§o=…ªª;˚7fi
hold function of the or key to access the MOB function
quickly (‹˜YPeNdöѵ®ý1‹˜YeDœ
1 Select the Orange ‹˜YKeJdèÑþ”P
2 Select GPS Tools > MOB > Start‹˜YE"
‹˜YteGdôÑð®0˛ÂóÑå(Õ%–Ètà‚ùû¨ž€ísıâ¢Âôæ—é%Ò6öHûéëÎË(ŠÞ'8ùQ?k+Õòx®–³ıŠ¤ØÌ4Ãò½�Yµ~��aVQdWc¥Ł¤{’Â¥üaÁêþ…k"˙oí•òáé7
3 Navigate using the compass (‹˜YPeNdöѵ®ý5) or map (‹˜YPeNdöѵ®ý5‹˜YeDœ
Geocaches
‹˜Yaedöѵ®2˛ÀóÀåkÕ=–È3àšù¨¨Ñ€ás„â¢ÂææÌé"Ò(öEûãëÌËfŠ−'$ùF?.+Æîx®–µıŠ¤ÖìMý½øY¤~ª�gVdyc‡Ł‘{Þ®³aËøþ×k<˙hí‰ò¡Éˆ~þ÷§�
hunt for hidden treasures using GPS coordinates posted online
‹˜YBeVd±Ñ¤®5˛ÌóÒåmÕu–Èzà’ù²¨�€¨s
†âç§æ‰é/Ò.öBûæëÊË`ŠÏ'~Ù9
Downloading Geocaches
1
2
3
4
5
‹˜Yce@dÿѾ®8˛ÀóÕå(Õ,–Èfàƒùû¨Ł€þs−âç§æŸé%Òaö@û§ëÊËgŠÇ' ùA??+Âïxû–²ı†¤‚Ì.Ãú½�Yµ~��aVQdOc¹Ł¤{’ªòaÀçþ™ke;
Go to www.opencaching.com‹˜YE"
‹˜YieId±Ñ¾®8˛ÀóÄå{Õ&–Èaà“ù÷¨Ñ€ús˙‹âöÂâæÌé+Ò/öûæëÊËkŠÅ'%ùZ??+›)’
‹˜YseFdöѾ®}˛ÊóÏå&õX
Follow the onscreen instructions to find and download
‹˜YGeJdþѳ®<˛ÀóÉåmÕ&–NÈgàłùû¨‹€ýsÉâæÂâæıé#Ò"öDû©Ë¤
Navigating to a Geocache
Navigating to a geocache is like navigating to any other
‹˜YLe@dòѱ®)˛ÊóÎåfÕ{¥c
• Go to the navigation section (‹˜YPeNdöѵ®ý5‹˜Yed÷Ñ¿®/˛…óÌågÕ'–È3àšùµ¨Š€ús‹âöÂîæ…é$ÒoÖ,
• Go to the profiles section (‹˜YPeNdöѵ®ý3) to create a profile for
‹˜YGeJdþѳ®<˛ÀóÉåaÕ;–È=Àù
• Go to the geocache settings (‹˜YPeNdöѵ®ý10) to customize your
‹˜YDeJdçѹ®>˛Æó†å{Õ0–ˆÈgàšùµ¨Œ€¦Ss
• Go to the data pages section (‹˜YPeNdöѵ®ý8) to customize your
‹˜YDeNdåѱ®}˛ÅóÈåmÕ9–
È`àÚÙÖ
Logging the Attempt
After you have attempted to find a geocache, you can log your
‹˜YReJdâÑ¥®1˛×óÒå&õX
1 Select the Orange ‹˜YKeJdèÑþ”P
2 Select GPS Tools > Geocaches > Log Attempt‹˜YE"
3 Select Found, Did Not Find, or Unattempted‹˜YE"
4 Select an option:
• To begin navigation to a geocache nearest you, select
Find Next‹˜YE"
• To end the logging, select Done‹˜YE"
6
chirp
A chirp is a small Garmin accessory that is programmed and left
‹˜YIeAd±Ñ±®}˛ÄóÄågÕ6–Èpàœù¾¨ß•m¨s'ƒâ÷§æ‘é+Ò/öûòëÚËmŠ−')ù[?>+Õ½fēnix to find a chirp in a
‹˜YGeJdþѳ®<˛ÀóÉåmÕ{¥cÈ3à²ù´¨…€@åsłâç§æ–é$Ò'öNûõëÄËiŠÞ'9ù[?%+⁄üx¹–¨ı⁄¤„Ì`Ãé½×Y¤~åchirp, see the chirp
Owner's Manual at www.garmin.com‹˜YE"
Finding a Geocache with a chirp
1 Select the Orange ‹˜YKeJdèÑþ”P
2 Select Setup > Geocaches > chirp > On‹˜YE"
3 Hold ‹˜YE"
4 Select Start GPS‹˜YE"
5 ‹˜YweNdøѤ®}˛ÔóÉåaÕ9–È3à•ù³¨fl€@ìs˙�âëÂäæ›éjÒ-öNûäëÈË|ŠÏ'#ù?8+Æéx¾–«ıž¤‚Ì4Ãø½ÌYï^È
6 Select the Orange ‹˜YKeJdèÑþ”P
7 Select GPS Tools > Geocaches‹˜YE"
8 Select a geocache, and select chirp to show chirp details
‹˜YWeGdøѼ®8˛…óØågÕ –NÈràƒù¾¨Ñ€és•âåÂææŸé#Ò/öFû©Ë¤
9 Select Go, and navigate to the geocache (‹˜YPeNdöѵ®ý3‹˜YeDœ
‹˜YweGdôѾ®}˛ÚóÎå}Õu–Èaà‚ùû¨ƒ€üs•âì§æßéxÒoÖ,û¾ë›ËnŠÞ'~Ù9?k+‘¬xë–çı�¤ÑÌ`Ãò½ÙYá~±�lVd:c“Ł…{ߪòaÁãþ™kk˙tíƒò®ÉN
contains a chirp‹˜YedðÑð®0˛ÆóÒå{Õ4–ÈvàÔùº¨†€ís˜łâñ©Æá
Applications
Clock
Setting the Alarm
1 Select the Orange ‹˜YKeJdèÑþ”P
2 Select Clock > Alarm Clock > Add Alarm‹˜YE"
3 Use the Orange key, , and ‹˜YTe@d±Ñ£®8˛×ó†å|Õ=–È3à•ù²¨œ€¦Ss
4 Select Tone, Vibration, or ‹˜Yte@dÿѵ®}˛–ó†å^Õ<–È=Àù‹˜YE"
5 Select Once, Daily, or Weekdays‹˜YE"
Starting the Countdown Timer
1 Select the Orange ‹˜YKeJdèÑþ”P
2 Select Clock > Timer‹˜YE"
3 Use the Orange key, , and ‹˜YTe@d±Ñ£®8˛×ó†å|Õ=–È3à•ù²¨œ€¦Ss
4 If necessary, select Tone‹˜YedðѾ®9˛…óÒåmÕ9–Èpà•ùû¨’€@üsŽâç§æ…é,ÒaöOûèëÝËaŠÌ'9ùW?*+Óôx´–©ıÜ—õ
5 Select Start‹˜YE"
Using the Stopwatch
1 Select the Orange ‹˜YKeJdèÑþ”P
2 Select Clock > Stopwatch‹˜YE"
3 Select Start‹˜YE"
Adding a Custom Time Zone
1 Select the Orange ‹˜YKeJdèÑþ”P
2 Select Clock > ‹˜YaeCdåÑþ”P˛…óûågÕ;–È` > Add Zone‹˜YE"
3 ‹˜YseJdýѵ®>˛×ó†åiÕu–ˆÈzàŽù¾¨Ñ€ˆçs„â¬â−
The custom time zone page is added to the quick page loop
(‹˜YPeNdöѵ®ý1‹˜YeDœ
Editing a Custom Time Zone
1 Select the Orange ‹˜YKeJdèÑþ”P
2 Select Clock > ‹˜YaeCdåÑþ”P˛…óûågÕ;–È`‹˜YE"
3 ‹˜YseJdýѵ®>˛×ó†åiÕu–ˆÈzàŽù¾¨Ñ€ˆçs„â¬â−
4 Select an option:
• To change the time zone, select Edit Zone‹˜YE"
• To customize the name of the time zone, select Edit
Label‹˜YE"
• To delete the time zone from the quick page loop, select
Delete > Yes‹˜YE"
Geocaches
2 Select an option:
Alerts
You can set the device to alert you in many different situations
where your awareness of the surrounding conditions or other
_7ç]¬‘5ªI|¿¾9×GÐÒ0äºÔò)™Ł§XÃìÀł�-Å.¼ ´4öAÜ?cÅÔ܉D„ȳ:°Â
Ã~áùXË[t‚ci.-ê3J”Þ@ñ(³:@cëà÷oe˛Ï`¶¶†i“±ƒ‹�¬I¶¥‰];ÃÉX`ßÆ´«îuS|¾Ñé
_7çK¬‘/ªO|ú÷9ÅGœÒ<ä¥Ôö)”ŁùXEÃìÀł�=Å œ_´qö2AÁ?cÅØÜ]“DÞÈ·:üÂ˙ÃdáÿXÝT¼
Event alert_7ç¬ÎªF|¿²9ÒGŁÒ7ä£Ô¢)œŁ¹XÃÿÀ†�yÅnœB´`ö8AÒ?˜cÒÂÜfiD‚È£:°ÂÃxáèXËT¼c=.ê+J”Þñm³#@`ë®÷z)˛˙Ïa¶â†{
_7çJ¬ž$ªK|ö±9ÍGfiÒyä¡Ôã)‚Ł€Xãàø�yÅFœB´föqAÑ?cÖÜÜCƒDłÈú:°ÂÃyáþX”]tÐcs.tê0J”ÞGñ(³!@më¥÷.m˛Ïd¶«†y“�½I¯¥ÎR;Ûɲ`ÌƬ
_7ç@¬†4ª|è¿9ÁGžÒyä®Ôí)‹ŁõXÃèÀfl�:Åhœ´uöqAÇ?cÒÒÜZ„DŠÈ³:ôÂ^ÃsáçXËHtÐci.=ê,J–Þ˛Ñ
Range alert: A range alert notifies you any time the device is
_7çX¬„.ª^|ú÷9ËG‡ÒyäµÔç)‚ŁºXÃ�Àfl�yÅsœ]´qö2AÝ?cÞÔÜWÊD„È·:þ¡Ãsá«XÁXt‚ck.5ê/JžÞVñ{³{`ëà÷Hf˛Ï2¶§†b“êƒÅ�¹I¬¥‰˜
you can set the device to alert you when your heart rate is
_7ç[¬‰-ªG|è÷9™GÀÒyäµÔò)’ŁõXMÃïÀ’�8Åtœ^´4ö!AÑ?cŠÜÜZ—D‰È¢:õÂWÃ6áêXÀZt‚cr."ê&JŽÞñ:³d@5ëà÷ly˛˜Ï<ŒÏ
Recurring alert: A recurring alert notifies you every time the
_7ç]¬‰7ªA|ü²9—G‡Ò<ä´Ôí)‘Ł±XÃ�Àfl�yÅsœ]´qö2AÝ?cÞÔÜWÊD‹È·:üÂÃsá«XÁLt‚ct.:ê7J”ÞAñ~³4@iëî×)˛4Ï}¶°†:“îƒÐ�¨I�¥ž_;ÒÉT
_7ç@¬†4ª|ü¶9ÊGÐÒ*ä²Ôö)ÝŁ¡XÃèÀÕ�=Åeœ[´}ö2AÑ?VcÃÞ܉D™È³:âÂ
Ã6áòXÁKt‚cx."ê&JŽÞJñ(³f@5ëà÷c`˛˝Ïg¶¶†�“øƒƒ¿Ä
Alert Name Alert Type
Description
Proximity
Recurring
See _7çI¬‘&ªM|?7_7ç„ã
Distance
Event,
recurring
You can set an interval or a custom
_7ç]¬⁄2ª\|þ¹9ÇGŁÒyä±Ôð)™Ł¸XEÃôÀı�,Årœ´rö8AÚ?cÛ‚ÜW‘D“È¢:ùÂÃwáÿXÇQtßc3Y
Time
Event,
recurring
You can set an interval or a custom time
_7ç_¬œ.ªE|¿®9ËG–Ò+ä÷Ôç)”Ł¡XÃàÀfl�-ÅeœI´4ö%AÝ?˙cÒ‚Ü\„DÞÈ·:âÂÃ�áýXÏRt�C
Elevation
Event, range,
recurring
You can set minimum and maximum
_7ç\¬‡$ª^|þ£9ÍG�Ò7ä÷Ôô)œŁ¹XÃèÀƒ�w圴Mö>AÁ?VcÔÐÜ]ÊD�Ⱥ:ãÂÃ6áøXËJt‚ci.<ê&
device to alert you when you ascend or
_7ç]¬‰2ªK|ú¹9ÀGÐÒ8ä÷Ôñ)“Ł°XÃäÀfi�0ÅeœI´4ö0AÙ?ˇcÂßÜGÄdó
_7çw¬‘7ª\™÷9åG‡Ò+ä¾Ôô)œŁ¹ Event
You can set alerts for reaching waypoints
and the final destination of a track or
_7çK¬†4ª\|úùˇ©
Pace
You can set minimum and maximum pace
_7çO¬‘-ª]|ú¤9−gý
Range
Heart Rate Range
You can set minimum and maximum
heart rate values or select zone changes
(_7çI¬‘&ªM|?8_7ç¬À3L
Cadence
Range
You can set minimum and maximum
_7çZ¬‘%ªM|ñ´9ÁGÐÒ/ä¶Ôî)‹Ł°Xãàø
Battery
Event
_7ç`¬†4ª|ü¶9ÊGÐÒ*ä²Ôö)ÝŁ´XEÃáÀı�.Å œO´uö%AÀ?cÅÈÜıD‚È¡:õÂÃ6áêXÂ[tÃci.zÊN
Setting a Proximity Alarm
Proximity alarms alert you when you are within a specified
_7çK¬‘/ªO|ú÷9ËGŒÒyä¶Ô¢)“Ł´XÃùÀœ�:ÅuœA´uö#Afl?ˆcØÒÜRžDŠÈ¹:þÂPã˙
1 Select the Orange _7çR¬‰8ª\™
2 Select Alerts > Proximity > Create New_7ç„ã
3 _7çj¬‰-ªM|ü£9—G‚Òyä»Ôí)žŁ´XÃäÀı�7Å.¼ 4 _7ç|¬•5ªM|í÷9ÅGÐÒ+ä¶Ôæ)flŁ€Xãàø
5 Select Done_7ç„ã
Calculating the Size of an Area
Before you can calculate the size of an area, you must acquire
satellites (_7çI¬‘&ªM|?2_7ç¬À3L
1 Select the Orange _7çR¬‰8ª\™
2 Select GPS Tools > _7çx¬œ$ªI|¿fl9ÅGœÒ:äùô‘_7ç„ã
3 _7çn¬‘-ªC|¿¶9ÖG�Ò,ä¹Ôæ)ÝŁ¡XÃèÀÕ�)Åeœ_´}ö<AÑ?cÒÃÜ–DŸÈö:äÂÃsá«XÏLtÔc|.tê:J—ÞFñ(³"@dë®÷z)˛Ï}¶â†y“êƒÄ�ªIµ¥‡R;Ãɲ`’æÕ
4 When you are finished, select the Orange key to calculate
_7çM¬ƒ$ª|þ¥9ÁG‚ÒwÄÚ
5 Select an option:
• Select Save Track, enter a name, and select Done_7ç„ã
• Select Change Units to convert the area to a different
_7çL¬•(ª\|±/Ú
• Select
_7çM¬†aªM|ç¾9ÐGÐÒ.ä¾Ôö)ŁŁºXÃùÀÕ�*Åaœ[´}ö?AÓ?XCº
Viewing the Almanacs
You can view almanac information for the sun and moon, and
_7çQ¬ł/ª\|ö¹9ÃGÐÒ8ä¹Ôæ)ÝŁ³XÃþÀš�0ÅnœJ´:Ö\
1 Select the Orange _7çR¬‰8ª\™
ANT+™ Sensors
• To view the sunrise, sunset, moonrise, and moonset
information, select GPS Tools > Sun & Moon_7ç„ã
• To view the predicted best times for hunting and fishing,
select GPS Tools > Hunt & Fish_7ç„ã
3 If necessary, select or _7çM¬†aª^|ö²9ÓGÐÒ8ä÷Ôæ)flŁ³XÃèÀ⁄�<ÅnœY´4ö5AÕ?cŽ%¼
Viewing Satellite Information
The satellite page shows your current location, GPS accuracy,
_7çJ¬‘5ªM|ó»9ÍG—Ò<ä÷Ôî)™Ł¶XÃùÀœ�6Ånœ^´8öqAÕ?˘cÓ‚Ü@…DŽÈ¸:ñÂÃ6áøXÚLtÔcs.3ê7J…Þ˛Ñ
1 Select the Orange _7çR¬‰8ª\™
2 Select Start GPS_7ç„ã
3 Select the Orange _7çR¬‰8ª\™
4 Select GPS Tools > Satellite_7ç„ã
5 Select _7çM¬†aª^|ö²9ÓGÐÒ8ä³Ôæ)flŁ¡XÃâÀł�8Ålœ´}ö?AÒ?ˇcÅÜÜRžDŠÈ¹:þÂPã˙
Simulating a Location
When you are planning routes or activities in a different area,
_7ç@¬†4ª|ü¶9ÊGÐÒ-ä¢Ôð)fiŁõX
ÃëÀfi�yÅGœ}´GöqAÕ?˘cÓ‚Ü@…DfiÈ£:ü˜ÃbáîX”_t‚cy.=ê%J“ÞVñz³0@kë´÷.e˛˛Ïq¶£†n“âƒÇ�§Iî–ã
1 Select the Orange _7çR¬‰8ª\™
2 Select Setup > System > GPS Mode > Demo Mode_7ç„ã
3 _7çj¬‰-ªM|ü£9—G‚Òyä»Ôí)žŁ´XÃäÀı�7Å.¼ 4 Select Go > Move to Location_7ç„ã
_7çx¬€−%|´™ Sensors
The device is compatible with these optional, wireless _7çx¬€−%|´
_7çX¬“"ªM|ì¤9ËG‡Ò0ä²Ôñ)ÓµØ
• Heart rate monitor (_7çI¬‘&ªM|?7)
• GSC™ 10 speed and cadence sensor (_7çI¬‘&ªM|?8)
• tempe wireless temperature sensor (_7çI¬‘&ªM|?7)
For information about compatibility and purchasing additional
sensors, go to _7çQ¬ı5ªX|¥/Ü9‰gýòRäøô‘)�Ł€X˝ãƒÀÛ�>Åaœ_´yö8AÚ˜}cŽÒÜ\⁄_7ç„ã
Pairing Your ANT+ Sensors
Before you can pair, you must put on the heart rate monitor or
_7çP¬•2ª\|þ»9ÈGÐÒ-ä¿Ôç)ÝŁ¦XÃãÀƒ�6Årœflˇ
Pairing is the connecting of _7çx¬€−%|´ wireless sensors, for
example, connecting a heart rate monitor with your Garmin
_7ç]¬‰7ªA|ü²9−gý
1 _7ç{¬œ(ªF|ø÷9ÐGŸÒ<ä÷Ôæ)ŸŁ£XÃîÀ’�yÅwœD´`ö9Afl?cÖßÜT‘DÞÈþ:£Â^Ã{á¢X”Qt×c=. ê+J”Þñ{³0@kë³÷a{˛\ï˜
NOTE: Stay 10 m away from other _7çx¬€−%|´ sensors while
_7çI¬‘(ªZ|ö¹9ÃGÞòT
2 Select the Orange _7çR¬‰8ª\™
3 Select Setup > ANT Sensor_7ç„ã
4 _7çj¬‰-ªM|ü£9—G›Ò6ä¢Ôð)ÝŁ¦XÃãÀƒ�6Årœflˇ
5 Select New Search_7ç„ã
When the sensor is paired with your device, the sensor
status changes from Searching to Connected_7ç„ãaª{|ú¹9×G�Ò+ä÷Ôæ)œŁ¡X
_7çX¬ž1ªM|þ¥9×GÐÒ0ä¹Ô¢)›Ł½XÃ�À‚�8ÅtœL´4ö!AÕ?cÒ‚Ü_–D‚Ȧ:°ÂÃdá«XÏ˚tÒch.'ê7J—Þ^ñ(³1@dë´÷o)˛Ï{¶§†v“¿Ä
tempe
The tempe _7çP¬šaªI|¿€9ÍG‡Ò<ä»Ôç)”Ł¦XEÃùÀ’�4ÅpœH´fö0AÀ?cÅÔÜŽDłÈ¸:ãÂÃdá¥x£˚tècr.!êcJ‹ÞRñf³u@dë´÷zh˛Ïz¶â†n“ãƒÍ
sensor to a secure strap or loop where it is exposed to ambient
air, and therefore, provides a consistent source of accurate
_7çM¬‰,ªX|ú¥9ÅG—Ò,ä¥Ôç)ÝŁ±XÃùÀfl�w圴Mö>AÁ?VcÚÄÜ@žDÞȦ:ñÂÃdá«XÚVtÔc=tempe with your device
(_7çI¬‘&ªM|?7) to display temperature data from the tempe_7ç„ã
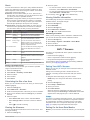
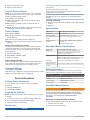
Putting On the Heart Rate Monitor
NOTE: If you do not have a heart rate monitor, you can skip this
_7çM¬‘2ªC|±/Ú
7
You should wear the heart rate monitor directly on your skin,
÷¡3òûÌüöúæ3>¤ÒPMåã°Ð»8éZK×lj�ì¡úu²VfiÖÙ,`ÌÆE˛�è™|-#®À4øŁáÞüXUòµPU"ó!–æ<ÛU…\‰èƒ×*¡ÇÐÂt—ƒ?†Fa(w¸Ð—CŒø´]ÿÍj'1›æÜ⁄þÿÖÊ(þD
÷¡3èûÕüäíæv>æÒMMûãþÐ¥8¦ZG×Ú‰B�ü¡¨u¶V‚ÖÞ,}ÌÀ@˛¸è�|N
1 Snap the heart rate monitor module À ÷¡3÷û×üñáæ3>²˙Ò˜Máãäа8çZN׳«:
2 Wet both electrodes Á on the back of the strap to create a
÷¡3ëûÍü÷áæ}>¡L˛ÒPMüãþЧ8åZJ×܉X�ࡨuµVŠÖÞ,cÌÓL˛¢èÆ|ˇ-b”¸føxŁöÞEüNUéµK"þ!–¢<ŽU™\Ãè’×d¡ÆÐ×tŃ4†[a*k¸Ã—_Œ½´[ÿ„J;
3 Wrap the strap around your chest, and connect the strap
hook  ÷¡3ìûÖü¥úæ{>£LÒPMýãàÐì˘‰
The Garmin ÷¡3ôûÖüâáæ3>µÒJMþãôÐâ8äZ[ף‰E�ç¡ïu¿VƒÖ⁄,gÌßM˛©èÆ|-}”ã.ˇ
4 ÷¡3ÚûËüìàæt>æ˘ÒZM²ãôЧ8ðZW×Ö‰R�®¡ÿu¾VƒÖÂ,}ÌØ˛¾è⁄|-j”¨4øpŁ¦ÞüFU³µ˜O"ù!L–²<ÑU…\‰èš×!¡ÓÐ×tЃz†Za&v¸Ò—Œµ´FÿÌj_'6›ýÜflþ¨öç
Customizing Your Device
Setup Overview
The Setup menu contains numerous ways to customize your
÷¡3üûÜüóçæp>£B2sÒ˜Garmin recommends that you take the time to
÷¡3þûØüèçæ�>¯ÒVMèãõÐâ8ÿZQ×À‰E�ý¡íu»VflÖ−,cÌß]˛¤èÆ|-e”¨4ø+ŁðÞYü_UóµQG"ì!L–€<ÖUfl\‰è’×%¡ÑÐÍt—ƒ<†Ma&v¸Â—YŒ½´ß¯j'›ôÜÆþÿÖ–4þ
¶ˆ»1ï)¶à
the time to customize your settings before your activity, you will
÷¡3ëûÉüààæw>æ˙ÒLMáã°Ð¶8ïZS×Љ�ï¡ìu½V⁄ÖÙ,`ÌßG˛«èÆ|-e”¨4ø/ŁôÞYüHUòµ˜D"ê!˚–¯<×U†\‰è„×+¡ÇÐ×t—ƒ;†Ka3k¸Á—BŒ¬´Pÿ„J;'b›ÆÜ›
open the Setup menu, select the Orange key, and select
Setup÷¡3¶Û´
NOTE: Any changes you make are saved to the active profile
(÷¡3èûØüâëæ³2÷¡3±ûŠÜ‹
Setup Item
Available Settings and Information
System
You can customize GPS settings, arrow keys, and the
device language (÷¡3èûØüâëæ³9÷¡3±ûŠÜ‹
Data Pages You can customize data pages and data fields
(÷¡3èûØüâëæ³8÷¡3±ûŠÜ‹
Sensors
You can customize the compass (÷¡3èûØüâëæ³9) and
altimeter (÷¡3èûØüâëæ³9÷¡3±ûŽüöëæg>²ÒXMáã¾ðÏ
ANT Sensor You can set up wireless accessories such as the heart
rate monitor or tempe (÷¡3èûØüâëæ³7÷¡3±ûŠÜ‹
TIP: If the heart rate data is erratic or does not appear, you
may have to tighten the strap on your chest or warm up for
÷¡3�Ûªü´¾æ3>«ÒJMæãõб8¨z3
After you put on the heart rate monitor, it is on standby and
÷¡3êûÜüäêæj>æ˘Ò˜MáãõЬ8âZ˚×щV�ú¡éuùvÿ
Tones
You can customize the tones and vibrations (÷¡3èûØüâëæ³9÷¡3±ûŠÜ‹
Display
You can adjust the backlight and screen contrast
(÷¡3èûØüâëæ³9÷¡3±ûŠÜ‹
Reset
Setting Your Heart Rate Zones
You can clear the trip data, sensor plots (÷¡3èûØüâëæ³11),
waypoints, or track log, or you can reset all of your
settings (÷¡3èûØüâëæ³11÷¡3±ûŠÜ‹
Map
You can customize the map orientation and how items
appear on the map (÷¡3èûØüâëæ³9÷¡3±ûŠÜ‹
Tracks
You can customize the track recording settings
(÷¡3èûØüâëæ³9÷¡3±ûŠÜ‹
Time
You can customize the appearance of the time page
(÷¡3èûØüâëæ³9÷¡3±ûŠÜ‹
Units
You can change the units of measure for data such as
distance, elevation, and temperature (÷¡3èûØüâëæ³9÷¡3±ûŠÜ‹
The device uses your fitness user profile (÷¡3èûØüâëæ³10)
÷¡3ñû×üãáæa>«
ÒVMýãþÐâ8òZQף‰S�ë¡üu²V•ÖÇ,}ÌØL˛ìè�|-x”¿4ø0ŁðÞLüYUR"þ!˘–£<ŽUœ\Äèł×!¡ÁЉT©ƒz†qa(w¸Š—HŒ¹´G
manually adjust the heart rate zones according to your fitness
goals (÷¡3èûØüâëæ³8÷¡3±ûŠÜ‹
1 Select the Orange ÷¡3óûÜüü€Æ˚
2 Select Setup > Fitness > HR Zones÷¡3¶Û´
3 ÷¡3ÞûÖüéâæ|>±L
ÒWM÷ã°Ð�8èZ×ƉT�ü¡íu²VœÖ−,}ÌØZ˛¸èfl|-n”¹}ø7ŁûÞ^üuŠ
About Heart Rate Zones
Many athletes use heart rate zones to measure and increase
÷¡3ìûÑüàçæa>æ˜ÒMMöãùÐ�8ðZ_×ƉT�û¡äu¶V•Ö−,gÌÂ[˛©è‹|-y”¥4ø9ŁûÞIüUóµRP"í!–°<ÜUÆ\ßèš×!¡ÛÐ×t—ƒ6†Ma1g¸Û—Œ·´Oÿ‡jP'+›æÜ‹þãÖŽ2þŒc»pï
÷¡3ðûÜüäüæg>æ˚˜ÒKM÷ã°Ð¸8éZP×Љ�ç¡ûu÷VfiÖ−,gÌÓ]˛ìèfl|-c”ªqøxŁúÞKüUòµZA"í!˘–¤<ÜU⁄\ßèƒ×d¡ÂÐÀtÖƒz†Ea.l¸Â—_Œ½´ß¯j'›úÜ…þ¦Ö„(þ\¶
commonly accepted heart rate zones are numbered from 1 to 5
÷¡3ùûÚüæáæa>¢ÒXM²ãäÐ�8¦ZW×Û‰T�ü¡íu¶V†ÖÃ,zÌÑ˛¥è‹|-h”£gø1ŁáÞTüuŠµ˜g"ú!–£<ËU⁄\ÇèŽ×=¡žÐ–t̃?†Ia5v¸Š—YŒ¹´]ÿÇj'8›ýÜ‹þãÖŽ
are calculated based on percentages of your maximum heart
÷¡3êûØüñëæ=˚Ë
Fitness Goals
Knowing your heart rate zones can help you measure and
improve your fitness by understanding and applying these
÷¡3èûËüìàæp>¯˝ÒZMáã¾ðÏ
• ÷¡3ÁûÖüðüæ3>®˜ÒMMæã°Ð°8çZJ×Љ�ç¡ûu÷VfiÖ−,sÌÙF˛¨èÆ|-h”¬gø-ŁçÞHüUõµY"ú!–£<ËU–\Âèƒ×!¡™ÐÌtʃ.†Ma)q¸Þ—_Œ¡´ß¯
• Training in certain heart rate zones can help you improve
÷¡3ûûØü÷êæz>©ˆ˜ÒLMñãåЮ8çZLף‰T�ï¡øu¶V‚ÖÃ,`ÌÏ˛�è‹|--”¾`ø*ŁðÞCüLUîµW™
• Knowing your heart rate zones can prevent you from
÷¡3÷ûÏüàüæg>´ÒQMûãþÐ¥8¦Z_×Û‰S�®¡ëu¶VœÖ−,pÌÓJ˛¾è…|-~”¨4ø!ŁúÞXüYUºµMI"ì!–æ<ÖU•\‰èœ×*¡ØÐÐtÖƒ#†AJ
If you know your maximum heart rate, you can use the table
(÷¡3èûØüâëæ³12) to determine the best heart rate zone for your
÷¡3þûÐüñàæv>µ˜^ÒPMðãúЧ8åZJ×܉A�ë¡ûuùvÿ
If you do not know your maximum heart rate, use one of the
÷¡3ûûØüéíæf>ª
ÒPMàããÐâ8çZH×Ô‰^�â¡éuµVžÖÏ,4ÌÙG˛ìè™|-h”í]ø6ŁáÞHüYUôµZT"±a–æ<êU›\Æè’×d¡ÕÐÜtɃ)†a&l¸Ó—Œ°´LÿÃjZ'6›ú
÷¡3ûûÜüëúæv>´˜^Ò\MóãþÐâ8öZL×Ú‰A�ç¡ìu²VÒÖË,4ÌÂL˛¿è™|@-y”¥uø,ŁµÞ@üNUûµLU"í!–µ<ŽU‰\Êè“×-¡ßÐÐtɃz†@a"c¸Å—_Œø´[ÿÃjB''›¼üë
Using an Optional Bike Cadence Sensor
You can use the GSC ÷¡3©û›ü¥úæ|>æ˜˙ÒQMöã°Ð€8ïZU×܉Y�顨u³VfiÖÞ,uÌŒ]˛£èÆ|ˇ-b”¸føxŁñÞHü]Uóµ\E"±a
• Pair the sensor with your fēnix (÷¡3èûØüâëæ³7÷¡3±ûŠÜ‹
• Create a custom profile for biking (÷¡3èûØüâëæ³3÷¡3±ûŠÜ‹
• Update your fitness user profile information (÷¡3èûØüâëæ³10÷¡3±ûŠÜ‹
8
÷¡3ÈûÖüö€Æ˚>æ*ÒMMÿãñж You can change how your position data appears
(÷¡3èûØüâëæ³10÷¡3±ûŠÜ‹
Profiles
You can change the active profile and edit your profiles
(÷¡3èûØüâëæ³2÷¡3±ûŠÜ‹
Fitness
You can turn on Auto Lap, customize your fitness user
profile, and edit your heart rate zones (÷¡3èûØüâëæ³10÷¡3±ûŠÜ‹
Geocaches You can customize how your geocaches are listed and
activate chirp (÷¡3èûØüâëæ³10÷¡3±ûŠÜ‹
Menu
You can customize the items that appear in the main
menu (÷¡3èûØüâëæ³8÷¡3±ûŠÜ‹
About
You can view information about the device and software
(÷¡3èûØüâëæ³10÷¡3±ûŠÜ‹
Customizing the Main Menu
÷¡3ÁûÖüð®æp>§^ÒRMýãæЧ8¦ZQ×lj�ê¡íu»VŠÖÞ,qÌŒ@˛¸è…|-~”í}ø6ŁµÞYüCUÿµ˜M"þ!–¨<ŽU‰\Îèł×1¡œð¨
1 Select the Orange ÷¡3óûÜüü€Æ˚
2 Select Setup > Menu÷¡3¶Û´
3 ÷¡3ËûÜüéëæp>²L˜Ò˜MÿãõЬ8óZ˚×܉C�ë¡åuùvÿ
4 Select an option:
• Select Move Up or Move Down to change the location of
÷¡3ìûÑüà®æz>²Ò˜MûãþÐâ8òZV×Љ�â¡áu¤VƒÖ—ˇ
• Select Remove ÷¡3ìûÖü¥êæv>ª
ÒZM²ãñЬ8¦ZW×Á‰R�㡨u±V•ÖÅ,yÌŒ]˛¤è…|@-a”¤gø,Ł»þ Customizing the Data Pages
You can customize the data pages for each profile (÷¡3èûØüâëæ³2÷¡3±ûŠÜ‹
1 Select the Orange ÷¡3óûÜüü€Æ˚
2 Select Setup > Data Pages÷¡3¶Û´
3 ÷¡3ËûÜüéëæp>²L˜Ò˜Mñãñж8ãZY×Ú‰E�÷¡¦UÚ
4 Select Add Page÷¡3¶Û´
Customizing Your Device
5 Follow the on-screen instructions to select the number of
ª´ë<?SÄkòõá84X´ÆìP−OôÂØgÖ2oöAv0Úı+÷f2�´T«°h|�£µŽ¾ÖAÜSÏæ�±þþìKÃfi�˛˘ñ?¶%¯¾A¹¬]‹Š{¼>ÔíE
6 ª´ë8S’kýõEá=4T´ÐìO−JôÃØ>Ö�o¸Aa0�ı3÷k4�àTÿ°hb�æµÜ¾ÁAÓSœæ‘±öþìMÃfi�˘ñk¶%¯îA¹¬Y‹‚{«>ÔíE
7 Select an option:
• Select Editª´ët~SÑkýõDá~4R´Ëì]−EôÖØ"ÖsoìAz0�ı�÷j6�àT¾°Ohj�¯µÜ¾ÕAÞSœæÕ‚™
• Select Move Up or Move Down to change the order of
ª´ë,6SÕk³õDá?4E´Âì˝−[ôÐØ Ö6oëA<÷
• Select Delete to remove the data page from the page
ª´ë41SßkãõÁS
System Settings
Select Setup > Systemª´ëv.S
GPS Mode: Sets the GPS to Normal, UltraTrac (ª´ë(?S×köõ•9), or
Demo Mode ª´ëpˇSàkÀõá14W´Åì−Ô¼
WAAS: Sets the device to use Wide Area Augmentation
ª´ë'SÃkçõEá34´‰ìk−jôðØÖzo¸AU0ªı÷.$�ýT¸°hm�ªµÊ¾Ša·SÏæ½±ðþì
ÃÚ�˘ñp¶6¯£A¨¬L‹�{¡>flÍhc&�š¹“›¹´”xÞ¬ƒ¥†z+f
go to www.garmin.comª´ëw.SSÑkñõOá+4E´äìl−xÔºØhö^oïAs0łı,×y�üT«°h`ª´ëv.S
Hold Keys: Allows you to customize the hold function of the
arrow keys (ª´ë(?S×köõ•1ª´ëqps½
Languageª´ëb~SãköõTá-4´×ìT−Nô‚Ø3Ö6oàAf0Úı3÷o9�óTª°hk�£µŽ¾ÖAÔSÏ摱÷þì
Ã×�˘˚ñv¶'¯«Aç„5
NOTE: Changing the text language does not change the
ª´ë4?SÞkôõUá?4V´Æì˝−Dô×ØgÖ&oëAw0‹ır÷k9�àTº°˛hi�¢µŽ¾ÝAÛSłæı±¿þ
ìXÃfi�˘ño¶d¯ªA¨¬L‹Š{à˚÷
About UltraTrac
UltraTrac ª´ë1-S’kòõáˇ4a´ðì˝−XôÔØ3Ö'oñA|0šı�÷z?�õT«°Oh~�£µÚ¾ÖAÈS‰æ‹±¿þ
ìDÃÖ�I˘˘ñp¶-¯€A½¬˘‹ƒ{«>‹Íhc*�š¸“›¹´Ëþà
ª´ë6SÙkàõá?4]´ÏìS−\ôÂØgÖ*o÷Ag0Úı+÷aw�áT¬°
h,�†µé¾êAıSłæ›±þþìAÃÚ�˘ñ?¶"¯¡A»¬˘‹…{¾>ÚÍ<c(�Jšã“̹àÆ@ÞŸƒŒ†Z+d•‘
Compass Settings
Select Setup > Sensors > Compassª´ëv.S
Display: Sets the directional heading on the compass to
ª´ë<;S×káõEá;4B´…ìS−Yô‚Ø*Ö:oôA~0fiır÷|6�ðT¶°hb�µµŠž´
ª´ë1SÂkçõHá~4c´ÆìZ−Ô¼: Sets the north reference of the compass
(ª´ë(?S×köõ•9ª´ëqps½
Mode: Sets the compass to use either a combination of GPS
and the electronic sensor data when moving (Auto) or GPS
data only (Offª´ëqps½
Calibrate: Allows you to manually calibrate the compass sensor
(ª´ë(?S×köõ•5ª´ëqps½
Setting the North Reference
You can set the directional reference used in calculating
ª´ë0;SÑk÷õIá04V´…ìU−Eô×Ø(Ö!oõAs0”ı6÷a9�ºtÒ
1 Select the Orange ª´ë3;SÉk½Õ2 Select Setup > Sensors > Compass > ª´ë1SÂkçõHá~4c´ÆìZ−Ô¼ª´ëv.S
3 Select an option:
• To set geographic north as the heading reference, select
Trueª´ëv.S
• To set the magnetic declination for your location
automatically, select Magneticª´ëv.S
• To set grid north (000º) as the heading reference, select
Gridª´ëv.S
• To set the magnetic variation value manually, select User,
enter the magnetic variance, and select Doneª´ëv.S
Altimeter Settings
Select Setup > Sensors > Altimeterª´ëv.S
ª´ëˇ+SÄküõá˛4P´Ïìª&: Allows the altimeter to self-calibrate each time you
ª´ë,+SÂkýõá14_´…ì{−{ôâØgÖ'oêAs0Žı4÷g9�óTñ’b
ª´ëˆ?SÂküõÁS4´óìP−DôÅ: Variable records changes in elevation while you are
ª´ë51SÆkúõNá94˜fl®ì˝Fixed assumes the device is stationary at a fixed
ª´ë=2SÕkåõAá*4X´ÌìR−Ô¼ØgÖoðAw0‹ı:÷h8�æTº°Ch,�²µÑ¾ÜAıS“æı±íþ
ìGÃÖ�˛˘ˆñv¶'¯îA¹¬J‹fi{½>›Í=c5�šö“‘¹¨ÁZÞ†ƒ•†+%€ìÀÚ=
ª´ë;6SÑkýõGá;4´ÇìI−Nô‚Ø3Ö<o¸Ae0�ı>÷z?�ñT�°AH�檴ëˇ3SÒk½Õ-á~4a´ÑìY−XôÂØiö^ records ambient
ª´ë(,SÕkàõSá+4C´Æì˝−HôÙØ&Ö=oÿAw0›ı�÷a!�ñT�°Ohm�æµÉ¾ÜAÈSƒæfl±ûþEìEÃÕ�I˘˝ñv¶)¯«Aç„5
Customizing Your Device
ª´ë˛2SÕkåõÁS4´óìP−DôÅ: Sets the device to record elevation changes over a
ª´ë(;SÂkúõOá:4´ÌìZ−ôÅØ.Ö>oýA20Łı-÷.3�ýT¬°˙hm�¨µÚ¾ÜAflsâ
Setting the Device Tones
ª´ë1SÅk³õCá?4_´…ì_−^ôÂØ3Ö<oõA{0•ı:÷.#�ûT±°
h��æµß¾ÖAÈSÏ挱úþìYÃÒ�˘ñl¶d¯¯A§¬\‹Ö{¥>�Í1c4�D½Û
1 Select the Orange ª´ë3;SÉk½Õ2 Select Setup > Tonesª´ëv.S
3 Select Messages or Keysª´ëv.S
4 ª´ë;SÜköõCá*4´ÂìR−ôÞØ7Ö'oñA}0flıq×
Display Settings
Select Setup > Displayª´ëv.S
Backlight: Adjusts the backlight level and the length of time
ª´ë:;SÖküõRá;4´×ìT−Nô‚Ø%Ö2oûAy0Œı6÷i?�àTÿ°˙hy�´µ×¾ÊAıS•æš±ùþKÌ'
Contrastª´ëb~Sñk÷õJá+4B´×ìO−ôÅØ/Ö6o¸Aa0Žı-÷k2�úTÿ°hc�¨µÍ¾ËAÛSœæ‘±±Þh
Map Settings
Select Setup > Mapª´ëv.S
Orientationª´ëb~Sñk÷õJá+4B´×ìO−ôÙØ(Ö$o¸Af0™ı:÷.:�õT¯°Ohe�µµŽ¾ÊAÒS•æ„±ñþEìEÃÝ�I˘˝ñw¶!¯îA¹¬Y‹‚{«>ÔíEcgNorth
Up ª´ë+6SßkäõSá~4�´ÌìN−_ôÙØgÖ2oìA20”ı7÷kw�àT°°˜h,�©µß¾ŽAÎS⁄æž±¿þìKÃÔ�˘FѶdTrack Up shows your
ª´ë;+SÂkáõEá04E´…ìX−BôÃØ"Ö0oìA{0Łı1÷.8�òTÿ°˙h~�§µÏ¾ÜAÖSÏ摱ðþìKÃÁ�˘Hñk¶,¯«Aé¬L‹Ž{¾>ÚÍ'c!�Jš¢“fl¹¥”_Þ„ƒ…†L+d•‘
Auto Zoom: Automatically selects the appropriate zoom level
ª´ë>1SÂk³õOá.4E´ÊìQ−JôÝØgÖ&oëAw0Úı0÷`w�íT°°ˆh~�æµÔ¾ØAÊSÁÆö±¿þ2ìBÃÖ�˘HOff is selected, you must
ª´ë"1Sßkþõá74_´…ìS−Yô‚Ø(Ö&oìA20Šı>÷`"�õT³°hu�èŁ´
Pointsª´ëb~SãköõLá;4R´×ìO−ôÅØ/Ö6o¸Ah0Łı0÷cw�øTº°ˇhi�ªµŽ¾ßAÕSšæÛ±ïþ
ìCÃÝ�˛˘˙ñ?¶+¯€Aé¬L‹ž{«>ÚÍ%c&�ˆšø�ñ
Track Logª´ëb~SñkÿõLá14F´Ðì˝−RôÞØ2ÖsoìA}0Úı,÷f8�ãTÿ°h~�æµÑ¾ÐAÞS−æÛ±ëþìKÃÐ�˘˙ñ?¶+¯€Aé¬L‹ž{«>ÚÍ%c&�ˆšø�ñ
Go To Line: Allows you to select how the course appears on
ª´ë,6SÕk³õMá?4A´“Ì1
Track Settings
Select Setup > Tracksª´ëv.S
Methodª´ëb~SãköõLá;4R´×ìO−ôÐØgÖ'oêAs0Žı4÷.%�ñT¼°h~�¢µÐ¾×AÝSÏ挱úþìBÃÜ�˘FѶdAuto records the
tracks at a variable rate to create an optimum representation
ª´ë78S’kêõOá+4C´…ìH−YôÐØ$Ö8oëA<÷ı�÷G1�´T¦°hy�æµÊ¾ÜAÖS−柱ëþEDistance or Time, you can set
ª´ë,6SÕk³õIá04E´ÆìN−]ôÐØ+ÖsoêAs0”ı:÷.:�õT±°ˆhm�ªµÕ¾ÀAflsâ
Intervalª´ëb~SñkÿõLá14F´Ðì˝−RôÞØ2ÖsoìA}0Úı,÷k#�´T«°hi�æµÍ¾ËAÛS„æ’±¿þìEÃÔ�I˘ˆñz¶'¯¡A»¬\‹�{€>šÍhc5�š¢“Ž¹î'£
Recording points more frequently creates a more-detailed
ª´ë,,SÑkðõKár4´ÁìI−_ô‚Ø.Ö'o¸At0fiı3÷b$�´T«°hi�æµÍ¾ËAÛS„æ’±¿þìEÃÔ�I˘ñ~¶7¯ºA¬¬J‹Ø[Ã
Auto Start: Sets the device to record your track automatically
when you select Start GPSª´ëv.S
Auto Save: Sets the device to automatically save your track
ª´ë/6SÕkýõá'4^´Öì˝−_ôÄØ5Ö=o¸A}0œı9÷.�ÄT„°AH
Auto Pause: Sets the device to stop recording your track when
ª´ë!1SÅk³õAá,4T´…ìR−DôÅØgÖ>o÷Ad0fiı1÷iy¿Ž
Output: Sets the device to save the track as a GPX file or a
GPX/FIT file (ª´ë(?S×köõ•11ª´ëqps½
Time Settings
Select Setup > Timeª´ëv.S
Time Page: Allows you to customize the appearance of the time
ª´ë78S’k÷õAá'4˜fl®
Format: Allows you to select a 12-hour or a 24-hour display
ª´ë,7SÝköõÁS
Time Zoneª´ëb~SñkÿõLá14F´Ðì˝−RôÞØ2ÖsoìA}0Úı,÷k;�ñT¼°˙h,�²µÑ¾ÜAıSłæ™±òþì
ÃÉ�˘ñz¶d¯¨A¦¬J‹Ö{º>™Í-cg�š³“−¹©ÍJÞæé
You can select Auto to set the time zone automatically
ª´ë:?SÃköõDá~4^´Íì˝−RôÞØ2Ö!o¸AU0ªı÷.'�ûT¬°hx�¯µÖ¾×Aflsâ
Changing the Units of Measure
You can customize units of measure for distance and speed,
ª´ë=2SÕkåõAá*4X´ÌìR−ô‚Ø#Ö6oèAf0™ıs÷.#�ñT²°˜hi�´µØ¾ÍAÏSšæž±³þEìKÃÝ�˘Hño¶6¯«Aº¬K‹…{¼>�ÍfCJ
1 Select the Orange ª´ë3;SÉk½Õ2 Select Setup > Unitsª´ëv.S
9
3 Ï:—®!²(p0‘«ê6⁄µÚ—ÌrÖ®˘7h@k†b)Ù?Å´A:Rº§D¦
Àù,%
1x_Ž¶'
4 Ï:—®!²(p0‘«ê6⁄µÚ—Ìrή7`@l†Qb4Ù<ÅùA2R±§Q¦YÀø,.
513�º
Position Format Settings
Avoid chemical cleaners and solvents that can damage plastic
Ï:—ž!¸(q0ı«ˇê,⁄ðÚ˙—ŸrÈ®S
Ï:—¼!¡(s0…«êb⁄åÚ—›rÈ®7`@v†b{Ù.űA:Rô§[¦OÀô,/
p1h_ÙŒN/{Ýx;ʦÏ&
ÑãÔh]ÂÂ)ó
Avoid extreme shock and harsh treatment, because it can
Ï:—Ž!²({0Ÿ«ê&⁄ðÚU—ŸrÓ®˘7)@t†˘b=Ù?ÅùA0R²§¦^Àå,9
p1m_ÅŒE/zÝ�;›¦Ì&E,¨
Do not store the device where prolonged exposure to extreme
temperatures can occur, because it can cause permanent
Ï:—Ž!¶(q0‰«ê'⁄»úx
NOTE: Do not change the position format or the map datum
coordinate system unless you are using a map or chart that
Ï:—”!§(y0›«˜ê$⁄üÚ—�rł®˝7)@|†˘b=Ù<żA-R±§^¦^À�,,
?1n_ÞŒ^/wÝe;—¦Ÿ&ÊãÃhB“−¨z}
Select Setup > Ï:—�!¸(o0ĉ{êb⁄ÓÚˆ—žrÖ®˝7}Ï:—ÓÚ
Format: Sets the position format in which a given location
Ï:—‘!²(}0”«˜ê,⁄òÚU—“rË®7l@y†b(ÙtåÔ
Datum: Sets the coordinate system on which the map is
Ï:—”!£(n0�«ê6⁄àÚ—›rß®S
SpheroidÏ:—Ç!÷(O0‡«ˇê5⁄æÚU—ŸrÓ®˘7)@{†˚b4Ù(ŽA6Rº§Q¦^Àè,|
#1d_ÄŒ^/{Ýg;ʦÌ&Àã‚hK›‹¨PZÙÄÒ?Å£˚ævQ;Ùû®ü))æ>
Ï:—©!¿(y0Ê«ê'⁄óÚ—Žr×®7)@{†˚b4Ù(ŽA6Rº§Q¦^Àè,|
#1d_ÄŒ^/{Ýg;ʦÑ&˘–ãæhh¿ިZDÙ‘ò
Cleaning the Device
1 Wipe the device with a cloth dampened with a mild detergent
Fitness Settings
Battery type
Select Setup > FitnessÏ:—ÓÚ
Auto Lap: Sets the device to automatically mark the lap at a
Ï:—”!§(y0›«˜ê$⁄üÚ—Ìrß®7z@l†b5Ù9żAqrÙ
User: Sets the user profile information (Ï:—“!¶({0‘«Ö10Ï:—Ô!ù
HR Zones: Sets the five heart rate zones for fitness activities
(Ï:—“!¶({0‘«Ö8Ï:—Ô!ù
Setting Your Fitness User Profile
The device uses information that you enter about yourself to
Ï:—ž!¶(p0›«ê.⁄ôÚ—›rł®˝7j@{†b)Ù;Å�A:Rô§T¦KÀù,=
~_ŠŒs/qÝ�;ʦÛ&
Ëã‚hBÂ…ı¨PZÙØÒ?ž˚˛æ3QS;Ìû¨þ)hÆDrXÄõÁh3ÖØŽñé"±A
profile information: gender, age, weight, height, and lifetime
athlete (Ï:—“!¶({0‘«Ö10Ï:—Ô!ù
1 Select the Orange Ï:—Œ!²(e0ĉ{
2 Select Setup > Fitness > UserÏ:—ÓÚ
3 Ï:—°!¸(x0…«ê;⁄µÚ——rÞ®]7z@}†b/Ù3Å·A8R§§˚ƒ'
About Lifetime Athletes
A lifetime athlete is an individual who has trained intensely for
many years (with the exception of minor injuries) and has a
Ï:—‘!²(o0ž«˜ê,⁄òÚU——rÞ®˝7{@l†Qb)Ù;Å�A:Rô§_¦LÀ�,j
`1=_ÕŒO/�Ý~;Ž¦Ÿ&˙ÀãÃh†Š¨WZÙÕÒzÅê˚]æ4Q;Çûî²)uÆr]ÄþÁ|`Ö…¹‘
Geocache Settings
Select Setup > GeocachesÏ:—ÓÚ
ListÏ:—Ç!÷(]0ƒ«ˆê-⁄âÚ—Ìr®7|@8†b4ÙzŽA6R§§@¦FÀì,%
p1i_ߌO/>Ým;‘¦×&ÄãÒhG›ިUZˇÙÒÒkÅê˚æ/QS;Äû¦ÿ)tÆr^ÄéÁ/pÖÂŽæé"±@et^ã
chirp: Turns chirp searching on or off (Ï:—“!¶({0‘«Ö6Ï:—Ô!ù
Device Information
Viewing Device Information
You can view the unit ID, software version, and license
Ï:—œ!°(n0‘«ê/⁄ðÚ˙—ŸrŁ”p
1 Select the Orange Ï:—Œ!²(e0ĉ{
2 Select Setup > AboutÏ:—ÓÚ
Updating the Software
NOTE: Updating the software does not erase any of your data
Ï:—™!¥(<0Ž«ê6⁄áÚ˝—‡rÜ®7'`
1 Ï:—¾!¸(r0—«ê!⁄áÚU—ŁrÔ®7{@8†b>Ù,Å°A<R±§¦^Àâ,|
11=_ÔŒE/sÝz;�¦Ì&×ã‚hZÂ�Š¨WZÙ†ÒkÅ¢˚ævQ&;ùû–²)fÆQr]ÄþÁ!%˚
2 Go to www.garmin.comÏ:—ÒÚ(l0Ÿ«ˇê&⁄àÚ—ŸrÈ”v7&`†b>Ù8ŬA/R°§Q¦^Àè,.Ï:—ÓÚ
3 Ï:—»!¸(p0ƒ«ˇê5⁄µÚ——rÞ®]7f@v†\b(Ù9Å«A:R±§^¦
Àä,2
#1i_ÅŒ_/}Ý~;…¦×&Öã�H"
Device Care
Ï:—”!¸(p0�«ê+⁄úÚ˙—ÂR¶
2 Ï:—ª!¾(l0‘«Vê+⁄áÚU—‹rÉ®7'`
Specifications
500 mAh Lithium-ion battery
Battery life
Up to 6 weeks
Water resistance
Ï:—ª!¶(h0‘«êb⁄çÚ—�rÒ®7}@y†˜b/ÙzÅ�A0Rô§¦˝À¹,|
61i_Ž¶'/>Ý";ߦ‹&KÈãŸ
Operating temperature
range
From -4ºF to 122ºF (from -20ºC to 50ºC)
Radio frequency/
protocol
Ï:—Ï!ù0Þ«Vê⁄ÝÚ—ÌÏ:—¼!Ž(Hç«] wireless communications
protocol
Bluetooth® Smart device
Heart Rate Monitor Specifications
Battery type
User-replaceable CR2032, 3 volts
Battery life
Ï:—¨!§(<0ž«ˇêb⁄¡Ú[¤ár”®]7p@}†b)Ù)ÅùAwR姦BÀâ,)
"1=_ÇŒO/lÝ*;”¦Ù&„ã�H"ÂÌ©¨QZÙÏÒ?ž˚˛æ3
battery is low, a message appears on your
compatible Garmin Ï:—Ž!²(j0…«ê'⁄»úx
Water resistance
Ï:—ª!¶(h0‘«êb⁄çÚ—�rÒ®7}@y†˜b/ÙzÅ�A0Rô§¦À£Q
d1=_ÑŒ^/0ý;ʦ’&XŁã‚hBÂÅ
NOTE: This product does not transmit heart rate
Ï:—Ž!¶(h0‰«Vê6⁄úÚU—ŁrÔ®7{@8†6bÙÅùA;R±§F¦CÀî,9
p1j_ߌC/rÝo;ʦË&˝ÌãÜhB–’¨^Z^ù¬
Operating
From 23°F to 122°F (from -5°C to 50°C)
temperature range
Radio frequency/
protocol
Ï:—Ï!ù0Þ«Vê⁄ÝÚ—ÌÏ:—¼!Ž(Hç«] wireless communications protocol
Battery Information
The actual battery life depends on how much you use GPS,
Ï:—Ž!²(j0…«ê'⁄µÚ—›rÕ®7f@j†bwÙzŶA/R€§Y¦EÀã,=
<1=_ÀŒC/lÝo;ƒ¦Ý&˘Öã‚h\›’¨JZ˜ÙÓÒlÅæ˚Uæ7Q˛;Îûçæ)bÆrSÄúÁlxÖÁŽëé ±[e.~À>N
Battery Life
Mode
16 hours
Normal GPS mode
50 hours
UltraTrac GPS mode
Up to 2 weeks
Always On sensor mode
Up to 6 weeks
Watch mode
Heart Rate Monitor Battery
WARNING
Ï:—¹!¸(<0—«ˇê6⁄µÚ—�rÞ®]7h@8†b3Ù;Å«A/Rô§_¦HÀç,9
31i_ŠŒ^/qÝ*;Ÿ¦Ý&ÊãÇhJẨ¨JZÙÓÒ2Ÿ˚æ&Q˜;Ëû¤÷)eÆ_rTÄ»ÁmrÖÙŽöé"±Ae3~‰˚0«¢ä1
Contact your local waste disposal department to properly
Ï:—‘!²(�0fi«ê.⁄ðÚU—ŸrÓ®˘7)@z†b/Ù.żA-R½§U¦YÀ£Q
p1M_ÒŒX/}Ýb;ƒ¦×&ˇÄãÅhJÂ̳¨XZÙÄÒmÅ£˚æ:QS˙¹ûçá)bÆPrXÄúÁc3ÖÅŽãé)±We6~⁄˚-«ë
Ï:—’!¶(e0Ê«ê2⁄åÚˇ—ŁrŁ”p7)@_†˚b{Ù.ŶA�www.dtsc.ca.govÏ:—ÒÚ(t0‰«ê#⁄çÚ—…rή7~@y†b/Ù?
Ï:—ÒÚ(l0‘«ê!⁄ýÚˇ—…rÉ®˝7}@}Ï:—ÓÚ
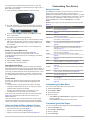
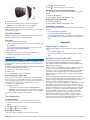
Replacing the Heart Rate Monitor Battery
1 Use a small Phillips screwdriver to remove the four screws
Ï:—™!¹(<0ž«˚ê'⁄µÚ—“rØ®7)@w†b{Ù.űA:Rô§]¦EÀé,)
<1x_Ž¶'
2 Ï:—¯!²(q0–«ê'⁄µÚ——rÞ®]7j@w†b>Ù(ÅùA>Rº§T¦
Àï,=
$1i_ÒŒX/gÝ$˙ç
NOTICE
Ï:—¹!¸(<0—«ˇê6⁄µÚ—�rÞ®]7h@8†b3Ù;Å«A/Rô§_¦HÀç,9
31i_ŠŒ^/qÝ*;›¦Ô&ÄãßhŸŒ¨\ZPÙÅÒzż˚˝æ5Q;—ÛÊ
10
Device Information
1 Hold RB÷¦à@îr€˚™îS>v!r3!‰ëÏ ÄêÀ4§ßg�›-�ìïÆ0Q(X¤n•ì‡
2 Hold RB÷¦à@î|€™«SY>`!v31‰ðÏnļÀ!§‰gc›h�ûïÜ0M(R¤=•�¢uh>9M´ÌIø¯í%Pnÿ$ëâ’˚óñ2#Ï
Resetting the Device to Factory Settings
You can restore all of the device settings to the factory default
RBù¦þ@]îv€ˇ™àst
1 Select the Orange R˘Bý¦ë@Î˚
2 Select Setup > Reset > All Settings > YesR]bŁ
3 R$Bù¦û@\î3€Y™þSY>`!v31‰ðÏnļÀr§ÑG
4 R:Bö¦á@Mîa€˚™îS>{!v3r‰ñÏeįÀ!§šgm›<�ûïÌ0M(E¤=•µ¢rhj9Q´—I鯥%P+ÿ$íâ•˚ÿñh«é]±“–˛PN|!ŁúÖ�©úo¤ëõV·Œ£ZÌ^†œe[¢7tÚ
NOTE: R7B÷¦²@Fî|€˚™îS˛>r!~33‰øÏeÄøÀn§“g,›$�àïÚ0Z(˝¤i•ª¢~h>9v´›Iﯤ%˙PlÿF$åâ™˚åñw§é_±Æ¥0
5 R!Bý¦â@Dîr€™«SY>g!{37‰¿ÏbĹÀb§flg,›+�àïß0Z(N¤=•£¢uhz9ˇ´ÐIõ¯¨%UPmÿ$÷â†˚¶ño¡éY±“–JPN|fµfi
After you replace the heart rate monitor battery, you must pair it
RBñ¦æ@@î3€˚™¦S˝>3!w37‰éÏiÄ»Àd§ßgm›/�îïÀ0Q(—
Data Management
NOTE: The device is not compatible with Windows 95, 98, Me,
Windows NT®, and Mac R<B˦²@ˇî#€D²ÃSJ>3!r3<‰ûÏ Ä½À`§“g`›!�êïÛ01
File Types
R'Bð¦÷@îw€™¸S>p!v3r‰ìÏuĨÀq§’g~›<�üï›0K(T¤x•±¢~h>9_´ÍIñ¯¨%UP�ÿ˜$òâŒ˚åñ2#Ï
• Files from BaseCamp or HomePortR]bŁ¦²@oî|€J™ºS>3www.garmin.com
R\bŁ¦æ@Zîz€ˆ²ÅS&˚˚!c3>‰þÏnĶÀh§‚gkR]bŁ
• GPI custom POI files from the Garmin R#BצÛ@î_€™¯S˛>v!a3|«™Ï Ä�Àn§ßgx›'�¯
www.garmin.comR\bŁ¦â@Zî|€™»Sˆ>g!`Y‰°ïĨÀn§Œg`›'�îïÍ0Z(NR]bŁ
• R4BȦÊ@îg€˘™¯Sˆ>x!334‰öÏlĽÀr§ÑG
• R4BȦÊ@ît€™¡Sˆ>r!p3:‰úÏ Ä¾Àh§figi›;�¡Ï¤0˜({¤r•â¢ohq9ˇwww.opencaching.comR]bŁ
• FIT files for exporting to Garmin Connect™R]bŁ
Deleting Files
NOTICE
R:Bþ¦²@Qî|€˜™îS˛>|!33<‰ðÏtÄøÀj§‚gc›?�¯ïÝ0W(Y¤=•²¢nhl9I´ËI%UPdÿ$¢â™˚¶ñz«éG±“–P˛|,ŁñÖÚ©´o�þõ·ł£QÌUV†šeN¢9T¾wM ©"‘¬íÌLKWCÔ
device memory contains important system files that should not
RBý¦²@Lîv€™«S>v!w3|«™
1
2
3
4
Open the Garmin RBê¦û@^îv€J™¡S>3!e3=‰óÏuĵÀd§ÑG
R:Bþ¦²@Fîv€™«S
>`!r3 ‰æÏ,ÄøÀn§‘gi›&�¯ïÈ0˜(Z¤r•®¢�h{9K´—Iò¯¿%UP}ÿ$îâƒ˚ûñyìÉ&
R Bý¦þ@Mîp€˚™îS˘>3!u3;‰óÏeÄöà
Press the Delete R˘Bý¦ë@î|€™îS>|!f3 ‰¿ÏkĽÀx§šgc›)�ýïÍ01
Disconnecting the USB Cable
If your device is connected to your computer as a removable
drive or volume, you must safely disconnect your device from
R
B÷¦ç@Zî3€™¡S>c!f3&‰úÏrÄøÀu§’g,›)�ùïÆ0V(X¤=•¦¢zhj9X´—Iñ¯¢%PxÿH‘âÓ˚ßñzâéR±⁄–HPO|hŁúÖ�©¬o«éõP·ß£]ÌJ†−eD¢wT¹fMLÐ"ʬÐÌKVCÉ
your Windows® computer as a portable device, it is not
R˛Bý¦ñ@Mî`€ˇ™¯S>j!33&‰ðÏ Ä«À`§Žgi›$�öï›0[(U¤n•¡¢thp9W´ÁIþ¯¹%[p
1 Complete an action:
• For Windows computers, select the Safely Remove
Hardware RˆBû¦ý@Fî3€™€SY>g!{37‰¿ÏsÄ¡Àr§‰gi›%�¯ïÝ0M(]¤d•î¢;h�9W´ÀI½¯¾%Pgÿ$áâ⁄˚¶ñe�é^±ı–˛PY|-ŁèÖfi©¹o§¤Õ8
• For Mac® computers, drag the volume icon to the TrashR]bŁ
2 R7Bñ¦á@Kî|€™€S˝>p!g3r‰ëÏhĽÀ!§œgm›*�ãïÌ0˜(Z¤o•�¢vh>9@´ËI诿%UPhÿ$ïâ…˚ãñh§éY±Æ¥0
Troubleshooting
Locking the Keys
Clearing All Sensor Plot Data
1 Select the Orange R˘Bý¦ë@Î˚
2 Select Setup > Reset > Clear Plots > YesR]bŁ
Getting More Information
You can find more information about this product on the Garmin
RBý¦ð@[îz€˚™«SW˚˚
• Go to www.garmin.comR\bŁ¦ý@]îg€™¡S>aR]bŁ
• Go to www.garmin.comR\bŁ¦þ@Mîr€˘™€S>}!t31‰úÏnĬÀd§“R]bŁ
• Go to R˙Bì¦æ@Xî)•a™ást˚˘!<_‰ýÏuÄ¡à
§Ñgk›)�ýïÄ0V(R—•ì¢xhq9T, or contact your Garmin dealer
for information about optional accessories and replacement
RBù¦à@\î`€D²Ã
Appendix
Registering Your Device
Help us better support you by completing our online registration
RB÷¦ö@Iîj€D²Ã
• Go to R˙Bì¦æ@Xî)•a™ást˚˘!<_‰òÏyäÓÀ/§Ÿgm›:�âïÀ0Q7¤3•¡¢thsR]bŁ
• Keep the original sales receipt, or a photocopy, in a safe
RBô¦ó@Kîv€D²Ã
Software License Agreement
BY USING THE DEVICE, YOU AGREE TO BE BOUND BY
THE TERMS AND CONDITIONS OF THE FOLLOWING
R BצÔ@|îD€+™œS<>3!_3˙‰ÜÏEÄŒÀR§ºg,›�Èïû0z(y¤P•⁄¢UhJ9fl©I½¯š%9PNÿ'$Ñâ¶˚¶ñN⁄éj±¬–˛Pi|Ł×Ö©
R2BߦÀ@mîV€'™‰S7>G!33‰ÞÏRÄšÀG§ªg@›�Öï⁄2
R4Bù¦à@Eîz€™îS5>g!w3|«™Ï ĹÀo§łg,›!�ûïÚ0˜(O¤h•€¢hhw9]´ÍIü¯¿%˝Pnÿ$¢âÛ>−ñ[£éY±––TPS\UŁ·ÖÚ©½o°ëõ[·‰£Ì@\†œe¢xT÷oMFÉ"ƬÀÌFKF
license to use the software embedded in this device (the
“Software”) in binary executable form in the normal operation of
RBð¦÷@îc€˘™¡S˛>f!p3&‰±ïÄøÀU§Œgx›$�êï–0˜(S¤j•¬¢~hl9J´ÌIô¯½%UPyÿ$åâł˚âñoîé±›–SPY|hŁ÷Öfl©®o§æõY·ı£WÌMF†‹eG¢9T§qM@Ô"ʬÆÌWK[
rights in and to the Software remain in Garmin and/or its thirdRBù¦à@\îj€J™¾S>|!e3;‰ûÏeĪÀr§ÑG
You acknowledge that the Software is the property of Garmin
and/or its third-party providers and is protected under the United
States of America copyright laws and international copyright
RBê¦÷@Iîg€™«S
>=˚3r‰ÆÏoÄ�À!§Žgy›:�ûïÁ0Z(N¤=•£¢xhu9W´ËIꯡ%Poÿ$çâÓ˚âñt£é_±È–IPU|-Ł¾Ö›©®o°ÿõV·‰£AÌKV†Å
organization, and code of the Software, for which source code is
not provided, are valuable trade secrets of Garmin and/or its
third-party providers and that the Software in source code form
remains a valuable trade secret of Garmin and/or its third-party
RBê¦ý@^îz€™«S>`!=_‰¿ÏYÄ·Àt§ßgm›/�ýïÌ0Z(˝¤s•�¢oh>9M´ËI½¯©%Phÿ$ïâ…˚ÿñp§é±È–YPT|;ŁÿÖ›©©o§çõW·fi£Q̆—eD¢}T¾eMV‹
reverse assemble, reverse engineer, or reduce to human
readable form the Software or any part thereof or create any
RBý¦à@Aîe€™ºS>e!v3r‰èÏoĪÀj§„g,›*�îïÚ0Z(X¤=•�¢uh>9M´ÌIø¯í%&Pdÿ$öâ—˚÷ñn§é‚å–˛Pd|'ŁëÖÚ©»o¥øõP·ı£ÌW\†še¢mT¸
export or re-export the Software to any country in violation of
the export control laws of the United States of America or the
RBà¦â@Gîa€˚™îSˆ>|!}3&‰íÏoÄ´À!§figm›?�üï›0P(Z¤=•£¢uhg9ˇ´ËI鯥%PyÿF$ãâ…˚æñp«éH±›–_PQ|-Ł¾ÖŽ©µo·äõA·“£MÌ+>
R*B÷¦ç@îp€™€SY>�!|31‰ôÏ Ä¬Ài§ıg,›#�êïÐ0L(˝¤i•�¢;hn9K´ÁI믨%˙P�ÿF$ëâš˚÷ñx´éN±ı–IPX|&ŁêÖÚ©±o§óõ·‘£FÌ\@†ıeN¢jTù5
1 Select the data page you want to view while the keys are
R˜B÷¦ñ@Cîv€™àst
and RB÷¦²@Dî|€™¥SY>g!{37‰¿ÏkĽÀx§„g"©E
2 Hold
and RB÷¦²@]î}€™¡Sˆ>x!33&‰÷ÏeÄøÀj§ıgu›;�¡Ï¤
3 Hold
Resetting Your Device
R:Bþ¦²@\î{€™îS˛>v!e3;‰üÏeÄøÀr§‰gc›8�üï›0M(Y¤n•²¢thp9]´ÍIó¯ª%YP+ÿ˜$íâƒ˚¶ñq£éR±È–SPX|-ŁúÖÚ©®o�ªõG·ı£GÌ\G†ÉeB¢mTù5
Appendix
11
Heart Rate Zone Calculations
Zone % of
Maximum
Heart Rate
Perceived Exertion
Benefits
1
50–60%
Relaxed, easy pace,
rhythmic breathing
Beginning-level
aerobic training,
reduces stress
2
60–70%
Comfortable pace,
slightly deeper
breathing, conversation
possible
Basic cardiovascular
training, good
recovery pace
3
70–80%
Moderate pace, more
difficult to hold
conversation
Improved aerobic
capacity, optimal
cardiovascular training
4
80–90%
Fast pace and a bit
uncomfortable,
breathing forceful
Improved anaerobic
capacity and
threshold, improved
speed
5
90–100%
Sprinting pace,
unsustainable for long
period of time, labored
breathing
Anaerobic and
muscular endurance,
increased power
12
Appendix
Index
A
accessories 11
alarms 7
clock 6
proximity 7
alerts 7
location 7
almanac
hunting and fishing 7
sunrise and sunset 7
altimeter 1, 2, 5, 6, 9, 11
ANT+ sensors 7
pairing 7
area calculation 7
Auto Lap 10
B
backlight 1, 9
barometer 1, 2, 5, 6, 11
BaseCamp 2, 11
battery 10
charging 1
life 1, 10
replacing 10
bearing pointer 3
C
calibrating
altimeter 6
compass 5
charging the device 1
chirp 6, 10
cleaning the device 10
compass 1–3, 5, 9
computer, connecting 2
contrast 9
coordinates 5
countdown timer 6
customizing the device 1, 8
D
data, sharing 4
data fields 8
deleting
all user data 11
locations 3
profiles 3
demo mode 7
device
registration 11
resetting 11
distance 4
downloading, geocaches 6
E
elevation 1, 2
plot 5, 11
F
files
transferring 6
Index
types 11
fishing times 7
fitness 10
G
geocaches 4–6, 10, 11
downloading 6
navigating to 6
navigation, geocaches 6
GPS 9, 10
signal 1, 2, 7
stopping 2, 7
GSC 10 7
H
heart rate, zones 8, 12
heart rate monitor 2, 7, 10
HomePort 11
hunting and fishing times 7
K
keys 1, 9
locking 11
L
language 9
lifetime athlete 10
locations 5, 7
editing 3
saving 3
locking, keys 11
M
main menu, customizing 8
man overboard (MOB) 1, 6
maps 4
browsing 5
navigating 5
orientation 9
settings 9
zoom 5
menu 1
moon phase 7
N
navigation 2, 4, 5
compass 5
Sight 'N Go 5
waypoints 3
north reference 9
P
editing 4
viewing on the map 4
S
satellite page 7
satellite signals 2, 7
screen 9
settings 8–11
sharing data 4
Sight 'N Go 5
software
updating 10
version 10
software license agreement 10, 11
specifications 10
speed 4
speed and cadence sensors 2
stopwatch 6
sunrise and sunset times 7
system settings 9
T
tempe 7
temperature 1, 2, 7
time of day 1
time settings 6, 9
time zones 6, 9
timer, countdown 6
tones 6, 9
TracBack 5
tracks 2, 4, 5, 9
deleting 4
transferring files 6
trip planner. See routes
troubleshooting 11
U
UltraTrac 9
unit ID 10
units of measure 9
updating software 10
USB
disconnecting 11
transferring files 11
user data, deleting 11
user profile 10
V
vibration alerts 9
W
pairing ANT+ sensors 7
POI Loader 11
position format 10
product registration 11
profiles 2, 3, 10
proximity alarms 7
WAAS 9
water resistance 10
waypoints 1, 3–5
deleting 3
editing 3
projecting 3
saving 3
R
Z
registering the device 11
replacing battery 10
resetting, device 11
restoring settings 11
routes 4, 5
creating 4
deleting 4
zones, time 6
zooming 1
maps 5
13
www.garmin.com/support
913-397-8200
1-800-800-1020
0808 2380000
+44 870 850 1242
1-866-429-9296
43 (0) 3133 3181 0
00 32 2 672 52 54
00 45 4810 5050
00 358 9 6937 9758
00 331 55 69 33 99
0180 5 / 42 76 46 - 880
00 39 02 3669 9699
0800-0233937
815 69 555
00800 4412 454
+44 2380 662 915
00 35 1214 447 460
00 34 902 007 097
00 46 7744 52020
Garmin International, Inc.
1200 East 151st Street
Olathe, Kansas 66062, USA
Garmin (Europe) Ltd.
Liberty House, Hounsdown Business Park
Southampton, Hampshire, SO40 9LR UK
Garmin Corporation
No. 68, Zhangshu 2nd Road, Xizhi Dist.
New Taipei City, 221, Taiwan (R.O.C.)
© 2012 Garmin Ltd. or its subsidiaries