1
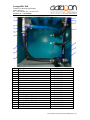
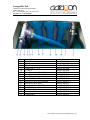
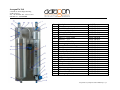
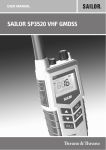
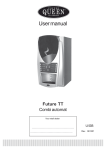
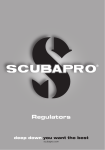
Aaragon Pte Ltd
5 Tank Road, #02-03 Nagarathar Bldg.
238061 Singapore
Tel.: +65 91128044; Fax.: +65 6737 9927
GST REG. No. 73032040000E
IMPORTANT
● Please use only High Pressure Compressors which are
suitable for Nitrox!!!!
● Do not compress Nitrox above 40% as this can cause
serious damages to your High Pressure Compressor
● The Venting Gas (Nitrogen) from the Needle Valve
must be vented to the outside if the Nitrox system is
installed inside a room!! Suffocation can occur if
nitrogen is allowed to collect in an enclosed space!!
● Aaragon Pte Ltd, Shall not be liable for any special,
incidental or consequential damages for loss, damage or
expense directly or indirectly arising from customers
use or inability to use the equipment, or for personal
injury or loss or destruction of any other property.
Aaragon Nitrox System Operation/User Manual Page 1 of 9
Aaragon Pte Ltd
5 Tank Road, #02-03 Nagarathar Bldg.
238061 Singapore
Tel.: +65 91128044; Fax.: +65 6737 9927
GST REG. No. 73032040000E
Aaragon Nitrox System – Operation/User Manual
Step 1.
Prior to starting your Nitrox System, make sure that everything is
properly affixed, especially the electrical power connection and all the
hosepipes.
Step 2.
Turn ON the main electrical switch.
Step 3.
When the main electrical switch is turned ON, the Control Display Panel
on your Screw Compressor should show “0.0 Bar Fault: Power Fail”.
Step 4.
On the Screw Compressor Control Display you will see Quit button with
red light next to it. Press on the Quit button. Screw Compressor Control
Display will change from “0.0 Bar Fault: Power Fail” to “0.0 Bar
Ready to Start”.
Step 5.
Now, go to your Refrigeration Dryer switch and make sure it is turned
ON, you should see the switch lighted up in green (Important: Your
Refrigeration Dryer should be let ON at all time as it will auto on/off
when the system is running).
Step 6.
Once all the above is in order, go to your Nitrox Panel and study the
Oxygen Monitor and follow through with the following steps:
1.
Turn ON the Oxygen Monitor by pressing on the on/off button.
2.
Unplug (remove) the Oxygen Sensor from its blue connection socket
by pulling it out and shaking the Oxygen Sensor slowly with your
hand in a up and down motion until the reading on the Oxygen
Monitor stops fluctuating (Important: Do not blow into the Oxygen
Sensor).
Aaragon Nitrox System Operation/User Manual Page 2 of 9
Aaragon Pte Ltd
5 Tank Road, #02-03 Nagarathar Bldg.
238061 Singapore
Tel.: +65 91128044; Fax.: +65 6737 9927
GST REG. No. 73032040000E
3.
Still on the Oxygen Monitor, once the reading stabilizes, press the
cal button for 3 seconds, Oxygen Monitor will displays “CAL” and
then change to “20.9” with ± 0.2.
4.
Connect the Oxygen Sensor back into its blue socket.
5.
Still on your Nitox Panel, take note of your Needle Valve on top of
the Membrane, make sure that the Needle Valve is complete closed,
(anti-clockwise to open and clockwise to close).
6.
Step 7.
You Nitrox Panel is now ready to use!
Once the above is in order, return to your Screw Compressor Control
Display and press the ON button. You need to wait for the Screw
Compressor to pressurize the system, this can be monitored on the Screw
Compressor Control Display which should show > 8.0 Bar. (If this is
not achieved, you need to return to your Nitrox Panel and make sure that
the Needle Valve is completely closed)
Step 8.
When > 8.0 Bar is achieved, you need to return to your Nitrox Panel and
use the Pressure Regulating Valve to adjust the pressure to exactly
8 Bar. The Pressure Regulating Valve need to be unlocked first with a
quick pulling motion before it can be turned to adjust the pressure level.
(Anti-clockwise to reduce pressure and clockwise to increase pressure).
Please note this Step has to by carried out every 50 hours or 1 month
whichever comes first!
Step 9.
Once exactly 8 Bar is achieved, you can now adjust your required
oxygen level by turning the Needle Valve accordingly, anti-clockwise to
increase oxygen level and clockwise to decrease oxygen level.
(Important: Do NOT exceed 40% oxygen level as this can cause
damage to your High Pressure Compressor and is hazardous).
Aaragon Nitrox System Operation/User Manual Page 3 of 9
Aaragon Pte Ltd
5 Tank Road, #02-03 Nagarathar Bldg.
238061 Singapore
Tel.: +65 91128044; Fax.: +65 6737 9927
GST REG. No. 73032040000E
Step 10.
Once required oxygen level is reached, turn your High Pressure
Compressor ON.
(Important: You must continuously monitor the
oxygen level as it may fluctuate, and you should use your Needle Valve
to adjust oxygen level accordingly)
Step 11.
RECOMMENDED: If 40% oxygen level is required, you must adjust
oxygen level to 39% in Step 9 (above) before turning your High
Pressure Compressor ON as in Step 10 (above).
Once the High
Pressure Compressor is turned ON, adjust the oxygen level carefully to
40% using the Needle Valve. This will ensure that the oxygen level does
not exceed 40%.
(Important: You must continuously monitor the
oxygen level as it may fluctuate, and you should use your Needle Valve
to adjust oxygen level accordingly)
IMPORTANT: Properly trained personnel MUST be present at all times!
SYSTEM SHUT DOWN:
After filing Nitrox tanks, the system must be shut down. Follow steps below:
1. Turn OFF your High Pressure Compressor.
2. Turn OFF your Screw Compressor by pressing the OFF button on the
Screw Compressor Control Display. (The Screw Compressor will take
approximately 3 minutes to auto shut down.
The Screw Compressor
Control display will show 0.0 Bar and this means your system is now
depressurized. At this stage, should you need to restart your system,
return to Step 3 and follow through again. For a complete shut down
simply turn the main switch OFF.)
3. Turn OFF the main switch. Your system is now successfully shut down!
Aaragon Nitrox System Operation/User Manual Page 4 of 9
Aaragon Pte Ltd
5 Tank Road, #02-03 Nagarathar Bldg.
238061 Singapore
Tel.: +65 91128044; Fax.: +65 6737 9927
GST REG. No. 73032040000E
Aaragon Nitrox System – Maintenance
Readjusting Pressure Maintaining Valve (PMV) ( Please see also Page 6 Pos. 6 )
1. To readjust your PMV, loosen the Nut on the PMV T-Knob using a 17mm
spanner.
2. Remove the silencer from the PMV.
3. Start (turn ON) Screw Compressor.
4. Once the Screw Compressor is running, adjust the Needle Valve on the Nitrox
Panel (anti-clockwise to decrease pressure and clockwise to increase pressure)
until the Screw Compressor reaches 8.5 Bar.
5. (Important: At 8.5 Bar, the PMV should start to blow.) If the PMV blow at
<8.5 Bar, or if the PMV does not start to blow at 8.5 Bar, then adjustment to the
PMV T-Knob is required. The PMV T-Knob can be turned anti-clockwise to
decrease pressure and clockwise to increase pressure accordingly.
6. Once you have successfully set the PMV to start to blow at 8.5 Bar, make sure
the Nut on the PMV T-Knob is tighten again and run the whole test once more to
re-confirm.
7. Upon successful completion of the retest, reconnect the silencer to the PMV.
8. Only well trained personnel should attempt this task
Aaragon Nitrox System Operation/User Manual Page 5 of 9
Aaragon Pte Ltd
5 Tank Road, #02-03 Nagarathar Bldg.
238061 Singapore
Tel.: +65 91128044; Fax.: +65 6737 9927
GST REG. No. 73032040000E
Changing of the Filters
1. The Air Filters (Blue filter Housing) must be changed every year or every 250
hours, whichever comes first. Please make sure that the filter elements are in the
right sequence! First Fine Filter then 2x Activated Carbon Filter!!
2. The Screw Compressor Oil, Oil Filter, Filter for Oil/Water Seperator and Intake
filter must be changed every year or every 500 hours, whichever comes first.
3. Please adjust the Pressure Holding Valve every year or every 250 hours,
whichever comes first.
4. Only well trained personnel should attempt this task.
Aaragon Nitrox System Operation/User Manual Page 6 of 9
Aaragon Pte Ltd
5 Tank Road, #02-03 Nagarathar Bldg.
238061 Singapore
Tel.: +65 91128044; Fax.: +65 6737 9927
GST REG. No. 73032040000E
Pos.
1
2
3
4
5
6
7
8
9
10
11
12
13
14
14.1
15
15.1
16
16.1
Description
Elbow ¾”
Hose Connection ¾” -> ¾”
Hose Clamp
Hose ¾”
Hose Connection 3/8” -> 5/8”
Pressure Maintaining Valve
Silencer
Elbow ¾”
Connection ¾” -> ¾”
T-Joint ¾”
Hose Connection ¾” -> ¾”
Hose Connection ¾” -> 5/8”
Hose Clamp
Activated Carbon Filter
Activated Carbon Filter Element
Activated Carbon Filter
Activated Carbon Filter Element
Fine Filter
Fine Filter Element
Article No.
AANX-250-0201
AANX-250-0202
AANX-250-0203
AANX-250-0204
AANX-250-0205
AANX-250-0206
AANX-250-0207
AANX-250-0208
AANX-250-0209
AANX-250-0210
AANX-250-0211
AANX-250-0212
AANX-250-0213
AANX-250-0214
AANX-250-0214.1
AANX-250-0215
AANX-250-0215.1
AANX-250-0216
AANX-250-0216.1
Aaragon Nitrox System Operation/User Manual Page 7 of 9
Aaragon Pte Ltd
5 Tank Road, #02-03 Nagarathar Bldg.
238061 Singapore
Tel.: +65 91128044; Fax.: +65 6737 9927
GST REG. No. 73032040000E
Pos.
1
2
8
9
10
11
12
13
14
14.1
15
15.1
16
16.1
17
18
Description
Elbow ¾”
Hose Connection ¾” -> ¾”
Elbow ¾”
Connection ¾” -> ¾”
T-Joint ¾”
Hose Connection ¾” -> ¾”
Hose Connection ¾” -> 5/8”
Hose Clamp
Activated Carbon Filter
Activated Carbon Filter Element
Activated Carbon Filter
Activated Carbon Filter Element
Fine Filter
Fine Filter Element
Connection ¾”
Connection ¾”
Article No.
AANX-250-0201
AANX-250-0202
AANX-250-0208
AANX-250-0209
AANX-250-0210
AANX-250-0211
AANX-250-0212
AANX-250-0213
AANX-250-0214
AANX-250-0214.1
AANX-250-0215
AANX-250-0215.1
AANX-250-0216
AANX-250-0216.1
AANX-250-0217
AANX-250-0218
Aaragon Nitrox System Operation/User Manual Page 8 of 9
Aaragon Pte Ltd
5 Tank Road, #02-03 Nagarathar Bldg.
238061 Singapore
Tel.: +65 91128044; Fax.: +65 6737 9927
GST REG. No. 73032040000E
Pos.
1
2
3
4
5
6
7
8
9
10
11
12
13
14
15
16
17
18
19
20
21
22
23
24
Description
Silencer
Needle Valve Stainless Steel
Connection ¾” -> ½”
Stainless Steel Pipe 22mm
Nitrox Membran
Elbow ¾” -> Pipe 22mm
Reducer 1” -> ¾”
Connection ¾” -> ¾”
Fastening Angle incl. Screws
Pressure Reducer incl. Gauge
Hose Connection ¾” -> ¾”
Hose Clamp
Hose Connection 1” -> 1 ¼”
Buffer Tank Stainless Steel
Oxygen Sensor
Oxygen Analyzer
Over Pressure Tubing 12mm
T-Join 1”
Over Pressure Connection set
Over Pressure Valve
Silencer
Elbow ¾” -> Pipe 22mm
Reducer 1” -> ¾”
Fastening Angle incl. Screws
Article No.
AANX-250-0101
AANX-250-0102
AANX-250-0103
AANX-250-0104
AANX-250-0105
AANX-250-0106
AANX-250-0107
AANX-250-0108
AANX-250-0109
AANX-250-0110
AANX-250-0111
AANX-250-0112
AANX-250-0113
AANX-250-0114
AANX-250-0115
AANX-250-0116
AANX-250-0117
AANX-250-0118
AANX-250-0119
AANX-250-0120
AANX-250-0121
AANX-250-0122
AANX-250-0123
AANX-250-0124
Aaragon Nitrox System Operation/User Manual Page 9 of 9