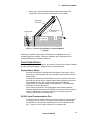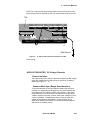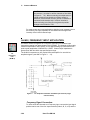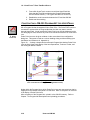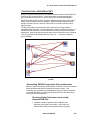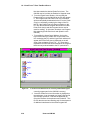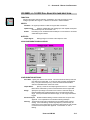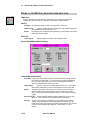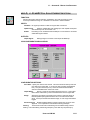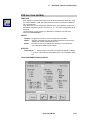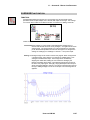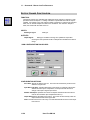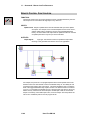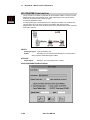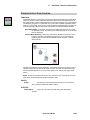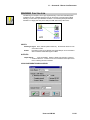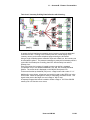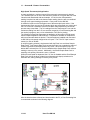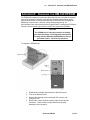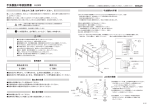
1
OM-320
OMEGAnetSM On-Line Service
http://www.omega.com
Internet e-mail
[email protected]
Servicing North America:
USA:
One Omega Drive, Box 4047
Stamford, CT 06907-0047
Tel: (203) 359-1660
e-mail: [email protected]
Canada:
976 Berger
Laval (Quebec) H7L 5A1
Tel: (514) 856-6928
e-mail: [email protected]
FAX: (203) 359-7700
FAX: (514) 856-6886
For immediate technical or application assistance:
USA and Canada:
Mexico and
Latin America:
Sales Service: 1-800-826-6342 / 1-800-TC-OMEGASM
Customer Service: 1-800-622-2378 / 1-800-622-BESTSM
Engineering Service: 1-800-872-9436 / 1-800-USA-WHENSM
TELEX: 996404 EASYLINK: 62968934 CABLE: OMEGA
Tel: (95) 800-TC-OMEGASM
En Espanol: (95) 203-359-7803
FAX: (95) 203-359-7807
e-mail: [email protected]
Servicing Europe:
Benelux:
Postbus 8034, 1180 LA Amstelveen, The Netherlands
Tel: (31) 20 6418405
FAX: (31) 20 6434643
Toll Free in Benelux: 06 0993344
e-mail: [email protected]
Czech Republic:
ul. Rude armady 1868
733 01 Karvina-Hranice
Tel: 420 (69) 6311899
e-mail:[email protected]
France:
9, rue Denis Papin, 78190 Trappes
Tel: (33) 130-621-400
Toll Free in France: 0800-4-06342
e-mail: [email protected]
FAX: 420 (69) 6311114
FAX: (33) 130-699-120
Germany/Austria: Daimlerstrasse 26, D-75392 Deckenpfronn, Germany
Tel: 49 (07056) 3017
Toll Free in Germany: 0130 11 21 66
e-mail: [email protected]
United Kingdom:
FAX: 49 (07056) 8540
25 Swannington Road,
P.O. Box 7, Omega Drive,
Broughton Astley, Leicestershire,
Irlam, Manchester,
LE9 6TU, England
M44 5EX, England
Tel: 44 (1455) 285520
Tel: 44 (161) 777-6611
FAX: 44 (1455) 283912
FAX: 44 (161) 777-6622
Toll Free in England: 0800-488-488
e-mail: [email protected]
It is the policy of OMEGA to comply with all worldwide safety and EMC/EMI regulations that
apply. OMEGA is constantly pursuing certification of its products to the European New Approach
Directives. OMEGA will add the CE mark to every appropriate device upon certification.
The information contained in this document is believed to be correct but OMEGA Engineering, Inc. accepts
no liability for any errors it contains, and reserves the right to alter specifications without notice.
WARNING: These products are not designed for use in, and should not be used for, patient connected applications.
1... INTRODUCTION
1... INTRODUCTION
MANUAL OVERVIEW
This User’s manual provides information relative to the use of the OM-320 Portable
Data Logging System. The manual is organized into sections describing the main
components of a OM-320 system, from the System Base through the various
features within the provided software. The last section of the manual consists of the
Appendices which give detailed specifications and information for general reference
and advanced applications.
After following the instructions for the installation of the HyperWare software, much
can be learned by exploring this manual, the software and the hardware in any
order... without concern for damaging results. However, it is HIGHLY
RECOMMENDED that this User’s manual be read in its entirety before deploying the
OM-320 in a real application.
A note on the keyboard / mouse convention used within this manual... Throughout
the manual, instructions on PC keyboard entry or menu selections via mouse are
specified by using italic print such as ENTER which refers to the `Enter’ Key on the
keyboard or FILE which refers to the menu item titled `FILE’.
OM-320 SYSTEM: `THE BIG PICTURE’
The OM-320 is a battery powered portable data logging and control system. It can be
left at a site to collect data from various analog and digital signal or sensor inputs.
This data is mathematically processed by the OM-320 and stored in its internal
memory while simultaneously performing basic onsite alarm and control functions.
The collected data is then transferred to a PC running the supplied HyperWare
software for data display and analysis.
OM-320 SYSTEM COMPONENTS
A OM-320 portable data logging system consists of a number of components... both
hardware and software.
The main components are listed below and details follow:
♦
OM-320 System Base
♦
Interface Modules
♦
HyperWare, Windows based software
♦
Options such as modems, PCMCIA, etc
USING THE OM-320
1-1
1... INTRODUCTION
OM-320 System Base
The OM-320 System Base (See Figure 1... -1) refers to the main data logger
unit housed in its weatherproof enclosure. The System Base houses the
battery pack, the Terminal Strip Adapter, and the main OM-320 front panel
with its associated plug-in ports for User installation of Interface Modules.
Quick Reference card(s)
Screwdriver
LCD Display
RS-232 Port
User Buttons
NEXT
SELECT
ENABLE
STOP
RESET
Front Panel
Alarm Switches
Vent Screw
Terminal Strip Adapter
Battery Pack
Thumbscrew
Gland Fitting
I/O Plate
HL001
Interface Modules
Interface Modules (See Figure 1... -2) are plug-in circuit board assemblies
that provide the interface to various types of inputs and output signals. The
Interface Modules can be User installed into the System Base then
configured for the specific type of signal or sensor to be connected to the
OM-320. Interface Modules are configured via software and/or switch
settings on the modules.
A family of Interface Modules is available for interface to various input signal
types such as thermocouples, RTD’s, voltage, current, frequency, event, etc.
Additionally, Interface Modules are available with outputs for digital alarm
and basic ON/OFF control functions.
Configuration Switches
HL002
Mounting Bracket
Figure 1... -2; Interface Module
1-2
USING THE OM-320
1... INTRODUCTION
HyperWare™ Software
Supplied with the OM-320 is a powerful Windows based software package
called HyperWare. HyperWare, running on an IBM compatible PC under the
Microsoft Windows environment provides a multitude of functions for setup
of the OM-320 as well as analysis of collected data including:
♦
Serial Communications support between the PC and the
OM-320 for RS-232 and telephone modem links
♦
Programming of the OM-320 using the powerful
HyperNet™ visual icon based programming method
♦
Multi-channel, graphic data display of previously
collected data using HyperPlot™
♦
Screen captures of HyperPlot graphs for seamless
integration into other Windows based software
applications such as wordprocessors, spreadsheets, or
desk-top publishing packages
♦
Conversion of collected data files to ASCII text or
Microsoft Excel file formats
♦
Powerful mathematical data manipulation of collected
data during conversion to HyperPlot graphs, ASCII text
files and Excel files
♦
HyperTrack™ real-time data display of OM-320 inputs
and HyperNet nodes
Additional Components
Special function modules are available to provide:
Telephone Modem Interface - plug-in modules that contain integral
low power 2400 Baud or 14.4 Kbaud telephone modems. These
modules allow for direct connection to standard telephone lines for
data transfer, reprogramming, and control...all from a remote PC
running HyperWare.
PCMCIA Memory Card Interface - plug-in module provides a
socket and interface circuitry for removable PCMCIA memory card
support. When utilized, the OM-320 stores data to the credit card
sized PCMCIA card. At any time, the card can be unplugged from
its socket and carried or shipped to a another site where the data
can be downloaded to a PC. Advantages of the PCMCIA card
include massive data storage capability, easily transportable data,
and field data collection by non-technical staff.
Special Serial Communications Interface - a variety of special
serial communication types and protocols are available for serial
signal interface. Contact Omega Engineering about your specific
application requirement.
Included with each OM-320 portable data logging system are a number of
other items including this manual, DB-9 and DB-25 to RJ-12 adapters, RS232 cable, a plug-in power supply, and liquid-tight fittings.
USING THE OM-320
1-3
1... INTRODUCTION
FEATURES
Designed with the User in mind, the OM-320 portable data logging system has a
multitude of integral features ranging from special hardware considerations to
unlimited software programmability and data review. Key features include:
1-4
♦
Up to 24 channels of analog input or 48+ digital input/outputs
♦
Configurable Interface Modules accept a multitude of signal
types and ranges all on a single module.
♦
Low power design allows for field logging up to 3 weeks from a
set of commonly available D-Cells.
♦
Terminal Strip Adapter wiring system allows for quick connect
and disconnect of the sensor and signal wiring harness. Using
this feature, the OM-320 can readily be moved and connected
up at different sites, with a minimum of setup time.
♦
Five integral alarm outputs including two relays
♦
True Microsoft Windows based HyperWare software... included
with the OM-320.
♦
Powerful HyperPlot graphic data display software with seamless
integration of plotted data into other Windows applications.
♦
HyperNet visual icon based programming provides unlimited
flexibility in programming, yet maintains simplicity with drag and
drop icon configuration. Set the OM-320 up without writing
cryptic lines of code nor experiencing the rigors of excruciating
two button menu tree nightmares.
♦
Intelligent logging methodologies include logging only upon
change of an input (Delta-Logging), Conditional logging based
on input levels, Conditional logging based on time of day or
elapsed time, dual speed logging initiated by User programmed
conditions, and more.
♦
Real-Time display (on integral liquid crystal display) of User
defined node points... ranging from raw input signals to
intermediate processed data to data logged to memory.
♦
User defined alarm messages
♦
Pager call-out upon User defined alarm conditions
USING THE OM-320
1... INTRODUCTION
SUMMARY OF STEPS IN UTILIZING THE OM-320
In a typical application of the OM-320 portable data logging system, the following
sequence of steps would be involved. Details of each step are presented in later
sections of this manual.
1. Install the required Interface Modules into the OM-320 System
Base. Configure Interface Module hardware switches if
applicable (eg enabling a front end divider for the +/-30VDC
range on the HLIM-1)
2. Connect up to the OM-320 via a serial link from your PC. Start
HyperWare and change to the HyperNet Development Screen.
3. Query the OM-320 for its current hardware configuration by
clicking the NEW button.
4. Construct a Program Net for this logging session by dragging
and dropping icons onto the HyperNet screen, then connecting
signals between the icons. Save the Program Net to disk and
print out a Terminal Strip Adapter wiring diagram for field
reference.
5. Transfer the Program Net to OM-320 memory via the serial link
and disconnect the serial link.
6. Install the OM-320 at the site and make the appropriate wiring
connections to the Terminal Strip Adapter and modem (if used).
7. Enable the OM-320, then as a quick pre-departure check, check
readings at various pre-programmed HyperProgram net nodes
using the Next and Select buttons while viewing the OM-320
display.
8. Close the door on the OM-320 and collect data.
9. Later, connect up to the OM-320 via a serial link (RS-232 or
modem) or retrieve the PCMCIA memory card and from within
HyperWare, download the OM-320 memory to a file on the PC.
10. For a fast and immediate review of the collected data, doubleclick on the data icon and HyperPlot will automatically load and
graphically display the collected data.
11. Save the desired HyperPlot graphic view as a Windows Bitmap
file , then switch to your Windows based wordprocessor and
seamlessly insert the saved graphic into your test report.
12. Optionally, use the HyperWare Post-Processing capability to
configure a special data reduction/ conversion icon network.
Then run the collected data file through the post processor and
generate a text file, Excel Spreadsheet file or another HyperPlot
file.
USING THE OM-320
1-5
1... INTRODUCTION
APPLICATIONS
Portable, self-contained, and of low-power design, the OM-320 can be deployed for
data collection in multitudes of applications. Data collection, data reduction,
intelligent logging, and alarming are all readily implemented with the flexibility of
HyperNet programming. The rugged hardware coupled with powerful, yet simple to
use, software allows for unlimited applications. Applications include:
1-6
♦
Vehicle testing
♦
Power monitoring and Energy audits
♦
Well pump down and slug testing
♦
Waste Water pump station performance and loading analysis
♦
Process monitoring with alarming upon `out of condition’
performance
♦
HVAC performance monitoring
♦
Laboratory experiment data collection
♦
Variable speed drive performance monitoring
♦
Oven profiling
USING THE OM-320
2... OM-320 SYSTEM BASE
2...OM-320 SYSTEM BASE
SYSTEM BASE OVERVIEW
The OM-320 main enclosure with its associated battery pack, front panel, wiring
terminals, etc is called the System Base. The System Base contains the main
microprocessor, memory, power supplies, analog to digital converter, and supporting
circuitry. Additionally, the System Base contains connectors for plug-in of Interface
Modules. The following major components of the System Base are detailed within
this section.
♦
Enclosure
♦
System Power and Batteries
♦
Terminal Strip Adapter; I/O Wiring
♦
Interface Module Backplane
♦
Front Panel
ENCLOSURE
The OM-320 (Figure 2..-1) is housed in a durable plastic weatherproof enclosure that
doubles as a carrying case. The enclosure has a gasketed door seal and with proper
installation, the OM-320 can withstand most process and field conditons with the
exception of direct immersion.
Quick Reference card(s)
Screwdriver
LCD Display
RS-232 Port
User Buttons
NEXT
SELECT
ENABLE
STOP
RESET
Front Panel
Alarm Switches
Vent Screw
Terminal Strip Adapter
Battery Pack
Thumbscrew
Gland Fitting
I/O Plate
HL001
Figure 2..-1: OM-320 System Base Components
The hinged front door features two latches that are released by pulling outward on
the molded tabs. For security, the top latch can be equipped with a padlock.
USING THE OM-320
2-1
2... OM-320 SYSTEM BASE
VENT SCREW
A vent screw is provided (black knob by the carrying handle) for equalization
of internal and external pressure during exposure to radically varying
barometric conditions such as during transport via airplane or over extreme
elevation changes. Loosening this knob a few turns will allow pressures to
equalize and re-tightening the knob will seal the vent. In most applications,
pressures will be equalized through minor leaks around the wiring egress
fittings and use of the vent is not necessary.
INPUT / OUTPUT WIRING PLATE
At the bottom of the enclosure, four thumb-screws hold the I/O Wiring Plate
in place. This plate has six holes sized for the supplied gland type sealing
fittings. An integral gasket seals the plate to the enclosure. Use of jacketed
wire for sensor wiring will result in an excellent seal to the fittings and
maintain the integrity of the System Base.
TIP:For special customer applications, an I/O plate
without fitting holes is available from Omega Engineering.
This plate can be machined by the User for their
particular I/O needs.
MOUNTING
The OM-320 can be wall mounted by attaching the supplied hanger to the
back face of the OM-320 enclosure with the supplied machine screws. To
attach the hanger refer to Figure 2..-2 and perform the following steps:
Hanger
Phillips Head Machine Screws
Back of HyperLogger
HL003
Figure 2..-2: System Base Hanger (back view)
1. Locate and remove the two phillips style flathead screws
on the back (near the top) of the OM-320.
2-2
USING THE OM-320
2... OM-320 SYSTEM BASE
2. Align the supplied hanger with the mounting holes and
and reinstall the two flathead machine screws, tightening
them securely.
3. In the event that the hanger is removed, the two
flathead machine screws should be reinstalled into the
back of the enclosure and tightened securely to reseal
the mounting holes.
SYSTEM POWER
Main Batteries
The OM-320 is powered from six D-cells mounted in a battery pack on the
lid (See Figure 2..-3). To access the batteries, remove the two thumbscrews
and the black cover. The batteries can then be replaced by popping them
out of the holders and reinstalling new batteries while observing polarity.
Align the batteries with the positive terminal toward the holder end marked
Battery Pack
HL004
Red Polarity Washers
Figure 2..-3: OM-320 Battery Pack
with a red washer. The battery pack cover fits correctly only one way... if it
doesn’t fit, flip it over.
Alkaline D-cells are recommended as they contain significantly more
energy than standard or `heavy-duty’ cells and will provide substantially
longer recording capability. Depending on the Program Net within the OM320, a fresh set of alkaline D-cells can power the OM-320 for up to 2 months
of logging.
External Power
For long term and/or semi-permanent applications of the OM-320, an
external power source may be used. If an external power supply is
connected to the OM-320 via the Terminal Strip Adapter ( page 2-4) and its
supply voltage is greater than approximately 12 VDC, the OM-320 will
operate from the external supply and the batteries will not be used. In the
USING THE OM-320
2-3
2... OM-320 SYSTEM BASE
event that the external power fails, the OM-320 will automatically transfer to
battery power and continue operation.
Memory and RTC Power
The OM-320 utilizes static ram for internal data storage which requires a
constant power supply to maintain its memory. Similarly, the Real Time
Clock (RTC) that keeps track of the date and time within the OM-320 runs
continually whether the main power switch is ON or OFF.
When the main power is ON, the memory and RTC draw their power from
the D-Cell batteries (or a connected external power supply). When the main
power is switched OFF, power for memory and the RTC automatically
switches to a small coin type lithium cell that is mounted on the main OM320 circuit board.
This cell will provide power for the RTC and memory for approximately one
year. Any time that the OM-320 main power is ON extends this lifetime. At
any time, the approximate state of charge of the lithium cell can be
displayed on the LCD under the SYSTEM STATUS / SUPPLY VOLTAGES
menu or from a serially connected PC running HyperWare with the Status
Query command. For lithium cell replacement procedure, refer to Appendix
D.
TERMINAL STRIP ADAPTER; I/O WIRING
The Terminal Strip Adapter (TSA) is a removable assembly that provides a
convenient method of connecting input and output (I/O) wiring to the OM-320 (see
Figure 2..-4). By using the TSA, a large quantity of wires can be connected and
disconnected with a minimum of effort. Wiring connections for power, sensor/signal
inputs, CJC sensing, and alarm outputs are all handled through the Terminal Strip
Adapter.
Terminal Strip Adapter (TSA)
Retaining Thumbscrew
PORT 1
OUTPUTS
INT EXT
CJC
EXT
PWR
PORT 5
PORT 6
PORT 2
PORT 3
PORT 4
HL005
Figure 2..-4: Terminal Strip Adapter (TSA)
Making I/O Wiring Connections
The TSA is held in place with a thumbscrew located in the center of the
board. To make wiring connections to the TSA, remove this thumbscrew
and unplug the TSA. Wiring can then be routed through the fittings and I/O
plate at the bottom of the OM-320 and secured into the various terminal
locations on the TSA.
2-4
USING THE OM-320
2... OM-320 SYSTEM BASE
TIP: When constructing a Program Net from within
HyperNet, one of the menu options will print out a TSA
wiring connection list for use during field wiring of the
OM-320. Details on generating this printout are covered
in the HyperNet Chapter.
After making the desired connections, plug the TSA back into the OM-320
and organize the wiring within the compartment, sliding extra wire out
through the the fittings. Reinstall the TSA retaining thumbscrew and tighten
the fittings.
Terminal Strip Connections
The TSA has silkscreen markings indicating specific I/O wiring connections
for the various terminal strips. Additional details for these connections
follow:
Port 1 to 6
The terminal strips labeled with a port number refer to one of the
Interface Module ports. When the Interface Module is installed, all
interface wiring (signal input, control output, etc) required by the
Interface Module is routed through the System Base and out to the
TSA. Each Interface Module has unique input and output wiring
requirements and is available on the Interface Module instruction
sheet or can be reviewed onscreen or printed out from within
HyperNet (Chapter 7).
CJC
Integral to the TSA is a cold junction compensation (CJC) sensor.
This sensor is a 10 Kohm @25C (Fenwall curve 16) thermistor
which is located by the long white DIN connector on the side
opposite the terminal strips. The CJC sensor senses the
temperature of the terminal strips (Internal Mode) which in turn, is
used in thermocouple measurements. Additionally, the CJC sensor
can be used within a Program Net to monitor the temperature inside
the OM-320 enclosure.
INTERNAL CJC SENSING APPLICATIONS:
For OM-320 applications with thermocouple inputs to the TSA, a
wire jumper must be installed across terminals 1 and 2 (marked
INT for internal). The OM-320 is shipped from the factory with
this jumper installed.
NOTE: If thermocouples are directly connected to the
TSA, a wire jumper must be installed across the CJC
terminal strip terminals marked INT or erroneous
readings will occur..
EXTERNAL CJC SENSING APPLICATIONS:
If thermocouples are not being directly connected to the TSA,
this CJC sensor can be used to measure temperatures (or limited
range resistance) outside of the enclosure. A 10 Kohm
thermistor (with the specified resistance curve) or a resistance
type sensor can be connected across the terminals marked EXT
USING THE OM-320
2-5
2... OM-320 SYSTEM BASE
on the CJC terminal strip. Refer to the CJC Icon in Appendix A
for additional details.
For external sensing applications, copper lug potted thermistors
with 10’ leads are available from Omega Engineering.
EXT PWR
A two position terminal strip is provided for connection of an external
low-voltage power source. A power source supplying 9-16 VDC or
10-20 VACat 250mA can be connected to the terminals. Polarity is
not critical. In normal operation, the OM-320 will only draw 3 to
30mA of current from this supply, however with relays, LEDs,
modems, etc the current level can be higher.
If an external power supply is connected to the OM-320 via the
Terminal Strip Adapter and its supply voltage is greater than the
internal battery voltage by approximately 1.2 VDC, the OM-320 will
operate from the external supply and the batteries will not be used.
In the event that the external power drops, the OM-320 will
automatically transfer to battery power and continue operation.
OUTPUTS
One 12 position TSA terminal strip is marked with OUTPUTS for the
first 10 terminal positions and GPDI INPUT for positions 11 and 12.
The Outputs follow:
R1
Wiring connections for Relay 1. The relay is a normally open
device with contacts rated for 500 ma MAX at 32VDC MAX.
R2
Wiring connections for Relay 2. The relay is a normally open
device with contacts rated for 500 ma MAX at 32VDC MAX.
DO1, DO2, AND DO3
Wiring connections for Digital Output 1, 2, and 3. A low current
5VDC rated digital output is available from each of these single
terminals. These terminals are the outputs under control from
the Digital Output icons within HyperNet. The output swings from
0 to 5VDC relative to the GND terminals (below) and is intended
Voltage
5
0
Current
1mA
HL029
Figure 2..-5: System Base Digital Output
Current Sourcing Characteristics
2-6
USING THE OM-320
2... OM-320 SYSTEM BASE
for sourcing and sinking signal level loads only. The output is
current limited with an internal 4.3Kohm series resistor which
results in varying output voltage levels as a function of load or
sourced current as shown in Figure 2..-5. These Digital Outputs
provide sufficient current for control of the Omega Engineering
RPS-1, Rechargable Power Supply which can be used for
powering/ exciting higher current sensors such as 4-20mA
transmitters (see Accessories in Appendix H).
GND
This pair of terminals serves as a common or ground connection
for the Digital Outputs and for the +5V supply. It is connected
directly to the OM-320 circuit ground.
+5V
This terminal provides a current limited +5 VDC supply for low
level current applications.
Note: Heavy loading of the +5 output will significantly
reduce battery life.
GPDI INPUT (+/-)
Two terminals are provided for signal input to the General Purpose
Digital Input (GPDI). Integral to the System Base is this single
digital input channel that can be configured under HyperNet as an
Event or Counter type input. The GPDI input signal (either a contact
closure or 0 to 15VDC max driven signal) is applied across theses
two terminals observing polarity.
The operation of the GPDI is configured during construction of the
Program Net within HyperNet and programming and applications are
described in the Master Icon Reference in Appendix A.
Field Disconnect Feature
Through the use of the TSA and the I/O Wiring Plate, a OM-320 can readily
be disconnected from its I/O wiring and temporarily moved to a new location
for another test or application. With the following method, it is not necessary
to disconnect, then reconnect all of the discrete wiring each time the OM320 is shared with another site or application.
To disconnect I/O wiring from the OM-320, refer to Figure 2..-6 and perform
the following steps:
1. Switch OM-320 power OFF
2. Remove the TSA retaining thumbscrew
3. Loosen the liquid-tight fittings so the wiring is free to
slide
4. Unplug the TSA and pull some additional wiring in
through the fittings
5. Remove the four I/O plate retaining thumbscrews
6. Tilt the I/O Wiring Plate and the TSA and feed them out
of the rectangular opening in the bottom of the OM-320
enclosure.
USING THE OM-320
2-7
2... OM-320 SYSTEM BASE
POR
T4
TSA
POR
T2
OUT
PUTS
POR
T1
POR
T3
INT E
X
CJC T
POR
T5
POR
T6
EXT
PWR
1. The TSA and I/O Wiring Plate can then be left on site
and the OM-320 moved to a new location. Additional I/O
Wiring Plates and TSA’s can be obtained from Omega
Engineering.
HL006
I/O Plate
Figure 2..-6: Removal of TSA through I/O Wiring
Opening
INTERFACE MODULE BACKPLANE
OM-320 Interface Modules plug into the System Base and provide various functions
such as signal / sensor interface, modem and PCMCIA memory card support. The
Interface Modules plug into a backplane that is located behind the front panel of the
OM-320. Access is gained to this backplane as follows Refer to Figure 2..-7 and
perform the following steps:
1. Remove the TSA retaining thumbscrew and unplug the TSA.
2. Remove the two thumbscrews at the top of the OM-320
enclosure.
2-8
USING THE OM-320
2... OM-320 SYSTEM BASE
1. Slowly, tug on the front panel handle (located near the top of the
front panel) and the front panel will swing open on its hinge.
HyperLogger
Front Panel
TSA Removed
Interface Module
Connectors
HL007
Figure 2..-7: Accessing the Backplane for Interface Module
installation
When the front panel is open, black connectors on the backplane for the six
numbered ports are available. Details on installation and configuration of the
Interface Modules are contained in Chapter 3.
FRONT PANEL DETAILS
The OM-320 front panel (see Figure 2..-8) contains numerous User buttons, switches
and the liquid crystal display. Details on these components follow:
System Power Switch
Power for the OM-320 is controlled with the System Power switch. When
the power is off, the batteries and any connected external power source are
disconnected.
The System Power does not affect data in memory or the Real Time Clock
date and time as both have a separate lithium battery backup power source.
This separate memory back-up battery will protect stored data for
approximately one year at normal room temperatures. Cell replacement
details are covered in Appendix D.
Power must be turned off to the System Base when installing Interface
Modules, replacing the lithium cell, EPROM, and any time the front panel is
opened. Additionally, to preserve battery life, turn the main power off
whenever the OM-320 is not being used.
RS-232 Serial Communications Port
A female 6/6 RJ-12 modular phone type jack is provided on the front panel
for RS-232 communications. A mating 6 conductor cable is supplied with
the OM-320 for communication between the PC and the OM-320 via this
port. This port is not for direct connection of a telephone line.
USING THE OM-320
2-9
2... OM-320 SYSTEM BASE
Serial Port
LCD Display
Push Buttons
NEXT
SELECT
ENABLE
STOP
Status Lights
RESET
Option Ports
Relay Control
Switches
System Power
Switch
HL008
Figure 2..-8: OM-320 Front Panel
CAUTION
The RS-232 jack is only for connection of RS-232
type signals (via the supplied cable and adapters)
and is not for direct connection of a telephone line.
For telephone modem communication with the OM320, utilize the OM-320 Modem Interface Module.
Direct connection of a telephone line to this jack will
result in permanent damage to the OM-320.
For longer communication distances, a longer cable can be used. Longer
cables can be purchased from Omega Engineering or from stores handling
standard phone supplies. If a cable is procured from a source other than
Omega Engineering, insure that the cable is 6 conductor and has the plugs
installed correctly. Refer to Appendix I for wiring details.
Although the RS-232 specification is only for communication distances up to
50’, communication with the OM-320 via RS-232 at Baud rates up to 19.2
Kbaud has been successfully achieved with 100’ of cable.
The OM-320 RS-232 communication circuitry powers up when a cable is
plugged into the port and a connection is established from within the
HyperWare Software. When the communication circuitry is powered up, an
additional load of approximately 30 mA is put on the power supply resulting
in shortened battery life.
For this reason, when not communicating with the OM-320, disconnect the
RS-232 cable. For extended communication sessions battery life can be
preserved by powering the OM-320 from an external power supply.
2-10
USING THE OM-320
2... OM-320 SYSTEM BASE
TIP: For relative reference, with the communication
circuitry powered up, a new set of batteries will discharge
in approximately 3 days.
Option Ports
Two Option Ports are provided on the OM-320 front panel. The port
openings are available for installation of special Interface Modules such as a
modem or PCMCIA socket. These ports are normally covered by
rectangular covers unless one or more of the optional Interface Modules are
installed (special bezels are provided with any of the Interface Modules
using these ports.
Push Buttons
Located at the top right corner of the front panel are five momentary push
buttons providing basic OM-320 operational control. Details on the button
functions follow:
NEXT and SELECT
The NEXT and SELECT buttons are used for User control of the
liquid crystal display (LCD) information displays. Pressing NEXT will
advance the LCD display to the next menu item at the current menu
level. Pressing the SELECT button selects that menu item and a
new level of menus or results are displayed.
A detailed explanation of the operation of the NEXT and SELECT
buttons is covered in a later section on the Display.
ENABLE
The ENABLE button initiates the execution of the current Program
Net residing in OM-320 memory. Upon press of the ENABLE
button, the LCD will change to display ENABLED on the second line.
Note that operation of the ENABLE button may be inhibited if Rotary
Memory Logging mode is set within the Global icon while building a
Program Net. Refer to the Master Icon Reference in Appendix for
details on the Global icon. Settings under the Global icon include:
LOG TO FULL MEMORY...
If the OM-320 is running in one of the Log to Full Memory modes,
multiple logging sessions can be retained in memory before a
download of data to a PC is required.
ROTARY MEMORY
If the OM-320 is programmed for the Rotary Memory mode, only
one logging session can be retained in memory before a
download is required. When the OM-320 has logged one session
and stopped, the LCD will display Memory Full. Pressing
ENABLE in this mode with a session already in memory will NOT
ENABLE execution of the Program Net, memory must be
downloaded or cleared before the OM-320 can be enabled.
USING THE OM-320
2-11
2... OM-320 SYSTEM BASE
FYI: The label ENABLE was chosen rather than START
for a subtle but important reason. When the ENABLE
button is pressed, execution of the Program Net
commences... but that does not necessarily mean that
data logging to memory has started.
For example, a Program Net is developed and uploaded
to the OM-320 that includes a setpoint function that
controls logging to memory. For example log only when
the kiln temperature exceeds 150F. Pressing the
ENABLE button merely causes the OM-320 to take
readings of the kiln temperature... but logging to memory
STARTS when the temperature rises above the 150F
threshold.
STOP
Pressing STOP at any time causes the OM-320 to finish sequencing
through the currently executing Program Net, then stop executing.
The LCD then updates to show STOPPED.
RESET
A hardware reset of the OM-320 microprocessor can be performed
by depressing and releasing both the STOP and RESET buttons at
the same time. This normally should not be required but in the
event that a noise glitch or some other malfunction occurs, this
manual Reset capability is provided for a User to force a reset of the
microprocessor from the front panel.
WATCH-DOG T IMER RESET
A special automatic reset circuit is incorporated into the System
Base to add additional reliability to the OM-320 system. This
circuitry, called a Watch-Dog Timer will force the OM-320
microprocessor to reset and continue operation where it left off
(within 2 seconds) in the event that an unforseen hiccup or noise
glitch (for example, from a nearby lightning strike) causes the
microprocessor to lose its place or lock-up.
Although this circuit normally should not operate, it adds one
more level of robustness to the OM-320 for handling unforeseen
events.
Display
An extended temperature range 2-line by 16 character liquid crystal display
(LCD) is provided. Information ranging from Operational Mode to System
Status to Alarm Messages to signal readings can all be displayed on the
LCD. The LCD is continually ON. Information to be displayed is controlled
by a User via the SELECT and NEXT front panel buttons.
Additionally, alarm messages will be automatically displayed on the LCD
when User pre-programmed conditions are met. These messages and
conditions are defined by the User in the Program Net developed within
HyperNet ( Chapter 7) and loaded into OM-320 memory.
2-12
USING THE OM-320
2... OM-320 SYSTEM BASE
Display Operation
Information that can be displayed on the LCD is arranged in a
hierarchical format and is accessed by a User via the NEXT and the
SELECT buttons on the front panel of the OM-320. The menu
structure is diagrammed in Figure 2..-9.
Pressing the NEXT button advances the display to the next available
item in that menu level. Repetitive presses of the NEXT button will
result in a circular sequencing through all of the available menu
items on the current level and eventual repeat of the sequence.
SELECT
N
E
X
T
Shows the EPROM version number and the
current operating mode
HYPERLOGGER X.XX
<MODE>
SELECT
SYSTEM
STATUS
Display
Date and Time
N
E
X
T
Shows the current date
and time in the
HyperLogger
Display
Remaining Memory
Shows the % memory used
and # of samples recorded
Unit Name and ID
Shows the Unit Name and
ID (set from HyperWare)
Net Program Name
Name of the Net Program
(set from HyperWare with
Global Icon)
Net Program
Description
Desc. of Net (set from
HyperWare eith Global Icon)
System Supply
Voltage
Voltage of the batteries or
external supply, whichever
is greater
Return to Top
Menu
Jumps to the top of the
menu system
(Loops to top of this menu)
DISPLAY PROBE
ICON VALUES
Steps through all of the Probe Icons and Displays their
current values
DISPLAY MEMORY
ICON VALUES
Steps through all of the Memory Icons and displays their
current values
DISPLAY STATUS
MESSAGES
Steps through all of the active Message Icons
ERASE
MEMORY
Erases data memory, leaving Net program intact
(Loops to top of this menu)
HL009
Figure 2..-9: LCD (display) Menu Structure
Pressing the SELECT button selects that menu item and a new level
of menus or results are displayed. A detailed description of the
various menu items and levels follow.
TIP - a good comprehension of this LCD menu structure
can be achieved by close reading of this section... but
better results may be achieved by just `diving in’ and
poking around with the NEXT and SELECT buttons to
develop a feel for the structure. Then read through this
section for the details.
USING THE OM-320
2-13
2... OM-320 SYSTEM BASE
Display Menu Items
Following are descriptions of each of the display menu items
identified in Figure 2..-9. Further details may be found in later
sections detailing the functions described.
T OP MENU:
When the OM-320 is powered ON, the Top Menu is displayed in
the LCD. The Top Menu indicates the OM-320 EPROM version
on the top line of the LCD (software version residing in an
EPROM memory chip within the OM-320) and on the bottom line,
the current operational mode of the OM-320. Displayed Modes
include:
ENABLED
Indicates the OM-320 is currently executing a Program Net
that has been developed with HyperNet and transferred to
the OM-320 memory.
STOPPED
The OM-320 is not executing a Program Net. Since the Net
is not executing and updating the net, stepping through
various Probe Points will result in values and states that will
not be current.
MEMFULL STOPPED
Data memory within the OM-320 has filled and the
execution of the Program Net has stopped. This message
will also display if the Rotary Memory mode is utilized (See
Global icon in Appendix A) and a logging session has been
performed. In Rotary Memory mode, only one logging
session can be maintained in the OM-320 memory.
MEMFULL ENABLED
Memory within the OM-320 has filled, however execution of
the Program Net is continuing. This mode of operation may
be User selected when alarming/control functions are to be
monitored.... even after the OM-320 memory has filled.
This display will only occur if the User has selected the
memory utilization option Log to Full Memory and Continue
Processing during setup of the Program Net within HyperNet
(Global Icon option).
MEMFULL WRAPPING
Displays when the OM-320 Program Net is configured in the
Rotary Memory mode. When memory fills, the OM-320
starts writing over the first collected data. Since the
Program Net is still executing, alarms and control functions
continue to be monitored. Rotary Memory mode is enabled
during setup of the Program Net under the Global Icon.
RCV’ING NET
Displays momentarily during the actual serial upload of of a
Program Net to the OM-320.
2-14
USING THE OM-320
2... OM-320 SYSTEM BASE
NO PROGRAM NET
Displays upon first power up of the OM-320 after the
Program Net has been lost. This should only occur after
replacement (or initial installation) of the lithium cell used for
Data Memory backup. The display indicates that a search
for a valid Program Net stored within the OM-320 memory
has failed.
In the event that this message displays, check (and replace
if low) the Lithium Cell via the STATUS menu described
below. Then reprogram the OM-320 with a new Program
Net.
BAD PROGRAM NET
Displays if an illegal or corrupted Program Net is in memory.
This message should only occur if memory containing the
Program Net has been corrupted. In the event that this
message displays, check (and replace if low) the Lithium
Cell via the STATUS menu described below.
CARD ERROR: MISSING FILE
Displays upon power-up of the OM-320 with an improperly
prepared PCMCIA card inserted. The card should be
formatted and prepared for use within the OM-320 as
described in Chapter 6.
BAD CONFIG
Displays if User selectable switch settings on the OM-320
Interface Module do not match the currently loaded Program
Net. The message also identifies which Interface Module
and channel or incompatible. If this message displays,
modify the Program Net to match the hardware or open the
OM-320 and examine the switch settings on the installed
Interface Modules and correct the invalid setting(s).
SYSTEM STATUS
From the Top Menu, pressing the Next button once will advance
the display to System Status. Pressing SELECT while System
Status is displayed results in a new level of display. Menu
selections available on this level include:
DATE AND TIME
Press SELECT to display the current Date and Time in the
OM-320 Real Time Clock. This is the date and time to
which collected data is referenced. The OM-320 date and
time are set from within HyperComm (Chapter 5).
REMAINING MEMORY
Press SELECT to display the number of samples recorded
and the percentage of memory used.
TIP: Depending on the User defined format
for data storage and the actual time and
values being stored, samples will require
varying amounts of memory for storage. For
this reason, use caution when extrapolating
the remaining logging time.
USING THE OM-320
2-15
2... OM-320 SYSTEM BASE
UNIT NAME & ID
Press SELECT to display the programmed OM-320 Name
and ID. The OM-320 Unit name and ID can be User
assigned through HyperWare (Chapter 5). This ID can be
used for corporate tracking of multiple units, calibration
schedules, etc.
PROGRAM NET NAME
Press SELECT to display the currently loaded Program Net
name. This name is assigned during the development of a
Program Net (Chapter 7).
PROGRAM NET DESCRIPTION
Press SELECT to display a previously programmed
description of the Program Net (above).
SYSTEM SUPPLY VOLTAGE
Press SELECT to display the OM-320 supply voltage and
the approximate state of charge of the memory / clock
backup lithium cell. If internal batteries are installed in the
OM-320 and an external power supply is also connected, the
displayed Supply Voltage indicated refers to the greater of
the two.
FYI: The displayed Supply Voltage is
measured at an internal node on the power
supply circuitry. Displayed battery voltage is
the voltage of the internal batteries .
External supply voltage will be
approximately 1.2 volts higher than
indicated.
The state of charge display for the lithium cell (used for
memory and clock backup) will display GOOD or LOW. If
LOW is displayed, download any desired data memory, then
replace the lithium cell per the instructions in Appendix D.
RETURN TO TOP MENU
Press SELECT to return to the Top Menu display. Press
NEXT to cycle through this level’s menu selections again.
DISPLAY PROBE ICON VALUES
During the construction of a Program Net within HyperNet, the
User can opt to connect Probe Point icons to various nodes
throughout the net. These Probe Point icons allow the User to
view the current values on the nodes to which they are
connected. (Program Net development is described in Chapter 7
and details on the Probe Point icon are included in Appendix A.)
One of the ways that the Probe Point values can be viewed is via
the OM-320 front panel LCD, as follows:
FYI: Probe Point is used for the icon name as
connecting these icons to a node on a Net is
somewhat analogous to putting a test meter probe
on the Net nodes and reading a value.
2-16
USING THE OM-320
2... OM-320 SYSTEM BASE
From the Top Menu, pressing the NEXT button twice will
advance the LCD to Display Probe Icon Values. Pressing
SELECT while Display Probe icon Values is on the LCD will shift
the display to a level containing the actual Probe Point values.
The top line of this display is the Probe icon Name assigned to
the icon during construction of the net and the second line is the
value and units.
Repetitively pressing NEXT will step the display through all of the
Probe icons previously programmed into the Program Net. To
return to the Top Menu, press SELECT when Return to Top
Menu is displayed.
Displayed Probe icon values will be updated whenever the net
node is updated. If the OM-320 is Stopped (ie not executing the
net), the last calculated node value will be displayed.
TIP: Displaying Probe icon Values while the OM-320 is
enabled will slow down the execution of the net. For
higher speed data logging applications (eg sub-second
sampling rates), faster performance can be achieved by
leaving the LCD in a mode where it is not displaying the
time/date, battery state of charge, remaining memory,
Probe icons, Memory Icons , or Net Values,
DISPLAY MEMORY ICON VALUES
In addition to display of Probe icon values (previously described),
the last value stored to any Memory icon within the executing
Program Net can also be displayed on the LCD.
From the Top Menu, pressing the NEXT button three times will
advance the LCD to Display Memory Icon Values. Pressing
SELECT while Display Memory Icon Values is on the LCD will
shift the display to a level containing the actual last logged
values. The top line of this display is the Memory Icon Name
assigned to the icon during construction of the net and the
second line is the last logged value and units.
To return to the Top Menu, press SELECT when the Return to
Top Menu message is displayed.
DISPLAY STATUS MESSAGES
Messages can be sent to the LCD due to OM-320 operational
conditions or User programmed Program Net conditions. To view
the active messages; from the Top Menu, press NEXT five times
and then SELECT while the Display Status Messages menu is
displayed. Step through the messages with the NEXT button and
return to the Top Menu by pressing SELECT when Return to Top
Menu is displayed.
Depending on the inputs and programmed conditions within the
currently executing Program Net, User programmed messages
may come and go as the conditions for display are met then not
met over time.
During execution of a Program Net, if the conditions (either OM320 operational or User defined Program Net) are met for a
message display (eg an alarm conditon occurs), the message will
display on the LCD immediately... overwriting any current
displays. Messages displayed on the LCD will not be cleared
USING THE OM-320
2-17
2... OM-320 SYSTEM BASE
from the LCD when they become False, however they will be
cleared from the internal display queue. Messages will only be
cleared from the LCD if another message is displayed or if the
User changes the LCD (via the Select/Next buttons) in any way.
For additional information on message display capability from
within a Program Net,, refer to the Message icon in Appendix A.
ERASE MEMORY
Data memory within the OM-320 and within an inserted PCMCIA
card can be cleared via the SELECT and NEXT buttons. To
clear memory, from the Top Menu, press NEXT six times until
the message Erase Memory appears on the LCD. Then press
SELECT a total of five times to clear the memory. Successful
erasure of the memory is confirmed with a Memory has been
Erased message.
Note that at any time during this sequence of SELECT button
presses, pressing the NEXT button will abort the Memory Clear
sequence and stored data will be preserved.
CAUTION!
All the King’s horses and all the King’s men can’t
reassemble erased OM-320 data again. Please be
careful.
Internal OM-320 memory and PCMCIA card memory can also
be cleared via a serial communication link. Refer to the Chapter
5 on HyperComm for details.
Relay Control Switches
The System Base contains two relays for use as low-voltage alarm or control
outputs. Wiring connections to these two normally open contact relays is via
the TSA.
CAUTION!
The two System Base relays are meant for lowvoltage low-current control and alarm applications.
Do not connect over 32 VDC potential or in excess of
250 mA of current through the relays.
In the lower left of the OM-320 front panel are two toggle switches labeled
Relay 1 and Relay 2. The switches are three position and are provided for
manual override of the relays. Description of operation in the three positions
follows:
OFF:
In the center position, the relays are disabled and can not be
turned ON by the OM-320 Program Net.
TEST: When the switch is toggled to the right, the relay is forced
into an ON state and the relay contacts are closed. This is a
`momentary’ position and when the switch is released, tit
returns to the OFF position.
2-18
USING THE OM-320
2... OM-320 SYSTEM BASE
RUN:
In the left position, the relay is under control of the OM-320
microprocessor. The relays will be switched ON and OFF
per the logic contained within the Program Net.
NOTE: If the relay alarm function is used within a
Program Net, insure that the switches are set to RUN
before leaving the site.
Status Lights
Three light emitting diode (LED) lights are provided on the front panel,
labeled STATUS, ALARM 1 and ALARM 2. The STATUS LED is merely a
visual indicator provided for User specified application from within a
Program Net. The ALARM LED’s provide visual indication of the state of the
two output relays (described above). When the ALARM LED is ON, the
relay contacts are closed.
USING THE OM-320
2-19
2... OM-320 SYSTEM BASE
NOTES:
2-20
USING THE OM-320
3... INTERFACE MODULES
3... INTERFACE MODULES
The OM-320 System Base includes six ports for plug-in installation of any of the
family of OM-320 Interface Modules (see Figure 3... -1) . Interface Modules provide
the interface between real world signals such as thermocouples, voltage, current,
telephone lines, etc and the OM-320 System Base.
This section covers the installation, wiring, hardware configuration, and application
considerations of the basic OM-320 family of Interface Modules. As additional
modules are added, the instruction sheets should be added to this section for
reference.
Utilization of the Interface Module channels within a HyperNet Program Net is
covered within Chapter 7 and the reference Master Icon Listing contained in
Appendix A.
Configuration Switches
HL002
Mounting Bracket
Figure 3... -1: Interface Module
HANDLING
As with all electronic systems, static electricity discharge can weaken or cause
permanent damage to circuitry. Protective circuitry is integral to the OM-320 system
including the Interface Modules, however when the Interface Modules are not
installed in the System Base, the protective circuitry is not effective. Therefore,
when handling Interface Modules, it is recommended that reasonable static control
procedures be followed.
♦
Before touching the Interface Module, discharge static electricity
built up in your body be touching a grounded point such as a
water faucet, cover plate screw on a receptacle, metal surface
of a grounded appliance or other earth ground.
♦
Do not wrap or store the Interface Module in static generating
materials such as untreated styrofoam packing `peanuts’ or
plastic bags. Anti-Static bags are available for storage of static
sensitive components.
USING THE OM-320
3-1
3... INTERFACE MODULES
INSTALLATION
When shipped, Interface Modules are provided with a Quick Reference Card,
Instruction sheet, and any necessary accessories. Optionally, if ordered with a
System Base, the Interface Modules are typically factory installed in the System
Base before shipment.
HyperLogger
Front Panel
TSA Removed
Interface Module
Connectors
HL007
Figure 3... -2: Accessing the OM-320 System Base backplane
The Interface Modules plug into a backplane that is located behind the front panel of
the OM-320. Access is gained to this backplane as follows (Figure 3... -2):
1. Remove the TSA retaining thumbscrew and unplug the TSA.
2. Remove the two thumbscrews at the top of the OM-320
enclosure.
3. Slowly, tug on the front panel handle (located near the top of the
front panel) and the front panel will swing open on its hinge.
3-2
USING T HE OM-320
3... INTERFACE MODULES
When the OM-320 is open, inspection of the exposed circuit board backplane
(Figure 3... -3) will reveal the connectors and threaded inserts used in installation of
TSA Connector
Interface Module
Connectors
PORT 6
PORT 5
PORT 4
PORT 3
PORT 2
PORT 1
Option Ports
Backplane
Special Extended
Connector for
Port 6
HL011
Inserts to secure Interface Module
Figure 3... -3: Backplane and Interface Module connectors
(view shown with OM-320 front panel open)
a Interface Module. Note that Interface Module ports 1 through 5 are all identical,
however Port 6 includes some additional connections (one of the Backplane socket
connectors is longer) and also aligns with the Front Panel cutouts (labeled Option
Port 1 and 2 on the Front Panel). Some Interface Modules such as the HLIM-5 must
be installed in Port 6.
To install an Interface Module into the System Base Backplane Ports 1 to 5:
1. Review the Interface Module instructions and observe any
special installation instructions.
2. Turn the OM-320 System Power switch OFF.
3. Remove the TSA retaining thumbscrew and unplug the TSA.
4. Remove the two thumbscrews at the top of the OM-320
enclosure.
5. Slowly, tug on the front panel handle (located near the top of the
front panel) and the front panel will swing open on its hinge
(Figure 3... -2).
6. Observe the gold connector pins on the long edge of the
Interface Module. These pins will plug into a mating black
socket mounted on the OM-320 System Base Backplane. Also,
two phillips head screws in angle brackets are at each end of the
Interface Module. These screws will mate with threaded inserts
in the Backplane (Figure 3... -3).
7. Orient the Interface Module with the diagonally cut end toward
the top of the Backplane.
USING THE OM-320
3-3
3... INTERFACE MODULES
8. Tighten the retaining screws into their mating inserts while
carefully observing the alignment of the mating connectors.
TIP: Start one screw into its mating insert, then align and
start the other screw. Check that the connectors are
aligned and then tighten both of the screws securing the
Interface Module to the Backplane..
To install an Interface Module into System Base Backplane Port 6:
1. Review the Interface Module instructions. If the Interface
Module uses either Front Panel Option Port 1 or 2, remove the
two phillips head screws holding the Option Port cover(s) in
place.
2. Follow the steps specified for installation of an Interface Module
into Ports 1 to 5 above.
3. Install any special bezels (provided with the Interface Module)
using the two phillips head screws removed in step 1.
3-4
USING T HE OM-320
3... INTERFACE MODULES
INTERFACE MODULE OPERATIONAL INSTRUCTIONS:
Each Interface Module has specific characteristics and instructions for set-up and
use that are unique to that particular module. These instructions are provided with
the Interface Module at the time of purchase. As Interface Modules are added to a
User’s OM-320, the instruction sheets provided should be added to this section of
the manual.
The instructions for most Interface Modules include both hardware and software
details. Software instructions will commonly be referenced from other sections of
this manual such as in the chapter on HyperComm for the modem modules and the
chapter on HyperNet programming for analog and digital Interface Modules.
Instruction sheets for the following Interface Modules are currently included in this
section:
♦
HLIM-1; Analog Interface Module
♦
HLIM-2; Event, Frequency, Count Interface Module
♦
HLIM-4; RTD, Thermistor, and Resistance Module
♦
HLIM-8; Digital Interface Module (8 channel digital I/O)
♦
HLIM-5 PCMCIA Memory Card Interface Module
♦
MM-2400 2400 Baud Modem option (for HLIM-5)
♦
MM-14.4 14.4kbaud Modem option (for HLIM-5)
USING THE OM-320
3-5
3... INTERFACE MODULES
NOTES:
3-6
USING T HE OM-320
3... INTERFACE MODULES
HLIM-1; FOUR CHANNEL ANALOG INTERFACE MODULE
OVERVIEW
Overview:
The HLIM-1 is a four channel Interface Module for use in conjunction with
the OM-320 System Base. Each of the four channels can be individually
programmed for any combination of the following signal types and input
ranges with HyperWare software (via HyperNet) and hardware
Configuration Switches (located on the Interface Module).
Thermocouple:
Type
Color (USA)
Range (F)
Range (C)
J
white/red
-60 to 1400F
-50 to 760C
K
yellow/red
32 to 2500F
0 to 1370C
E
purple/red
-150 to 1830F
-100 to 1000C
T
blue/red
-250 to 750F
-160 to 400C
R
black/red
32 to 1830F
0 to 1000C
S
black/red
32 to 3182F
0 to 1750C
Table 3... -1: Thermocouple input types and ranges
DC Voltage:
Full Scale (FS) ranges:
Icon
Full Scale Input Ranges
VDC-LO
+/- 20mV
+/-40mV
+/-50mV
+/-200mV
+/-1V
+/-2V
VDC-MED
+/-5 V
+/- 10V
VDC-HI
+/- 3V
+/-15V
+/-60mV
+/-100mV
+/-30V
Table 3... -2: DC Voltage input ranges
Input Impedance for the 5V, 10V, and 30V ranges is >2.5Megohm.
All other range’s input impedance is > 10 Megohm.
DC Current:
Full Scale (FS) ranges:
Icon
Full Scale Input Ranges
mA-LO
+/-200uA
+/-400uA
+/-500uA
+/-2.0mA
+/-11 mA
+/-22mA
+/-1.0mA
Table 3... -3: DC Current input ranges
Input resistance for all current ranges is a 100 ohm precision shunt.
USING THE OM-320
3-7
3... INTERFACE MODULES
Module Installation:
Refer to page 3-2 for instruction on installation of the Interface Module into
the OM-320 Backplane. No special considerations are required for
installation of this module into the System Base.
Upon completion of installation, visually insure that all of the connector pins
are mated in their respective sockets.
Port Requirements / Limitations:
This module can be installed in any of the six Backplane ports.
Hardware Configuration Switches:
Four sets of Configuration Switches are provided for each of the four
channels (Figure 3... -4). Through the use of these switches, various types
of signals can be directly fed into the OM-320 eliminating the need for User
supplied external precision dividers, shunts and other circuitry.
Configuration Switches
Retaining Screw
Fuses
ON
O 1
N
2
3
4
O 1
N
1/8
2
3
4
O 1
N
1/8
2
3
4
O 1
N
1/8
2
3
4
1/8
OFF
Channel
Channel
Channel
Channel
HL012b
A
B
C
D
Figure 3... -4: Channel configuration switches within the HLIM-1 Interface
Module
3-8
USING T HE OM-320
3... INTERFACE MODULES
Although for most applications, an in-depth understanding of the function of
these switches is not required, a simplified schematic of the input section of
the HLIM-1 is provided in Figure 3... -5. As can be seen in this schematic,
different combinations of the switches interject voltage dividers and shunts
into the input stage of the
2.49M
SW1
INPUT
FUSE
SW2
SW3
0-30
Range
SW4
0-10
Range
AMP
4-20mA
Range
GROUND REFERENCE JUMPER
ML014
22K
Figure 3... -5: Simplified schematic of input section
of HLIM-1
Input Overcurrent Fuses:
Each channel is protected by a 125mA fuse as shown in Figure 3... -5
(circuit) and Figure 3-4 (physical location on module). This fuse will protect
the module from overcurrent surges received from malfunctioning or
improperly connected sensors and transmitters.
In the event that a channel on a module quits responding with proper values,
it may be an indication that this protective fuse has blown. The fuse can be
removed from the circuit and checked for continuity with an ohm-meter
and/or replaced with a Littelfuse P/N: 273.125 fuse available from Omega
Engineering Incorporated or many electronic distributors.
The following reference chart provides the necessary information for
configuration of the switches. The switch settings are read by the OM-320
during a query of the hardware configuration (from within HyperNet) so the
User is not burdened with keeping notes of the current OM-320
configuration. Improper setting of the switches will result in a `Bad
Configuration’ message on the LCD upon power-up of the OM-320. In the
event that this message displays, check the switch settings per Table 3... -4
and correct the conflict.
Input / Range
SW 1
SW2
SW3
SW4
Thermocouples
OFF
OFF
OFF
ON
USING THE OM-320
3-9
3... INTERFACE MODULES
VDC up through +/-2 VDC
VDC up through +/-10 VDC
OFF
OFF
ON
OFF
VDC up through +/-30 VDC
OFF
ON
OFF
OFF
All Current (mADC) Ranges
ON
OFF
OFF
ON
Table 3... -4: HLIM-1 configuration switch settings
HLIM-1 Channel Configuration via Software:
When a HLIM-1 channel is configured as a particular type of input via the
module configuration switches, the configuration will be automatically
detected during the development of a Program Net for the OM-320.
Software configuration and utilization of the HLIM-1’s channels in a
Program Net is covered in Chapter 7 and within the Master Icon Listing in
Appendix A.
HLIM-1; THERMOCOUPLE APPLICATION
Thermocouple Connection:
To utilize an HLIM-1 channel as a thermocouple input, configure that
channel’s Interface Module Configuration Switch per Table 3... -4. Channels
configured as thermocouple inputs utilize three terminal strip connections
per input; Positive lead, Negative lead, and Shield.
Connect the thermocouple positive and negative (red in USA) leads to the
correct pair of terminals on the TSA PORTx terminal strip. Refer to Chapter
7 for steps to generate a TSA Wiring printout for use in making field wiring
connections.
Thermocouple Icon
TSA Terminal Strip
1
Thermocouple
2
3
4
5
6
7
8
9
10 11 12
HL014
Hi
Lo (Red)
Shield
Earth Ground
Figure 3... -6: Thermocouple (and optional Shield) terminal strip connection
Polarity is critical..
Shielded thermocouple wire is recommended in electrically noisy
environments for optimum signal protection. If shielded wire is used, a
ground wire should be run from one of the Shield terminals to an earth
ground connection to conduct away noise picked up by the thermocouple
shield (Figure 3... -6). Only one ground wire is required per 12 position
terminal strip as terminals 3, 6, 9 and 12 are all interconnected within the
TSA circuit board.
NOTE: Do not ground the shield wire at the sensor end away from the OM320.
3-10
USING T HE OM-320
3... INTERFACE MODULES
Thermocouple Application Notes:
Cold Junction Compensation (CJC): For thermocouple measurements,
the temperature of the terminal strip connections is required in the voltage to
temperature conversion equation used by the OM-320. This temperature is
measured by the CJC sensor located on the back of the TSA. Any
differential temperature from the metal terminal strip connections to the CJC
sensor on the TSA circuit board will result in direct measurement errors.
The TSA is thermally designed to provide good CJC sensor vs terminal strip
temperature tracking however, to minimize this potential error, avoid
installations or effects that will induce extreme temperature differential. The
most accurate readings will be achieved when the door to the OM-320 is
closed and temperatures within the enclosure have stabilized.
DIFFERENTIAL POTENTIAL: to minimize current loop induced errors, use
isolated type thermocouples or insure that all thermocouple junctions are at
ground potential. Insure that input voltages do not exceed 3.0V above or
below circuit ground (maximum common mode voltage).
HLIM-1; DC VOLTAGE APPLICATION
VDC- Lo
Range Icon
The HLIM-1 can support three different major ranges (and a multitude of sub-ranges)
of analog DC voltage input depending on the channel’s hardware Configuration
Switch setting (See Table 3... -4). To utilize an HLIM-1 channel as a DC Voltage
input, set that channel’s Configuration Switch per the Table for the desired input
signal range.
As shown in Figure 3... -5, when DC-MED or DC-HI are selected with the hardware
Configuration Switches, front-end divider circuitry is enabled. This circuitry
attenuates the input signal to a range that can be handled by the HLIM-1
instrumentation amplifier section.
TIP: For best accuracy and absolute resolution, utilize
the lowest range possible that will cover the input signal’s
dynamic range without over-ranging.
Signal Connection (all Ranges):
VDCMedium
Range Icon
Interface Module channels configured as VDC inputs provide three terminal
strip connections per input; Positive lead, Negative lead, and Shield.
Connect the VDC signal positive and negative leads to the correct pair of
terminals on the TSA PORTx terminal strip (Figure 3... -7). Refer to
Chapter 7 for steps to generate a TSA Wiring printout for use in making field
wiring connections.
Observe polarity or the output signal will be reversed.
USING THE OM-320
3-11
3... INTERFACE MODULES
To minimize noise pickup on sensor wiring between the OM-320 and the end
sensor or signal source, 18 to 22 AWG shielded, twisted pair wire is
recommended.
Shielded Twisted
Pair Line
TSA Terminal Strip
1
2
3
4
5
6
7
8
9
10 11 12
HL016
+
-
VDC-High
Range Icon
Shield
Earth Ground
Figure 3... -7: VDC signal (and optional shield) terminal strip connection
FYI: Shielded wire minimizes the amount of noise picked
up by the internal conductors carrying the signals by
providing an `electrical shell’ or Faraday cage around the
internal conductors.
Twisted pair wiring exposes both conductors equally to
the ambient electrical noise. This common-mode type
noise is easier to reject by the Interface Modules input
signal conditioning circuitry than un-balanced (or
differential) noise.
Shielding and/or twisted pair wire is especially recommended in electrically
noisy environments for optimum signal protection. If shielded wire is used, a
ground wire should be run from one of the Shield terminals to an earth
ground connection to conduct away noise picked up by the shield conductor.
Only one ground wire is required per 12 position terminal strip as terminals
3, 6, 9 and 12 are all interconnected within the TSA circuit board. Multiple
terminal strips on the TSA (multiple ports) can be daisy-chained to a
common earth ground wire (Figure 3... -8).
3-12
USING T HE OM-320
3... INTERFACE MODULES
NOTE: Do not ground the signal wiring shield conductor at the sensor end
(the end away from the OM-320) as this can induce additional noise into the
TSA
1
2
3
4
5
6
7
8
9
10
11
12
1
2 3
R1
4
R2
5
6
7
+
1
2
3
4
GND
5
6
+5V
7
5
1
D03
DO2
4
8
6
7
8
2 3
4
5
6
-
10
11
10
11
12
EXT
PWR
7
8 9 10 11 12
PORT 6
GPDI INPUT
9
9
PORT 5
8 9 10 11 12
D01
3
INT EXT
CJC
PORT 1
OUTPUTS
1
2
12
PORT 2
1
2
3
4
5
6
7
8
9
10
11
12
1
2
3
PORT 3
4
5
6
7
8
9
10
11
12
PORT 4
HL015
Earth Ground
Figure 3... -8: Daisy-chained shield connections on TSA
sensor wiring..
APPLICATION NOTES; DC Voltage Channels
Channel Isolation:
The negative terminal of HLIM-1 channels configured as DC Voltage
inputs are isolated from the OM-320 circuit ground by a 22Kohm
resistor (see Figure 3... -5).
Common Mode Input Range Considerations:
To prevent saturation of the input amplifier stages and erroneous
readings, no voltages should be applied to any input terminals that
are greater than 4.0V above or below circuit ground. If the signal
being measured is not connected to the OM-320 circuit ground (ie
`isolated’ supplies are used), common mode input voltages up to 32
V can be accepted. Voltages above this level can be lethal and
should not be applied to the OM-320. Supply isolation can be
achieved by allowing the OM-320 to run from its internal batteries
(rather than an external source).
USING THE OM-320
3-13
3... INTERFACE MODULES
Multiple Measurement Nodes on a Circuit:
When measuring different voltage points from a common circuit with
multiple channels (of one or more Interface Modules), measurement
errors from induced ground currents can exist. Single ended
measurements may be required. Consult the factory for application
assistance.
HLIM-1; DC CURRENT (MA-LO) APPLICATION
mA-Lo Icon
The HLIM-1 can accept DC Current within the ranges specified in Table 3... -3. To
utilize an HLIM-1 channel as a DC Current input, set that channel’s Configuration
Switch per Table 3... -4 as a mA-LO Channel.
As shown in Figure 3... -5, when mA-DC is selected with the hardware Configuration
Switches, a precision 100 ohm burden resistor is enabled. The input signal is
measured as a voltage across the shunt resistor.
TIP: For best accuracy and absolute resolution, utilize
the lowest range possible that will cover the input signal’s
dynamic range without over-ranging.
Signal Connection (all Current Ranges):
Interface Module channels configured as mA-LO inputs provide three
terminal strip connections per input; Positive lead, Negative lead, and
Shield.
Connect the mADC signal positive and negative leads to the correct pair of
terminals on the TSA PORTx terminal strip (Figure 3... -8). Refer to
Chapter 7; HyperNet Programming for steps to generate a TSA Wiring
+ XTMR -
+
4-20mA
Panel Meter
-
TSA Terminal Strip
1
2
3
+ A
4-20mA
+ Controller
+
Power
Supply
4
5
+
B
6
7
8
9
10 11 12
+ XTMR -
-
-
GND
HL017
Figure 3... -8: Terminal strip connections for multiple 4-20mA
inputs
printout for use in making field wiring connections.
Observe polarity or the output signal will be reversed.
To minimize noise pickup on sensor wiring between the OM-320 and the end
sensor or signal source, 18 to 22 AWG shielded, twisted pair wire is
recommended. At the low current levels interfacing to the HLIM-1, voltage
3-14
USING T HE OM-320
3... INTERFACE MODULES
drop in signal wiring is not a concern, however for extremely long runs, a
voltage drop analysis should be performed for the entire loop and if
necessary larger gauge wire should be used.
FYI: Typically, with current signals (in contrast to low
level voltage signals), noise pickup will be less due to the
low impedances involved in the circuit. However, in realworld applications, one should attempt to minimize noise
on signal wires whenever possible.
Shielded wire minimizes the amount of noise picked up
by the internal conductors carrying the signals by
providing an `electrical shell’ or Faraday cage around the
internal conductors.
Twisted pair wiring exposes both conductors equally to
the ambient electrical noise. This common-mode type
noise is easier to reject by the Interface Modules input
signal conditioning circuitry than un-balanced (or
differential) noise.
Shielding and/or twisted pair wire is especially recommended in electrically
noisy environments for optimum signal protection. If shielded wire is used, a
ground wire should be run from one of the Shield terminals to an earth
ground connection to conduct away noise picked up by the signal wire
shield. Only one ground wire is required per 12 position terminal strip as
terminals 3, 6, 9 and 12 are all interconnected within the TSA circuit board.
Multiple terminal strips on the TSA (multiple ports) can be daisy-chained to a
common earth ground wire (Figure 3... -8).
NOTE: Do not ground the signal wiring shield conductor at the sensor end
(the end away from the OM-320) as this can induce additional noise into the
sensor wiring..
APPLICATION NOTES; DC Current Channels
Channel Isolation:
The negative terminal of HLIM-1 channels configured as DC Current
inputs are isolated from the OM-320 circuit ground by a 22Kohm
resistor (see Figure 3... -5).
Common Mode Input Range Considerations:
To prevent saturation of the input amplifier stages and erroneous
readings, no voltages should be applied to any input terminals that
are greater than 4.0V above or below OM-320 circuit ground.
In wiring multiple 4-20mA transmitters to the OM-320 through an
HLIM-1 channel, this 4.0V common mode level must not be
exceeded. Figure 3... -8 shows an acceptable method to connect
multiple transmitters running from a common power supply to
USING THE OM-320
3-15
3... INTERFACE MODULES
several channels on an HLIM-1 Interface Module channel without
exceeding this spec.
A simple method to comply with this spec is to insure that all
negative inputs (-) on channels configured as mA-LO inputs are
directly connected to the GROUND (-) terminal of the power supply
used for excitation of the 4 to 20 mA loop (eg the Omega
Engineering RPS-1, Rechargeable Power Supply). This will insure
that the voltage developed across the 100 ohm resistor internal to
the HLIM-1 mA-LO input channel will never exceed 2 VDC (ie 20mA
X 100 ohms = 2 VDC) relative to any channel’s (-) negative terminal.
In Figure 3... -8, the voltage developed between node [A] to [GND]
and node [B] to [GND] will never exceed 2VDC (in normal
operation).
Multiple Measurement Nodes on a Circuit:
When measuring different voltage points from a common circuit with
multiple channels (of one or more Interface Modules), measurement
errors from induced ground currents can exist. Single ended
measurements may be required. Consult the factory for application
assistance.
3-16
USING T HE OM-320
3... INTERFACE MODULES
NOTES:
USING THE OM-320
3-17
3... INTERFACE MODULES
HLIM-2; DIGITAL INTERFACE MODULE OVERVIEW
Overview:
The HLIM-2 Interface Module provides four input channels and four output
channels on a single module. Each of the four input channels can be
individually programmed for any combination of Event input, Count input, or
Frequency input. The four output channels provide current limited nominal
5VDC output. Configuration of the module is done from within HyperNet in
HyperWare.
Module Installation:
Refer to Chapter 3 for instruction on installation of the Interface Module into
the OM-320 Backplane. No special considerations are required for
installation of this module into the System Base. Upon completion of
installation, visually insure that all of the connector pins are mated in their
respective sockets.
Port Requirements / Limitations:
This module can be installed in any of the six Backplane ports.
Hardware Configuration Switches:
No hardware configuration switches are provided on the HLIM-2. All
configuration is done via the HyperNet software.
Software Configuration of the HLIM-2:
The HLIM-2 module is completely configured on a channel by channel basis
from within the HyperNet software. This software configuration and
utilization of the various HLIM-2 channels in a Program Net is covered in
Chapter 7 and within the Master Icon Listing in Appendix A.
HLIM-2; EVENT INPUT APPLICATION
Figure 3... -9:
Event icon
(HLIM-2)
The Event function of the HLIM-2 allows for the recording of the state of an ON/OFF
type input. Configured as an Event input, a channel will accept a powered input
signal (ranging from 0 to a maximum of 15VDC) or a contact closure (dry contact)
input.
♦
For powered input signals, the HLIM-2 Event function defines
signals less than 1VDC as a Low level and greater than 4VDC
(15VDC max) as a High level.
♦
For contact closure type inputs, power is automatically supplied
from the HLIM-2 channel circuitry via a 100Kohm pull-up
resistor (R1 in Figure 3... -13).
Channel input impedance is greater than 30K ohm.
A 40mS debounce circuit can be enabled via software which can be used to filter out
`contact bounce’ (Refer to the Master Icon Listing in Appendix A for details).
3-18
USING T HE OM-320
3... INTERFACE MODULES
HLIM-2; COUNTER INPUT APPLICATION
The Counter function of the HLIM-2 provides an accumulating total of signal
transitions received at its input.
Configured as a Counter type input, a channel will accept a powered input signal
ranging from 0 to a maximum of 15VDC or a contact closure (dry contact) input.
♦
For powered input signals, the HLIM-2 Counter function defines
signals less than 1VDC as a Low level and greater than 4VDC
(15VDC max) as a High level.
♦
For contact closure type inputs, power is automatically supplied
from the HLIM-2 channel circuitry.
In Counter mode, 16,777,216 transitions can be received before the counter will rollover to 0 and begin counting up again. This may be a consideration during the
implementation of a Counter channel within a Program Net and is covered in the
Master Icon Listing, Appendix A.
Channel input impedance is greater than 30K ohm.
A 40mS debounce circuit can be enabled via software which can be used to filter out
`contact bounce’ (see below).
Event / Counter Input Signal Connections:
To utilize an HLIM-2 channel as an Event or Counter input, connect the input
signal positive lead to an Input terminal (Chan A, B, C, or D) and the
negative lead to one of the four Common terminals on the TSA PORTx
terminal strip (Figure 3... -11). Note that all of the four Common terminals
are interconnected and connect directly to the OM-320 circuit ground. Refer
to Chapter 7 for steps to generate a TSA Wiring printout for use in making
field wiring connections.
Contact Closure Application
C
ha
C nn
ha e
Co nn l A
e
C mm l B
ha on
C nn
ha e
Co nn l C
m el D
m
on
Figure 3... 10:
Counter
icon (HLIM2)
1
2
3
4
5
6
7
8
9
10 11 12
Contact Closure
HL020
Isolation from Relay contact closure
Powered Signal Application
TTL or CMOS
15VDC Max
12
VDC
Lamp
Figure 3... -11: Contact closure and Powered type Event or Counter
signal input connections
USING THE OM-320
3-19
3... INTERFACE MODULES
CAUTION: Note that a direct connection exists between
the common (-) terminal on all four channels of the HLIM2 (Figure 3... -13). When connecting to multiple event or
counter signal sources sharing a common ground or
reference, insure that the source’s ground or reference is
connected to the terminal strip `common’ terminal to
prevent shorting out of the source signal and possible
damage to the HLIM-2 or TSA.
For most counter and event applications, shielding is not necessary due to
the relatively low input impedance of the channel and the high noise
immunity of the HLIM-2 channel input.
HLIM-2; FREQUENCY INPUT APPLICATION
Figure 3... 12:
Frequency
icon
(HLIM-2)
An HLIM-2 channel configured as a Frequency type input can measure input
frequencies ranging from approximately 5Hz to 20KHz. The channel will accurately
measure frequencies of sine, square, or sine approximating input waveforms with
peak to peak amplitudes of 300mVDC to 15VDC. Channel input impedance is
greater than 30K ohm within the specified input range.
The HLIM-2 incorporates an AC coupled front-end amplifier for use with low
amplitude signals ( see AMP in Figure 3... -13).
Figure 3... -13: Simplified schematic of HLIM-2 input channel (single
channel shown)
Frequency Signal Connection:
To utilize an HLIM-2 channel as a Frequency input, connect the input signal
positive lead to one of the four Input terminals (Chan A, B, C, or D) and the
3-20
USING T HE OM-320
3... INTERFACE MODULES
negative lead to one of the four Common terminals on the TSA PORTx
terminal strip (Figure 3... -14). Note that all of the four Common terminals
are interconnected and connect directly to the OM-320 circuit ground..
Refer to Chapter 7 for steps to generate a TSA Wiring printout for use in
making field wiring connections.
CAUTION: Note that a direct connection exists between
the common (-) terminal on all four channels of the HLIM2 (Figure 3... -13). When connecting to multiple
frequency sources sharing a common ground or
reference, insure that the source’s ground or reference is
connected to the terminal strip `common’ terminal to
prevent shorting out of the frequency signal and possible
damage to the HLIM-2 or TSA.
For Frequency recording applications with small signal amplitude, high
frequencies, long lead length and/or in noisy environments, twisted pair wire
will provide extra noise immunity. In extremely noisy applications, shielded
wire may be required. If shielded wire is used, the shield at the OM-320 end
should be connected to an external earth ground (Figure 3... -14) or if
available, a grounded Shield connection provided on another type installed
interface module (such as the HLIM-1).
NOTE: Do not ground the shield wire at the end away from the OM-320.
Ch
Chann
e
Coann l A
e
m
Ch m l B
an on
Ch n
an el C
ne
lD
TSA Terminal Strip
Shielded Twisted
Pair Line
1
Frequency
Source A
2
3
4
5
6
7
8
9
10 11 12
HL022
+
-
Frequency
Source B
+
Shield
Earth Ground
Figure 3... -14: Frequency input terminal strip connections (two inputs
shown)
USING THE OM-320
3-21
3... INTERFACE MODULES
HLIM-2; DIGITAL OUTPUT APPLICATION
The HLIM-2 provides four channels dedicated as outputs. These channels can be
configured for functions such as alarming. The output is a current limited voltage
signal with the voltage/current characteristics shown in Figure 3... -15. As shown,
with a light load, the output voltage maintains approximately 4+ VDC but as the
Digital
Output icon
(HLIM-2)
Figure 3... -15: HLIM-2 Digital output drive
characteristics
current draw increases, current limiting occurs and the output voltage droops. The
output can be short circuited continuously without damage to the output drive
circuitry, but the OM-320 battery life will be drastically reduced.
Note that the when the Output is OFF, it is merely floating, ie it is not driven to a
ground (or shorted to ground) potential. This may be a consideration when driving
TTL or other type inputs. A pull-down resistor (eg 10K) can be added on the terminal
strip connections from the output to the common to provide a low resistance OFF
state if necessary. Keep in mind that this resistor will consume power when the
Output is ON.
Digital Output Signal Connections:
Ch
Chan E
Coan F (ou
t)
m
Ch mo (ou
t
a n )
Ch n G
an (o
Co H u
m (o t)
m u
on t)
To utilize an HLIM-2 Output channel, connect the load positive lead to an
Output terminal (Chan E, F, G, or H) and the load negative lead to one of
TSA Terminal Strip
1
2
3
4
5
6
7
8
Channel E
LOAD
9
10
11
12
HL024a
Channel F
LOAD
Figure 3... -16: HLIM-2 Digital output terminal strip
3-22
USING T HE OM-320
3... INTERFACE MODULES
the four Common terminals on the TSA PORTx terminal strip (Figure 3... 16). Note that all of the four Common terminals are interconnected and
connect directly to the OM-320 circuit ground. Refer to Chapter 7 for steps
to generate a TSA Wiring printout for use in making field wiring connections.
USING THE OM-320
3-23
3... INTERFACE MODULES
HLIM-4; RTD / RESISTANCE INTERFACE MODULE OVERVIEW
Overview
The HLIM-4 is a four channel Interface Module for use in the OM-320
System Base. Each of the four channels can be individually programmed
for any combination of RTD (100 ohm or 1000 ohm), Resistance or
Thermistor input via the HyperWare software (HyperNet).
Additionally, for RTD and resistance measurements, 2, 3, and 4-Wire
configurations can be selected. With 3 and 4-wire configurations, the
resistance due to the extension wires is minimized. With 3 or 4-wire
configuration, two input channels are required.
Module Installation:
Refer to the OM-320 User’s Manual Section 3 for instruction on installation
of the Interface Module into the OM-320 Backplane. No special
considerations are required for installation of this module into the System
Base. Upon completion of installation, visually insure that all of the
connector pins are mated in their respective sockets.
Port Requirements / Limitations:
This module can be installed in any of the six Backplane ports.
Hardware Configuration Switches:
No hardware configuration switches are provided on the HLIM-4. All
configuration is done via the HyperNet software.
Software Configuration of the HLIM-4
The HLIM-4 module is completely configured on a channel by channel basis
from within the HyperNet software. This software configuration and
utilization of the various HLIM-4 channels in a Program Net is covered in
overview in Chapter 6, within the Master Icon Listing in Appendix A, and with
specific detail in this document.
When the HLIM-4 module is detected in a OM-320 after clicking on the New
Program button from within HyperNet, four icons representing the HLIM-4
input channels will display on the screen. The icons will display as 2-wire
RTD inputs as the default. These icons can be switched to Resistance or
Thermistor inputs by double-clicking on the icon then on the Change button.
HLIM-4; RTD INPUT APPLICATION
The RTD function of the HLIM-4 allows for the input of Platinum RTD’s with any of
the following characteristics:
RTD Input
♦
100 or 1000 ohm @ 0’ C
♦
European (0.0385) or American (0.0392) alpha coefficient curve
♦
2, 3, or 4-wire configuration
The actual temperature is calculated from the resistance and can be output in either
degrees C or F. Two input temperature ranges are provided for maximizing span
3-24
USING T HE OM-320
3... INTERFACE MODULES
and ultimate resolution of the readings. The RTD element resistance is measured
using a constant current ratiometric technique which provides excellent stability over
time and temperature.
Refer to the Excitation Current Table for current levels utilized in the excitation of
the RTD elements.
HLIM-4; THERMISTOR INPUT APPLICATION
Thermistor
Input
The Thermistor function of the HLIM-4 allows for the input of 10,000 ohm @ 25C
NTC thermistors conforming to the Fenwall Curve 16 or equivalent RT curve.
The actual temperature is calculated from the resistance and can be output in either
degrees C or F. Four input temperature ranges are provided for maximizing span
and ultimate resolution of the readings. The Thermistor element resistance is
measured using a constant current ratiometric technique which provides excellent
stability over time and temperature. Due to the high resistance vs temperature ratio,
only 2-wire configuration is provided (and required).
Refer to the Excitation Current Table for current levels utilized in the excitation of
the Thermistor element under test.
HLIM-4; RESISTANCE INPUT APPLICATION
Resistance
Input
The Resistance function of the HLIM-4 can measure resistances ranging from 200
ohm to 400,000 ohm full scale. 2, 3, or 4-wire configurations can be used depending
on absolute accuracy requirements.
Twelve input resistance ranges are provided for maximizing span and ultimate
resolution of the readings. The resistance is measured using a constant current
ratiometric technique which provides excellent stability over time and temperature.
Refer to the Excitation Current Table for current levels utilized in the excitation of
the resistance elements being measured.
HLIM-4; INPUT SIGNAL CONNECTION METHODS:
For all three signal types, RTD, thermistor, and resistance, a ratiometric resistance
measurement technique is used. In the case of the RTD and thermistor
measurements, a software conversion is then used to convert this resistance into
temperature.
In measuring the resistance of a distant element with a conventional 2-wire
connection configuration, the resistance of the lead wires running from the OM-320
TSA terminal to the actual sensing element itself will add resistance and
corresponding error. The magnitude of these errors depends on the resistance of the
lead wires which is a function of wire gauge, temperature, and any connection
resistance. If the resistance is small relative to the resistance being measured, this
additive lead wire resistance can be ignored (eg in thermistor or Kohm resistance
measurements). However, in applications of RTDs or lower resistance ranges this
lead wire resistance can add up to substantial measurement errors... especially if
long runs or lighter gauge lead wire is used. For example, in a 100 ohm RTD, 0.4
ohms of lead wire resistance would translates to a reading error of 1 Deg C.
To minimize these lead wire induced errors, the HLIM-4 supports 3-wire and 4-wire
connection methods. Connection diagrams and descriptions for each of the wiring
methods follow.
USING THE OM-320
3-25
3... INTERFACE MODULES
2-Wire Configuration
The 2-wire configuration is easiest to use and allows for utilization of all four
input channels of the HLIM-4 as individual channels. All three input types,
RTD, thermistor, and resistance can be measured with the 2-wire technique.
For short runs, heavier gauge lead wires and/or higher resistance
measurements, the 2-wire technique will provide excellent performance with
minimal error.
2-Wire
Config
Calculating Lead Wire Effects
To calculate resistance errors induced by lead wires in a 2-wire
configuration:
1. Estimate the total length of the lead wire to be used.
2. Multiply this length by the resistance per foot of the wire
to be used. Complete wire tables are available from wire
manufacturers and in many electronic reference books.
For general reference, an abbreviated table is included
below.
Note that wire resistances are typically given per 1000
foot.
3. Assess the effects of this resistance on the required
accuracy. For RTD applications, tables are available
from the manufacturer that correlate RTD element
resistance to degrees over the usable range. As a
general guideline, a 100 ohm RTD will have a 1 Degree
C change for every 0.36 ohms, a 1000 ohm RTD will
have a 1 degree C change for every 3.6 ohms (hence the
increasing popularity of the 1000 ohm RTD).
Wire Gauge
ohms per 1000 ft
@ 25C (77F)
ohms per 1000 ft
@ 65C (149F)
26
41.6
48
24
26.2
30.2
22
16.5
19.0
20
10.4
11.9
18
6.5
7.5
16
4.1
4.7
Table 5: Typical Copper Wire resistance
2-Wire TSA Connections:
For each Interface Module Port, a 12 position terminal strip is
provided on the TSA. Each HLIM-4 input channel utilizes 3 of the
12 terminals (1-2-3, 4-5-6, 7-8-9, 10-11-12). Connect the input
signal to the first two of the three input terminals (1-2, 4-5, 7-8, 1011) on the TSA. A wire jumper must then be installed from the
second to the third terminal (2-3, 5-6, 8-9, 11-12).
3-26
USING T HE OM-320
3... INTERFACE MODULES
Refer to Chapter 6 for steps to generate a TSA Wiring printout after
construction of a Program Net for use in making field wiring
connections.
A
B
C
D
1 2 3 4 5 6 7 8 9 10 11 12
RTD Element
Jumper
Cable Shield
hl-2wire
Figure 3... -17; 2-Wire Configuration
For long lead wire runs and in applications in electrically noisy
environments, it is recommended that twisted pair and/or shielded
wire be used. The extension wire shield can be connected to the 3rd
terminal (ground) along with the jumper. If shielded wire is used, a
ground wire should be run from one of the shield/ground (3rd)
terminals on the TSA to an earth ground connection to conduct away
noise picked up by the shield conductor. Terminals 3, 6, 9, and 12
are all internally connected so a single grounding wire will suffice.
Refer to Figure 3-8 in the OM-320 Users Manual.
3-Wire Configuration
3-Wire
Config
The 3-wire configuration is used in applications where the lead wire effects
calculated as above will have a significant error inducing effect on the
resistance measurement. The 3-wire configuration requires two input
channels (A and B or C and D) to implement. From within the HyperNet
Window, double-clicking Channel A or C icons displays a dialog and allows
for selection of 2, 3, or 4-wire connection. When 3 -wire is selected, a
second corresponding icon (Channel B or D) is removed as this second
channel is required for the 3 -wire measurement.
3-Wire Compensation Theory:
With a 3-wire configuration, the resistance of one of the lead wires is
measured, doubled and then subtracted out of the measured total
element plus lead wire circuit resistance. The 3-wire configuration,
as the name implies, requires the use of three discrete wires from
the TSA to the element. Two of the leads connect to one common
end of the element and the other lead connects to the other end of
the element. The 3-wire configuration provides nearly the same
level of error compensation as the 4-wire configuration with one less
wire.
USING THE OM-320
3-27
3... INTERFACE MODULES
Due to the fact that only one of the lead wires resistance is actually
measured and the other lead wire is assumed to match, in using the
3-wire configuration, it is important that both lead wires used for the
excitation current (connected to terminals 1 & 2, or 7 & 8 and
opposite ends of the element) are of the same approximate length,
same gauge, and operating at the same temperature. The third lead
(connected to terminal 4 or 10) can be of lighter gauge if desired as
a very low current flows through it.
3-Wire TSA Connections:
As can be seen in the 3-Wire Wiring Diagram, each channel
requires 6 of the 12 terminals. Channel A uses terminals 1 through
6, and Channel C uses terminals 7 through 12.
A
C
3rd Wire used as SENSE lead
1 2 3 4 5 6 7 8 9 10 11 12
RTD Element
Jumpers
Cable Shield
hl-3wire
Figure 3... -18: 3-Wire Configuration
Two matching gauge Excitation wires should connect from opposite
ends of the element and to terminals 1-2 or 7-8 on the TSA. A third
Sense wire then connects from the element (sharing the connection
with a lead from terminal 1 or 7 on the TSA) to terminal location 4 or
10. Two wire jumpers must then be installed connecting terminals 23 and 5-6 for Channel A and 8-9 and 11-12 for Channel C.
Refer to Chapter 6 for steps to generate a TSA Wiring printout
after construction of a Program Net for use in making field wiring
connections.
For long lead wire runs and in applications in electrically noisy
environments, it is recommended that twisted pair and/or shielded
wire be used. The extension wire shield can be connected to
terminal 6 or 12 (ground). If shielded wire is used, a ground wire
should be run from one of the ground terminals on the TSA to an
earth ground connection to conduct away noise picked up by the
shield conductor. Terminals 3, 6, 9, and 12 are all internally
connected so a single grounding wire will suffice. Refer to Figure 38 in the OM-320 Users Manual.
3-28
USING T HE OM-320
3... INTERFACE MODULES
4-Wire Configuration
4-Wire
Config
The 4-wire configuration is used in applications where the lead wire effects
calculated as above will have a significant error inducing effect on the
resistance measurement. The 4-wire configuration provides the best
compensation for lead wire resistance at the expense of running a 4th lead.
The 4-wire configuration requires two input channels (A and B or C and D) to
implement. From within the HyperNet Window, double-clicking Channel A
or C icons displays a dialog and allows for selection of 2, 3, or 4-wire
connection. When 4-wire is selected, a second corresponding icon (Channel
B or D) is removed as this second channel is required for the 4-wire
measurement.
4-Wire Compensation Theory:
With a 4-wire configuration, the excitation current flows to and from
the element through one pair of leads. The actual voltage
developed across the element is then measured using a second pair
of Sense leads that conduct a very small amount of current (hence
adding negligible I * R voltage measurement error) .
The 4-wire configuration, as the name implies, requires the use of
four discrete wires from the TSA to the element. Two of the leads
connect to one end of the element and the other two to the other end
of the element.
Due to the fact that the excitation current flows through a separate
pair of leads, wire gauge, temperature effects, and connection
resistance has no effect on the accuracy of the readings. The
Sense leads (connected to terminals 4-5 or 10-11) can be of lighter
gauge if desired as a very low current flows through them.
4-Wire TSA Connections:
As can be seen in the 4-Wire Wiring Diagram, each channel
requires 6 of the 12 terminals. Channel A uses terminals 1 through
6, and Channel C uses terminals 7 through 12.
The Excitation wires connect from opposite ends of the element and
to terminals 1-2 or 7-8 on the TSA. A second pair of Sense wires
then connects from opposite ends of the element to terminals 4-5 or
10-11. A wire jumper must then be installed connecting terminals 23 for Channel A and 8-9 for Channel C.
Refer to Chapter 6 for steps to generate a TSA Wiring printout
after construction of a Program Net for use in making field wiring
connections.
USING THE OM-320
3-29
3... INTERFACE MODULES
C
A
Excitation leads
1 2 3 4 5 6 7 8 9 10 11 12
RTD Element
+
+
-
Jumper
Sense leads
Cable Shield
hl-4wire
Figure 3... -19: 4-Wire Configuration
For long lead wire runs and in applications in electrically noisy
environments, it is recommended that twisted pair and/or shielded
wire be used. The extension wire shield can be connected to
terminal 6 or 12 (ground). If shielded wire is used, a ground wire
should be run from one of the ground terminals on the TSA to an
earth ground connection to conduct away noise picked up by the
shield conductor. Terminals 3, 6, 9, and 12 are all internally
connected so a single grounding wire will suffice. Refer to Figure 38 in the OM-320 Users Manual.
Range
Res 200 ohm
Res 200 ohm
Res 400 ohm
Res 400 ohm
Res 2000ohm
Res 4000 ohm
Res 10,000 ohm
Res 20,000 ohm
Res 40,000 ohm
Res 100,000 ohm
Excitation
Current
1 mA
10 mA
1 mA
10 mA
100 uA
100 uA
100 uA
100 uA
10 uA
10 uA
Range
Res 200,000 ohm
Res 400,000 ohm
RTD-100 ohm 300C
RTD-100 ohm 850C
RTD-1000 ohm 300C
RTD-1000 ohm 850C
Therm -32 to 250C
Therm -4 to 250C
Therm +10 to 250C
Therm +25 to 250C
Excitation Currents used for HLIM-4 Ranges
3-30
USING T HE OM-320
Excitation
Current
10 uA
10 uA
1 mA
1 mA
100 uA
100 uA
10 uA
10 uA
10 uA
100 uA
3... INTERFACE MODULES
NOTES:
USING THE OM-320
3-31
3... INTERFACE MODULES
HLIM-8; DIGITAL I/O INTERFACE MODULE OVERVIEW
Overview:
The HLIM-8 is an eight channel Interface Module for use in the OM-320
System Base. Each of the eight channels can be individually programmed
for any combination of Event input or Digital output via the HyperWare
software (HyperNet).
Module Installation:
Refer to Chapter 3 for instruction on installation of the Interface Module into
the OM-320 Backplane. No special considerations are required for
installation of this module into the System Base. Upon completion of
installation, visually insure that all of the connector pins are mated in their
respective sockets.
Port Requirements / Limitations:
This module can be installed in any of the six Backplane ports.
Hardware Configuration Switches:
No hardware configuration switches are provided on the HLIM-8. All
configuration is done via the HyperNet software.
Software Configuration of the HLIM-8:
The HLIM-8 module is completely configured on a channel by channel basis
from within the HyperNet software. This software configuration and
utilization of the various HLIM-8 channels in a Program Net is covered in
Chapter 7, within the Master Icon Listing in Appendix A, and within this
document.
HLIM-8; EVENT INPUT APPLICATION
Event icon
(HLIM-8)
The Event function of the HLIM-8 allows for the recording of the state of an ON/OFF
type input. Configured as an Event input, a channel will accept a powered input
signal (ranging from 0 to a maximum of 26VDC) or a contact closure (dry contact)
input.
♦
For powered input signals, the HLIM-8 Event function defines
signals less than 1VDC as a Low level and greater than 4VDC
(26VDC max) as a High level.
♦
For contact closure type inputs, power is automatically supplied
from the HLIM-8 channel circuitry via a 100Kohm pull-up
resistor (R1 in Figure 3... -20).
Channel input impedance is greater than 30K ohm.
A 40mS debounce circuit can be enabled via software which can be used to filter out
`contact bounce’ (Refer to the Master Icon Listing in Appendix A for details).
3-32
USING T HE OM-320
3... INTERFACE MODULES
Figure 3... -20: Simplified schematic of HLIM-8 input/output
channel (single channel shown)
Event Input Signal Connections:
Ch
an
Ch A
a
Co n B
mm
Ch on
Chan C
a
Co n D
mm
Ch on
a
Ch n E
Coan F
m
Ch mo
an n
Ch G
a
Co n H
mm
on
To utilize an HLIM-8 channel as an Event input, connect the input signal
positive lead to an Input terminal (Chan A, B, C, D, E, F, G, or H) and the
negative lead to one of the four Common terminals on the TSA PORTx
terminal strip (Figure 3... -21). Note that all of the four Common terminals
on the terminal strip (3, 6, 9, 12) are interconnected and connect directly to
the OM-320 circuit ground. Refer to Chapter 7 for steps to generate a TSA
Wiring printout for use in making field wiring connections.
Contact Closure Application
1
2
3
4
5
6
7
8
9
10 11 12
Contact Closure
HL032
Isolation from Relay contact closure
Powered Signal Application
TTL or CMOS
15VDC Max
12
VDC
Lamp
Figure 3... -21: Contact closure and Powered type Event signal input
USING THE OM-320
3-33
3... INTERFACE MODULES
CAUTION: Note that a direct connection exists between
the common (-) terminal on all eight channels of the
HLIM-8. When connecting to multiple event signal
sources sharing a common ground or reference, insure
that the source’s ground or reference is connected to the
terminal strip `common’ terminal to prevent shorting out
of the source signal and possible damage to the HLIM-8
or TSA.
For most event applications, shielding is not necessary due to the relatively
low input impedance of the channel and the high noise immunity of the
HLIM-8 channel input.
HLIM-8; DIGITAL OUTPUT APPLICATION
An HLIM-8 channel configured as a Digital Output can provide an ON/OFF voltage
signal for alarming applications. The output is a current limited voltage signal with
the approximate voltage/current characteristics shown in Figure 3... -22. As shown,
with a light load, the output voltage maintains approximately 4+ VDC but as the
Digital
Output icon
(HLIM-8)
Figure 3... -22: HLIM-8 Digital output drive
characteristics
current draw increases, current limiting occurs and the output voltage droops. The
output can be short circuited continuously without damage to the output drive
circuitry, but the OM-320 battery life will be correspondingly reduced.
3-34
USING T HE OM-320
3... INTERFACE MODULES
Digital Output Signal Connections:
To utilize an HLIM-8 channel as a Digital Output, connect the load positive
lead to an Output terminal (Chan A, B, C, D. E, F, G, or H) and the load
negative lead to one of the four Common terminals on the TSA PORTx
terminal strip (Figure 3... -23). Note that all of the four Common terminals
are interconnected and connect directly to the OM-320 circuit ground (see
Figure 3... -20). Refer to Chapter 7 for steps to generate a TSA Wiring
printout for use in making field wiring connections.
Ch
a
B nn
e
Co l A
m
C m
on
D
Co
m
E m
on
F
Co
m
G m
on
H
Co
m
m
on
TSA Terminal Strip
1
2
3
4
5
6
7
8
9
10 11 12
HL034
LOAD
LOAD
Figure 3... -23: HLIM-8 Digital output terminal strip
connections
USING THE OM-320
3-35
3... INTERFACE MODULES
HLIM-5; PCMCIA MEMORY CARD MODULE
Overview:
The HLIM-5 is a special function Interface Module for use in the OM-320
System Base. The HLIM-5 provides capability to record data to a removable
SRAM based memory card (Omega Engineering Part Numbers; MC-50, MC100, MC-200) rather than to internal OM-320 memory. This memory card
can then be read through a PD-1, PCMCIA Drive, installed (connected to) on
a PC.
In addition to this function, the HLIM-5 provides support circuitry for the MM14.4 and MM-2400 modems. These optional internal modems provide
phone line based control and interrogation of the OM-320 as well as a
Pager Alarm function. The modems plug directly into the HLIM-5 and can
be field installed.
Module Installation:
Installation of the HLIM-5 into the OM-320 System Base is unique in that it
has a memory card socket that projects through the front panel of the OM320 (Figure 3... -24). For this reason, the HLIM-5 can only be installed into
Backplane Port 6.
HLIM-5
Modem Option
Other Modules
HL026
Front Panel
Figure 3... -24: HLIM-5 installation in Port 6
To install the HLIM-5 follow these steps:
1. Relocate any Interface Module already installed in Port
6. Refer to the Interface Module Installation, page 3-2
for general Interface Module installation and removal
instructions.
2. On the OM-320 front panel, remove the two retaining
screws and the cover over Option Port 2. Save the
screws and cover.
3. Follow the instructions specified in the Interface Module
Installation, page 3-2 to install the HLIM-5 into the OM320 Backplane. Note that one circuit board of the HLIM-5
actually fits along the edge of the backplane and nearly
touches the metal front panel of the OM-320 (Figure 3...
-24). Upon completion of installation, visually insure that
3-36
USING T HE OM-320
3... INTERFACE MODULES
all of the connector pins are mated in their respective
sockets.
4. Carefully align and fasten in place the special HLIM-5
memory card socket bezel plate provided with the HLIM5 module. Use the two machine screws removed in step
1.
Configuration of the HLIM-5:
The presence of a HLIM-5 is detected automatically by the OM-320 upon
power-up. No additional software or hardware configuration of the module is
necessary.
Operation of the HLIM-5 and PCMCIA Memory Card:
For full details on the configuration and use of the PCMCIA card, refer to
Chapter 6.
NOTE
Numerous types of PCMCIA cards are currently
available on the market utilizing various
technologies. To insure compatibility with the HLIM5, utilize only Omega Engineering supplied memory
cards or verify alternate parts compatibility with
Omega Engineering Technical Support prior to
plugging into the OM-320.
USING THE OM-320
3-37
3... INTERFACE MODULES
MM-2400; 2400 BAUD INTERNAL MODEM MODULE
Overview:
The MM-2400 is a 1200/2400 Baud telephone modem module designed for
installation internally in the OM-320 System Base. The MM-2400 provides
direct connection between the OM-320 and a standard voice quality
telephone line. This will allow the full complement of serial communications
and control of the OM-320 from a remotely located PC equipped with a
modem.
The MM-2400 is a low power modem, drawing approximately 50mA during
operation (off-hook) and 0 mA while quiescent (on-hook). It installs on the
HLIM-5 Interface Module.
Modem Module Installation:
The MM-2400 plugs into a HLIM-5 PCMCIA Interface Module, then into the
OM-320 System Base backplane. The MM-2400 telephone line connectors
project through the front panel of the OM-320 via Option Port 1. In
installation, the MM-2400 is plugged into the HLIM-5 and fastened in place,
then the entire assembly is installed into the OM-320 System Base. The
HLIM-5 / MM-2400 assembly can only be installed into Backplane Port 6, as
it utilizes the front panel Option Ports.
To install the MM-2400, follow these steps:
1. If an HLIM-5 (without the MM-2400 is currently installed
in Port 6, remove it. If another Interface Module is
installed in Port 6, relocate it to another Port. Refer to
the Interface Module Installation section, page 3-2 for
general Interface Module installation and removal
instructions.
1. On the OM-320 front panel, remove the four retaining
Figure 3... -25: Modem module installation onto HLIM-5
3-38
USING T HE OM-320
3... INTERFACE MODULES
2.
3.
4.
5.
6.
7.
screws and the covers over Option Ports 1 and 2. Save
the screws and cover.
After discharging any static electricity in your body (see
Interface Module Handling precautions at the start of this
chapter), remove the MM-2400 from its static proof bag.
Unplug the terminal strip plug and set aside. Orient the
MM-2400 module as shown in Figure 3... -25, and plug
the gold pins on the modem module into the mating
black connector on the HLIM-5. Visually check that the
pins are all in the connector.
Install the two machine screws provided with the MM2400 through the HLIM-5 circuit board and into the two
plastic standoffs on the MM-2400. Tighten the screws
snugly.
Unplug the two position terminal plug from the MM-2400
module.
Follow the instructions specified in the Interface Module
Installation Section, page 3-2 to install the HLIM-5 / MM2400 assembly into the OM-320 Backplane. Upon
completion of installation, visually insure that all of the
connector pins are mated in their respective sockets.
Carefully align and fasten in place the special HLIM-5
memory card socket bezel plate provided with the HLIM5 module over Option Port 2 and the special bezel
provided with the MM-2400 over Option Port 1. Use the
machine screws removed in step 1.
Plug in the terminal strip plug removed in step 3.
Telephone Line Connection:
A standard voice grade telephone line can be used with the MM-2400. The
two phone conductors (tip and ring) can be connected to the MM-2400 via
the provided plug-in terminal plug or a modular phone plug. Polarity is not
critical for either connection method.
Terminal Plug method: Route the phone line through one of the
strain reliefs at the bottom of the OM-320 enclosure. Strip back the
phone lead insulation and connect the conductors to the terminal
plug (polarity is not critical). The plug can then be plugged into the
mating connector on the MM-2400 accessible through the OM-320
front panel Option Port 1.
Modular Phone Plug method: Plug a telephone cord equipped
with a 6/2 modular phone plug (RJ-12 type) into the modular phone
socket accessible through the OM-320 front panel Option Port 1.
Insure that the phone conductors are installed into the center two
locations of the plug (polarity is not critical).
Various length phone extension cords with the RJ-12 type modular
phone plugs on each end are readily available from most phone
supply stores. Insure that the `telephone base’ type cord is used...
not the `handset’ cord as the handset plug is smaller and will not
effect a good connection.
Plug the other end of the phone cord into the telephone wall jack.
USING THE OM-320
3-39
3... INTERFACE MODULES
Hardware Configuration Switches:
No hardware configuration switches are provided on the HLIM-5 or the MM2400. All configuration is done via the HyperWare software.
Operation of the MM-2400:
The presence of the installed HLIM-5 and MM-2400 is detected
automatically by the OM-320 upon power-up. The MM-2400 is selfconfiguring with the exception of one parameter... the number of rings
before the OM-320 answers an incoming call. This parameter is set from
within HyperNet (the Global icon) and is thoroughly explained within the
Master Icon Listing in Appendix A under the Global icon section.
Additional information on the setup and configuration of the modem located
at the PC is provided in Appendix K.
3-40
USING T HE OM-320
3... INTERFACE MODULES
MM-14.4; 14.4KBAUD INTERNAL MODEM MODULE
Overview:
The MM-14.4 is a 1200, 2400, 4800, 9600, 14,400 Baud telephone modem
module designed for internal installation in the OM-320 System Base. The
MM-14.4 provides direct connection between the OM-320 and a standard
voice quality telephone line. It allows the full complement of serial
communications and control of the OM-320 from a remotely located modem
equipped PC.
The MM-14.4 is a low power modem, drawing approximately 125mA during
operation (off-hook) and 0 mA while quiescent (on-hook). It installs on the
HLIM-5 Interface Module.
Installation / Operation:
The MM-14.4 is installed and configured identically to the MM-2400. Refer
to the MM-2400 installation and configuration instructions in the previous
section for details.
Additional information on the setup and configuration of the modem located
at the PC is provided in Appendix K.
USING THE OM-320
3-41
4... HYPERWARE™ SOFTWARE INTRODUCTION
4... HYPERWARE™ SOFTWARE INTRODUCTION
SOFTWARE OVERVIEW
Included with the OM-320 System is HyperWare™, a multi-functioned Windows™
based software package. HyperWare is an integrated program that works with the
OM-320 to provide communications, programming and collected data display.
Integrated in the HyperWare program are the following windows / environments:
♦
HyperComm™ - supports serial communications between the
OM-320, the PC, and the PCMCIA drive graphically. Via
HyperComm, Status inquiries can be made, data is downloaded,
and Program Nets are transferred between the PC, the PCMCIA
drive and/or the OM-320,
♦
HyperNet™ - a visual programming environment for
developing Program Nets via Icons and connections. The
developed Net is then transferred to the OM-320 memory where
it provides operating instructions for the logging session.
♦
Post Processing (including HyperPlot™) - for graphing and
data conversion of OM-320 collected data.
♦
HyperTrack™ - providing real-time data display of Program
Net nodes as they are processed by the OM-320.
Figure 4... -1: Organization of HyperWare software
Each of the above HyperWare windows is covered in a separate chapter within this
manual. In a typical data collection session with the OM-320, all of the above
functions will be used.
PC REQUIREMENTS
To install and use HyperWare, the following minimum equipment is required:
USING THE OM-320
4-1
4... HYPERWARE™ SOFTWARE INTRODUCTION
♦
386 or higher IBM PC compatible
♦
4 Meg (minimum) of RAM memory
♦
Mouse or other pointing device
♦
Serial port for OM-320 connection (via Modem or RS-232 link)
♦
Microsoft Windows 3.1
♦
VGA display
♦
5 Meg of Hard disk space
♦
Windows supported / installed printer (optional)
HYPERWARE INSTALLATION
To install the HyperWare program onto your PC hard disk follow these steps:
1. Start Microsoft Windows.
2. Insert the HyperWare Program disk #1 into your floppy drive.
3. From the Program Manager's File menu, select Run, then type
a:install (or b:install) then <ENTER>
4. Follow the on screen directions for installing the software.
Dialogs prompting for User input will display during the
installation providing the opportunity to customize the
installation. For most Users, selecting the default responses to
the prompts will provide a fool-proof installation.
5. After installation, double-click on the new HyperWare icon (from
within the Program Manager) to launch the HyperWare
application.
UPGRADING HYPERWARE TO A NEW VERSION:
Instructions for upgrading HyperWare from a previous release are supplied with the
new upgrade diskette.
4-2
4... HYPERWARE™ SOFTWARE INTRODUCTION
HYPERWARE PROGRAM TOPOLOGY
Upon launch of the HyperWare program, the HyperComm window will be displayed.
From the HyperComm window, switching to other windows (HyperNet, HyperTrack,
and Post-Processing) is performed by clicking on the buttons displayed on the button
bar at the top of the HyperComm window. HyperWare can be visualized as shown
in Figure 4... -1. From the other windows, return to the HyperComm window by
clicking on the HyperComm button at the left end of the button-bar.
Figure 4... -2: The Opening HyperComm Window
USER INTERFACE
HyperWare complies with the conventional keyboard and mouse commands that
are used in most Windows applications. Some commands require double-clicking
(such as the Enable and Stop commands via serial communications) and others
utilize a visual click and drag of icons (as in construction of Program Nets and for
icon based serial communications).
In the HyperComm window and throughout HyperWare, passing the cursor over
icons and buttons results in a short descriptor display on the Status Message Bar in
the lower left corner of the screen.
HyperWare features on-line help using the conventional Windows help format.
Press the <F1> key at any time or uitilize the Help menu to select options for
HyperWare help.
USING THE OM-320
4-3
4... HYPERWARE™ SOFTWARE INTRODUCTION
NOTES:
4-4
5... HYPERCOMM™ COMMUNICATIONS
5... HYPERCOMM™ SERIAL COMMUNICATIONS
OVERVIEW
Upon launching HyperWare, the HYPERCOMM window (Figure 5... -1) will appear with
graphic images of a PC with a connected PCMCIA card drive (optional) and a OM320. From within this window, communications between the PC and the OM-320 as
well as communications between the PC and the PCMCIA card drive are initiated
and handled.
Figure 5... -1: HyperComm serial communications window (no serial connection)
The external PCMCIA card drive is an optional system item. Data and Program Net
information is transferred between the PC and the PCMCIA card drive by simply
dragging and dropping the appropriate icons overlaying the PC and the drive.
Chapter 6 contains details on the setup and use of the PCMCIA card feature.
In serial communication between the OM-320 and the PC, both RS-232 and
telephone modem communications are supported. A simple dialog box is provided
for the communication link setup, thereafter all communications are handled by
dragging icons (representing information) between the graphic PC and OM-320.
Communications between the PC and a connected OM-320 are required for a
multitude of functions including download of OM-320 collected data, programming of
the OM-320, and real-time data display.
From the HyperComm window, access to the HYPERNET, HYPERTRACK, and POSTPROCESSING windows is achieved by clicking on one of the three buttons on the
Button Toolbar.
USING THE OM-320
5-1
5... HYPERCOMM™ COMMUNICATIONS
ESTABLISHING AN RS-232 LINK
RS-232 Hardware Connection:
Select and plug in one of the provided DB-9 to RJ-12 adapters to fit the PC
serial port desired for OM-320 communications. A 9-pin and a 25-pin
adapter are provided with the OM-320. Plug one end of the provided RS232 cable (CAR-4) into the adapter modular jack and the other into the
Serial Port jack on the front of the OM-320 and turn OM-320 System Power
ON.
HyperComm Connection via RS-232:
After launching HyperWare and display of the opening screen, the
HYPERCOMM window will be displayed. Move the cursor over the graphic
DB-25 type connector (center of the screen on the cable) and double-click to
bring up the SERIAL COMMUNICATIONS dialog box (Figure 5... -2).
Figure 5... -2: Serial Communications setup dialog box (RS-232 mode)
For RS-232 communication, insure that the USE MODEM check box in the
MODEM CONTROL section is not checked.
Select the PORT using the pull-down list boxes under the PORT PARAMETER
SECTION. Select the port to which the RS-232 adapter is connected. For
RS-232 communications 19,200 Baud is automatically selected and will
provide the fastest data transfers..
5-2
USING THE OM-320
5... HYPERCOMM™ COMMUNICATIONS
TIP: If the port number is unkown, select one of the
ports then attempt to connect (see following). If
unsuccessful, change the selected Port and try again.
After selecting the port, click on the CONNECT button to initiate
communication with the OM-320. At this time, HyperWare will attempt to
communicate with the OM-320 . Close the SERIAL COMMUNICATIONS dialog
box by clicking the OK button and HyperWare will return to the HYPERCOMM
window ready for communication.
If the link fails, check the following:
♦
Is the cable connected?
♦
Is the Omega Engineering supplied adapter used?
♦
Insure that the adapter used is the one that was supplied
with the OM-320. (other Omega Engineering products
use other similar looking but funtionally different
adapters)
NOTE: LBI supplied adapters are wired for proper
compatibility between the OM-320 and the PC. If an
alternatively sourced adapter is used, insure that it
complies with the wiring specified in Appendix I.
Also, adapters that convert DB-25 to DB-9 (and vis-aversa) commonly cause problems. Utilize the proper
adapter supplied with the OM-320 (both DB-9 and DB-25
are supplied).
♦
Is the OM-320 power ON?
♦
Select another serial port from within the SERIAL
COMMUNICATIONS dialog box and retry.
ESTABLISHING A TELEPHONE MODEM LINK
Modem Hardware Configuration:
Before attempting a link to a OM-320 via telephone modem, insure the
following equipment requirements are met:
Ρ
Ρ
Ρ
The OM-320 must have a MM-14.4 or MM-2400 Modem Option
installed. This modem is referred to as the remote modem in this
manual.
The PC must have a Hayes compatible modem installed or connected
and powered. This modem is referred to as the local modem in this
manual.
Info on the PC modem capabilities must be on hand (ie Baud rate
capabilities, installed port, etc)
USING THE OM-320
5-3
5... HYPERCOMM™ COMMUNICATIONS
HyperComm Connection via Modem:
Launch HyperWare and after the opening screen, the HYPERCOMM window
will be displayed. Move the cursor over the graphic DB-25 type connector
(center of the screen on the cable) and double-click to bring up the SERIAL
COMMUNICATIONS dialog box (Figure 5... -2).
Click on the USE MODEM check box under MODEM CONTROL and the dialog
will change slightly (Figure 5... -3) to enable editing of parameters in the
MODEM CONTROL section. Edit the various parameters within the MODEM
SERIAL COMMUNICATIONS dialog box per the following guidelines:
Port:
Specify the PORT using the pull-down list box under the PORT
PARAMETER SECTION. Select the port to which the modem is
connected.
TIP: If the port number to which the modem is
connected is unkown, select one of the ports then
attempt to connect (see following). If unsuccessful,
change the selected Port and try again.
5-4
USING THE OM-320
5... HYPERCOMM™ COMMUNICATIONS
Figure 5... -3: Serial Communications setup dialog box (Modem mode)
Baud:
Specify the baud rate rate that will be used to communicate between
the PC and the local modem. Set this baud rate per the following
Local Modem Capability
Set Dialog Box Baud To:
1200 baud
1200 baud
2400 baud
2400 baud
9600 or faster baud
19,200 baud
Table 5... -1: Local modem settings
table:
FYI: The remote modem (at the OM-320) will
automatically adapt to the baud rate of the calling
modem.
Redial:
If this box is checked, HyperWare will automatically make another
attempt to call the OM-320 if the first attempt fails for any reason.
The time specified in the edit box is a delay time to wait before
attempting the next call.
USING THE OM-320
5-5
5... HYPERCOMM™ COMMUNICATIONS
Phone:
A short dialing directory of frequently called OM-320 numbers can
be maintained using the List Box provided.
ADDING A NEW DIRECTORY ENTRY:
To add a directory entry, use conventional text editing
commands to highlite then type over an existing entry. The entry
will not be lost and a new entry will be added.
The format for the directory entry consists of text followed by a
colon, then the phone number.
USER TEXT:619-555-1212
The phone number may contain numbers, hyphens, parenthesis
and commas with the following action:
♦
Numbers - digits 0 through 9 are dialed
♦
Hyphens and parenthesis - ignored during dialing
♦
Commas - insert a two second delay during dialing.
Delays may be required for accessing an outside line on
some phone systems.
EDITING AN EXISTING DIRECTORY ENTRY
Select the entry to be edited via the drop down list box. Using
the mouse, highlite the text to be edited and type in corrections.
REMOVING DIRECTORY ENTRIES
The phone list is maintained within the hyperlog.ini file. This file
is located in the Windows directory and can be edited with any
text editor. Before editing this file, close the HyperWare
application and make a backup copy of the hyperlog.ini file in
case it needs to be restored. Two lines in the hyperlog.ini file
need to be deleted to properly remove a phone directory entry.
Follow these steps to remove the directory entry:
1. Close the HyperWare application.
2. Locate the hyperlog.ini file in the windows directory and
make a copy of it (eg hyperlog.bak)
3. Using Notepad, open hyperlog.ini
4. Locate the section titled [Modems]
5. Locate the line starting with PhoneX= where X is a
number and the entry to the right of the equal sign is the
entry to be removed.
6. Make a note of the value of X. Then delete the entire
line starting with PhoneX =
7. Locate and delete a second line with the same value of
X that starts with ModemX= which will be located in the
same section.
8. Save and Exit the editor. Re-launch HyperWare and
check that all is well.
Modem:
HyperComm includes the standard configurations for three major
modem brands, Hayes Compatible, US Robotics, and Zoom. Refer
5-6
USING THE OM-320
5... HYPERCOMM™ COMMUNICATIONS
to the modem’s manual for the command set used by the modem
installed at the PC. Note that most modems (although not
necessarily manufactured by Hayes, US Robotics, or Zoom) can
utilize one of these three configurations.
Clicking on the Modem list box and selecting the desired modem will
automatically configure the various modem parameters to meet
most User’s needs.
If a modem with a command set different from the supplied three is
used, a custom Modem Type entry can be added to the Modem list
box. To enter a custom Modem Type, the Dial Prefix, Hangup
command, and Initialization strings need to be added. Refer to the
User’s manual supplied with your modem and follow these steps to
add a custom Modem Type entry:
1. Click on the Modem list box arrow and enter a new
Modem configuration name.
2. Edit the Dial Prefix text box with the command required
by your modem. Upon commencing of dialing, this
Prefix string is sent immediately before the phone
number. For most modems this will be ATDT (if touchtone dialing is supported by the phone line) or ATDP (for
pulse dialing on phone lines not supporting touch-tones)
3. Edit the Hangup text box for the requirements of your
modem. Most modems will use ATH. The Hangup
string is transmitted to the modem when the User clicks
on the Hangup button from within the Modem
Communications dialog.
4. Edit the Initialization text box for your modem’s
requirements. A multitude of variations are possible for
this initialization string and the modem User’s manual
should be referenced carefully. The initialization string is
sent to the modem immediately after clicking on the Dial
button within the Modem Communication dialog. Key
parameters to specify in the modem initialization string
include:
Ρ
Verbal Response codes ENABLED
Ρ
Full Response code set ENABLED (eg Busy,
Connect 14400/ARQ, etc)
Ρ
Echo DISABLED (off)
5. Clicking on the OK button saves the three strings to the
Modem Type name specified in the Modem list box.
After configuring all modem parameters, click on DIAL and the modem
connection sequence will commence. After a short dialing and
communication protocol negotiation between the modems, a dialog box will
show indicating success or failure in making the link.
If successful, click OK . Close the SERIAL COMMUNICATIONS dialog box with
another OK and HyperWare will return to the HYPERCOMM window ready for
communication.
If the link fails, check the following points:
♦
Is the PC to modem cable connected? (external
modems only)
USING THE OM-320
5-7
5... HYPERCOMM™ COMMUNICATIONS
♦
Is the modem power ON? (external modems only)
♦
Is the local modem port selected correctly? If in doubt,
select another serial port from within the SERIAL
COMMUNICATIONS dialog box and retry.
♦
Is the selected baud rate correct for the modem?
♦
Is a working telephone line connected to the modem?
♦
Is there another device using the telephone line (i.e. a
fax machine)
♦
Does the modem work with other communication
programs? If not, this may indicate that the modem port
is conflicting with another serial port.
Additional modem configuration and troubleshooting information is supplied
within Appendix K.
5-8
USING THE OM-320
5... HYPERCOMM™ COMMUNICATIONS
VISUAL COMMUNICATIONS VIA HYPERCOMM™
Once the serial link (via RS-232 or modem) is established, a complete cable will
show between the OM-320 and the PC and additional icons will overlay the OM-320
graphic (Figure 5... -4). Depending on the type of link established, a modem or DB25 connector will display in the middle of the cable. At this time, control and
interrogation commands can be sent to the OM-320.
Figure 5... -4: HyperComm serial communication window (connection established)
Communication Techniques
Visual communication has been designed into the HyperComm Window
allowing for intuitive mouse driven communication. Two methods are used
for communicating commands between the PC and the OM-320:
Drag and Drop of Icons: Icons representing various types of
information are overlayed on the PC and OM-320 graphics. By
dragging and dropping these icons between the PC and the OM-320,
data communication is implemented.
For example, to set the OM-320 Clock to the current PC time,
merely click and hold on the Clock Icon overlaying the PC, drag it
over the the OM-320 and release it. A confirmation dialog will
display to insure your actions.
USING THE OM-320
5-9
5... HYPERCOMM™ COMMUNICATIONS
Double-Clicking Icons: Immediate commands can be executed by
double-clicking on many of the icons. For example, to Enable the
OM-320, position the cursor over the Enable Button and double-click
and a confirmation dialog will display to insure your actions.
TIP: Some of the icons can be double-clicked on as a
short-cut command. For example, double-clicking on the
Clock Icon overlaying the OM-320 allows for directly
setting the clock via text entry.
Communication Icons and their Functions
Enable Button Icon
Double-clicking on this button performs the same function as
pressing the Enable button on the front of the OM-320. After
double-clicking, a dialog will appear to confirm the action. If any
error conditions exist (eg the Program Net is incompatible with the
hardware) a warning dialog will display and the OM-320 may not be
Enabled. Operational Status can always be confirmed with the
Status Query command (below).
If the OM-320 is Rotary Memory mode, and data has been stored to
memory, the memory will have to be cleared before Enabling is
allowed.
Stop Button Icon
Double-clicking on this button performs the same function as
pressing the Stop button on the front of the OM-320. After doubleclicking, a dialog will appear to confirm the action. Operational
Status can always be confirmed with the Status Query command
(below).
Clear Button Icon (OM-320 Clear not PCMCIA Clear)
When the OM-320 is not Enabled, double-clicking on this button
results in a clearing of memory (after confirmation). After doubleclicking, a dialog will appear to confirm the action. Memory Status
can always be confirmed with the Status Query command (below).
The OM-320 memory can be cleared while the OM-320 is Enabled.
However, If the OM-320 is Enabled, only memory containing data
that has been downloaded will be cleared. This allows for OM-320
use in long duration continuous acquistion and download periods
without missed data.
Unit Name and ID Query
Each OM-320 can be assigned an ID and short Name. The ID and
NAME are retained in OM-320 memory until changed via the
following procedure and are not cleared with power down or Memory
Clear commands. Both entries can be displayed on the OM-320
5-10
USING THE OM-320
5... HYPERCOMM™ COMMUNICATIONS
LCD under the STATUS menu and are also available via a OM-320
Status Query from the PC (following).
To program the OM-320 ID and NAME, move the cursor over the
LCD on the OM-320 and double-click. A dialog will open for editing.
OK will reprogram the OM-320 to the new ID and NAME.
Status Query
At any time, the OM-320 can be interrogated for its operational
Status.
Figure 5...
-5: Status
icon
Figure 5... -6: OM-320 Status report dialog
Drag and drop the Status Icon from the OM-320 to the PC and
release it. The OM-320 Status dialog (Figure 5... -6) will open
detailing operational information.
Reported information includes:
UNIT INFORMATION:
OM-320 VERSION:
Specifies the OM-320 version number.
UNIT NAME AND UNIT ID:
User programmable information for tracking of equipment
(see procedure for setting described above).
USING THE OM-320
5-11
5... HYPERCOMM™ COMMUNICATIONS
UNIT TIME:
The current date and time on the OM-320 internal real time
clock.
PROGRAM NET INFORMATION:
NAME AND DESCRIPTION:
Information that has been User programmed in the Global
Icon from within HyperNet.
CURRENT OPERATIONAL STATE:
OPERATIONAL MODE:
Indicates if the unit is Enabled, Stopped, Idle, etc.
REMAINING MEMORY:
Specifies the percentage and Kilobytes of data memory still
available. When using this number for estimating available
logging time consideration must be made for varying
sampling rates and data storage formats.
# OF SAMPLES LOGGED:
Specifies the number of samples recorded to memory.
SYSTEM SUPPLY VOLTAGE
Displays the OM-320 supply voltage. If internal batteries
are installed in the OM-320 and an external power supply is
also connected, the displayed Supply Voltage refers to the
greater of the two.
FYI: The displayed Supply Voltage is
measured at an internal node on the power
supply circuitry. Displayed battery voltage
will be the voltage of the internal batteries.
External supply voltage will be
approximately 1.2 volts higher than
indicated.
BACKUP LITHIUM CELL:
The state of charge display for the lithium cell (used for data
memory and clock backup) will display GOOD or LOW. If
LOW is displayed, download any desired data memory, then
replace the lithium cell (See Appendix D).
INSTALLED H/W (HARDWARE)
This box lists the standard (eg relays, GPDI, etc) and installed
hardware (eg Interface Modules, modems, etc.)
ACTIVE MESSAGES
Displays any messages that have been generated due to
abnormal operating conditions (such as a power failure) or as a
result of a Message Icon being activated from within a Program
Net (Chapter 7).
5-12
USING THE OM-320
5... HYPERCOMM™ COMMUNICATIONS
Time Set
Figure 5...
-7: Time
Set icon
The OM-320 real-time-clock can be set in two different ways.
Synchronized with PC Time: By dragging the Clock Icon from
the PC to the OM-320 and releasing, the PC system time is
programmed into the OM-320.
Set Absolute Time: Double-clicking on the Clock Icon
overlaying the OM-320 graphic will display a Time Set dialog.
Edit the dialog and select OK to program the OM-320 clock to the
displayed date and time. This method is handy when
communicating via modem with OM-320s located in different
time zones.
Program Net Transfer
Figure 5...
-8: Net
icon
Refer to Chapter 7 for details on the transfer of Program Net to and
from the PCMCIA card.
After the serial link is established, a Net icon will display overlaying
both the OM-320 and the PC in the HyperComm window. The
Program Net icon overlaying the OM-320 represents the Program
Net currently loaded into OM-320 memory. The Program Net
overlaying the PC represents the last Program Net edited from
within the HyperNet (Chapter 7) development window or the last
Program Net downloaded from a serially connected OM-320.
Program Nets can be transferred in both directions:
♦
Downloaded from the OM-320 to the PC to review/edit
the Program Net currently loaded into OM-320 memory.
♦
Uploaded from the PC to the OM-320 to reprogram the
OM-320
At any time, the Program Net currently loaded in the OM-320
memory can be downloaded to the PC. Click and drag the Program
Net Icon overlaying the OM-320 to the PC and release it. This
Program Net can then be edited, saved, and/or uploaded back to the
OM-320.
To reprogram the OM-320 with a new Program Net, click and drag
the Net Icon overlaying the PC to the OM-320 and release it. The
Net icon on the PC represents the last Program Net (*.NET) file
edited from within the HyperNet (Chapter 7) window or the last
Program Net downloaded from a serially connected OM-320.
If a different Program Net is to be transferred, open the desired
Program Net from within HyperNet, then return to the HyperComm
window and drag the icon to the OM-320.
NOTE: If the target OM-320 memory contains collected
data, the User will be prompted to download or clear the
data prior to reprogramming. Upon upload of the new
Program Net, data in the OM-320 memory will be lost.
USING THE OM-320
5-13
5... HYPERCOMM™ COMMUNICATIONS
NOTE: During the upload of a Program Net to the OM320, several integrity tests are performed. One of the
tests checks the size of the Program Net to insure that it
will fit into the available OM-320 memory. In the event
that the Program Net is too large, reduce the number of
icons and retry. Refer to the README file supplied with
the HyperWare for an approximate maximum number of
icons that can be included in a Program Net for that
version of software.
Data Download
Refer to Chapter 6 for details on the Download of Data from the
PCMCIA card.
To transfer data from the OM-320 memory to a file on the PC disk,
click and drag the Memory icon overlaying the OM-320 to the PC
and release it. After a prompt dialog, the data will be downloaded.
Upon completion of the serial data transfer, a filename will be
requested by a pop-up dialog.
Figure 5...
-9:
Memory
icon
Figure 5... -10: File Information comments entry dialog
After entry of the filename, a dialog will display for the User to enter
additional File Information to be stored with the file (Figure 5... -10).
This information includes a short single line Title as well as room for
extensive comments. The File Information can be accessed at a
later time from within the Post-Processing window and HyperPlot.
Upon closing of this dialog, the Download file will then be processed
and stored to disk as an ascii file with the extension *.HLD.
Data downloads can be performed while the OM-320 is Enabled and
executing a Program Net that uses either of the Log to Full modes
(see the Global Icon in Appendix A). If the OM-320 is in the Rotary
5-14
USING THE OM-320
5... HYPERCOMM™ COMMUNICATIONS
Memory mode, the unit must be Stopped before data can be
downloaded.
Probe Point Query
Figure 5...
-11: Probe
Point icon
During the construction of a Program Net within HyperNet™, the
User can opt to connect Probe Point icons to various nodes
throughout the net. These Probe Point icons allow the User to view
the current values on the nodes to which they are connected. One
of the ways that the Probe Point values can be viewed is by clicking
and dragging the Probe Point icon overlaying the OM-320 to the PC
and releasing it. The last updated value at the Probe Point node is
then displayed on the PC. Optionally, by clicking on the Resample
Periodically check box, readings will be communicated to the display
dialog as the node is updated.
FYI: Probe Point is used for the icon name as
connecting these icons to a node on a Net is somewhat
analogous to putting a test meter probe on the Net nodes
and reading a value.
If a Program Net that contains Probe Point icons is currently loaded
into PC memory, then a Probe Point icon will display overlaying the
PC.
Password
The logger contains a multi-level password system that can be used
to foil unauthorized access via telephone modem or RS-232
connection. The logger password system allows for five passwords,
a Master and four User passwords.
Figure 5... 12:
Password
lock
MASTER PASSWORD
The Master password allows access to all logger functions,
including the ability to manage the User passwords. To enable or
change the Master password, double-click on the Password icon
(small lock graphic) in the upper left corner of the logger graphic
in the HyperComm Window . A dialog will appear which allows
the Master password to be changed, and the User passwords to
be configured.
USER PASSWORDS
Up to four User passwords can be set. These passwords allow for
specific control of access to individual logger functions. Access
to the User password configuration dialog requires the Master
password. To configure User passwords, double-click on the
Password icon, enter the Master password, and click on the
Configure button. A dialog will open allowing the User passwords
to be configured. Enter user passwords in the four text boxes at
the top of the dialog. Specific logger functions can then be
checked to allow access to that function for that password.
USING THE OM-320
5-15
5... HYPERCOMM™ COMMUNICATIONS
CAUTION
Keep track of Passwords as they can not be disabled
via a serial link without knowing the Master
password.
PASSWORD PROTECTED FUNCTIONS
Access to the following functions can be granted/denied via
Figure 5... -13: Password Configuration Dialog
the User password configuration dialog. A checked box
indicates that access is granted to the corresponding
function.
5-16
♦
Download Net Program
♦
Download Data
♦
Upload Net Program
♦
Enable
♦
Stop
♦
Clear Memory
♦
Get Status
♦
Set Time
♦
Monitor Probes
USING THE OM-320
5... HYPERCOMM™ COMMUNICATIONS
♦
Real Time Tracking
♦
Set Unit Name/ID
DOWNLOAD NET - A SPECIAL CASE
In order to Download Data or run a Real Time Tracking session,
the Program Net that is running in the logger must also be loaded
into HyperWare. Because of this, HyperWare automatically
Downloads the Net from the logger prior to executing either
function. Since this is required, any time that either the Download
Data or Real Time Tracking boxes are checked, the Download
Net box is automatically checked.
DISABLING PASSWORDS
To disable the logger Password feature, the Master Password is
required. Double-click on the Password (lock) icon, enter the
Master password when prompted and select Change Master
Password. Click the OK button without entering any text in the
New Password or Confirm text boxes. This will clear the Master
password and allow access to all logger functions without a
password.
USING THE OM-320
5-17
5... HYPERCOMM™ COMMUNICATIONS
NOTES:
5-18
USING THE OM-320
6... PCMCIA CARD CONFIGURATION AND USE
6... PCMCIA CARD CONFIGURATION AND USE
OVERVIEW:
The OM-320 utilizes the optional PCMCIA Card System to provide expanded data
storage capacity within the OM-320 and/or to provide storage to a removable
memory card that can be removed and transported to another location where the
data is read from the card and saved into a file on the a PC.
For expanded memory capability, the OM-320 requires the HLIM-5 Interface Module
which includes the PCMCIA card socket and one or more PCMCIA cards. If the
memory card is to be used in a transportable mode, an external PCMCIA drive (PD1 or also referred to as TMD-650) is required at the PC location.
With PCMCIA memory card system the following features are available:
♦
Expanded memory... OM-320 memory storage increase from
the standard 40,000 readings to in excess of 250,000 readings.
♦
Transportable data... the memory card can be removed from the
OM-320 and transported to a PC location where the data can be
read from the card
♦
Field reprogramming of the OM-320... a Program Net can be
built in the office through HyperWare, then loaded onto the
PCMCIA card for transport to the OM-320 location
PCMCIA CARD SYSTEM COMPONENTS:
The PCMCIA card system consists of the following components:
♦
HLIM-5 Interface Module: the HLIM-5 interface module installs
into the OM-320 System Base and contains the socket into
which the memory card inserts.
NOTE
This socket is not PCMCIA spec compliant. For this
reason, do not plug any products into this socket that
have not been provided or approved by Omega
Engineering Incorporated.
♦
Memory Card: with varying capacity from 50,000 samples to in
excess of 250,000 samples, this is the transportable SRAM
memory onto which data and Program Nets are stored.
♦
PD-1 (also referred to as the TMD-650) PCMCIA Drive: this
external drive connects to the PC parallel (printer) port and
provides read/write capability between the PC (running
HyperWare software) and the PCMCIA card.
♦
PD-1 Software Drivers: a set of software drivers (CardTalk)
provided with the PD-1 that are installed to hard disk and
provide the necessary software interface between the PD-1drive
and HyperWare. Also included are a number of utilities for use
in formatting, copying etc on the PCMCIA card.
USING THE OM-320
6-1
6... PCMCIA CARD CONFIGURATION AND USE
PCMCIA CARD - EXPANDED MEMORY CAPACITY APPLICATION
Hardware Configuration
For applications using the PCMCIA card only for expanded memory capacity
within the OM-320, the only components required are the HLIM-5 and one or
more memory cards (formatted for us with the OM-320 PCMCIA card
system). The HLIM-5 module should be installed per the Interface Module
instructions in Chapter 3. Memory cards for use in this system are supplied
pre-formatted from Omega Engineering Incorporated.
Software Configuration
No special software configuration is required. When the HLIM-5 is installed
in the OM-320, the OM-320 will auto-detect the presence of the module.
Operation of the HLIM-5 and PCMCIA Memory Card:
To use the PCMCIA card for data storage...
1. STOP the OM-320. Cycle the OM-320 power to OFF.
2. Visually inspect the formatted and prepared (as supplied
from Omega Engineering Incorporated ) PCMCIA card
connector for any debris in any of the connector holes
and clean if necessary.
The Write Protect switch located on the end of the card
opposite the connector should be slid away from the WP
position to enable writing of data to the memory card
(Refer to Figure 6... -1).
3. Orient the card with the top label facing toward the right
side of the OM-320 and slide the card fully into the card
slot in Option Port 2. Upon full insertion, the Eject button
next to the slot will be fully extended.
4. Turn the OM-320 Power ON. Press the ENABLE
button.
5. The PCMCIA card will be automatically detected and
the LCD will display ENABLED - PCMCIA. All logged
data will be stored in the PCMCIA card.
6-2
♦
If the OM-320 displays STOPPED after Enabling, the
Write Protect switch on the PCMCIA card is in the
PROTECT position. Correct and reinsert the card.
Press ENABLE and observe the display.
♦
If the PCMCIA card does not contain the proper format
and support files (as supplied from Omega Engineering
Incorporated) a message on the display will indicate
CARD ERROR. The card must be reformatted and the
support files rewritten before use.
USING THE OM-320
6... PCMCIA CARD CONFIGURATION AND USE
CAUTION:
If the memory card does not easily insert fully into
the socket, double-check the orientation. The socket
is designed to prevent full insertion with reversed
orientation.
For data storage on the memory card, the Write
Protect switch must be in the disabled position (ie
slid away from the WP mark)
NOTE
Numerous types of PCMCIA cards are currently
available on the market utilizing various
technologies. To insure compatibility with the HLIM5, utilize only Omega Engineering supplied memory
cards or verify alternate parts compatibility with
Omega Engineering Technical Support prior to
plugging into the OM-320.
PCMCIA CARD - TRANSPORTABLE DATA APPLICATION
For applications of the PCMCIA card for transportable data, the OM-320 must be
configured with the HLIM-5 Interface Module and an the external PCMCIA drive (PD1) must be connected to the PC and interface drivers installed. The correct PCMCIA
drive letter must then be specified within HyperWare.
OM-320 Configuration
The HLIM-5 module should be installed per the Interface Module instructions
in Chapter 3. Memory cards for use in this system are supplied preformatted from Omega Engineering Incorporated.
PC / External PCMCIA Drive Configuration
The following steps must be performed to configure the PC and the PD-1
external PCMCIA card drive. The procedure for connecting the PD-1 (also
known as TMD-650) drive and configuring the software drivers is contained
within the User’s Guide supplied with the PD-1 drive. Additional comments
and suggestions are provided below.
Connecting the PD-1 Drive:
Follow the instruction detailed in the User’s Guide supplied with the
drive.
USING THE OM-320
6-3
6... PCMCIA CARD CONFIGURATION AND USE
Installing the CardTalk Drivers:
Follow the detailed instructions in the User’s Guide supplied with the
drive. The installation process creates a directory called CardTalk
and copies a number of files into it. It then modifies the
AUTOEXEC.BAT and CONFIG.SYS files. A few additional
comments on this installation process:
♦
Insure that the installation is done from DOS as
specified
♦
Either the Express or the Custom Installation can be
used.
♦
For use with HyperWare, only the SRAM card drivers
are required. (ie at the prompt, do not select to install
the FFS2 drivers for Microsoft Flash File system as
they are not required)
♦
Two different types of parallel port are available on PC’s
today, the EPP (enhanced parallel port) and Standard.
All installations will run with the Standard port type
selected. If a EPP port is available, selecting this type
will provide slightly faster data read/write performance.
During the installation, if EPP is selected but is not
detected, a message will display and the CardTalk
software will not be installed. If this occurs, repeat the
installation choosing Standard.
♦
Specify the correct printer port to use during installation
(the default is LPT1)
Near the end of the installation process, changes will be made to the
PC AUTOEXEC.BAT and CONFIG.SYS files. Three lines are
added to the CONFIG.SYS file:
DEVICEHIGH=C:\CARDTALK\SSPPORT.SYS /lpt:1
DEVICEHIGH=C:\CARDTALK\CTALKCS.EXE
DEVICEHIGH=C:\CARDTALK\CARDTALK.SYS /A /MEMW
/IOW
In the AUTOEXEC.BAT file, the CARDTALK directory is added to
the PATH.
TIP: These drivers are fairly large and will be loaded into
memory at reboot. For Users running DOS 6.0 or later
with the Multiple Configuration boot options, it may be
desirable to set up an optional load of these drivers.
Refer to the DOS Help and/or manual for details on how
to set up the Multiple Configuration boot.
6-4
USING THE OM-320
6... PCMCIA CARD CONFIGURATION AND USE
TIP: Upon boot of the PC with the standard drivers
installed, the PD-1 will be assigned the next consecutive
drive letter. For User’s requiring specific assignment of a
drive letter to the PD-1 drive, the CONFIG.SYS file can
be modified to force the PD-1 drive to be assigned to a
particular drive letter. Refer to the Technical Support
FAQ (frequently asked questions) sheet supplied with the
drive for details.
TIP: For user’s that do not require control of the specific
drive letter assigned to the PD-1 and want to minimize
the size of the loaded PD-1 interface drivers, an older
version of the CardTalk drivers (V2.16 for the TMD-550)
is available. This version requires only 24K of memory
and will support only the SRAM cards used in the OM320 system. Additionally, this version of drivers does not
allow for a User assigned drive letter... it will
automatically use the next drive letter in the system.
If used, these drivers install into a directory called
DATABOOK instead of the directory called CARDTALK
referred to within this chapter.
NOTE:
The OM-320 and HyperWare PCMCIA card system
has been designed to be implemented using the
external PD-1 PCMCIA drive. Users with PC’s
equipped with integral PCMCIA drives may be able to
utilize drivers supplied with their PC’s for read/write
from DOS formatted SRAM PCMCIA cards. However
due to the variability in PCMCIA card spec
compliance and system configurations,
considerable cautious experimentation may be
required to implement the system.
Quick Test of the PCMCIA Drive Configuration
After installation of the drivers, reboot the PC and the drivers will be
loaded into memory. The drive letter that the PCMCIA drive is
installed as will be displayed briefly in the on-screen messages
displayed during the system boot. Note this letter for future use.
If the system does not correctly identify the drive, error messages
will display. Refer to the PCMCIA drive User’s Guide for instructions
on troubleshooting drive configuration problems.
After a successful configuration, the drive installation can be simply
tested as follows:
USING THE OM-320
6-5
6... PCMCIA CARD CONFIGURATION AND USE
CAUTION
Before inserting a PCMCIA card into the drive, touch
the case of the PC or some other ground to
discharge any static body charge. This step
minimizes the chance of damaging the card by
discharging your body static charge through the
PCMCIA card connector.
1. Insert a formatted and prepared (as supplied by Omega
Engineering Incorporated) PCMCIA card into the drive.
Be sure that a card is inserted fully into the drive before
testing.
2. Use the conventional DOS command DIR X: where X
represents the drive letter assigned to the PCMCIA drive
to read the files on the card.
Three files should be listed on the card:
FORMAT.MEM
NET.MEM
DATA.MEM
HyperWare Software Configuration
After the PD-1 drive has been connected, the drivers installed, an installed
drive letter determined, and access to the drive has been tested through
DOS, HyperWare must be configured.
Launch the HyperWare program under Windows and select the
Options/Paths menu from the HyperComm Window Menu Bar.
1. In the PCMCIA Format Command Text Box specify the
drive and path where the CardTalk drivers are located
followed by the command TCFORMAT.
In most installations, this will be
C:\CARDTALK\TCFORMAT.EXE.
The command TCFORMAT is a special command
supplied with the CardTalk drivers that is used for
formatting PCMCIA cards in the PD-1 drive. The
resulting card format is DOS compatible.
2. In the PCMCIA drive Text Box, specify the drive letter
that is used to access the PCMCIA drive. This letter was
determined and tested in previous steps.
3. Select OK to save the changes and close the dialog.
4. Double-click on the PC drive graphic and HyperWare
will scan the PCMCIA card installed in the drive checking
for proper format and the presence of the three support
files.
6-6
USING THE OM-320
6... PCMCIA CARD CONFIGURATION AND USE
PCMCIA Card Usage with HyperWare
The PCMCIA card, in a transportable memory application is typically used to
transfer collected data from a remotely located OM-320 to the PC and/or to
transfer a new Program Net from the PC to a remotely located OM-320.
Transferring Data from the OM-320 to the PC
After data has been stored on a PCMCIA card in the OM-320, the
card can be transported back to the PC location where the collected
data is transferred from the card to a Download File on the PC. The
following steps detail this procedure:
1. Press STOP on the OM-320 front panel and cycle the
OM-320 power OFF. Remove the PCMCIA card with
the Eject button.
2. At this time, a new formatted and prepared card can be
inserted into the PCMCIA card socket and the OM-320
can be powered up and the ENABLE button pressed.
Observe the LCD for any error messages before leaving
the site.
NOTE: review the tips and cautionary measures to be
used in handling and insertion of the PCMCIA card in
the section above titled PCMCIA Card - Expanded
Memory Application
3. Transport the PCMCIA card to the PC location and
insert the card into the PCMCIA drive.
4. Double-click on the PCMCIA drive graphic within the
HyperComm Window and the PCMCIA card will
automatically be scanned. After a short delay, a
Program Net and Data icon will be displayed overlaying
the PCMCIA drive graphic.
5. Drag the Data icon from the PCMCIA drive to the PC
and the data transfer will commence. Refer to Chapter
6 for details on entering comments, etc during the data
transfer process.
6. The PCMCIA card can be cleared by double-clicking on
the CLEAR button located by the PD-1 graphic.
Transferring a Program Net from the PC to the OM320
A OM-320 at a remote location can be reprogrammed by writing a
Program Net on a PCMCIA card at the PC location, then plugging
the PCMCIA card into the OM-320. The following steps will
implement the programming:
1. Develop the new Program Net at the PC location (see
Chapter 7 on HyperNet Programming for details).
NOTE: it is imperative that the developed Program Net
is compatible with the remotely located OM-320. Great
inconvenience can result if an incompatible Program
Net is developed , transported to the OM-320, and
attempted to be run. Methods to insure this are
discussed in Chapter 7.
USING THE OM-320
6-7
6... PCMCIA CARD CONFIGURATION AND USE
2. Insert a PCMCIA card into the PD-1 drive
3. Drag the Program Net icon from the PC to the PD-1
graphic. A dialog will display stating that any data
currently on the PCMCIA card will be erased. Select OK
and the program is transferred.
4. Transport the card to the OM-320 location. Stop the
OM-320 and cycle the power OFF. Insert the PCMCIA
card.
5. Turn the power ON and press ENABLE. Upon Enabling,
if a Program Net is detected on the card, the OM-320
will automatically be reprogrammed with this Program
Net and start logging data to the card.
6. Proper execution can be confirmed via the LCD Status
display(s).
PCMCIA - MISCELLANEOUS
Formatting PCMCIA cards
Before a PCMCIA card can be used in the OM-320 system, it must be
properly formatted and prepared. As supplied from Omega Engineering
Incorporated, PCMCIA card are already formatted and prepared however,
this procedure is fully supported under HyperWare.
To format and prepare and new card, insert it into the PC-1 drive and
double-click on the PD-1 graphic. HyperWare will detect that the card has
not been formatted nor prepared and a dialog will respond accordingly.
Selecting YES at the request will automatically format the card using the
TCFORMAT.EXE utility from the CardTalk directory, then the 3 required files
(FORMAT.MEM, DATA.MEM, and NET.MEM) will be copied onto the
PCMCIA card.
Windows 95 - Special PCMCIA Card Considerations
In systems running Windows 95, HyperWare cannot format the card by
calling the TCFORMAT command. To format the card, exit windows 95 and
manually run the TCFORMAT command with the following syntax:
TCFORMAT X: where X is the PD-1 drive letter
After the card has been tcformatted, the copying the three support files can
be completed from within HyperWare. Launch HyperWare and double-click
on the drive, then follow the ensuing dialogs.
MEMORY CARD HANDLING / MAINTENANCE
The MC series memory cards are packaged in a protective metal case, however
reasonable care should be exercised in the handling and use of the cards. The card
should not be exposed to water, extremely high or low temperatures (eg on the dash
of a car on a sunny day), or dirt/mud... especially on the connector end.
The MC-XX memory cards utilize an internal lithium cell (Panasonic BR-2325, 3V or
equivalent) for power when not installed in the OM-320 or the PD-1 drive at the PC
location. This lithium cell should be replaced yearly for maximum data integrity.
Data in memory will be maintained for up to 2 hours with the battery removed from
6-8
USING THE OM-320
6... PCMCIA CARD CONFIGURATION AND USE
the compartment, however it is highly recommended that any valuable data in the
card be downloaded before replacing the battery.
To replace the cell:
1. Locate a clean area to work.
2. Visually locate the battery access door and lock located on the
end of the memory card opposite the connector end.
1. Using a paper clip or other small probe, slide the Lock pin away
from the embossed LOCK mark.
Figure 6... -1: Memory Card lithium cell access and Write Protect Switch
2. Swing open and remove the battery compartment door . The
lithium cell can then be removed.
3. Slide the new cell into the compartment insuring the positive (+)
side of the cell is toward the top of the card.
4. Carefully insert the battery door and swing it closed.
5. Slide the Lock pin to the LOCK position.
USING THE OM-320
6-9
6... PCMCIA CARD CONFIGURATION AND USE
NOTES:
6-10
USING THE OM-320
7... HYPERNET™ ICON BASED PROGRAMMING
7... HYPERNET™ ICON BASED PROGRAMMING
OVERVIEW
The OM-320 operates in the field based on a program loaded into its memory called
a Program Net (Figure 7... -1). The Program Net provides instructions for the OM320 including which channels to sample, when to sample, how to process the
incoming signals, when to output alarms, and much more.
Figure 7... -1: Example Program Net
Development of a Program Net is done on a PC running HyperWare. After
development, the Program Net is uploaded directly to the OM-320 memory via a
serial communication link or indirectly via upload to a PCMCIA card. The PCMCIA
card can then be plugged into the OM-320. Actual development of the Program Net
is performed in the HYPERNET WINDOW and the serial transfer of the Program Net
from the PC to the OM-320 (or to the PCMCIA card) is performed from within the
HYPERCOMM WINDOW.
Program Nets are developed through the following sequence of steps:
♦
Create a new Program Net file for the connected OM-320 (which
automatically determines the installed hardware in the
connected OM-320)
♦
Add desired functions to the Program Net by dragging various
icons onto the HyperNet workspace
♦
Add connections between icon terminals indicating signal flow
♦
Configure the various icon options (eg Celcius or Fahrenheit,
type of thermocouple, filtering, equations, etc)
♦
Configure the Global icon
♦
Save the Program Net and/or transfer it to a connected OM-320
for execution.
This chapter describes the HyperNet development environment and provides
detailed instruction on constructing Program Nets. Detailed icon configuration
information is provided in the Master Icon Reference in Appendix A. For the
USING T HE OM-320
7-1
7... HYPERNET™ ICON BASED PROGRAMMING
technically curious, additional information on the theory of operation of Program
Nets is available in Appendix G.
AN EXAMPLE PROGRAM NET
A simple Program Net is shown in Figure 7... -2. In this Program Net, two
thermocouple inputs (represented by the two matching icons near the left of the
workspace) are sampled periodically (based on the Sample Rate Clock connected to
the top of each of the Thermocouple icons) and their values are stored in OM-320
memory (RAM chip icons). Additionally, the difference between the two
thermocouple channels is calculated (by the Math icon) and stored in memory.
Figure 7... -2: Temperature sampling Program Net
7-2
USING THE OM-320
7... HYPERNET™ ICON BASED PROGRAMMING
HYPERNET DEVELOPMENT WINDOW FEATURES AND TOOLS
Accessing the HyperNet Window
To enter the HYPERNET WINDOW from within the HYPERCOMM WINDOW, click
on the HYPERNET button on the toolbar. The HyperNet Window will open
Figure 7...
-3:
HyperNet
window
button
Figure 7... -4: HyperNet, Program Net development window
(Figure 7... -4) displaying the default Net or the last edited Net.
Returning to the HyperComm Window
From within the HyperNet Window, to return to the HyperComm Window,
click on the HyperComm button (small OM-320 graphic) at the left end of
toolbar.
HyperNet Window Topology
When the HyperNet Window opens, a default Net or the last edited Net will
be displayed on the workspace (Figure 7... -4). Use the slide bars at the
right edge and bottom of the workspace to shift the display.
At the top of the window is a Menu Bar and below that, an Button / Icon Tool
Bar. Passing the cursor over the various icons results in a short descriptor
display on the Status Bar at the lower left corner of the window.
Descriptions of the main button / icon groups follow:
HyperComm Access
A single click returns the screen to the HyperComm Window. If the
Program Net currently displayed in the workspace has been
changed, a dialog will open prompting the User with an option to
save the edited Program Net.
Figure 7... -5:
Return to
HyperComm
button
USING T HE OM-320
7-3
7... HYPERNET™ ICON BASED PROGRAMMING
Create New Net
Clicking on New Net will automatically query the OM-320, then
update the workspace display showing icons for the connected OM320’s hardware configuration including any User installed modules
and options. This requires a serial connection between the OM-320
and the PC. To have a serial connection, the OM-320 and the PC
must be linked via RS-232 or Modem and the connection must be
established from within the HyperComm Window (Chapter 5).
Figure 7...
-6: New Net
button
Open Net and Save Net
Clicking on the Open Net button (or selecting File/Open Net from the
menu bar) results in the opening of the standard File Open dialog
box with the default file sort set to *.NET. Previously saved
Program Nets can be retrieved.
The Save Net button will save the currently displayed Program Net
to disk under the current Program Net filename with the extension
*.NET. If a filename has not been assigned, the standard File Save
As dialog box will open, allowing for User input of a Program Net
filename.
Figure 7...
-7: Open
and Save
Nets
TIP: Use the drop down menu selection `File / Save Net
As’ to save Nets with a different filename.
Delete Icon or Connection (Link)
To delete a connection (link) between icons, click on the Delete icon
(the Status Bar will display Select Object to Delete and the cursor
will change shape) then on one of the ends of the connection to be
deleted. (To select the end, the cursor must be over the icon
terminal). To delete another connection, repeat the procedure. If
multiple connections originate at an icon terminal, they will all be
deleted.
To delete an icon, click on the Delete button and then on the icon to
be deleted. If an icon is deleted, all connections into and out of the
icon will also be deleted.
If the Delete function has been selected and no items are to be
deleted, clicking on any open space in the workspace will disable the
Delete function.
Figure 7...
-8: Delete
Button
Program Net Icon Selection Bar
Included in the Program Net Icon Bar is a collection of various icons
to be used in the development of Program Nets. Clicking on the
arrows at the left and right edge of the bar will scroll the bar left or
right displaying additional icons.
Figure 7... -9: Icon assortment (with scroll arrows at each end)
7-4
USING THE OM-320
7... HYPERNET™ ICON BASED PROGRAMMING
PROGRAM NET CONSTRUCTION
Program Nets are developed in HyperNet and saved as files with the filename
extension *.NET.
Program Nets must be developed to match the existing hardware installed in the
target OM-320. For example a Program Net that uses a modem function will only
work in a OM-320 that has a modem installed.
Configuration details that must match include:
♦
Interface Modules - Program Nets must match the OM-320
installed Interface Module types.
♦
Port - The Port used in the Program Net and the Port used for
an Interface Module in the OM-320 must match.
♦
Channel Configurations - Interface Modules equipped with
hardware configuration switches must have their switches set to
match the Program Net on a channel by channel basis.
For Example: If an HLIM-1 is installed in Port 3 and has
the Channel B configured (via the Channel B hardware
configuration switch) for VDC-HI, then any Program Net
loaded into the OM-320 must have Channel 3B used as a
VDC-HI channel (or optionally, not used).
If a Program Net that does not match the target OM-320 hardware
configuration is uploaded to the OM-320 memory, a configuration mismatch
error will display and the upload will not occur. This checking of
compatibility is handled automatically within HyperWare during the upload
process and insures that hardware and software compatibility exists.
TIP: Users that have a number of OM-320s in use may
find it convenient to create a subdirectory in their
HyperWare directory for each of the OM-320s with which
they work. The subdirectory names may correlate to the
OM-320 ID or Unit Name which are User programmed
(See HyperNet Programming in Chapter 7). As Program
Nets are developed for each OM-320 or configuration,
they can then be saved into the corresponding
subdirectory.
To Develop a New Program Net...
To develop a new Program Net, the target OM-320 hardware configuration
must be known. After configuring the OM-320 hardware as required for the
data logging application (ie installing modules, setting channel configuration
switches, etc), establish a serial connection to the OM-320 from the
HyperComm Window.
USING T HE OM-320
7-5
7... HYPERNET™ ICON BASED PROGRAMMING
Switch to the HyperNet Window and click on the CreateNew Net button and
the connected OM-320 will be automatically polled for its hardware
configuration. The workspace will update and show icons representing the
standard System Base hardware and any User installed hardware.
Before editing of the workspace begins, this unconnected Program Net
should be saved to disk by clicking on the File Save button or using the `File
/ Save Net As’ selection from the menu. This unconnected Program Net can
then be used as a starting Net for development of varying Program Nets
based on the same OM-320 configuration.
As Program Nets are developed, they should be saved with a filename
different from this basic Program Net. Use the `File / Save Net As’ dropdown menu to save Nets with different filenames.
To Open an Existing Net for Editing...
If a previously developed Program Net is to be edited, open the Program
Net file by clicking on the Open File button and selecting the desired file.
Icon Placement
To add an icon from the Tool Bar to the workspace, click on the desired icon
and while holding the mouse button down, drag the icon onto the workspace.
Release the button when the icon is positioned in the approximate desired
location. Icons can be relocated within the workspace by the same
technique... even after connections have been made.
The Icon Toolbar contains more icons than are visually displayed at the top
of the window. To see additional icons, click on the left and right arrows at
the ends of the boolbar to spin to additional icons.
The HyperNet workspace utilizes dynamic panning. As an icon (or
connection) is dragged near the edge of the screen, the workspace will pan.
Using Grids
If desired, a grid structure can be enabled on the workspace that
provides a visual grid and/or `snap to grid’ function. Select `Options
/ Grid’ and select the desired operation.
The Snap function is merely an aid to align icons neatly within the
workspace.
Changing Fonts
Labeling text surrounds icons as they are placed. The font, size,
color and effects used for this text can be changed through the dropdown menu `Options / Font’ and its corresponding dialog.
Icons
Icons are the main building blocks used in the development of a Program
Net. Icons within a Program Net graphically represent different items
ranging from hardware input channels to intermediate processing functions
to hardware outputs and more. A partial listing of available HyperNet icons
is in Table 7... -1.
7-6
USING THE OM-320
7... HYPERNET™ ICON BASED PROGRAMMING
NOTE: A complete icon listing with detailed setup and application
information is supplied for reference in Appendix A.
Input Icons
VDC-LO
CJC
Thermocouple
Event
Frequency
Count
Start/Stop Clock
Output Icons
Relay Output
Pager Alarm
LCD Message
Digital Output
Processing Icons
Math
Delta Function
Average Function
Count Accumulator
Comparator
Logical AND
Integral Function
Memory
Special Icons
Sample Rate Clock
Global Settings
Warm-Up Timer
Probe Point
Table 7... -1: Partial listing of icon functions available for Program Net
construction
Icon Topology
Icons share many similar features including their graphic
appearance (input and output terminals, etc) and configuration
techniques. Figure 7... -10 shows the topology of an icon with its
Figure 7... -10: Icon topology and terminal types
various terminals.
T ERMINALS
All icons (except the Global Icon) have terminals for the addition
of signal connections. An explanation for the various types of
terminals follows:
LOGIC / DATA INPUT TERMINALS
On the left side of the icon are typically one or two inputs for
Logic or Data signal types. Data enters the icon for
processing through these Input terminals. Some two input
icons (eg Math) do not require signals to be connected to
both Input terminals for operation.
USING T HE OM-320
7-7
7... HYPERNET™ ICON BASED PROGRAMMING
LOGIC / DATA OUTPUT TERMINAL
On the right side of the icon is a single Output terminal.
After processing of an input signal(s) is completed, the
output is updated. Depending on the type of icon and the
User configuration, this Output terminal may or may not be
updated every time the Update and/or an Input terminal is
updated. The Enable input (description follows), the type of
processing that the icon performs, and User specified
parameters within the Configuration dialog all effect when
the Output terminal is updated.
For example, when using an Average icon, the Output
terminal will only be updated with a new value after a User
specified number of inputs have been averaged.
ENABLE INPUT TERMINAL
Many icons have an Enable input terminal located near their
top left corner that will accept a Logic input (True/False).
Depending on the state of the input signal, the icon is
enabled or disabled for processing.
NOTE: if the Enable input is not connected, it
defaults to the Enabled state.
A simple application of the Enable input might be in an
engine temperature recording application. A Thermocouple
icon may be enabled / disabled by a Logic signal that is True
when the engine ignition is ON. With this configuration,
temperature recording will only occur when the engine is
running.
The Enable input can also be used for optimizing the speed
of Program Nets and/or minimizing the amount of data
collected as the processing normally done by an icon in a
Program Net is not performed if the Enable input is False.
For example, a Program Net may be built that has several
input temperatures that are scanned on a fairly high speed
basis. By use of the Enable terminal, the data flow to OM320 memory may be disabled during normal operating
conditions and enabled when abnormal temperature
readings are detected.
UPDATE INPUT TERMINAL
The Input signal icons (Thermocouple, VDC, GPDI, etc) are
all equipped with an Update input terminal located in the
center top of the graphic. Whenever this Update terminal
receives an Update command, it proceeds to update its
output terminal value (assuming that its Enable terminal is
True or not connected).
UPDATE OUTPUT TERMINAL
The Sample Rate Clock and the Warm-up icon have a
special output terminal located at the bottom center of the
graphic called an Update output terminal. This terminal
sends a command to the connected icon to Update its
output (eg take a sample, process an equation, etc).
7-8
USING THE OM-320
7... HYPERNET™ ICON BASED PROGRAMMING
Details on the Sample Rate Clock and the Warmup icon are
covered in the Master Icon Reference in Appendix A .
Configuring Icons
Most of the icons within HyperWare must be configured before they
can be used. User configuration entails selection of various icon
operational parameters such as names, input ranges, sampling
rates, etc and is simply done through dialog boxes associated with
each icon.
To configure an icon that has been placed on the workspace,
double-click on the graphic and an Icon Configuration dialog box will
appear. Each icon has a unique dialog box with programmable
parameters to meets its needs. However, many parameters are
common to the different types of icons. A Thermocouple Input icon
Configuration Dialog is shown in Figure 7... -11 and a description of
configuration parameters typically seen in a configuration dialog box
follow.
Various standard Windows techniques are used to select the
different parameters within the dialog box from text entry and editing
to selection via radio buttons.
Figure 7... -11: Thermocouple input icon configuration
dialog box
ICON NAME
Each icon can have an 8 character name assigned that displays
on the workspace under the icon.
OUTPUT NAME
The output signal can be assigned an 8 character name which
displays above the Output Terminal of the icon. This name is
USING T HE OM-320
7-9
7... HYPERNET™ ICON BASED PROGRAMMING
commonly referenced by icons connected to this Output terminal.
For example, if this Thermocouple icon were connected to one
of a Math icon’s input terminals, the name Tinlet would be
referenced within the Math icon as an Input terminal name.
UNITS
Many of the icons can output their signals with various units such
as Degrees C or F, V or mV, Degrees or Ohms, etc. Radio
buttons are typically used to select one of the Unit types.
SIGNAL T YPE OR RANGE
This Thermocouple icon supports 6 different types of
thermocouple. Similarly, other icons have User configurable
ranges or types.
OTHER PARAMETERS
Most of the icons have additional parameters such as filtering,
equations, data types, etc that are all User programmable.
Icon Assortment
A complete reference listing of all of the icons available within HyperWare is
included in the Master Icon Listing in Appendix A. Details on Configuration,
applications, and proper usage are described.
Global Icon
One special icon that is included in every Program Net is called the Global
icon. Within the Global icon’s Configuration dialog are options for various
global Program Net options. These options include Program Net Name,
memory utilization mode, clock resolution, and modem paramteres. The
operation of this icon should be reviewed in the Master Icon Reference in
Appendix A before attempting to construct a Program Net.
Figure 7... 12: Global
icon
Making Connections Between Icons
Lines are used within a Program Net to indicate the flow of signals between
icons. (See Figure 7... -1)
Signal Types
Three types of signals can be communicated between icons in a
Program Net. The three signal types are differentiated by color and
their different functions follow:
DATA (RED)
Numerical values are transmitted from icon to icon via Data type
signal connections. HyperNet allows Data connections to be
made ONLY between Data terminals on icons to preclude
mismatching of signal types.
7-10
USING THE OM-320
7... HYPERNET™ ICON BASED PROGRAMMING
SIGNALS COMMUNICATED VIA
DATA TYPE CONNECTIONS
EXAMPLE ICONS WITH DATA TYPE
T ERMINALS
TEMPERATURE
OUTPUTS FROM THERMOCOUPLE ICONS
VOLTAGE
OUTPUTS FROM VOLTAGE ICONS
PRESSURE
MATH (INPUTS AND OUTPUTS)
FLOW
INPUTS TO COMPARATORS
OUTPUTS FROM COUNTERS
Table 7... -2: Example Data type signals and Icons
LOGIC (GREEN)
True / False values are transmitted from icon to icon via Logic
type signal connections. Logic signals have only two states. As
with the other signal types, HyperNet only allows Logic signals to
be connected to Logic type terminals on icons.
SIGNALS COMMUNICATED VIA
LOGIC TYPE CONNECTIONS
TRUE OR FALSE CONDITIONS
EXAMPLE ICONS WITH LOGIC TYPE
T ERMINALS
INPUTS TO RELAY ALARM ICONS
OUTPUTS FROM COMPARATORS
ENABLE INPUTS TO SAMPLE RATE CLOCKS
INPUT TO MESSAGE ICON
OUTPUT FROM START/STOP CLOCK
INPUTS TO COUNTERS
Table 7... -3: Example Logic type signals and icons
UPDATE (BLUE)
Update commands are a special type of signal that is generated
ONLY by Sample Rate Clock icons. This signal is connected to
the Update input on icons and commands them to update their
outputs. As with the other signal types, HyperNet only allows
Update signals to be connected to Update type terminals on
icons.
USING T HE OM-320
7-11
7... HYPERNET™ ICON BASED PROGRAMMING
SIGNALS COMMUNICATED VIA
UPDATE TYPE CONNECTIONS
THE UPDATE COMMAND
GENERTED BY THE SAMPLE RATE
CLOCK ICON
EXAMPLE ICONS WITH UPDATE TYPE
T ERMINALS
INPUT ICONS HAVE AN UPDATE TERMINAL
Table 7... -4: Example Update signals and icons
Adding Signal Connections Between Icons
Connections between two icons are drawn by locating the mouse
cursor over the first icon’s terminal (note how the cursor changes
when properly located over a terminal), clicking and holding the
button down, then dragging a connection line to the second icon’s
terminal and releasing the button.
The direction that signal connections can be dragged on the
workspace is limited to minimize potential problems with feedback
and/or race conditions. Connections can only be drawn from the left
to the right on the workspace.
During the connection process, HyperNet checks and disallows
recognized illegal connections such as:
♦
Differing terminal types cannot be interconnected. For
example, a Data terminal cannot be connected to a
Logic terminal.
♦
Output terminals can only connect to Input or Enable
terminals.
♦
Connections cannot be made between terminals on the
same icon
♦
Multiple connections to a single Input terminal.
During the construction of Program Nets, it is common for multiple
connection lines to originate at an Output terminal, however most
icons can only have one or two inputs. Some icons such as the
Scroll Tracking and Destination File icons (used in the PostProcessing and HyperTrack Windows) allow for more than two
inputs and will automatically add input terminals as connection lines
are added.
Saving the Net
After development of the Program Net, the program can be saved to a file
by clicking on the Save to Disk icon in the Toolbar.
NET PERFORMANCE
After construction of a Program Net a quick review should be done to insure that the
Net’s performance in the OM-320 will meet the User’s goal. This check should
include proper implementation and for higher speed applications, a processing
(execution) speed review.
7-12
USING THE OM-320
7... HYPERNET™ ICON BASED PROGRAMMING
Program Net Checklist
♦
Has the Global Icon been configured? Has a Program Name
and Description been assigned?
♦
Have connections been added between icons?
♦
Have desired measurement units (eg C, F, ohms, etc) been
selected?
♦
Does each icon have a name and output name? Names are not
necessary for the icons to function, however, if they are used
consistently during the construction of a Program Net, the
presence of a User defined name (vs the default name)
becomes an indicator that the icon has been configured.
Additionally, the added annotation makes comprehension of the
net by other Users and/or at a later date even easier.
♦
Do the Memory icons have names assigned? If omitted, it may
be more difficult to identify data during plotting and further postprocessing.
Program Net Execution Speed
NOTE: The information presented in this section is
provided for Users that are attempting to collect data at
faster rates (such as Samples per Second).
Users utilizing the OM-320 for data collection at slower
rates (eg Samples per Minute) may opt to skip this
section and refer to it later when faster rates are
required.
Due to the nearly unlimited flexibility and potential variations of Program Net
designs, it is difficult to specify the actual speed performance of Program
Nets. In an attempt to relate to the OM-320 User a feel for the Program Net
processing speeds to be expected, the following guidelines are presented.
Additionally, a number of example Program Nets are provided in Appendix B
with their approximate execution speeds. From this information, a feel for
the speed of execution of most Program Nets can be developed.
Program Net Performance Guidelines
The time required for a Program Net to execute within the OM-320
is a function of a number of variables including:
♦
Total number of icons in the Program Net - with a
greater number of icons to process each time the
Program Net loops, more time is required.
♦
Type of icons - different types of icons require various
amounts of time to process. For example, a
Thermocouple input icon requires a considerable
amount of processing time to perform the analog to
digital conversions, CJC measurements, and the
associated math. On the other end of the speed
spectrum, a Data Memory icon merely stores data into a
memory location... an operation which can be performed
very quickly.
USING T HE OM-320
7-13
7... HYPERNET™ ICON BASED PROGRAMMING
♦
Program Net design - Program Nets can be developed
that have varying execution times that are a function of
inputs or values within the Net. A simple example of
this is a Program Net that scans a single digital input (eg
switch state) and only enables the logging of 10
thermocouple input channels when the switch is closed.
In this example, the digital input could be scanned very
fast when open, but when it closes, extra processing
time is required for the 10 thermocouple channels.
An Empirical Answer...
After optimization of a Program Net with consideration of the above
guidelines, the best way to determine the speed performance of a
Net is to upload it to a OM-320 and run it. If maximum speed is the
goal, the driving Sample Rate Clock rate can be set to a minimum
(eg 1mS) and the program can be tested. Review of the data and
actual sample times will result in a very accurate execution rate
value.
Following are three benchmark Program Net execution times that
can be used to gain a relative feel for the sampling rates achievable
with the OM-320. The times were empirically determined with a
single channel (as specified) storing directly to memory. In each
case, the Program Net consists of one Sample Rate Clock icon, one
input channel icon, and one memory icon. No filtering was enabled.
Input Icon Type
Samples per Second
(one channel)
VDC-LO
150
Thermocouple Type J
30
Counter (GPDI)
320
Figure 7... -13: Approximate throughput rates for various
types of signals / Program Nets
Nets that utilize conditional logging strategies will have varying
execution rates. A feel for these Net execution rates can be
developed by constructing and running Program Nets that represent
each conditonal branch of the Net, then summing the execution
times for branches that can could execute simultaneously.
Miscellaneous Program Net Performance
Considerations
MISSED SAMPLES
Although it is possible to set Sample Rate Clock rates faster than
a Program Net can actually execute, the Program Nets will
attempt to run. In these conditions, if a Sample Rate Clock
sends the Update command before the Net has been fully
executed, the OM-320 will finish the Net execution then
immediately start processing the Net again.
7-14
USING THE OM-320
7... HYPERNET™ ICON BASED PROGRAMMING
The fact that an Update command has been processed late is
accessible to the User via the Warning icon. One of the options
within the Warning icon is to provide a logic output if a Sample is
Missed. Details on the Warning icon are provided in the Master
Icon Reference in Appendix A.
It must be noted that in this situation, although the actual data
has not been sampled at the programmed rate, all collected data
will include the actual date/time that the Net executed.
TIP: To achieve maximum speed of a Program
Net, the Sample Rate Clock(s) used in the Net
can be set to a rate faster than the Net can
possibly process.
OTHER DETRIMENTS TO SPEED
Any additional processing that is performed during execution of a
Program Net such as serial communication (eg HyperTrack
operation, Status Queries, etc) and/or display of readings through
the OM-320 front panel LCD will have detrimental effects on the
rate at which a Program Net can execute. For optimum
speed,wthe LCD should not be displaying updating information
(eg Probe Points, battery voltage, etc).
PROGRAM NET DOCUMENTATION
Two features are provided within the HyperNet Window to assist in documenting and
the ensuing field wiring of the OM-320.
HyperNet Printout
The actual Program Net display can be printed by selecting Print Net from
the File menu.
NOTE: The PC must be set to 256 color mode in order to
properly print the Net.
TSA Wiring Printout
A Terminal Strip Adapter (TSA) I/O Listing can be generated and printed for
the Program Net. This listing can then be used during the field wiring of the
various I/O signals to the TSA.
Upon completion of the Program Net, select Save TSA I/O List from the File
menu, enter a filename, and the file will be generated and saved as an
ASCII text file. A text editor will automatically open the file. The listing can
then be printed from within the editor and carried with the OM-320 to the
installation site.
The TSA Listing includes the connections for each of the I/O channels that is
used in the Program Net as well as standard connections for External Power,
the Digital Port and the CJC connector. Names assigned to Input and
Output icons in the Program Net are used for channel identification.
At the bottom of the TSA I/O Listing are various notes relative to other
connections such as modem. These notes are imported from a file called
NOTES.TXT which is supplied in HyperWare. Reminders and special
installation comments can be added by the User to the NOTES.TXT file by
editing the file with any text editor (such as Notepad). After editing, the
USING T HE OM-320
7-15
7... HYPERNET™ ICON BASED PROGRAMMING
revisions will appear on the TSA Listing each time a listing is generated from
within HyperNet.
PROGRAM NET UPLOAD TO THE OM-320
After the Program Net has been checked and saved, clicking on the HyperComm
Window button will return HyperWare to the HyperComm Window. The Program Net
icon displayed on the PC graphic represents the last edited Program Net. Drag and
drop the Program Net icon from the PC to the serially connected OM-320 or to the
PCMCIA card drive to upload the new Program Net.
Refer to Chapter 5, HyperComm Serial Communications for details of the Program
Net serial link uploading procedure or to Chapter 6 for details on using the PCMCIA
card.
7-16
USING THE OM-320
7... HYPERNET™ ICON BASED PROGRAMMING
NOTES:
USING T HE OM-320
7-17
8... POST-PROCESSING OF COLLECTED DATA
8... POST-PROCESSING OF COLLECTED DATA
OVERVIEW
Once data has been collected by the OM-320 and downloaded to a OM-320
Download file on the PC, a number of powerful data analysis and viewing options
are available from within HyperWare. (See HyperComm, Chapter 5 for details on
downloading data from the OM-320).
The Post-Processing window within HyperWare provides the capability to `postprocess’ (ie process after collection) data in the following ways:
♦
Graphically plot collected data using HyperPlot
♦
Merge data from separate logging sessions into a single file for
Before and After type performance comparisons
♦
Save HyperPlot graphs to bitmap (*.BMP) files allowing
seamless inclusion into other Windows applications such as
wordprocessors and spreadsheets
♦
Convert collected data into an Excel Version 4 (*.XLS) file
♦
Convert collected data into a date/time annotated ASCII (*.TXT)
file
♦
Algebraically manipulate collected data and save to a new OM320 Download, Excel, or text file.
HyperPlot is a powerful graphing module included in HyperWare that can be used for
immediate plotting of collected data.
File conversions and algebraic manipulation of collected data are handled by
constructing a Post-Processing Net which converts downloaded data from a OM-320
Download file to another User defined file/format.
POST-PROCESSING NETS
Post-Processing Nets provide a means to convert OM-320 Download files to various
formats and, if desired, perform additional algebraic processing of collected data as
it is converted to the new file format.
USING THE OM-320
8-1
8... POST-PROCESSING OF COLLECTED DATA
A Post-Processing Net is constructed much the same way as a Program Net is
developed within HyperNet. The main difference is that a Program Net running in a
Figure 8... -1: Example Post-Processing Net
OM-320 receives its data from various hardware channels such as thermocouples,
then saves the collected data to OM-320 memory. In contrast, Post-Processing Net
receives its data from a OM-320 Download file, processes the data, then saves the
data in a destination file format. Figure 8... -1 shows a completed Post-Processing
Net.
To perform a file conversion and view / analyze the collected data, the following
steps are required:
8-2
♦
Switch to the Post-Processing window
♦
Open a OM-320 Download file and construct a Post-Processing
Net with icons and connections
♦
Specify the destination file format(s)
♦
Start the Post-Processing (ie run the Post-Processing Net)
♦
Launch the desired data review/analysis application (eg
HyperPlot, Excel, Notepad, etc)
USING T HE OM-320
8... POST-PROCESSING OF COLLECTED DATA
Entering the Post-Processing window
From within the HyperComm Window, click on the Post-Processing button
and HyperWare will change to the Post-Processing window, Figure 8... -3.
Figure 8...
-2: PostProcessing
button
Figure 8... -3: Post-Processing window
Constructing a Post-Processing Net
Post-Processing Net construction utilizes similar icon placement and
connection techniques as used during construction of a OM-320 Program
Net (Chapter 7) or a HyperTrack Net (Chapter 10).
Opening a OM-320 Download File (*.HLD)
Figure 8...
-4: Open
Download
File button
The first step in Post-Processing of a OM-320 Download file is to
open the file to be processed. A source OM-320 Download file
containing the OM-320 collected data is opened by clicking on the
Open OM-320 Download File button on the toolbar. Selecting the
desired file will result in a display of Memory icons on the left side of
the Post-Processing workspace. Each of the icons represents a
channel of logged data contained within the OM-320 Download file.
Reviewing File Information
After a Download file has been opened, the File Information entered
at the time of Download can be reviewed. To see the Title and
comments entered, select File/Data File Information from the menu.
The comments are read-only and cannot be edited from within this
window, however comments can be highlighted and copied/pasted
to other documents.
USING THE OM-320
8-3
8... POST-PROCESSING OF COLLECTED DATA
Adding Icons
Two icons are available on the Icon Toolbar for use in construction
of the Post-Processing Net; a Math icon and a File icon.
MATH ICON
The Math icon provides algebraic processing of data as it passes
from input to output. In Figure 8... -1, the Math icon is providing
a differential temperature calculation and generating a third data
channel, Delta-T, which is then stored to the destination file.
Double-click on the icon to open its configuration dialog box. See
the Master Icon Listing in Appendix A for configuration details.
Figure 8...
-5: Math
icon
DESTINATION FILE ICON
The Destination File icon represents storage to file of all signals
connected to its inputs. Up to 36 inputs can be connected to the
File icon when it is used as an Excel file or 24 when used as an
ASCII file. Each time a User adds a connection, an additional
input terminal appears.
Double-clicking on the icon opens its Configuration dialog box.
With the dialog box, the destination file data format can be
specified as ASCII (*.TXT), OM-320 Download (*.HLD), or
Version 4.0 Excel spreadsheet (*.XLS) format. See the Master
Icon Listing in Appendix A for configuration details.
Multiple File icons can be connected in a net for simultaneous
storage of different signals and/or multiple file formats.
Figure 8... 6:
Destination
File icon
Connecting Icons
Icons are connected using the standard drag and drop connection
method as used for construction of HyperNet Program Nets. The
order of connections made to the Destination File icon determines
their sequence in the resulting file.
Unconnected Memory icons will not be processed nor included in the
Destination File.
Other Post-Processing Net Development Options
As in the development of a Program Net from within HyperNet,
various tools such as Grid, Snap, and Print Net options are available
from the Menu Bar.
Saving the Post-Processing Net
Upon completion of the Net, it can be saved for later use with the menu
selection File/Save Net As or with the Save Net button. The saved PostProcessing Net can then be opened at a later time for conversion of
additional OM-320 Download files that have the same channel configuration
and filename.
Figure 8...
-7: Save
Net button
An Example: Every day, a OM-320 is downloaded and
the data is run through the same Post-Processing Net
which converts the data to an Excel spreadsheet. A
Post-Processing Net could be constructed once and
saved with the filename CONVERT.PST.
8-4
USING T HE OM-320
8... POST-PROCESSING OF COLLECTED DATA
Each day, when the data is downloaded from the OM320, a new filename is given to the OM-320 Download
file (eg Monday.hld, Tuesday.hld, Wednesday.hld, ...).
From within the Post-Processing window, the PostProcessing Net CONVERT.PST can then be opened, the
Excel destination filename changed, then run. The PostProcessing Net will automatically check for compatibility,
then connect to the open OM-320 Download file and
process the data into the new Excel destination file..
STARTING A POST-PROCESSING SESSION
To start the conversion, click on the Green Start button and a Post-Processing status
dialog will display as the file conversion proceeds.
Figure 8...
-8: Start
Processing
VIEWING THE CONVERTED DATA
After the processing of the Net is complete, the converted data file can be viewed
immediately by double-clicking on the Destination File icon. The application
program (eg Excel, HyperPlot, Notepad, etc) associated with the Destination File
type will be launched as specified under the Options/Paths menu within the
HyperComm window and the converted file will be loaded automatically.
Options / Paths
Selecting the Options / Paths menu from the menu-bar in the HyperComm
window displays a dialog for User specification of the directory paths and
program filenames to use during the viewing of files from within the PostProcessing window. A text window is provided for User entry of the default
path and program name for a spreadsheet program (eg Excel for viewing
*.XLS destinations files) and for a text editor (eg Notepad for viewing *.txt
destination files). Note that the Window Notepad application is for viewing
text files smaller than 50K in size. For viewing larger data files, change the
text editor to the DOS “EDIT.COM” or another text editor with large file
capabilities.
If the Destination File icon has been configured for a OM-320 Download file format
(*.HLD), double-clicking on the icon will launch HyperPlot.
If the destination/converted file has been configured for either an Excel or an ASCII
text file, it can also be opened without the use of HyperWare from within the
respective application’s normal Open file commands
A SHORTCUT TO HYPERPLOT...
Figure 8...
-9:
HyperPlot
button
For immediate graphic review of the first seven channels of data in a OM-320
Download file, HyperPlot can be used without construction of a Post-Processing Net.
Switch to the Post-Processing window, and immediately click on the HyperPlot
button in the Tool Bar. The OM-320 Download file to be viewed can then be
selected via the FILE/Open View menu.
Detailed use of HyperPlot is explained in Chapter 9.
USING THE OM-320
8-5
8... POST-PROCESSING OF COLLECTED DATA
MERGING OF DOWNLOAD FILES
Through a special function in the Post-Processing Window, two Download files can
be merged into a single Destination file. This is a powerful feature that can be used
for generating Before and After type performance plots with HyperPlot.
For example, a pressure and temperature data logging session could be run on a
process prior to process improvements being made. After the improvements have
been made, the logging session could be repeated (using the same Program Net for
comparison consistency). The data from the Before and After sessions could then
be combined into a single file. This resulting file can then be plotted using
HyperPlot. From within HyperPlot, individual plots times can be shifted, allowing for
registration and comparison of the Before and After performance data.
The File Merge Process...
Two Download files can be opened and combined (merged) in the PostProcessing window as follows:
1. Open the first Download file in the usual manner by
double-clicking on the Open Download File button (or
selecting File/Open Download Data File from the menu
bar).
File Information can be viewed by selecting the File/Data
File Information choice from the Menu Bar.
2. Open the second Download file by selecting File/Open
Secondary Data File from the drop-down Menu Bar. A
second group of Memory icons will display within the
window.
File Information on this second Source file can be viewed
by selecting the File/Data File Information choice from
the Menu Bar and clicking on NO.
3. Drag and drop a Destination File icon onto the
workspace and add connections from the Memory icons
(to be included in the Destination File) to the Destination
File icon.
Double-click on the Destination File icon and specify a
filename and type of file.
4. Click on the Start Post-Processing (green flag) button
and the files will be merged into one Destination File.
Merged File Characteristics
After a Merge of two Download files, the resulting file will contain data and
Channel Names from both the First and the Second source files. However,
additional File Information such as Starting Time/Date, comments, etc. will
be pulled from ONLY the first source file. Additionally, both file’s channel
data will adjusted to start at the same date/time.
8-6
USING T HE OM-320
9... HYPERPLOT™ GRAPHIC DATA DISPLAY
9... HYPERPLOT™ GRAPHIC DATA DISPLAY
OVERVIEW
HyperPlot is an integral sub-program of HyperWare that provides graphic data
display of 1 to 7 channels of OM-320 collected data versus time (Figure 9... -1).
Autoscaling, zoom/unzoom, data analysis, and bitmap file (*.BMP) generation are all
provided features of HyperPlot. HyperPlot displays data from the standard OM-320
Download file format (*.HLD).
Presented in this chapter is information on launching the HyperPlot program, details
on using the various display options, and methods used for outputting graphed data
for inclusion into reports or printing.
Figure 9... -1: HyperPlot graphic data display
LAUNCHING HYPERPLOT
The HyperPlot program can be launched in a number of different ways:
♦
Directly from the HyperComm Window for an immediate review
of data just downloaded from the OM-320.
♦
From the Post-Processing window for general use.
♦
After processing of data through a Post-Processing Net
USING THE OM-320
9-1
9... HYPERPLOT™ GRAPHIC DATA DISPLAY
From HyperComm...
After data has been downloaded from a OM-320 to a OM-320 Download file
(*.HLD) on the PC, the data can be immediately viewed with HyperPlot.
After the Download file has been saved to PC disk, a Memory icon will
display overlaying the PC graphic in the HyperComm Window. Doubleclicking on this Memory icon will immediately launch HyperPlot. The first
seven channels of data contained within the just Downloaded file will be
automatically plotted with auto-scaled time and magnitude axis.
From Post-Processing Window
For general use, HyperPlot can be launched from the Post-Processing
window of HyperWare. Click on the Post-Processing button from the
HyperComm Window and HyperWare will change to the Post-Processing
window.
Clicking on the Launch HyperPlot button opens the HyperPlot window, at
which time a OM-320 Download file can be opened (details follow).
Figure 9...
-2: Launch
HyperPlot
button
From a Post-Processing Net
If a Post-Processing Net is constructed that utilizes a Destination File icon
with a *.HLD format, HyperPlot can be launched by double-clicking on the
Destination File icon immediately after running the net. HyperPlot will start
and the first seven channels of data contained within the Destination File will
auto-scaled and plotted.
Figure 9... 3:
Destination
File icon
HYPERPLOT WINDOW OVERVIEW
When HyperPlot starts, the window shown in Figure 9... -1 displays (with or without
data graphed). Details on the various components of the HyperPlot window follow.
Time Axis
A horizontal axis is used for display of time. The time can be displayed in
elapsed or absolute modes with either linear or logarithmic scaling.
Data Axis
Up to seven vertical axes can be displayed on a single plot, each with
unique scaling. At the bottom of each axis is the data channel name and
units assigned during construction of the net (to the Memory icon). Upon
initial display, the axes are auto-scaled to allow the data to fit on the
workspace. If required, scaling may be expressed with scientific notation
(engineering format) and the multiplier will appear near the top of the
appropriate axis.
Slide Bars
Slide bars are displayed at the right side and the bottom of the window which
can be used for panning vertically and horizontally. Drag the slide button or
click on the arrows at each end of the slide bars to pan the display.
9-2
USING THE OM-320
9... HYPERPLOT™ GRAPHIC DATA DISPLAY
Zooming
Areas of a plot can be enlarged via the HyperPlot Zooming feature. To
zoom into an area of interest, a rectangular outline can be drawn around a
region using the mouse and the display will change to fill the window with the
outlined plot... auto-scaling time and channel data axes as necessary.
To zoom into a region:
1. Locate the mouse on one corner of the rectangular area
to be defined.
2. While holding the left mouse button down, drag a
rectangular box around the region to be enlarged.
3. Release the mouse button and the outlined area will fill
the screen.
To zoom out, use the Zoom All or Zoom Last commands under the
Calculations menu (see following Menu bar details).
Menu Bar
The Menu bar along the top edge of the HyperPlot window provides User
control of the plotting features within HyperPlot.
HYPERPLOT MENU BAR
The conventional Windows menu bar techniques are used to load files for plotting,
modify plotting parameters, and output plots. Descriptions of the features within
each menu follow:
File
Open View
Loads a new OM-320 Download file for plotting.
Save as Bitmap
Outputs the currently displayed screen view as a Windows bitmap
file. The bitmap file format is readily integrated into other software
applications. When selected, a filename is requested and the file
extension *.BMP is appended.
Print View
Outputs the currently displayed screen view to the Windows default
printer.
Data File Information
Displays the Title and comments entered into the Download file at
the time of Download from the OM-320 or PCMCIA card. From this
window, the Title displayed at the top of Plots can be edited.
Calculations
Zoom All
Returns the view to show all of the data file.
USING THE OM-320
9-3
9... HYPERPLOT™ GRAPHIC DATA DISPLAY
Zoom Last
Returns the view to show the last level of zoom
Cursor
Brings a vertical cursor onto the view. The cursor shows on the left
edge of the screen with a small triangle displaying just above the
time axis. The cursor can be moved by locating the mouse cursor
over the vertical line (the cursor will change to a double-ended
arrow) then clicking the left mouse button and dragging the cursor
left and right.
At the right edge of the view, the time and channel values
intersected by the cursor will be displayed.
NOTE: When zoomed into a sufficient level that individual
data points can be discerned on the screen, the cursor
will appear to hop from data point to data point.
If mismatched sampling rates were used during data
collection, displayed cursor values not on actual data
points will utilize linear interpolation for the value.
Analyze View
Analyze View provides a quick display of the average, minimum
value, maximum value, and the time integral for each data channel
for the currently displayed view. This dialog can be copied to the
Windows clipboard (hit <alt> P while the dialog is displayed) and
then pasted into another application.
Options
X-Axis
The Time (X-Axis) axis can be displayed in a number of different
formats at the User’s discretion. Selecting the X-Axis menu results
in a dialog box allowing for User specification of the following
options.
T IME FORMAT
Selection of the appropriate radio buttons
♦
HH:MM:SS or Seconds Time Base; specifies the time
display format for Hours, Minutes and Seconds, or in
Seconds only.
♦
Elapsed or Absolute Time display; With Elapsed
mode, the time display starts with Time 0 as the time of
the first data sample. With Absolute mode, the time
and date when the OM-320 stored the sample is used.
♦
Linear or Logarithmic; The X-axis is scaled linearly or
on a base 10 log scale.
T IME INTERVAL
Using the provided Time Interval text box, the time base
(essentially a manual time base zoom function) can be manually
9-4
USING THE OM-320
9... HYPERPLOT™ GRAPHIC DATA DISPLAY
specified. The entered value in units (approximate) will be used
for the time window displayed in a single view. For example, if
the value is entered as 60, the HyperPlot view will be time
zoomed to display approximately 60 units (seconds, hours, etc)
in a single full screen view.
T IME SHIFT
Individual channel plots can be shifted in time from milliseconds
to days. Following the example format, in a Channel’s text box,
enter in the time to shift that plot.
The Time Shift capability can be very convenient for time
registering (aligning) plots of data within a Before / After Merged
file for easy graphic comparison. Refer to Chapter 8 for details
on generating a Merged file.
Figure 9... -4: HyperPlot Options / X-axis
Y-Axis
The Y-Axis dialog (Figure 9... -5) provides User control over grids,
scaling and symbols used during the plotting of data. Descriptions
of User selectable options follow:
CHANNEL NAME
The individual data channel names from the OM-320 Download
file are listed. The names are assigned when developing a
HyperNet and/or Post-Processing Net.
USING THE OM-320
9-5
9... HYPERPLOT™ GRAPHIC DATA DISPLAY
DISPLAY CHANNEL
Checking a data channel’s checkbox results in that channel being
plotted.
Figure 9... -5: Y-Axis configuration dialog
DISPLAY GRID
A row of radio buttons specifies to which channel’s Y-axis the
horizontal grid should be connected.
DISPLAY Y-AXIS
Checking a data channel’s Y-Axis checkbox results in that
channels Y-Axis being displayed. In many plots, it may only be
necessary to display a single Y-axis if the scaling is the same for
all channels. For example if four channels of temperature data
are being plotted and they all are scaled from 0 to 100F, only a
single Y-Axis is required, allowing more area for data display.
DISPLAY SYMBOLS
Check boxes are provided for the enabling of symbols for each
displayed channel.
SCALING AUTO / MANUAL
When a OM-320 Download file is first plotted, all channels are
autoscaled to fit on the screen. This auto-scaling feature can be
disabled by the User and a manual range specified by clicking
the Manual checkbox and entering a High and Low limit in the
Manual Ranges text boxes. (As a short-cut, editing of the
Manual Range text boxes automatically switches the Auto /
Manual checkbox to Manual).
To return to the Auto-scaling mode, merely click on the Auto
checkbox and the range will automatically be rescaled to fit the
screen.
9-6
USING THE OM-320
9... HYPERPLOT™ GRAPHIC DATA DISPLAY
UNITS
The individual data channel units from the OM-320 Download file
are listed. The units are assigned when developing a HyperNet
and/or a Post-Processing Net.
Help
The Help menu provides access to the Help information through the
standard Windows techniques.
PLOTTING LARGE FILES WITH HYPERPLOT
If a OM-320 Download file contains a channel with greater than 20,000 samples, the
plot must be broken into two or more pages for plotting. If a file of this size is
plotted, an information dialog box will display asking if the User wants to advance to
the next page before plotting.
When a page of data (beyond the first page) is selected for plotting, the X-axis will
display the time from the start of the file, however data will only be plotted in the
right half of the screen. Plotted data can then be expanded to full screen using the
conventional Zooming method.
INTEGRATING HYPERPLOTS INTO OTHER SOFTWARE
APPLICATIONS
Via Bitmap Files
Through the File/Save File as Bitmap menu choice (explained previously)
HyperPlots can be saved to a bitmap file format (*.BMP) which can then be
utilized in a multitude of other Windows applications.
From within other applications, menu commands are available that allow
User’s to specify a location and the bitmap file to be integrated. For
example, from within Microsoft’s Word for Windows, using the Insert Frame
and insert Picture commands results in a seamless integration of the plot
into a document. Other applications have similar procedures for integrating
plots.
HyperPlot bitmap files can also be annotated and/or edited further from
within graphic editing applications such as Windows Paintbrush.
Via the Windows Clipboard
For quick and simple integration of plots into other applications, the plot can
be captured to the Windows clipboard, then pasted into another document.
To perform this procedure, display the plot on the screen, then save the
screen to the clipboard by pressing <ALT> and <Print Screen>. Change to
the other application and utilize the Paste command to integrate it into the
document.
NOTES:
USING THE OM-320
9-7
10... HYPERT RACK™ REAL-TIME DATA DISPLAY
10... HYPERTRACK™ REAL-TIME DATA DISPLAY
OVERVIEW
The OM-320 in conjunction with a PC running HyperWare is capable of operating in
a real-time mode called HyperTrack or tracking. HyperTrack provides a real-time
graphic trending and/or scrolling numerical display on the connected PC screen of
values received from a serially connected OM-320. Figure 10... -1 shows real-time
tracking in the HyperTrack window. The HyperTrack display occurs concurrently
while the OM-320 is executing its Program Net and logging data.
Graphic trending and Scrolling can be run simultaneously and multiple windows of
each function can be open.
Figure 10... -1: Real-time tracking of data within the HyperTrack window
HyperTrack can operate via RS-232 or modem serial connections, allowing for the
real-time monitoring of actual Program Net values from a remotely located OM-320.
To utilize the HyperTrack feature within HyperWare, the following steps are
performed:
1. Develop and upload to the OM-320 a Program Net which
includes Probe Point icons at the Net nodes to be monitored.
USING THE OM-320
10-1
10... HYPERT RACK™ REAL-TIME DATA DISPLAY
2. From within HyperTrack, construct a real-time HyperTrack Net.
(Note that this is a different Net than the Program Netuploaded
into the OM-320 memory. The HyperTrack Net runs on the PC)
3. Establish the serial connection between the PC and the OM-320
4. Enable real-time tracking
CONSTRUCTING A OM-320 PROGRAM NET FOR HYPERTRACK
Figure 10... 2: Probe
Point icon
A OM-320 that is to be used in the real-time tracking mode must be programmed
with a Program Net that incorporates Probe Point icons. The Probe Point icons are
connected to nodes within the Program Net that the User may want to monitor
through HyperTrack. Not all nodes with Probe Point icons must be displayed on the
PC during HyperTrack, however any node to be monitored must have a Probe Point
icon.
Probe Point icons can be given a Name via the conventional icon configuration
dialog box. This name is used as a column heading during real-time tracking (see
the Master Icon Reference in Appendix A).
Figure 10... -3 shows a simple two thermocouple Program Net that has Probe Point
icons to allow HyperTrack display of the two temperatures, Tinlet and Toutlet, and
the cooling fan status FanStat.
Figure 10... -3: Example Program Net with Probe Point
icons connected for tracking (built in HyperNet window)
Nodes within the Program Net to which Probe Point icons are connected can also be
displayed on the OM-320 front-panel LCD real-time. Refer to Chapter 2 for real-time
LCD display of Probe Point icons.
After completion of the Program Net, upload it to the OM-320 memory. Refer to
Chapter 7 for Program Net development and uploading procedures.
10-2
USING THE OM-320
10... HYPERT RACK™ REAL-TIME DATA DISPLAY
CONSTRUCTING A HYPERTRACK NET
During a real-time tracking session, the OM-320 transmits values of the Probe Point
icons to the PC via the serial link. These values are then processed through a
HyperTrack Net running on the PC (in the HyperTrack window) and displayed.
HyperTrack Nets provide a means to perform additional processing of values from
Probe Point icons before they are displayed. HyperTrack Nets can also provide
storage of Probe Point icon values to a file on the PC while the real-time data is
being received.
The HyperTrack Net is constructed much the same way as a Program Net is
developed within HyperNet. The main difference is that a Program Net running in a
OM-320 receives its data from various hardware channels such as thermocouples
whereas the HyperTrack Net receives its data from the Probe Point icons contained
in the Program Net in an Enabled OM-320. Figure 10... -4 shows a completed
HyperTrack Net.
Figure 10... -4: Example HyperTrack Net (developed within the HyperTrack
window)
Determining OM-320 Program Net Probes Information
Before a HyperTrack Net can be developed, the Probe Point icons contained
within the associated OM-320 Program Net must be known. This
information can be gained by downloading the Program Net from a serially
connected OM-320 or by opening the Program Net from disk (assuming it
was saved after development).
Receiving Probe Point Icons from a serially
connected OM-320):
1. Establish a serial connection with the OM-320 to be
used during the HyperTrack session. At this time, the
OM-320 has already been programmed with a Program
USING THE OM-320
10-3
10... HYPERT RACK™ REAL-TIME DATA DISPLAY
Net that contains the desired Probe Point icons. The
OM-320 may be in either the Enabled or Stopped mode.
2. From the HyperComm Window, click and drag the
Program Net icon on the OM-320 to the PC and release
it. The Program Net and Probe Point icon information
will be automatically downloaded to the PC and a Probe
Point icon will display overlaying the image of the PC.
NOTE: If the Probe Point icon does not display on the
PC, then the transferred Program Net does not contain
Probe Point icon(s) and this Program Net can not be
used for tracking. (In this case, develop a new Program
Net containing Probe Point icons and upload it to the
OM-320.)
1. From within the HyperComm Window, click on the
HyperTrack button (or double click on the Probe Point
icon overlaying the PC) and the HyperTrack window will
appear with Probe Point icon(s) displayed on the left
edge of the workspace (Figure 10... -5). These icons
represent the Probe Point icons detected in the Program
Net that was just downloaded to the PC (and which is
Figure 10... -5: Probe Points detected in the currently loaded Net Program
currently programmed in the OM-320’s memory).
2. Once this Probe Point icon information is displayed on
the workspace, it can be saved to a HyperTrack Net file
(the filename extension *.PRB will be appended) by
using the File/Save As drop-down menu selection. This
file can then be used as a starting point for development
of additional nets based on the same Program Net.
10-4
USING THE OM-320
10... HYPERT RACK™ REAL-TIME DATA DISPLAY
3. The OM-320 connection can then be disconnected (eg
to save long distance charges if connected via modem)
while the HyperTrack Net is developed.
Reading Probe Point icons from a Program Net on
disk:
If a copy of the Program Net that will be running in the OM-320
during tracking is available on disk, this Program Net can be opened
from disk and the Probe Point icon information will be available for
HyperTrack Net development.
This method does not require establishing a serial link with the OM320.
Figure 10...
-6:
HyperTrack
button
1. Switch to the HyperNet Window by clicking on the
HyperNet button.
2. Open the Program Net file
3. Switch to the HyperComm Window by clicking on the
HyperComm button, and a Probe Points icon should be
overlayed on the PC. (If the Probe Point icon is not
displayed, the Program Net selected does not contain
any Probe Point icons and a new Program Net should be
selected/developed.)
1. From within the HyperComm Window, click on the
HyperTrack button (or double click on the Probe Point
icon overlaying the PC) and the HyperTrack window will
appear with Probe Point icons displayed on the left edge
of the workspace. These icons represent the Probe Point
icons in the Program Net currently programmed in the
OM-320’s memory.
2. Once this Probe Point icon information is displayed on
the workspace, it can be saved to a HyperTrack Net file
(the filename extension *.PRB will be appended) by
using the File/Save As drop-down menu selection. This
file can then be used as a starting point for development
of additional nets based on the same Program Net.
Note: The Program Net icon overlaying the PC in the
HyperComm Window represents the last Program Net
loaded from disk (in the HyperNet Window) or the last
Program Net downloaded from a serially connected OM320. If the Program Net currently residing in the PC
contains Probe Point icons, then that icon will also show
overlaying the PC.
Building the HyperTrack Net
Icons
Three icons are available on the Icon Toolbar for use in construction
of the HyperTrack Net, a Math icon, a File icon, and the Real-Time
Scrolling Display icon.
USING THE OM-320
10-5
10... HYPERT RACK™ REAL-TIME DATA DISPLAY
MATH ICON
The Math icon provides algebraic processing of data as it passes
from input to output. In Figure 10... -3 above, the Math icon is
providing a differential temperature calculation and generating a
third data channel, Tdelta which is then displayed as well as
stored to file.
Figure 10... 7: Math icon
FILE ICON
The File icon represents storage to file of all signals connected to
its inputs. Multiple inputs can be connected to the File icon and
through its configuration dialog box, the data can be stored in an
ASCII (*.TXT), OM-320 Download (*.HLD), or Excel Spreadsheet
(*.XLS) format.
Multiple File icons can be connected in a net for simultaneous
storage of different signals and/or multiple file formats.
Figure 10... 8: File icon
REAL-TIME SCROLLING DISPLAY ICON
Signals connected to the Scrolling Display icon will be displayed
in a scrolling columnar format on the Workspace when tracking is
enabled. Up to 8 inputs can be connected to this icon. No
configuration dialog is available for this icon, double-clicking on it
opens the scrolling display window.
Multiple Scrolling Display icons can be connected in a net
allowing multiple HyperTrack windows to be displayed
simultaneously for greater channel capability.
Figure 10... 9: Real-time
Scroll icon
REAL-TIME GRAPHIC T RENDING DISPLAY ICON REAL-TIME GRAPHIC
T RENDING DISPLAY
Signals connected to the Trending Display icon will be displayed
in a multi-trace horizontal line graph format within the Workspace
when tracking is enabled. Up to 8 inputs can be connected to
this icon. No configuration dialog is available for this icon,
double-clicking on it opens the scrolling display window.
Multiple Scrolling Display icons can be connected in a net
allowing multiple HyperTrack windows to be displayed
simultaneously for greater channel capability.
Fig 10... 10: Realtime Trend
icon
Connecting Icons
Icons are connected using the standard drag and drop connection
method used for construction of Program Nets.
Unconnected Probe Point icons will not display.
Other HyperTrack Net Development Options
As in the development of a Program Net from within HyperNet,
various tools such as Grid, Snap, and Print Net options are available
from the Menu Bar.
Saving the HyperTrack Net
Upon completion of the Net, it can be saved for later use with the menu
selection File/Save Net As or with the Save Net button.
10-6
USING THE OM-320
10... HYPERT RACK™ REAL-TIME DATA DISPLAY
Saved HyperTrack Nets should only be used for real-time tracking with OM320s configured with Program Nets that contain matching Probe Point icons.
If mismatched nets are used, channels may be incorrectly titled and
displayed in incorrect sequence.
For example: A HyperTrack Net is developed and saved
for use with a OM-320 Program Net that includes 3
Probe Point icons labeled A, B, and C. Accidently, the
HyperTrack Net is used with a OM-320 running a
Program Net that contains only 2 Probe Point icons
labeled X and Y. The resulting HyperTrack Net data
display will result in two channels labeled A (displaying X
data) and B (displaying Y data) and a third channel
labeled C that just displays 0.
To avoid this confusion, check the correlation between
the HyperTrack Net and the OM-320 Program Net before
Tracking.
STARTING A HYPERTRACK SESSION
Initiation of a HyperTrack session is handled from within the HyperTrack window.
Before starting a session, the following conditions must be met:
♦
The OM-320 must be programmed with a Program Net including
Probe Point icons
♦
A serial connection between the OM-320 and the PC must be
established
♦
A compatible HyperTrack Net must be loaded and displayed on
the HyperTrack window of HyperWare
♦
All File icons included within the HyperTrack Net must have
filenames provided
♦
The OM-320 must be Enabled
To start tracking, click on the Green Start button. Clicking on this button commands
the connected OM-320 to start sending out the Probe Point icon values, which are in
turn processed by the HyperTrack Net on the PC. The Scrolling Display window(s)
will automatically open and begin displaying data. Any Destination File icons will
create the specified filenames and begin recording to that file.
Figure 10... 11: Start
Tracking
button
HyperTrack Scrolling Display Window
During real-time tracking, data from the signals connected to the Scrolling
Display icon is displayed in a columnar format in the pop-up Scrolling
Display window.
Channel Display Order
The order of display (left to right) of inputs is set by the order of
connection of signals to the Scrolling Display icon. The top
connection is displayed on the left and the bottom connection is
displayed on the right.
Up to 8 channels can be displayed in the Scrolling Display window.
Utilize the slide bar at the bottom of the window to view channels
that are out of the window to the left or right.
USING THE OM-320
10-7
10... HYPERT RACK™ REAL-TIME DATA DISPLAY
Data Buffer
As new data is collected, older data will be scrolled down one line.
Older data is still accessable after it has scrolled out of the window
by clicking on the scroll bar buttons on the right side of the window.
HyperTrack Trending Display Window
During real-time tracking, data from the signals connected to the Trending
Display icon is displayed in a multi-pen horizontal format in the pop-up
Trending Display window. Time is plotted horizontally and input data
amplitude is plotted vertically on a single axis.
As time progresses, track data is buffered, scrolls off the left edge of the
window, and is eventually deleted from the buffer (FIFO) as a function of the
User defined settings explained below.
NOTE:
In cases where the OM-320 is set for very fast
sampling rates , the Trending function will put heavy
video demands on the connected PC and PC’s video
card. In some cases, the PC will be unable to handle
the high speed incoming data stream and the
Trending display will not perform or will update very
slowly. If this is the case, decrease the OM-320
sampling rate or run HyperWare and the Trending
function on a faster PC platform.
10-8
USING THE OM-320
10... HYPERT RACK™ REAL-TIME DATA DISPLAY
Trending Configuration Dialog
By double-clicking anywhere on the Trending Display Window, a
Configuration Dialog is displayed (Figure 10... -12). This dialog allows for
various User settings for the data display.
Figure 10... -12: Real Time Trending Configuration dialog
NOTE: After changing any of the following settings,
the Tracking session must be Stopped (click on the
Stop Sign Button) and restarted (Green Flag).
Changing any of the following settings during a
Tracking session will result in a refresh of the
display and clearing of buffered data.
Time Display Formats
Time is displayed on the horizontal axis and can be set for either
Elapsed time since the start of the Track session (the default), or
Absolute, in which the absolute calendar date and time is displayed.
To select Absolute, click on the Display Absolute Date/Time checkbox.
USING THE OM-320
10-9
10... HYPERT RACK™ REAL-TIME DATA DISPLAY
Channel Ranges
The data channels are scaled and plotted per a single amplitude
axis on the left edge of the plot. Upon start of a Trend Tracking
session, the range for all channels defaults to +/-1000.
A Min. and Max. value for each channel can be set by editing the
appropriate text boxes. If all of the channels have the same
Min/Max values, then the vertical axis will reflect this range. For
example if 4 channels of room temperature are being logged, all of
the 4 channels could be set for 50 to 70 and the vertical axis would
reflect this approximate range.
If the Channels have different Min/Max settings, the vertical axis will
default to display as 0 to 100% of the range specified.
Data Buffer
As data is received by the Trending icon, it is buffered temporarily in
PC memory. Eventually, the buffer fills and the oldest data is
deleted as new data is added (FIFO). The amount of data that is
buffered in the PC is set in the Trending Configuration dialog by
editing the Sample Buffer text box.
Plot Period
The amount of data that is displayed in the Trending Window is set
by editing the Plot Period setting in the Configuration Dialog. Older
data (that has not rolled out of the buffer... see above) is still
accessible after it has scrolled out of the window by clicking on the
scroll bar buttons on the lower edge of the window.
NOTE: Stopping, then restarting a HyperTrack
session using a net containing File icons will cause
the file information to be overwritten with new data.
To save data from consecutive HyperTrack sessions,
rename any connected File icon before restarting the
HyperTrack session.
PAUSING A HYPERTRACK SESSION
Figure 10... 13: Pause
button
By clicking on the Pause button on the toolbar, a HyperTrack session can be
temporarily stopped if the data being recieved is of no concern. Any connected
Destination File icons will stop writing to their files, but will not close.
RESUMING AFTER PAUSE
When in Pause mode, the Pause button will change into a Resume button. Clicking
this button will resume normal Tracking operation and resume writing to any
Destination File icons.
Figure 10... 14: Resume
button
10-10
USING THE OM-320
10... HYPERT RACK™ REAL-TIME DATA DISPLAY
STOPPING A HYPERTRACK SESSION
Figure 10... 15: Stop
Tracking
button
To stop a real-time tracking session, click on the Stop button. Stopping a tracking
session does not stop execution of the Program Net within the OM-320, it merely
commands the OM-320 to stop sending Probe Point values to the PC.
When a HyperTrack session is stopped, the files associated with any connected File
icons are closed and the update of data to the Scrolling Display window stops.
NOTE: Stopping, then restarting a HyperTrack
session using a net containing File icons will cause
the file information to be overwritten with new data.
To save data from consecutive HyperTrack sessions,
rename any connected File icon before restarting the
HyperTrack session.
USING THE OM-320
10-11
10... HYPERT RACK™ REAL-TIME DATA DISPLAY
NOTES:
10-12
USING THE OM-320
10... HYPERT RACK™ REAL-TIME DATA DISPLAY
USING THE OM-320
10-1
11.. . APPENDICES
11... APPENDICES
USING THE OM-320
11-1
11... APPENDICES
NOTES:
11-2
USING T HE OM-320
11.. . APPENDIX A: MASTER ICON REFERENCE
APPENDIX A: MASTER ICON REFERENCE
SUPPLY VOLTAGE (VBATT) INPUT ICON
FUNCTION:
Used to take readings of the OM-320 Supply Voltage. If internal batteries are installed in
the OM-320 and an external power supply is also connected, the output value will be the
higher of the two.
INPUTS:
Hardware:
No signal input shown on Net for Program Net connections.
Update Clock:
Output is updated with new reading upon each Update Clock pulse
when Enable
input is unconnected or HI.
Enable:
Processing of icon is allowed when Enable pin is unconnected or
connected and Enable signal is TRUE.
OUTPUTS:
Output Signal:
Data type signal. The Units of the output are Volts
ICON CONFIGURATION DIALOG BOX:
CONFIGURATION OPTIONS:
Icon Name:
Specify the label for the icon. This name will show directly under
the icon within the Program Net.
Output Name:
Specify the label for the Output. This name will show directly
under the Output terminal within the Program Net.
USING THE OM-320
11-3
11.. . APPENDIX A: MASTER ICON FILE REFERENCE
THERMOCOUPLE INPUT ICON:
FUNCTION:
Performs the thermocouple channel selection, amplification, cold junction compensation
and A-D conversion for a thermocouple hardware input from an HLIM-1 Interface Module.
The CJC reading is taken from the integral thermistor on the TSA (terminal strip adapter).
INPUTS:
Hardware: No signal input shown on Net for Program Net connections.
Update Clock:
Output is updated with new reading upon each Update Clock pulse
when Enable input is unconnected or Hi.
Enable:
Processing of icon is allowed when Enable pin is unconnected or connected
and Enable signal is TRUE.
OUTPUTS:
Output Signal:
Data type signal. The Units of the output are degrees C or F,
selectable from the icon configuration dialog box.
ICON CONFIGURATION DIALOG BOX:
CONFIGURATION OPTIONS:
Icon Name: Specify the name for the channel. This name will show directly under the
icon within the Program Net. If no name is User provided, the Backplane
Port (1 to 6) and Channel (A to D) where the actual Interface Module
channel is installed will be used for the name.
Output Name:
Specify a name for the Output signal from this icon. This Output
Name will be referenced by other icons downstream in the Program Net.
Use This Channel for Voltage:
Both the Thermocouple Icon and the VDC-2V
Icon utilize the same Interface Module hardware Configuration Switch
setting. Because of this capability, a Thermocouple Icon can be changed
into a VDC-LO Icon by simply clicking on the CHANGE button.
11-4
USING T HE OM-320
11.. . APPENDIX A: MASTER ICON REFERENCE
Thermocouple Type:
channel.
Units:
Specify the type of thermocouple to be connected to this
Specifies the temperature scale units that will be output from this icon.
Celcius and Fahrenheit are directly supported, however, conversion to other
units can be performed within a Program Net by adding a Math Icon onto
this icon’s output.
AC Noise Reject: Enables software filtering of 50Hz or 60Hz noise on inputs. See
Appendix for an explanation of the 50/60 Hz filtering technique.
Filtering:
Three levels of first order noise filtering can be enabled during
thermocouple channel reading. First order filtering reduces high frequency
noise that may be picked up by sensor wiring with the cost that it slows
down the rate at which a channel can be sampled. See Appendix for
discussion on use of filtering.
USING THE OM-320
11-5
11.. . APPENDIX A: MASTER ICON FILE REFERENCE
CJC (COLD JUNCTION COMPENSATION) INPUT ICON:
FUNCTION:
Performs the Cold Junction Compensation (CJC) channel selection, amplification, and
A-D conversion for a thermistor hardware input from a sensor mounted on the Terminal
Strip Adapter TSA).
Alternatively, the CJC icon can be used to take a resistance reading or measure the
temperature of an external thermistor (10Kohm at 25C, Fenwall curve 16 or equivalent).
A wire jumper on the TSA can be removed and external wiring added if this optional use
is desired. Due to the optimization of the CJC circuit for temperature sensing, the
resistance measurement capability of this circuit does not provide consistent linearity over
the full range. The normal resistance measuring range for a thermistor is 200 ohms to
70,000 ohms.
NOTE: If Thermocouple icons are used in the Program Net, the external sensing function
described above must not be used as the temperature of the TSA is critical in the
calculation of thermocouple temperatures.
INPUTS:
Hardware: No signal input shown on Net for Program Net connections.
Update Clock:
Output is updated with new reading upon each Update Clock pulse
when Enable input is unconnected or Hi.
Enable:
Processing of icon is allowed when Enable pin is unconnected or connected
and Enable signal is TRUE.
OUTPUTS:
Output Signal:
Data type signal. The Units of the output are degrees C, degrees
F, or Ohms. This is software selectable from the icon configuration dialog
box.
ICON CONFIGURATION DIALOG BOX:
CONFIGURATION OPTIONS:
Icon Name: Specify the name for the channel. This name will show directly under the
icon within the Program Net.
Output Name:
Specify a name for the Output signal from this icon. This Output
Name will be referenced by other icons downstream in the Program Net.
Units:
11-6
Specifies the temperature scale units that will be output from this icon.
Celcius, Fahrenheit, and Ohms are directly supported.
USING T HE OM-320
11.. . APPENDIX A: MASTER ICON REFERENCE
DC-LO; +/- 2VDC FULL SCALE VOLTAGE INPUT ICON
FUNCTION:
Performs the analog channel selection, amplification, and A-D conversion for a DC
voltage input within the range of +/-2V from an HLIM-1 Interface Module.
INPUTS:
Hardware: No signal input shown on Net for Program Net connections.
Update Clock:
Output is updated with new reading upon each Update Clock pulse
when Enable input is unconnected or Hi.
Enable:
Processing of icon is allowed when Enable pin is unconnected or connected
and Enable signal is TRUE.
OUTPUTS:
Output Signal:
Data type signal. The Units of the output are Volts
ICON CONFIGURATION DIALOG BOX:
CONFIGURATION OPTIONS:
Icon Name: Specify the name for the channel. This name will show directly under the
icon within the Program Net. If no name is User provided, the Backplane
Port (1 to 6) and Channel (A to D) where the actual Interface Module
channel is installed will be used for the name.
Output Name:
Specify a name for the Output signal from this icon. This Output
Name will be referenced by other icons downstream in the Program Net.
Change this channel to a thermocouple input:
Both the Thermocouple Icon
and the DC-LO Icon utilize the same Interface Module hardware
Configuration Switch setting. Because of this capability, a DC-LO Icon can
be changed into a Thermocouple Icon by simply clicking on the CHANGE
button.
USING THE OM-320
11-7
11.. . APPENDIX A: MASTER ICON FILE REFERENCE
Range:
Specify the input range to be used for this channel. Select the range so
that anticipated input signal fluctuations will not exceed this Full Scale
range. If the input exceeds the selected range, an over-range value will be
logged.
AC Noise Reject: Enables software filtering of 50Hz or 60Hz noise on inputs. See
Appendix for an explanation of the 50/60 Hz filtering technique.
Filtering:
11-8
Three levels of first order noise filtering can be enabled during channel
reading. First order filtering reduces high frequency noise that may be
picked up by sensor wiring with the cost that it slows down the rate at which
a channel can be sampled. See Appendix for discussion on use of
filtering.
USING T HE OM-320
11.. . APPENDIX A: MASTER ICON REFERENCE
DC-MED; +/- 10 VDC FULL SCALE VOLTAGE INPUT ICON
FUNCTION:
Performs the analog channel selection, amplification, and A-D conversion for a DC
voltage input within the range of +/-10VDC from an HLIM-1 Interface Module.
INPUTS:
Hardware: No signal input shown on Net for Program Net connections.
Update Clock:
Output is updated with new reading upon each Update Clock pulse
when Enable input is unconnected or Hi.
Enable:
Processing of icon is allowed when Enable pin is unconnected or connected
and Enable signal is TRUE.
OUTPUTS:
Output Signal:
Data type signal. The Units of the output are Volts
ICON CONFIGURATION DIALOG BOX:
CONFIGURATION OPTIONS:
Icon Name: Specify the name for the channel. This name will show directly under the
icon within the Program Net. If no name is User provided, the Backplane
Port (1 to 6) and Channel (A to D) where the actual Interface Module
channel is installed will be used for the name.
Output Name:
Specify a name for the Output signal from this icon. This Output
Name will be referenced by other icons downstream in the Program Net.
Range:
Specify the input range to be used for this channel. Select the range so
that anticipated input signal fluctuations will not exceed this Full Scale
range. If the input exceeds the selected range, an over-range value will be
logged.
AC Noise Reject: Enables software filtering of 50Hz or 60Hz noise on inputs. See
Appendix for an explanation of the 50/60 Hz filtering technique.
Filtering:
Three levels of first order noise filtering can be enabled during channel
reading. First order filtering reduces high frequency noise that may be
picked up by sensor wiring with the cost that it slows down the rate at which
a channel can be sampled. See Appendix for discussion on use of
filtering.
USING THE OM-320
11-9
11.. . APPENDIX A: MASTER ICON FILE REFERENCE
DC-HI; +/- 30 VDC FULL SCALE VOLTAGE INPUT ICON
FUNCTION:
Performs the analog channel selection, amplification, and A-D conversion for a DC
voltage input within the range of +/-30VDC from an HLIM-1 Interface Module.
INPUTS:
Hardware: No signal input shown on Net for Program Net connections.
Update Clock:
Output is updated with new reading upon each Update Clock pulse
when Enable input is unconnected or Hi.
Enable:
Processing of icon is allowed when Enable pin is unconnected or connected
and Enable signal is TRUE.
OUTPUTS:
Output Signal:
Data type signal. The Units of the output are Volts.
ICON CONFIGURATION DIALOG BOX:
CONFIGURATION OPTIONS:
Icon Name: Specify the name for the channel. This name will show directly under the
icon within the Program Net. If no name is User provided, the Backplane
Port (1 to 6) and Channel (A to D) where the actual Interface Module
channel is installed will be used for the name.
Output Name:
Specify a name for the Output signal from this icon. This Output
Name will be referenced by other icons downstream in the Program Net.
Range:
Specify the input range to be used for this channel. Select the range so
that anticipated input signal fluctuations will not exceed this Full Scale
range. If the input exceeds the selected range, an over-range value will be
logged.
AC Noise Reject: Enables software filtering of 50Hz or 60Hz noise on inputs. See
Appendix for an explanation of the 50/60 Hz filtering technique.
Filtering:
11-10
Three levels of first order noise filtering can be enabled during channel
reading. First order filtering reduces high frequency noise that may be
picked up by sensor wiring with the cost that it slows down the rate at which
a channel can be sampled. See Appendix for discussion on use of
filtering.
USING T HE OM-320
11.. . APPENDIX A: MASTER ICON REFERENCE
MA-LO;
+/- 20 MADC FULL SCALE CURRENT INPUT ICON
FUNCTION:
Performs the analog channel selection, amplification, and A-D conversion for a DC
current input within the range of +/-20mADC from an HLIM-1 Interface Module.
INPUTS:
Hardware: No signal input shown on Net for Program Net connections.
Update Clock:
Output is updated with new reading upon each Update Clock pulse
when Enable input is unconnected or Hi.
Enable:
Processing of icon is allowed when Enable pin is unconnected or connected
and Enable signal is TRUE.
OUTPUTS:
Output Signal:
Data type signal. The Units of the output are Milliamps.
ICON CONFIGURATION DIALOG BOX:
CONFIGURATION OPTIONS:
Icon Name: Specify the name for the channel. This name will show directly under the
icon within the Program Net. If no name is User provided, the Backplane
Port (1 to 6) and Channel (A to D) where the actual Interface Module
channel is installed will be used for the name.
Output Name:
Specify a name for the Output signal from this icon. This Output
Name will be referenced by other icons downstream in the Program Net.
Range:
Specify the input range to be used for this channel. Select the range so
that anticipated input signal fluctuations will not exceed this Full Scale
range. If the input exceeds the selected range, an over-range value will be
logged.
AC Noise Reject: Enables software filtering of 50Hz or 60Hz noise on inputs. See
Appendix for an explanation of the 50/60 Hz filtering technique.
Filtering:
Three levels of first order noise filtering can be enabled during channel
reading. First order filtering reduces high frequency noise that may be picked up by
USING THE OM-320
11-11
11.. . APPENDIX A: MASTER ICON FILE REFERENCE
sensor wiring with the cost that it slows down the rate at which a channel can be sampled.
See Appendix for discussion on use of filtering.
11-12
USING T HE OM-320
11.. . APPENDIX A: MASTER ICON REFERENCE
RTD INPUT ICON (HLIM-4)
FUNCTION:
RTD, resistance, and thermistor signal inputs can all be handled with the HLIM-4. With
the HLIM-4 installed in a OM-320, these respective function icons become available for
use in Program Nets.
As an RTD input, the icon samples the resistance of the connected RTD, converts it to
temperature and passes it along to the next icon. 2, 3, and 4-wire configurations are all
supported.
This channel/icon can be changed to a thermistor or resistance input channel by
selecting the Change button.
INPUTS:
Hardware: No signal input shown on icon for Program Net connections.
Update:
The input is sampled every time an Update command is received on the
Update input and the Enable terminal is True.
Enable:
Processing of the icon is allowed when Enable pin is unconnected or
connected and the Enable signal is TRUE.
OUTPUTS:
Output Signal:
Data type signal. The Units of the output are degrees C, degrees
F, or Ohms. This is software selectable from the icon configuration dialog
box.
ICON CONFIGURATION DIALOG BOX:
USING THE OM-320
11-13
11.. . APPENDIX A: MASTER ICON FILE REFERENCE
CONFIGURATION OPTIONS:
Icon Name: Specify the name for the channel. This name will show directly under the
icon within the Program Net. If no name is User provided, the Backplane
Port (1 to 6) and Channel (A to H) where the actual Interface Module
channel is installed will be used for the name.
Output Name:
Specify a name for the Output signal from this icon. This Output
Name will be referenced by other icons downstream in the Program Net.
Input Type: Specifies the wiring configuration to be used.
2-Wire is typically used for measurements of higher resistance values or
with short lead wire runs where the resistance of the lead wires induces
negligible error. With 2-wire configuration, all four input channels can be
used.
3 and 4-Wire configurations are used where the lead wires to the element
are longer and/or premium measurement accuracy is required. Both 3 and
4-wire configurations compensate for the lead wire resistance. 3-wire
provides nearly the same performance as 4-wire using only 3 wires instead
of 4.
If 3 or 4-wire configuration is selected, the input requires two input
channels. From within the A and C channel icons, selecting 3 or 4-wire will
result in a displayed message that a second channel will be deleted (B or
D).
Range:
Specify the input range to be used for this channel. For optimum resolution,
choose the narrowest range that will meet the signal fluctuation without
exceeding the Full Scale Range. If the input exceeds the selected range, an
over-range value will be logged.
Input Res: Specify the RTD 0’C resistance value. Both 100 and 1000 ohm devices are
supported.
Curve (alpha):
Specify the alpha coefficient for your type of RTD. This coefficient
is used in the conversion equation of resistance to temperature. If
unknown, contact the RTD supplier for input. European (most common) =
0.00385 and American = 0.00392.
Units:
Select Degrees C or F
Filtering:
Three levels of first order noise filtering can be enabled during channel
reading. First order filtering reduces high frequency noise that may be
picked up by sensor wiring with the cost that it slows down the rate at which
a channel can be sampled. See the OM-320 User’s Manual Appendix for
discussion on use of filtering.
AC Noise Reject: Enables software filtering of 50Hz or 60Hz noise on inputs. See
the OM-320 User’s Manual Appendix for an explanation of the 50/60 Hz
filtering technique.
Change:
11-14
Click on CHANGE to switch the icon / dialog box between thermistor,
resistance, or RTD type input.
USING T HE OM-320
11.. . APPENDIX A: MASTER ICON REFERENCE
THERMISTOR INPUT ICON (HLIM-4)
FUNCTION:
RTD, resistance, and thermistor signal inputs can all be handled with the HLIM-4. With
the HLIM-4 installed in a OM-320, these respective function icons become available for
use in Program Nets.
As a thermistor input, the icon samples the resistance of the connected thermistor,
converts it to temperature and passes it along to the next icon. As thermistors have high
ohm/C ratios, lead wire error is negligible and only the 2-wire configuration is supported.
This channel/icon can be changed to an RTD or resistance input channel by selecting the
Change button.
INPUTS:
Hardware: No signal input shown on icon for Program Net connections.
Update:
The input is sampled every time an Update command is received on the
Update input and the Enable terminal is True.
Enable:
Processing of the icon is allowed when Enable pin is unconnected or
connected and the Enable signal is TRUE.
OUTPUTS:
Output Signal:
Data type signal. The Units of the output are degrees C, degrees
F, or Ohms. This is software selectable from the icon configuration dialog
box.
ICON CONFIGURATION DIALOG BOX:
USING THE OM-320
11-15
11.. . APPENDIX A: MASTER ICON FILE REFERENCE
CONFIGURATION OPTIONS:
Icon Name: Specify the name for the channel. This name will show directly under the
icon within the Program Net. If no name is User provided, the Backplane
Port (1 to 6) and Channel (A to H) where the actual Interface Module
channel is installed will be used for the name.
Output Name:
Specify a name for the Output signal from this icon. This Output
Name will be referenced by other icons downstream in the Program Net.
Range:
Specify the input range to be used for this channel. For optimum resolution,
choose the narrowest range that will meet the signal fluctuation without
exceeding the Full Scale Range. If the input exceeds the selected range, an
over-range value will be logged.
Units:
Select Degrees C or F
Filtering:
Three levels of first order noise filtering can be enabled during channel
reading. First order filtering reduces high frequency noise that may be
picked up by sensor wiring with the cost that it slows down the rate at which
a channel can be sampled. See the OM-320 User’s Manual Appendix for
discussion on use of filtering.
AC Noise Reject: Enables software filtering of 50Hz or 60Hz noise on inputs. See
the OM-320 User’s Manual Appendix for an explanation of the 50/60 Hz
filtering technique.
Change:
11-16
Click on CHANGE to switch the icon / dialog box between thermistor,
resistance, or RTD type input.
USING T HE OM-320
11.. . APPENDIX A: MASTER ICON REFERENCE
RESISTANCE INPUT ICON (HLIM-4)
FUNCTION:
RTD, resistance, and thermistor signal inputs can all be handled with the HLIM-4. With
the HLIM-4 installed in a OM-320, these respective function icons become available for
use in Program Nets.
As a Resistance input, the icon samples the resistance connected to its input, and passes
it along to the next icon. 2, 3, and 4-wire configurations are all supported.
This channel/icon can be changed to a thermistor or RTD input channel by selecting the
Change button.
INPUTS:
Hardware: No signal input shown on icon for Program Net connections.
Update:
The input is sampled every time an Update command is received on the
Update input and the Enable terminal is True.
Enable:
Processing of the icon is allowed when Enable pin is unconnected or
connected and the Enable signal is TRUE.
OUTPUTS:
Output Signal:
Data type signal. The Units of the output are Ohms.
ICON CONFIGURATION DIALOG BOX:
USING THE OM-320
11-17
11.. . APPENDIX A: MASTER ICON FILE REFERENCE
CONFIGURATION OPTIONS:
Icon Name: Specify the name for the channel. This name will show directly under the
icon within the Program Net. If no name is User provided, the Backplane
Port (1 to 6) and Channel (A to H) where the actual Interface Module
channel is installed will be used for the name.
Output Name:
Specify a name for the Output signal from this icon. This Output
Name will be referenced by other icons downstream in the Program Net.
Input Type: Specifies the wiring configuration to be used.
2-Wire is typically used for measurements of higher resistance values or
with short lead wire runs where the resistance of the lead wires induces
negligible error. With 2-wire configuration, all four input channels can be
used.
3 and 4-Wire configurations are used where the lead wires to the element
are longer and/or premium measurement accuracy is required. Both 3 and
4-wire configurations compensate for the lead wire resistance. 3-wire
provides nearly the same performance as 4-wire using only 3 wires instead
of 4.
If 3 or 4-wire configuration is selected, the input requires two input
channels. From within the A and C channel icons, selecting 3 or 4-wire will
result in a displayed message that a second channel will be deleted (B or
D).
Range:
Specify the input range to be used for this channel. For optimum resolution,
choose the narrowest range that will meet the signal fluctuation without
exceeding the Full Scale Range. If the input exceeds the selected range, an
over-range value will be logged.
For reference, the excitation currents used on the various ranges are
documented. In cases where two identical ranges are provided , use the
range with the higher current... unless self-heating or other ancillary effects
are of concern.
Filtering:
Three levels of first order noise filtering can be enabled during channel
reading. First order filtering reduces high frequency noise that may be
picked up by sensor wiring with the cost that it slows down the rate at which
a channel can be sampled. See the OM-320 User’s Manual Appendix for
discussion on use of filtering.
AC Noise Reject: Enables software filtering of 50Hz or 60Hz noise on inputs. See
the OM-320 User’s Manual Appendix for an explanation of the 50/60 Hz
filtering technique.
Change:
11-18
Click on CHANGE to switch the icon / dialog box between thermistor,
resistance, or RTD type input.
USING T HE OM-320
11.. . APPENDIX A: MASTER ICON REFERENCE
EVENT INPUT ICON (GPDI)
FUNCTION:
The GPDI (General Purpose Digital Input) is a hardware digital input for Event and
Counter applications. It is incorporated into every OM-320 System Base.
As an EVENT input, it samples the input signal state (High or Low) per the sampling rate
set on the Update input. It updates its output only when the input changes state.
INPUTS:
Hardware: No signal input shown on Net for Program Net connections.
Update:
The input is sampled every time an Update command is received on the
Update input. If the input state has changed since the last Update
command was received, the Output is updated with the new state. The
absolute time resolution of the state change is determined by the frequency
of the Update signal. For example, if an Update command is received
every second, the state change will be recorded with one second
resolution.
Enable:
Processing of the icon is allowed when Enable pin is unconnected or
connected and the Enable signal is TRUE.
OUTPUTS:
Output Signal:
Logic type signal
ICON CONFIGURATION DIALOG BOX:
CONFIGURATION OPTIONS:
Icon Name: Specify the name for the channel. This name will show directly under the
icon within the Program Net. If no name is User provided, the Backplane
Port (1 to 6) and Channel (A to D) where the actual Interface Module
channel is installed will be used for the name.
Output Name:
Specify a name for the Output signal from this icon. This Output
Name will be referenced by other icons downstream in the Program Net.
Event / Counter
Select EVENT for the Event function.
Debounce: Enables a hardware filter circuit that prevents short duration transitions
from passing into the icon. Debounce can be used to filter out contact
bounce from mechanical switches. The GPDI Debounce has a time
USING THE OM-320
11-19
11.. . APPENDIX A: MASTER ICON FILE REFERENCE
constant of approximately 50mS. Note that the use of Debounce will delay
the actual input to output time by 50 to 200 mS.
FYI: Contact bounce is a phenomenon that
occurs when a mechanical switch opens or
closes. During switching, the physical electrical
contacts inside the switch bounce against each
other a number of times before they settle to
their final state.
Depending on the duty cycle of the contact
bounce, the OM-320 may count these bounces
as events or transitions (count mode) resulting
in technically accurate but undesired data. By
enabling the debounce function, typical short
duration contact bounce will be filtered out.
Output True when input is LOW / HIGH:
Specify what the state of the input
signal is for the icon Output to be True. For example, if a switch is
connected to the Event icon input, the User can then specify which state the
switch should be in for a TRUE Output from the Event icon. Output True
when input is LOW will result in an icon Output that is TRUE when the
switch is closed. Output True when input is TRUE will result in an icon
Output that is True when the switch is open.
11-20
USING T HE OM-320
11.. . APPENDIX A: MASTER ICON REFERENCE
COUNTER INPUT ICON (GPDI)
FUNCTION:
The GPDI (General Purpose Digital Input) is a hardware digital input for Event and
Counter applications and is incorporated into every OM-320 System Base.
As a COUNTER input, it accumulates counts from a User connected hardware signal
input, then outputs the count when it receives an Update command. When the count is
output, the counter is automatically set back to 0 and counting resumes.
The GPDI Counter (in contrast to the HLIM-2 Counter) is very fast and can count pulses
received at input rates up to 10 KHZ. However, when using the GPDI Counter with high
speed inputs, it is imperative that the Counter receive an Update command before it
counts up to 65,535 or a counter roll-over condition will occur and count data will be lost.
INPUTS:
Hardware: No signal input shown on Net for Program Net connections.
Update:
The accumulated count is output every time an Update command is
received on the Update input. To preclude the loss of data, this Update
command should be received before the icon counts to 65,535 or the
counter will roll-over to 0 and continue counting, resulting in lost counts.
Enable:
Processing of the icon is allowed when Enable pin is unconnected or
connected and the Enable signal is TRUE.
OUTPUTS:
Output Signal:
Data type signal (ie Count totals)
ICON CONFIGURATION DIALOG BOX:
CONFIGURATION OPTIONS:
Icon Name: Specify the name for the channel. This name will show directly under the
icon within the Program Net. If no name is User provided, the Backplane
Port (1 to 6) and Channel (A to D) where the actual Interface Module
channel is installed will be used for the name.
Output Name:
Specify a name for the Output signal from this icon. This Output
Name will be referenced by other icons downstream in the Program Net.
Event / Counter
Select COUNTER for the Counter function.
USING THE OM-320
11-21
11.. . APPENDIX A: MASTER ICON FILE REFERENCE
Debounce: Enables a hardware filter circuit that prevents short duration transitions
from passing into the icon. Debounce can be used to filter out contact
bounce from mechanical switches. The GPDI Debounce has a time
constant of approximately 50mS. Debounce should not be used when
counting signals of frequency higher than 10Hz or signals with On or Off
durations shorter than approximately 100mS.
FYI: Contact bounce is a phenomenon that
occurs when a mechanical switch opens or
closes. During switching, the physical electrical
contacts inside the switch bounce against each
other a number of times before they settle to
their final state.
Depending on the duty cycle of the contact
bounce, the OM-320 may count these bounces
as events or transitions (count mode) resulting
in technically accurate but undesired data. By
enabling the debounce function, typical short
duration contact bounce will be filtered out.
Count Rising / Falling Edges:
The GPDI increments its accumulated count
when its input changes state from hi to lo or lo to hi. The User can specify
which transition (edge) is to be counted Rising (lo to hi) or Falling (hi to lo).
For example if a switch is connected to the input, the User can specify that
the count increment when the switch closes (Falling Edge) or when it opens
(Rising Edge).
11-22
USING T HE OM-320
11.. . APPENDIX A: MASTER ICON REFERENCE
EVENT INPUT ICON (DIGITAL I/O WITH HLIM-2)
FUNCTION:
An Event / Counter / Frequency input and Digital output functions are all provided with the
HLIM-2. Four channels can be configured on an individual basis as Frequency, Event, or
Counter type Inputs and four separate channels are available for Digital Output. With the
HLIM-2 installed in a OM-320, these respective function icons become available for use in
Program Nets.
As an EVENT input, the icon samples the state of the User connected hardware input
signal (HI or LO) each time an Update command is received. The icon output state is
updated when the input state changes.
The same dialog is used to configure the channel for Event, Frequency, and Counter
functions.
INPUTS:
Hardware: No signal input shown on icon for Program Net connections.
Update:
The input is sampled every time an Update command is received on the
Update input. If the input state has changed since the last Update
command was received, the Output is updated with the new state. The
absolute time resolution of the state change is determined by the frequency
of the Update command. For example, if an Update command is received
every second, the state change will be recorded with one second
resolution.
Enable:
Processing of the icon is allowed when Enable pin is unconnected or
connected and the Enable signal is TRUE.
OUTPUTS:
Output Signal:
Logic type signal
ICON CONFIGURATION DIALOG BOX:
CONFIGURATION OPTIONS:
Icon Name: Specify the name for the channel. This name will show directly under the
icon within the Program Net. If no name is User provided, the Backplane
Port (1 to 6) and Channel (A to D) where the actual Interface Module
channel is installed will be used for the name.
USING THE OM-320
11-23
11.. . APPENDIX A: MASTER ICON FILE REFERENCE
Output Name:
Specify a name for the Output signal from this icon. This Output
Name will be referenced by other icons downstream in the Program Net.
Units:
Provides a text box for User entry of a units label that will be shown at the
output from this icon. Conversion to other units can be performed within a
Program Net by adding a Math Icon onto this icon’s output.
Event / Counter / Frequency
Select EVENT for the Event function.
Debounce: Enables a hardware filter circuit that prevents short duration transitions
from passing into the icon. Debounce can be used to filter out contact
bounce from mechanical switches. The HLIM-2 Debounce has a time
constant of approximately 50mS. Note that the use of Debounce will delay
the actual input to output transition time by 50 to 200 mS.
FYI: Contact bounce is a phenomenon that
occurs when a mechanical switch opens or
closes. During switching, the physical electrical
contacts inside the switch bounce against each
other a number of times before they settle to
their final state.
Depending on the duty cycle of the contact
bounce, the OM-320 may count these bounces
as events or transitions (count mode) resulting
in technically accurate but undesired data. By
enabling the debounce function, typical short
duration contact bounce will be filtered out.
Output TRUE when Input is HIGH / LOW: Allows logical reversal of the Output with
respect to the input state.
11-24
USING T HE OM-320
11.. . APPENDIX A: MASTER ICON REFERENCE
COUNTER INPUT ICON (DIGITAL I/O WITH HLIM-2)
FUNCTION:
Event / Counter / Frequency input and Digital output functions are all provided with the
HLIM-2. With the HLIM-2 installed in a OM-320, these respective function icons become
available for use in Program Nets.
The same dialog is used to configure the four input channels for Event, Frequency, and
Counter functions.
As a COUNTER input, the HLIM-2 channel accumulates counts from a User connected
hardware signal input, then outputs the count to the net when it receives an Update
command. When the count is output, the counter is automatically set back to 0 and
counting resumes.
The HLIM-2 Counter can count pulses received at input rates up to apx 20 Khz. However,
at higher frequencies, the net must be configured to read the counter before it overflows
or the counter will overflow and return to 0 and continue incrementing.
INPUTS:
Hardware: No signal input shown on Net for Program Net connections. The HLIM-2
Counter function increments its count on received rising or falling edges of
the input signal.
Update:
The accumulated count is output every time an Update command is
received on the Update input. To preclude the loss of data, this Update
command (from a connected Sample Rate Clock ) should be received
before the icon counts to 16,777,216 or the counter will roll-over to 0 and
continue counting, resulting in lost counts.
Enable:
Processing of the icon is allowed when Enable pin is unconnected or
connected and the Enable signal is TRUE.
OUTPUTS:
Output Signal:
Data type signal (ie Count totals)
ICON CONFIGURATION DIALOG BOX:
CONFIGURATION OPTIONS:
Icon Name: Specify the name for the channel. This name will show directly under the
icon within the Program Net. If no name is User provided, the Backplane
USING THE OM-320
11-25
11.. . APPENDIX A: MASTER ICON FILE REFERENCE
Port (1 to 6) and Channel (A to D) where the actual Interface Module
channel is installed will be used for the name.
Output Name:
Specify a name for the Output signal from this icon. This Output
Name will be referenced by other icons downstream in the Program Net.
Units:
Provides a text box for User entry of a units label that will be shown at the
output from this icon. Conversion to other units can be performed within a
Program Net by adding a Math Icon onto this icon’s output.
Event / Counter / Frequency
Select COUNTER for the Counter function.
Debounce: Enables a hardware filter circuit that prevents short duration transitions
from passing into the icon. Debounce can be used to filter out contact
bounce from mechanical switches. The HLIM-2 Debounce has a time
constant of approximately 50mS. Note that the use of Debounce will delay
the actual input to output transition time by 50 to 200 mS.
FYI: Contact bounce is a phenomenon that
occurs when a mechanical switch opens or
closes. During switching, the physical electrical
contacts inside the switch bounce against each
other a number of times before they settle to
their final state.
Depending on the duty cycle of the contact
bounce, the OM-320 may count these bounces
as events or transitions (count mode) resulting
in technically accurate but undesired data. By
enabling the debounce function, typical short
duration contact bounce will be filtered out.
Count Rising / Falling edges: Specify which edge of the input signal is to be used to
increment the counter (eg when a device being monitored turns ON or
OFF).
11-26
USING T HE OM-320
11.. . APPENDIX A: MASTER ICON REFERENCE
FREQUENCY INPUT ICON (DIGITAL I/O WITH HLIM-2)
FUNCTION:
Event / Counter / Frequency input and Digital output functions are all provided with the
HLIM-2. With the HLIM-2 installed in a OM-320, these respective function icons become
available for use in Program Nets.
The same dialog is used to configure the channel for Event, Frequency, and Counter
functions.
As a FREQUENCY input, the HLIM-2 channel samples the incoming waveform and
outputs the measured frequency to the net.
Calculation of the input signal frequency requires longer for lower frequencies. Due to
this effect, the speed of execution of a Program Net may be reduced when reading low
frequency inputs. (eg 10Hz inputs will require approximately 100mS to read, whereas a
100Hz input will require only 10mS)
NOTE: Due to the advanced signal processing utilized in the frequency mode,
unbalanced duty-cycle inputs are measured with the same accuracy as balanced dutycycle inputs.
INPUTS:
Hardware: No signal input shown on Net for Program Net connections.
Update:
The measured frequency is output every time an Update command is
received on the Update input.
Enable:
Processing of the icon is allowed when Enable pin is unconnected or
connected and the Enable signal is TRUE.
OUTPUTS:
Output Signal:
Data type signal, Frequency in Hz.
ICON CONFIGURATION DIALOG BOX:
CONFIGURATION OPTIONS:
Icon Name: Specify the name for the channel. This name will show directly under the
icon within the Program Net. If no name is User provided, the Backplane
Port (1 to 6) and Channel (A to D) where the actual Interface Module
channel is installed will be used for the name.
Output Name:
Specify a name for the Output signal from this icon. This Output
Name will be referenced by other icons downstream in the Program Net.
USING THE OM-320
11-27
11.. . APPENDIX A: MASTER ICON FILE REFERENCE
Units:
Provides a text box for User entry of a units label that will be shown at the
output from this icon. Conversion to other units can be performed within a
Program Net by adding a Math Icon onto this icon’s output.
Event / Counter / Frequency
11-28
Select FREQUENCY for the Frequency function.
USING T HE OM-320
11.. . APPENDIX A: MASTER ICON REFERENCE
EVENT INPUT ICON (DIGITAL I/O WITH HLIM-8)
FUNCTION:
Event input and Digital output functions are all provided with the HLIM-8. With the HLIM8 installed in a OM-320, these respective function icons become available for use in
Program Nets.
As an EVENT input, the icon samples the state of the User connected hardware input
signal (HI or LO) each time an Update command is received. The icon output state is
updated when the input state changes.
This channel/icon can be changed to a Digital Output channel by selecting the Change
this channel to an Output button.
INPUTS:
Hardware: No signal input shown on icon for Program Net connections.
Update:
The input is sampled every time an Update command is received on the
Update input. If the input state has changed since the last Update
command was received, the Output is updated with the new state. The
absolute time resolution of the state change is determined by the frequency
of the Update command. For example, if an Update command is received
every second, the state change will be recorded with one second
resolution.
Enable:
Processing of the icon is allowed when Enable pin is unconnected or
connected and the Enable signal is TRUE.
OUTPUTS:
Output Signal:
Logic type signal
ICON CONFIGURATION DIALOG BOX:
CONFIGURATION OPTIONS:
Icon Name: Specify the name for the channel. This name will show directly under the
icon within the Program Net. If no name is User provided, the Backplane
Port (1 to 6) and Channel (A to H) where the actual Interface Module
channel is installed will be used for the name.
USING THE OM-320
11-29
11.. . APPENDIX A: MASTER ICON FILE REFERENCE
Output Name:
Specify a name for the Output signal from this icon. This Output
Name will be referenced by other icons downstream in the Program Net.
Units:
Provides a text box for User entry of a units label that will be shown at the
output from this icon. Conversion to other units can be performed within a
Program Net by adding a Math Icon onto this icon’s output.
Debounce: Enables a hardware filter circuit that prevents short duration transitions
from passing into the icon. Debounce can be used to filter out contact
bounce from mechanical switches. The HLIM-8 Debounce has a time
constant of approximately 50mS. Note that the use of Debounce will delay
the actual input to output transition time by 50 to 100 mS.
FYI: Contact bounce is a phenomenon that
occurs when a mechanical switch opens or
closes. During switching, the physical electrical
contacts inside the switch bounce against each
other a number of times before they settle to
their final state.
Depending on the duty cycle of the contact
bounce, the OM-320 may count these bounces
as events resulting in technically accurate but
undesired data. By enabling the debounce
function, typical short duration contact bounce
will be filtered out.
Change This Channel to an Output: Not applicable when using this channel as an
Event input. To change this channel to an Output, click on the Change
button.
11-30
USING T HE OM-320
11.. . APPENDIX A: MASTER ICON REFERENCE
DIGITAL OUTPUT ICON (HLIM-8)
FUNCTION:
Eight channels of Digital output or Event input are all provided with the HLIM-8. With
the HLIM-8 installed in a OM-320, these respective function icons become available for
use in Program Nets. (Click on the CHANGE button within the Event dialog to switch the
channel’s icon function to a Digital Output).
The Digital Output icons provide software access to these digital outputs.
This channel/icon can be changed from a Digital Output to an Event Input channel by
clicking on the CHANGE button.
INPUTS:
Data/Logic Signal: Logic type. True input turns hardware output ON. False input
turns output OFF. Optionally, use the Latch icon in front of the Digital
Output icon to latch the Output True upon receipt of a momentary True
input.
Update Clock:
Enable:
None
Processing of icon is allowed when Enable pin is unconnected or
connected and Enable signal is TRUE.
OUTPUTS:
Output Signal:
Hardware output only. No output terminal shown on icon for
Program Net connections.
ICON CONFIGURATION DIALOG BOX:
CONFIGURATION OPTIONS:
Icon Name: Specify the name for the channel. This name will show directly under the
icon within the Program Net. If no name is User provided, the Backplane
Port (1 to 6) and Channel (A to D) where the actual Interface Module
channel is installed will be used for the name.
Input Name: In this box, HyperNet displays the Output Name of the icon connected to
this icon’s Input. The Output Name can be changed in the other icon’s
dialog.
Use this channel for Input: Select CHANGE to switch this icon into an Event type
Input icon.
USING THE OM-320
11-31
11.. . APPENDIX A: MASTER ICON FILE REFERENCE
DIGITAL ALARM OUTPUT ICON
FUNCTION:
Three Digital Alarm outputs are provided as an integral part of the OM-320 System Base.
The Digital Alarm icons provide software access to these alarm outputs.
INPUTS:
Data/Logic Signal: Logic type. True input turns Alarm ON. LOW input turns Alarm
OFF. Optionally, use the Latch icon in front of the icon to latch the Alarm
ON with a momentary True input.
Update Clock:
None
Enable:
None
OUTPUTS:
Output Signal:
Hardware output only. No output terminal shown on icon for
Program Net connections.
ICON CONFIGURATION DIALOG BOX:
CONFIGURATION OPTIONS:
Icon Name: Specify the label for the icon. This name will show directly under the icon
within the Program Net.
Input Name: In this box, HyperNet displays the Output Name of the icon connected to
this icon’s Input. The Output Name can be changed in the other icon’s
dialog.
11-32
USING T HE OM-320
11.. . APPENDIX A: MASTER ICON REFERENCE
RELAY ALARM OUTPUT ICON
FUNCTION:
Two Relay Alarm outputs are provided as an integral part of the OM-320 System Base.
The Relay Alarm icons provide software access to these alarm outputs.
INPUTS:
Input Signal:
Logic type. True input turns Alarm ON. False input turns Alarm
OFF. Optionally, use the Latch icon in front of the icon to latch the Alarm
ON with a momentary True input.
Update Clock:
None
Enable:
None
OUTPUTS:
Output Signal:
Hardware output only. No output terminal shown on icon for
Program Net connections.
ICON CONFIGURATION DIALOG BOX:
CONFIGURATION OPTIONS:
Icon Name: Specify the label for the icon. This name will show directly under the icon
within the Program Net.
Input Name: In this box, HyperNet displays the Output Name of the icon connected to
this icon’s Input. The Output Name can be changed in the other icon’s
dialog.
USING THE OM-320
11-33
11.. . APPENDIX A: MASTER ICON FILE REFERENCE
GREEN LED STATUS OUTPUT ICON
FUNCTION:
A Green LED (light emitting diode) is provided as an integral part of the OM-320 System
Base and displays on the front panel of the OM-320. The Green LED icon provides
software access to this Status output.
INPUTS:
Data/Logic Signal: Logic type. True input turns LED ON. False input turns LED OFF.
Optionally, use the Latch icon in front of the icon to latch the LED ON with
a momentary True input.
Update Clock:
None
Enable:
None
OUTPUTS:
Output Signal:
Hardware output (LED) only. No output terminal shown on icon for
Program Net connections.
ICON CONFIGURATION DIALOG BOX:
CONFIGURATION OPTIONS:
Icon Name: Specify the label for the icon. This name will show directly under the icon
within the Program Net.
Blinking:
11-34
If the Blinking check box is checked, the LED will blink at a rate of 1 second
ON, 1 second OFF when the input is True. If not checked, the LED will be
ON continuously when the input is True.
USING T HE OM-320
11.. . APPENDIX A: MASTER ICON REFERENCE
LCD MESSAGE OUTPUT ICON
FUNCTION:
User programmed messages can be displayed on the LCD (liquid crystal display) on the
front panel of the OM-320 System Base. The LCD Message icon provides for User entry
of a two-line message for display when the icon input is TRUE.
INPUTS:
Data/Logic Signal: Logic type. True input turns message ON. False input turns
message display OFF. Optionally, use the Latch icon in front of the LCD
Message icon to latch the message ON upon receipt of a momentary True
input.
Update Clock:
Enable:
None
Processing of icon is allowed when Enable pin is unconnected or
when connected and Enable signal is TRUE.
OUTPUTS:
Output Signal:
Hardware output (to LCD display) only. No output terminal shown
on icon for Program Net connections.
ICON CONFIGURATION DIALOG BOX:
CONFIGURATION OPTIONS:
Icon Name: Specify the label for the icon. This name will show directly under the icon
within the Program Net.
First / Second Line Output: Two text boxes are provided for User entry of text to be
displayed on the LCD when the Input is TRUE. Up to 16 characters can be
entered on each line.
APPLICATION CONSIDERATIONS:
When the LCD icon is activated (ie its input is TRUE), the programmed message is
displayed on the OM-320 LCD. If a second (different) message is activated the second
message will be displayed on the LCD and the first message will be maintained on a
queue of active messages. This queue of messages can be reviewed via the OM-320
front panel Next / Select buttons menu Display Status Messages or via a Status Query
from within the HyperComm Window.
USING THE OM-320
11-35
11.. . APPENDIX A: MASTER ICON FILE REFERENCE
DIGITAL OUTPUT ICON (HLIM-2)
FUNCTION:
Four channels of Digital output are provided (along with 4 channels of Event / Counter/
and Frequency input) with the HLIM-2. With the HLIM-2 installed in a OM-320, these
respective function icons become available for use in Program Nets.
The Digital Output icons provide software access to these digital outputs.
Refer to the Frequency, Counter and/or Event applications of the HLIM-2 for further
information on those functions.
INPUTS:
Data/Logic Signal: Logic type. True input turns hardware output ON. False input
turns output OFF. Optionally, use the Latch icon in front of the Digital
Output icon to latch the Output True upon receipt of a momentary True
input.
Update Clock:
Enable:
None
Processing of icon is allowed when Enable pin is unconnected or
connected and Enable signal is TRUE.
OUTPUTS:
Output Signal:
Hardware output only. No output terminal shown on icon for
Program Net connections.
ICON CONFIGURATION DIALOG BOX:
CONFIGURATION OPTIONS:
Icon Name: Specify the name for the channel. This name will show directly under the
icon within the Program Net. If no name is User provided, the Backplane
Port (1 to 6) and Channel (A to D) where the actual Interface Module
channel is installed will be used for the name.
Input Name: In this box, HyperNet displays the Output Name of the icon connected to
this icon’s Input. The Output Name can be changed in the other icon’s
dialog.
11-36
USING T HE OM-320
11.. . APPENDIX A: MASTER ICON REFERENCE
PAGER CALL-OUT ICON
FUNCTION:
In OM-320s equipped with a telephone modem option, the Pager Call-Out icon can be
used to dial a pager phone number, wait a User defined period of time (for the Paging
service tone), then transmit a User assigned code number. This code number can be
User assigned to represent a site and/or particular warning or status indication.
INPUTS:
Data/Logic Signal: Logic type. A FALSE to TRUE transition on the icon input initiates
the Pager call. The Page will complete even if the input signal returns
LOW.
Update Clock:
Enable:
None
Processing of icon is allowed when Enable pin is unconnected or
connected and Enable signal is TRUE.
OUTPUTS:
Output Signal:
Hardware output to installed modem. No output terminal shown on
icon for Program Net connections.
ICON CONFIGURATION DIALOG BOX:
CONFIGURATION OPTIONS:
Icon Name: Specify the name for the channel. This name will show directly under the
icon within the Program Net.
Input Name: In this box, HyperNet displays the Output Name of the icon connected to
this icon’s Input. The Output Name can be changed in the other icon’s
dialog.
Pager Phone Number: Enter the telephone number to dial to gain access to the pager;
optionally followed by a number of commas (each which represents a 2
second delay) followed by the code number to be sent to the pager display.
For example: (619) 555-1212,,,,,9999 entered in this text box will result in:
1.
2.
When the Pager icon is activated, the OM-320 will dial the
phone number (619)555-1212. Parenthesis and hyphens are
ignored.
Wait for a 10 second delay (5 commas @ 2 seconds each)
USING THE OM-320
11-37
11.. . APPENDIX A: MASTER ICON FILE REFERENCE
3. The code number 9999 will be sent to the pager
4. The OM-320 modem will disconnect.
The commas are entered to insert a delay between the dialing of the pager
and the sending of the code. The delay time should be determined by the
User to meet the subscribed pager system timing requirements. This delay
can be determined empirically by calling the pager with a telephone and
manually timing the delay between the last number dial and the tone
indicating when a pager code should be entered. To allow for variations in
this delay time, a few extra seconds (one or two commas) can be added to
insure that the tone is received before the pager code is sent.
NOTE: The OM-320 does not detect a busy line or pager tone, it merely
executes the sequence of numbers and commas defined in this text box.
The Pager call-out function and associated timing should be tested prior to
field application.
Number of times to repeat page:
If a number other than 0 is entered in this box,
the Pager icon will will repeat the dialing sequence the specified number of
times.
Number of seconds between retries:
before a repeat call is placed.
Enter the time to wait(in seconds)
APPLICATION CONSIDERATIONS:
Multiple Pager icons can be used in a Program Net, each connected to a different status
or warning function. Different pager phone numbers and/or codes can then be assigned
to indicate different status or warning conditons.
11-38
USING T HE OM-320
11.. . APPENDIX A: MASTER ICON REFERENCE
PROBE POINT OUTPUT ICON
FUNCTION:
Probe Point Icons mark and provide access to nodes within a Program Net for:
1. The OM-320 front panel display while the Net is executing.
Values at the nodes can be accessed through the Display
Probe Icon Values LCD menu selection
2. Use during real-time HyperTrack sessions. Nodes marked
with Probe Point icons are accessible via the serial link.
The units displayed by a Probe Point icon is inherited from the output to which it is
connected. These units will appear on the LCD display as well as when the Probe Point is
used in a HyperTrack Net.
INPUTS:
Data/Logic Signal: Data or Logic type. The terminal will accept either signal type.
Update Clock:
Enable:
None
Processing of icon is allowed when Enable pin is unconnected or
when connected and Enable signal is TRUE.
OUTPUTS:
Output Signal:
Hardware output (to LCD display and/or serial link ) only. No
output terminal shown on icon for Program Net connections.
ICON CONFIGURATION DIALOG BOX:
CONFIGURATION OPTIONS:
Icon Name:
Specify the label for the icon. This name will show directly under
the icon within the Program Net.
Input Name:
In this box, HyperNet displays the Output Name of the icon
connected to this icon’s Input. The Output Name can be changed in the
other icon’s dialog.
Data Output Format: The User can specify the data format that will be used in Output
of the signal. In certain applications, additional processing speed may
be realized through a judicious selection of the format.
Default to Input Formats - the default format. The data will be output
using the same data format (Floating Point or Long Integer) as the Inputs
use. This selection can be used consistently with good speed performance
and no loss of precision.
USING THE OM-320
11-39
11.. . APPENDIX A: MASTER ICON FILE REFERENCE
Long Integer - The Input data will be converted to signed integer format,
then output. Signed Integer format includes only the digits to the left of the
decimal (XXXXX.)
The advantage of using Long Integer format is that this format will generally
consist of a fewer number of bytes, hence serial transmission of the data
for HyperTrack will be slightly faster. The number of bytes will dynamically
size, from 1 to 4 bytes, according to the magnitude of the Output.
The disadvantage of Long Integer format is that numerical precision will be
lost if incoming data is in floating point format. Precison will be lost in the
conversion to integer format (eg 26.3 becomes 26). If large numbers are
processed, this loss of precision may be negligible (eg 36785.2 becomes
36785).
11-40
USING T HE OM-320
11.. . APPENDIX A: MASTER ICON REFERENCE
MEMORY (OM-320) ICON
FUNCTION:
The Memory icon represents data memory within the OM-320 System Base (either
internal or a PCMCIA memory card if installed).
The Units associated with the icon Output connected to the Memory icon Input will be
stored with the recorded values.
INPUTS:
Data/Logic Signal: Data or Logic type. The terminal will accept either signal type.
Update Clock:
Enable:
None
Processing of icon is allowed when Enable pin is unconnected or
when connected and Enable signal is TRUE.
OUTPUTS:
Output Signal:
Hardware output to memory only. No output terminal shown on
icon for Program Net connections.
ICON CONFIGURATION DIALOG BOX:
CONFIGURATION OPTIONS:
Icon Name:
Specify the label for the icon. This name will show directly under
the icon within the Program Net.
Input Name:
In this box, HyperNet displays the Output Name of the icon
connected to this icon’s Input. The Output Name can be changed in the
other icon’s dialog.
Data Storage Format: The User can specify the data format that will be used to store
the data in memory. In certain applications, additional processing speed
and/or less memory per stored sample can be realized through a judicious
selection of the format.
Default to Input Formats - the default format. The data will be stored
using the same data format (Floating Point or Long Integer) as the Inputs
use. This selection can be used consistently with good speed performance
and no loss of precision.
Long Integer - The Input data will be converted to integer format, then the
data will be stored to memory in a signed Integer format. Signed Integer
format includes only the digits to the left of the decimal (XXXXX.)
USING THE OM-320
11-41
11.. . APPENDIX A: MASTER ICON FILE REFERENCE
The advantage of using Long Integer format is that this format will generally
utilize a fewer number of memory bytes for data storage. The number of
bytes will dynamically size, from 1 to 4 bytes, according to the magnitude
of the Output.
The disadvantage of Long Integer format is that numerical precision will be
lost if incoming data is in floating point format. Precison will be lost in the
conversion to integer format (eg 26.3 becomes 26). If large numbers are
processed, this loss of precision may be negligible (eg 36785.2 becomes
36785).
11-42
USING T HE OM-320
11.. . APPENDIX A: MASTER ICON REFERENCE
DESTINATION FILE ICON
FUNCTION:
The Destination File icon represents a file on disk within the PC. This icon can be used
as a destination file for data processed through a HyperTrack session and for file to file
conversions from within the Post-Processing window.
The Units associated with the Output terminal of the icon which is connected to the
Destination File icon Input will be stored with the recorded values.
INPUTS:
Data/Logic Signal: Data or Logic type. The terminal will accept either signal type.
Update Clock:
None
Enable:
None
OUTPUTS:
Output Signal:
Hardware output to file on disk only. No output terminal shown on
icon for Program Net connections.
ICON CONFIGURATION DIALOG BOX:
CONFIGURATION OPTIONS:
The standard Windows File Save dialog box format is used during the configuration of the
Destination File icon. Conventional Windows commands are used to specify the
destination path and filename.
Save File as Type: Specify the file type (and extension) to be used. Three file types
are supported as follows:
*.HLD - This format is the standard OM-320 Download file format.
HyperPlot uses this file format.
*.TXT - An ASCII file format that can be viewed with any text type editor or
wordprocessor such as Notepad (for smaller files).
*.XLS - The Excel spreadsheet file format.
USING THE OM-320
11-43
11.. . APPENDIX A: MASTER ICON FILE REFERENCE
REAL-TIME SCROLLING DISPLAY ICON
FUNCTION:
The Real-Time Scrolling Display icon represents the HyperTrack Scrolling Display
Window in which real-time data values from a OM-320 are displayed. The Real-Time
Scrolling Display icon is used from within the HyperTrack Window during construction of
a HyperTrack Net.
The Units associated with the Output terminal of the icon which is connected to the Data
File icon Input will be stored with the recorded values.
Double clicking on the icon opens the HyperTrack Scrolling Display Window.
INPUTS:
Data/Logic Signal: Up to eight Data or Logic type. The terminal will accept either
signal type. As connections are added to the icon, additional terminals
appear, up to a total of 8 channels.
Update Clock:
None
Enable:
None
OUTPUTS:
Output Signal:
No output terminal shown on icon for Program Net connections.
ICON CONFIGURATION DIALOG BOX:
No Icon Configuration Dialog is available for this icon. Double clicking on the icon opens
the HyperTrack Scrolling Display Window.
CONFIGURATION OPTIONS:
No Configuration Options are available.
11-44
USING T HE OM-320
11.. . APPENDIX A: MASTER ICON REFERENCE
DELTA FUNCTION ICON
FUNCTION:
The Delta icon provides a special data processing function that can be used in a Program
Net to drastically reduce the number of data samples required to profile an analog signal.
The Delta icon only passes data from input to output when the input signal differs from
the last passed sample by more than a User defined amount, ie the `delta’ value.
When logging data that has periods of relatively stable values mixed with occassional
dynamic fluctuations, the Delta icon can reduce the amount of data samples required to
profile the curve with a minimum of accuracy compromise.
The data plotted above demonstrates the reduction of data points that is possible with the
Delta icon. The Program Net shown below was developed with a Delta icon programmed
with a Delta value of 1 degree F. Temperature data was then collected over a few
seconds while the temperature sensor was warmed and then allowed to cool. As can be
seen, the curve profiles do reflect slight differences (1 degree F maximum deviation),
however the number of data samples used is radically reduced with the Delta icon data.
(Note that the curves are displayed with the same temperature scaling but are merely
offset for viewing.)
USING THE OM-320
11-45
11.. . APPENDIX A: MASTER ICON FILE REFERENCE
INPUTS:
Data/Logic Signal: Data type.
Update Clock:
Enable:
None
Processing of icon is allowed when Enable pin is unconnected or
when connected and Enable signal is TRUE.
OUTPUTS:
Output Signal:
Data type. The Delta icon updates its output data when the
updated input has changed in magnitude by a User defined `delta’ amount
in comparison to the last passed sample.
ICON CONFIGURATION DIALOG BOX:
CONFIGURATION OPTIONS:
Icon Name: Specify the label for the icon. This name will show directly under the icon
within the Program Net.
Input Name: In this box, HyperNet displays the Output Name of the icon connected to
this icon’s Input. The Output Name can be changed in the other icon’s
dialog.
Output data if input changes by more than: Enter the `delta’ value. For example if
the data is to be passed if it changes by more than +/-2 degrees then enter
the value of 2.
Units:
Provides a text box for User entry of a units label that will be shown at the
output from this icon.
Force Output Every: If this box is checked, a value will output periodically regardless
of whether or not the delta value has been exceeded.
11-46
USING T HE OM-320
11.. . APPENDIX A: MASTER ICON REFERENCE
AVERAGE FUNCTION ICON
FUNCTION:
Averages data passing through the icon. The Average icon will accumulate a User
specified number of input samples, then calculate and output the average. The Average
icon can be used in either of two different modes: Conventional, or Sliding. These two
modes are described below.
Conventional:For example, if a User wants to take temperature readings every 5
minutes and calculate and store hourly averages, a Program Net as shown
could be used. The Thermocouple icon is set to sample every 5 minutes
per its attached Sample Rate Clock and the Average icon is configured to
average 12 readings (ie 12 readings x 5 minutes = 1 hour) then output.
Sliding: The sliding average can be used to smooth noisy signals. When configured as
a sliding average, every time the icon receives an updated input, a new
average is calculated and output. The average will be calculated by
dropping the oldest value, adding the new value then dividing by the
Number of Samples Per Average. The following graph shows two plots of
the same noisy input signal. The highly varying trace depicts the raw input
which was logged straight to memory. The second, smoother trace was fed
through a Sliding Average icon set for 10 samples. The smoothing effect is
apparent.
USING THE OM-320
11-47
11.. . APPENDIX A: MASTER ICON FILE REFERENCE
INPUTS:
Data/Logic Signal: Data type.
Update Clock:
Enable:
None
Processing of icon is allowed when Enable pin is unconnected or
when connected and Enable signal is TRUE.
OUTPUTS:
Output Signal:
Data type. The Average icon updates its output after receiving and
averaging the User specified number of readings.
ICON CONFIGURATION DIALOG BOX:
CONFIGURATION OPTIONS:
Icon Name: Specify the label for the icon. This name will show directly under the icon
within the Program Net.
Input Name: In this box, HyperNet displays the Output Name of the icon connected to
this icon’s Input. The Output Name can be changed in the other icon’s
dialog.
Conventional/Sliding: Select type of Averaging function to perform.
Number of Samples per Average: Specify the number of input readings to average
before outputting.
Output current Average upon disable: Check this box to force an output of the inprocess average calculation at any time that the icon is disabled. If this
box is not checked, upon receipt of a disable signal, the Average
calculation will be momentarily suspended until the icon is re-enabled and
no in-process value will be output.
For example, if an average is to be calculated over 10 samples but only 7
have been averaged and the icon is disabled, the 7 sample average will be
output and the Average calculation will be suspended until re-enabled.
Upon re-enable, the calculation will continue and after 3 more samples are
received, the 10 sample average will be output (unless the following check
box is checked)
11-48
USING T HE OM-320
11.. . APPENDIX A: MASTER ICON REFERENCE
Clear Sample Count and Average upon Enable: Check this box to force a reset of
the Average calculation as well as the Sample count used used for the
calculation upon receipt of an Enable signal.
If this box is not checked, upon receipt of an Enable signal, the Average
calculation will proceed from its suspended state (that it entered when it
was disabled).
Units:
Provides a text box for User entry of a units label that will be shown at the
output from this icon.
Output Name:
Specify the label for the Output. This name will show directly
under the Output terminal within the Program Net.
USING THE OM-320
11-49
11.. . APPENDIX A: MASTER ICON FILE REFERENCE
MINIMUM FUNCTION ICON
FUNCTION:
Detects the minimum data value passing through the icon. The Minimum icon will
accumulate a User specified number of input samples, then calculate and output the
minimum value received.
For example, if a User wants to take temperature readings every 5 minutes and calculate
and store hourly minimums, a Program Net as shown could be used. The Thermocouple
icon is set to sample every 5 minutes per its attached Sample Rate Clock and the
Minimum icon is configured to analyze 12 readings (ie 12 readings x 5 minutes = 1 hour)
then output the minimum.
INPUTS:
Data/Logic Signal: Data type.
Update Clock:
Enable:
None
Processing of icon is allowed when Enable pin is unconnected or
when connected and Enable signal is TRUE.
OUTPUTS:
Output Signal:
Data type. The Minimum icon updates its output with the
minimum value after receiving and analyzing the User specified number of
readings.
11-50
USING T HE OM-320
11.. . APPENDIX A: MASTER ICON REFERENCE
ICON CONFIGURATION DIALOG BOX:
CONFIGURATION OPTIONS:
Icon Name: Specify the label for the icon. This name will show directly under the icon
within the Program Net.
Input Name: In this box, HyperNet displays the Output Name of the icon connected to
this icon’s Input. The Output Name can be changed in the other icon’s
dialog.
Output after __ Samples: Specify the number of input readings to analyze before
outputting the minimum value in the group.
Output current Value upon disable: Check this box to force an output of the current
Minimum Value at any time that the icon is disabled. If this box is not
checked, upon receipt of a disable signal, the Minimum calculation will be
momentarily suspended until the icon is re-enabled and no in-process value
will be output.
For example, if a Minimum is to be calculated over 10 samples but only 7
have been analyzed and the icon is disabled, the 7 sample Minimum Value
will be output and the Minimum Value detection will be suspended until reenabled. Upon re-enable, the detection will continue and after 3 more
samples are received, the 10 sample Minimum will be output (unless the
following check box is checked)
Clear Sample Count and Value upon Enable: Check this box to force a reset of the
Minimum Value as well as the Sample count used used for the calculation
upon receipt of an Enable signal.
If this box is not checked, upon receipt of an Enable signal, the Minimum
analysis will proceed from its suspended state (that it entered when it was
disabled).
Units:
Provides a text box for User entry of a units label that will be shown at the
output from this icon.
Output Name:
Specify the label for the Output. This name will show directly
under the Output terminal within the Program Net.
USING THE OM-320
11-51
11.. . APPENDIX A: MASTER ICON FILE REFERENCE
MAXIMUM FUNCTION ICON
FUNCTION:
Detects the maximum data value passing through the icon. The Maximum icon will
accumulate a User specified number of input samples, then calculate and output the
maximum value of this set of received input values.
For example, if a User wants to take temperature readings every 5 minutes and calculate
and store hourly maximums, a Program Net as shown could be used. The
Thermocouple icon is set to sample every 5 minutes per its attached Sample Rate Clock
and the Maximum icon is configured to analyze 12 readings (ie 12 readings x 5 minutes =
1 hour) then output the maximum value received in this set of 12 readings.
INPUTS:
Data/Logic Signal: Data type.
Update Clock:
Enable:
None
Processing of icon is allowed when Enable pin is unconnected or
when connected and Enable signal is TRUE.
OUTPUTS:
Output Signal:
Data type. The Maximum icon updates its output with the
maximum value after receiving and analyzing the User specified number of
readings.
11-52
USING T HE OM-320
11.. . APPENDIX A: MASTER ICON REFERENCE
ICON CONFIGURATION DIALOG BOX:
CONFIGURATION OPTIONS:
Icon Name: Specify the label for the icon. This name will show directly under the icon
within the Program Net.
Input Name: In this box, HyperNet displays the Output Name of the icon connected to
this icon’s Input. The Output Name can be changed in the other icon’s
dialog.
Output after __ Samples: Specify the number of input readings to analyze before
outputting the maximum value in the group.
Output current Value upon disable: Check this box to force an output of the current
Maximum Value at any time that the icon is disabled. If this box is not
checked, upon receipt of a disable signal, the Maximum calculation will be
momentarily suspended until the icon is re-enabled and no in-process value
will be output.
For example, if a Maximum is to be calculated over 10 samples but only 7
have been analyzed and the icon is disabled, the 7 sample Maximum Value
will be output and the Maximum Value detection will be suspended until reenabled. Upon re-enable, the detection will continue and after 3 more
samples are received, the 10 sample Maximum will be output (unless the
following check box is checked)
Clear Sample Count and Value upon Enable: Check this box to force a reset of the
Maximum Value as well as the Sample count used used for the calculation
upon receipt of an Enable signal.
If this box is not checked, upon receipt of an Enable signal, the Maximum
analysis will proceed from its suspended state (that it entered when it was
disabled).
Units:
Provides a text box for User entry of a units label that will be shown at the
output from this icon.
Output Name:
Specify the label for the Output. This name will show directly
under the Output terminal within the Program Net.
USING THE OM-320
11-53
11.. . APPENDIX A: MASTER ICON FILE REFERENCE
SUM FUNCTION ICON
FUNCTION:
Sums the input values received for a User specified number of input updates.The Sum
icon will accumulate a User specified number of input samples, then calculate and output
the arithmetic sum of this set of received input values.
For example, if a User wants to record the daily and hourly flow totals from a pulse output
flow meter, the above net could be used. Assuming each pulse from the flow meter
equals 1 gallon, then the Counter can be set to accumulate pulses for an hour, then
output these hourly totals. These hourly totals are stored in memory (Hr-Total) and also
fed into the Summing icon. This Sum icon is configured to totalize (sum) 24 inputs, then
output the daily sum to memory ( the sum of 24, 1 hour totals equals one days total).
INPUTS:
Data/Logic Signal: Data type.
Update Clock:
Enable:
None
Processing of icon is allowed when Enable pin is unconnected or
when connected and Enable signal is TRUE.
OUTPUTS:
Output Signal:
Data type. The Sum icon updates its output with the arithmetic
sum of the User specified number of input readings.
11-54
USING T HE OM-320
11.. . APPENDIX A: MASTER ICON REFERENCE
ICON CONFIGURATION DIALOG BOX:
CONFIGURATION OPTIONS:
Icon Name: Specify the label for the icon. This name will show directly under the icon
within the Program Net.
Input Name: In this box, HyperNet displays the Output Name of the icon connected to
this icon’s Input. The Output Name can be changed in the other icon’s
dialog.
Output after __ Samples: Specify the number of input readings to totalize before
outputting the sum of the input readings.
Output current Value upon disable: Check this box to force an output of the current
Sum Value at any time that the icon is disabled. If this box is not checked,
upon receipt of a disable signal, the Summation calculation will be
momentarily suspended until the icon is re-enabled and no in-process value
will be output.
For example, if a Sum is to be calculated over 10 samples but only 7 have
been analyzed and the icon is disabled, the 7 sample Summation Value will
be output and the Summing calculation will be suspended until re-enabled.
Upon re-enable, the summing will continue and after 3 more samples are
received, the 10 sample Summation Value will be output (unless the
following check box is checked)
Clear Sample Count and Sum upon Enable: Check this box to force a reset of the
Summation Value as well as the Sample count used used for the
calculation upon receipt of an Enable signal.
If this box is not checked, upon receipt of an Enable signal, the Summation
calculation will proceed from its suspended state (that it entered when it
was disabled).
Clear Sum after Output: Check this box to force the Sum Value to be reset to 0 after
Output. If this box is not checked, the icon will perform as a totalizer
Units:
Provides a text box for User entry of a units label that will be shown at the
output from this icon.
Output Name:
Specify the label for the Output. This name will show directly
under the Output terminal within the Program Net.
USING THE OM-320
11-55
11.. . APPENDIX A: MASTER ICON FILE REFERENCE
DUTY-CYCLE FUNCTION ICON
FUNCTION:
Calculates the amount of time per a User defined time period, that the input signal is True
(on) or False (off). Connected to the LOGIC output of an upstream icon (eg an Event
icon) the Duty Cycle icon will determine the accumulated ON or OFF (True/False) time
over a User defined time period and output that data value at the end of each period. It is
to be used with Logic input signals.
NOTE: For integration of DATA type signals refer to the Integral icon.
For example, to determine the ON time (duty cycle) per hour of a pump in a water supply
lift station. The pump power is sensed by an Event input channel which is sampling the
pump status (on/off) every second. The Event icon output is connected to the Duty cycle
icon input and an Update Clock is connected to the Duty cycle icon Update terminal. The
Duty cycle icon Update Clock is set for 1 Hour. The Duty cycle icon then samples its
input at a 1 second rate and calculates and outputs the ON (OFF) duty cycle of the input
signal upon receipt of an Update Clock pulse (ie every hour).
INPUTS:
Data/Logic Signal: Logic type (true/false).
Update Clock:
Yes, specifies the time period over which the duty-cycle is
calculated
Enable:
None
OUTPUTS:
Output Signal:
Data type. The Duty-cycle icon updates its output after receiving
an Update Command from the connected Update Clock. The Output will
be in Percent (ie a number from 0 to 100) or a decimal format (ie a number
from 0.0 to 1.0) depending on the User specified Report format within the
Configuration Dialog.
11-56
USING T HE OM-320
11.. . APPENDIX A: MASTER ICON REFERENCE
ICON CONFIGURATION DIALOG BOX:
CONFIGURATION OPTIONS:
Icon Name: Specify the label for the icon. This name will show directly under the icon
within the Program Net.
Calculate Per Period: Specify whether True (ON) or False (OFF) time per Period is to
be accumulated.
Units:
Provides a text box for User entry of a units label that will be shown at the
output from this icon.
Report:
Specify if the output value is to be in Percent or in a Decimal format.
Output Name:
Specify the label for the Output. This name will show directly
under the Output terminal within the Program Net.
USING THE OM-320
11-57
11.. . APPENDIX A: MASTER ICON FILE REFERENCE
RATE OF CHANGE FUNCTION ICON
FUNCTION:
The Rate of Change icon calculates and outputs the rate of change of a signal for a user
specified number of samples. A “sliding” calculation is performed each time the input is
updated. For example, if the user-entered number of samples is 5, after the 5th sample is
taken, the 1st and 5th samples are used for the calculation. The next time sample is
taken, the 2nd and 6th are used and so on.
INPUTS:
Data/Logic Signal:
Data type.
OUTPUTS:
Output Signal:
Data type. The Rate of Change icon updates its output after
receiving the user specified number of samples and calculation the Rate of
Chnge.
ICON CONFIGURATION DIALOG BOX:
CONFIGURATION OPTIONS:
Icon Name: Specify the label for the icon. This name will show directly under the icon
within the Program Net.
Input Rate Time Base: Specifies ttime base of the output. For example if Seconds is
selected and the input is temperature, the output would be the rate of
change of the input in degrees per second.
Number of Samples: Specifies the number of samples that defines the time interval
used for the calculation.(dtm samples/intervals???).
Output Name:Specify the label for the Output. This name will show directly under the
Output terminal within the Program Net.
Units: Provides a text box for user entry of a units label that will be shown at the output
from this icon
11-58
USING T HE OM-320
11.. . APPENDIX A: MASTER ICON REFERENCE
USING THE OM-320
11-59
11.. . APPENDIX A: MASTER ICON FILE REFERENCE
TIME INTEGRATION FUNCTION ICON
FUNCTION:
Calculates the time integral of data type input over a User defined integration period. The
Time Integral icon can only be used with DATA type inputs.
NOTE: For LOGIC type input time integration, refer to the Duty-Cycle icon.
For example, the Integral icon can be used in a Net (see above) to determine the hourly
flow total of oil through a pipe. The oil flow RATE is sampled every minute by a 4-20mA
flow transmitter and the signal is converted to GPM via a Math icon. This flow rate is then
connected to the Integral icon which calculates the hourly volume flow by integrating the
flow rate over time. The Sample Rate Clock connected to the Integral icon Update
terminal determines the integration period.
INPUTS:
Data/Logic Signal: Data
Update Clock:
Yes, specifies the time period over which the input signal is
integrated
Enable:
None
OUTPUTS:
Output Signal:
Data type. The Integral icon updates its output with the new
integral value after receiving an Update Command from the connected
Update Clock.
11-60
USING T HE OM-320
11.. . APPENDIX A: MASTER ICON REFERENCE
ICON CONFIGURATION DIALOG BOX:
CONFIGURATION OPTIONS:
Icon Name: Specify the label for the icon. This name will show directly under the icon
within the Program Net.
Input Rate Timebase: Units per...
Specify the timebase (ie units per second, per minute, etc) for which
the input signal rate is specified. By providing this information, the Net
will automatically calculate the correct unit volume output based on the
integration period. In the above example, the flow rate was in GPM.
With a 1 hour integration period specified (by the User connected Rate
Clock), the Net will automatically generate the correct volume output.
If a timebase other than seconds, minutes, hours, or days is used, the
rate (Integral icon input) can be scaled by a math icon prior to
connection to the Integral icon to bring the timebase within the possible
timebase selections.
Units:
Provides a text box for User entry of a units label that will be shown at the
output from this icon.
Output Name:
Specify the label for the Output. This name will show directly
under the Output terminal within the Program Net.
USING THE OM-320
11-61
11.. . APPENDIX A: MASTER ICON FILE REFERENCE
HISTOGRAM FUNCTION ICON
FUNCTION:
The Histogram icon compares its input value with a user specified range. If the input
value falls within the range, its internal counter is incremented. When a user specified
number of inputs have been compared, the icon outputs its count.
For example, in the net shown above, five different Histogram icons are being used to
monitor how often the pressure input falls within five different ranges. Each icon is set to
compare the same number of samples before outputting its count.
INPUTS:
Data/Logic Signal:
Data type.
OUTPUTS:
Output Signal:
Data type. The Histogram icon outputs it count after receiving the
user specified number of samples.
11-62
USING T HE OM-320
11.. . APPENDIX A: MASTER ICON REFERENCE
ICON CONFIGURATION DIALOG BOX:
CONFIGURATION OPTIONS:
Icon Name: Specify the label for the icon. This name will show directly under the icon
within the Program Net.
Input Name: In this box, HyperNet displays the Output Name of the icon connected to
this icon’s input. The Output Name can be changed in the other icon’s
dialog.
Output Totals After ___ Samples: When the number of samples specified have been
received and compared, the icon will output the count of how many
samples fell within the specified range.
Clear Sample Count and Totals upon Enable: The icon keps track of how many
samples it has compared, as well as how many fell into the specified range.
Check this box to force a reset of both counts upon receipt of an enable
signal.
Clear Totals After Output: Check this box to force the icon to clear the count after it is
output.
Units: Provides a text box for User entry of a units label that will be shown at the output
from this icon.
Count incremented when the input satisfies the following conditions: Specifies the
range that the input must fall within in order to increment the icon’s counter.
USING THE OM-320
11-63
11.. . APPENDIX A: MASTER ICON FILE REFERENCE
REMOTE CONTROL FUNCTION ICON
FUNCTION:
The Remote Control icon has a logic output that can be controlled real-time by the user.
This output can be connected to the logic input of any other icon.
INPUTS:
Update Clock: Output is updated to the last user selected state upon each Update
clock pulse. For example, it the connected Update clock is set for 60 sec.,
and the output state is changed by the user via HyperWare(described
below), the actual state of the output will not update until the icon receives
an Update pulse which may be up to 60 seconds later.
OUTPUTS:
Output Signal:
Logic type. The Remote Control icon updates its output after
receiving a user generated command to do so from HyperWare.
For example, the portion of a net program depicted above shows posible uses for the
Remote Control icon.The Remote Control icons labeled “Relay #1” and “Relay #2” are
connected to the logger’s relay output icons. This would enable the user to control the
state of the logger’s hardware relay outputs real-time. The Remote Control icon labled
“Log T-In” is connected to the Enable input on a Thermocouple icon which is set to log
data to memory. Whenever the Thermocouple’s enable input is ON, the channel will
sample. Conversely, if its Enable input is OFF, it will not sample. This setup allows the
user to turn on different portions of a net program at will
11-64
USING T HE OM-320
11.. . APPENDIX A: MASTER ICON REFERENCE
Remote Control icons can be accessed from the HyperTrack Real Time Display window.
The button used to monitor/change the states of Remote Control icons is shown above.
Clicking this button will cause HyperWare to query the logger for the names and
corresponding states of its Remote Control icons. HyperWare will then display the
following dialog box.
The states of each icon can then be selected. Clicking “OK” will cause HyperWare to sent
the appropriate commands to the logger, telling it to update the Remote Control Ions
accordingly.
USING THE OM-320
11-65
11.. . APPENDIX A: MASTER ICON FILE REFERENCE
ICON CONFIGURATION DIALOG BOX:
CONFIGURATION OPTIONS:
Icon Name: Specify the label for the icon. This name will show directly under the icon
within the Program Net.
Initial State: This is the state of the icon’s output uon enabling
11-66
USING T HE OM-320
11.. . APPENDIX A: MASTER ICON REFERENCE
HAP FUNCTION ICON
FUNCTION:
The HAP icon is used in conjunction with the Omega Engineering HyperWare Automation
Program (HAP) application. Hap is a stand-alone application separate from HyperWare,
that automates most of HyperWare’s communication functions. .. When the HAP icon’s
input goes TRUE, the icon will initiate communication with a PC that is running the HAP
application.The icon will tell HAP which functions to perform. based on the information
entered in the configuration dialog. HAP will then proceed to perform those functions.
INPUTS:
Data/Logic Signal:
Data type.
OUTPUTS:
Output Signal:
Data type(Optional). The HAP icon turns on its output if it was
unable to connect to HAP. The output will remain ON untill the next time
the HAP icon fires off
ICON CONFIGURATION DIALOG BOX:
CONFIGURATION OPTIONS:
Icon Name: Specify the label for the icon. This name will show directly under the icon
within the Program Net.
USING THE OM-320
11-67
11.. . APPENDIX A: MASTER ICON FILE REFERENCE
Output Name:Specify the label for the Output. This name will show directly under the
Output terminal within the Program Net.
Modem/RS-232: Specifies the type of communication
Phone Number: This is the phone number that will be called if telephone modem
communication is selected.
Retries: If a call is unsuccessful, the dialing sequence will be repeated the specified
number of times.
Retry Delay: If a call is unsuccessful, the logger will wait the specified time before
attempting again.
Output Upon Communication Failure: Checking this box will cause an output to
appear. This outup goes TRUE if a the logger fails to connect to the PC.
Pop-Up Message: Causes a pop-up message. to be displayed on the PC running HAP.
This message will contain some basic header information as well as the
following if selected.
Send All Active Messages: If this bo is cheked, the Pop-up message will contain all
active system messages.
Custom Message: If this box is checked a custom message can be entered.
Data Download: Check this box to perform a download of logger memory.
Base Download Filename: Specifies the first few characters of the downloaded
filename. HAP will append the base filename with “__last”. If a file with that
name already exists, hap will rename the older file to the base filename
appended with __X where X is a number
Data Download File Format, *HLD/*XLS/*CSV: Specify the output file type.
Clear Memory After Download: Check this box to clear memory after the data is
downloaded.
Generate Report: Check this box to generate an Excel report.
Use Report Template Name: Specify the report template to use. This template must
be generated using HAP
Output Report Name: Name of the report file
.
11-68
USING T HE OM-320
11.. . APPENDIX A: MASTER ICON REFERENCE
TEXT NOTE ICON
FUNCTION:
The Text Note icon provides a means to add user comments to a specific portion of a net
program. The Text Note icon is located at the right-hand end of the sipnnable toolbar as
depicted below.
The Text Note is not the same as other icons in that it doesn’t actually process any data.
It only displays text within the net program. Although the icon does not perform any
function when the net program is run, it is an integral part of the net and remains intact
when uploaded/downloaded to the logger. An example of a net that contains Text Note
icons is shown below.
USING THE OM-320
11-69
11.. . APPENDIX A: MASTER ICON FILE REFERENCE
INPUTS:
None
OUTPUTS:
None.
ICON CONFIGURATION DIALOG BOX:
CONFIGURATION OPTIONS:
Lines 1,2 & 3: Simply enter the text that is to be displayed into the three boxes.
11-70
USING T HE OM-320
11.. . APPENDIX A: MASTER ICON REFERENCE
MATH FUNCTION ICON
FUNCTION:
The Math icon accepts one or two input signals, performs a User defined mathematical
calculation, then outputs the result. Equations are entered by the User and optionally
saved to a User-Defined math library. A Pre-Defined library of special equations is also
provided.
For example, if a User wants to calculate the temperature differential across a heat
exchanger radiator and store this `math channel’ to memory, a Net as shown above might
be used.
INPUTS:
Data/Logic Signal: One or Two Data type. If only one input is used, the other input
should be left unconnected.
Update Clock:
Enable:
None
Processing of icon is allowed when Enable pin is unconnected or
when connected and Enable signal is TRUE.
OUTPUTS:
Output Signal:
Data type. The Math calculation result.
USING THE OM-320
11-71
11.. . APPENDIX A: MASTER ICON FILE REFERENCE
ICON CONFIGURATION DIALOG BOX:
CONFIGURATION OPTIONS:
Icon Name: Specify the label for the icon. This name will show directly under the icon
within the Program Net.
X and Y Input Name: In this box, HyperNet displays the Output Names of the icons
connected to this icon’s Inputs. The Output Names can be changed in the
other icons’ dialogs.
Swap X and Y:
Clicking on the SWAP button swaps the X and Y input
connections. The change is reflected in the X and Y Input Name boxes as
well as in the actual Program Net where the connections are redrawn.
Math Function:
A text box is provided for entry of the equation to be calculated. In
the equation, use X and Y to represent the values at the X and Y inputs.
Supported math functions, their Syntax, and Explanations are provided in
the following table:
11-72
FUNCTION
Addition
Subtraction
Multiplication
Division
Exponentiation
Exponential
Parenthesis
SYNTAX
X+7
X-20
X*1.2
X/2
X^3
EXP(X)
2*(X-Y)
Square
Square Root
SQR(Y)
SQRT(X)
EXPLANATION
Adds 7 to Input X
Subtracts 20 from Input X
Multiplies X times 1.2
Divides X by 2
X cubed
e to Xth power
2 times the difference of the X Input
minus the Y Input
Y squared
Square root of X
USING T HE OM-320
11.. . APPENDIX A: MASTER ICON REFERENCE
Absolute Value
Zeroize
Natural Log
Log Base 10
Sine
Cosine
Tangent
ArcCosine
ArcSine
ArcTangent
ArcTangent2
ABS(Y)
ZERO(X)
LOG(Y)
LOG10(X)
SIN(Y)
COS(X)
TAN(Y)
ACOS(X)
ASIN(X)
ATAN(X)
ATAN2(Y)
TC converter1
TC_J(X,Y)
TC converter
TC converter
TC converter
TC converter
TC converter
TC_K(X,Y)
TC_E(X,Y)
TC_T(X,Y)
TC_R(X,Y)
TC_S(X,Y)
Absolute value of Y
Zero if X is negative, X otherwise
Natural log of Y
Base 10 log of X
Sine of Y
Cosine of X
Tangent of Y
ArcCosine of X
ArcSine of X
ArcTangent of X
ArcTangent2 is accurate for values
of X very close to and equal to 0
Temperature calculation using type J
thermocouple input in mV (X) and
CJC input in ohms(Y)
Same as above for type K
Same as above for type E
Same as above for type T
Same as above for type R
Same as above for type S
Math Library: A math function library is provided for storing User defined equations
that may be used frequently.
To save a function, enter the equation in the Math Function text box, then
select Save To. A dialog will open allowing for User entry of a short
comment about the function to be saved. After entry of the comment,
selecting OK saves the function to the User Function Library for future
recall.
To retrieve a function for use, select Browse and a dialog will open allowing
access to the Pre-Defined Library equations (provided with HyperWare and
not editable by the User) as well as the User-Defined Library where User
added equations are retained. Highlight the equation and click on Use and
the function will be loaded into the Math Function text box.
Functions can be deleted by highlighting, then clicking on the Remove
button.
Units:
Provides a text box for User entry of a units label that will be shown at the
output from this icon.
Output Name:
Specify the label for the Output. This name will show directly
under the Output terminal within the Program Net.
Output When:
Defines when the Output is updated. If inputs to the icon are
updated at different times/rates (asynchronously), the User can specify
when the Output should be updated.
X or Y Updated - The Output is updated if either the X or the Y inputs are
Updated.
1
See Example Nets in Appendix xxx for application ideas on use of the TC
Converter functions.
USING THE OM-320
11-73
11.. . APPENDIX A: MASTER ICON FILE REFERENCE
X input Updated - The Output is updated only when the X input is
Updated. If a calculation is performed that uses the Y input, the last Y
input value will be used in the calculation and the Output will be updated.
Y input Updated - The Output is updated only when the Y input is
Updated. If a calculation is performed that uses the X input, the last X
input value will be used in the calculation and the Output will be updated.
Output Format:
The User can specify the data format for the Output from the icon.
In certain applications, additional processing speed and/or less memory
per stored sample can be realized.
Default to Input Formats - the default format. The data will be passed
using the same data format as the Inputs use. Note that if inputs are
received as integers, operations resulting in a decimal component (eg
division) will be output as integers with corresponding loss of precision
(trunction of decimal). If this is of concern, utilize the Floating Point format.
Floating Point - The Output data will be of Floating point format. Floating
Point format includes both the integer and decimal components (XXX.XXX)
of the calculation result.
Advantages of Floating Point mode:
1. This format will result in outputs that have no loss in
precision.
Disadvantages of Floating Point mode:
1. Calculations will perform slower than Long Integer mode. The
calculation speed may be 10x slower per operation than using
Long Integer mode.
2. If the Output is connected to a Memory icon, Floating Point
mode will always use 4 bytes for data storage.
Long Integer - The Input data will be converted to integer format, then the
calculation will be performed and output in signed Integer format. Signed
Integer format includes only the digits to the left of the decimal (XXXXX.)
Advantages of Long Integer mode:
1. Calculations will perform faster. Processing throughput rates
may be up to 10 times faster (per operation) than the
equivalent calculation using floating point math.
2. If the Output is connected to a Memory icon, Long Integer
mode will generally utilize a fewer number of bytes for data
storage. The number of bytes will dynamically size, from 1 to
4 bytes, according to the magnitude of the Output.
Disadvantages of Long Integer mode:
1. Input numerical precision will be lost if incoming data is in
floating point format. Precison will be lost in the conversion to
integer format (eg 26.3 becomes 26). If large numbers are
processed, this loss of precision may be negligible (eg
36785.2 becomes 36785).
2.
11-74
Calculation results will be truncated to integers, hence any
decimal components will be lost (eg 10/3=3.33333 but will be
output as the integer 3). If large numbers are processed
and/or operations are performed that will not have decimal
results (addition,subtraction, multiplication, etc), this loss may
be negligible.
USING T HE OM-320
11.. . APPENDIX A: MASTER ICON REFERENCE
COMPARATOR (SETPOINT) FUNCTION ICON
FUNCTION:
The Comparator icon performs a comparison between its X and Y inputs and Outputs a
Logic (True/False) signal depending on the result of the comparison. If the X input is
greater than the Y input, the Output is True. If the X input is less then the Y input, the
Output is False.
In the above net, when the temperature of the engine oil exceeds 130C, the relay output
will be energized. The Comparator has been configured with hysteresis of 10 degrees.
When the temperature drops to below 120C (130-10), the alarm will be turned off.
NOTE: Optionally utilize the Latch icon between the Comparator and the Alarm to latch
the Alarm ON once it turns on.
INPUTS:
Data/Logic Signal: Two Data type inputs are required for operation.
Update Clock:
Enable:
None
Processing of icon is allowed when Enable pin is unconnected or
when connected and Enable signal is TRUE.
OUTPUTS:
Output Signal:
Logic type.
USING THE OM-320
11-75
11.. . APPENDIX A: MASTER ICON FILE REFERENCE
ICON CONFIGURATION DIALOG BOX:
CONFIGURATION OPTIONS:
Icon Name: Specify the label for the icon. This name will show directly under the icon
within the Program Net.
X and Y Input Name: In this box, HyperNet displays the Output Names of the icons
connected to this icon’s Inputs. The Output Names can be changed in the
other icons’ dialogs.
Swap X and Y:
Clicking on the SWAP button swaps the X and Y input
connections. The change is reflected in the X and Y Input Name boxes as
well as in the actual Program Net where the connections are redrawn.
Comparator Function:
When the configuration dialog appears, the comparator is
configured to perform a simple comparison between X and Y, if X is
greater than or equal to Y, the Output is ON.
If the Hysteresis box is checked, an additional line is displayed with a text
box for entry of hysteresis (ie deadband) which is then included in the
comparison function. As shown, a Hysteresis of 10 degrees has been
specified. In this case, when the oil temperature rises to equal or greater
than 130C, the Output will turn ON. When the temperature of the oil drops
to less than 120C, the output will turn OFF.
Hysteresis is commonly used to prevent short cycling due to quick dynamic
system response and/or signal fluctuations and noise/jitter.
Output Name:
Specify the label for the Output. This name will show directly
under the Output terminal within the Program Net.
Output When:
Defines when the Output is updated. If inputs to the icon are
updated at different times/rates (asynchronously), the User can specify
when the Output should be updated.
X or Y Updated - The Output is updated if either the X or the Y inputs are
Updated.
11-76
USING T HE OM-320
11.. . APPENDIX A: MASTER ICON REFERENCE
X input Updated - The Output is updated only when the X input is
Updated. If a calculation is performed that uses the Y input, the last Y
input value will be used in the calculation and the Output will be updated.
Y input Updated - The Output is updated only when the Y input is
Updated. If a calculation is performed that uses the X input, the last X
input value will be used in the calculation and the Output will be updated.
USING THE OM-320
11-77
11.. . APPENDIX A: MASTER ICON FILE REFERENCE
CONSTANT FUNCTION ICON
FUNCTION:
The Constant icon represents a fixed User defined value. A typical application for the
Constant is as a threshold for use with the Comparator icon as shown below.
In the above net, when the temperature of the engine oil exceeds 130C, the relay output
will be energized.
INPUTS:
Data/Logic Signal: None.
Update Clock:
None
Enable:
None
OUTPUTS:
Output Signal:
Data type, fixed value of User definition.
ICON CONFIGURATION DIALOG BOX:
CONFIGURATION OPTIONS:
Icon Name: Specify the label for the icon. This name will show directly under the icon
within the Program Net.
Constant: Enter the constant value in this text box.
Output Name:
Specify the label for the Output. This name will show directly
under the Output terminal within the Program Net.
11-78
USING T HE OM-320
11.. . APPENDIX A: MASTER ICON REFERENCE
Units:
Provides a text box for User entry of a units label that will be shown at the
output from this icon.
USING THE OM-320
11-79
11.. . APPENDIX A: MASTER ICON FILE REFERENCE
LATCH FUNCTION ICON
FUNCTION:
The Output turns ON and stays ON when the Input transitions from OFF to ON. The
Latch icon is commonly used in front of an Alarm output icon to force the Alarm to stay
ON once it is turned ON (see following Net).
INPUTS:
Data/Logic Signal: Logic ( True/False) type.
Update Clock:
None
OUTPUTS:
Output Signal:
Logic type.
ICON CONFIGURATION DIALOG BOX:
CONFIGURATION OPTIONS:
Icon Name: Specify the label for the icon. This name will show directly under the icon
within the Program Net.
Stays TRUE when ______ turns TRUE:
The Ouput name of the icon connected
to the Latch icon input is displayed in this function statement.
11-80
USING T HE OM-320
11.. . APPENDIX A: MASTER ICON REFERENCE
Output Name:
Specify the label for the Output. This name will show directly
under the Output terminal within the Program Net.
USING THE OM-320
11-81
11.. . APPENDIX A: MASTER ICON FILE REFERENCE
AND LOGIC FUNCTION ICON
FUNCTION:
The Output turns TRUE ONLY when both of the Inputs are TRUE. If either or both of the
Inputs are FALSE, the Output is FALSE.
INPUTS:
Data/Logic Signal: Two Logic (TRUE/FALSE) type.
Update Clock:
None
Enable:
None
OUTPUTS:
Output Signal:
Logic type.
ICON CONFIGURATION DIALOG BOX:
CONFIGURATION OPTIONS:
Icon Name: Specify the label for the icon. This name will show directly under the icon
within the Program Net.
Output TRUEwhen: ___________ AND _________ are TRUE: HyperNet completes
this functional statement using the names of the Outputs from the icons
that are connected to this AND icon’s Inputs.
Output Name:
Specify the label for the Output. This name will show directly
under the Output terminal within the Program Net.
11-82
USING T HE OM-320
11.. . APPENDIX A: MASTER ICON REFERENCE
OR LOGIC FUNCTION ICON
FUNCTION:
The Output turns TRUE when either of the Inputs are TRUE. If both of the Inputs are
OFF, the Output is OFF.
INPUTS:
Data/Logic Signal: Two Logic (True/False) type.
Update Clock:
None
Enable:
None
OUTPUTS:
Output Signal:
Logic type.
ICON CONFIGURATION DIALOG BOX:
CONFIGURATION OPTIONS:
Icon Name: Specify the label for the icon. This name will show directly under the icon
within the Program Net.
Output TRUEwhen: ___________ OR _________ is TRUE:
HyperNet completes
this functional statement using the names of the Outputs from the icons
that are connected to this OR icon’s Inputs.
Output Name:
Specify the label for the Output. This name will show directly
under the Output terminal within the Program Net.
USING THE OM-320
11-83
11.. . APPENDIX A: MASTER ICON FILE REFERENCE
XOR (EXCLUSIVE OR) LOGIC FUNCTION ICON
FUNCTION:
The Output turns TRUE when the state of the two Inputs are different, ie ONLY ONE of
the Inputs is TRUE. If neither or both of the Inputs are TRUE, the Output is FALSE.
INPUTS:
Data/Logic Signal: Two Logic (True/False) type.
Update Clock:
None
Enable:
None
OUTPUTS:
Output Signal:
Logic type.
ICON CONFIGURATION DIALOG BOX:
CONFIGURATION OPTIONS:
Icon Name: Specify the label for the icon. This name will show directly under the icon
within the Program Net.
Output TRUE when: ___________ is DIFFERENT than _________:
HyperNet
completes this functional statement using the names of the Outputs from
the icons that are connected to this XOR icon’s Inputs.
Output Name:
Specify the label for the Output. This name will show directly
under the Output terminal within the Program Net.
11-84
USING T HE OM-320
11.. . APPENDIX A: MASTER ICON REFERENCE
NOT (INVERTER) LOGIC FUNCTION ICON
The NOT icon inverts the signal as it passes through. When the Input isTrue the Output
is False. When the Input is False, the Output is True.
INPUTS:
Data/Logic Signal: Logic (True/False) type.
Update Clock:
None
Enable:
None
OUTPUTS:
Output Signal:
Logic type.
ICON CONFIGURATION DIALOG BOX:
CONFIGURATION OPTIONS:
Icon Name: Specify the label for the icon. This name will show directly under the icon
within the Program Net.
Output True when ________ is False:
HyperNet completes this functional
statement using the name of the Output from the icon that is connected to
this NOT (inverting) icon’s Inputs.
Output Name:
Specify the label for the Output. This name will show directly
under the Output terminal within the Program Net.
USING THE OM-320
11-85
11.. . APPENDIX A: MASTER ICON FILE REFERENCE
TIMED COUNTER FUNCTION ICON
The Timed Counter is a software counter that can be used within a Net for accumulating
transitions over a fixed period of time( for example: counting pulses received per hour). In
concept, this icon performs a similar function as a hardware counter input such as the
GPDI in the Counter mode. However, the difference is that the Timed Counter is a
software version that can be used to count transitions received from other software icons
such as the Comparator.
The icon is has an Update Clock input that specifies the time period over which it is to
accumulate the transitions received on its Input. The Net shown below counts the
number of times per hour a temperature exceeds the 1400F threshold and stores this
OverTemps per hour value in memory.
INPUTS:
Data/Logic Signal: Logic (True/False) type.
Update Clock:
Specifies the period of time over which the count is accumulated.
When an Update command is received, the current count is output and
counting resumes (optionally it can be reset to 0 before counting resumes)
Enable:
Processing of icon is allowed when Enable pin is unconnected or
when connected and Enable signal is TRUE.
OUTPUTS:
Output Signal:
Data type. The accumulated count is output.
ICON CONFIGURATION DIALOG BOX:
CONFIGURATION OPTIONS:
Icon Name: Specify the label for the icon. This name will show directly under the icon
within the Program Net.
When ______ Update pulse is received, output the _____ count total: HyperNet
completes this functional statement using the names of the Outputs from
the icons that are connected to this Counter icon’s Enable and Signal
Inputs.
Clear Counter on Output: If this check box is checked, after the accumulated count
total is passed to the Output, the total will be cleared and counting will
restart from 0. If the box is not checked, counting will be cumulative,
adding on to the current total.
11-86
USING T HE OM-320
11.. . APPENDIX A: MASTER ICON REFERENCE
Count Rising / Falling Edges: The Up Counter increments its accumulated count
when its input changes state. The User can use this option to specify
whether Rising (False to True) or Falling (True to False) transitions
(edges)are to be counted.
Output Count upon disable: Check this box to force an output of the accumulated
Count at any time that the icon is disabled. If this box is not checked, upon
receipt of a disable signal, the Counting function will be momentarily
suspended until the icon is re-enabled and no in-process value will be
output.
For example, if a Count is to be output when a one hour Update Pulse has
been received but only 20 minutes have gone by and the icon is disabled,
the 20 minute sample Count total will be output and the counting function
will be suspended until re-enabled. Upon re-enable,counting will continue
and after 40 more minutes, the hourly Count Total will be output (unless
the following check box is checked)
Count Rising / Falling Edges:
The Timed Counter increments its accumulated
count when its input changes state. The User can use this option to
specify whether Rising (False to True) or Falling (True to False) transitions
(edges)are to be counted.
Units:
Provides a text box for User entry of a units label that will be shown at the
output from this icon. Conversion to other units can be performed within a
Program Net by adding a Math Icon onto this icon’s output.
Output Name:
Specify the label for the Output. This name will show directly
under the Output terminal within the Program Net.
USING THE OM-320
11-87
11.. . APPENDIX A: MASTER ICON FILE REFERENCE
UP COUNTER FUNCTION ICON
The Up Counter is a software counter that can be used within a Net to count up to a User
defined count value, then output the count. After outputting the count, the Up Counter
clears the counter and starts counting up again.
An example application follows:
An input signal (logic) is generated every time a widget is produced on a production line.
The User wants to log the time to produce 100 widgets. With the Up Counter
programmed to 100, every time 100 event inputs are accumulated, the icon will output the
value 100 to memory.
INPUTS:
Data/Logic Signal: Logic (True/False) type.
Enable:
Processing of icon is allowed when Enable pin is unconnected or
when connected and Enable signal is TRUE.
OUTPUTS:
Output Signal:
Data type. The accumulated count is output.
ICON CONFIGURATION DIALOG BOX:
11-88
USING T HE OM-320
11.. . APPENDIX A: MASTER ICON REFERENCE
CONFIGURATION OPTIONS:
Icon Name: Specify the label for the icon. This name will show directly under the icon
within the Program Net.
Input Name: In this box, HyperNet displays the Output Name of the icon connected to
this icon’s Input. The Output Name can be changed in the other icon’s
dialog.
Output Count after ____ input transitions received: When the number of
transitions received on the Up Counter’s Input equals this User supplied
value, the value is passed to the Output and the count resumes again at 0.
Count Rising / Falling Edges: The Up Counter increments its accumulated count
when its input changes state. The User can use this option to specify
whether Rising (False to True) or Falling (True to False) transitions
(edges)are to be counted.
Output Count upon disable: Check this box to force an output of the accumulated
Count at any time that the icon is disabled. If this box is not checked, upon
receipt of a disable signal, the Counting function will be momentarily
suspended until the icon is re-enabled and no in-process value will be
output.
For example, if a Count is to be output after 100 samples have been
received but only 60 have been received and the icon is disabled, the 60
sample Count total will be output and the counting function will be
suspended until re-enabled. Upon re-enable,counting will continue and
after 40 more samples are received, the 100 sample Count Total will be
output (unless the following check box is checked)
Clear Transition and Input Counts upon Enable: Check this box to force a reset of
the accumulated Count Total as well as the Sample count used used for the
calculation upon receipt of an Enable signal.
If this box is not checked, upon receipt of an Enable signal, counting
calculation will proceed from its suspended state (that it entered when it
was disabled).
Clear Counter on Output: Check this box to force the Count Value to be reset to 0
after Output. If this box is not checked, the icon will perform as a counting
totalizer
Units:
Provides a text box for User entry of a units label that will be shown at the
output from this icon. Conversion to other units can be performed within a
Program Net by adding a Math Icon onto this icon’s output.
Output Name:
Specify the label for the Output. This name will show directly
under the Output terminal within the Program Net.
USING THE OM-320
11-89
11.. . APPENDIX A: MASTER ICON FILE REFERENCE
SAMPLE RATE CLOCK FUNCTION ICON
The Sample Rate Clock icon generates the Update signal/command used throughout
Nets to set Sampling Rates of the different input type icons. (The icon derives its clock
rate from a OM-320 internal clock.)
When the Sample Rate Clock generates an Update command, it causes the connected
icons to read their inputs, process the signal accordingly, then Update their Outputs.
Sample Rate Clocks within a Net set the pace at which the various branches of the
Program Net sequence.
Multiple Sample Rate Clocks can be used within a single Program Net to provide different
sampling rates.
INPUTS:
Alternate Rate Input:
Logic type input. The Sample Rate Clock has a Logic
Input terminal that is used to control which of two clock rates will be output
(see Sample Rate Clock Configuration Dialog below) .
If the Alternate Rate Input is left unconnected, Update pulses will be output
at the standard rate. If connected to a Logic type (True/False) Output from
another icon (as shown in the Net below), the state of this signal will
determine which of two rates will be used. When the Input is LOW, the
Standard Update rate will be output. When the Input is TRUE (in the Net
below, when an overtemp condition occurs) , the Alternate faster Clock
Update rate will be output.
11-90
USING T HE OM-320
11.. . APPENDIX A: MASTER ICON REFERENCE
NOTE: The link (connection to the Alternate Rate Input on the Sample
Rate Clock is unique in that it feeds back from an Output terminal to an
Input terminal that is to the left on the screen. This is the only link that can
be connected this way. To make the connection, drag the link from the
Sample Rate Clock Input terminal to the Output terminal (left to right).
Enable:
Processing of icon is allowed when Enable pin is unconnected or
when connected and Enable signal is TRUE.
The Enable terminal can be left unconnected, connected to a Start/Stop
Clock icon, or connected to any other logic signal. This could control the
generation of Update signals as a condition of some other parameter.
OUTPUTS:
Output Signal:
Update type. The Sample Rate Clock icon is the only icon that
can generate an Update command/signal. (The Warm-up icon does not
actually generate an Update signal, it just passes it through).
ICON CONFIGURATION DIALOG BOX:
CONFIGURATION OPTIONS:
Icon Name: Specify the label for the icon. This name will show directly under the icon
within the Program Net.
Never use Alternate Rate / Use Alternate Rate when _____ is True: If the Alternate
Rate Input is left unconnected, Never use Alternate Rate will be displayed.
When a link is made to the Alternate Rate Input, Use Alternate Rate when
`_____’ is True is displayed. In quotes, HyperNet displays the Output
Name of the icon connected to the Alternate Rate Input terminal. The
displayed Output Name can be changed in the other icon’s dialog.
Update pulse every:
A text box is provided for User entry of a number. The
units (seconds, minutes, hours, days) can be specified via the list box.
NOTE: To specify Update signal rates faster than 1 second, set the
Sample Rate Clock Resolution to milliseconds from within the Global
icon Configuration dialog. Use of the millisecond setting will result in
higher power consumption as the OM-320 microprocessor is continually
running during this mode. In the Seconds mode, the microprocessor is put
to a low power `sleep’ mode during times of inactivity.
NOTE: In MILLISECOND Mode, logging sessions must be
limited to a maximum length of 2 weeks. This limitation
holds for both Rotary and Log to Full Memory modes.
USING THE OM-320
11-91
11.. . APPENDIX A: MASTER ICON FILE REFERENCE
This 2 week limit is due to a maximum time count that the
OM-320 can internally store at the faster clock rate. For
sessions longer than 2 weeks, utilize the SECOND mode.
Refer to Global icon listing for additional information.
Alternate Rate:
If a Logic link is connected to the Alternate Rate Input terminal, the
Alternate Rate setting is enabled. Enter the Update pulse rate to be used
when the Alternate Rate Input connection is True.
11-92
USING T HE OM-320
11.. . APPENDIX A: MASTER ICON REFERENCE
WARM-UP FUNCTION ICON
The Warm-up icon is is a special two Output terminal icon. It immediately outputs a logic
signal on one terminal upon receipt of an Update signal, then after a User programmed
delay, passes the Update signal to its second Output.
The typical application for the Warm-Up icon is to provide control of a power supply for
excitation of a sensor or transmitter and a short delay until the sensor/transmitter is read.
The following example Net illustrates that application. Upon receipt of the Update
command from the Sample Rate Clock, the Warm-up icon immediately cycles its Logic
Output terminalTrue which turns on the connected Relay Alarm icon to power up a
24VDC power supply for the 4-20mA loop excitation. The icon then waits for a User
defined period of time, then passes the Update command to the connected mA-Lo (420ma) Input icon which then takes a sample. The next time the Net is executed, the
power supply is turned OFF.
INPUTS:
Update:
The icon immediately turns its Logic Output True when an Update
command is received. The Output staysTrue until the User provided time
expires.
Enable:
Processing of the icon is allowed when the Enable pin is
unconnected or when connected and Enable signal is TRUE.
OUTPUTS:
Output Signal 1:
Logic type. The Logic Output turnsTrue and staysTrue
immediately after receipt of an Update command.
Output Signal 2:
Update type. The Update command is passed through the icon
after a User defined delay (warm-up time).
USING THE OM-320
11-93
11.. . APPENDIX A: MASTER ICON FILE REFERENCE
ICON CONFIGURATION DIALOG BOX:
CONFIGURATION OPTIONS:
Icon Name: Specify the label for the icon. This name will show directly under the icon
within the Program Net.
WarmUp Time A text box is provided for User specification of the desired warmup time
delay between the Logic Output turnTrue and the pass through of the
Update command. The time is in seconds.
Output Name:
Specify the label for the Output. This name will show directly
under the Output terminal within the Program Net.
11-94
USING T HE OM-320
11.. . APPENDIX A: MASTER ICON REFERENCE
PERIODIC OUTPUT FUNCTION ICON
FUNCTION:
The Periodic Output Icon generates a Square Wave/Pulse output based upon time values
entered by the user in the configuration dialog box. When the icon’s Enable pin goes HI,
the output remains LOW for a specified period. The output then goes HI for a user defined
period before going back to a LOW state. This cycle is then repeated a specified number
of times or continuously. There are two modes of operation that define the icon’s behavior
when its Enable pin returns LOW, Reset Upon Disable, and Suspend While Disabled.
Reset Upon Enable: In this mode, whenever the Enable input goes from HI to LOW,
the operation is reset. The next time the Enable pin goes HI, the cycle starts
from the beginning.
Suspend While Disabled: In this mode, whenever the Enable input goes from HI to
LOW, the operation is suspended. All timers are put on hold while the
Enable is LOW. The next time the Enable goes HI, operation continues
where it left off.
The above net displays a typical application. The Periodic Output Icon is used to cycle a
OM-320 Relay Output On and Off at regular intervals, whenever the GPDI input is ON.
Another possible application is to insert a time delay into an Event (Logic Type) signal
branch.
NOTE: At least one Sample Rate Clock icon is required in every net program. This icon
must always be enabled (Enable pin disconnected or ON).
INPUTS:
Enable:
Processing of icon is allowed when Enable pin is connected or
when connected and Enable signal is TRUE.
OUTPUTS:
Output Signal:
Logic Type. The output is TRUE during user defined time
windows.
USING THE OM-320
11-95
11.. . APPENDIX A: MASTER ICON FILE REFERENCE
ICON CONFIGURATION DIALOG BOX:
CONFIGURATION OPTIONS:
Icon Name: Specify the label for the icon. This name will show directly under the icon
within the Program Net.
Reset Upon Enable/Suspend While Enabled: Specifies the mode of operation..
Delay to Initial Turn-On: Amount of time after the Enable input goes HI, that the
output remains LOW. If the Enable pin is not connected, it is HI. In this
case, the Delay is the time delay after enabling the OM-320 itself.
On Duration:. Amount of time the output remains HI.
Off Duration:..Amount of time the output remains LOW.
Number of Cycles to Repeat: Number of times that the specified cycle will repeat.
Entering zero will cause the cycle to repeat continuously.
NOTE: The Delay to Initial Turn-On time is not repeated.
Output Name:Specify the label for the Output. This name will show directly under the
Output terminal within the Program Net.
NOTE: The millisecond entry box is disabled if the mS mode is not selected in the
Global icon.
11-96
USING T HE OM-320
11.. . APPENDIX A: MASTER ICON REFERENCE
START/STOP CLOCK FUNCTION ICON
The Start/Stop Clock icon generates a Logic output that is a function of a User defined
time. Two different modes of operation are available, Absolute Start/Stop and Delayed
Start/Stop.
Absolute Start/Stop Mode: In this mode, the icon output is True for a User defined
window of time. The User can specify the Start and Stop dates and times.
Delayed Start/Stop Mode: The icon output goes True at a User specified elapsed
time after the OM-320 is Enabled, then stays True for a User specified
length of time before returning False.
NOTE: In both modes, after the Start/Stop clock `stops’, the OM-320 will continue to be
Enabled. However, any icons in the Net that are controlled by the Start/Stop icon will not
update. Alarms will remain in the state they are in when the Stop occurs.
A typical application of this icon is to enable an unattended OM-320 at some particular
future time, then disable after a period of time. The following Net illustrates that
application:
INPUTS:
Enable:
Processing of icon is allowed when Enable pin is unconnected or
when connected and Enable signal is TRUE.
OUTPUTS:
Output Signal:
Logic type. The Output is True during User defined time
windows.
USING THE OM-320
11-97
11.. . APPENDIX A: MASTER ICON FILE REFERENCE
ICON CONFIGURATION DIALOG BOX (ABSOLUTE START/STOP MODE):
CONFIGURATION OPTIONS (ABSOLUTE START/STOP MODE):
Icon Name: Specify the label for the icon. This name will show directly under the icon
within the Program Net.
Absolute Start / Stop or Delayed Start Mode: Specifies the mode of operation. The
time setting boxes will change accordingly.
Start On:
A text box is provided for User entry of the date and time
to turn the OutputTrue.
Stop On:
A text box is provided for User entry of the date and time
to turn the Output OFF.
Output Name:
Specify a name for the Output signal from this icon. This Output
Name will be referenced by other icons downstream in the Program Net.
11-98
USING T HE OM-320
11.. . APPENDIX A: MASTER ICON REFERENCE
ICON CONFIGURATION DIALOG BOX (DELAYED START/STOP MODE):
CONFIGURATION OPTIONS (ABSOLUTE START/STOP MODE):
Icon Name: Specify the label for the icon. This name will show directly under the icon
within the Program Net.
Absolute Start / Stop or Delayed Start Mode: Specifies the mode of operation. The
time setting boxes will change accordingly.
Start After (elapsed HH:MM:SS): A text box is provided for User entry of
the time to delay before starting (turning the Output True).
Stay ON for:
A text box is provided for User entry of the time to leave
the Output True.
Output Name:
Specify a name for the Output signal from this icon. This Output
Name will be referenced by other icons downstream in the Program Net.
USING THE OM-320
11-99
11.. . APPENDIX A: MASTER ICON FILE REFERENCE
STOP LOGGING FUNCTION ICON
When the Stop Logging icon receives a Logic True input, it stops the OM-320 execution of
the Program Net. The function is the same as if the front panel STOP button were
pressed.
In the following example Net, if the flow ever drops to less than 10GPH, the OM-320 will
stop logging. In this Net, logging will not restart, even if the flow increases to over 10GPH
again.
INPUTS:
Data/Logic Signal: Logic type (True/False). A True signal on this input Stops
execution of the OM-320 Program Net..
Enable:
Processing of the icon is allowed when the Enable pin is
unconnected or when connected and Enable signal is TRUE.
OUTPUTS:
Output Signal:
Internal system control output only. No output terminal shown on
icon for Program Net connections.
ICON CONFIGURATION DIALOG BOX:
No Configuration Dialog is provided.
11-100
USING T HE OM-320
11.. . APPENDIX A: MASTER ICON REFERENCE
WARNING FUNCTION ICON
The Warning icon outputs a True Logic signal while any of five User selected system
conditions are true. Multiple Warning icons can be used in a Program Net to initiate
alarming or other action upon different conditions. The following example illustrates
activation of a Page (and front panel LED) if the OM-320 memory fills to 90%.
INPUTS:
Data/Logic Signal: None, internal system status only. No terminals shown for icon
connections in Net.
Enable:
Processing of the icon is allowed when the Enable pin is unconnected or
when connected and Enable signal is TRUE.
OUTPUTS:
Output Signal:
Logic (True/False). Output is TRUE only while any of the five
conditions are true. A Latch icon can be connected to the Output of this
icon if a latching function is desired.
ICON CONFIGURATION DIALOG BOX:
USING THE OM-320
11-101
11.. . APPENDIX A: MASTER ICON FILE REFERENCE
CONFIGURATION OPTIONS:
Icon Name: Specify the label for the icon. This name will show directly under the icon
within the Program Net.
Output is True when:
Check boxes are provided for User selection of up to five
conditions, any of which will cause the icon Output to go True. Note that
the Output will only stay TRUE while the condition is true. The five
conditions are:
1.
Memory Becomes __%Full - Output latches TRUE if OM320 memory is filled to the specified percentage. Output goes
LOW when Memory is cleared (unless some other conditon is
true, forcing the Warning icon Output TRUE).
2.
Sample Missed - Output latches TRUE if a sample is missed
(ie not taken at the Sample Rate Clock commanded time)
during execution of a Program Net. This can occur if a Net
requires more time to process than the User has specified via
Sample Rate Clock Update rates. Note that missing a sample
does not cause the Program Net to stop. The Output is reset
LOW when the Program Net is Stopped.
3.
Power Failure - a Power Failure occurs when the OM-320
power supply voltage falls below a useable level. If this
occurs, the OM-320 stops execution of the Program Net,
preserves data memory, and sets a memory marker (flag) that
indicates that a Power Failure has occurred. When the power
to the OM-320 returns, the Warning icon Output latches
TRUE indicating that a Power Failure has occurred, and the
OM-320 will automatically resume execution of the Program
Net however the icon Output will remain TRUE. The Output is
set LOW when the Program Net is stopped. This condition is
mainly used to indicate to a User that a Power Failure
occurred at some time. For warning of impending power
failure, use the Power Low condition (above).
4.
System RESET - if a System RESET occurs, the Output
latches TRUE. The Watch-Dog Timer or a front panel RESET
can cause a System RESET to occur. The Output is set LOW
when the Program Net is stopped.
5.
Runtime Error - if a Runtime Error occurs, the Output latches
TRUE. Runtime errors should normally not occur, but could
be caused by a corrupted Program Net in the OM-320’s
memory. A Runtime error could also be caused by
incompatible OM-320 and HyperWare versions. The Output is
set LOW when the Program Net is stopped.
Output Name:
Specify a name for the Output signal from this icon. This Output
Name will be referenced by other icons downstream in the Program Net.
11-102
USING T HE OM-320
11.. . APPENDIX A: MASTER ICON REFERENCE
GLOBAL FUNCTION ICON
The Global icon provides for User specification of various OM-320 system settings that
may be used during the execution of a Program Net. No Input or Output terminals are
available on the icon.
INPUTS:
Data/Logic Signal: None.
Enable:
None. Icon is always enabled.
OUTPUTS:
Output Signal:
None
ICON CONFIGURATION DIALOG BOX:
CONFIGURATION OPTIONS:
Icon Name:
Specify a label for the icon. This label will appear directly below
the icon. A suggested use for this name is to enter the filename for the
Program Net... allowing for quick future reference.
Program Name:
A short (16 characters maximum) Program Net name can be
entered via this text box. This name can be accessed on the OM-320 front
panel LCD as well as through a Status Query serial communication
command.
Program Description:
A short (32 characters maximum) Program Net
description can be entered via this text box. This name can be accessed on
the OM-320 front panel LCD as well as through a Status Query serial
communication command.
USING THE OM-320
11-103
11.. . APPENDIX A: MASTER ICON FILE REFERENCE
Memory:
Three selections are available for utilization of the OM-320 memory:
Log to Full Memory and STOP Processing - if selected, the OM-320 will
log data until memory is filled, then stop execution of the Program Net and
go into a low power sleep mode.
NOTE: If MILLISECOND Sample Clock Resolution is selected (see below)
logging sessions must be limited to a maximum length of 40 days.
Log to Full Memory and CONTINUE Processing - if selected, the OM320 will log data until memory is filled, then continue the execution of the
Program Net excluding the storage of data to memory. This mode allows
all of the non-Memory icons in the Program Net to continue operation
providing continued Alarm, Probe Point, etc access.
NOTE: If MILLISECOND Sample Clock Resolution is selected (see below)
memory must be filled before a maximum of 40 days after Enabling the
OM-320 . Processing will continue after the 40 day limitation.
Rotary Memory - if selected, the OM-320 will log data until the memory is
filled, then begin overwriting the oldest sample in memory. Processing of
the complete Program Net will continue as normal.
NOTE: If MILLISECOND Sample Clock Resolution is selected (see below)
logging sessions must be limited to a maximum length of 40 days.
Sample Clock Resolution: Two options are available for selecting the time
resolution of the OM-320.
SECONDS - This mode should be used for all Program Nets that have
Sample Rate Clocks set at 1 second or slower. In this mode, the OM-320
`sleeps’ in a low-power mode during times of inactivity, providing extended
battery life. Sample Rate Clocks can be set as fast as 1 second.
MILLISECONDS - This mode must be used if any Sample Rate Clocks will
be set at faster than 1 second rates. In this mode, the OM-320 can resolve
time increments as small as 1/1000 of a second. NOTE: Use of the
millisecond mode will result in higher power consumption as the OM-320
microprocessor is continually operating. Depending on the Program Net,
the energy consumption in this mode may be approximately 10 to 15 times
higher than in the SECOND mode.
NOTE: In MILLISECOND Mode, logging sessions must be
limited to a maximum length of 40 days. This limitation
holds for both Rotary and Log to Full Memory modes.
This 40 day limit is due to a maximum time count that the
OM-320 can internally store at the faster clock rate. For
sessions longer than 40 days, utilize the SECOND mode.
Recalibration Period:
The OM-320 performs various self-calibrations during
execution of a Program Net. The User can specify the frequency of these
calibrations. If a 0 is entered for the period, a recalibration will be
performed at the start of each Program Net execution. If speed is not of
concern, entering 0 for each of the recalibration periods will result in
optimum performance.
ADC - the analog to digital converter used within the OM-320 and much of
the analog circuitry incorporated into Interface Modules can drift over time
and temperature fluctuations. By performing a recalibration, most of this
drift can be nulled. Specify the period in seconds between recalibrations.
CJC - a Cold Junction Compensation sensor is mounted on the TSA. The
temperature it measures on the TSA is used during thermocouple millivolt
to temperature conversions (HLIM-1). This CJC Recalibration Period
11-104
USING T HE OM-320
11.. . APPENDIX A: MASTER ICON REFERENCE
specifies how frequently the CJC temperature is checked and updated in
the thermocouple calculation equation. Any temperature error in the
measurement of the TSA will result in a nearly equal error in the
thermocouple reading.
TIP: If a short duration test is being performed where
maximum speed of thermocouple readings is required,
sufficient accuracy may be achieved by setting the
Recalibration Period fairly long. In this way, a CJC
recalibration will be done before the first pass through the
Program Net, then the high speed readings will be taken,
then another CJC recalbration. During the test, the TSA
thermal mass will keep the CJC temperature fairly
constant.
Battery - the internal power supply voltage is checked periodically based
on the User specified Recalibration Period. This Battery voltage is used by
the Warning icon for detection of a Power Low condition and for update of
the OM-320 front panel LCD System Supply Voltage display. For most
applications of OM-320s this period can be set fairly long (eg 3600
seconds) as battery voltage droops slowly. If additional loads are being
powered such as modems, outputs, etc shorten this value accordingly.
If the Warning icon is not being used and battery voltage will not be
checked via the LCD or through a serial communication Status Query, this
Recalibration Period can be set very long.
Auto-answer after __ ring: If a OM-320 is equipped with a modem, the number of
rings to wait before answering the call can be User defined. Enter the
number in the provided text box.
USING THE OM-320
11-105
11.. . APPENDIX B: EXAMPLE PROGRAM NETS
APPENDIX B: EXAMPLE PROGRAM NETS
Following are some example Program Nets with descriptions of their operation.
Engine Oil Cooler Performance Test:
Two thermocouples are configured to sample inlet and outlet oil temperatures every
30 seconds on a heat exchanger. Logging of data only occurs when the engine
ignition is ON. A delta-T calculation is performed and the inlet, outlet, and
differential temperature is stored to memory. Probe icons are available for display
of all three temperatures from the LCD and/or via a serial link.
USING THE OM-320
11-107
11.. . APPENDIX B: EXAMPLE PROGRAM NETS
Hydraulic Pump Performance Test
The above Net is designed for collecting data from a hydraulic pump on a vehicle
during periods of high fluid temperature operation only. Two thermocouple channels
and a continually powered pressure transducer are sources of input signals.
After Enabling the Net, the inputs are sampled every 30 seconds. When the Tinlet
temperature exceeds 160F (Comparator and Constant icons), data storage to
memory is Enabled for all three parameters and the OM-320 front panel LCD
displays a message stating that the temperature currently exceeds 160F and data is
being logged to memory.
The DC voltage from the pressure transducer is converted to PSI via the Math icon.
Instantaneous values for the two temperatures and pressure are accessible on the
OM-320 LCD and/or through a serial connection via the Probe icons.
11-108
USING T HE OM-320
11.. . APPENDIX B: EXAMPLE PROGRAM NETS
Tank Level / Inventory Profiling Data Collection with Alarming:
A remote site liquid tank has a constantly varying inventory as liquid is added and
removed over time. Profiling of the inventory over time, onsite display of the
inventory amount, and overflow telephone pager alarming are all desired.
Using a single 4-20mA pressure transmitter input and a Math icon, the inventory can
be calculated in gallons. The pressure transmitter is powered from a battery which is
cycled ON 10 seconds prior to reading, then OFF with the Relay icon and the
Warmup icon.
Every 30 minutes, the inventory is logged to memory as well as compared
(Comparator icon) to four different thresholds, 100, 200, 300, and 400 thousand
gallons. The current level is displayed on the OM-320 front panel LCD.
In the event that the top threshold (full) is met, a Page is sent with a code of `111’.
Additionally, every minute, a float type level switch is read via the GPDI icon in the
Event mode. When the tank gets too close to overflowing, the switch closes. This
signal is then sent to the Pager icon and a Page of `999’ is sent.
A separate Program Net branch is added to initiate a Page of `222’ if the OM-320
memory fills or a Run-time error occurs.
USING THE OM-320
11-109
11.. . APPENDIX B: EXAMPLE PROGRAM NETS
High Speed Thermocouple Application:
In some applications, maximum speed of thermocouple measurement is desired.
The Thermocouple icon is one of the slowest to process in a Program Net due to the
intensive math associated with each sample. A Cold Junction Compensation
reading is required as well as the thermocouple reading, then the two are combined
through curve approximating polynomials... heavy math for the OM-320.
A method to improve on the throughput rate of thermocouple inputs exists. If the
thermocouple inputs are read as mV signals (which are processsed very quickly) and
the CJC is read as a resistance (which is lots faster than temperature), the net will
process many times faster. The mV readings from the Thermocouple icon and the
resistance reading from the CJC icon are then merged in a Post-Processing Net and
the results (in degrees) are put into a destination *.HLD file for plotting.
The following Program Net represents an application of this method of high speed
thermocouple temperature data collection. Temperature rise data on components
within an automobile brake is desired. Thermocouples are installed and connected
to OM-320 input channels configured as mV inputs. The TSA CJC input is sent to
memory in units of OHMS.
A unique triggering scheme is implemented with the Event icon and three Sample
Rate Clocks. One Sample Rate Clock causes the Event icon to sample the status of
a switch connected to the brake pedal every 10mS. When the switch is open (ie
brakes NOT activated) the CJC icon is enabled and the Sample Rate Clock sends a
reading to memory every second. Additionally,. the 50mS Sample Rate Clock is
sampling at its primary rate which is set to 1 second.
When the brake pedal is depressed, the CJC icon is disabled and the 50mS Sample
Rate Clock driving the three Voltage icons (thermocouple inputs) switches to its
Alternate rate, storing readings to memory every 50mS.
After the data has been collected and downloaded to the PC, a Post-Processing Net
is constructed as shown in the following diagram.
11-110
USING T HE OM-320
11.. . APPENDIX B: EXAMPLE PROGRAM NETS
This Post-Processing Net combines the voltage data from the thermocouple input
channels and the CJC readings (in ohms) to calculate the actual temperature of each
of the three thermocouple channels and store the data in a new destination file
called BRAKETST.HLD. This special calculation is done using the function
TC_J(X,Y) in each of the three Math icons.
USING THE OM-320
11-111
11.. . APPENDIX B: EXAMPLE PROGRAM NETS
NOTES:
11-112
USING T HE OM-320
11.. . APPENDIX C: HYPERWARE FILE LISTING
APPENDIX C: HYPERWARE FILE LISTING
During the installation of the HyperWare package, the following files and directories
are created on the PC hard disk. The file listing uses the default sub-directory
names offered during the installation process. If different names were chosen by the
User during installation, the files will be installed in those respective directories.
To uninstall the HyperWare software, locate and delete all of the listed files from the
hard drive. Note that no modifications are done to the Windows system or
configuration files during the installation process.
HyperWare installation generated files:
Path and File
\HYPERWAR\HYPERLOG.EXE
\HYPERWAR\WAVE.EXE
Description
Main HyperWare program
HyperPlot graphing program
\HYPERWAR\BC402RTL.DLL
\HYPERWAR\BIDS402.DLL
\HYPERWAR\OWL202.DLL
\HYPERWAR\DBWIN.DLL
\HYPERWAR\DIBAPI.DLL
\HYPERWAR\CLIB.DLL
program library
program library
program library
program library
program library
program library
\HYPERWAR\HYPERWAR.HLP
\HYPERWAR\NOTES.TXT
\HYPERWAR\DATAx.HLD
\HYPERWAR\DEMO_X.NET
Help file
TSA I/O Listing comments
Example download files
Example Program Net files
\HYPERWAR\TEST.PST
\HYPERWAR\TEST.PRB
\HYPERWAR\TEST.NET
\HYPERWAR\TEST.HLD
\HYPERWAR\README.TXT
Example Post-Processing Net
Example HyperTrack Net
Example OM-320 Program Net
Example OM-320 Download file
Late breaking notes and comments
\WINDOWS\MATH.LIB
\WINDOWS\HYPERLOG.INI
Math function library
Program configuration file
NOTE: During the HyperWare installation process, a file called BWCC.DLL is
installed into the Windows directory (if it does not already exist in that directory).
This file is common to many different software applications and should not be
removed as it may be required by these other applications.
USING THE OM-320
11-113
11.. . APPENDIX C: HYPERWARE FILE LISTING
NOTES:
11-114
USING T HE OM-320
11.. . APPENDIX D: CHANGING THE CLOCK/MEMORY BACKUP BATTERY
APPENDIX D: CHANGING THE CLOCK / MEMORY
BACKUP BATTERY
The OM-320 internal memory and real-time clock are powered from a Panasonic
BR2325 (or equivalent) lithium cell when the OM-320 Main Power switch is OFF.
The cell is mounted in a socket located on the main microprocessor circuit board
which is located directly under the OM-320 front panel.
To change the lithium cell:
1. Download any valuable data retained in OM-320 memory.
2. Turn off the OM-320 power
3. Remove the retaining screw holding the TSA in place, then
unplug the TSA.
4. Remove the 7 black machine screws located on the OM-320
front panel. These screws hold the OM-320 circuit board
assembly to the front panel.
5. Remove the two thumbscrews at the top of the OM-320
enclosure and carefully swing the OM-320 front panel open.
6. The lithium cell is located in the socket at the lower right corner
of the exposed circuit board.
7. Gently pry the cell to be replaced out of its holder with a small,
blunt, non-metallic tool being careful not to puncture the cell or
USING THE OM-320
11-115
11.. . APPENDIX D: CHANGING THE CLOCK / MEMORY BACKUP BATTERY
8.
9.
10.
11.
damage any surrounding circuitry. Insulated tweezers may
assist in pulling the cell out of the holder. Use care during this
step so that the spring loaded contact is not bent up excessively.
Slide a new cell (Panasonic BR2323 or equivalent) into the
holder with the positive terminal UP. A properly installed cell
will seat approximately flush with the top of the socket.
Slowly swing the OM-320 front panel back in place over the
circuit board assembly while aligning and guiding the switches,
buttons, and RS-232 jack through the front panel holes.
Install the 7 black screws and tighten slowly while insuring that
all of the switches, buttons and other components project
through their respective openings.
Reinstall the TSA and power up the OM-320. Clear the unit
memory and upon loading of a new Program Net, the unit is
ready to deploy.
CAUTION
Use care in handling lithium cells. Currently
manufactured cells such as the BR2325 are very
stable and safe parts, however, DO NOT TEMPT
FATE! Do not puncture, short, or dispose of in fire
as explosions could occur.
11-116
USING T HE OM-320
11.. . APPENDIX E: CHANGING THE OM-320 EPROM
NOTES:
11-118
USING T HE OM-320
11.. . APPENDIX E: CHANGING THE OM-320 EPROM
APPENDIX E: CHANGING THE OM-320 EPROM
The EPROM (Eraseable /Programmable Read Only Memory) contains the software
code which controls the function of the OM-320. Updates to add features and/or
improve performance are sometimes performed on the OM-320 by changing the
EPROM to a later version. If desired, contact Omega Engineering, Inc
Service/Repair Dept. about performing the upgrade.When a replacement EPROM is
received, use the following procedure to remove and replace the EPROMs.
CAUTION
The EPROM chip is especially sensitive to damage
from static discharge. Discharge body static before
working with the OM-320 and EPROM by touching a
grounded surface. Call with any questions!
To change the EPROM chip:
1. Download any valuable data retained in OM-320 memory.
2. Turn off the OM-320 power
3. Remove the retaining screw holding the TSA in place, then
unplug the TSA.
4. Remove the 7 black machine screws located on the OM-320
front panel. These screws hold the OM-320 circuit board
assembly to the front panel.
USING THE OM-320
11-119
11.. . APPENDIX E: CHANGING THE OM-320 EPROM
5. Remove the two thumbscrews at the top of the OM-320
enclosure and carefully swing the OM-320 front panel open.
6. The EPROM is located in a socket near the center of the
exposed circuit board.
7. Gently pry the EPROM to be replaced out of its socket with a
small screwdriver or other instrument. Pry at one end then the
other until the EPROM is free from its socket. Be careful so that
surrounding circuitry is not damaged.
8. Align the new EPROM in its socket with the small notch located
to the left while making sure that each of the EPROM’s legs are
aligned with the mating holes in the socket.
9. Press slowly to seat the EPROM in its socket. Visually examine
the installation to insure that all of the EPROM legs are inserted
in their holes.
10. Slowly swing the OM-320 front panel back in place over the
circuit board assembly while aligning and guiding the switches,
buttons, and RS-232 jack through the front panel holes.
11. Install the 7 black screws and tighten slowly while insuring that
all of the switches, buttons and other components project
through their respective openings.
12. Reinstall the TSA and power up the logger. The LCD should
display some verbage (which indicates that the EPROM is
correctly installed). Perform a 3-button initialization at this
time with the following procedure:
A. Depress and hold the NEXT button down on the front
panel.
B. Momentarily, depress the STOP and RESET buttons.
C. After a second or so, release the NEXT button.
This sequence will result in a complete initialization of the unit.
After a short sequence of display messages on the LCD, a
SYSTEM INITIALIZED message should display momentarily
indicating that the logger was properly initialized. If this
message does not display, repeat the procedure.
13. After initialization, reprogram the logger with a new Net
Program and the unit is ready to deploy
.
11-120
USING T HE OM-320
11.. . APPENDIX E: CHANGING THE OM-320 EPROM
NOTES:
USING THE OM-320
11-121
11.. . APPENDIX F: FILTERING OPTIONS
APPENDIX F: FILTERING OPTIONS
Many of the Interface Modules can be configured with filtering options for reducing
the noise picked up on sensor or input signal wiring. A short discussion of two of the
filtering methods that are available to the User through icon configuration dialog
boxes follow:
ADC Input Filtering
Three levels of first order noise filtering (None, Low, Medium, High) can be enabled
during many of the analog input icon configuration dialog boxes. First order filtering
reduces High frequency noise that may be picked up by sensor wiring. However,
filtering slows down the rate at which a channel can be sampled as it adds additional
settling time to the total time required for a reading.
Additional settling time required for each of the three levels is specified in the table
below.
If speed of execution of the Program Net is not of concern, utilize the High level of
filtering for best noise rejection.
Filter Level
Additional Settling Time
None
0
Low
3 ms
Med
4.5 mS
High
12 mS
50Hz / 60Hz Sofware Filtering
Noise radiated from utility power lines (including house and building wiring,
appliances and extension cords) and picked up by sensors and associated wiring is
one of the most common sources of data acquisition error.
The OM-320 has additional software based filtering capability designed to remove 50
Hz or 60Hz power line sourced noise from incoming signals. This filtering capability
is especially helpful in applications with sensors and/or wiring which is in close
proximity to utility wiring.
USING THE OM-320
11-123
11.. . APPENDIX G: HYPERNET T HEORY OF OPERATION
The above plot demonstrates the performance of the 50Hz software filtering. The
plot is from actual data collected by a OM-320 during the development and testing of
the software filtering feature. A 5Vp-p AC swept frequency was super-imposed on a
2.5VDC and input into a OM-320 equpped with an HLIM-1 The input channel was
configured with the 50 Hz filtering enabled. As can be seen from the plot, at 50 Hz,
the amplitude of the noise is radically reduced.
As with all filtering, a compromise is involved. Line Rejection filtering adds
approximately 8.5 mS for 60 Hz rejection (10mS for 50Hz) to the measurement and
processing time required for a reading.
If the desired sampling rate allows, enable Line Reject filtering by selecting 50 or 60
Hz depending on the power line frequency used in the installation locale. In the
USA, 60 Hz should be selected.
11-124
USING T HE OM-320
11.. . APPENDIX G: HYPERNET T HEORY OF OPERATION
APPENDIX G: HYPERNET THEORY OF OPERATION
A Program Net is a graphical representation of a sequence of commands. In the
process of transferring the Program Net to the OM-320, the Program Net is
converted over to a sequence of commands. When Enabled, the OM-320
microprocessor follows this sequence of commands to perform the desired functions.
During execution, the microprocessor steps through each of the commands,
completing the command if possible, then moving on to the next command. This
stepping through of commands can be visualized fairly accurately as propogating
through connections between icons in a Program Net.
In execution of a Program Net by the OM-320 microprocessor, an order of
operations is followed. The Program Net executes in approximately this order:
1. When a Sample Rate Clocks internal counter counts up to the
User specified sampling period (ie the Update pulse set within
the icon configuration dialog) the Sample Rate Clocks send out
their Update command to any connected icons.
2. Icons connected to the Sample Rate Clock(s) then update their
Outputs (eg taking a thermocouple temperature reading and
presenting the value on the Output)
3. Icons connected to these Outputs then receive the new signal
and process the signal and present it on their Ouput. This
processing then progresses through the remaining icons in the
Program Net from left to right.
4. When the processing has progressed completely through the
Program Net the OM-320 then waits (if any time remains),
waiting for the next Sample Rate Clock to generate an Update
command. If the Program Net specifies Seconds resolution
mode (Global Icon), the OM-320 goes into a low power sleep
mode to extend battery life.
5. When the Sample Rate Clock generates the Update command,
processing begins sequencing through the Program Net again.
During the execution of the Program Net, some parts of the Net may be skipped for
a number of reasons. Execution will then jump to the next part of the Net and
continue sequencing. Reasons that this might occur include:
♦
The sequence may run into an icon that is not Enabled.
♦
An icon may be encountered that has two inputs, where only one
input was recently processed, and the User has specified that
the Output is to be updated only upon Update of both inputs.
This explains why Program Nets will execute at different speeds if they contain
conditional statements. For example, a Program Net may be developed that
monitors a contact closure input (which can be done 100’s of times per second).
When the contact closes, 10 more channels may be enabled, storing data to
memory. The Program Net will slow accordingly. Also, different branches of a
Program Net may execute at different times if they are driven by Sample Rate
Clocks that have asynchronous (ie not synchronized) Update pulse rates specified by
the User.
USING THE OM-320
11-125
11.. . APPENDIX G: HYPERNET T HEORY OF OPERATION
NOTES:
11-126
USING T HE OM-320
11.. . APPENDIX H: ACCESSORIES
APPENDIX H: ACCESSORIES
Accessory items for the OM-320 portable data logging system include:
♦
Interface Modules - the OM-320 family of products is
continuing to expand with powerful plug-moodules and
accessories
♦
OM-420 - an integrated data logging system that
includes an RPS-1 rechargeable power supply and the
OM-320 all ruggedly packaged in a NEMA 4X rated
enclosure. With this system, higher current sensor
excitation (eg 4-20mA transmitters) is simply configured.
Under control of the OM-320 Program Net, the power to
various sensor loops can be cycled for optimization of
battery life.
The internal batteries can be recharged from
photovoltaics or other low-voltage AC or DC source.
♦
Photovoltaic Power Generation Systems - for long
term unattended data logging
♦
RPS-1 Rechargeable Power Supply - for higher
current sensor excitation or output drive (alarm)
applications
♦
OEM Systems - contact Omega Engineering about low
cost “no frills” systems for integration into your
manufactured equipment
Contact Omega Engineering Inc for additional information and pricing on
these accessories.
USING THE OM-320
11-127
11.. . APPENDIX I: RS-232 CABLE, PORT AND ADAPTER
NOTES:
11-128
USING T HE OM-320
11.. . APPENDIX I: RS-232 CABLE, PORT AND ADAPTER
APPENDIX I:RS-232 CABLE, PORT AND ADAPTER
PIN
Description
1
+5VDC (current limited source from OM-320)
2
Ground
3
Transmit (OM-320 output)
4
Receive (OM-320 input)
5
Not Used
6
DTR ( OM-320 input; computer asserts HI to wake
up the OM-320 serial port)
USING THE OM-320
11-129
11.. . APPENDIX I: RS-232 CABLE, PORT AND ADAPTER
NOTES:
11-130
USING T HE OM-320
11.. . APPENDIX J: TROUBLESHOOTING T IPS
APPENDIX J: TROUBLESHOOTING TIPS
Refer to any README.TXT files that may be provided in the HyperWare software
directory after installation for additional comments and troubleshooting tips.
TROUBLESHOOTING PROGRAM NETS:
Probe Point Diagnostics:
If operation of a Program Net is not what was expected, the judicial
insertion of Probe Point icons can be a valuable troubleshooting method.
This insertion of Probe Point icons at various points throughout the net
allows for the real-time display of the values and/or states of various nodes
in the net.
To implement this method of troubleshooting, drag additional Probe Point
icons onto the screen and connect them to various outputs in the net.
Transfer the net to the OM-320 and Enable the unit. Via the front panel
LCD or through HyperTrack, the status of each of the Probe Point icons can
be observed. These values will commonly lead you to the crux of the
problem.
Incompatible Net Warning dialog:
This message normally displays during an attempted download and enable
of a Program Net that does not match the current OM-320 configuration.
For example if a Program Net uses channels on an Interface Module that is
not currently installed in the OM-320, or if configuration switches on a
module are not set correctly, the OM-320 will catch this incompatibility.
In OM-320s running at higher speeds, this message may display if a
Program Net upload is attempted while the OM-320 is Enabled. If this
occurs, stop the OM-320 and retry the upload.
Bad Program Net warning dialog:
If the OM-320 currently does not have a valid Program Net in memory, this
message will display upon enabling.
Correct by uploading a new Program Net.
SYSTEM ERRORS:
No Display on the OM-320 LCD:
Upon power-up of the OM-320, numerous internal checks are performed.
In the event that the LCD never displays the standard “OM-320” message,
a number of problems could exist.
The main batteries may be discharged: a volt meter can be used to
check the voltage across the batteries (remove cover and probe where the
wires are soldered to the battery holders.) If no critical loads are connected
to the Output Relay(s), a load can be put onto the batteries by holding one
of the Relay switches in the TEST position while observing the voltage.
New batteries will read approximately 9 VDC and batteries below apx 7
volts are essentially dead.
OR... apply an external supply to the EXT power terminals on the TSA.
The OM-320 may have a corrupted Program Net: A special total system
initialization can be performed by simultaneously holding the front panel
NEXT and STOP buttons down while momentarily tapping the RESET
USING THE OM-320
11-131
11.. . APPENDIX J: TROUBLESHOOTING T IPS
button. After initialization, the LCD will display System Initialized.
any front panel button to enter into normal mode.
Press
NOTE: This 3 button reset will erase all internal data as well as the
currently loaded Program Net. Use with caution.
SERIAL COMMUNICATION PROBLEMS:
Cannot establish an RS-232 link:
Insure that only Omega Engineering OM-320 adapters and cables are
used. Also, insure that no gender or pinout adapters (eg 9 pin to 25 pin)
are used. Pinout is critical and must be correct for communication to
work. Pinout details are provided in Appendix I.
Check the Port number and that the port is actually working with another
serial package and device (eg a modem).
Refer to addtional considerations in the HyperComm Serial
Communications chapter.
Modem Communication Problems:
Refer to Appendix K for modem configuration details.
Refer to the HyperComm Serial Communications chapter.
HYPERPLOT :
No Data Displays upon loading of File:
Data may actually be loaded but compressed. Select the
Calculations\Zoom All menu choice to view.
ANALOG READINGS:
Incorrect readings on HLIM-1 Channels:
Ensure that the fuse for the particular channel is not blown.
11-132
USING T HE OM-320
11.. . APPENDIX K: MODEM CONFIGURATION
APPENDIX K: MODEM CONFIGURATION
SUPPLEMENT
As modem initialization is never as easy as it should be, this appendix was written
to provide additional assistance in the configuration of modems for communication
between the PC (equipped with the LOCAL modem) and the OM-320 (equipped with
the REMOTE modem). Four different configurations with 2400 baud and 14.4
Kbaud modems are provided for general reference (also see modem material
covered in Chapter 5).
Obviously, other combinations will exist, however, it is hoped that some
understanding of the setups can be gleaned from the following examples and
explanations to make life easier. Intelligent experimentation is commonly the best
method for modem configuration... however, after experimentation, if a reliable
connection can’t be implemented, please call our technical support group for
additional assistance.
Modem commands beyond the basics are not standardized and have evolved over
the years as different manufacturers have implemented more advanced features.
Hence, standard commands can’t be supplied for the plethora of modems available
on the market today. The following short list of commands is fairly consistent
between modems:
AT
&F0
&F1
E0
Q0
V1
Attention command
Use factory defaults settings 0 (common usage)
Use factory defaults settings 1 (also common)
Turn off local Echo of commands
Enable Result Codes
Use Verbal Result Codes
Local 2400 to Remote 2400 (MDM-2400 Modem Option)
Within the HyperWare Modem Communication Dialog Box, set:
Baud Rate: 2400
Initialization String: AT&F0E0Q0V1 or AT&F1E0Q0V1.
This sets the local modem to its factory defaults (F0 or F1) and then
turns Echo Off and enables Verbal Result Codes. (No error
correction or compression is used in 2400 Baud modems so no
additional settings are required to configure those features in the
Initialization String box).
Local 2400 to Remote 14.4 (MDM-14.4 Modem Option)
Within the HyperWare Modem Communication Dialog Box, set:
Baud Rate: 2400
Initialization String: AT&F0E0Q0V1 or AT&F1E0Q0V1.
This sets the local modem to its factory defaults (F0 or F1) and then
turns Echo Off and enables Verbal Result Codes (usually two
commands, one to Enable Result Codes and one to select Verbal
rather than numeric). (No error correction or compression is used in
USING THE OM-320
11-133
11.. . APPENDIX K: MODEM CONFIGURATION
2400 Baud modems so no additional settings are required to
configure those features in the Initialization String box).
Local 14.4 to Remote 2400
Within the HyperWare Modem Communication Dialog Box, set:
Baud Rate: 2400
Initialization String: Set to disable Error Correction, disable Data
Compression, Echo Off and enable Verbal Result Codes (usually
two commands, one to Enable Result Codes and one to select
Verbal rather than numeric). The commands to disable the
Correction and Compression functions will vary with manufacturer,
so a bit of research may be required in the Modem Manual supplied
with the local 14.4 modem.
Examples of functional strings for two different modems follow:
US Robotics 14.4:
Pract Periphs 14.4:
AT&F1E0X4&M0
AT&F1Q0E0V1&M0
Local 14.4 to Remote 14.4 (MDM-14.4 Modem Option)
Within the HyperWare Modem Communication Dialog Box, set:
Baud Rate: 19,200
Initialization String: Set the local modem to its factory defaults
(F0 or F1) and then turn Echo Off and enable Verbal Result Codes
(usually two commands, one to Enable Result Codes and one to
select Verbal rather than numeric). Error correction can be enabled
and will automatically be negotiated between the modems upon
connection. Data Compression may be enabled on the local
modem, but it will be ignored by the remote modem.
Examples of functional strings for two different modems follow:
US Robotics 14.4:
Pract Periphs 14.4:
11-134
AT&F1E0X4
AT&F1Q0E0V1
USING T HE OM-320