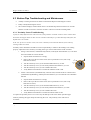
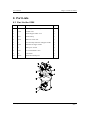
1
Hopper Loaders
Filters for Central Vacuum Systems
Filters for Raw Material Conveyors
User Manual
MANUAL NUMBER: VC-S230-0102
P.O.B. 1122
Afula Illit 18550, Israel
Phone: +972-4-6069700, Fax: +972-4-6405911
[email protected]
www.sysmetric-ltd.com
July, 2009
Hopper Loaders & Filters
1.
INTRODUCTION .................................................................................................................................4
1.1
1.2
2.
FEATURES: ...........................................................................................................................................4
ABOUT THIS MANUAL ..........................................................................................................................5
SAFETY INSTRUCTIONS ..................................................................................................................5
2.1
2.2
3.
User Manual
LOADERS ..............................................................................................................................................5
AUTOMATIC FILTER ..............................................................................................................................5
HOPPER LOADERS ............................................................................................................................6
3.1
PRINCIPLE OF OPERATION .....................................................................................................................6
3.2
LOADER PARTS.....................................................................................................................................7
3.2.1
The “Loader Full” Proximity Switch ..........................................................................................7
3.2.2
Pneumatic Valve ..........................................................................................................................7
3.2.3
Bottom Flap .................................................................................................................................7
3.2.4
Vacuum Cut Off Valve .................................................................................................................8
3.3
ADDITIONS FOR GRANULATED MATERIAL LOADERS ............................................................................8
3.3.1
Automatic Cleaning Mechanism..................................................................................................8
3.4
POWDER LOADERS ...............................................................................................................................9
3.4.1
Powder Filters .............................................................................................................................9
3.4.2
Automatic Powder Filter Cleaning............................................................................................10
3.5
PNEUMATIC DRAWINGS OF HOPPER LOADERS....................................................................................11
3.5.1
Granulated Material Loader .....................................................................................................11
3.5.2
Granulated Material Loader with Automatic Cleaning Mechanism .........................................11
3.5.3
Powder Loader with Five Cleaning Blowbacks and Five Filters ..............................................11
4.
CENTRAL VACUUM SYSTEMS FILTERS ...................................................................................12
4.1
AUTOMATIC FILTERS ..........................................................................................................................12
4.1.1
Principle of Operation of Automatic filters ...............................................................................12
4.2
STATIC FILTER ....................................................................................................................................13
5.
RAW MATERIAL CONVEYING SYSTEMS .................................................................................14
5.1
5.2
6.
THE PUMP POWER SUPPLY .................................................................................................................15
PRINCIPLES OF CONVEYING PIPELINES................................................................................................15
TROUBLESHOOTING ......................................................................................................................16
6.1
LOADER TROUBLESHOOTING ..............................................................................................................16
6.1.1
Load Cycle Doesn’t Start...........................................................................................................16
6.1.2
Load Cycle Doesn’t Stop According to “Full” Prox. Switch ....................................................16
6.1.3
Load Cycle Doesn’t Stop ...........................................................................................................16
6.1.4
Loading is Weak ........................................................................................................................16
6.2
FILTER TROUBLESHOOTING ................................................................................................................17
6.2.1
Loading on Vacuum Line...........................................................................................................17
6.2.2
Automatic Filter Not Cleaning Correctly ..................................................................................17
6.3
BOTTOM FLAP TROUBLESHOOTING AND MAINTENANCE ....................................................................18
6.3.1
Proximity Sensor Troubleshooting ............................................................................................18
7.
PREVENTIVE MAINTENANCE......................................................................................................19
7.1
LOADER MAINTENANCE ......................................................................................................................19
7.1.1
Granule Loader Maintenance....................................................................................................19
-2-
www.sysmetric-ltd.com
User Manual
Hopper Loaders & Filters
7.1.2
Powder Loader Maintenance ....................................................................................................19
7.2
FILTER MAINTENANCE .......................................................................................................................20
7.2.1
Automatic Filter Maintenance ...................................................................................................20
7.2.2
Static Filter Maintenance ..........................................................................................................20
8.
8.1
8.2
8.3
8.4
8.5
8.6
8.7
8.8
9.
PART LISTS ........................................................................................................................................21
PART LIST FOR S380...........................................................................................................................21
PART LIST FOR S300...........................................................................................................................22
PART LIST FOR S230...........................................................................................................................23
PART LIST FOR AUTOMATIC FILTER ....................................................................................................24
PART LIST FOR STATIC FILTER ............................................................................................................25
VACUUM VALVE ................................................................................................................................26
VACUUM CUTOFF VALVE ...................................................................................................................27
BLOW-BACK KIT ................................................................................................................................28
ELECTRICAL DIAGRAM OF 6 PIN REINFORCED PLUG .......................................................29
www.sysmetric-ltd.com
-3-
Hopper Loaders & Filters
User Manual
1. Introduction
The Sysmetric S-series hopper loaders are intended for use in central vacuum conveying applications.
Standard models include both models for pellets and models for powders. The S-series loaders receive their
vacuum from a central vacuum system and are equipped with a pneumatic vacuum valve to control air flow.
All of the models are designed to work with standard vacuum pumps used in industry. The hopper loaders
designed to work with pellets can be equipped with automatic filter cleaning. A vacuum cut off valve aids
easy loader emptying.
S-Series Main Models
1.1 Features:
•
Loader body made of 304 polished stainless steel.
•
Easily removable clamp for easy loader opening for cleaning.
•
Automatic cleaning (standard in powder loaders, optional in granule loaders)
•
Capacitive proximity switch determines when the loader is full.
•
Loading is initiated by a magnetic Reed switch, which senses the bottom flap.
•
Non-return flap at the material inlet facilitates conveying from shared material lines.
-4-
www.sysmetric-ltd.com
User Manual
Hopper Loaders & Filters
•
Standard 6 pin plug connects the loader to the control system.
•
Grid filter for pellet loaders.
•
Cloth filters for powder loaders.
•
Vacuum cut off valve.
•
Optional automatic cleaning for pellet loaders operated by vacuum valve timing, without
the need for dedicated control.
•
Complies with the CE safety standard, EMC, low voltage.
1.2 About This Manual
A central vacuum conveying system contains at least three major components:
1.
Vacuum pump (or pumps) and central filter.
2.
Hopper loaders (also called vacuum receivers).
3.
Control system.
Any description of the workings of the loader depends on the control system. Therefore the sections about
the loading cycle, about the On/Off switch and about troubleshooting assume that a Sysmetric control
systems is being used, or a system that implements similar logic.
2. Safety Instructions
2.1 Loaders
•
Secure the loader to the hopper below.
•
Do not use a damaged pneumatic system.
•
Do not use the loader if the blow-back tank is damaged.
•
Use clean, dry air with pressure of 6-8 bars (85-115psi).
•
Properly connect the loader to the control unit. The proximity switch is a standard 30 mm,
24VDC, NPN type.
2.2 Automatic Filter
•
Secure and fasten the filter base.
•
Install the vacuum pump as close as possible to the automatic filter.
•
Secure the vacuum pump.
•
Use clean, dry air with pressure of 6-8 bars (85-115psi).
www.sysmetric-ltd.com
-5-
Hopper Loaders & Filters
User Manual
3. Hopper Loaders
3.1 Principle of Operation
.
The loading cycle starts when the raw
material level in the hopper chamber
(10) drops below the bottom flap (1)
which returns to its level state. The
magnet attached to the bottom flap
activates the Reed switch. The Reed
switch relays to the controller that the
loader is empty and is awaiting
refilling. The controller places the
loader into the “filling queue”. When
the loader is at the top of the queue the
controller sends an electric pulse to the
pneumatic valve (2) to open the
vacuum cut off valve (3) and create a
vacuum in the loader chamber.
Loading is carried out after the
pneumatic valve (2) moves the vacuum
cut off valve (3) to the loading
position. The vacuum in the pipe (7)
causes a vacuum in the loader chamber
which causes the bottom flap (1) to
close. The one-way valve (4) opens
and raw material is sucked into the
loader via the material feed pipe (5).
Note: In loaders equipped with
automatic cleaning, the automatic filter
cleaning process is carried out with
each opening of the vacuum cut off
valve.
3
3
7
Emptying is carried out when the
level of the raw material is higher than
the “loader full” proximity sensor (6).
The proximity sensor tells the
controller that the loader is full. The
controller closes the vacuum cut off
valve (3) (emptying position). The
vacuum pipe (7) is sealed, the air vents
(8) open and air is sucked into the
loader chamber. The weight of the raw
material opens the bottom flap (1) and
the raw material flows out.
Note: It is possible to operate the
system by predetermined fixed cycle
times. In this case the operation of the
loader is independent of the proximity
switch and the level of the material is
in accordance with the planned loading
time.
8
3
7
4
5
5
R1
B
R2
A
R1
B
R2
P
P
2
9
A
R1
KI501
A
KI501
2
2
6
P
B
10
1
R2
1
1
-6-
www.sysmetric-ltd.com
User Manual
Hopper Loaders & Filters
3.2 Loader Parts
3.2.1 The “Loader Full” Proximity Switch
Each hopper loader is fitted with a “Loader Full” proximity switch whose role is to stop loading when it is
covered by raw material thus indicating that the loader is full. The sensor has a small LED indicator on the
rear which indicates when the sensor senses material. The sensor sensitivity can be tuned by turning the
screw on the rear.
A faulty or badly adjusted sensor will cause the system problems.
An under-sensitive sensor will not detect material in the hopper loader. In this case the controller will load
for a pre-determined period of time; the default time is 30 seconds.
In the case of an over-sensitive sensor, the sensor constantly senses material and the system will stop
working within 10 seconds.
For details on adjusting the sensor sensitivity see chapter 6.3.1.
3.2.2 Pneumatic Valve
The vacuum and conveying system uses 5X2 1/8
24VDC air valves. When the valve is disconnected
(figure 1) air pressure enters via the inlet P and exits via
the outlet A.
3
2
A
1
R1
R1
A
B
B
A
P
B
R2
When the solenoid is operated (figure 2) the air pressure
enters via the inlet P and exits via the outlet B. R1 and
R2 are air vents for pressure release.
P
R2
M
To manually operate the valve press the screw M (figure
3), upon releasing the screw the valve will return to the
disconnected state, for continued manual operation turn the screw M half a turn via a small screw driver.
An indicator LED on the cable cap lights up when the valve is open (figure 2).
Possible faults: The loader is at “loading” state, the valve is not operating, the LED is turned off, air
pressure is normal and the system works manually – check for possible electrical faults.
3.2.3 Bottom Flap
The bottom flap has two roles: closing the hopper chamber thus allowing vacuum build up during loading,
informing the controller that there is no raw material
in the hopper.
The bottom flap regulates material flow from the
loader. A magnet on the flap and a magnetic Reed
switch (4) provide the “demand service” signal to the
control unit. The flap has three positions: open, level
and closed.
When the loader is not working and is full with
material, the material keeps the flap in the open
position (1). When the flap is in the open position, the
magnetic switch is open. When the loader becomes
empty, and the flap is free to move, it moves into the
level position (2). In the level position, the magnet is
near the magnetic switch and the switch is closed.
This signals to the control unit that the loader requires
www.sysmetric-ltd.com
4
3
1
15-20 mm
2
-7-
Hopper Loaders & Filters
User Manual
service. When the loader is working, the vacuum pulls the flap to the closed position (3), in which it seals
the material exit, so that air will flow only from the material inlet pipe. At this position, the magnetic switch
is also closed. Since the loader is working, the control unit ignores the status of the switch, but the switch is
designed to be closed for compatibility with 3rd party control units.
Possible faults:
1.
2.
3.
A faulty seal or lack of seal leads to air entering via the door causing a weak vacuum.
Faulty or incorrectly adjusted magnetic sensor.
Loading alarm appears on the controller when a) the bottom flap remains closed for 2 seconds after
the vacuum cut off valve closes, b) after 4 consecutive loading alarms.
3.2.4 Vacuum Cut Off Valve
A vacuum cut off valve is installed on all hopper loaders intended for use with pellets. The role of the valve
is to make the raw material drop out of the loader chamber faster after filling by stopping the vacuum and
by the rapid intake of air into the chamber.
The vacuum cut off valve works as follows: when the valve is closed (idle state), the piston (6) is open and
the fore seal (2) prevents the vacuum from passing into the loader chamber while the air vents (5) allow
external air to enter the chamber. During loading the piston (6) closes and opens the valve to the vacuum (1)
and the rear seal (4) seals the air vents (5). The role of the supporting disk (3) is to stiffen the seals. At the
end of the loading cycle the piston moves forward and the front seal (2) again closes the vacuum and the
seal (4) opens the air vents (5) thus allowing air at atmospheric pressure to quickly enter and fill the
chamber.
3.3 Additions for Granulated Material Loaders
3.3.1 Automatic Cleaning Mechanism
The automatic cleaning mechanism is an optional addition for hopper loaders working with granulated
materials. The mechanism operates automatically on each opening of the vacuum valve (3).
Principle of operation – when the loader is idle and the vacuum valve is closed the pressure in the chamber
(1) rises. During the cleaning process the air is blown through the valve (2) via an air filter.
-8-
www.sysmetric-ltd.com
User Manual
Hopper Loaders & Filters
It is possible to define whether cleaning takes place at the beginning or the end of the loading cycle by
connecting the air supply pipe between the piston and the chamber (4) via the front (5) or rear (6)
connection.
4
1
2
3
6
5
3.4 Powder Loaders
Loaders for powders work basically in the same way as loaders for granulated materials. The difference
between them is the air filtering and the filter cleaning mechanism. All of the loaders designed to work with
powders are fitted with cloth rather than grid filters. Loaders for powders are equipped with two pneumatic
valves, a vacuum valve and a dedicated valve for automatic cleaning.
3.4.1 Powder Filters
There are two types of powder filters:
1.
Single body filter for filtering particles no smaller than 0.1 mm (ground polyethylene).
2.
5 body filter for filtering particles no smaller than 5 microns (PVC powders).
www.sysmetric-ltd.com
-9-
Hopper Loaders & Filters
User Manual
3.4.2 Automatic Powder Filter Cleaning
The automatic cleaning mechanism operates every time the vacuum valve (6) closes and the material drops
into the chamber. The cleaning is carried out while the material drops, by dedicated valves (10) which
separately pressurize each of the blowback chambers (8). During cleaning the chambers blow the air out
through a valve (7) into the filters (9) and clean them from dust. An overflow pipe (11) releases excess
pressure.
The cleaning process can be carried out several times in succession. There must be at least a 5 seconds
interval between each cleaning in order for the blowback chambers to recharge.
6
6
7
8
9
10
11
- 10
-
www.sysmetric-ltd.com
User Manual
Hopper Loaders & Filters
3.5 Pneumatic Drawings of Hopper Loaders
3.5.1 Granulated Material Loader
A
R1
P
B
R2
3.5.2 Granulated Material Loader with Automatic Cleaning Mechanism
3.5.3 Powder Loader with Five Cleaning Blowbacks and Five Filters
www.sysmetric-ltd.com
- 11 -
Hopper Loaders & Filters
User Manual
4. Central Vacuum Systems Filters
The filter is designed to protect the vacuum pump from penetration of dust and particles that pass through
the granulated material filters. The powder filters are situated on the inlet pipe leading to the vacuum pump.
There are two types of filters: automatic filters whereby cleaning takes place without the need for
dismantling and static filters whereby which have to be dismantled for cleaning.
4.1 Automatic Filters
The structure of the automatic filters allows cleaning the filter element without dismantling it. The cleaning
takes place by the building up vacuum in the chamber and its rapid discharge. A cloth filter situated at the
bottom of the chamber collects the dust. The filtering system has three dedicated pneumatic valves for
automatically cleaning the filter.
It is important to install the filter in the immediate proximity of the vacuum pump and to ensure that the
connecting vacuum pipe between the vacuum pump and the filter is as short as possible. It is also important
that the filter is situated in a position that provides easy cleaning and maintenance.
4.1.1 Principle of Operation of Automatic filters
Working State – air is sucked into the vacuum pump
via the vacuum cut off valve (1) and via the filter (11),
the vacuum created in the chamber closes the bottom
flap (9) and the loader starts working via the vacuum
line (14).
Cleaning – starts after every 30 minutes of operation,
the vacuum cut off valve (1) closes and at the same
time the air valve (3) pulses open and closed every
second. This causes a sudden flow of air from the air
valve through the filter center (11) thus shaking the
filter element and accumulated dust drops out through
the lower door (9) into the collecting bag (10).
Waiting State occurs when the system waits for a
vacuum signal. In this state the motor works
economically without any load. Valves 3 and 5 are
open enabling the air stream to cool the pump down.
Resting State – the motor is turned off, the vacuum
cut off valve is closed, the lower door is open and dust
freely falls into the bag.
Backup System allows one pump to serve additional
hopper loaders on a separate vacuum line. The backup
occurs under the following conditions: a. the pump
switch is turned off b. residual current device has
tripped c. one pump is turned off and the other
vacuum lines are not over loaded. During backup the
valve (2) commands the vacuum cut off valve (1) to
close, valve (8) operates the backup valve (7). In this state the loading is carried out directly between the
backup line (15) and the vacuum line (14).
- 12
-
www.sysmetric-ltd.com
User Manual
System
State
Working
Cleaning
Waiting
Resting
Hopper Loaders & Filters
Vacuum Line Blocked
Valve (1)
Valve (2)
Open
Not
Operating
Closed
Operating
Open
Not
Operating
Closed
Operating
Air Valve
Pump Blocked
Valve (3)
Valve (4)
Valve (5)
Valve (6)
Closed
Not
Open
Not
Operating
Operating
Operating in one second pulses
Open
Operated
Open
Not
Operating
Closed
Not
Open
Not
Operating
Operating
Pump
Working
Working
Working
Stopped
4.2 Static Filter
The static filter is designed for use in small systems. The structure of the filter enables the filter element to
be easily dismantled for cleaning. For ease of maintenance it is important to install the filter in an easily
accessible position.
To Vacuum
Pump
Quick
Release
Band
To Loaders
Vacuum
Line
Filter
Base
Quick
Release
Band
www.sysmetric-ltd.com
- 13 -
Hopper Loaders & Filters
User Manual
5. Raw Material Conveying Systems
The conveying system is designed to convey raw material from the silos to the dosing system or process line
via a vacuum pump. Each vacuum pump can serve up to 32 hopper loaders one at a time. If more than one
loader requires filling simultaneously, the controller places the loader in a queue. When the leader reaches
the head of the queue the controller starts the loading cycle and signals the vacuum cut off valve to move to
the “loading” position. When the controller completes the loader’s loading cycle it moves on to the next
hopper loader waiting in the queue and so on and so forth. If there are no loading requests the vacuum pump
goes into “waiting” state and after a further 3 minutes without vacuum requests the vacuum pump goes into
“resting” state.
The following diagram shows two independent raw material conveying systems whereby:
1 – Silo, 2 – Vacuum Pump, 3 – Feeding Manifold, 4 – Vacuum Pipe, 5 – Automatic Filter, 6+8 – Groups
of Hopper Loaders, 7 – Back Up line between pumps (hot back up) allowing one vacuum pump to serve
additional loaders on the other line if necessary.
- 14
-
www.sysmetric-ltd.com
User Manual
Hopper Loaders & Filters
5.1 The Pump Power Supply
Pump power supply cabinet is supplied according to specifications with control over a single pump to up
to four pumps.
The operation switches include: Main Switch for turning off the electricity supply during maintenance of
the electrical cabinet or pumps.
Pump Switches (turn each pump on/off). The pump will not turn off immediately, it will turn off when the
current loading cycle finishes.
The operating status lamps indicate the pump status: Lamp on – pump is in waiting state, Flashing slowly
– loading, Rapid flashing – pump fault (O.L), Off – system off.
The Back Up switch is designed to operate the vacuum pumps back up line, the status lamp indicates:
Flashing slowly – backing up, Off – system disconnected – no back up.
Back Up
0
1
Pump 2
0
Pump 1
1
0
1
5.2 Principles of Conveying Pipelines
The time taken to load the loader depends on the efficiency of the material flow
in the pipelines. Every curve in the pipe causes friction between the material and
the pipeline walls and thus reduces the flow rate and the system efficiency.
Every branch in the pipelines leads to some of the material stopping completely
and greatly reduces the material flow rate.
Incorrect construction of pipelines causes a waste of time and energy.
It is recommended to minimize curves in the pipelines, to use pipes with the same
radius without narrow passageways and use arcs with the largest possible radius.
Incorrect piping
layout
www.sysmetric-ltd.com
- 15 -
Correct piping
layout
Hopper Loaders & Filters
User Manual
6. Troubleshooting
6.1 Loader Troubleshooting
6.1.1 Load Cycle Doesn’t Start
1.
Check On/Off switch and that the plug is firmly plugged into the loader.
2.
Check air pressure (6-8 bar, 85-115 psi).
3.
Check the led in the pneumatic valve. If the led is on and the air pressure is correct, the
pneumatic valve is malfunctioning and should be replaced.
4.
Check the magnetic switch on the bottom flap.
6.1.2 Load Cycle Doesn’t Stop According to “Full” Prox. Switch
1.
Check power supply to the proximity switch.
2.
Adjust the sensitivity of the proximity switch.
6.1.3 Load Cycle Doesn’t Stop
1.
Check air pressure (6-8 bar, 85-115 psi).
2.
If the vacuum valve doesn’t close, check the pneumatic cylinder and the fore seal.
3.
If the cycle keeps restarting check that the magnetic switch works correctly. If it doesn’t
work correctly (i.e. the switch is ON when the flap is open), check the integrity of the
switch arm fitting.
6.1.4 Loading is Weak
1.
Check that the loader’s filter is clean.
2.
Check that the vacuum valve fully opens.
3.
Check the seal on the bottom flap. There might be some pellets stuck there which prevent
the bottom flap from closing properly.
4.
Check that there is sufficient vacuum in the vacuum line (200-500mBar).
5.
Check that the material line doesn’t have any leaks or holes in the middle. Pellets might
tear flex tubes.
- 16
-
www.sysmetric-ltd.com
User Manual
6.
Hopper Loaders & Filters
In the case of shared material lines, check the non-return flaps of the other loaders using
the line. If one non-return flap is malfunctioning, all the other loaders that use that line
will suffer and the loader whose non-return flap is malfunctioning will work OK.
6.2 Filter Troubleshooting
6.2.1 Loading on Vacuum Line
1.
Check correct air pressure on air pressure gauge.
2.
Check integrity of filter element.
3.
In automatic filters - check integrity of the bottom flap and seal.
4.
In automatic filters – check integrity of the operator valve and air pressure.
6.2.2 Automatic Filter Not Cleaning Correctly
1.
Check air pressure (6-8 bar, 85-115 psi).
2.
Check integrity of all pneumatic valves, manually check correct operation.
3.
Check integrity of all valves. Check integrity of seals and that the valve opens fully.
www.sysmetric-ltd.com
- 17 -
Hopper Loaders & Filters
User Manual
6.3 Bottom Flap Troubleshooting and Maintenance
•
A faulty or missing seal lead to air intake via the bottom flap thus weakening the vacuum.
•
Faulty or badly tuned magnetic sensor.
•
The controller displays vacuum alarms when: a. the bottom flap remains closed for two seconds
after the vacuum cut off valve closes the vacuum. b. after four consecutive loading faults.
6.3.1 Proximity Sensor Troubleshooting
A faulty or badly adjusted sensor will cause the system problems. An under-sensitive sensor will not detect
material in the hopper loader. In this case the controller will load for a pre-determined period of time; the
default time is 30 seconds.
In the case of an over-sensitive sensor, the sensor constantly senses material and the system will stop
working within 10 seconds.
Proximity sensor maintenance should be carried out periodically or whenever the loading is not working
properly. Adjust the sensor sensitivity according to the type of sensor fitted on the loader as follows:
1.
Orange colored sensors, manufactured by Effector, whereby the LED indicator (2) is ON when
the sensor DOES NOT sense material.
2.
•
Stop the loader and wait for it to empty.
•
Remove the cap at the rear of the sensor (this cap looks like a screw, but it only
hides the real screw).
•
Turn the sensitivity screw (2) CW until the LED indicator (1) is OFF.
•
Turn the sensitivity screw (2) CCW slowly until the LED indicator (1) is ON.
•
Turn the sensitivity screw (2) CCW a further half a turn.
•
Verify that the LED indicator is turned OFF when the loader is full.
1
2
Yellow colored sensors (manufactured by Carlo Gavazzi) or black and silver colored sensors
(manufactured by Brumberg), whereby the LED indicator (2) is ON when the sensor SENSES
material.
•
Stop the loader and wait for it to empty.
•
Remove the cap at the rear of the sensor (this cap looks like a screw, but it only
hides the real screw).
•
Turn the sensitivity screw (2) CW until the LED indicator (1) is ON.
•
Turn the sensitivity screw (2) CCW slowly until the LED indicator (1) is OFF.
•
Turn the sensitivity screw (2) CCW a further half a turn.
•
Verify that the LED indicator is turned ON when the loader is full.
To replace the proximity sensor or to remove any dirt built up on the sensor head, open the hopper
loader by releasing the upper clamp and removing the cover. The proximity sensor will now be
accessible.
- 18
-
www.sysmetric-ltd.com
User Manual
Hopper Loaders & Filters
7. Preventive Maintenance
When a vacuum receiver is working in a sub-optimal way, it may still manage to supply material to the
process machine. For example, if the “Loader Full” proximity switch is not working, the load cycle will take
more time than necessary. If such problems are not dealt with in time, they accumulate until the central
loading system can no longer satisfy the demand of all the machines. At this stage it is difficult to spot the
problem, since there are several problems that have accumulated.
The solution for this problem is to conduct preventive maintenance checks on the conveying system on a
regular basis. The following sections describe the checks for vacuum receivers and filters. In addition,
preventive maintenance must be carried out for the pumps and for central filters, according to the
manufacturer’s instructions.
7.1 Loader maintenance
7.1.1 Granule Loader Maintenance
•
Check the integrity of the clamp and the seal of the cap. They may be damaged due to
improper closing.
•
Check the air system. Watch for leaks in the air fittings and the pneumatic valve.
•
For loaders with a blow-back mechanism – the blow on an empty loader should “kick” the
bottom flap.
•
Open the cap, check the integrity and cleanliness of the grid filter.
•
Check the integrity of the flap on the material inlet and the seal on the flap.
•
Check “Loader Full” proximity switch. Hot material loaded from dryers might melt the
proximity switch.
•
Check integrity of the bottom flap and the seal.
7.1.2 Powder Loader Maintenance
•
Check the integrity of the clamp and the seal of the cap. They may be damaged due to
improper closing.
•
Check the air system. Watch for leaks in the air fittings and the pneumatic valve.
•
Check the cleaning system - the blow should be heard.
•
Open the cap; check the integrity and cleanliness of the cloth filter.
•
Check the integrity of the flap on the material inlet and the seal on the flap.
•
Check “Loader Full” proximity switch. Hot material loaded from dryers might melt the
proximity switch.
•
Check integrity of the bottom flap and the seal.
www.sysmetric-ltd.com
- 19 -
Hopper Loaders & Filters
User Manual
7.2 Filter Maintenance
7.2.1 Automatic Filter Maintenance
Weekly:
• Empty the dust chamber situated on the bottom of the filter.
•
Open the filter cover and check the whether the filter element is clean and intact. Clean the
filter element if necessary.
•
Check the air pressure.
•
Check the integrity of the bottom flap and seal.
•
Check the integrity of cover clamp and seal.
Every 3 months:
•
Open the filter cover; remove and check filter element integrity. Verify that there are no
holes. It is possible to identify holes by shining a light on the filter element.
•
Check the air pressure.
•
Verify correct operation of the cleaning valves.
7.2.2 Static Filter Maintenance
Weekly:
• Open the filter cover and check the integrity of the filter element, remove the dust and clean as
necessary.
•
Check the integrity of the cover clamp and seal.
Every 3 months:
•
Open the filter cover; remove and check filter element integrity. Verify that there are no
holes. It is possible to identify holes by shining a light on the filter element.
Recommended maintenance periods will vary with different materials.
- 20
-
www.sysmetric-ltd.com
User Manual
Hopper Loaders & Filters
8. Part Lists
8.1 Part List for S380
No.
Part No.
Description
B710
S380 Hopper Loader Body
1
A105
Vacuum valve
1
2
7
320mm hopper loader cover
1
3
M2-1
320mm clamp
1
4
M101
50mm non-return seal
1
5
11
Non-return flap 50mm for S hopper loaders
1
6
A501
Grid filter for hopper loader
1
7
E1
30mm prox. Switch
1
8
P101
1/8” 5x2 Pneumatic valve
1
9
E2
Reed switch
1
10
M103
100mm bottom flap seal
1
www.sysmetric-ltd.com
Qty.
- 21 -
Hopper Loaders & Filters
User Manual
8.2 Part List for S300
No.
Part No.
Description
B610
S300 Hopper Loader
1
A105
Vacuum valve
1
2
7
320mm hopper loader cover
1
3
M2-1
320mm clamp
1
4
M101
50mm non-return seal
1
5
11
Non-return flap 50mm for S hopper loaders
1
6
A501
Grid filter for hopper loader
1
8
E1
30mm prox. Switch
1
9
P101
1/8” 5x2 Pneumatic valve
1
10
E2
Reed switch
1
11
M103
100mm bottom flap seal
1
R1
Extension for powder filter
1
- 22
-
Qty.
www.sysmetric-ltd.com
User Manual
Hopper Loaders & Filters
8.3 Part List for S230
No.
Part No.
Description
B550
S230 Hopper Loader Body
1
A105
Vacuum valve
1
2
7-2
S230 hopper loader cap
1
3
M2-2
230mm clamp
2
4
M101
50mm non-return seal
1
5
11
Non-return flap 50mm for S hopper loaders
1
6
P101
1/8” 5x2 Pneumatic valve
1
7
E1
30mm prox. switch
1
8
M102
76mm bottom flap seal
1
9
E2
Reed switch
1
www.sysmetric-ltd.com
Qty.
- 23 -
Hopper Loaders & Filters
User Manual
8.4 Part List for Automatic Filter
No.
Part No.
Description
Qty.
B1000
Automatic Filter
1
M126
Filter Element CA1533
1
2
M2-1
320mm clamp
1
3
A105
Vacuum Valve
1
4
M103
100mm bottom flap seal
1
5
M123
Collecting Bag
1
6
7
320mm Loader Cap
1
7
R1
Fitting
1
8
P101
5X2, 1/8”, 24VDC pneumatic valve
*2
9
M124
Air Valve Filter
*1
10
M19
Adaptor to 50mm Pipe
1
11
98-2
Base
1
* Pumps that work in neutral have an additional separate pneumatic valve installed on the air valve and the
pump valve. An additional filter is also placed on the air valve.
- 24
-
www.sysmetric-ltd.com
User Manual
Hopper Loaders & Filters
8.5 Part List for Static Filter
No.
Part No.
Description
B1002
Static Filter
1
M126-2
Filter Element WGA22K
1
2
M2-2
230mm Clamp
2
3
7-4
Upper Cap with Outlet Pipe
1
4
7-21
Lower Cap
1
5
M19
Adaptor to 50mm Pipe
1
6
98-2
Base
1
www.sysmetric-ltd.com
Qty.
- 25 -
Hopper Loaders & Filters
User Manual
8.6 Vacuum Valve
No.
Part No.
Description
A105
Vacuum Valve
1
P10
ISO 25X50 air cylinder
1
2
M11
Cylinder adapter
1
3
M13
2” seal supporting disc
1
4
M100
Vacuum valve seal
1
5
M10
Valve body
1
6
M19
Adapter to 50mm pipe
1
- 26
-
Qty.
www.sysmetric-ltd.com
User Manual
Hopper Loaders & Filters
8.7 Vacuum Cutoff Valve
No.
Part No.
Description
A105
Vacuum Valve
1
P10
ISO 25X50 air cylinder
1
2
M11-1
Cylinder adapter
1
3
199/199-1
Springy disc
4
M13
2” seal supporting disc
1
5
M100
Vacuum valve seal
1
6
M10
Valve body
1
7
M19
Adapter to 50mm pipe
1
www.sysmetric-ltd.com
Qty.
- 27 -
Hopper Loaders & Filters
User Manual
8.8 Blow-Back Kit
No.
Part No.
Description
A107
Blow-back kit
1
A106
Compressed air accumulator
1
2
P51
1/8”-5mm elbow fitting
1
3
P22
1/8”-1/2” fitting
1
4
P105
Quick-exhaust valve
1
5
P21
1/2” MxF fitting
1
6
P20
3/8”-1/2” fitting
1
- 28
-
Qty.
www.sysmetric-ltd.com
User Manual
Hopper Loaders & Filters
Not
Used
Flap
Sensor
Upper
Proximity
Sensor
Vacuum
Valve
9. Electrical Diagram of 6 Pin Reinforced Plug
KI501
www.sysmetric-ltd.com
- 29 -