1
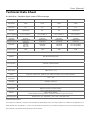
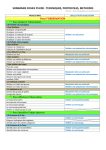
Pro-MicroScan
Microscope Digital Camera
BASIC USER MANUAL
Version 3.0
USB 2.0 CAMERA
User Manual
WARNING!
TO AVO ID TH E RISK OF FIRE OR ELECT RICAL SHOCK. N EVER EXPOSE THIS PRO DUC T TO WATER OR
OPER ATE IN A H IGH HU MID IT Y EN VIRONME NT.
Keep camera away from the following:
High temperatures and excessive humidity
Direct sunlight or other heat sources
Dust
Extreme vibration
If the camera lens becomes dirty, first try blowing dust particles from it.
Next use a lint free cloth or proper lens cleaning cloth to wipe the lens gently.
Only use approved lens cleaning fluids. Never touch the lens with your
fingers! Do not allow the camera to come into contact with water or any
other liquid. If water or a foreign substance should get in the camera,
unplug the camera immediately and do not attempt to plug in until after a
long period of time to allow for drying. This does not necessarily mean it will
work again! Do not open the camera case or attempt your own repairs.
Internal components may create risk of electrical shock or fire. There are no
user serviceable components inside. Clean the outside of the camera by
wiping with a clean, dry cloth. Never use harsh or abrasive cleaners or
organic solvents on the camera or any of its parts. If you notice smoke or a
strange smell coming from the camera, immediately unplug the camera and
consult an authorized dealer.
User Manual
Trademark and copyright information
© COPYRIGHT 2008, OPLENIC
All rights are reserved. No part of this document may be photocopied,
reproduced, or translated to another language without the prior written
consent of OPLENIC. The information contained in this document is subject
to change without notice. OPLENIC shall not be liable for errors contained
herein or for consequential damages in connection with the furnishing,
performance or use of this material.
Microsoft
®
and Windows
®
are U.S. registered trademarks of Microsoft
Corporation.
Welcome
Thank you for buying OPLENIC Pro-MicroScan high resolution USB2.0 camera. We
suggest you spend a few minutes carefully reading this user manual before
installing and using your camera.
Please keep this user manual in a safe place for future reference.
User Manual
Warnings and Precautions
Precautions when using your Pro-MicroScan
Keep camera away from the following:
· High temperatures and excessive humidity
· Direct sunlight or other heat sources
· Dust
· Extreme vibration
If the imaging sensor lens becomes dirty, first try blowing dust particles from it.
Next use a lint free cloth or proper lens cleaning cloth to wipe the lens gently.
Only use approved lens cleaning fluids. Never touch the lens with your fingers!
Do not allow the camera to come into contact with water or any other liquid. If
water or a foreign substance should get in the camera, unplug the camera
immediately and do not attempt to plug in until after a long period of time to
allow for drying. This does not necessarily mean it will work again! Do not open
the camera case or attempt your own repairs. Internal components may create risk
of electrical shock or fire. There are no user serviceable components inside.
Clean the outside of the camera by wiping with a clean, dry cloth. Never use harsh
or abrasive cleaners or organic solvents on the camera or any of its parts.
If you notice smoke or a strange smell coming from the camera, immediately
unplug the camera and consult an authorized dealer.
User Manual
System Requirements
PC running either Windows
®
2000 or XP (Professional-SP4) -XP
(Professional-SP2) are installed when shipping, No working if specifications up to
reach of above after shipment
♦
DirectX 9.0 or later installed
♦
2.0 GHz minimum processor(Recommend dual core 2.8GHz or more)
♦
USB 2.0 Port
♦
CD-ROM drive
♦
512 MB RAM(Recommend 1GB or more)
♦
200 MB Free HDD
Performance is dependent on the PC's graphics card.
USB 2.0 is only supported on Windows
try to use any other Microsoft
®
®
2000, Me, XP, 2003, Vista and 2008. Do not
operating system. will NOT work on a Mac
Computer.
Windows 2000 must have Service Pack 4 (or later) installed and XP Pro must have
Service Pack 2 (or later) installed in order for the camera to function correctly. To
check if you have USB2.0 installed on your computer goes to:
Start > Settings > Control Panel > System⋯ or 'right-click' on “My Computer” and
select “properties” from the context menu...
Click on the “Hardware” tab and then onto the button “Device Manager”;
Within Universal Serial Bus controllers (USB controllers) you will see a list of USB
devices installed on your machine. In this example the red arrow is indicating the
USB2.0 device. USB2.0 controllers may be labeled as USB2.0 controllers, however
they may also be labeled as “Enhanced” or “Standard Enhanced” controllers. The
so-called “ Standard” or “Standard Universal” controllers are for the slower
USB1.x system.
User Manual
Package Contents
If you find any contents missing or damaged, contact the place of purchase
Eyep iece Ca mera
USB Ca ble
ScopePhoto *
Dri ver CD-ROM
Eyepiece Adapte r
Ma nual
ScopePhoto software is available for option at extra cost. Not in standard package.
Installing the Driver and Software
1. Insert CD into CD-ROM drive
2. Select “Install camera driver”
-Continue with installation prompts. (If using Vista, please plug the digital eyepiece into
the USB slot before installing camera driver and skip step 3). (If unidentified publisher/
Windows Logo Testing appear, select continue anyway)
3. Install image software
desktop)
(After installation the image software icon will created on the
User Manual
To Connect Camera
Connect the USB cable into a free USB slot on the computer (Requires USB 2.0 interface).
“New Hardware Found” displays at the bottom right of your PC screen. The camera is recognized.
-The found new hardware wizard would start, Select “Install the software automatically”
-Finish (If unidentified publisher/ Windows Logo Testing appear, select continue anyway)
NOTE:
1.Plug the USB connector to board USB2.0 port directly on the back of the PC is recommend,
2.Do NOT use anything to extend the USB cable.
Using the camera
1. Start the MiniSee or ScopePhoto software
2. Start video
MiniSee--Click on the camera name below “Video” button.
ScopePhoto-Click on the camera name below “Live capture” on the bottom of start page.
(If you do not see the start page, you may find it from “Help-->Show Start Page”)
3. Connect the camera to the microscope and turn on the light.
(Please make sure your light system has the option of a BLUE LIGHT FILTER. For the CCD to view
properly, you would need light color temperatures around 5600K-6000K.)
4. Setting the white balance
-Empty the stage so it would be viewing an empty field. Then set the white balance by going to: Setup
Video source property auto white balance
5. Capture the image Press
to capture image
MiniSee tool bar
ScopePhoto tool bar
6. Capture the Video
More about using the software please see ”HELP” of the software.
User Manual
Trouble Shooting
WARNING:
Please do not attempt to open the camera case. There are no user serviceable parts inside.
USB Device Conflicts
When there are a number of USB devices installed at the same time, unexpected errors can arise. The
cause can be insufficient available USB bandwidth, or possibly too much combined current being drawn
by USB devices. To test for these conditions you should uninstall and unplug as many other USB devices
as possible. This should help to rule out the above, and eliminate possible conflicts with other cameras.
If you are using an extended USB cable, please make sure the cable’s bandwidth is good enough to
support High-Speed USB 2.0 standard. Once the camera is not working well, please remove it.
Image Preview/Capture Problems
If you have installed driver and you get a black screen with DirectShow Capture, Check the setting of PC
display mode, make sure that’s on “32Bit true color”. If you can preview the image but can not capture
it(Camera icon is gray) ,Installing the DirectX9.0 or later version.
Frame rate slow & color noise on the screen
Video Mode: use smaller size video mode will get faster frame rate video
Integration time / luminous intensity setting: longer Integration time and brighter illumination will
make the frame rate faster.
If you have any other problems, please visit our website to get help information
http://www.oplenic.com/support.asp
http://www.oplenic.com/faq.asp
User Manual
Technical Data Sheet
Pro-MicroScan : SkopKam digital camera FOR microscope
Model
DCM130
DCM300
DCM310
DCM500
DCM510
DCM800
DCM900
Part Number
#5860
#5880
#5888
#5890
#5898
#5900
#5908
Sensor Size
1/2"
1/2"
1/2"
1/2.5"
1/2.2"
1/2.5"
1/2.3"
Pixel Size
8µmX8µm
5.2µmX5.2µm
3.2µmX3.2µm
2.2µm X2.2µm
2.2µm X2.2µm
1.75µmX1.75µm 1.75µmX1.75µm
Sensitivity
(v/lux-sec @550nm)
1.8
1.0
1.5
1.0
1.2
1.3
1.4
Max Resolution
(Hardware)
1280X 1024
1.3M pixels
2048X1536
3M pixels
2048X1536
3M pixels
2592X1944
5M pixels
2592X1944
5M pixels
3264X2448
8M pixels
3488X2616
9M pixels
Frame Rate
(Depend on the PC)
20frames/sec@
1280X1024
4frames/sec@
2048X 1536
Video Mode
1280X1024
640 X 480
320 X 240
2048X1536
1600X1200
1280X1024
800 X 600
2048X1536
1024 X 768
640 X 480
512 X 384
2592X1944
2048X1536
1280 X 960
864 X 600
2592X1944
1280 X 960
800 X 600
640 X 480
3264X2448
1600X1200
1280X1024
640 X 480
3488X2616
1600X1200
1280X1024
640 X 480
Dynamic Range
65dB
62dB
75dB
75dB
68dB
75dB
75dB
<11frames/sec@ <2 frames/sec@ <7 frames/sec@ <1 frames/sec@ <1 frames/sec@
2048 X 1536
2592 X 1944
2592 X 1944
3264 X 2448
3488 X 2616
Wave Length(nm)
400-650nm (IR-Cut added)
Exposure
ERS (Electronic Rolling Snap)
White Balance
Automatic / Advanced Manual
Auto-exposure
Automatic / Advanced Manual
Image Output
USB2.0, 480Mb/s
Power Supply
USB2.0 DC 5V / 1.5 A
Programmable
Control
Image size, exposure time, brightness, gain, Gamma Correction, color,, contrast, Saturation,
Working
Temperature
-30°C ~ 70°C
USB Cable
USB cable, length 2.5m
Accessories Included
2 adaptors (Ф23.2 to Ф30, Ф23.2 to Ф30.50, one each) TS-M1 stage micrometer available for option at extra cost
Output data
RGB24, Direct Show and Twain interface
Software
Driver: support Direct Show and Twain
Image software: MiniSee
Advanced Image-processing software: ScopePhoto available for option at extra cost
Operating System
Windows 2000 / Me / XP(SP2/SP3) / 2003 / Vista / 2008 32Bit system
User Manual
Technical Data Sheet
Pro-MicroScan : SkopKam digital camera FOR microscope
Model
MDC200
MDC320
MDC560
MDC140BW
Part Number
#5870
#5910
#5920
#5930
Sensor Size
1/3”
1/3”
1/2”
2/3”
Pixel Size
3.2µmX3.2µm
N/A
N/A
6.5µmX6.5µm
Sensitivity
(v/lux-sec @550nm)
0.45 in condition 1*
0.4 in condition 1*
0.45 in condition 1*
0.05 in condition 1*
Max Resolution
(Hardware)
1600X1200
2M pixels
2048X1536
3.2M pixels
2720X2048
5.6M pixels
1360X1024
1.4M pixels
Frame Rate
(Depend on the PC)
<20frames/sec@
1600X1200
<15frames/sec@
2048X1536
10frames/sec@
2720X2048
12frames/sec@
1360X1024
Video Mode
1600x1200
1024x768
800 x 600
640 x 480
2048X1536
1024x768
2720X2048
1360x1024
1360X1024
680 x 512(2x2BIN)
340 x 256(4x4BIN)
Dynamic Range
62dB
75dB
75dB
80dB
Wave Length(nm)
400-650nm (IR-Cut added)
Exposure
ERS (Electronic Rolling Snap)
White Balance
Automatic / Advanced Manual
Auto-exposure
Automatic / Advanced Manual
Image Output
USB2.0, 480Mb/s
Power Supply
USB2.0 DC 5V / 1.5 A
Programmable
Control
Image size, exposure time, brightness, gain, Gamma Correction, color,, contrast, Saturation,
Working
Temperature
-30°C ~ 70°C
USB Cable
USB cable, length 2.5m
Accessories Included
2 adaptors (Ф23.2 to Ф30, Ф23.2 to Ф30.50, one each) TS-M1 stage micrometer available for option at extra cost
Output data
RGB24, Direct Show and Twain interface
Software
Driver: support Direct Show and Twain
Image software: MiniSee
Advanced Image-processing software: ScopePhoto available for option at extra cost
Operating System
Windows 2000 / Me / XP(SP2/SP3) / 2003 / Vista / 2008 32Bit system
*Standard image Condition I
Use a pattern box (luminance: 706cd/m2, color temperature of 3200K halogen source) as a subject. (Pattern for evaluation is not applicable.) Use a
testing standard lens with CM500S (t = 1.0mm) as an IR cut filter and image at F5.6. The luminous intensity to the sensor receiving surface at this
point is defined as the standard sensitivity testing luminous intensity.
User Manual
Warranty
OPLENIC Three Year Limited Warranty
OPLENIC warrants its products to be free from the date of purchase this product
for three year. OPLENIC will repair or replace such product or part thereof which,
upon inspection by OPLENIC, is found to be defective in materials or workmanship.
As a condition to the obligation of OPLENIC to repair or replace such product, the
product must be returned to OPLENIC together with proof-of-purchase satisfactory
to OPLENIC.
All returns must be accompanied by a written statement setting forth the name, address and daytime
telephone number of the owner, together with a brief description of any claimed defects. Parts or
product for which replacement is made shall become the property of OPLENIC.
The customer shall be responsible for all costs of transportation and insurance, both to and from the
factory of OPLENIC, and shall be required to prepay such costs.
OPLENIC shall use reasonable effort to repair or replace any accessory covered by this warranty within
thirty days of receipt. In the event repair or replacement shall require more than thirty days, OPLENIC
shall notify the customer accordingly. OPLENIC reserves the right to replace any product which has
been discontinued from its product line with a new product of comparable value and function.
License Agreement
The software and accompanying documentation are protected by the International copyright laws. Any
use of this software in violation of copyright laws or the terms of this agreement will be prosecuted to
the best of our ability.
OPLENIC authorizes you to make archival copies of this software for the sole purpose of back-up and
protecting your investment from loss. Under no circumstances may you copy this software or
documentation for the purposes of distribution to others. You may not distribute, modify, adapt,
translate, reverse engineer, recompile, disassemble or otherwise attempt to discover the source code
of the Software. Any information supplied by OPLENIC or obtained by you, as permitted hereunder, may
only be used by and may not be disclosed to any third party or used to create any software which is
substantially similar to the Software.