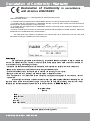
1
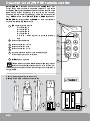
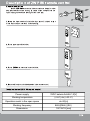
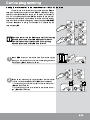
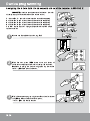
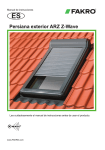
Programming and Usage Instructions GB ARZ Solar Roller Shutter Read the instructions below carefully before proceeding to the device operation. www.FAKRO.com 1/ Contents Important information ........................................................................................................................................ 3 Description of the roller shutter ................................................................................................................. 4-5 Description of ZWP S8 remote control ................................................................................................... 6-7 Remote installation .............................................................................................................................................. 7 Technical data of ZWP S8 remote control .............................................................................................................7 Reach of Z-Wave devices ..................................................................................................................................8 Sample configuration of Z-Wave network ..............................................................................................................8 Device programming .................................................................................................................................... 9-1 2 Adding the roller shutter to the remote control – INCLUDE function …................................................................. 9 Assigning the roller shutter to movement buttons of the remote – ASSOCIATE ............................................... 1 0 Removing the roller shutter from the movement buttons of the remote – DELETE function …...........................11 Removing roller shutter from the remote control – EXCLUDE function. …......................................................... 1 2 Reset of the remote control to factory settings – DEFAULT function .................................................................1 2 Adding another remote control to the network – LEARN MODE function ..........................................................1 3 Checking the battery charge level ....................................................................................................................... 1 3 Additional information / Signalling description .....................................................................................1 4 Cooperation of devices from different manufacturers in Z-Wave network …................................................... 1 4 Adding the ARZ Solar roller shutter to the network operated by the controller of other manufacturer ......... 1 4 Reset (return to factory settings) ….................................…............................................................................... 1 4 Special function – ALL ON, ALL OFF …............................................................................................................. 1 4 Manual operating …........................................................................................................................................... 1 4 Signalling description ......................................................................................................................................... 1 4 Declaration of Performance …...................................................................................................................... 1 5 FAKRO PP Sp. z o.o. ul. Węgierska 1 44A 33-300 Nowy Sącz Polska www.fakro.com tel. +48 1 8 444 0 444 fax. +48 1 8 444 0 333 2/1 6 Important information Read the instructions below carefully before proceeding to device operation in order to ensure its proper functioning Please carefully read the instructions below before installing the device to avoid electric shock, laceration, etc. While installing the roller shutter it is essential to comply with the following rules: ● After unpacking, check roller shutter elements for any signs of mechanical damage. ● Installation should be performed by a qualified individual following manufacturer's instructions. ● Take the roller shutter out of the package, lay it out flat and connect (two-core cable – 1 2VDC). Verify its correct functioning by performing one full working cycle with the use of manual operating button. ● Plastic containers used for packing should be kept out of children's reach as they may be a potential source of hazard. ● The roller shutter should be used for its intended purpose in agreement with its design. FAKRO Company shall not be held responsible for any consequences resulting from improper roller shutter use. ● Any activities relating to cleaning, adjustment or disassembly of the roller shutter should be preceded with its disconnection from the mains. ● The roller shutter should not be cleaned using any solvent substances or open stream of water (do not immerse in water). ● Any roller shutter repairs should be carried out by the manufacturer's authorised service. ● The roller shutter is for external use only. ● In case of adverse weather conditions (frost, snow) operating the roller shutter may be impossible. 3/1 6 Description of the roller shutter The ARZ Solar roller shutter is intended for mounting onto FAKRO roof windows and has been adapted for cooperation with wireless control devices offered by FAKRO and other manufacturers offering products with Z-Wave logo. The roller shutter is equipped with a two-way radio communication module. For communication, the Z-Wave module utilizes radio wave frequency of 868,42 MHz. The ARZ Solar roller shutters feature three limit switches: • limit switch at unfolded shutter's armour position (outskirt) • limit switch at folded shutter's armour position (outskirt) • current limiting protecting the roller shutter against damage and the user against accidental injury as a result of contact with movable elements of the roller shutter. To be able to operate the shutter, it is necessary to install it following the picture installation instructions included in the product package. Below there is presented general view of the ARZ Solar roller shutter with description of available buttons and indicators. 4 3 1 2 1 – manual operating button 2 – network status (LED 1 ) 3 – programming button P 4 – network status (LED 2) 4/1 6 Description of the roller shutter Radio communication module and connecting terminals of the servo-motor in the ARZ Solar roller shutter are under the right armour of the shutter seen from the inside. See the picture below. 5 – place of the motor connection 6 – place of the photovoltaic panel connection for recharging batteries 7 – place of power supply connection (battery) 8 – main switch 5 6 7 8 Technical data of device. Power voltage 12 [V] DC Rated current 1,4 [A] Speed 23 r.p.m. Radio protocol Z-Wave Working frequency 868,4 [MHz] EU 5/1 6 Description of ZWP S8 remote control Note!!! ZWP S8 is dedicated remote to control the ARZ Solar roller shutter. Using other controllers is possible, however it may cause accelerated wearing off the batteries of these controllers because of the wake activity function lengthening time required by the controller. Therefore, the roller shutter can be programmed to one of the controllers (e.g. ZWP1 0 remote control, ZWK1 0, ZWG1 or ZWG3 keyboards or ZWMP, ZWMA modules) offered by FAKRO or other manufacturer's controller equipped with Z-Wave module. 1 2 LEDs signalling active channel 1 – channel No. 1 2 – channel No. 2 3 – channel No. 3 4 – channel No. 4 1 2 3 4 – shared channel* - 2 groups, 4 shutters in each button of channel selection 3 4 5 button of movement – roll up button of movement - stop button of movement - unroll 4 6 group of movements buttons – used to operate single roller shutter or group of roller shutters 5 7 IN/EX programming button 1 2 1 2 3 4 3 6 * On the shared channel 1 2 3 4 there are available two groups of buttons of movement. Simultaneously, four roller shutters from one of two groups can be controlled, but their synchronous operation is not guaranteed. 1 . Pull out up back part of the remote housing 2. Screw out the screw on the back of the remote 1 2 IN/EX IN/EX 6/1 6 7 Description of ZWP S8 remote control Remote installation Holder of ZWPS8 remote should be mounted onto the wall or other permanent element of the building by means of two screws driven into cylindrical plugs inserted into openings drilled in the wall. 1 . Screw the lower section of the holder by means of included screws driven to anchor pins inserted in drilled openings. 2. Put on upper part of the holder. 3. Put on ZWPS8 remote control onto the holder. 4. Remove foil strip to unlock the batteries in the remote control. Technical data of ZWP S8 remote control Power supply 3VDC bateria 2xAAA 1,5[V] Working temperature (+5oC) do (+40 oC) Operation reach in the open space do 40[m] Working frequency 868,4[MHz] (EU) Dimensions 157/38/19 [mm] 7/1 6 Reach of Z-Wave devices Reach of Z-Wave devices Radio signal range depends on the type of construction, the materials used and the Z-Wave devices location. Penetration of the radio signal in different materials: 1 Brick wall - 60-90% 2 Reinforced concrete - 20-60% 3 Wooden structures of gypsum cardboard - 80-95% 4 Glass- 80-90% 5 Metal walls- 0-1 0% ZRD ZWMP ARZ Solar ARZ Solar 3 5 2 4 1 ZWP S8 Sample configuration of Z-Wave network ZWP S8 remote control starts individually two ARZ Solar roller shutters (active channel No. 1 ). Additionally, roller shutters can be launched simultaneously (active shared channel 1 2 3 4). Weather module in cooperation with the rain sensor closes roof windows when the first drops of rain appear. 8/1 6 Device programming Adding the roller shutter to the remote control – INCLUDE function In order for the roller shutter to communicate within the Z-Wave network it is essential to connect it to the Z-Wave network and assign specific number (Node ID). The device can be added to the network, only if it is not already part of other Z-Wave network. To add the roller shutter to another network, it is necessary to remove it from the existing network or restore to factory settings by means of any basic PRIMARY controller. Readiness to assign to the network is indicated by the network status LED. 0.5s. x1 FAKRO FAKRO 5s. The roller shutter is in the Z-Wave network if after pressing button P, the network status LED blinks once for 0.5 sec. The roller shutter is not in the network if after pressing button P, the network status LED is on for 5 sec. 1 x1 FAKRO FAKRO x1 Press IN/EX button on the remote once. The remote signals waiting for the information on the roller shutter being added to the network – LEDs 1 4 are on for 1 0 sec. 4 1 IN/EX 0.5s. x1 2 Within 1 0 sec. press programming button P on the roller shutter until the moment the network status LED blinks once 0.5 sec. correct adding of the roller shutter to the remote control – LEDs 2 3 are on for 2 sec. incorrect adding of the roller shutter to the remote control – two LEDs 1 4 blink 3 times. FAKRO 2 3 FAKRO 4 1 9/1 6 Ważne Device programming Assigning the roller shutter to movement buttons of the remote – ASSOCIATE ASSOCIATE procedure associates controlled device – the roller shutter with any movements buttons of the remote control. 1 – channel No. 1 – two roller shutters can be controlled separately 2 - channel No. 2 - two roller shutters can be controlled separately 3 - channel No. 3 - two roller shutters can be controlled separately 4 - channel No. 4 - two roller shutters can be controlled separately 1 2 3 4 – shared channel * - two groups with 4 roller shutters in each can be controlled 1 1 23 4 2 1 4 3 1 Choose one of available channels , e.g. No. 1 23 4 IN/EX x1 x1 2 Within 1 .5 sec. press IN/EX button once and button of movement once with which the roller shutter will be controlled. Readiness to assign the device is signalled by the remote control – LEDs 1 2 3 are on for 1 0 sec. t<1.5s 1 2 3 x1 FAKRO 3 1 0/1 6 Within 1 0 sec. press programming button P on the roller shutter until LEDs 2 3 4 on the remote control are on. error - LEDs 1 2 3 blink 3 times 2 3 4 1 2 3 Device programming Removing the roller shutter from the movement buttons of the remote – DELETE function In some cases (change of installation place, replacement of damaged device) it is necessary to remove the roller shutter both from the controller's memory (removing assignment to buttons – DELETE) as well as from the Z-Wave network (EXCLUDE) to prevent errors when sending commands (to non-existing devices) and excessive wearing off the batteries of portable controllers. Do not remove devices physically from the network without first removing them from the controllers' memory by means of DELETE and EXCLUDE functions because it may lead to significant delays in the operation of devices in the network and fast wearing off of the batteries of controllers. The order of execution of functions is also very important. First perform DELETE function and at the very end EXCLUDE function. 1 1 Choose one of channels from which you want to remove the roller shutter. 2 3 4 IN/EX x2 x1 2 t<1.5s. Within 1 .5 sec. press IN/EX button twice and movement button of a given group once until LEDs 2 3 4 are on. Readiness to remove assignment of the roller shutter is signalled by the remote control – LEDs 2 3 4 are on for 1 0 sec. 2 3 4 x1 FAKRO 3 11 /1 6 Within 1 0 sec. press P button on the roller shutter and hold until LEDs on the remote change into 1 2 3. error – LEDs 2 3 4 blink three times. 1 2 3 4 2 3 11 /1 6 Device programming Removing roller shutter from the remote control – EXCLUDE function. f the user wants to remove the roller shutter from the Z-Wave network completely (reset HomeID) e.g. in order to assign to another controller, procedure presented below must be performed. By means of EXCLUDE function the user removes the roller shutter from the Z-Wave network and buttons of movement. 1 IN/EX x2 Within 1 sec. press IN/EX button on the remote twice. The remote control signals waiting for the information about the roller shutter being removed – LEDs 2 3 are on for about 1 0 sec. 2 3 5s. x1 2 Within 1 0 sec. press button P on the roller shutter and hold until network status LED is on for 5 sec. The remote signals waiting for the information about the roller shutter being removed from the network – LEDs 2 3 are on for 1 0 sec. correct removing of the device from the network is signalled by the remote control – LEDs 1 4 are on for 2 sec. incorrect removing from the network – LEDs 2 3 blink 3 times. FAKRO FAKRO 4 2 1 3 0.5s. x1 FAKRO The roller shutter is in the Z-Wave network if after pressing button P, network status LED blinks once for 0.5 sec. The roller shutter is not in the network if after pressing button P, network status LED is on for 5 sec. FAKRO 5s. x1 FAKRO FAKRO Reset of the remote control to factory settings – DEFAULT function Reset of the controller will cause removing of all devices from its memory and the change of unique HomeID network address for a new one. Removing devices from the controller will not cause reset of devices themselves. If the user wants to add them once again to the Z-Wave network (controller's memory) it is necessary to perform EXCLUDE procedure on devices and assign them again IN/EX x2 t<1,5s 1 1 2/1 6 Within 1 .5 sec. press IN/EX button twice and SELECT button once until LEDs 2 3 - 1 4 - 2 3 blink. - If a given sequence of LEDs will not occur it is necessary to perform procedure again. 1 2 3 4 x1 Programming / Checking the battery charge Adding another remote control to the network – LEARN MODE function Function is used for copying information about devices from basic controller (PRIMARY) to additional and making it a SECONDARY controller. After performing LEARN MODE on the additional controller, it is also necessary to assign device to buttons of movement with the use of ASSOCIATE function. It is better to perform LEARN MODE function after adding all devices to basic controller or after modification of the network. IN/EX 4 x1 1 IN/EX 1 2 Press IN/EX button on basic remote control once. LEDs 1 and 4 will be on. 1 PRIMARY SECONDARY Within 1 0 sec. press three times IN/EX button on additional remote control until LEDs 1 3 are on. Within 1 0 sec. on basic remote control LEDs 2 and 3 will be on and on additional LEDs 2 and 4 will be on. 2 3 By means of additional controller – SECONDARY it is not possible to add device to the network (INCLUDE) and remove device from the network (EXCLUDE). However, it is possible to perform ASSOCIATE and DELETE functions. PRIMARY and SECONDARY function of the controller can be performed by any controller complying with Z-Wave protocol. Checking the battery charge level 1 . Choose one of four available channels by means of which the roller shutter is programmed. 2. Press button stop and hold for 3 sec. until channel status LED e.g. 1 starts blinking. 3. Channel status LED blinks for about 1 0 sec. 4. Press button of movement – open. Inquiry concerning the battery charge level is sent to the device. In response the user will get message displayed by the controller's LEDs: I - 1 - (25% of battery charge), II - 1 , 2 - (50% of battery charge), III - 1 , 2, 3 - (75% of battery charge), IV - 1 , 2, 3, 4 - (1 00% of battery charge) 3 x3 4 2 1 1 4 3 2 1 t=3s. II I 1 1 III 1 2 3 IV 1 2 2 3 4 1 3/1 6 Additional information / Signalling description Cooperation of devices from different manufacturers in Z-Wave network Z-Wave allows to integrate devices of different manufacturers which can work in different groups; lighting, heating, domestic automatic control, etc. Z-Wave devices operate as repeaters in the network, thus increasing the range of radio communication. The more devices in the network, the more reliable and more resistant to interference is performance of the devices within the network. Adding the ARZ Solar roller shutter to the network operated by the controller of other manufacturer Note!!! Make sure that the device (roller shutter) does not belong to any other network. Start INCLUDE procedure with the controller of existing network and then press programming button P on the roller shutter being added to the network. Note!!! Information how to initiate and perform INCLUDE and ASSOCIATE function with the use of controllers of other manufacturers is to be found in the instructions of these devices. Reset (return to factory settings) Sometimes it may be necessary to reset the roller shutter to factory settings and delete all the information concerning the network it communicates with. In order to do this, any basic controller (which can initiate the INCLUDE and EXCLUDE functions) can be used. For the roller shutter, RESET function is the same as EXCLUDE function. Note!!! Return to factory settings is indicated by the roller shutter, the network status LED emits continuous light. Special function – ALL ON, ALL OFF It is possible to define whether the roller shutter has to respect “Close all” or “Open all” commands. Note!!! Instructions how to define respecting functions “Close all” and “Open all” are to be found in instructions of the respective devices. Manual operating The “manual operating button” allows operating the ARZ Solar roller shutter directly after its installation. In order to control the roller shutter manually it is necessary to press manual operating button. Buttons work sequentially e.g. start, stop, start in another direction, stop – etc. 1 . Pressing the button for the first time starts the roller shutter to unfold. 2. Pressing the button for the second time stops the roller shutter. 3. Pressing the button for the third time causes the roller shutter to fold up. Signalling description Motor working status Network status Current consumed by the roller shutter The device has not been associated with motor is too high. It may be caused by any network, i.e. remote control of the Triple lingering snow, ice, leaves, etc. on the LED device is not possible. This LED is always flashing of shutter's armour. It is necessary to clean the continuously on after connecting the power supply to a the motor armour and guides. In case of problems on brand new roller shutter It is switched off status LED with operation please contact with FAKRO after adding the device to the network by service. means of the “INCLUDE” function. 1 4/1 6 11 4/1 4/1 66 Declaration of Performance No. D01/CPR/13659/13 Declaration of Performance Year of issue 07 EN 13659 1. The product-type: External roller shutter ARZ (H, E, Solar, Z-Wave) 2. Identification code: According to number on the guide profile the armour of the roller shutter (below the example of the identification) ARZ-E/102 78x118 FAKRO EN 13659 AREBAAA10206 05 2123 5 BM AREBAAA10206index 3. Intended use: 4. Manufacturer: 2123 5 – production date BM – packer initials for roof windows FAKRO Sp. z o.o. Węgierska 144a Street, 33-300 Nowy Sącz, Poland 5. Authorised representative: 6. System of assessment and verification of constancy of performance: 7. Harmonised standard: 8. Initial Type Test: ./. 4 EN 13659:2004+A1:2008 performed by Centre of Building Construction Engineering, Inc., Prague. 9. Declared performance: Essential characteristics Performance Harmonised technical specification Wind resistance Technical class 6 EN 13659:2004+A1:2008 10. The performance of the product identified in points 1 and 2 is in conformity with the declared performance in point 9. This declaration of performance is issued under the sole responsibility of the manufacturer identified in point 4. Signed on behalf of the manufacturer by: Ewa Łukaszczyk-Haslik (Certification and Quality Control Director) Nowy Sącz, 01/07/2013 1 5/1 6 Declaration of Conformity / Warranty Declaration of Conformity in accordance with directive 2006/95/EEC We FAKRO Sp. z o.o., 144a Węgierska St. declare that the product: ARZ Solar Roller Shutter: is compliant with the requirements of 2004/108/EEC directive concerning electromagnetic compatibility; is compliant with the requirements of 1999/5/EEC directive concerning radio devices and final telecommunication equipment and mutual recognition of their conformity; ● is compliant with the requirements of 2006/95/EEC directive concerning electric equipment designed for use within certain voltage limits; ● has been manufactured according to harmonized standards PN-EN 300220-2, PN-EN 301489-3, PN-EN 55014-1, PN-EN 55014-2, PN-EN 60335-2-97, PN-EN 60335-1; ● ● The ARZ Solar roller shutter is considered to be a device that can be introduced to use only after installation performed according to installation and user instructions. 12 - 04 - 2010 Warranty The manufacturer guarantees correct functioning of the device. He also undertakes to repair or replace the device if its defects result from material or structural faults. The warranty period is 24 months from the date, of purchase with fulfilling the following conditions: • Installation has been performed by an authorised person, accordance with manufacturer's recommendations. • Seals remain intact and no unauthorised structural changes have been made. • The device has been used in accordance with its intended use according to user manual. • Damage is not a result of improperly made electrical system or weather conditions. • The manufacturer is not responsible for the mechanical damage and damage which occurred as a result of improper use. In case of failure, the device must be submitted for repair with a Warranty Card. Defects revealed within the warranty period will be removed free of charge no longer than 1 4 days after accepting the product for repair. Warranty and post-warranty repairs are performed by the manufacturer i.e. FAKRO PP. Sp. z o.o. Quality Certificate: Device Model............................................................................................................................................ Serial Number............................................................................................................................... Seller............................................................................................................................................. Address......................................................................................................................................... Date of Purchase............................................................................................................................ ............................................................................................................... Signature (stamp) of installing person © 201 3 FAKRO ® 25.11 .1 3 NC97C-GB