1
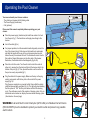
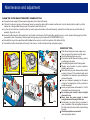
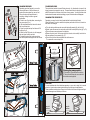
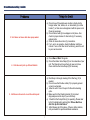
BK 0002700
ENGLISH
Dear Customer,
Thank you for choosing our product to clean your pool. We hope
that you will enjoy using your new robot to maintain your swimming
pool for years to come.
Before you begin to use your robot, please take a few minutes to
carefully read these operating instructions.
Again, thank you for choosing our product.
IMPORTANT
CAUTION: Do not switch the pool cleaner “ON” if it is not fully
immersed in water. Operating the cleaner out of water will
cause severe damage immediately and will result in loss of
warranty.
Allow the cleaner to remain in the pool for 15 to 20 minutes
following the end of its cleaning cycle. This will allow the
motors to cool adequately. Do not leave the cleaner in the
pool all the time. Always remember to turn the power supply
“OFF” and unplug it from the power outlet before removing
the cleaner from the pool.
WARNING: Your Cleaner should not be used while people
are swimming in the pool.
Safety Note
- The unit must be supplied through a residual current device
(RCD) having a rated residual operating current not
exceeding 30 mA
- The connection to the branch circuit should be consistent
with the local and national wiring rules (electrical code).
- Mishandling of the unit can result in leakage of lubricants.
- If the supply cord is damaged, it must be replaced by the
manufacturer’s service agent or a qualified and trained
person in order to avoid hazards.
1
Operating the Pool Cleaner
Your new automatic pool cleaner contains:
- The robotic pool cleaner with its floating cable.
- The Power Supply (transformer).
- Cart (optional)
Please read this manual completely before operating your pool
cleaner.
Place the power supply (transformer) at least three meters / ten feet
from the pool.(fig.1). The transformer will supply low voltage to the
cleaner.
1
Uncoil the cable.(fig.1a)
For proper operation, lock the moveable handle diagonally across the
top of the cleaner's body. Push down on the handle lock mechanism
and slide the handle all the way to the end (recommended one slot
before the end), then release the lock. The handle will remain fixed in
this position. Repeat this process on the other side of the cleaner.
Remember, the handle must be fixed diagonally (fig.2a, 2b)
1a
Place the unit in the water. Turn the unit side to side in the water to
allow air to escape from the body and then let the cleaner sink to the
bottom of the pool (fig.3). Then, spread the cable over the surface of
the pool as evenly as possible (fig.1).
Plug the cable into the power supply. Make sure the key on the plug
exactly corresponds with the key slot on the socket of the power
supply (fig.1b).
Plug the power supply into a grounded outlet. Ensure that the electric
outlet has been properly grounded (fig.1c). The light will glow indicating
that the system is “ ON “ and the pool cleaner will start the cleaning
cycle. The unit keeps record of the number of cleaning cycles. Only an
authorized service center can display the accumulated cleaning cycles.
(See details on the next page)
2b
3
2a
1b
WARNING: A Ground Fault Current Interrupter (GFCI-USA) or a Residual Current Device
(RCD-EUROPE) must be installed to protect your electric outlet and prevent any possible
electric shock.
1c
2
Power Supply - Operating Instructions
A
C
slot
D
E
slot
socket
Push and rotate right to lock
B
F
key
key
Cable
plug
Transformer
socket
Rotate left and pull to unlock
To plug the cable (Fig A) into the socket on the power supply (Fig B), please do the following:
1. Prepare the plug as seen in (Fig. C) with the key and 3 outside slots exactly as shown.
2. Fit exactly the key and the slots from cable plug with the corresponding key and slots from the transformer socket. (Fig. D)
3. Push the plug into the socket of the transformer all the way in.
4. Once the plug is in, rotate the plug to the right to lock it into place (Fig. E).
5. To remove the plug, first rotate the plug to the left to unlock it, then pull it out (Fig. F).
a. Light indicates that the machine is running.
b. Green push button turns the machine ”ON”.
c. Red push button turns the machine “OFF”.
IMPORTANT- After every cycle the pool cleaner will turn off automatically . In case you want to turn the machine off during the working
cycle, push the red button once and the indicator light will turn off, indicating that the machine has stopped running.
3
Maintenance and adjustment
CLEAN THE FILTER BAG AFTER EVERY CLEANING CYCLE
a. Unplug the power supply. (Please keep the plug away from contact with water)
b. If the unit is in the pool, gently pull the cleaner toward you using the cable until the handle is within reach. Use the handle (not the cable) to pull the
cleaner out of the pool after allowing most of the water to drain from the unit.
c. Lay the unit on its back on a smooth surface (in order to prevent scratches on the machine body), release the lock tabs and remove the bottom lid
assembly. (fig.4a, 4b, 4c, 4d)
d. Remove the filter bag from the support bars, turn it inside out and wash off all the dirt with a garden hose or in a sink. Squeeze the bag gently until the
rinse water is clear. If necessary, machine wash the bag using only cold water with NO DETERGENT! (fig.5)
e. Re-install the bag on the support bars with the label in the center of one of the long sides of the bottom lid (5a)
f. Re-install the bottom lid assembly in the body. Push down on it until lock tabs will snap into place properly.
lock tab
smooth
surface
smooth
surface
label
4
IMPORTANT TIPS:
Shut off and unplug the power supply every
time you remove the cleaner from the water.
Clean the filter bag after every cycle.
Reverse the handle after every cleaning cycle to
avoid tangling the cable.
Periodically straighten out the floating cable.
Replace worn brushes to ensure maximum
cleaning performance
Make sure that your pool cleaner positions itself
properly on the wall. The machine handle must
rest parallel to the water line upon reaching the
surface of the water.
Save your cleaner's packaging for off-season
storage or for shipping the unit to your dealer if
service is required.
Leave your pool cleaner in the water for 15 to 20
minutes after every cleaning cycle.
Do not leave your cleaner in direct sunlight
when not in use.
Never leave the power supply in direct
sunlight and avoid leaving it in the rain.
Occasionally, you should rinse your cleaner in
clean, fresh water. This will lengthen the service
life of the drive belts, drive tracks and scrubbing
brushes.
Clean the propeller once a month
(see next page for details)
6
Wheel tube
PVA brush
end hub
CHANGING BRUSHES
Depending upon how frequently you use the
cleaner pool cleaner, it will be necessary to
replace the brushes when they are worn out.
Worn out brushes will impede cleaner’s
scrubbing, climbing the walls or general
performance.
a. Detach one of the side plates, unscrewing the
four screws (see fig.7a ).
b. With side plate detached, take out the wheel
tube from the machine.
c. Open the end hub and pull out the worn PVA
brush.(see fig.6)
d. Place the new PVA brush on to the hexagonal
tube and close it with the end hub.
e. Reinstall the wheel tube in place and place
back the side plate screwing back the four screws.
PVA BRUSHES CARE:
This special brush material is most efficient when wet. Any discoloration is normal in the
drying process when exposed to open air. Please allow brushes to absorb pool water for
about 20 minutes before initial use or at first use of every season. You will notice that as the
brushes absorb the water and start scrubbing your pool, the discoloration will disappear.
CHANGING THE DRIVE BELTS
Depending on usage, the drive belts (located behind the side plate) will stretch.
When this happens, in order to maintain the optimum performance of the unit, these drive
belts have to be changed.
a) Turn the robot upside down and remove the bottom lid assembly (fig. 4a,4b,4c,4d).
b)Inside, locate 4 screws on drive motor side, which hold the side plate in place (fig. 7a, 7b).
c)Take out these screws and remove the side plate
d)Remove the drive track. Before removing the drive track, notice carefully how the drive
belts are positioned for re-assembly (fig. 7c).
e)Take out the old drive belts and replace them with new ones.
To re-assemble, reverse steps d to a.
7a
outlet top
propeller
Cleaning the pump propeller:
1) Take out the 2 (4) screws from the outlet top
2) Take out the outlet top and remove hair and
other debris around propeller
7b
CAUTION:
To avoid scratches and other blemishes appearing on your robot, simply find a smooth
surface for it to rest on when cleaning the debris bag or performing minor adjustments.
These scratches could produce changes in the robots soft and smooth edges resulting in
potential damage to some flexible pool surfaces.
7c
smooth
surface
5
smooth
surface
PLEASE CHECK THE FOLLOWING BEFORE CALLING YOUR SERVICE CENTER
Before troubleshooting, the pool cleaner must be disconnected from the power supply and the power supply must be unplugged from the
electrical outlet to prevent damage to the unit and possible personal injury.
For reference numbers, consult the parts list diagram located on the last page of the instructions.
1. Unit does not pump water or move:
a) Check to see if electric outlet (22) has power.
b) Check if transformer (16) is plugged into a grounded outlet
and the blue cable assembly is plugged into the
transformer.*
c) Switch the power supply “OFF” (19) and “ON” (21) buttons
a few times. Allow 45 seconds between “ON” and “OFF”.
d) Check for and remove any debris such as hair, string, or
leaves that may be obstructing the free movement of the
Drive Pulley (5), Drive Belts (6) , or Drive Tracks (7) .
e) Check that the Drive Belts (6) and Drive Tracks (7) are
properly aligned and are taut. Adjust or replace if
necessary.
2. Unit does not pump water at all, or pumps slowly
but moves:
a) Check to see if propeller (1) is seized due to accumulation
of hair or debris on the propellers. Remove the top screws on
each outlet top (1) and clean the propeller. When
reassembling the top cover, do not overtighten the screws.
b) Check to see if the filter bag (12) is thoroughly clean.
Clean as necessary.
c) If a and b are negative, check the pump motors (2). If
they are not functioning send the unit to your service
center.
*The transformer cord can only be replaced with the aid of special purpose tools normally available only to authorized dealers, distributors and service centers.
6
a) Check to see if forward/reverse motion is obstructed by
foreign matter; hair, debris, etc. on drive belts (6) or drive
tracks (7) or there is an entanglement with the power cord.
Clean as necessary.
b) Check if drive belts (6) have slipped out of place. Also
check for proper tension of drive belts (6). If necessary
replace belts.
c) Check for loose drive motor (3) connections.
d) If a, b, and c are negative, check the Master and Slave
motors. If one or the other is not functioning, send the unit
to your service center.
3. Unit does not move but does pump water:
a) Check 2a and 2b of this guide.
b) Check the Intake Valve Flaps (23) on the underside of your
unit. The Flaps should move freely to open and close.
Clean and free the Valve Flaps (23) if necessary.
4. Unit does not pick up dirt and debris:
a) Most likely a thorough cleaning of the filter bag (12) is
needed.
b) Check to see that the blue cable (15) is properly spread
out and is untangled.
c) Allow the unit to run in the pool for the entire cleaning
cycle.
d) Make sure that the Floating Handle (14) is locked
diagonally across the top of your unit's body.
e) Check that the Pump Motor (2) is operating. Please refer
to the Troubleshooting section titled “Moves But Does
Not Pick Up Dirt And Debris”
f) After following all of the above, if there is still a problem,
call your dealer for specific additional assistance.
5. Unit does not seem to cover the entire pool:
7
a) Check the battery in the Remote Control Transmitter (25),
replace if necessary.
b) Make sure that you activate the RC System (25) no more
than 30 meters away from the Transformer, pointing the
control box to the antenna.
c) If there is still a problem with the RC System (25), call your
service center for assistance.
6. Remote control (optional) does not operate properly:
7. Debris Comes Out Of The Aquabot When
Removing It From Pool
(Bottom Lid Does Not Close Properly)
a) Lock Tab (24)s -Check that the Lock Tabs (24) are not
warped. They should be straight and aligned with the unit's
body.
b) Intake Valves (23) - Check that the Intake Valve Flaps on
the underside of your unit (in the Bottom Lid ) move freely
to open and close. Clean Flaps if necessary.
8. The cable is twisted:
a) Reverse the diagonal position of the handle.
b) Use the E-Z swivel as shown bellow.
CABLE CARE
The cable may become twisted after a period of time in use. To correct
this condition, simply lock the moveable handle on the top of the cleaner
in the opposite diagonal direction. The pool cleaner will now travel in the
opposite direction while cleaning your pool and the cable will uncoil.
Check the cable periodically for external damage. If the problem persists,
use the E-Z Swivel device.
Holding with one hand the E-Z Swivel.
Place the Robot on the ground and
unplug the cable from the transformer.
With one hand, holding the E-Z Swivel,
walk away from the Robot, pulling the The core will rotate inside the cover
cable to its full length.
and in this way will untangle the cable.
patent pending
8