1
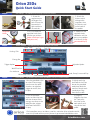
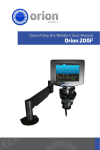
Orion 250s
Quick Start Guide
Follow the steps below to begin welding right away.
Step 1
Welder Setup
*for additional info see page 8 of the user manual
1. Place the welder in a desired
workspace. *Orion HDMI ports
are not compatible with any
other HDMI ports. Connecting
them to other devices may
damage the welder and/or the
other devices.
3. Plug the foot
pedal into any of the
three “Foot Pedal/
Microscope” ports
on the welder. Use
of foot pedal is
optional.
Step 2
Microscope Setup
2. Attach the power
cable to the back of
the welder then into
the wall.
a)
On
Step 3
Stylus Setup
3. Attach the power
cable into the back of
the microscope then into
the wall. Now turn on the
microscope and adjust
the brightness with the
dial on the side.
Collet
b)
2. Plug microscope
cable into either of
the 3 “Foot Pedal/
Microscope” ports
on the welder then
into the port on the
microscope light ring.
4. Adjust the microscope head
and stylus holder up and down
by loosening their respective
knobs. Once they are in a
desired position, tighten their
knobs.
*for additional info see page 14 of the user manual
1. With the slit on the
Stylus plug facing up,
lightly push the plug
into the port and screw
the connector on the
plug clockwise 3 or 4
turns.
a)
4. Choose your
preferred hand piece
attachments and plug
them into the front
of the welder. *a)
Arc Welding. b) Tack
Welding.
*for additional info see page 9 of the user manual
1. Place the microscope next to
the welder. *Orion HDMI ports
are not compatible with any
other HDMI ports. Connecting
them to other devices may
damage the welder and/or the
other devices.
Brightness
b)
c)
Hull
0.6-0.7”
3. a) Pull to remove the stylus hull then unscrew the collet
to insert the electrode. b)The electrode should stick out
between 0.6 and 0.7 in. c) Tighten the collet and slide the
stylus hull back on.
2. Now push in the end
of the plug and screw
the connector 3 or 4
turns again. Repeat this
process until the plug is
securely fastened.
4. Place the stylus in the
stylus holder then adjust
the microscope head up or
down with the adjustment
knob until the stylus is
in focus. *Place a finger
under to electrode to help
with focusing.
OrionWelders.com
Orion 250s
Quick Start Guide
Step 4
Gas Setup
*for additional info see page 12 of the user manual
1. Screw the
regulator onto
the Argon Gas
tank. Ensure the
connection is
tight and there
are no leaks.
3. First, unscrew the
regulator knob, then
turn the gas tank on.
(make sure there is gas
tank pressure.)
Regulator
Knob
2. Attach the
thicker end of
tubing to the
regulator, then
the thinner end
to the back of
the welder.
Tank Pressure
4. Slowly turn the
regulator knob
clockwise until the
pressure to welder
is at 10 cuft/hr (do
not exceed 10 psi).
Pressure to Welder
Step 5
Touch Screen
*for additional info see page 15 of the user manual
Load Save
Arc Tab
Tack Tab
Settings Tab
Energy Bar
Trigger Option
Agitation Option
Weld Time Bar
Gas Indicator
Microscope Indicator Foot Pedal Indicator
Step 6
First Welds
Undo, Sleep, Pause and Play
*for additional info see www.OrionWelders.com for instructional videos
1. Use the provided stylus
to select 25ws energy,
max time on the weld
time bar, no agitation,
trigger on touch, then
hit play.
3. Use the provided
stylus to select the tack
tab then choose 60ws
energy, max time on the
weld time bar, trigger
with Foot Pedal then
hit play.
2. Lightly touch the
electrode in the 25ws
box on the provided
weld plate. Maintain
contact & keep hands
steady by resting
them on the table.
4. Plug the
Alligator clips into
the Tack ports
then line up the
work pieces and
step on the foot
pedal.
*For immediate access to videos, tutorials, and other Orion related material;
scan this QR code with any smart phone or go to www.OrionWelders.com.
OrionWelders.com