1
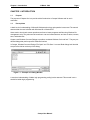
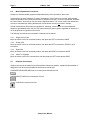
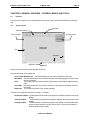
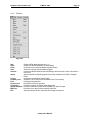
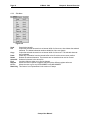
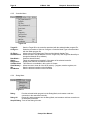
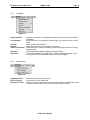
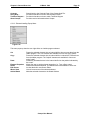
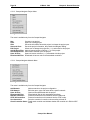
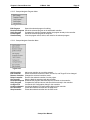
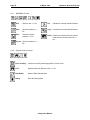
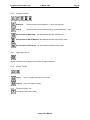
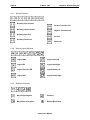
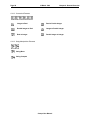
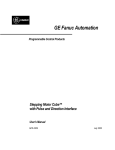
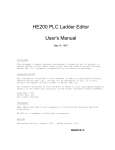
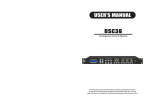
User Manual for IC300OSW232 Cscape Software Second Edition, 19 March 1999 GFK-1630 WARNINGS, CAUTIONS, AND NOTES as Used in this Publication Warning Warning notices are used in this publication to emphasize that hazardous voltages, currents, temperatures or other conditions that could cause personal injury exist in this equipment or may be associated with its use. In situations where inattention could cause either personal injury or damage to equipment, a Warning notice is used. Caution Caution notices are used where equipment might be damaged if care is not taken. Note Notes merely call attention to information that is especially significant to understanding and operating the equipment. This document is based on information available at the time of its publication. While efforts have been made to be accurate, the information contained herein does not purport to cover all details or variations in hardware or software, nor to provide for every possible contingency in connection with installation, operation, or maintenance. Features may be described herein which are not present in all hardware and software systems. GE Fanuc Automation assumes no obligation of notice to holders of this document with respect to changes subsequently made. GE Fanuc Automation makes no representations or warranty, expressed, implied, or statutory with respect to, and assumes no responsibility for the accuracy, completeness, sufficiency, or usefulness of the information contained herein. No warranties of merchantability or fitness for purpose shall apply. The following are trademarks of GE Fanuc Automation North America, Inc. Alarm Master CIMSTAR Helpmate PROMACRO Series Six CIMPLICITY CIMPLICITY 90 – ADS CIMPLICITY Power TRAC GEnet Genius Genius PowerTRAC Logicmaster ModelMaster ProLoop Series One Series Three Series Five Series 90 VuMaster Workmaster The following are trademarks of Horner Electric, Inc. Cscape SmartStack CsCAN Copyright 1999 GE Fanuc Automation North America, Inc. All Rights Reserved i TABLE OF CONTENTS CHAPTER 1: INTRODUCTION............................................................................................................... 1 1.1 1.2 PURPOSE ................................................................................................................................... 1 PREREQUISITES .......................................................................................................................... 1 CHAPTER 2: CONVENTIONS USED IN THIS MANUAL ........................................................................ 3 2.1 PURPOSE ................................................................................................................................... 3 2.2 SEMANTIC CONVENTIONS ............................................................................................................. 3 2.3 TYPOGRAPHICAL CONVENTIONS.................................................................................................... 3 2.4 MOUSE OPERATIONAL CONVENTIONS ............................................................................................ 4 2.4.1 Single Click or Click ........................................................................................................... 4 2.4.2 Double Click....................................................................................................................... 4 2.4.3 Right-Click ......................................................................................................................... 4 2.4.4 Select" or "Highlight ........................................................................................................... 4 2.5 GRAPHICAL CONVENTIONS ........................................................................................................... 4 CHAPTER 3: PRODUCT OVERVIEW .................................................................................................... 5 3.1 3.2 PURPOSE ................................................................................................................................... 5 PRODUCT OVERVIEW ................................................................................................................... 5 CHAPTER 4: SYSTEM REQUIREMENTS .............................................................................................. 7 4.1 4.2 PURPOSE ................................................................................................................................... 7 REQUIREMENTS .......................................................................................................................... 7 CHAPTER 5: INSTALLATION................................................................................................................ 9 5.1 5.2 5.3 5.4 5.5 5.6 PURPOSE ................................................................................................................................... 9 DISTRIBUTION ............................................................................................................................. 9 INSTALLATION ............................................................................................................................. 9 RESULTS .................................................................................................................................... 9 EXECUTION................................................................................................................................10 CUSTOMIZING THE INSTALLATION .................................................................................................10 CHAPTER 6: GENERAL OVERVIEW – SCREENS, MENUS, AND TOOLS ..........................................11 6.1 PURPOSE ..................................................................................................................................11 6.2 SCREEN LAYOUT ........................................................................................................................11 6.3 MENUS......................................................................................................................................12 6.3.1 Main Menu ........................................................................................................................12 6.3.2 File Menu ..........................................................................................................................13 6.3.3 Edit Menu..........................................................................................................................14 6.3.4 Program Menu ..................................................................................................................15 6.3.5 Controller Menu ................................................................................................................16 6.3.6 Debug Menu .....................................................................................................................16 6.3.7 Tools Menu .......................................................................................................................17 6.3.8 Screens Menu...................................................................................................................17 6.3.9 View Menu ........................................................................................................................18 6.3.10 Window Menu ...................................................................................................................18 6.3.11 Help Menu ........................................................................................................................19 6.3.12 Element Handling Popup Menu .........................................................................................19 6.3.13 Cscape Navigator Project Menu ........................................................................................20 6.3.14 Cscape Navigator Network Menu ......................................................................................20 6.3.15 Cscape Navigator Program Menu......................................................................................21 6.3.16 Cscape Navigator Controller Menu....................................................................................21 6.4 TOOL BARS ...............................................................................................................................22 6.4.1 WINDOWS Tool bar..........................................................................................................24 6.4.2 Program Control Tool bar ..................................................................................................24 6.4.3 Controller Tool Bar ............................................................................................................25 6.4.4 Target Node ID Tool..........................................................................................................25 6.4.5 Security Tool Bar...............................................................................................................25 6.4.6 Text Screen Editor Tool.....................................................................................................25 6.4.7 Boolean Elements .............................................................................................................26 6.4.8 Bit-wise (logical) Elements ................................................................................................26 6.4.9 Data Move Elements.........................................................................................................26 6.4.10 Math Elements ..................................................................................................................27 6.4.11 Advanced Math Elements..................................................................................................27 6.4.12 Conversion Elements ........................................................................................................28 6.4.13 String Manipulation Elements ............................................................................................28 6.4.14 Comm Port Functions........................................................................................................29 6.4.15 Special Functions..............................................................................................................29 6.4.16 Status Bar .........................................................................................................................29 6.5 HOT KEYS .................................................................................................................................30 Chapter 1: Introduction 19 March 1999 Page 1 CHAPTER 1: INTRODUCTION 1.1 Purpose The purpose of Chapter One is to provide a brief introduction to Cscape Software and its use in controllers. 1.2 Prerequisites A basic level of understanding of Microsoft Windows technology and operation is assumed. The manual assumes that the user is familiar with Windows-95 or Windows-NT. Users need to know basic mouse operations and how to locate programs and files using Windows file management tools. They also need to know how to use and create shortcuts. and how to select, rename, save, and delete files. Cscape uses Windows Common Dialogs to provide a consistent Windows "look and feel." They are predefined dialogs that perform specific Windows functions. In Cscape, Windows Common Dialogs “File Open” and “File Save.” are used. Both dialogs look identical except for the title bar at the top of the dialog: Figure 1.1 - Example of a Dialog Window A user-level understanding of ladder logic programming coding is also assumed. This manual is not a tutorial for ladder logic programming. Cscape User Manual Page 2 19 March 1999 NOTES Cscape User Manual Chapter 1: Introduction Chapter 2: Conventions 19 March 1999 Page 3 CHAPTER 2: CONVENTIONS USED IN THIS MANUAL 2.1 Purpose The purpose of Chapter Two is to detail the visual and semantic conventions used in the manual. 2.2 Semantic Conventions GE Fanuc controller products provide many features not normally available in standard Programmable Logic Controllers (PLCs). The Operator Control Station (OCS) product line includes features such as built-in displays and network capability. GE Fanuc differentiates its product from a common PLC by referring to its product as a “controller” or as an "OCS". Both the controller and the OCS have control capabilities. The major difference between a controller and an OCS is that an OCS has display capabilities. 2.3 Typographical Conventions Whenever possible, graphics are used to depict the actions that need to be taken. In the cases where this is not possible, the following conventions are used: a. Menu Items, when referenced from text, are printed in Courier Type. Example: File b. When a series of menu items must be selected, the items are printed in Courier and are separated by a vertical bar. Example: File|Open c. Inputs typed by the user are also printed in Courier. Example: To select the third item, type <3> Cscape User Manual Page 4 2.4 19 March 1999 Chapter 2: Conventions Mouse Operational Conventions Cscape is a Windows-based program and depends heavily on the operation of the mouse. In this manual, the term "left button" is used to describe the "main" button, the one that, when pressed, causes the primary action (usually the selection or activation of an item). The term "right button" describes the "other" button, which may or may not cause a significant action. The "center" button of a three-button mouse (or simultaneously clicking both buttons of a two-button mouse) is not used in Cscape. Several mouse device drivers have the capability of "switching" mouse buttons to accommodate lefthanded or right-handed users. Still, the "left" button causes the primary action, regardless of whether it is on the physical left or right side of the mouse. The following conventions are used herein to describe mouse actions: 2.4.1 Single Click or Click Move the mouse cursor into a suitable position, then press the LEFT mouse button ONCE. 2.4.2 Double Click Move the mouse cursor into a suitable position, then press the LEFT mouse button TWICE in quick succession. 2.4.3 Right-Click Move the mouse cursor into a suitable position, then press the RIGHT mouse button ONCE. 2.4.4 Select" or "Highlight Move the mouse cursor over a desired item, and then press the LEFT mouse button ONCE. 2.5 Graphical Conventions Graphics are used in the manual as much as possible. Whenever possible, a graphical representation is designed to look as much as possible like its real-world counter part. COMPUTER KEYBOARD KEYS have a rounded, three-dimensional look WINDOWS BUTTONS have a rectangular, flat look. Cscape TOOLS have a square, flat look: Cscape User Manual Chapter 3: Product Overview 19 March 1999 Page 5 CHAPTER 3: PRODUCT OVERVIEW 3.1 Purpose The purpose of Chapter Three is to provide a brief overview of the Cscape product. 3.2 Product Overview Cscape stands for “Control Station Application Programming Environment” Using Cscape, the complete control station line can be programmed using a single application programming package. Included in Cscape are: • • • • • The "drag and drop" Ladder Program Editor. Integrated Operator Interface Programming Controller Configurator, including I/O Configuration Project Navigator, for organization of large projects Real-time Debugger Firmly based in Microsoft Windows technology, Cscape provides an intuitive, familiar interface that is easy to learn and use. Use of the mouse based interface reduces typing to a minimum. Most elements can be specified and placed using the mouse alone. When a network (CAN, DeviceNet, etc) is provided by the controller products, Cscape can use the network to upload, download, and monitor any GE Fanuc controller residing on the network. Using the Network Pass Through Connection, Cscape can talk to any unit from one position. It is no longer necessary to make a direct physical connection to a unit to be programmed. Cscape can make a logical connection to the unit from any other unit on the network. Configuration of attached controllers is handled by Cscape. Using Network Pass Through features, any unit can be programmed through a physical connection to any other unit. Once the ladder program is written, it is automatically checked for syntax errors before it is downloaded. The source code causing syntax errors can be located through a simple click of the mouse. Ladder source code can be protected from unauthorized viewing or editing by using "OEM Sections". Rungs of ladder code are marked as "OEM Sections", and can be viewed or edited only by personnel with proper security clearance. Cscape programs can be "self-documenting". That is, it is possible to save the actual source code, comments, and element names to the target unit. Although this takes up valuable memory inside the controller, the complete program – source code, comments, and names – are available to individuals with a sufficient security clearance and the Cscape software. Disk files are not necessary Physical errors or those errors originating from an outside source can be located by using the Cscape Debugger. This provides a real-time connection to all affected controllers. The user is able to view inputs and outputs and see the subsequent impact of each input and output as they are happening. Cscape User Manual Page 6 19 March 1999 Chapter 3: Product Overview Cscape supports the complete GE Fanuc OCS line. Cscape can be manually configured for a specific product, and programs can be written before the hardware is available. Once connected to the network Cscape can automatically configure controllers. Cscape is capable of supporting multiple ladder program files at one time. The programmer can develop a project which contains all source code files, hardware descriptions, and hardware configuration. Cscape can also debug all OCS units simultaneously from a single PC. Cscape User Manual Chapter 4: System Requirements 19 March 1999 Page 7 CHAPTER 4: SYSTEM REQUIREMENTS 4.1 Purpose The purpose of Chapter 4 is to describe the hardware and software components necessary to load and install Cscape. 4.2 Requirements A personal Computer running Microsoft's Windows 95™, Windows 98™ or Windows NT™ Version 4.0 or later: • • • • • 8MB of RAM Memory, minimum. Mouse 1 free serial port 600x800, 256 color video display recommended 10 MB of hard disk space Additional hard disk space will be needed to store any ladder programs that are written. If the computer uses a serial mouse, a second serial port must be provided for use by Cscape. Serial Port parameters used by Cscape are not user-definable. For reference, the Cscape serial port parameters are set at 9600 baud, 8 data bits, no parity, and 1 stop bit. Cscape User Manual Page 8 19 March 1999 NOTES Cscape User Manual Chapter 4: System Requirements Chapter 5: Installation 19 March 1999 Page 9 CHAPTER 5: INSTALLATION 5.1 Purpose The purpose of Chapter Five is to describe the installation process for Cscape. 5.2 Distribution Cscape may be provided on two or more floppy diskettes, or on a single CD-ROM. There is no difference in the functionality caused by the distribution method. In the case of floppy diskettes, the diskettes are clearly labeled DISK 1, DISK 2, etc. During the installation process you will be asked to insert Disk 2 and any subsequent diskettes, if necessary. In the case of CD-ROM, there is only one disk provided. 5.3 Installation The Cscape Distribution disk contains an Installation Wizard. On floppy diskette 1 or on the CD-ROM locate and run the SETUP.EXE program. Complete instructions are included. There is only one point where a relatively important decision must be made. You will be asked to choose a directory in which to install Cscape. The default directory is C:\Progran Files\Cscape. This will be acceptable for most installations. Some customers, though, may wish to customize this. The most common "custom" directory is C:\Cscape. In any case, it is important that you remember the Cscape "home" directory path, be it C:\Progran Files\Cscape, C:\Cscape, or something else. 5.4 Results A successful Cscape installation will perform the following actions: The specified Cscape "home" directory will be created if it does not already exist. A special PROJECTS directory will be created in the Cscape "home" directory, [home]\PROJECTS. The Cscape executable will be installed in the "home" directory. Cscape Help Files will be installed in the "home" directory. Cscape will be attached to the Start Menu by placing a group in the C:Windows\Start Menu \Programs directory. This group contains shortcuts that can be copied to the desktop or to the Start Menu itself. Cscape User Manual Page 10 5.5 19 March 1999 Chapter 5: Installation Execution Cscape is launched by locating and clicking its shortcut: Click on the Start Button, Highlight the PROGRAMS menu. Highlight the CSCAPE menu. Highlight the Cscape Shortcut. 5.6 Customizing the Installation There is little that can be customized. The only useful customization is to create a shortcut in a more easily accessible location. Using standard Windows techniques, locate the C:\Windows\Start Menu\Programs\Cscape directory. Right-Click on the Cscape icon. Select COPY from the popup menu. Close the directory. Click the mouse on the Windows Desktop. This places the Cscape Icon on the desktop for easier use. Cscape User Manual Chapter 6: General Overview 19 March 1999 Page 11 CHAPTER 6: GENERAL OVERVIEW – SCREENS, MENUS, AND TOOLS 6.1 Purpose The purpose of Chapter Six is to describe the screen layout, menus, and tools available to the Cscape user. 6.2 Screen Layout Main Menu Horizontal Toolbars Vertical Toolbars Floating Toolbars Source Code Display Area Ruler Scroll Bars Status Bar Figure 6.1 Once invoked, the Cscape screen appears as follows: The important parts of the display are: Source Code Display Area The ladder program source code is displayed in this area Main Menu This is the Main Menu which contains the main function grouping from which all submenus are derived. Ruler This contains the Line Number and/or Rung Number of the ladder programs source code. Scroll Bars Use these windows to view areas of the source code that are not already visible on the screen. Status Bar This contains the status of the Cscape package. Toolbars may be placed horizontally, vertically, or "floating": Horizontal Toolbars Toolbars placed in this area will be placed horizontally across the tops of the display. Vertical Toolbars Toolbars placed in this area will be placed vertically along the left side of the display. Floating toolbars Toolbars that are not otherwise placed in the vertical or horizontal areas will appear as child windows, and will "float on top of" any other information or windows displayed by Cscape. Cscape User Manual Page 12 6.3 19 March 1999 Chapter 6: General Overview Menus Like most Windows programs, Cscape depends heavily on menus. The following is a discussion of the menus and their functions. 6.3.1 Main Menu Figure 6.2 The Main Menu is always present at the top of the Cscape window. The following sub-menus are available: File Edit Program Controller Debug Tools Screens View Window Help Provides file handling capabilities: Open, Close, Print, etc. Provides editing capabilities: Cut, Copy, Paste, etc. Provides functions at the program level: Upload, Download, verify, etc. Provides functions at the controller level: Run, Stop, Network ID, etc. Provides access to the Debug facilities. Provides system-wide utilities such as security and system options Provides access to the Text Screen Editor and Remote Terminal Access Provides access to "viewed" features such as comments, grid line, and toolbars. This is a standard Windows access menu allowing access to a New Window, tiling, etc Provides access to the on-line help file. Cscape User Manual Chapter 6: General Overview 6.3.2 19 March 1999 Page 13 File Menu Figure 6.3 New Open... Close Save Save As... Opens a NEW ladder program file (CSP) Invokes the familiar Windows File Open dialog Closes the current selected ladder program window. Saves the currently selected ladder program Invokes the familiar Windows Save As dialog to allow the user to save a file under a new name. Import Allows importation of ladder program source files created by the HEPLC Program Editor Project Invokes the Create/Open Project dialog. Summary Info... Allows the user to add or edit information in the File Summary. Print Provides printing features Print Preview Provides Print Preview Features Print Setup... Provides access to the Printer Setup Dialog Box Update Firmware Provides a method to update OCS firmware from within Cscape. MRU List Provides a list of the four Most recently Used files. Exit Saves and closes all files, then exits the Cscape environment Cscape User Manual Page 14 6.3.3 19 March 1999 Chapter 6: General Overview Edit Menu Figure 6.4 Undo Cut Cancels the last edit. Copies the selected elements into an internal buffer for future use, then deletes the selected elements. The deleted elements remain available for future use (paste). Copy Copies the selected elements into an internal buffer for future use. The selected elements are not deleted. Paste Pastes any information from the internal buffer to the file at the current cursor position. Delete Deletes the selected elements. The elements are not saved and can not be re-used. Select All Selects all elements in the source file. Find Invokes a dialog to allow you to find an element. Replace Allows the user to replace a registers reference with a different register reference. Go To... Allows the user to go to any LINE NUMBER or RUNG NUMBER. Read Only This feature is not implemented in the version of Cscape Cscape User Manual Chapter 6: General Overview 6.3.4 19 March 1999 Page 15 Program Menu Figure 6.5 Network Inputs... I/O Names... Element Usage Upload Download Verify Error Check... View Error List... Invokes a dialog for the assignment of Network (%IG, %QG) points. Provides a dialog for the naming of I/O points. generates a "report" about how I/O Elements are used. Starts the procedure to upload a program from a controller into Cscape. Starts the procedure to download a program from Cscape to a controller. Starts the procedure to verify a program in a controller with that displayed in Cscape. Checks the selected source code for syntax errors. Views the Error List generated by the last Error Check. Cscape User Manual Page 16 6.3.5 19 March 1999 Chapter 6: General Overview Controller Menu Figure 6.6 Target ID... Configure... I/O Filters... Set Network ID Data Watch... Status... Diagnostics... View/Set Clock Clear Memory... Idle Run/Monitor 6.3.6 Sets the Target ID for the controller associated with the selected ladder program File. Starts the procedure to Select or Configure a Controller Model Type to be associated with the ladder program file. Allows tuning of the Digital Input Filters and the Network Update Time. Allows the user to set the Network ID of the Target Unit (if the Target has the ability to change the Network ID by software). Starts the Watch Window. Takes an instantaneous "snapshot" of the status of the selected controller. Displays the Status of the selected controller. This feature is not available in this version of Cscape Allows the user to clear all of the OCS' memory – program, retentive registers, etc. Sets the selected controller to the Idle Mode Sets the selected controller to the Run Mode. Debug Menu Figure 6.7 Debug Puts the selected ladder program into the Debug Mode, and creates a real time connection to the associated controller. Debug All Places ALL ladder programs into the Debug Mode, and creates a real time connection to all associated controllers. Stop All Debug Turns off the Debug All mode. Cscape User Manual Chapter 6: General Overview 6.3.7 19 March 1999 Page 17 Tools Menu Figure 6.8 Search Network... Force Outputs... Security... Options... Connect Via Modem Step Calc Strip Chart 6.3.8 Searches the network for all available controllers, then reports their Run Status (RUN/Idle). Allows the user to force outputs to a known state. The controller must be in Idle Mode. Starts the Security procedures. Starts the procedure to set up system-wide options. Allows the user to configure a modem in order to program a remote OCS using telephone lines. Invokes the Stepper Motion Parameter Calculator dialog. Invokes a four-element strip chart dialog. Although intended as an aid in PID tuning, this chart can be used with any four INT (16-bit) registers. Screens Menu Figure 6.9 View/Edit Screens Edit Text Tables Remote Text Term Starts the built-in Text Screen Editor. Start the built-in Text Table Editor. Creates a real-time connection to the associated controller and allows the user to manipulate the controller's front panel under the control of Cscape. Cscape User Manual Page 18 6.3.9 19 March 1999 Chapter 6: General Overview View Menu Figure 6.10 Grid Lines Wide View OEM Sections Tool Bars Comments Zoom Compact Ladder Turns ON or OFF the grid lines used for placement of ladder program elements. Make the element grid position wider so that long element names may be more easily read. Allows special "OEM" (proprietary) code sections to be seen if the proper password is provided. Allows the user to turn ON or OFF those toolbars that have this capability. Allows the user to place comments inside the ladder program. Allows the display to be "zoomed" for better viewing of selected areas. Removes all blank rungs and lines from the ladder program 6.3.10 Window Menu Figure 6.11 NEW Tile Horizontal Tile Vertical Cascade Close All Open Window List 6.3.11 Help Menu CREATES A NEW, VIEW OF THE CURRENT CODE WINDOW. Tiles all open windows in a horizontal manner. Tiles all open windows in a vertical manner. Tiles all open window in a cascade manner. Closes all open windows. This is a list of all opened windows. Figure 6.11 Cscape User Manual Chapter 6: General Overview Contents Using Help… Technical Support… About Cscape 19 March 1999 Page 19 Goes directly to the Contents Page of the Cscape Help File. Provides information on how to use the help function. Provides information on how to reach Technical Support Provides version information about Cscape. 6.3.12 Element Handling Popup Menu Figure 6.12 This menu pops up when the user right-clicks on a ladder program element: Cut Copy Paste Element Properties Delete Edit Screen Where Used Add to Watch Places the selected elements into an internal buffer, then removes them from the ladder program. The "cut" elements are available for future use using "paste". Places the selected elements into an internal buffer, but does NOT remove them from the ladder program. The "copied" elements are available for future use using "paste". Places any elements that are in the internal buffer into the position indicated by the cursor. Allows the user to set the element properties (i.e., Type, offset, name). Deletes the selected elements. The elements are not available for future use. Invokes the built-in text Screen Editor. Lists all occurrences of the selected element. Adds the selected elements to the Watch Window. Cscape User Manual Page 20 19 March 1999 Chapter 6: General Overview 6.3.13 Cscape Navigator Project Menu Figure 6.13 The menu is available only from the Cscape Navigator. New Open Save Save and Close Edit Project Add All Open Files Add Selected Files Open All Files Download All Files Creates a new project. Opens an existing project. Saves the information about this project, but keeps the project open. Saves the project information, then closes the Navigator Dialog. Allows user to change the project file (CPJ) and notes for this project. Adds all opened source code files (CSP) to this project. Adds certain selected file to the project. Opens all source code files (CSP) associated with this project. Downloads all source code to the associated controllers. 6.3.14 Cscape Navigator Network Menu Figure 6.14 The menu is available only from the Cscape Navigator. Add Network Edit Network Open All Files Download All Files RUN All Controllers STOP All Controllers Sort Controllers Check Controller Status Adds a network to the project configuration. Edits the name, type, and notes about a specific network. Opens all files associated with the project. Downloads all files to their associated controllers. Places all controllers on this network into the RUN mode. Places all controllers on this network into the STOP mode. Sorts the controller in numeric order according to Node ID . Reads each controller and indicate whether the controller is in RUN or IDLE mode. Cscape User Manual Chapter 6: General Overview 19 March 1999 Page 21 6.3.15 Cscape Navigator Program Menu Figure 6.15 Edit Program Download Program Verify Program Print Program View Summary Opens the selected program for editing Sends the selected program to the associated controller Compares the selected program against the program already in the controller Sends the selected program to the printer View the program name, author, and notes for the selected program 6.3.16 Cscape Navigator Controller Menu Figure 6.16 Add Controller Edit Controller Rename Controller Delete Controller Set Target ID Download Program Verify Program Configure I/O Configure Network Run Controller Stop Controller Add a new controller to an existing network. Allows the selected controller's name, source file, and Target ID to be changed. Changes the selected controllers name. Remove the selected controller from the project. Sets the Node Id associated with this controller. Download the program associated with this controller to the controller. Compares the selected source code file with that already in the controller. Invokes the I/O Configuration dialog for this controller. Invokes the Network I/O Configuration dialog for this controller. Places the selected controller into the RUN mode. Places the selected controller into the IDLE mode. Cscape User Manual Page 22 6.4 19 March 1999 Chapter 6: General Overview Tool Bars Next to menus, Tool Bars and Tools are the most common means to access program functions. Tool Bars are also highly configurable. In most cases, the user is able to configure how the Tool Bar looks and how it is displayed. Cscape Tool Bars are "dockable" in that they may be automatically attached to the top or left side of the display area or they may "float" anywhere on the screen. Horizontal Toolbars Vertical Toolbars Floating Toolbars Figure 6.17 Because Cscape has many toolbars available, a method has been included to allow easy access to all toolbars without cluttering the display. The Toolbar Selection tool appears like the following: This tool is used to select the Element Toolbars used while creating the Ladder program. The user may select an Element Toolbar by either using the drop-down list, or by using the spinner control. In either case, the selected toolbar appears to the right of the Selection Tool: Unlike other toolbars, this toolbar is not completely "dockable". It may not be docked to the left side of the screen. If, after selecting one toolbar and floating or docking the result, another toolbar is selected, the docked image will return to it's rightful place beside the Selection Tool. If it is desired for the Element Toolbars to be fully dockable, select from the View|Toolbars menu. Cscape User Manual Chapter 6: General Overview 19 March 1999 Page 23 Several Tool bars are available: Boolean Elements tool bar Bit-wise Elements Tool bar Math Elements Tool bar Advanced Math Element Toolbar Comparison Elements Tool bar Timer/Counter Elements Tool bar Data Move Elements Tool bar String Elements Communications Elements Special Elements Windows Tool bar Controller Tool bar Program Control Tool bar Security Tool bar Configure Controller Target ID Selector Text Screen Editor Status Line Cscape User Manual Page 24 6.4.1 Chapter 6: General Overview WINDOWS Tool bar New Opens a new CSP file Cut Deletes the currently selected element Open Opens an existing CSP file Copy Copies the currently selected element Save Save the currently selected CSP file Project 6.4.2 19 March 1999 Paste Pastes any elements from the internal buffer into the currently selected CSP file. Opens or creates a CPJ file Program Control Tool bar Error Checking Check the currently selected program for syntax errors Find Specify and find an element in the CSP file Data Watch Opens a Data Watch window Debug Enter the Debug Mode Cscape User Manual Chapter 6: General Overview 6.4.3 19 March 1999 Controller Tool Bar Download Download the currently selected CSP file to the controller. Upload Upload the file from the controller into the currently selected CSP file. Set Controller to RUN mode Set the selected controller to RUN mode Set Controller to DO I/O Mode Set the selected controller to the DO I/o mode Set Controller to IDLE mode 6.4.4 Set the selected controller to IDLE mode Target Node ID Tool Selects the Node ID of the target unit in a Pass Through Connection. 6.4.5 6.4.6 Security Tool Bar Log In Log in to System Security as a new user Log Out Log out of System Security Text Screen Editor Tool Invokes the Text Screen Editor. Cscape User Manual Page 25 Page 26 6.4.7 19 March 1999 Chapter 6: General Overview Boolean Elements Normally Open Contact Positive Transition Coil Normally Closed Contact Negative Transition Coil Normally Open Coil Set Coil Normally Closed Coil Reset Coil 6.4.8 6.4.9 Bit-wise (logical) Elements Logical AND Logical Shift Left Logical OR Logical Shift Right Logical Exclusive OR Logical Rotate Left Logical NOT Logical Rotate Right Data Move Elements Move Single Register Fill Block Move Block of Registers Relative Block Move Cscape User Manual Chapter 6: General Overview 19 March 1999 6.4.10 Math Elements Equation Divide Plus (add) Modulo Minus (subtract) Square Root Times (multiply) Absolute Value 6.4.11 Advanced Math Elements Exponentiate Tangent Log ArcSine Exponent ArcCosine Natural Log ArcTangent Sine Radians Cosine Degrees Scale Cscape User Manual Page 27 Page 28 19 March 1999 Chapter 6: General Overview 6.4.12 Conversion Elements Integer to Real Real to Double Integer Double Integer to Real Integer to Double Integer Real to Integer Double Integer to Integer 6.4.13 String Manipulation Elements String Move String Compare Cscape User Manual Chapter 6: General Overview 19 March 1999 6.4.14 Comm Port Functions Open Comm Port Transmit to Comm Port Close Com Port Modem Control Receive from Comm Port ModBus Comm Port 6.4.15 Special Functions Stepper Move Independent PID ISA PID 6.4.16 Status Bar Cscape User Manual Page 29 Page 30 6.5 19 March 1999 Hot Keys Key Tool Functions <F1> Context Sensitive Help <F2> Select Normally Open (N/O) Contact <F3> Select Normally Closed (N/C) Contact <F4> Select Branch Element <F5> Select Comment Element <F9> Select Normally Open (N/O) Coil <ESC> Select Tool <CTRL><N> Open New File <CTRL><O> Open Existing File <CTRL><S> Save File <CTRL><J> Open Project <CTRL><P> Print <CTRL><X> Cut Selected Elements <CTRL><C> Copy Selected Elements <CTRL><V> Paste Selected Elements <CTRL><Z> Undo last edit <CTRL><A> Select All Elements <CTRL><F> Find a Register <CTRL><H> Replace a Register <CTRL><G> Goto Rung or Line Cscape User Manual Chapter 6: General Overview Chapter 6: General Overview 19 March 1999 Cscape User Manual Page 31 Page 32 19 March 1999 INDEX INDEX Boolean Elements Toolbar ................................................... 26 Comments As Documentation ........................................ 5 Full or Icon ................................................. 18 Configuration OCS Hardware ............................................. 5 Controller Configuration................................................ 5 Force Outputs............................................. 17 Menu.......................................................... 16 Remote Text Terminal ................................ 17 Search Network for..................................... 17 Set Idle Mode ............................................. 16 Set Run Mode ............................................ 16 Term Defined ............................................... 3 Toolbar....................................................... 25 Upload From .............................................. 15 CSP File New File ..................................................... 13 Debug.............................................................. 5 Menu.......................................................... 16 Multiple....................................................... 16 Multiple Units................................................ 6 Default Directories ........................................... 9 Hot Keys........................................................ 30 Menus Controller ................................................... 16 Debug ........................................................ 16 Edit ............................................................ 14 Element Handling ....................................... 19 File............................................................. 13 Help ........................................................... 18 Program ..................................................... 15 Screen........................................................ 17 Tools .......................................................... 17 View ........................................................... 18 Window ...................................................... 18 Mouse Movement Double Click ................................................. 4 Highlight ....................................................... 4 Right Click.................................................... 4 Single Click .................................................. 4 OCS Term Defined .......................................... 3 OEM Code ...................................................... 5 Pass-Through Connection ............................... 5 Password With OEM Code ..........................................18 Remote Text Terminal ....................................17 Tool Bars Advanced Math elements............................27 Bitwise Elements.........................................26 Boolean Elements.......................................26 Controller....................................................25 Conversion Tools ........................................28 Data Move Elements...................................26 Floating.......................................................22 Horizontal ...................................................22 Math Elements............................................27 Program Control .........................................24 Security ......................................................25 Status Bar...................................................29 Vertical .......................................................22 Windows .....................................................24 Tools And Associated Hot Keys............................30 Check for Errors..........................................24 Copy Selected Elements .............................24 Cut Selected Elements................................24 Data Watch.................................................24 Debug.........................................................24 Download....................................................25 Find an Element..........................................24 Log In .........................................................25 Log Out.......................................................25 Menu ..........................................................17 New CSP File .............................................24 New Project ................................................24 Open Existing CSP File...............................24 Paste From Clipboard .................................24 Save CSP File ............................................24 Set DO I/O Mode ........................................25 Set Idle Mode..............................................25 Set Run Mode.............................................25 Set Target ID ..............................................25 text Screen Editor .......................................25 Toolbar Selection Tool ................................22 Upload ........................................................25 Cscape User Manual