1
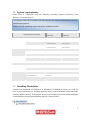
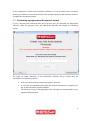
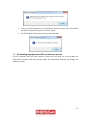
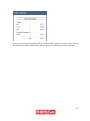
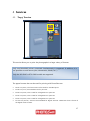
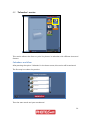
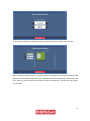
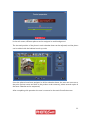
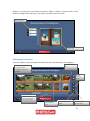
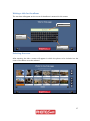
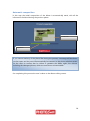
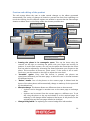
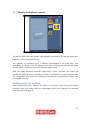
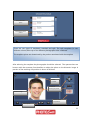
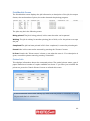
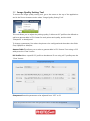
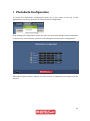
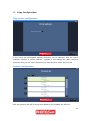
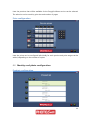
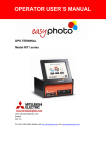
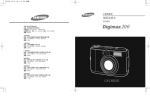
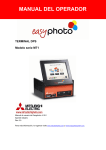
User Manual REV 1.0 Thank you for choosing this Mitsubishi Electric® product More information is available at http://www.mitsubishiphotosuite.com/ 2 1 2 3 4 5 6 7 INSTALLING THE PRODUCT. ...................................................................................................... 4 1.1 SYSTEM REQUIREMENTS ....................................................................................................................................... 5 1.2 INSTALLING PHOTOSUITE. ................................................................................................................................... 5 ACTIVATING THE SOFTWARE .................................................................................................... 7 2.1 EXECUTING THE SOFTWARE DURING THE TRIAL PERIOD ................................................................................... 7 2.2 ACTIVATING THE SOFTWARE THROUGH A HASP USB DEVICE ....................................................................... 8 2.3 ACTIVATING THE SOFTWARE THROUGH A LICENCE KEY .................................................................................... 8 2.4 ACTIVATING EQUIPMENT WITH INTERNET ACCESS ............................................................................................ 9 2.5 ACTIVATING EQUIPMENT WITH NO INTERNET ACCESS.................................................................................... 10 HOME SCREEN............................................................................................................................ 13 3.1 HOME SCREEN ELEMENTS .................................................................................................................................. 13 3.2 HOW TO SELECT THE PHOTOS ........................................................................................................................... 13 3.3 HOW TO SEE IN DETAIL THE ADDED FOLDERS .................................................................................................. 15 3.4 HOW TO START A PHOTOSUITE SERVICE ......................................................................................................... 15 3.5 SHOPPING CART.................................................................................................................................................. 15 SERVICES ..................................................................................................................................... 17 4.1 ‘COPY’ SERVICE ................................................................................................................................................... 17 4.2 ‘CALENDARS’ SERVICE ........................................................................................................................................ 20 4.3 ‘EASYGIFTS ALBUM’ SERVICE ............................................................................................................................. 23 4.4 'IDENTITY CARD PHOTO’ SERVICE ...................................................................................................................... 31 4.5 'GREETING CARDS’ SERVICE ............................................................................................................................... 35 PRINTMODULE ........................................................................................................................... 39 5.1 GENERAL OPERATION ......................................................................................................................................... 39 5.2 IMAGE QUALITY SETTING TOOL ........................................................................................................................ 41 PHOTOSUITE CONFIGURATION .............................................................................................. 42 6.1 COPY CONFIGURATION...................................................................................................................................... 43 6.2 EASYGIFTS CALENDARS CONFIGURATION........................................................................................................ 44 6.3 EASYGIFTS ALBUM CONFIGURATION................................................................................................................ 45 6.4 IDENTITY CARD PHOTO CONFIGURATION ......................................................................................................... 46 6.5 GREETING CARDS CONFIGURATION .................................................................................................................. 50 UNINSTALLING. ......................................................................................................................... 51 3 1 Installing the product. To ensure the correct operation of PhotoSuite the following elements should be installed: - Printer driver (included in the installer) - Microsoft .NET Framework 4.0 - The PhotoSuite application. Follow the instructions given below to install the complete PhotoSuite solution. If a Windows text box appears during the installation process that says "Windows cannot verify the editor of this driver software", select the option “Install this driver software anyway”. . Please ensure that your computer is correctly updated through Windows Update. If you are in doubt, consult your Windows operating system manual. . 4 1.1 System requirements Photo Suite is compatible with the following operating systems: Windows Vista, Windows 7 and Windows 8. To install the Photo Suite software the user must be the machine administrator or have administrator permits. Make sure your operating system has all the available updates. Operating system (32-bit, 64-bit) Minimum requirements system Recommended requirements system Processor Windows Vista Intel® Core™2 Duo Processor Intel® Core™ I5 Processor or a or a more recent one more recent one Windows 7 , Windows 8 Intel® Core™2 Duo Processor Intel® Core™ I5 or a more recent one more recent one Windows Vista 2 GB 4 GB Windows 7, Windows 8 2 GB 4 GB Windows Vista 2 GB 4 GB Windows 7, Windows 8 2 GB 4 GB Processor or a RAM Free space on disk CD drive CD or DVD drive (optional) Software Connectivity Other Windows Vista .NET Framework 4.0 Windows 7, Windows 8 .NET Framework 4.0 Compatibility with USB USB 2.0 HS USB cable Certified USB 2.0 cable with a length of less than 2 metres. * Adobe Acrobat Reader 5.0 or later version 1.2 Installing PhotoSuite. Connect the Mitsubishi CP-D70DW-S or Mitsubishi CP-K60DW-S printer to a USB 2.0 port in your computer. If a message appears saying a New hardware device has been detected, please cancel it. If the printer driver is not installed, the printer will be displayed in the Windows devices administration panel as "Other devices". 5 Before starting the installation process make sure the printer has paper and ink and that no error message is displayed. Then execute the ‘PhotoSuite’ installation assistant. Follow the steps indicated by the assistant. During the installation process the “USB Driver Updater” programme will be launched. Press “Install” to install the printer driver. Once the above steps have been completed, the PhotoSuite solution will now be installed and ready to use. If the printer driver is properly installed, the printer will be displayed in the Windows devices administration panel as "MITUSBISHI USB Printer". If the printer is connected to another USB 2.0 the driver must be reinstalled. To install the driver execute the “USB Driver Updater” programme in the administrator mode. This programme is in the installation folder called “C:\Program Files\Photo Suite\USBDriver\” . 6 2 Activating the software A software licence is required for the permanent activation and execution of the PhotoSuite software in the equipment. If the activation has not been made, the Photo Suite software will remind you that it must be activated. The software can be executed in trial mode for three days. Once the trial period has expired the PhotoSuite software should be activated to continue executing it in the equipment. For more information about activating the software please consult your habitual supplier. 2.1 Executing the software during the trial period If you have not yet activated the software or do not have a licence, the application can be executed in trial mode for three days. To try out the software, select the option "Continue with the trial version" in the PhotoSuite software screen that tells you to activate the PhotoSuit software. The application will always tell you that you have two trial days left, and if the trial period has started, the date on which it expires. 7 The trial period term commences when you first select the option “Continue with the test version". If you have not selected the option “Continue with the trial version” the application will continue to tell you that you have a three-day trial period. 2.2 Activating the software through a HASP USB device If you have a HASP USB device that has a PhotoSuite software licence, just connect the HASP device to a USB in your computer and execute the software. You will not be asked to make any software activation while the HASP USB device is connected to the equipment and you will be able to execute the PhotoSuite software. If you forget to connect the HASP USB device before executing the PhotoSuite software, it will warn you that it must be activated and if the three-day trial period has expired, it will not allow you to execute it. To solve this problem, reconnect the HASP USB device. If you disconnect the HASP while the software is being executed, the software will stop functioning. 2.3 Activating the software through a licence key If you have a licence key proceed as follows to activate the PhotoSuite software. The activation process will vary depending on whether your computer has internet access or not. 8 If the equipment in which the PhotoSuite software is to be activated has no internet access, you will have to access the internet with another computer with internet access to complete the activation process. 2.4 Activating equipment with internet access If your computer has internet access and you have not yet activated the PhotoSuite software, when the process starts, the PhotoSuite software will display the following screen: The steps for online activation of the PhotoSuite software using a licence key are described in the following section: 1. Enter your licence key and select the option “Activate”. 2. If you have not registered previously the system will ask you to register your key in the PhotoSuite register website. On selecting "Accept" the registration form will open up automatically in your predetermined browser. 9 3. Once you have registered in the PhotoSuite website, return to the PhotoSuite software and select the option “Activate” again. 4. The PhotoSuite software activation process will start. 2.5 Activating equipment with no internet access If your computer does not have internet access and you have not yet activated the PhotoSuite software, when the process starts, the PhotoSuite software will display the following screen: 10 The procedure for activating the PhotoSuite software with a licence key in a computer with no internet access is set out below. In this activation process you should use another computer which does have internet access: 1. On executing the PhotoSuite software, select the option “Obtain "SW ID"” in the “Step 1” tab. Store the file generated in a safe place, as you will need it for the next step. 2. Access the website http://www.mitsubishiphotosuite.com/register with the equipment that has internet access, to register your licence key and obtain a licence file that will enable you to activate the computer without internet access. To generate the licence file the web form will ask you for your product key and the “SW ID” file generating during the first step. The licence file downloaded during the last step of the web registration process will also be sent to the e-mail address you entered when registering. 3. The next step is to activate the software with the licence file generated in the previous step. To do this execute the PhotoSuite software again and select the option “Activate” in the “Step 2” tab. 11 In the open file box select the licence file obtained during the previous step and select the option “Open”. 4. The PhotoSuite software activation process will start. 12 3 Home screen 3.1 Home screen elements The home screen is divided into 5 parts: - Menu: It contains the menu for changing the language and direct accesses to different applications. File examination area: From this Windows explorer you can easily access your computer images, network units, devices installed in the computer, etc.… Drag area: This panel can be used to drag the folders and the photos you want to print and see the ones already added to the system. Services area: This area allows you to see and execute the different printing services available in PhotoSuite. Shopping cart: This area allows you to see the current price of all the services sent for printing and a list of them. 3.2 How to select the photos To select the photos used for the different Photosuite services, just select them, drag them and release them on the panel marked for this purpose. Maintain pressed Press Release 13 Bear in mind that you will later see screens from which you can easily select the photos for printing. For this reason we recommend you directly drag the folder containing the client's photos. The programme will scan the folder to find all the photos in it or in its subfolders. So if you drag a USB device all the photos in it will be located. Depending on the size of the dragged folder, this search process may taken quite some time. If you want to cancel the process press the option “cancel” next to the progress bar. If the system locates folders or files that are inaccessible, usually related to corrupt directories in the device, the name of the dragged file will be shown in red. The images found in the directories with no problems can be used for providing the different services. The user's photos are not yet copied, so the device should not be removed until it has finished providing the required services. It may not be possible to drag and release directly from some devices, for instance a cell phone. In such cases it is advisable to first copy the photos from the device to a folder. Then drag the photos directly from that folder. 14 3.3 How to see in detail the added folders If you want to see the content of an added folder double click on the folder in the list of added elements and a browser will open up, showing you the content of the folder. 3.4 How to start a PhotoSuite service First select the client's photos and then click on the required service. Each service needs a minimum number of photos for it to be provided correctly, for instance 12 photos will be needed for the monthly calendar product. The application will inform you if there are not enough photos to provide the service. 3.5 Shopping cart When you have finished providing a service the total updated price of the order will be shown. If you want to see a list of the services provided for the client, click the option "Show summary”. 15 Once you have finished working with the current client, press the option “New” and all the information will be deleted from the shopping cart, including the client's photos. 16 4 Services 4.1 ‘Copy’ Service This service allows you to print the photographs in a large variety of formats. Only one Mitsubishi printer connected simultaneously is supported. In addition, it is not possible to send remote jobs (Laboratories, Kiosks, etc…) Only the K60-DWS or D70-DWS models are supported. The paper formats that can be used for printing with PhotoSuite are: 10x15 cm (4”x6”). The format most often used for standard prints 13x18 cm (5”x7”). Intermediate size for portraits. 15x20 cm (6”x8”). This is used for enlargements or portraits. 15x15 cm (6”x6”). This is used for enlargements or portraits. 15x23 cm (6”x9”). This is used for enlargements or portraits. 11.5x15 cm (4.5”x6”). Format recommended for digital cameras. Maintains the 4:3 format of the digital camera viewer. 17 ‘Copy’ service: workflow After the client has selected the folders for working with, he can examine the photos, order the different print sizes for each one, rotate them (only in order to see them better, the result is not saved permanently in the original file) and edit the brightness and contrast, apply black and white or sepia effects, adjust the colour, etc. by pressing the option Touch-up’. The miniatures of the photos are shown at the top, in chronological order. The selected photo, in orange, is also shown in the central panel. The copies are added for each different print format to the right of the central photo. The unit price and number of copies are also indicated in the box for each print size. The total number of copies of each photo, including the different print formats, is shown below each miniature in the top panel. The total price of this service is shown in the box in the bottom right corner. The next option must be pressed to confirm the selection and continue the workflow. Ordering method Ascending/de scending order Number of miniatures Print size, price and partial quantities Number of copies in the selected size This shows a full-size view of the photo selected. To exit the full-size screen click on the photo. Total price 18 When the option “Next” is pressed a window appears in which the print options can be selected, including: The quality of the finish, if automatic improvements are required and the print quality. Option apply automatic improvements or normal printing Option: Normal or advanced printing Option: Matte or Glossy finish Then the service takes all the necessary information and generates the files required for production. Depending on the type of service, this may take a few seconds or several minutes (as in the case of an album with several pages and a large number of photos). The service is closed and the user is returned to the main PhotoSuite menu to continue generating orders or adding services to the same order, as required. 19 4.2 ‘Calendars’ service This service allows the client to print his photos in calendars with different sizes and formats. Calendars: workflow After pressing the option “Calendars” in the home screen, this service will be activated. The first step is to select the product. Then the start month and year are selected. 20 A style and a collection of backgrounds are then selected for creating the calendar. Before entering the edit screen, the information on the days and months is automatically prepared, in accordance with the local configuration and the parameters selected by the user (year and initial month) and painted on each background. This process may take a few seconds. 21 In the edit screen, different photos can be assigned to each background. The size and position of the photo in each calendar sheet can be adjusted, and the photo can be edited with the habitual touch-up tools. Once the photos have been assigned to all the calendar sheets, the user can move on to the print options screen and then to the product order summary (where several copies of the same calendar can be requested). After completing this operation the user is returned to the main PhotoSuite menu 22 4.3 ‘Easygifts Album’ service The Easygifts Album application allows you to create photo albums in a quick, easy and simple way. It also offers the option of choosing between different products and offers different page and size configurations. The ‘Easygifts Album’ application has a wide range of combinations or “templates” for the automatic layout of the photographs on the album pages. It is also possible to choose between the client's own photos or a large variety of decorative photos to fill in the background of each page, in addition to inserting a text for the album title, meaning that the album can be designed for the client in a very short space of time. ‘Easygifts Album’ service: workflow Once the client has selected the folders with the photos, an album can be created automatically in a few steps, following the application instructions flow. This section describes the different screens and their meanings. 23 Selecting the product The required product is selected here, based on the size and number of pages. Each product admits a minimum and a maximum range of photographs. Type of background The user can either choose his own photos as a background for each page (the programme automatically selects a photo from among those on the page) or choose a decorative background from among several available themes. Theme selection If the client wants to use decorative backgrounds for the album pages, he must decide what theme to use in this step. Each theme has several backgrounds that are applied at 24 random to each page of the selected product. When a theme is pressed, each of the different backgrounds that form it are shown for brief intervals of time. Theme selection. Preview area Photograph selection Once the folders to be processed have been selected, the following screen appears: Miniature viewing Minimum Minimum and and maximum maximum size number number of of photos photos available available that that are are to to be be selected selected Rotate selected photo. Number of photos selected, final number of album pages and price Photo-selection area. Select/deselect all the Preview of the photos. selected photo. 25 The selected photos will change the colour of the lower bar with the name. To see a full-size preview of the selected photo on the screen, press the button with the magnifying glass icon. The number of photos selected is shown on the screen. If the minimum number of photos needed for the album is not selected, the button in the right bottom corner which allows the flow to continue will not be activated. If too many photos are selected, a message will be displayed. 26 Writing a title for the album The text that will appear on the cover of the album is entered in this screen: Cover text Upper or lower case letters. Other characters. Selecting the cover After entering the title a screen will appear in which the photo to be included on the cover of the album must be selected. 27 Automatic composition In this step the initial composition of the album is automatically made, with all the information furnished during the previous phase. Preview area. Progress bar. If you cannot read any of the photo files during the process, a message will be shown on the screen and the user will automatically be returned to the photo selection screen for the client to confirm that he wishes to generate the album again, but without including the damaged photos, which are now shown as inaccessible. On completing this process the user is taken to the album editing screen. 28 Preview and editing of the product The edit screen allows the user to make several changes to the album generated automatically. The variety of changes is limited to prevent the client from spending too much time editing, but the different options are studied to ensure that the client always obtains an album that is to his liking within the shortest possible time. Colour on the Page scrolling arrows. Change background. edges of the photos. “Scramble ” button. Exchange one photo in the album for another. Crop the Touch up the photo. selected photo Rotate the selected photo. Add or remove Eliminate selected photo text on the page. Album editing area. Finish editing the album. Framing the photo in its rectangular space. This can be done using the controls on the right or touching the photo with your finger and moving its position. In multi-touch screens, not only can the photo be moved but the zoom level can also be adjusted by increasing the distance between your fingers on the photo. This movement is known as “pinch zoom”. If the screen is not a multitouch one, use the controls on the right to adjust the zoom level. “Scramble” option. Every time this button is pressed, the photos are repositioned differently on the same page, to allow the user to choose between the different layouts. “Delete” button. One of the photos on the current page is deleted and the layout of the other photos will automatically change to make up for the space left by the deleted one. Move/exchange. This button allows two different actions to be executed: o A photo can be dragged to another one on the same page to exchange them. o A photo can be moved from the current page to a different one. To do this, drag the photo to the top and release it on the required page. On releasing it, the change will be made and the layout of the photos on the original page and the new page will also be changed. Change background. For replacing the current background with another 29 Change frame. This allows the use to choose between a black or a white frame or no frame Rotate. Rotate the selected photo. Touch up photo. This takes the user to the photo touch-up menu Add Text. When text is added, additional tools appear for moving its position and changing the font size, lettering and colour. Order summary Once the changes to the product have been approved and it has been decided which print options will be used, the next screen appears: Number of copies of album. Price of each copy of album Total price without Finish creating the including possible album. additional taxes When the next button is pressed the printing process starts and the user is returned to the home screen. 30 4.4 'Identity card photo’ service This service allows the user to print a photographic composition for identity documents, passports, wallet-sized portraits, etc. The operator can combine up to 2 different photographs in the same print, with accessibility to different tools for adjusting the zoom, cropping and cleaning the photo and the option of applying automatic biometric adjustments. With the “apply automatic biometric adjustments” option activated, the system will process the selected photo and adjust the face to the biometric image associated with the composition. This means time savings for the operator in printing the identity card photograph correctly. Identity card photo: workflow After pressing the option “Identity card photo” in the home screen, this service will be activated. Once the folders with the photographs have been selected the template selection screen will appear. 31 Composition of a photo Composition of two photos There are two types of templates: standard and split. The split templates (in two different colours) allow up to two different photographs to be combined. The template prices are determined by the product associated with the template. After selecting the template the photographs should be selected. The operator has two buttons with the necessary functionalities to adjust the photo to the biometric image. A preview of the resulting composition is shown at all times. Photos available Controls for inserting the photo. Biometric image Preview of the composition. Rotate photo 32 Control for changing the template photo selected Once the photos have been inserted and the result is satisfactory, press “Next” to continue. A summary is then shown with a preview of the composition generated. In this screen the operator can select the number of copies to be printed. Number 33 Automatic biometric adjustments With the automatic biometric adjustments option activated in the service configuration (see chapter entitled '‘Identity Card' service administration’ chapter: general configuration’), the system may take longer to show the selected photo. The photo may appear centred and with the zoom adjusted. 34 4.5 'Greeting cards’ service This service allows the client to create different types of products such as Christmas, birth and christening cards, anniversary cards, children's birthday cards, etc. Decorative frames can also be added to the photos and they can be printed in different formats. Greeting cards: workflow After pressing the option “Greeting cards” in the home screen, this service will be activated. Once the folders with the photographs have been selected the card selection screen will appear. 35 Then the different products will be selected depending on the print size. The price is shown for each product. The possibility also exists of adding extras phrases in each product. This is explained later in the product configuration section. After selecting the product the screen with the styles and designs available for the type of product created is displayed. Some designs may be repeated in different styles. Styles Design preview After selecting the design the edit screen appears, where the photo to be inserted in the design is selected and the necessary adjustments are made. 36 Photos available Move photo Photo zoom Edit text Change design Certain designs may have a specific text, for instance "Merry Christmas", "Happy holidays" etc. or a default text such as "Enter text". Regardless of the content, the text can always be changed by the end user. The position of the photo in the frame area can be adjusted by dragging your finger over that part of the screen or using the available controls on the right. To change the current design, use the design change button. Every time it is pressed the design is changed at intervals in the design group belonging to the same style. The content of the text will not change but the position or the colour of the text will, since this is information provided by the designer in order to always obtain an attractive result. The Touch-up button allows changes to be made to the photo as already explained in other sections of this manual. The “Edit Text” button must be pressed to change the lettering, size, colour and shadowing of the font and the content of the text. The edit screen has a keyboard at the bottom. As the characters are entered, they are painted in real time on the screen. The text can be moved by dragging the design directly with your finger or using the arrow keys on the right. To rotate the text at small angles, touch the rotate button briefly. To rotate at an angle of 90, 180 or 270 degrees keep the button pressed. 37 As the text allows line breaks to be entered, there are also 3 different text alignment options: left, centred and right. To accept or cancel the changes made to the text in this screen press the validation button in the right bottom corner. Move text Once the image has been inserted and the text and its characteristics defined, press “Next” to continue. Ask the client whether he wants to apply automatic improvements to the photos, if it is configured in this mode. Then a summary of the Greeting card product ordered is shown. The quantity can also be increased. For some products consisting of several cuts of paper (3 or 4 panoramic cards generated from consecutive cuts of an A4 sheet, for instance), this quantity refers to the number of packets and not to the total number of copies. Quantity 38 5 PrintModule To access the PrintModule go to the menu at the top of the application in the Direct Accesses section and select PrintModule. 5.1 General operation Allows a job to be paused in Allows the user to resume a paused order to execute the next job job in the queue To minimise the PrintModule . The orders will continue to be executed in the second plane. Allows completed or paused jobs to be deleted. If you want to delete a job that is being printed, you must first pause the Job selection press the “Shift” key to select more than one job. consecutive job. The “Control” key is used to select different jobs. Allows the job to be paused. If a job is paused and then an order is made through PhotoSuite that jobs will be placed in the “Waiting” status. If you want to pause a job but want the next job to be printed, press the “Pause & Next” button. 39 PrintModule Screen The PrintModule screen displays the job information, a description of the job, the output format, the total number of prints, the order date and the printing progress. The jobs may be in the following states: Being printed: The job is being printed; in this state the order can be paused. Waiting: The job is waiting for another printing job to finish, or for the printer to accept the job. Completed:The job has been printed in full. Once completed, it cannot be printed again. Paused:Jobs in this state can be resumed by pressing the “Resume” button. In Error:Consult the “Printer status” column to see what the error is. If no description is given, consult the printer status by pressing “PrinterInfo”. Printer Info This displays information about the connected printer. The model, printer status, type of paper loaded and number of copies available are shown. If you have just switched the printer on, press the “Search Printers” button to refresh this screen. If the PrintModule closes after starting up, check that the printer is connected to a USB 2.0 port and that it is switched on. 40 5.2 Image Quality Setting Tool To access the image quality setting tool, go to the menu at the top of the application and in the Direct Accesses section select “Image Quality Setting Tool”. This tool allows you to adjust the printing quality. It allows an ICC profile to be defined as well as a gamma table in CPG format for each printer and quality, and the initial “Sharpness” to be adjusted. To change a parameter, first select the printer to be configured and then select the finish: Fine, Superfine or Ultrafine… Gamma Table:This allows you to select a gamma table in CPG format. If not using a CPG table press the “Clear” button. ICC Profile:Allows a specific ICC profile to be selected. If not using a ICC profile press the “Clear” button. Sharpness:Allows this parameter to be adjusted from “OFF” to “8” Once the parameters have been changed, press “Save” to save the configuration 41 6 PhotoSuite Configuration To access the PhotoSuite configuration menu go to the menu at the top of the application in the Direct Accesses section and select Configuration. After closing the configuration menu, the user can enter and change certain parameters of the services, such as prices, products to be displayed and the service configuration. Although the price screen is specific for each service, its operation is the same in all the screens. 42 6.1 Copy Configuration Copy service configuration. In this screen the photograph explorer behaviour can be changed. With the option “Multiple selection in photos selector” checked, it will change the photo selection operation. Now you can select the photos you want and then select the print size. Product Configuration Here the products that will be shown as available or not available are selected. 43 Price Configuration Here the prices can be configured individually for each product and price ranges can be added, depending on the number of copies. The reference field is disabled and so it cannot be configured. 6.2 Easygifts Calendars Configuration Product Configuration In the Easygifts Calendars service configuration the products to be shown when configuring the Calendar can be selected. 44 Price configuration Here the prices can be configured individually for each product and price ranges can be added, depending on the number of copies. 6.3 Easygifts Album Configuration Product Configuration 45 Here the products that will be available for the Easygifts Album service can be selected. The selection can be made by print size and number of pages. Price configuration Here the prices can be configured individually for each product and price ranges can be added, depending on the number of copies. 6.4 Identity card photo configuration Product configuration 46 Identity card photo configuration Exclusive options of the Identity Card Photo service can be configured in this menu. The image at the top shows the configuration screen by default. If the option “Use of automatic face alignment” is unchecked, this operation must be executed manually. On the other hand if you activate the option “Apply customised adjustments” the “Configure” button will be activated. When it is pressed, a Windows explorer window will appear where the user can select a photo for use as a reference. 47 After selecting the photo to be used as a reference, a new menu will appear: Here you can adjust the photo colour values manually and the saturation, contrast and brightness parameters. If you want, press the "Automatic Adjustments" button and Photosuite will adjust the values for you. Press the “Print” button to send the photo for printing and see the result of the adjustments on paper. If correction is needed, continue to adjust the parameters. 48 Lastly, the user can configure the templates that will be available for providing the Identity Card Photo service. The templates displayed can be activated and deactivated. Price configuration Here the prices can be configured individually for each product and price ranges can be added, depending on the number of copies. 49 6.5 Greeting cards configuration Product configuration The size of each style and collection that will be available can be selected here. For instance, you can offer Greeting Cards with a size of 10x15 for only a specific collection, but other different sizes for another collection. Price configuration Here the prices can be configured individually for each product and price ranges can be added, depending on the number of copies. 50 7 Uninstalling. To uninstall the PhotoSuite solution correctly, stop or finish all the print jobs in progress. Then go to “Home Menu”, “All programmes”, PhotoSuite and select “Uninstall” and follow the instructions of the uninstallation assistant to complete the process. Once completed, PhotoSuite will have been completely uninstalled from your computer. The application can also be uninstalled from the Windows control panel in the Programmes and Characteristics section. 51 Thank you for choosing this Mitsubishi Electric® product More information is available at http://www.mitsubishiphotosuite.com/ Microsoft, Windows, Windows XP SP3, Windows Vista, Windows 7 and Windows 8 are registered trademarks of Microsoft Corporation in the USA and/or in other countries. Adobe and Adobe Photoshop are registered trademarks of Adobe Systems. The different software packages mentioned in the manual are commercial marks registered in their respective companies. 52