1
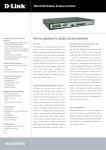
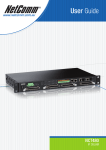
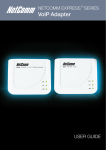
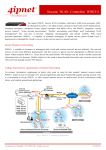
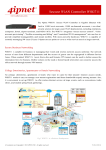
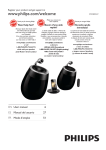
How to configure the IAC4500 Internet Access Controller for Billing
by Volume Application with NCT480 IP DSLAM using port location
mapping
Introduction
The following paper provides instructions on how to configure NetComm’s IAC4500
Internet Access Controller with NetComm NCT480 IP DSLAM for ‘billing by volume’
application. It specifically focuses on the IAC4500’s new feature ‘billing by volume’
under deployment scenarios A: Port Location Mapping for 802.1Q VLAN Tagging.
This document is being created at a time when the following versions of firmware were
in production:
• IAC4500: Firmware V1.02.05
• NCT480: Firmware R2.32
(Note: IAC4500 with firmware V1.02.05 or later supports billing by volume)
The test PCs that used in this white paper were running WinXP with Internet browser
IE7.0. (The web interface of the devices under test in this white paper are best
viewed with Microsoft Internet Explorer 6.0 and above at 800 x 600 resolution)
It is recommended that the readers of this document has read and understood the
IAC4500 & NCT480 user manual.
How to configure NetComm IAC4500 for billing by volume application with NCT480 IP DSLAM using
port location mapping
Nov2008
CL
Page 1
IAC4500 VLAN Management
The IAC4500 offers two methods of connection. User can either be issued a unique
user name and password which is required on log in, or using VLAN tagging, the Port
Location Mapping Feature in the IAC. Rooms can then be recognized via its room
number. Both options in the IAC4500 offer zero configurations for subscribers/hotel
room guests. Guests simply plug the Ethernet cable into their laptop, enter a
username and password or simply accepts the terms and conditions and they are
connected without changing any settings at all.
VLAN Management
A VLAN allows a physical network to be divided into several logical networks. A device
can belong to more than one VLAN group. Devices that are not in the same VLAN
groups can not talk to each other. VLAN can provide isolation and security to users
and increase performance by limiting broadcast domain. VLAN tag can be added to
the MAC header to identify the VLAN membership of a frame across bridges. A
tagged frame is four bytes longer than an untagged frame. Each port of NCT480 is
capable of passing tagged or untagged frames.
Each port has its own Ingress rule. If Ingress rule accept tagged frames only, the
switch port will drop all incoming non-tagged frames. If Ingress rule accept all frame
type, the switch port simultaneously allow the incoming tagged and untagged frames.
An untagged frame doesn’t carry any VID to which it belongs. When an untagged
frame is received, Ingress Process insert a tag contained the PVID into the untagged
frame. Each physical port has a default VID called PVID (Port VID). PVID is assigned
to untagged frames or priority tagged frames (frames with null (0) VID) received on
this port. Figure 2 illustrates the VLAN Tagging relationship between the NCT480 and
the IAC4500.
Figure 2: 802.1Q VLAN Tagging relationship between NCT480 and IAC4500
How to configure NetComm IAC4500 for billing by volume application with NCT480 IP DSLAM using
port location mapping
Nov2008
CL
Page 2
The IAC4500 uses Port-Location Mapping (PLM) for Scenario A authentication only.
Scenarios B and C are not covered in this paper. PLM insists that the network into
which the IAC4500 is installed supports IEEE 802.1Q VLAN tagging for packets
traveling between the IAC4500 and the network.
As the name suggests, PLM assigns a unique VLAN ID (VID) to each room or location
in order to bill the room using a Property Management System (PMS, e.g. Micros
Fidelio) installed at the premises.
The IAC4500’s PLM feature will accept 802.1Q VLAN tagged packets and send back
untagged packets to the device connected to a particular port. It is therefore important
to confirm with the manufacturer of the 802.1Q VLAN device used on the network that
it supports the ability to tag packets being sent to the IAC4500 and accept untagged
packets being sent from the IAC4500 to the device.
Figure 1 illustrates the logical network diagram for NCT480 IP DSLAM working with an
IAC4500.
Logical Network Diagram
Figure 1: NCT480 with IAC4500 Internet Access Controller
How to configure NetComm IAC4500 for billing by volume application with NCT480 IP DSLAM using
port location mapping
Nov2008
CL
Page 3
NCT480 VLAN Management
There are 3 types of management interfaces available for NCT480 IP DSLAM system
management. The web management interface, the CLI interface and the Telnet
interface.
It is recommended to use the inbuilt web management interface for NCT480 system
configuration. This white paper is written in the basis of using the web management
interface of the NCT480 IP DSLAM.
The characteristic nature of IAC4500’s 802.1Q VLAN tagging feature is that the IAC
will accept VLAN tagged packets from its LAN network and only respond to its LAN
network with untagged packets. Due to this VLAN tagging behaviour of the IAC4500,
NCT480 will be configured to the following way in this test scenario.
1. All traffics from the 48 ADSL ports (data upstream direction) will leave the
NCT480 with a VLAN tagged number (room number).
2. All the traffic coming from the IAC4500 to the NCT480 (data downstream
direction) are with untagged default VLAN number 1.
The NCT480 running firmware R2.32 requires configuration make via its web interface
to perform the above configuration. Please refer to screens shots shown in following
section.
Step 1
Login to NCT480 web management interface.
Default IP address for Eth-3 (system management port): 192.168.1.1/24
Default User Name: admin
Default Password: admin
To check system firmware version, please navigate to
Menu> System > Information
How to configure NetComm IAC4500 for billing by volume application with NCT480 IP DSLAM using
port location mapping
Nov2008
CL
Page 4
NCT480 R2.32 System Default Information
Navigate to:
Menu > Deployment > PVC Setting > Select “All Port” from the dropdown list and hit
“Delete” to delete the default PVC. Then Click on “Bulk ADD” to recreate PVC for
VLAN ID 101 ~ 148.
How to configure NetComm IAC4500 for billing by volume application with NCT480 IP DSLAM using
port location mapping
Nov2008
CL
Page 5
Once “Bulk Add” completed.
The port will have a PVID of 101 ~ 148 instead of the default VLAN 1.
Step 2
Navigate to:
How to configure NetComm IAC4500 for billing by volume application with NCT480 IP DSLAM using
port location mapping
Nov2008
CL
Page 6
Menu > Protocol > VLAN port > Ensure that the default VLAN ID is 1.
This means that all the downstream traffic from IAC4500 (untagged traffics) will be
accepted and they will go via default VLAN group 1 in the Eth-1 to all the 48 ADSL
ports of the NCT480.
Step 3
Navigate to:
Menu > Protocol > Trunk VLAN Setting > ADD
This means Eth-1 will assign the data packets from VLAN group 101 ~ 148 with their
corresponding VLAN tag number when it leave the port to the IAC4500.
How to configure NetComm IAC4500 for billing by volume application with NCT480 IP DSLAM using
port location mapping
Nov2008
CL
Page 7
-
How to configure NetComm IAC4500 for billing by volume application with NCT480 IP DSLAM using
port location mapping
Nov2008
CL
Page 8
Step 4
Navigate to: Menu > Commit & Reboot > Commit then Reboot system
How to configure NetComm IAC4500 for billing by volume application with NCT480 IP DSLAM using
port location mapping
Nov2008
CL
Page 9
How to configure NetComm IAC4500 for billing by volume application with NCT480 IP DSLAM using
port location mapping
Nov2008
CL
Page 10
IAC4500 Internet Access Controller Configuration
The following settings are made to the IAC4500. Connect the PC to the LAN port of
the IAC4500.
IAC4500 Default IP Address: 10.59.1.1/8
Default User Name: admin
Default Password: admin
1. Enter all system information to the IAC4500
2. Configure IAC4500 WAN/LAN settings – configure the WAN to a mode and
with IP addresses that suitable for your network environment. Eg you may set
the IAC4500 WAN to a static IP of 172.17.1.34/24 with gateway 172.17.1.1/24.
How to configure NetComm IAC4500 for billing by volume application with NCT480 IP DSLAM using
port location mapping
Nov2008
CL
Page 11
3. Set IAC4500 to use Built-in Authentication Scenario A – Bill by room number.
Please navigate to Configuration Menu > System Setting > Authentication >
Built-in Authentication > select option = Scenario A then click ‘Apply’ at the
Scenario Guide and ‘Apply’ at the Authentication Configuration page
How to configure NetComm IAC4500 for billing by volume application with NCT480 IP DSLAM using
port location mapping
Nov2008
CL
Page 12
4. Create Billing Profiles. Please refer to screen shot below for three example
billing profiles that used in this test scenario.
How to configure NetComm IAC4500 for billing by volume application with NCT480 IP DSLAM using
port location mapping
Nov2008
CL
Page 13
How to configure NetComm IAC4500 for billing by volume application with NCT480 IP DSLAM using
port location mapping
Nov2008
CL
Page 14
How to configure NetComm IAC4500 for billing by volume application with NCT480 IP DSLAM using
port location mapping
Nov2008
CL
Page 15
Please note that traffic-based billing counts both the download and upload
data volume.
5. Create a port location mapping table with all the VLAN ID that were set in the
NCT480 IP DSLAM. Please navigate to > system setting > port location
mapping
How to configure NetComm IAC4500 for billing by volume application with NCT480 IP DSLAM using
port location mapping
Nov2008
CL
Page 16
-
How to configure NetComm IAC4500 for billing by volume application with NCT480 IP DSLAM using
port location mapping
Nov2008
CL
Page 17
6. Activate Bandwidth management according to Billing Profile settings: navigate
to Configuration Menu > Advance Setting > Bandwidth Management > Select
‘Bandwidth Management’ and Select ‘Class of Service based on RADIUS or
billing profile settings’ then click ‘Apply’.
Aside: If you are planning to have equal bandwidth for all subscribers regardless
which billing profiles they are under, you may select the first option on the Bandwidth
management page.
How to configure NetComm IAC4500 for billing by volume application with NCT480 IP DSLAM using
port location mapping
Nov2008
CL
Page 18
7. Select the Property Management System (PMS). Click on PMS Configuration
under System Settings > Billing and select the PMS and click Apply:
How to configure NetComm IAC4500 for billing by volume application with NCT480 IP DSLAM using
port location mapping
Nov2008
CL
Page 19
If the site does not have a listed PMS (Micros Fidelio, Spectrum MK II or Marriott, then
select ‘Proprietary’ and use Net Retriever software (a middleware between IAC4500
and other PMS systems) to allow the IAC4500 to communicate and pass on the billing
data to the PMS system. Then click ‘Apply’ to apply settings.
8. Save Configuration and Reboot System.
9. Back up configuration file & Port Location Mapping Table as they are two
separate back up files.
Aside: This white paper does not include any IAC4500 management IP access list and
IP/MAC/URL filtering as these settings varies from site to site. It is generally
recommended that the appropriate settings are configured in the device to ensure
some level of secure access control and that the necessary system log files are sent
to system manager for system management.
How to configure NetComm IAC4500 for billing by volume application with NCT480 IP DSLAM using
port location mapping
Nov2008
CL
Page 20
Connect Test Modems & Test Internet Access
1. Set the test modems at the guest rooms to WAN: Bridged Mode; LAN DHCP
Server OFF. If the CPE you are using is loaded with NetComm Bridged
firmware, like NB6Series_R2T8 Bridged modem then there is no need to reconfigure the modem in the room, it will be just a plug and play device for this
test scenario.
2. Connect the test modems to an ADSL Port of the NCT480 DSLAM system (The
ADSL data point socket in the guest room) and wait for ADSL light on the test
modem turn solid green.
3. Connect test PC to the LAN Port of the test modem. (Note: TCP/IP setting of
the PC is to be set to obtain IP Address/ DNS address from DHCP server
automatically).
4. Wait for a valid IP address assigned by the IAC4500 to your subscriber PC.
5. Once a valid IP address received by the subscriber/guest room PC, open
Internet browser. Attempt to access the Internet by browsing a website. If PLM
has been setup correctly, the following page will be presented. You will then
select and accepts Internet access condition and hit Enter then OK.
How to configure NetComm IAC4500 for billing by volume application with NCT480 IP DSLAM using
port location mapping
Nov2008
CL
Page 21
How to configure NetComm IAC4500 for billing by volume application with NCT480 IP DSLAM using
port location mapping
Nov2008
CL
Page 22
This information will be sent to the PMS system via the PMS console port at the face
panel of the IAC4500.
Note: if the following page is presented instead of the login page above, then the
setup for scenario A: Port Location Mapping Billing is incorrect. Please review the
above steps regarding port location mapping on devices mentioned above.
6. Surf the Internet. Test complete!
(To view current IAC user list, please refer to Appendix A enclosed in this document.)
How to configure NetComm IAC4500 for billing by volume application with NCT480 IP DSLAM using
port location mapping
Nov2008
CL
Page 23
Appendix A
To view or disconnect current IAC4500 login user, please login to the IAC4500 and
navigate to Configuration Menu > System Status > Current User List
How to configure NetComm IAC4500 for billing by volume application with NCT480 IP DSLAM using
port location mapping
Nov2008
CL
Page 24
How to configure NetComm IAC4500 for billing by volume application with NCT480 IP DSLAM using
port location mapping
Nov2008
CL
Page 25