1
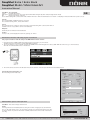
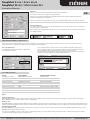
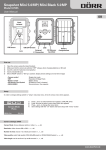
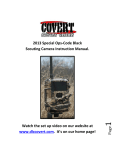
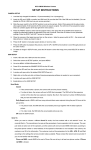
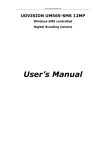
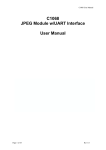
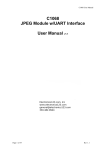
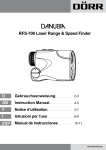
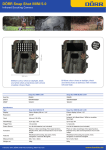
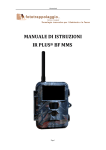
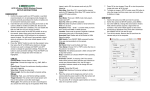
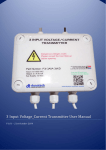
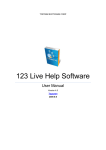
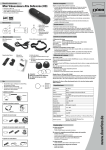
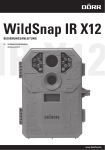
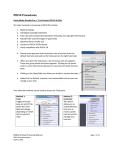
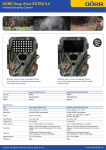
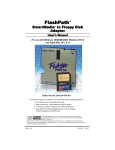
SnapShot Extra / Extra black SnapShot Mobil / Mobil black 5.1 Instruction Manual Flash Infrared GB SIM Card Slot 2“ Colour Display PIR Sensor ON/OFF Switch External V- Connection Lens USB Battery SD Memory Card Slot Compartment Quick Guide 1) 2) 3) 4) 5) Open the camera using the lateral brackets Make sure that the camera is always switched “OFF”, when changing batteries or SD card Insert 12 x AA/1,5 V batteries (mind polarity) Insert unlocked SD card Move “ON/OFF“ switch to “setup“ position. Display shows settings and real time images • Camera symbol • 5M • Battery symbol • SD Memory Card Symbol • [00034/00965] Single shot mode Resolution 5 Mega Pixels Battery status SD Memory Card is inserted Stored pictures / free capacity Setup In order to change settings switch to “setup” and press menu. A list of various menu items appears. 1) 2) 3) 4) Press and to select between the registers (CAM, PIR, SYS), register (GSM) only in MOBIL versions Press and to select a menu item within the registers Press and to change the menu items Save settings with the “ok” button and leave setup with “menu” button Camera settings (CAM) Camera Mode: choose between photo or video ( , , ok) Resolution: either choose 3M or 5M or 8M or 12M ( , , ok) Number of shots: choose 1 to 3 shots per motion ( , , ok) Video quality: select VGA quality (640x480 pixels) or QVGA (320x240 pixels) ( , , ok) Video length: can be set from 1 up to 60 seconds ( , , ok) Motion Detector Settings (PIR) PIR sensitivity: PIR Interval: Time Interval: Timer: choose the sensitivity (high, normal, low) or turn sensor off ( , , ok) Select time (1 sec to 60 min) when PIR sensor is deactivated after a shot. If camera is in send mode, please make sure that you allow an interval of at least 3 minutes, because the camera needs this time frame in order to send the picture. Set time interval of camera. Shoots photos during time set (5sec to 8h) If set “OFF” the camera triggers upon motion Camera is on standby mode during desired time. Outside this time camera does not take photos and does not react to motion (same for “timer interval” mode ). After setting time camera only works during time frame. GSM Setup (available for camera models Mobil and Mobil black only) In order to setup the GSM functions both, SIM and SD card have to be inserted. The data such as address, cell phone number and GSM and MMS parameters can easily be setup on the PC! 10 DÖRR GmbH • Postfach 1280 • 89202 Neu-Ulm/Germany • Fon +49 731 97037-0 • Fax +49 731 97037-37 • [email protected] www.doerrfoto.de SnapShot Extra / Extra black SnapShot Mobil / Mobil black 5.1 Instruction Manual GB Send Mode – choose between Instant: immediate transmission Daily report: camera sends a report of how many pictures were taken during the day (time of daily message needs to be set) Off: camera saves pictures on SD card Choose desired setting with , and confirm with ok. Return with “menu” button. If Send Mode is set to “Instant” or “Daily Report” there are further menu points to choose. Send via Choose either MMS or GPRS transmission of pictures Choose desired setting with , and confirm with ok. Send to Choose transmission to cell phone, email or both. Choose desired setting with , and confirm with ok. In GPRS mode it is only possible to send to email addresses Recipients Check cell phone numbers and email addresses. Location In setup mode, camera displays the location by pressing “ok” button. Download Tool - Transfer of the setup program on an SD card This program is needed to make the settings in the MMS /Email software on the PC. 1. 2. Insert SD card (max. 16GB) and SIM card (without password protection, pin) into camera. The SIM card must be unlocked for sending SMS, MMS and emails. Turn power switch to position „SETUP“ and press the „MENU“ button. With the right arrow select „GSM“. With the down arrow go to “Download Tool”, with “OK” the software will be saved on the SD card. 3. Turn off the camera and remove the SD card! Then save the software on the PC. Open the ZIP file and the GSMsetup.exe! The following input mask appears >>>> Now the settings can be made easily. Individual menu options of this input mask Send Mode – How often an image should be sent Instant The image will be sent immediately after recording. The number of images per day can be limited from 1 to 99. If the camera is set to „0“ the number of images is not limited. If the camera is in video mode, the camera only sends an information via SMS, since the data volume of video transmission is too big. 11 DÖRR GmbH • Postfach 1280 • 89202 Neu-Ulm/Germany • Fon +49 731 97037-0 • Fax +49 731 97037-37 • [email protected] www.doerrfoto.de SnapShot Extra / Extra black SnapShot Mobil / Mobil black 5.1 Instruction Manual GB Daily Report In this mode the camera will send a daily report of its activities within the last 24 hours. Please enter the time when the report should be sent. 1. In the photo mode the total number of images made in the last 24 hours will be transmitted as well as time of the last recording. 2. In the video mode only the total number of recorded videos in the last 24 hours will be transmitted. 21 30 21 30 Off - The transmission function is switched off and no more images will be sent. Send via Mode of transmission: „MMS“ or „GPRS“. When set to „GPRS“ the SMTP parameters of your e-mail account must be entered in „Email Set“. If you select the „GPRS“ option (send by e-mail), you will be reminded that you have to enter or to check the parameters. You can do this under the menu item „Set Email“. Here you must enter the outgoing mail server (SMTP) to which the camera has to send the email with the image. Enter exactly the same data that have been used when creating the account (email address, name of the account, email password). Example of GMX account In the “Email” window, you can also define another name which will appear as sender name in the email (please do not enter blanks). This allows you to individualize your camera if you have several cameras in use. Send To Here you can specify the recipient to whom the image should be sent to. Phone: Email: Both: Images will be sent to a phone number Images will be sent to an email address Images will be sent to a phone number and to an email address (this function is only available with „Sent via MMS“. When sending via GPRS you can send to an email address only. Operator Parameter Here you can set the provider/ network operator of your SIM card. In the software you will already find some parameters of various network providers worldwide. Choose your country and your operator. For example: Germany, Operator T-Mobile. If your network provider is not preset, the parameters for each network provider can be entered individually. The data can be obtained from the network provider or a web search. By clicking on the button „Custom“ you can register desired Network provider. Up to 3 different providers (Customer1, Customer2, Customer3) can be registered. Enter the parameters for the mobile service provider and save settings with OK. The example shows the parameters for T-Mobile. (Password in this example = tm). 12 DÖRR GmbH • Postfach 1280 • 89202 Neu-Ulm/Germany • Fon +49 731 97037-0 • Fax +49 731 97037-37 • [email protected] www.doerrfoto.de SnapShot Extra / Extra black SnapShot Mobil / Mobil black 5.1 Instruction Manual Recipients Here you can specify the recipient telephone number and email addresses. You can enter up to 4 phone numbers and email addresses. GB Note: The more receivers are added, the longer takes the transmission! Please separate the individual numbers and addresses with a semicolon „;“. Enter your mobile phone number without country code, e.g. 0160 1234567. At least one number has to be set. Rename and Max Size It is possible to enter a name for the camera. Under Rename a name can be entered using up to 8 characters. The name appears on each image. Enter mobile phone number without country code Before sending, the image files will be scaled down due to the transfer speed. The image size can be selected from 60 KB to 120 KB. Enter email address DÖRR SNAPSHOT MOBIL 5.1 SMS Function The camera can be controlled by SMS commands from a mobile phone. For example you can switch the camera from photo to video mode, request a real-time image or the location, change phone numbers and email addresses in the recipients list. Turn on the SMS function To use this feature, please select “ON” for “SMS switch” in the Operator parameters. The command number is „Phone number 1“. This number has the right to change saved phone numbers (numbers 2, 3, and 4) and email addresses. All stored numbers can execute the commands according to the following list, in order to control the camera. An answer whether changes were made or message about camera location (if requested) will be always sent to the mobile phone number, which requested it. List of SMS commands ACTION SMS COMMAND CAMERA FEEDBACK VIA SMS Add telephone number #140#1#telephonenumber# (Number) added Delete telephone number #140#0#telephonenumber# (Number) deleted Add Email address #141#1#Email address# (Email address) added Delete Email address #141#0#Email address# (Email address) deleted Photo Modus #310#P# The current mode is photo Video Modus #310#V# The current mode is video Request real-time image #500# Real-time picture via GPRS or MMS Request location #510# Location via text message Picture transmission On #200#On# GSM is waked up Picture transmission Off #200#Off# GSM enters sleeping mode NOTES: Request real-time image With SMS #500# the camera takes a real-time image and sends it immediately to the stored receivers according to the settings. This process can take a few minutes. If set to GPRS transmission, picture will be sent to your email address. Request location With SMS #510# the longitude and latitude degrees is reported, based on where the camera is located at the moment of the shot. The data is based and transmitted via the network operator and are therefore may not be very accurate. A text message with location of camera will be sent to the mobile phone number which has sent the request. Picture transmission On/Off With SMS #200#Off# the image transmission is turned off. During this time pictures are stored on SD card, but not transmitted via MMS or GPRS. By sending command #200#ON# the transmission will be continued. If you sent a wrong SMS command, you will receive a text message showing „command is invalid“. During picture transmission or while executing other commands, you will receive text message showing „command is busy.“ 13 DÖRR GmbH • Postfach 1280 • 89202 Neu-Ulm/Germany • Fon +49 731 97037-0 • Fax +49 731 97037-37 • [email protected] www.doerrfoto.de SnapShot Extra / Extra black SnapShot Mobil / Mobil black 5.1 Instruction Manual Saving The entries under „GSM SETUP.exe“ can now be saved. The generated file „PROFILE. BIN“ can either be saved directly to an SD card or on the PC first and then transferred to an SD card. The location is specified in the „Path“ window. GB Insert the SD card with the „PROFILE. BIN“ file into the camera. Data transmission Switch the camera to „SETUP“. After a few seconds the message „update success“ appears. The parameters are now stored on the camera. Test shot Switch camera to „SETUP“. Wait until camera found network and press . Press , then press „menu“and confirm with „ok“. Camera starts manual transmission of picture and work from step 1 to step 10 then display shows „send successfully“. Picture was transmitted to registered phone number or email address. System Settings (SYS) Date & Time: Date to be set as dd.mm.yyyy, Time to be set in 24h Time Stamp: choose if time & date are shown on pictures or not Flash Range: select desired setting 6m or 12m Password: secure camera with password, to avoid misuse. The password is needed every time the camera is switched “on”. Default password is “0000”. Note your password carefully, without the password the camera cannot be operated. Language: choose either German or English language Sound / Beep: choose “beep” sound on keyboard input or “silent” mode Overwrite function: Camera may overwrite old pictures with new ones when SD card is full or alternatively abandon function Format: this function deletes all data on the SD card Default settings: this sets all parameters to “factory defaults” except date & time When settings are completed, press „MENU“ to return to starting menu. Playback Press in setup mode to watch latest photos. Press and to display all pictures. Press “menu” again to return to setup screen. Select video and press in order to play this video. Press twice to return to „SETUP“ menu. Single pictures and videos can be deleted by pressing “menu” in playback mode and select “delete“ and confirm with “ok”. File name: Pictures and videos will be named continuously, starting with IMG0001.jpg (picture) or IMAG0001.avi (video) Test shot: In setup mode switch camera to manually then take a test shot. Installation of the Camera Fix camera to a tree, pole or any suitable object. Best range is 3-10 meters from camera to object. For security reasons you may obtain cable lock optionally. Directing the Camera 1) 2) 3) 4) 5) Hang up camera in about 0,75 - 1 m height, slightly tilting ahead Switch camera to “setup” and close housing. Move in front of camera. When red light is flashing you see the area which is covered by the PIR sensor It is recommended to test the position and take several test photos, to see the area covered by the camera Switch the camera off now Start surveillance To make the camera ready: 1. Switch camera to „setup“. Camera logs into the mobile network. If login was successful display shows provider and signal strength. 2. Switch camera to „on“ and close housing. After 15-30 seconds camera is ready. Camera Check Up Options to check if the camera has taken pictures: 1) 2) 3) 4) Open camera housing and enter Setup mode The lower line of starting menu shows the number of pictures taken and the remaining full space Press to view the pictures Alternatively switch camera off and exchange the memory card with a fresh one. So you can view images on your computer or TV. It is recommended to check the battery status as well. When capacity goes down, it will be more difficult to achieve correctly illuminated night shots. In case of doubt, replace batteries with new ones. 14 DÖRR GmbH • Postfach 1280 • 89202 Neu-Ulm/Germany • Fon +49 731 97037-0 • Fax +49 731 97037-37 • [email protected] www.doerrfoto.de SnapShot Extra / Extra black SnapShot Mobil / Mobil black 5.1 Instruction Manual Tips & Tricks 1. SIM Cards Unlock your SIM card, there is no possibility to enter the SIM password. Before the SIM card is used, you need to register the card by dialing a number first. Warning: No support for Micro SIM cards! The camera transmits images via MMS or Email. Please make sure that these services are unlocked and that they are supported by your provider. The transmitter modules in the camera support the following bandwidth: 850MHz, 900MHz, 1800MHz and 1900MHz. GB 2. Mobile network The signal strength of the mobile network can be very different, which may cause interference in image transmission. Please check carefully whether the signal strength is sufficient (ideally full strength on display) and that the antenna is mounted correctly. 3. SMS commands If camera does not react to SMS commands, activate function by sending SMS command #200#On# with the operator phone number. 4. SD memory cards The camera operates only with a SD memory card. Some SD cards do not harmonize with the DÖRR SnapShot and restrict or prevent proper function of the camera. The camera does not turn on, do not switch to the menu mode or makes either „camera“ or just „video“ recordings. If the camera shows these problems, please try with another SD card (different brand, different capacity). The card should not have more than 16GB! 5. Setup Mode In the SETUP mode, the camera automatically switches off after 3 minutes if no activity is registered. To make further settings, the camera must be switched off and then switched back ON to the setup mode. 6. Motion Detector (PIR Sensor) The sensor reacts under specific condition and within a certain range. Generally the detection range is slightly smaller then the camera´s picture angle. The detection of objects depends on temperature and other circumstances like vegetation and reflecting areas. Ideal conditions, perfect adjustment and high sensibility allow the camera to reach 20m triggering. An average of 10m should be considered normal. Several testings are necessary to get the best position for the camera. 7. Light conditions Consider that back light is not good to take proper pictures. Carefully choose the position of camera, so it is not directly facing the sun or complete shadow. 8. Lens rattle A filter covers the lens, it allows colored pictures at daylight and black & white shots at night. When camera is turned off the filter is not fixed which can cause the rattle. Do not worry your camera is not defective. 9. Weather resistance Although the camera is weather resistant, we recommend to mount the camera in a protected area, where it is not exposed to direct rain or permanent sun. Dust- and Waterproof (IP54). 10.Subject to change. Latest manual download here: http://download.doerrfoto.info/manuals/Snapshot%20manuals/ The CE marking complies with the European directives. You can download the respective EU declaration of conformity with following link: http://www.doerrfoto.de/info/EG-Konformitätserklärungen/ 15 DÖRR GmbH • Postfach 1280 • 89202 Neu-Ulm/Germany • Fon +49 731 97037-0 • Fax +49 731 97037-37 • [email protected] www.doerrfoto.de