1
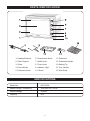
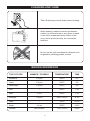
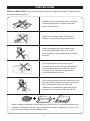
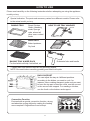
Dear Customer, Congratulations! Thank you for buying this KORYO appliance. Your new Electric Oven has been designed for your convenience. We are sure you will get many years of trouble free service from this appliance. Before commissioning this device please read this user manual carefully. Please retain this user manual, warranty certicate, sales receipt and if possible carton with the inner packaging. Contents Operating Instructions 3 Cautions 3 Maintenance 4 Warning 4 Parts Identification 5 Specifications 5 Cleaning And Care 6 Baking Reference 6 Functional Control 7 Precautions 8 How To Use 9 Functional Control 10 E-waste Disposal 10 Warranty 11 2 OPERATING INSTRUCTIONS HEAT THE EMPTY OVEN 1. Insert the tray and baking net. 2. Set the heater operating switch to “UPPER & LOWER”, set the temperature control dial to “250ºC” and heat the empty oven for about 10 minutes. NOTE: There may be some smoke and a burning smell at first use, but this is not a malfunction. TEMPERATURE CONTROL DIAL 1. Set the Temperature Control Dial for the dishes which you are going to cook. HEAT OPERATING SWITCH Select “Upper” “Lower” or “Upper & Lower” according to the dishes you are going to cook. You can observe whether the heaters are working or not by observing the front indicator light. 1. Set the arrow on the timer knob to the number which indicates the cooking time (minutes) according to the dishes you are going to cook. 2. Set the Timer by turning it clockwise. • The oven will turn off automatically at the end of the selected time and a bell will ring. • When setting the Timer to less than 5 min, turn it to more than 6 min. and then back to the selected time. 3. The oven can be turned off manually during cooking by turning the Timer counter-clockwise to the “OFF” position. Note: If the inside of the oven is dirty, cooking may take slightly longer than usual. CAUTIONS If the oven is positioned to close to a wall, the wall will be burned or stained. Be sure the curtain, etc., are not in contact with the body. Do not put anything between the bottom of the body and the surface on which it is set, an object so placed could be burned. Do not put anything on the oven while using it, the heat could cause deformation, cracking, etc. 3 CAUTIONS This product must not be left unattended while it is connected to the supply mains. Any bottled or tinned food can not be heated directly as the bottle or tin would be broken out and scald the person. Be careful! Not to bum yourself during use or immediately after use. The metal parts and glass window of the door become extremely hot during use. Be careful not to touch them when opening and closing the door. AC power must be taken from a properly wired outlet. Insert the plug completely into the socket. If it is not, it could become abnormally hot. Do not use an electric light outlet. Never connect multiple plugs to the same outlet. MAINTENANCE 1. Other than cleaning mentioned in this instruction manual, no additional maintenance or serving of this appliance is required. 2. Repairs, when necessary, must be performed at an authorised service facility. 3. This appliance is intended for HOUSEHOLD USE ONLY and not for commercial or industrial use. WARNING If the supply cord is damaged, kindly call company authorized service person in order to avoid hazard. SPECIAL WARNING Recycling symbol, don’t dispose of the product with household refuse. CAUTION: The temperature of the accessible surface may be high when the appliance if operation. 4 PARTS IDENTIFICATION 1. Heating Element 6. Temperature Knob 11. Rotisserie 2. Rack Support 7. Mode Knob 12. Rotisserie Handle 3. Glass 8. Timer Knob 13. Baking Try 4. Door Handle 9. Indicator Light 14. Tray Handle 5. Rotisserie Knob 10. Stand 15. Wire Rack SPECIFICATIONS Model No. KOT 6120 Rated Voltage / Frequency 220-240V AC, 50 Hz Rated Wattage 2000W Capacity 60L 5 CLEANING AND CARE Take off the plug and cool down before cleaning. When cleaning, wash the interior and exterior surface, try not use brush or any others to wash, so as not to scrape the interior surface of the oven, and to protect the tray, the net and the food fork. Do not use the toxic and abrasive cleaners such as gasoline, polishing powder, solvent. BAKING REFERENCE TYPE OF FOOD NUMBER / TICKNESS TEMPERATURE TIME Sandwich 2-3 pcs 200ºC 2-3 Toast 2-4 pcs 250ºC 2-5 Hamburger 2-3 pcs 200ºC 3-5 Fish / 200ºC 7-10 Ham 2 cm 200ºC 7-12 3-4 pcs 200ºC-250ºC 8-10 Cake / 150ºC 20-30 Steak 1-2 cm 250ºC 10-15 Half Chicken 175ºC-200ºC 30-40 Sausage Chicken 6 FUNCTIONAL CONTROL MODE CONTROL Select the suitable heating element according to the dishes you are going to cook. Upper Heating Lower Heating Upper & Lower Heating TIMER 1. Set the arrow on the “Timer” to the number which indicates the cooking time (minutes) according to the dishes you are going to cook. * You can observe whether the heating elements are working or not by observing the front indicator light. 2. Set the “Timer” by turning it clockwise. The oven will turn off automatically at the end of the selected time and a bell will ring. • When setting the Timer to less the 5 min, turn it to more than6 min. and then back tot the selected time. 3. The oven can be turned off manually during cooking by turning the “Timer” anti-clockwise to the “OFF” position. ROTISSERIE FUNCTION Select the suitable heating element according to the dishes you are going to cook. Rotisserie Function Convection Function 7 Convection & Rotisserie Function PRECAUTIONS SPECIAL INDICATION: The accessory image varies from different models. Please refer to the actual model you buy. Always use the tray handler when inserting or removing the tray. Touching these will cause severe burns. When hot, not apply water to the glass window, it may cause the glass to break. When unplugging the cord, always take hold of the plug itself. Never pull on the cord. Doing so could break the wires inside the cord. Do not position the unit close to a gas burner or other source of high temperature or do not direct an electric fan, etc, at the unit during use. Doing so could prevent correct temperature control. Do not wet the power cord nor handle the unit with wet hands. Always unplug the cord after use, or whenever the unit is to be left unattended. A malfunction while the plug is inserted into the outlet could cause a fire. When cooking oil-splashing dishes such as roast chicken, it is recommended to put 2 sheets of aluminum foils on a tray in order to diminish oil splashing. Put one on a tray. Then oil will drip to a gap between foils. 8 HOW TO USE Please read carefully on the following instructions before attempting on using the appliance model you buy. Special indication: The parts and accessory varies from different models. Please refer to the actual model you buy. BAKING TRAY HOW TO USE TRAY HANDLER Roast Chicken, Gratin, Hamburg steak, Sponge cake, almost all other oven-cooked foods WIRE RACK Baked potatoes, Dry food BAKING TRAY & WIRE RACK For food which will drip / boiled fish, etc Rotisserie forks and handle * Please take note that the trays are not perfectly square. NOTE: Be careful when removing pudding and other hot liquids. RACK SUPPORT You can adjust the tray at 4 different positions according to the dishes you want to cook. for instance, when making macaroni gratin and you want to have the top part cooked the most, use the second or the second rack support. For roasting a chicken, use the fourth or the bottom rack support. Convection Function Featured with a special convection function, strong and absolute cycling airflow by making the heating more complete. Original flavor can be kept. 9 HOW TO USE ROTISSERIE FUNCTION USE WITH ROTISSERIE FORKS INSTALL ROTISSERIE FORKS RIGHT With this function, even baking will be provided. INSTALL ROTISSERIE FORKS LEFT REMOVE ROTISSERIE FORKS Install the rotisserie forks to the rotisserie hole, and then put it to the rotisserie tray. Use rotisserie handle to take out the rotisserie forks form the rotisserie try, and then remover it from the rotisserie hole. ROTISSERIE HANDLE Please always use Rotisserie Handle to take out the Rotisserie Forks. CAUTION: Beware of HOT dripping oil! FUNCTIONAL CONTROL TEMPERATURE CONTROL Set the “Temperature Control” by turning clockwise to select the suitable temperature according to the dishes you are going to cook. (Temperature Control ranging from 0ºC to 250ºC) E-WASTE DISPOSAL This symbol on the product or on the container indicates that this product cannot be eliminated with the general waste. The user is responsible for eliminating this kind of waste by throwing them away at a "recycling point" specifically for electrical and electronic waste. Selective collection and electrical equipment recycling contribute to preserve natural resources and warrant waste recycling to protect environment and health. In order to receive further information about electrical and electronic waste collecting and recycling, contact your Local Council, the service of household waste or the establishment where the product was acquired. 10 WARRANTY This product comes with a warranty of 12 months from the date of purchase as specified on the warranty card. This is against all defective material or workmanship. In the event of a defect, Future Retail Limited or Koryo Authorized Service Centre undertakes to repair the set, free of charge, during the warranty period. In the event of a defect developing in the product, contact KORYO Customer Care or Koryo Authorized Service Centre and provide information about the defect, the model number and serial number of the product. THIS WARRANTY IS VOID IF 1. The completely filled warranty card is not presented to the authorised personnel at the time of servicing of the product. 2. The product is not operated according to the instructions given in the user manual. 3. Defects are caused by improper or reckless use. 4. Modifications or alterations have been made to the product or if the product has been tampered with, in any manner whatsoever. 5. Repairs to the product are carried out by anyone other than an authorised company representative. 6. For defects other than faulty parts or workmanship such as damage due to lightning, abnormal voltage, spillages, dust, accidental damage, etc. 7. The serial number is deleted or altered. 8. Used for any non–domestic purpose. OTHER TERMS AND CONDITIONS 1. Repairs or replacement will be carried out either by a Future Retail Limited authorised customer care centre or by a representative. 2. All expenses incurred in collecting the unit(s) or part(s) thereof from the Customer Service Centre, as well as any other expenses and incidentals will be borne by the customer. 3. Whilst the company will make every effort to carry out repairs at the earliest, it is made expressly clear that the company is under no obligation to do so in a specified period of time. 4. The company or its authorised customer centre reserves the right to retain any part(s) or component(s) replaced at its discretion, in the event of a defect being noticed in the equipment during the warranty 11