1
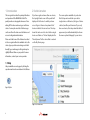
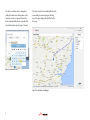
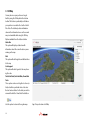
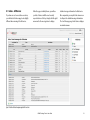
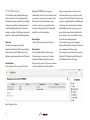
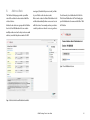
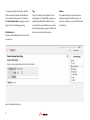
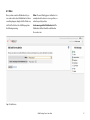
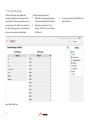
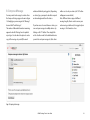
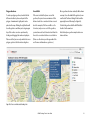
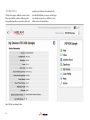
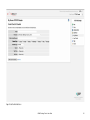
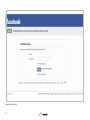
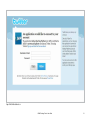
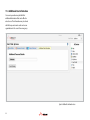
BEAM Tracking Portal
User Guide
2
CONTENTS
1. Introduction
4
1.1 Help
2. The Devices List
4
3. Map
5
3.1 3D Map
4. Inbox
11.4 Additional User Information
12. Appendix - Device Specific
Information
33
12.1 Iridium Extreme™
12.2 Shout Nano™
11
4.1 Inbox - All Devices
5. Sent Messages
14
6. Address Book
15
6.1 Rules
7. Canned Messages
18
8. Compose Message
19
9. Geofence
20
10. My Device
22
10.1 Device Information
10.2 Latest Position Information
10.3 Device Configuration
10.4 Check-In Schedule
10.5 My Devices
11. User Profile
27
11.1 User Profile
11.2 Emergenchy Contact Information
11.3 External Services
BEAM Tracking Portal - User Guide
3
1. Introduction
2. Administration
This user guide describes the principal functions
and operation of the BEAM Web Portal. The
portal provides a cartographical means of visualising GPS locations and messages sent from a
device. You may also view lists of all messages
sent to and from the device and edit device and
account configuration information.
Please note that some of the features described
in the user guide will not be available due to the
device type or portal version being used. Additionally, logos and images in this guide may be
slightly different than on your portal. For more
information, contact your service provider.
If you have registered more than one device,
the top right hand corner of the portal will
display a list of devices to which you have
access. Figure 2 shows a drop down list of
devices visible to the current user. The dropdown list can be used to select either a single
device or all devices. The text displayed is the
“friendly name” for the device that is entered
on the My Device page.
1.1 Help
Help is available on most pages by clicking the
question mark icon shown below in the title bar.
Figure 1 Help Icon
Figure 2 List of Visible Devices
4
The menu options available to you below
this list depend on whether you select a
single device or all devices, the type of device
selected, and the portal version. If you only
have one device, this drop-down list will not
appear and you will automatically be shown
the menu options that apply to your device.
3. Map
The Map page is used for mapping the location
of your device. You have the option of using
Google Maps or Bing Maps. To alter your choice,
visit the User Profile page. Once logged in, you
will be shown the last reported position for your
device (or devices).
You can navigate (move your view) in two
dimensions. To pan (move the map), do one of
the following:
• Click and drag the map
• Press the up arrow on your keyboard to
move north
• Press the down arrow on your keyboard to
move south
• Press the right arrow on your keyboard to
move east
• Press the left arrow on your keyboard to
move west
Additionally, you can zoom in or out pressing
the + or - keys on your keyboard. You can move
the cursor over a location and use the mouse
scroll button to zoom in or out on that location.
To center and zoom in on a location, double
click the location.
Bing Maps
• Arrows - Click the appropriate arrow buttons
to move the view north, south, east or west.
• Zoom In - Click the zoom in icon (+). To zoom
continuously, click and hold this button.
• Zoom Out - Click the zoom in icon (-). To
zoom continuously, click and hold this
button.
• For more information on using Bing maps,
click here.
Google Maps
• Arrows - Click the appropriate arrow buttons
to move the view north, south, east or west.
• Street View - Click to view street-level imagery
• Zoom - Click + to zoom in on the center of
the map. Click - to zoom out.
• Zoom slider - Drag the zoom slider up or
down to zoom in or out incrementally.
When you click on a device location icon, an
information box appears (see Figure 3 below).
The information box also displays information
related to the message on three tabs.
Figure 3 Map page with Message tab of Info Box
BEAM Tracking Portal - User Guide
5
The Message tab shown on Figure 3, displays
information related to the message. On this
tab you will find all position information
that was sent. This may include Latitude,
Longitude, Speed, Heading and Altitude.
Additionally, this tab will show you any text
included in the message as well as the time
the message was sent.
Figure 4 Map page with Device tab of Info Box
6
The Device tab shown on Figure 4, displays
information related to the device that sent the
message. On this tab you will find the friendly
name of the device, device identifier (often
the IMEI of the
device), the device user and a photo.
If you haven’t uploaded a photo, a stock
photo of your device may be shown. The
friendly name of your device and the photo
may be changed on the My Device page.
The Track tab displays options for drawing the
device track within specified time interval.
The “Show Track” link retrieves all position
information and shows track on the map.
When the track is already shown the text of
the link is changed to “Hide Track”. Clicking
Hide Track removes selected track from the
map. The default time interval is 7 days from
the last received message containing position
information.
Figure 5 Map page with Track tab of Info Box
BEAM Tracking Portal - User Guide
7
The start or end date can be changed by
clicking the date and selecting date on the
calendar control (see Figure 6 below), the
track is automatically shown or updated for
selected time interval (see Figure 7 below).
The device track is shown with light blue dots
representing received messages. Clicking
any of the dots displays the Info Box for the
message.
Figure 6 Track tab calendar control
Figure 7 Device Track shown on the Map page
8
Additional options may be available from the
bottom of information box:
• Zoom - Selecting this option causes the map
to automatically zoom in to a smaller scale
• Show Inbox – Opens Inbox page with the
current message selected
• Ping Device - Sends a message to the device
requesting it to report its current location.
Please note that if the device is in standby
mode or powered off, the message will be
queued at the Iridium gateway for delivery
and the device will not respond immediately
(this option is only available if the device
supports receiving messages)
• Send Message – Opens the compose
message page for sending a message to the
device
Whilst on this page, you will be notified via a
pop up box if a new message is received.
The Map footer contains the following
information:
This feature may be disabled by your Service
Provider
Refresh – This option updates the map
with the latest position messages without
reloading the whole page.
Last Check – This is the last time the portal
checked to see if there are any updates from
the selected device or devices.
Last Message – If a single device is selected
then this is the date and time of the most
recent message. If all devices are selected
then this shows the date and time of the most
recent message from all the devices.
LAT/LNG – This shows the latitude and
longitude of the mouse pointer on the map.
3D Map – This option allows you to view your
position on Google Earth. Note: The google
earth plug-in must be installed on your
machine to use this feature.
Figure 8 Notification that the current device has received a new
message
BEAM Tracking Portal - User Guide
9
3.1 3D Map
You may also view your position on Google
Earth by using the 3D Map link in the bottom
toolbar. This feature is particularly useful when
your position is near either the South or North
Pole. Note: The detailed position information
shown in the information boxes on the normal
map is not available while using the 3D Map.
Options available from the bottom toolbar:
Status Bar
This option will display a status bar with
information about the current location you are
viewing on the map
Grid
This option will add longitude and latitude lines
to the map
Scale Legend
This option will add a legend to the map showing the scale.
Track Start Date, Track End Date, Show/Hide
Track
These options can be used together to show (or
hide) a track for a particular device. Just enter
the start and end dates for the track you wish to
view and then hit the Show/Hide Track button
Use this option to return to the regular map.
10
Figure 9 Device position shown on the 3D Map
4.Inbox
The Inbox page shows messages received
from the device in reverse chronological order.
The icons displayed against each row have the
following meanings:
Emergency Message
This is a message indicating that the emergency
function of the device was activated.
Position report
This is the position of the device at the time the
message is sent.
Cancel Emergency Message
This is an emergency cancellation message.
Standard Message
This is a text message.
All other messages
Hovering over the icon will let you know the
type of message.
Canned Messages
This is a canned message.
Columns in the grid have the following meaning:
Time
The time the device reported (UTC or user local
time when set on the User Profile page). When
hovered over, this column displays a popup with
the time in standard UTC format.
Message
The body of the message.
System Message
This is a system message (System Test,
Diagnostics Response, Request Device Identifier
Response, or Synchronising Data over the Air).
BEAM Tracking Portal - User Guide
Recipient
The address to which the message was
destined. This is typically an address book entry.
Hovering the mouse over this field will show the
expanded address book entry.
Position
The position of device at the time of the report.
For messages with a valid location, clicking on
the position jumps to the location of the device
on the Map page.
Speed
The velocity of the device at the time of the
report (km per hour).
Heading
The course over ground.
Altitude
The elevation in meters.
Source
Indicates the source of the position (For most
devices this is the in-built GPS. Some devices
support other location technologies e.g. Doppler).
Note that some columns will appear blank for
some messages. For example, the position,
heading, altitude, and source columns will be
blank when viewing a text message without a
position.
11
The first page of messages will be automatically
displayed. If you have more messages, page
numbers will display below the table. Click
on the page number to jump to that page
of messages. Please note that the maximum
number of messages that are visible is 1000.
Once a device has exceeded this limit, only the
most recent 1000 are visible. If you wish to keep
a history, then you are advised to export the
data using the link provided.
Figure 10 Messages from the Device
12
4.1 Inbox – All Devices
If you have access to more than one device,
you will notice the Inbox page looks slightly
different when viewing it for all devices.
When the page is initially shown, you will see
your list of devices with the most recently
reported device at the top. Simply click the right
arrow next to the message time to display
detailed message information for that device.
Once expanded, you may click the down arrow
to collapse the detailed message information.
The Sent Messages page for all devices displays
in a similar manner.
Figure 11 Inbox for all devices showing message details for one device
BEAM Tracking Portal - User Guide
13
5. Sent Messages
The Sent Messages page displays all messages
sent to a device in reverse chronological order.
This includes messages sent from the portal itself
and messages sent from an external source but
routed through the portal. Figure 12 shows an
example screenshot of Sent Messages page in the
portal. The columns have the following meaning:
Time Sent
The time the message was queued for
transmission to the device (UTC or user local time
when set in user’s profile). When hovered over,
displays a popup showing the time in UTC format.
Sender Address
This is originator of the message. This column
Figure 12 Messages to the Device
14
will display “SERVER” if the message was
automatically sent to the device from the portal
in response to a request e.g. a location request.
If the portal receives and external message
to route to a device (e.g. an email reply from
a device text message), then this column will
display the sender’s email address.
Message Type
The type of the message sent to the device.
Message Text
This is normally body text of the message
for text messages. In some cases it contains
additional information about the message.
Messages can be sent to the device in a number
of ways. Typically, this is done through the
Compose page. However, messages can be
sent from another device, in reply to an email
message or from an SMS device. In all cases, any
messages routed through the portal will appear
on this page. For some devices the portal may
automatically respond to emergency, power
up and test messages that are initiated on the
device. In these cases a record of the message
sent to the device will appear here.
To view earlier messages, use the paging
buttons at the bottom of the grid. You may view
up to a maximum of 1000 messages.
The messages in your sent list can be exported
to Excel, in CSV format, by using the ‘Export To
Excel’ link at the bottom of the page.
6.
Address Book
The Address Book page provides you with a
view of the address book associated with the
selected device.
Address book entries are grouped into Distribution Lists. Each Distribution List can contain
multiple entries and each entry can be an email
address, a mobile telephone number for SMS
messages (if enabled for your account), or links
to your Twitter or Facebook accounts.
Rules can be created so that a Distribution List is
notified automatically when some event occurs
with the device. For example, when your device
sends its position or when it crosses a geofence.
To add an entry to a distribution list click the
“Add a New Distribution List” link. Simply give
your Distribution List a name and click the “Add
List” button.
Figure 14 Create Distribution List screen
Figure 13 Address Book with several Distribution Lists and Rules
BEAM Tracking Portal - User Guide
15
To create a new address book entry, click the
“Add a new entry” link under the Distribution
List you want to add an entry to. The fields on
the Create Address Book entry page, shown in
Figure 15, have the following meaning:
Distribution List
The name of the Distribution List the entry will
be created in.
Figure 15 Create Address Book Entry screen
16
Type
The type of address book destination. This is
most typically set to “Email”. Other options are
available including SMS (if enabled for your
account), Facebook and Twitter. For more information about posting messages to Twitter and
Facebook, see the User Profile section.
Address
The email address (for an email recipient) or
a telephone number (for SMS messages). If
Facebook or Twitter is selected, then this field is
not displayed.
6.1 Rules
Once you have created a Distribution List you
can create a rule to alert a Distribution List when
something happens. Simply click the “Add a new
rule” link. The fields on the Add Rule page have
the following meaning.
When: The event that triggers a notification. For
example when the device crosses a geofence, or
when it reports its position.
Send a message to this Distribution List: The
Distribution List that should be notified when
the event occurs.
Figure 16 Create Rule screen
BEAM Tracking Portal - User Guide
17
7. Canned Messages
The Canned Messages page displays the
currently configured canned messages for the
selected device. Each device may store up to 30
canned messages, 15 of which are user defined;
the other 15 messages are pre-set for the device
by your service provider or administrator.
Figure 17 Canned Messages Screen
18
To edit the canned message text:
1. Click “Edit” on the appropriate grid row.
The grid row will switch into edit mode.
2. Change the message text. To save
changes, click “Save”. To cancel changes,
click “Cancel”.
3.
The new canned message text will then be
sent to the device.
8. Compose Message
You may send a text message to a device from
the Compose Message page as shown in Figure
18. Simply type your message in the “Message”
box and click “Send Message”.
The number of allowable characters remaining
appears below the “Message” and is updated
as you type. You also have the option to send a
copy of the message to yourself (the email
address with which you logged in). Depending
on device type, you may also be able to request
an acknowledgement from the device.
If you have access to more than one device, you
can send your message to multiple devices by
clicking on the “To” button. Then simply click
on the check box next to the additional devices
you wish to send your message to. (Note: Users
with access to only one device, the “To” button
will appear as normal text.)
Note: Different devices support different
message lengths, thus in order to ensure your
entire message is delivered, it is suggested your
message is 160 characters or less.
Figure 18 Composing a text message
BEAM Tracking Portal - User Guide
19
9. Geofence
A geofence is a virtual perimeter around a real
world geographic area The Geofence page may
be used to set up a geofence for your device.
Once a geofence is configured on the portal, the
user is notified whenever the geofence is crossed.
Geofence traversal is monitored by the platform
for all devices (except Iridium Extreme devices).
Figure 19 Geofence screen with no associated geofence.
20
Two types of geofence are supported; circular,
where the fenced-in area is a circle, or polygon,
where the fenced in area is defined by a line
joining up to 8 separate coordinates. In addition,
users may opt to use predefined geofences
which can be configured by an administrator.
To begin, click the link to “Create Circular
Geofence” or “Create Polygon Geofence”.
Circular Geofence
To create a circular geofence, first double-click
the left mouse button to place centre point
of the circle. Then, double click the left mouse
button again to confirm the radius of the circle.
Clicking the right button will clear the geofence
and allow you to begin again. The centre point
and radius can be adjusted by clicking and
dragging the pushpins.
Polygon Geofence
To create a polygon geofence, double-click the
left mouse button to place each point of the
polygon. A maximum of eight points can be
placed on the map. Clicking the right button will
clear the geofence and allow you to begin again.
Any of the vertices can be re-positioned by
clicking and dragging the numbered pushpin.
Please note that you are not permitted to save a
polygon geofence that has intersecting lines.
Fence Width
If the user is alerted they have crossed the
geofence, they must move a minimum of this
distance back to be considered to have crossed
back. For example, if the fence width is set to
50 meters, and you cross out of the geofence,
you must move at least 50 meters back from the
fence to be considered to have crossed back in.
(Please see the device specific appendix at the
end for more information on geofences.)
Once a geofence has been created, it will be shown
on a map. To see the details of the geofence, hover
over the text “Geofence Settings” in the box in the
upper right corner of the map (See Figure 20).
To delete the geofence click the link “Delete this
Geofence” in the same box.
Note that only one geofence may be active on a
device at a time.
Figure 20 Geofence screen with associated circular geofence
BEAM Tracking Portal - User Guide
21
10. My Device
The My Device page is split into several sections.
Please note that the contents of this page will
vary greatly depending on your device type and
Figure 21 My Device Screen showing ALL options
22
portal version. Below, we have attempted to
describe all fields that you may see on this page.
You should not expect to see all fields or even
all the sections described below.
10.1. Device Information
The Device Information section displays
important information about your device.
Device Id
This is normally the devices IMEI (International
Mobile Equipment Identity) number, but can
also be a different identifier that uniquely
identifies the device.
Friendly Name
The name used to refer to the device on the
portal. If no friendly name exists for the device,
the IMEI number will appear instead. You may
edit this name by selecting the “Edit” icon.
Description
The user entered description of the device.
Image
A user uploaded image of their device.
Device Type
The type of device currently being viewed.
Device Monitoring Interval – If enabled, devices
may be monitored by BEAM Web Portal. The
monitoring interval may be set here. A rule can
be created on the Address Book page to notify a
distribution list when a device becomes overdue.
Device Monitoring Buffer
The Monitoring Buffer is a set period of time
that BEAM Web Portal will wait after the
Monitoring Interval is exhausted before marking
a device overdue.
Email Delivery
Users can opt to receive email directly on their
device. Once this feature had been enabled
for a device the email address will show here.
This feature is not enabled by default and must
be turned on here before email can be sent
directly to the device. Note that only the first 160
characters of the email will be sent to the device.
Device Phone Number
The device phone number provided on the
SIM card (optional). You may edit this name by
selecting the “Edit” icon. If entered, this number
is sent to GEOS in the event of an emergency.
Registration Code
The code number, created on the device, which
must be entered during the registration process.
PIN Code
The code number from the portal that must
be entered into the device to indicate that the
device is registered with the portal.
Dynamic Geofence Radius
A Dynamic Geofence can be used to alert
you if the device has moved too far since its
last position. When a Dynamic Geofence has
been set up for a device, a circular region is
created around the device’s last position with
BEAM Tracking Portal - User Guide
the selected radius. The next time the device
reports its position, if it is outside of the region
it is considered to have crossed its geofence. On
the Address Book page, you can set up a rule to
alert you if this geofence is crosssed.
Use GEOS Alliance
This option is only available to users of Iridium
Extreme devices. Users of this device can
register with GEOS Alliance and have their
emergency message sent directly to GEOS.
Please note that you must register the device
with GEOS before using this feature.
23
10.2. Latest Position Information
The Latest Position Information section contains
information about the last time your device
reported its position to the portal.
Last Reported On
This is the time that the device last reported its
position.
Last Reported Position
Last reported position of the device.
Request Device Identifier
The My Devices page includes a means to
request the device identifier. The device identifier
is the value stored in the first “My Number”
slot on the device’s SIM card, normally the
device’s phone number. Pressing the “Request
Device Identifier” button will send a message
to the device (visible on the “Sent Messages”
page) requesting it send a response message
containing the device identifier. The response
message will appear on the “Inbox” screen.
Request Device Diagnostics
The “Request Device Diagnostics” feature works
the same as the “Request Device Identifier”
feature, except the response message will include
diagnostic information for the device. Diagnostic
information returned will include battery voltage,
charger status, accumulator range, visible
24
satellites, firmware version and hardware version.
This information can useful when diagnosing a
fault with your service provider.
Request Device Location
The “Request Device Location” feature works the
same as the “Request Device Identifier” feature,
except the response message will include the
devices current location.
Manual Check In
This option creates a check in message for the
device so that the device is not considered
overdue. The purpose of this option is to allow
an administrator check in the device when the
user of the device is otherwise unable to. (For
example if a user’s device runs out of battery
and the user instead calls into the portal
administrator.)
10.3. Device Configuration
Device Configuration is data that is stored
on the device, and is normally edited on the
device. However, you can remotely update
your device by using this page and sending the
settings to the device.
It is important to note that the information
displayed on this screen is only sent to the device
when the device is first switched on. When the
portal receives a switch-on message from the
device, it automatically sends the changed
configuration. Thus, if you update the information
here, the changes will not be displayed on the
portal until the device is re-started and a new
switch-on message has been received.
It is also important to note that if the device is
not turned on, it will not receive the updated
configuration settings until it is turned back on.
10.4. Check-In Schedule
Check-in schedules can be used to specify times
when a device must check in. A device that hasn’t
reported according to its schedule will be marked
overdue, and an alert will be sent to all users in
the “Check In Schedule” address book list.
Users can either define their own check
in schedule or use one created by an
administrator. Users can create a schedule
based on “Selected Times” or “Intervals”. For
selected times, the user need only specify the
times that a device must check in. For intervals,
the user must specify the start and end time in
addition to the interval. The “Buffer Period” is the
time before or after the check in time that the
user may send a message to the portal.
Figure 22 Create Check In Schedule Screen
BEAM Tracking Portal - User Guide
25
10.5. My Devices
The My Devices page is only visible to users
with access to more than one device. This
page shows a list of devices accessible to the
currently logged in user, as well as the friendly
name for that device. The page gives a quick
view into all the devices visible to the logged in
user. Clicking on the friendly name of a device
will select that device and navigate the user to
the My Device page for the device.
Figure 23 My Devices Screen
26
11. User Profile
The User Profile page includes information
relating to the current logged in user. This
contact information will be included in the
emergency email messages in the event of an
alert being received by a device.
Figure 24 User Profile Screen
BEAM Tracking Portal - User Guide
27
11.1. User Profile
Name, address and phone numbers (daytime,
evening, mobile) of the device holder.
Time Zone
When specified, the time displayed on portal
pages is converted from UTC to time zone
selected here.
Figure 25 Emergency Contact Screen
28
11.2. Emergency Contact Information
Culture
Specifies the format date and time display to be
displayed.
Password, Security Question and Answer
A user can change their password, security
question and security answer with these options.
The information specified in this section will be
included in the emergency email messages in
the event of an alert being received by a device.
Please note that if you add the GEOS emergency
call centre address, this information is not sent
to GEOS.
11.3. External Services
You may authorize the portal to post status
updates to your Facebook account or tweet
to your Twitter account from this page. Simply
click the appropriate link for Facebook or Twitter
and you will be re-directed to the Facebook or
Twitter site where you can sign in and authorize
BEAM Web Portal to post on your behalf.
Once you have authorized Facebook or Twitter,
you may add it to a Distribution List in your
Address Book. Any future messages sent from
your device to that Distribution List will now
also post the message to your Facebook or
Twitter account. Please note that the process
of redirecting you to Facebook or Twitter is to
ensure that the connection is secure. At no time
does BEAM Web Portal record or store your
credentials for Facebook or Twitter. You can
deactivate the links at any time from the portal
or the social network sites.
Figure 26 Facebook & Twitter Authentication Screen
BEAM Tracking Portal - User Guide
29
Figure 27 Facebook Login Screen
30
Figure 28 Twitter Authentication Screen
BEAM Tracking Portal - User Guide
31
11.4. Additional User Information
Your service provider may add fields for
additional information that can be filled in
about a user. This information may be shared
with first responders and search and rescue
organizations in the event of an emergency.
Figure 29 Additional User Information Screen
32
12. Appendix
Device Specific Information
12.1. Iridium Extreme™
Registering Your Device
When registering with the portal on your device
via the *#575# command, you will be prompted
to enter a PIN number from the portal. This
number can be found on the My Device page in
the Device Information section
Unregistering Your Device
To unregister your device, from the idle screen,
dial: *#576# and press the green key. Under
these circumstances, messages from the
handset will no longer be sent to the portal.
Please note that you may still be charged by
your service provider. Please contact your
service provider for more information.
Address Book
Please refer to Iridium Extreme User Manual,
Chapter “8: Using the Phonebooks” (page 75) to
add a distribution list to your device phonebook.
In simple terms, create a new entry to “My
Phonebook” then enter your Address Book
Distribution name in the email field. For example,
when you have an Address Book distribution
list called “Friends”, use the word “Friends” in the
email address field on the device.
Canned Messages
If you edit a canned message, the system will
attempt to send synchronise the changes with
your device. If the update does not succeed, for
example, your device is switched off, then the
next time your device is switched on, the system
will synchronise all canned messages. If you have
access to more than one device, you will be given
the option to change canned messages for the
selected device, or all your devices.
Geofences
When using a geofence with an Iridium Extreme
device, the geofence coordinates are sent to the
device from the portal. The device then monitors
its position internally and sends a message to the
portal when the geofence has been traversed. The
device also alerts the user on the device screen by
means of an audible beep and an icon.
When creating a geofence, you will be prompted
to enter the following additional information:
• Refresh Rate in Minutes – How often the
Iridium Extreme™ device should check to see
if it has crossed the geofence. This minimum
value is 1 minute.
• Send Message to Portal When Crossed – If
checked, a message will be sent to the portal
when the device crosses the geofence. If left
unchecked, no message will be sent to the
portal when the device crosses the geofence.
BEAM Tracking Portal - User Guide
Note that the device itself will always notify
the user when the geofence is crossed.
12.2. Shout Nano™
Address Book
After editing your address book, you will need to
synchronize the portal with your Shout device.
To do this, download the Synchronisation tool.
The Shout device has no features for adding or
editing its address book. Therefore, you must
synchronize. If you do not, then you will not be
able to select a recipient and you will not be
able to send text messages. Also, if you edit an
address book entry and do not re-synchronize,
then the portal will send the message to latest
entries you created and not necessarily the
intended recipient displayed on the device.
Canned Messages
After editing your canned messages, you will
need to synchronise the portal with your Shout
device. To do this, download the Synchronisation
tool. The Shout device has no features for adding
or editing canned messages. Therefore, you
must synchronize. If you do not, then you will
not be able to select a canned message and will
have to type the message in full on the device.
Also, if you edit a canned message and do not
re-synchronize, then the portal will send the
latest version you created and not necessarily the
intended text displayed on the device.
33
34
BEAM Communications Pty Ltd
8 Anzed Court, Mulgrave
Victoria, 3170, AUSTRALIA
Tel: +61 3 8588 4500 Fax: +61 3 9560 9055
www.beamcommunications.com
PART #: USRMAN007801U
Web: www.beamcommunications.com
Info: [email protected]
Support: [email protected]