1
NetOffice User Manual
Ctrl-click any topic to jump to that section.
INTRODUCTION
3
GETTING STARTED
3
GETTING ORIENTED
4
ICONS
5
PREFERENCES
5
USER PROFILE
5
PASSWORD
6
NOTIFICATIONS
6
ADD NEW CLIENTS
7
EDIT CLIENT USER
9
PROJECTS
10
EDIT PROJECT
11
PROJECT TEAM
12
PHASES
13
TASKS
14
EDIT TASKS
16
DISCUSSIONS
17
NOTES
19
NEW SUPPORT REQUESTS
19
MANAGING SUPPORT REQUESTS
20
LINKED CONTENT
UPLOAD NEW DOCUMENTS
21
21
UPDATE DOCUMENTS
PROJECT SITE
23
23
PROJECT SITE USERS
24
CLIENT ACCESS
25
PUBLISH
26
DELETE SITE
27
OTHER FEATURES
27
REPORTS
27
SEARCH
28
BOOKMARKS
32
GNU FREE DOCUMENTATION LICENSE
34
Copyright (c) 2003 Michelle L. Feldman (http://www.collabowrite.net).
Permission is granted to copy, distribute and/or modify this document under the terms of the GNU Free Documentation License. A copy of
the license is included in the section entitled "GNU Free Documentation License".
INTRODUCTION
NetOffice is an internet-enabled system for use in projects that require collaboration
over the internet. Those organizations, such as consulting firms, that rely on a
division between firm-side and client-side information will benefit most from use of
NetOffice. The system is divided in two parts which we will call "Internal Project
Site" and "Client Project Site." The project team, excluding the client, has access
to the Internal Project Site. On the Internal Project Site, users fall into several
categories: Administrator, Manager, and User.
Administrators can maintain both business and technical aspects of the system.
Managers administrate projects: they can add and edit clients, projects, project
details, calendars, and reports but cannot upgrade the system, create new or change
existing system users, or access the database. Users can view most information but
can only add new discussions, notes, tasks, and linked content. The Internal Project
Site users also have access to the Client Project Site on the projects to which they
are assigned.
Client users do not have access to the Internal Project Site. When clients log
in at the login page, they are directed to the Client Project Site. On this Site, they
can approve or reject documents, file support requests, review tasks, or add a
message to the bulletin board. Clients only have access to their own projects and
cannot view or edit projects that belong to other clients. Clients also do not have
access to those items that the project manager or other team member does not
publish to the Client Project Site.
GETTING STARTED
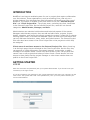
LOG IN
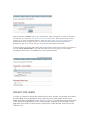
Enter the username and password (ask your system administrator if you do not know your
username) in the login screen.
If you have forgotten your password, click "Forgot Password" and enter your username on the
next screen. The system will email a new password to you if your user profile contains your
correct email address.
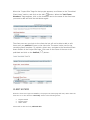
GETTING ORIENTED
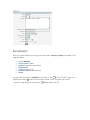
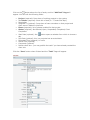
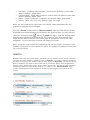
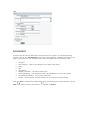
The Home Page (Figure 1.2) on the Internal Project Site will appear after you have
successfully logged in. Other team members will also see this home page but the client will
see an entirely different page, which is discussed in Client Site and in Documentation for
Clients.
From this page, the manager or team member can access all aspects of the system except for
the Menu Item labeled "Admin." "My Bookmarks" will appear above "My Projects" after the
user has created bookmarks (project-related internet links).
1.
2.
3.
4.
5.
Main Navigation (items circled with "1" in Figure 1.2). This menu bar appears at the
top of every page on the Internal Project Site. To return to the home page from any
part of the Internal Project Site, click on the item labeled "Home" in this navigation.
The user can also access all the major components of the site using this navigation.
Right Navigation (items circle with "2" in Figure 1.2). These links appear in the top
right corner of every page on the Internal Project Site. The user can log out or
edit/view preferences. To view the external Client Project Site, click "Go to Project
Site."
Location - the site user's location is projected under the Main Navigation ("3" in
Figure 1.2). In some cases, secondary page navigation will also appear here.
My Projects - the user can see and access the list of current projects assigned to that
user, or create new/ delete existing projects. The use can also access the list from
"Projects" in the Main Navigation from anywhere on the Internal Project Site.
My Tasks - the user can see and access the list of current tasks assigned to that user,
or delete existing tasks. The use can also access the task lists under each project by
visiting that project's page.
6.
7.
8.
My Discussions - the user can see, access, delete/close, or publish the list of current
"discussions" (or conversational postings) on assigned projects. The user can also
access the discussions under each project by visiting that project's page.
My Reports - the user can create new or delete existing project reports that include
such information as outstanding tasks, status, and priority.
My Notes - the user can view and edit existing notes.
ICONS
•
- "Add"
•
- "Delete"
•
- "Publish" > will add to Client Project Site
•
- "Unpublish" > will remove from Client Project Site
•
- "Edit"
•
- "View"
•
- "Copy"
•
- "Import"
•
- "Export" - saves to spreadsheet
•
- "Close Discussion" - disallows further posts to topic
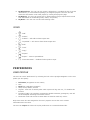
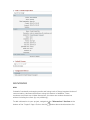
PREFERENCES
USER PROFILE
The user can reach "Preferences" by selecting the link in the top Right Navigation. In the user
profile you can specify:
•
•
•
•
•
•
•
Full Name (as opposed to user name)
Title
Email (for notification purposes)
Work, Home, Mobile, and Fax
Log Out - time with no activity after which system will log user out; "0" disables this
function
Timezone (GMT): the numbers correspond to global timezones; postings by user will
be timestamped according to timezone chosen
Permission level and account creation date are listed as read-only values
Only those users who are assigned to the user's projects can see the user's contact
information and vice versa.
The user can export the values of his/her preferences to a comma delimited file.
PASSWORD
The system administrator initially creates usernames, passwords, and
permissions. Once logged into the system, the user can change his/her password
by selecting "Change Password" in "Preferences."
If the user does not remember his/her password, he/she can have the password sent
to his/her email address during the login process. If the user does not have an email
address in the system, or does not recall his/her username, the user must request
the password manually from the system administrator.
NOTIFICATIONS
In the "Notifications" section of "Preferences," the user can choose whether to
receive notifications via email (at the email address specified in "Profile"). All
notification is the system default. To decline notifications, the user can either leave
the email address field (in "Profile") blank or uncheck all of the boxes by selecting
the "Select/Deselect All."
If the user wants to receive only a select group of notifications, he/she can choose
on the basis of:
•
•
•
•
new task assignment
assigned task status, priority, or due date change
new project assignment or removal
new discussion topic or posting
Such notifications will occur only on assigned projects.
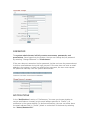
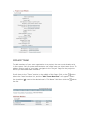
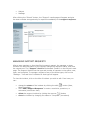
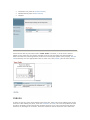
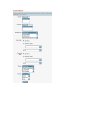
ADD NEW CLIENTS
To create your first project in NetOffice, you must initially create a client to which to
attach the project. Click on the "Clients" item of the top menu bar, then click on the
button (on the "Client Orqanizations" Page.)
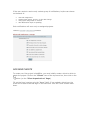
Fill out the form (requires only the "Name" field). If you upload a client logo, the
client will be able to see that logo on the client site. Click the "Save" button when
done.
When you have saved your new client, the main "Client" Page will appear. This
page provides information about the client and lists projects and client-side users
(who will access the client site as opposed to the team site). You can edit the Client
on the "Client Organization" Page
Organization's "Details" by clicking on the
or by selecting the box ( ) next to the client's name in the "Clients" list on the
"Client Organizations" Page and then clicking the
button above the list.
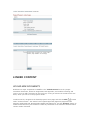
ADD CLIENT USER
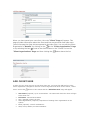
In order for your client users to log into their client site, you must first add him/her to the
Client organization. Navigate to the main "Client" Page and scroll down to the section, "Client
Users." Select the
•
•
•
•
•
•
button in this section and the "Add Client User" Page will appear.
User Name (required): Up to 16 characters - the name with which the client will login
to the client site
Full Name: Last and First Names
Title: (optional) Client's job title
Client Organization (required): Drop-down of existing client organizations in the
system
Email (optional): used for notifications
Work, Home, Mobile, Fax Phone Numbers
•
•
Comments
Password (required): Up to 16 characters, letters, numbers, case-sensitive
Click the "Save" button when finished and the "Client Organization" Page will appear.
EDIT CLIENT USER
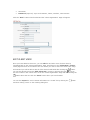
Once you have added a client user, you can edit this and other users for that client by
navigating back to the "Client Organization" Page. Scroll down to the "Client User" section
of the page and click on the name of the user whom you want to edit. The "Client User" Page
will load and you will be able to edit all of the above-listed fields after clicking the
button.
You can also directly access the "Edit Client User" screen by selecting the box ( ) next to
the user's name in the "Client User" list on the "Client Organization" Page and then clicking the
button above the list. Click the "Save" button when you have finished.
You can also export the user's contact information to a "Vcard" file by clicking the
and then clicking "Save" on the resulting dialog box.
button
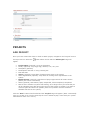
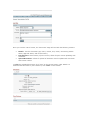
PROJECTS
ADD PROJECT
Once you have created the client to which to attach project, navigate to the "Projects" item in
the top menu bar. Select the
appear.
•
•
•
•
•
•
•
•
•
•
button above the list and the "Add Project" Page will
Project Name (required): Up to 50 characters
Priority (optional): Very High, High, Medium, Low, Very Low
Description (optional)
Development Site URL: if using a testing site
Final Site URL
Owner (required): Drop-down of existing team users in the system
Client Organization (optional): Drop-down of existing client organizations in the
system
Enable Phases (required): Drop-down of project types which will create certain
phases (this can be customized)
Status (optional): Not Started, Open, Suspended, Client Completed, Completed
Max file size: defaults to system-wide setting; set to larger size if you know that you
will be uploading large files during the course of the project or smaller if you want to
conserve space and limit user uploads (have the sys admin reset the maximum
allowable file size for the system)
Click the "Save" button when finished and the "Project" Page will appear. (Note: Occasionally
there is a mySQL error here but generally the user is added anyway. Check with your system
administrator if this error occurs.)
EDIT PROJECT
When you have saved your new project, the main "Project" Page will appear. This
page provides:
•
•
•
•
•
•
•
Project Details
Project Site Create
Support requests information
Discussions
Team members list
Linked Content (documents)
Notes
You can edit the Project "Details" by clicking on the
on the "Project" Page or by
selecting the box ( ) next to the project's name in the "Projects" list on the
"Projects" Page and then clicking the
button above the list.
PROJECT TEAM
To add members of your own organization to a project, the user must already exist
in the system. Only a system administrator can create new non-client team users. To
add an existing user to your team, navigate to the "Project" Page for the project to
which you want add team members.
button
Scroll down to the "Team" section in the middle of this Page. Click on the
above the "team"member list, and the "Add Team Members" will appear. Select
the checkbox ( ) next to the desired user's "Full Name" field then click the
the list.
above
The "Project" Page will load with the team member listed in the "Team" section. To
view the details of the team member, either click on the user's name or select the
checkbox ( ) next to the desired user's "Full Name" field then click the
above the list.
button
To delete a team member from the project, select the checkbox ( ) next to the
desired user's "Full Name" field then click the
button above the list.
PHASES
All projects in NetOffice follow a project lifecycle methodology, meaning that they
are broken down into phases, then tasks. Your system administrator can customize
these phases, in terms of number, order, and names. When you create the project,
the "Enable Phases" type you chose will automatically create the pre-determined
set of phases in your new project (Note: you can also choose not to enable phases at
all).
You can edit the information pertaining to a particular phase by clicking on the name
of the phase in the "Phases" section of the "Project" Page, and then clicking the
edit button when you reach the "Phase" Page. You can also select the box ( ) next
to the phases's name and then clicking the
button above the list.
When the "Phase" Page for editing appears, you may alter the following fields:
•
Status: Not Started, Open, Complete, Suspended
•
Start Date: clicking on the
will open a small calendar from which to
choose a date
End Date: this is an actual not projected date
Comments
•
•
Click the "Save" button when finished and the "Phase" Page will appear.
TASKS
Eash phase of your project should contain tasks, which in turn can contain sub-tasks.
To add a new task, navigate to the "Phase" Page and scroll down to the "Tasks"
section.
Click on the
button above the list of tasks, and the "Add Task" Page will
appear. You can edit the following fields:
•
•
•
•
•
•
•
•
•
•
•
•
Project (required): Drop-down of existing projects in the system
Task Name (required): short title of task (ie - "Create Site Map")
Description
Assigned To (optional): Drop-down of team members on that project and
client users if added to client site
Phase (required): list of phases enabled for that project
Status (required): Not Started, Open, Suspended, Completed, Client
Completed
button opens a calendar from which to choose a
Start Date (optional): the
day
Due Date (optional): this is a projected not an actual date
Estimated Time (optional): in hours
Actual Time (optional)
Comments (optional)
Publish check box - you may publish the task if you have already created the
client site
Click the "Save" button when finished and the "Task" Page will appear.
EDIT TASKS
VIEW
To view task information, click on the "Task" name field in the list on the "Phases"
Page. You can also view tasks assigned to you by navigating to the Home Page and
click on the task's name in the "My Tasks" section. The "Task" Page will load,
containing the following sections:
•
•
•
•
•
Task Info
Details
Update History
Linked Content: documents that are assigned only to the task
Assignment History: if the tasks has been assigned to multiple users, the
dates, users assigned, and comments will appear here
EDIT
To edit main task information, click on the
button on the "Task" Page or select
the box ( ) next to the task's name in the "Task" section on the "Phase" Page and
then clicking the
button above the list.
You can edit all the details of the task in "Add Task" except for the Phase and Client
Organization. Additionally:
•
•
Complete Date: actual date of completion
Assignment History Comments
Press the "Save" button when finished.
DELETE
To delete a task from a phase, click the
button on the task's "Task" Page. You
can also delete the task from the "Phase" Page by selecting the box ( ) next to the
task's name in the "Tasks" section and then clicking the
button above the list.
DISCUSSIONS
ADD
Instead of constantly exchanging emails and losing track of these important chains of
communication, document discussions using this feature in NetOffice. Team
members and clients can initiate discussions; the team can conduct discussions
without including the client (by not publishing).
To add a discussion to your project, navigate to the "Discussions" Section at the
bottom of the "Project" Page. Click on the the
button above the discussions list.
Enter the Topic, and Message. To include the client in the discussion by publishing to
the client site, select the box ( ) next to Publish. Click the "Save" button when
finished.
POST/CLOSE
To post to a discussion, first navigate to the "Discussion" Page by scrolling down to
the "Discussions" section of the "Project" Page. Click on the "Post Reply" link in the
"Posts" section.
You may close the discussion by clicking the
button from the "Discussion" Page.
Closing, unlike deleting, leaves a record of the discussion. To delete a discussion
entirely, select the
button at the top of the "Discussion" Page. Closing, deleting,
publishing, and unpublishing can also be done from the "Project" Page under the
"Discussions" section.
NOTES
To keep a brief record of a meeting or phone conversation or to call something to the
project's attention, use the note feature of NetOffice.
To add a note to your project, navigate to the "Notes" section at the bottom of the
"Project" Page. Click on the the
following fields:
button above the notes list. Notes have the
•
Project: List of existing projects in the system
•
•
button for a calendar
Date: date note entered, click the
Topic: Phone Conversation, General Notes, Conference Notes (your sys admin
can customize these)
Description: actual content of note
•
button on
Click the "Save" button when finished. Edit the note by clicking the
the "Note" Page or by selecting the box ( ) next to the note's name in the "Notes"
list on the "Projects" Page and then clicking the
button above the list.
NEW SUPPORT REQUESTS
When a client experiences technical or other issues with workproduct, he or she can
file a support request through the Project Site interface. A team member may also
file a request through the project site by clicking on the link "Go to Project Site" at
the top of any team site page, selecting the appropriate project, and clicking on
"Support" on the left-hand side of the page. The "Add Support Request" Page will
appear and contains the following fields:
•
Priority (Very Low, Low, Medium, High, Very High)
•
•
Subject
Message
After clicking the "Submit" button, the "Support" results page will appear and give
the team member an opportunity to respond immediately to the support response.
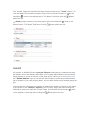
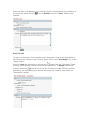
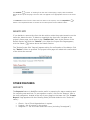
MANAGING SUPPORT REQUESTS
After a team member or client has filed a support request, the manager or team
member can add information to the request, change the request's status, and close
the request out. The "Support" Section lies beneath "Details" on the Project's main
page. The Support Section lists the type and number of requests in the queue: new,
open, and complete. To manage a request of any of the three types, click on the
"Manage..." link and list of incidents for that type will appear.
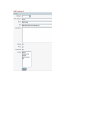
To view the incident, click on the title of incident you wish to edit. From here you
can:
•
•
•
•
) button (New,
change the status of the incident by clicking the edit (
Open,Complete)
click "Add a Support Response" to enter a resolution, questions, or
comments (see screen shot)
delete the support incident by clicking the remove (
) button
close the incident by changing it's status to "Complete" (see above)
LINKED CONTENT
UPLOAD NEW DOCUMENTS
Workflow is a major component in NetOffice. The "Linked Content" area of a project
centralizes documents, allows for assignments and approvals, and enables versioning and
review. You may add a document of any kind here, so long as it does not exceed the file size
limits, which you can set in the project's details.
To add a new file, navigate to the desired project's home page and click the Add (
) button
under "Linked Content". The "Status" Field regards approvals (Approved, Approved with
Changes, Needs Approval, No Approvals Needed, Not Approved). Use the "Browse" button to
locate the document on your hard drive. Make any comments in the Comment field and add a
version number if desired.
Once you click the "Save" button, the "Document" Page will load with the following sections:
•
•
•
Details - lists the document type, name, version, size, owner, comments, publish
status, approval status, and version history
Peer Reviews- shows history of peer reviews; allows for peer review uploading with
comments
Upload Document - allows for upload of document owner's update with comments
and version number
To view the uploaded document, click "View" in the version history under Details. To
download the document to your hard drive, click "Save" in that section.
UPDATE DOCUMENTS
The author of a document may make his/her own changes or want to incorporate peer review
comments into an existing document. To update the file, navigate to the document's home
page and scroll down to the "Update file" Section. Check the version of the document you
are updating, and click on the appropriate version number. The "Status" field refers to
approvals (Approved, Approved with Changes, Needs Approval, No Approvals Needed, Not
Approved). Use the "Browse" button to locate the updated file on your hard drive and upload it
to the server. Make any comments desired.
After you have clicked on "Update File," the document home page will load, listing the newly
updated document in "Version History" under the Details section. To view the update, click
"View" in this section. To download the update to your hard drive, click "Save".
PROJECT SITE
CREATE PROJECT SITE
As was explained in the Introduction to this manual, NetOffice has two primary components:
team site and client site. The client site allows your clients to login and see only their project
or projects. Furthermore, you can control the documents, assignments, and discussions are
available to the client.
NetOffice does not automatically create a site when you create project. To create the client
site, navigate to the home page of the project. Scroll down to the last item, titled "Project
Site" in the Details Section and click on the "Create" link. The "Create Project Site" Page will
appear listing the Project's name and the client organization if selected.
After clicking the "Create" button, the "Project Site" Page will appear. In order for clients to
use this site, you must first add client users to the organization listed as the client for that
project, if you have not already done so. Then add these client users to the project team
(explained on the next page). Finally, in order for client users to see any documents,
assignment, and so on in their site, you must publish those items to the site.
A team member can access the Project Site from anywhere within the team site by clicking on
the link "Go to Project Site" in the top right hand corner of any page. To learn about
navigating the client site, see NetOffice for Clients documentation.
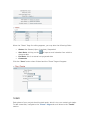
PROJECT SITE USERS
In order for clients to access the project site for their project, the project must have
an associated client organization. Also, the client user must exist first as a user
under that client organization (see "Add Client Users"). To add an existing client user
of the assigned organization to the project's team, navigate to the project's home
page and scroll down to the last item, Project Site, under Details, and click on the
"Details" link.
When the "Project Site" Page for that project appears, scroll down to the "Permitted
Client Users" section, and click on the Add (
)button. When the "Add Team
Members" Page appears, click on the checkbox next to the name of the client user
you want to add and click the Add button again.
The client user can now login to the client site but will not be able to add or edit
items until you publish the user to the client site. The same is also true for the
consulting team members. To publish a client user, navigate to the Permitted Client
Users Section of the Project Site Page. Click next to the name of the user to be
published and click on the Publish (
) button.
CLIENT ACCESS
When the client user logs into NetOffice, the project site home page will load, rather than the
time site. He or she will have read-only access to the following items:
•
•
•
Project Details
Project Team
Client Tasks
Clients will be able to freely add and edit:
•
•
•
Document List (same as Linked Content)
Bulletin Board (same as Discussions)
Support
Clients will be able to post tasks under "Team Tasks." However, in order for the task to
appear in the client site, the project manager must log into the team site and navigate to
where the tasks are posted (generally to the most current open phase of the project). Edit the
task and assign it to the appropriate team or client user, then publish (see the next section).
PUBLISH
In order to see any of the work posted to the team site, team users must publish items to the
client site. After adding any item, such as a document or a task, the user can publish the item
by either navigating to the section that contains the item or by going into the home page for
that item. If working from a section, select the checkbox next to the item's name then click
the Publish (
) button. If working from the item's home page, simply click the Publish
Button at the top of the page. The item will now appear in its appropriate section in the client
site.
To remove an item from the client site but retain in the system, use the Unpublish (
button. The Unpublish button is located in the same places as the Publish button.
)
DELETE SITE
If you decide to remove the client site but wish to retain the project as active on the
team site, delete the site. To delete or unpublish the client site, navigate to the
project's home page, scroll down to the "Publish Site" item at the bottom of the
Details Section and click the "Details" Link. When the Project Site Page appears,
click the Delete (
) button above the Details Section.
The "Delete Project Site" Page will appear asking for confirmation of the delete. Click
the "Delete" button to proceed. The project home page will reload with confirmation
of the client site removal.
OTHER FEATURES
REPORTS
The Reports feature in NetOffice can be useful in preparing for status meetings and
for compiling new task lists. To put together a report, click on the "Reports" item in
the main navigation, located at the top of every page on the team site. The "Create
Report" Page appears with the following fields (all fields default to the "Select All"
value):
•
•
•
Clients - list of Client Organizations in system
Projects - list of projects in the system
Assigned To - list of all team and client users (including "Unassigned")
•
•
•
•
Due Date - projected date complete; choose either All Dates or enter date
range in Between Dates fields
Complete Date - actual date complete; choose either All Dates or enter date
range in Between Dates fields
Status - Client Completed, Completed, Not Started, Open, Suspended
Priority - None, Very low, Low, Medium, High, Very high
Note: the user creating the report may only choose values associated with the
projects to which he/she is assigned.
Click the "Create" button and the "Report Results" Page will load with the results
produced from the parameters you selected in the previous step. You may edit the
report by clicking the edit (
) button. To save the report, type the desired report
and the report parameters will be saved. The report will then be accessible from
either the My Reports section in the home page or the Reports item in the main
navigation. You may also edit or delete the report from there.
Note: saving the report saves the parameters and not the results - therefore if your
updates of a project or client impact the report, the results will change the next time
you view the report.
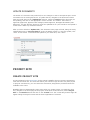
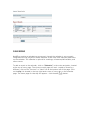
SEARCH
NetOffice has a site-wide search facility that allows you to comb the site for words or phrases.
To search the team NetOffice installation, click on "Search" in the main navigation located at
the top of every page. The "Search" Page will load, asking for keywords. You can also specify
where in NetOffice you want to conduct the search (All content, Notes, Client Organizations,
Projects, Tasks, Discussions, Users). If you choose "All Content," the search items will appear
categorized under their appropriate headings (ie - "Notes"). The "Search Results" Page
contains all categorized results and allows the user to search again at the bottom of the
results.
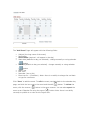
CALENDAR
NetOffice contains a calendaring component, though the calendar is not currently
integrated with the projects or tasks elements so the user must manually add items
on the calendar. The calendar is optimal for meetings, milestones/deliverables, and
other events.
To add an event to the calendar, click on "Calendar" in the main navigation, located
at the top of every page. The current month page will load - to add an event to a
different, click on the "Previous" or "Next" link at the bottom left of the page. Click
on the day link located in the top right hand corner of every day on the calendar
page. The home page for that day will appear - click the add (
) button.
The "Add Event" Page will appear with the following fields:
•
•
•
•
Subject (the long name of the event)
Description
Short Name (required - will appear in the day)
Start date (defaults to day you selected) - change manually or using calendar
•
) button
(
End date(defaults to day you selected) - change manually or using calendar
•
•
•
•
) button
(
Start Time
End Time
Reminder (Yes or No)
Event recurs... (Checkbox) - Note: there is no ability to change the end date
or type for recurrence
Click "Save" to add the event. To edit the event, navigate back to the calendar day
page, and click the box next to the event and the edit (
event, click the remove (
) button. To delete the
) button in the same manner. You can also export the
event as an iCalendar file using the export (
) button. Note: there is no ability
currently to publish to or view on the Project Site.
BOOKMARKS
To keep track of web site addresses associated with your projects, use the bookmarking
function. Click on the "Bookmarks" item in the main navigation, located at the top of every
page on the team site. The "Add Bookmark" Page will appear with the following fields:
•
•
•
•
•
•
•
•
•
Category
New Category - adds a new category to the above drop-down
Name
URL
Description
Shared (checkbox) - all team members see
Home (checkbox) - puts bookmark under "My Bookmarks" on your home page
Comments (checkbox) - not currently functional
Private - select from list of team members if you want only limited sharing
Click the "Save" button and the Bookmarks page will load listing the new bookmark. Use the
edit (
) button to edit or the remove (
) button to delete.
GNU Free Documentation License
GNU FREE DOC
LICENSE.doc
<< Double Click File to Open