1
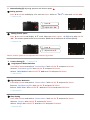
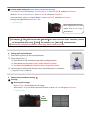
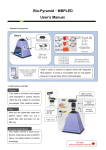
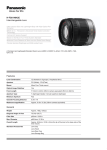
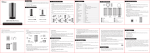
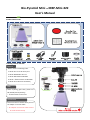
Bio‐Pyramid Mini・MBP‐Mini‐XZ2 User’s Manual Standard Accessories Installing camera and filter Camera Please attach in following order. 1. Attach CLA‐12 to XZ‐2 lens part 2. Attach RA5255B to CLA‐12 3. Attach MF‐SC60 to RA5255B 4. Attach Φ52mm sleeve to MF‐SC60 5. Attach all of above to hood body Filter When replacing glass filter, please use MF‐SC58A (sold separately) * Φ52mm filter can be used. Accessories
Please connect to camera when you use AC adapter or remote cable. * AC adapter and remote cable cannot be used simultaneously ○Instruction・・・
★ mark is important
Following XZ‐2 User’s Guide, set your camera as described below. Gel documentation takes place in a darkroom environment and it is difficult to capture quality images with full automatic mode. Please select M (manual) mode for documentation. Followings are setting instruction on manual mode. 1
Camera Setting (1) (This color indicate corresponding page in XZ‐2 user guide ) ① Select M (manual) mode by using Mode Dial ** Manual P18 Mode Dial ② Image Stabilizer Press OK button and display live control. Select the image stabilizer item using ▲▼. Select an“IS1”with ◄► and press OK button. ** Manual P36 OK Button ③ Monotone (black and white) Press OK button and display live control. Select the picture mode item using ▲▼. Select an“Monotone”with ◄► and press OK button. ** Manual P37 ④ ISO Sensitivity ★ Press OK button and display live control. Select the ISO sensitivity item using ▲▼. Select an“1600”with ◄► and press OK button. ** Manual P44 ⑤ Flash Off Keep strobe inside the camera and flash won’t go off Strobe
2 Camera Setting (2) adjusting aperture and shutter speed ★ ① Setting aperture Press ▲ on sub dial and display ◄► mark on screen. Select an“F8.0”F value with sub dial ◄►. ** Manual P18
①
Press ▲ ② adjust with ◄► ② Setting shutter speed Press ▲ on sub dial and display ▲▼ mark. Select an shutter speed “2 (1/2) sec”with sub dial ◄►. The shutter speed can be set to minimum 1/2000 sec to maximum 16 minutes [BULB]. ** Manual P18
① Press ▲ ▲
▼
② adjust with ▲▼ Memo: shutter speed can be adjusted with control ring as well 3
Camera Setting (3)
** Manual P46 ① Long Exposure Noise Reduction Press MENU button and select a “Custom Menu “with sub dial ▼ and press OK button.
Select an “Exp/Metering/ISO“ with sub dial ▼ and press OK button. Select a “Noise Reduct“ with sub dial ▼, and set it ON and press OK button. ** Manual P61
② High ISO Noise Reduction Press MENU button and select a “Custom Menu “with sub dial ▼ and press OK button.
Select an “Exp/Metering/ISO“ with sub dial ▼ and press OK button. Select a “Noise Filter“ with sub dial ▼, and set it Standard and press OK button. ** Manual P61
③ Sleep Setting Press MENU button and select a “Custom Menu “with sub dial ▼ and press OK button.
Select an “Display“ with sub dial ▼ and press OK button. Select a “Sleep“ with sub dial ▼, and set it OFF and press OK button. ** Manual P60
④ Custom mode Settings (Restore above preselected settings) Press MENU button and select a “Shooting Menu 1“ with sub dial ► and press OK button.
Select an “Reset/C Mode Setup “ with sub dial ▼ and press OK button. From the menu, select a “Custom Mode 1“ with sub dial ▼, and press OK button. Settings are registered to Mode dial “C 1“ ** Manual P48
Once registered, just set mode dial to C1 from second time Meme on battery charging and remote control ①AC adapter[F‐3AC]and remote cable[RM‐UC1]has same connector shape. Therefore, camera can be operated while using[F‐3AC]but unable to use[RM‐UC1]simultaneously. ② Please fully charge battery before connecting remote cable to camera.
4
Setting Up Transilluminator ① Place focusing sheet on the Transilluminator. ② Place Hood on the ① ⇒ Place Hood on the Transilluminator after installing camera. ⇒ place Hood in a way that it covers entire emission surface. ⇒ Use Shield mat MBP‐FW if emission area is larger than hood Transilluminator
Sold separately ③ Focusing sheet will become luminous once Transilluminator is turned on. **image uses shield mat MBP‐FW 5
Camera Focus and Zoom Setting ★ ① Focusing ⇒ Choosing focus target Press sub dial ◄ and display the AF target. Select the AF target to which you want to focus on with sub dial and press OK button. ** Manual P26
OK
Button ⇒ Focus Lock setting. Press OK button and set focus with sub dial ▲▼. Select “S‐AF“ with sub dial ►, and press OK button.
** Manual P14
⇒ Keeping the shutter button pressed halfway, and make sure AF target position. ⇒ Adjust zoom with Zoom Lever as it requires. Zoom Lever ② MF (Manual Focus) Setting ⇒ Switching to MF after procedure ① would fix focus position. ⇒ Press OK button and change focus setting with sub dial ▲▼. Set MF with sub dial ► and press OK button. Readjust with sub dial when out of focus.
Press and hold OK button for a while changes adjusting of F value and manual focus. Automatically magnify the image when focusing. 6
① Switch to MF ② Adjust focus with sub dial Gel Documentation Turn on the Camera ⇒ Place the gel right in center and turn on the Transilluminator. ⇒ Turning the zoom lever to the right and adjusts to appropriate shooting range. ** Manual P10
Zoom Lever 7
Adjusting Brightness ★ Adjusting brightness with“Shutter Speed” ⇒ Shutter speed means exposure time. Slow shutter speeds let more amounts of light reaches the image sensor and thus are used to brighten images. Please adjust accordingly. (Tip: start with rough estimates and narrow a target down for precise adjustment) ** Manual P18
Longer
Brighter 8
Shorter Darker Manual Focus When it is difficult to focus with AF (e.g. gel is too thick, or unable to use focusing sheet), use manual focus instead. ① Press OK button and display the Live Control, and select the MF mode. ② Adjust focusing position with sub dial ** Manual P43
① Switch to MF Automatically magnify the image when focusing. 9
10
② Adjust focus with sub dial Transfer Picture data to PC. You can transfer images to a computer by connecting the camera to the computer with the provided USB cable and software (CD‐ROM)., ** Manual P74
Saving Image / Viewing Photograph / Erasing / Printing ① Captured images will be save in SD card ** Manual P83 ② To see captured images, please select picture from[playback mode]** Manual P11 ③ To find images from the list (Index display) ** Manual P11 ④ To enlarge images (Close‐up playback) ** Manual P11 ⑤ Erasing Images ** Manual P12 ⑥ Printing Images ** Manual P70 Other settings … Please refer XZ‐2 Instruction manual for detail. The guide is one of the standard settings for documentation and for reference purpose only. Please adjust details in accordance with your particular observing environment. White Balance – When you shoot with color, please adjust white balance in accordance with color tone of light source. You will be able to capture image without any color bias.
** Manual P38 Image Size – Setting image (pixel) size. Smaller data (pixel) size is easy to handle. Large data (pixel) size is preferable for printing and enlarging. ** Manual P62
Date – Able to verify captured date. ** Manual P28
Photo Printer *sold separately ‐ Epson Picture Mate PM225 etc. Able to print images in just 3 easy steps. **manual P71 *operation may vary depending on the model. Please refer to manual of your printer model Filters: Sharp‐cut filters cut excitation wave length and transmit only emission wavelength. MF‐SC60 (RED) cuts wavelength below 600nm. Please use MF‐SC60 for EtBr, and please use MF‐SC56A (sold separately) for such regent as SYBR Green.
Bio‐Pyramid Mini : Specification ◆ Maximum shooting area 167mm × 147mm (= interior dimension) * May vary, depends on the camera. ◆ Shooting range Include φ52mm sleeve With super mount 203mm 235mm ★ Please select the camera that can be focused to shooting area within these ranges. ◆ Filter | Sharp Cut filter Use φ52mm filter ◆ Size W187 × D167mm (= Hood External Dimensions) x H 203mm (include camera mounting part) x H 315mm (include super‐mount) ◆ Weight Body/Super‐mount 500g / 184g