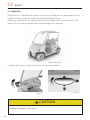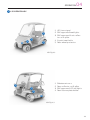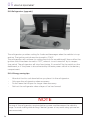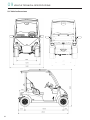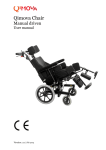
1
1. INTRODUCTION
Congratulations on your new Garia vehicle.
The Garia is the ultimate luxury golf and leisure car; a unique combination of performance, versatility and elegance – designed to move you.
This Garia car User’s Manual contains important information that you will need for
the proper operation, maintenance and handling of your Garia.
This User’s Manual covers the Garia Golf Car, the Garia LSV, and the Garia Monaco.
We encourage you to read this and the other following manuals thoroughly before
operating your Garia.
If you have additional questions regarding operation or maintenance, please contact
your local Authorized Garia Service Dealer for support.
Thank you for choosing Garia.
After Sales and Support Department
Garia A/S
Lunikvej 44
DK-2670 Greve
Denmark
User’s Manual: Garia golf and leisure vehicle.
© 2012 by Garia A/S
3rd Edition
All rights reserved. Any reprinting or unauthorized use without the written permission of Garia A/S is prohibited.
Copyrighted material.
This manual may not be reproduced in its entirety or in parts without the
written permission of Garia A/S, After Sales and Support Department
Printed in Denmark
G21 982 001 03 Garia user’s manual
I
CONTACT U.S.
Garia Inc. Technical Assistance and Service Parts
Phone: +1 210 481 5500
Fax: +1 210 481 5505
18838 Stone Oak Parkway, Suite 201
San Antonio, Texas 78258
United States
CONTACT EUROPE
Garia A/S Support and After Sales (international)
Phone: +45 46 570 580
Fax: +45 46 590 599
Lunikvej 44
DK-2670 Greve
Denmark
For service inquiries:
[email protected]
For warranty inquiries:
[email protected]
For support, repair and other general inquiries:
[email protected]
Find your local dealer at:
http://www.garia.com
Garia A/S and Garia Inc. reserves the right to make design changes without obligation to make
these changes on units previously sold.
The information contained in this manual is subject to change without notice.
Garia A/S or Garia Inc. is not liable for errors in this manual or for incidental or consequential
damages that result from the use of the material in this manual.
II
IMPORTANT MANUAL INFORMATION
Particularly important information is emphasized in this manual by the following notations:
!
The Safety Alert Symbol means ATTENTION! BE ALERT! YOUR SAFETY IS INVOLVED!
! DANGER
Failure to follow DANGER instructions could result in severe injury or death to the
vehicle occupants, a bystander, or a person inspecting or repairing the vehicle.
! WARNING
Failure to follow WARNING instructions could result in severe injury or death to the
vehicle occupants, a bystander, or a person inspecting or repairing the vehicle.
! CAUTION
Failure to follow CAUTION instructions could result in damage to the vehicle or the
surroundings.
NOTE
This message provides additional important information.
III
! WARNING
Read and understand the manual completely before operating your Garia vehicle.
NOTE
Garia A/S is continually making enhancements or improvements in design or quality
which are applied to its products. This manual contains all available information on
the current product at the time of printing, however, there can be minor differences
between your Garia vehicle and this manual. If you have any questions concerning this
manual or your Garia product, please consult your Garia dealer.
This manual is to be considered a permanent part of the Garia vehicle. Hence, it
should always follow the vehicle, including when it is resold.
! WARNING
A floor mat is available as an option, using the floor mat may cause interference with
the pedals which can results in failure to stop the vehicle or uncontrolled throttle
movement. This can cause serious injury or death. The floor mat can potentially slide
on the floor of the vehicle, which can create hazardous conditions; causing serious
injury or death.
IV
! WARNING
Be aware, when operating on public roads, that this vehicle offers significantly little
crash protection compared to normal cars, vans, trucks or other motorized vehicles.
This will result in a higher risk of injuries or death in collisions, at any speed, especially in
areas with heavy traffic or traffic with higher speeds.
To reduce the risk of injuries or accidents, follow the guidelines below:
• All passengers must always wear seatbelts at any time (If fitted).
• Always reduce speed when driving on hills or when cornering to reduce the risk of
vehicle tipping over or passengers falling out.
• Avoid operating at night as far as possible. The vehicle can be hard for others to
see, or it can be hard for others to recognize the limited crash protection.
• NEVER operate while under the influence of alcohol and/or drugs.
IMPORTANT NOTE
ALWAYS OPERATE THIS GARIA VEHICLE IN COMPLIANCE WITH YOUR COUNTRY AND LOCAL
VEHICLE REGULATIONS INCLUDING REGISTRATION, TITLING, INSURANCE, SEAT BELT USAGE, AND OPERATOR’S LICENSING.
Turn ignition switch to the off position and remove key before leaving the vehicle.
ALWAYS FASTEN YOUR SEAT BELTS!
To extend the life of your batteries:
•
Keep the vehicle plugged into the charger even during long absences. The charger
recognizes the charging needs, and will keep the batteries in peak condition without causing any damage.
•
Keep batteries fully charged at any time possible.
•
Avoid deep discharging of batteries at any time possible.
•
Add distilled water as necessary, using the Trojan® HydroLink™ Watering system
(see user’s manual, chapter 3).
•
Always wear safety goggles or eye protection, rubber gloves and a face mask before handling batteries.
•
Check the electrolyte by observing the water level indicator to insure that the
watering frequency rate is maintaining the correct electrolyte level. (Especially
when new (first 4 weeks) and under heavy use.) See page 22 in the golf car user’s
manual for more information regarding the water level indicator.
V
IMPORTANT LABELS/NOTIFICATIONS
Dashboard Label. Read before operating vehicle. Label size may vary
Batteries Warning Label. Read before handling batteries.
Label placed in the battery compartment. Label size may vary.
VI
Fig. 1.1
Fig. 1.2
Maintenance Warning Label. Read before maintaining vehicle.
Label placed in the battery compartment. Label size may vary.
Towing Warning Label. Read before towing vehicle.
Label placed in the battery compartment. Label size may vary.
Fig. 1.3
Fig. 1.4
Fig. 1.5
Load area label. Read before operating vehicle. Label size may vary.
Additional labels can be present on specific vehicles, depending on local jurisdiction.
VII
REPORTING SAFETY DEFECTS
If you believe that your vehicle has a defect which could cause a crash or could cause
injury or death, you should immediately inform the National Highway Traffic Safety
Administration (NHTSA) in addition to notifying Garia Inc.
If NHTSA receives similar complaints, it may open an investigation, and if it finds that a
safety defect exists in a group of vehicles, it may order a recall and remedy campaign.
However, NHTSA cannot become involved in individual problems between you, your
dealer, or Garia Inc.
To contact NHTSA, you may call the Vehicle Safety Hotline toll-free at:
1–888–327–4236 (TTY: 1–800–424–9153);
go to:
http://www.safercar.gov
write to:
Administrator
NHTSA
400 Seventh Street, SW
Washington, DC 20590
You can also obtain other information about motor vehicle safety from
http://www.safercar.gov.
To contact Garia, please write to:
Garia Inc., Technical Assistance and Service Parts
18838 Stone Oak Parkway, Suite 201
San Antonio, Texas 78258
United States
Phone: +1 210 481 5500
Fax: +1 210 481 5505
email:
[email protected]
or go to:
http://www.garia.com
VIII
TABLE OF CONTENTS
01 WARRANTY
1. Warranty . . . . . . . . . . . . . . . . . . . . . . . . . . . . . . . . . . . . . . . . . . . . . . . . . . . . . . . . . . . . . . . . . . . . . . 1
02 SAFETY
2.1 Garia LSV and Monaco. . . . . . . . . . . . . . . . . . . . . . . . . . . . . . . . . . . . . . . . . . . . . . . . . . . . . . . . . 3
2.2 Golf Car. . . . . . . . . . . . . . . . . . . . . . . . . . . . . . . . . . . . . . . . . . . . . . . . . . . . . . . . . . . . . . . . . . . . . . 3
2.3.1 Batteries . . . . . . . . . . . . . . . . . . . . . . . . . . . . . . . . . . . . . . . . . . . . . . . . . . . . . . . . . . . . . . . . . . . 4
2.3.3 Checking tire wear. . . . . . . . . . . . . . . . . . . . . . . . . . . . . . . . . . . . . . . . . . . . . . . . . . . . . . . . . . . 5
2.3.2 Tire & Pressure conditions. . . . . . . . . . . . . . . . . . . . . . . . . . . . . . . . . . . . . . . . . . . . . . . . . . . 5
2.3.4 Body and chassis. . . . . . . . . . . . . . . . . . . . . . . . . . . . . . . . . . . . . . . . . . . . . . . . . . . . . . . . . . . . 6
2.3.4 Brakes. . . . . . . . . . . . . . . . . . . . . . . . . . . . . . . . . . . . . . . . . . . . . . . . . . . . . . . . . . . . . . . . . . . . . . 6
2.3.5 Steering. . . . . . . . . . . . . . . . . . . . . . . . . . . . . . . . . . . . . . . . . . . . . . . . . . . . . . . . . . . . . . . . . . . . 7
2.3.6 Reverse warning indicator (Except Garia Monaco). . . . . . . . . . . . . . . . . . . . . . . . . . . . . 8
2.3.7 Pedal operation. . . . . . . . . . . . . . . . . . . . . . . . . . . . . . . . . . . . . . . . . . . . . . . . . . . . . . . . . . . . . . 9
2.3.7.1 Accelerator pedal . . . . . . . . . . . . . . . . . . . . . . . . . . . . . . . . . . . . . . . . . . . . . . . . . . . . . . . . . . 9
2.3.7.2 Brake pedal. . . . . . . . . . . . . . . . . . . . . . . . . . . . . . . . . . . . . . . . . . . . . . . . . . . . . . . . . . . . . . . 10
2.4 driving the garia Golf car. . . . . . . . . . . . . . . . . . . . . . . . . . . . . . . . . . . . . . . . . . . . . . . . . . . . . 11
2.4.1 driving the Garia LSV and Monaco. . . . . . . . . . . . . . . . . . . . . . . . . . . . . . . . . . . . . . . . . . . . 12
2.4.2 Driving on golf courses and roads . . . . . . . . . . . . . . . . . . . . . . . . . . . . . . . . . . . . . . . . . . . 13
2.4.3 Driver qualifications . . . . . . . . . . . . . . . . . . . . . . . . . . . . . . . . . . . . . . . . . . . . . . . . . . . . . . . . 14
2.4.4 Safety precautions when maintaining the vehicle. . . . . . . . . . . . . . . . . . . . . . . . . . . . . 14
2.4.5 Maintenance to ensure safety. . . . . . . . . . . . . . . . . . . . . . . . . . . . . . . . . . . . . . . . . . . . . . . 15
2.4.6 Transport recommendations. . . . . . . . . . . . . . . . . . . . . . . . . . . . . . . . . . . . . . . . . . . . . . . . 15
2.4.7 Mirrors . . . . . . . . . . . . . . . . . . . . . . . . . . . . . . . . . . . . . . . . . . . . . . . . . . . . . . . . . . . . . . . . . . . . 16
2.4.8 Seat belts GARIA LSV AND MONACO. . . . . . . . . . . . . . . . . . . . . . . . . . . . . . . . . . . . . . . . . 17
03 BATTERIES
3.1 Battery Safety Warning and Instructions. . . . . . . . . . . . . . . . . . . . . . . . . . . . . . . . . . . . . .
3.1.1 Battery safety. . . . . . . . . . . . . . . . . . . . . . . . . . . . . . . . . . . . . . . . . . . . . . . . . . . . . . . . . . . . . .
3.2 General Information. . . . . . . . . . . . . . . . . . . . . . . . . . . . . . . . . . . . . . . . . . . . . . . . . . . . . . . . . .
3.3 Charging of batteries . . . . . . . . . . . . . . . . . . . . . . . . . . . . . . . . . . . . . . . . . . . . . . . . . . . . . . . .
3.4 Charger LED. . . . . . . . . . . . . . . . . . . . . . . . . . . . . . . . . . . . . . . . . . . . . . . . . . . . . . . . . . . . . . . . .
3.5 Equipment for handling batteries . . . . . . . . . . . . . . . . . . . . . . . . . . . . . . . . . . . . . . . . . . . . .
3.6 Battery maintenance and care. . . . . . . . . . . . . . . . . . . . . . . . . . . . . . . . . . . . . . . . . . . . . . . .
3.6.1 Watering batteries . . . . . . . . . . . . . . . . . . . . . . . . . . . . . . . . . . . . . . . . . . . . . . . . . . . . . . . . .
3.6.2 Using the HydroLink™ on-board water filler system. . . . . . . . . . . . . . . . . . . . . . . . . . .
3.6.3 Using the flow-rite hand pump. . . . . . . . . . . . . . . . . . . . . . . . . . . . . . . . . . . . . . . . . . . . . .
3.6.4 Preventive maintenance . . . . . . . . . . . . . . . . . . . . . . . . . . . . . . . . . . . . . . . . . . . . . . . . . . . .
18
19
20
20
21
22
22
23
23
24
26
IX
3.6.5 Cleaning batteries. . . . . . . . . . . . . . . . . . . . . . . . . . . . . . . . . . . . . . . . . . . . . . . . . . . . . . . . . .
3.7 Storage of batteries. . . . . . . . . . . . . . . . . . . . . . . . . . . . . . . . . . . . . . . . . . . . . . . . . . . . . . . . .
3.7.1 Storage in hot environments (higher than 90°F (32°C)) . . . . . . . . . . . . . . . . . . . . . . .
3.7.2 Storage in cold environments (less than 32°F (0°C)). . . . . . . . . . . . . . . . . . . . . . . . . .
3.7.3 Water supplies. . . . . . . . . . . . . . . . . . . . . . . . . . . . . . . . . . . . . . . . . . . . . . . . . . . . . . . . . . . . . .
3.7.4 Watering system. . . . . . . . . . . . . . . . . . . . . . . . . . . . . . . . . . . . . . . . . . . . . . . . . . . . . . . . . . . .
3.8 General information about Trojan® T-875 batteries. . . . . . . . . . . . . . . . . . . . . . . . . . . . .
04 OPERATION
4.1 Overview. . . . . . . . . . . . . . . . . . . . . . . . . . . . . . . . . . . . . . . . . . . . . . . . . . . . . . . . . . . . . . . . . . . . .
4.2 Overview Golf car . . . . . . . . . . . . . . . . . . . . . . . . . . . . . . . . . . . . . . . . . . . . . . . . . . . . . . . . . . . .
4.3 Overview LSV. . . . . . . . . . . . . . . . . . . . . . . . . . . . . . . . . . . . . . . . . . . . . . . . . . . . . . . . . . . . . . . .
4.4 Overview Monaco. . . . . . . . . . . . . . . . . . . . . . . . . . . . . . . . . . . . . . . . . . . . . . . . . . . . . . . . . . . .
4.5 Speed switch (standard on LSV and Monaco). . . . . . . . . . . . . . . . . . . . . . . . . . . . . . . . . .
4.6 Instrument clusTer notifications . . . . . . . . . . . . . . . . . . . . . . . . . . . . . . . . . . . . . . . . . . . . . .
4.6.1 Critical battery level. . . . . . . . . . . . . . . . . . . . . . . . . . . . . . . . . . . . . . . . . . . . . . . . . . . . . . . .
4.6.2 Currently no messages . . . . . . . . . . . . . . . . . . . . . . . . . . . . . . . . . . . . . . . . . . . . . . . . . . . . .
4.6.3 Do not turn vehicle off for 2 min. . . . . . . . . . . . . . . . . . . . . . . . . . . . . . . . . . . . . . . . . . . . .
4.6.4 Reduced power. . . . . . . . . . . . . . . . . . . . . . . . . . . . . . . . . . . . . . . . . . . . . . . . . . . . . . . . . . . . .
4.6.5 Service due. . . . . . . . . . . . . . . . . . . . . . . . . . . . . . . . . . . . . . . . . . . . . . . . . . . . . . . . . . . . . . . .
4.6.6 Battery discharge indicator. . . . . . . . . . . . . . . . . . . . . . . . . . . . . . . . . . . . . . . . . . . . . . . . .
4.7 Ignition Switch. . . . . . . . . . . . . . . . . . . . . . . . . . . . . . . . . . . . . . . . . . . . . . . . . . . . . . . . . . . . . . .
4.8 Main power switch . . . . . . . . . . . . . . . . . . . . . . . . . . . . . . . . . . . . . . . . . . . . . . . . . . . . . . . . . . .
4.9 Parking brake. . . . . . . . . . . . . . . . . . . . . . . . . . . . . . . . . . . . . . . . . . . . . . . . . . . . . . . . . . . . . . . .
4.10 Driving, accelerating . . . . . . . . . . . . . . . . . . . . . . . . . . . . . . . . . . . . . . . . . . . . . . . . . . . . . . . .
4.11 Stopping, braking. . . . . . . . . . . . . . . . . . . . . . . . . . . . . . . . . . . . . . . . . . . . . . . . . . . . . . . . . . . .
4.12 Rough terrain driving. . . . . . . . . . . . . . . . . . . . . . . . . . . . . . . . . . . . . . . . . . . . . . . . . . . . . . . .
4.13 Hill hold and roll back. . . . . . . . . . . . . . . . . . . . . . . . . . . . . . . . . . . . . . . . . . . . . . . . . . . . . . . .
4.14 Emergency braking . . . . . . . . . . . . . . . . . . . . . . . . . . . . . . . . . . . . . . . . . . . . . . . . . . . . . . . . . .
4.15 Motor braking. . . . . . . . . . . . . . . . . . . . . . . . . . . . . . . . . . . . . . . . . . . . . . . . . . . . . . . . . . . . . . .
4.16 Braking with THE parking brake . . . . . . . . . . . . . . . . . . . . . . . . . . . . . . . . . . . . . . . . . . . . . .
X
27
28
28
28
28
29
29
31
32
33
34
35
36
36
36
36
37
37
37
38
39
40
41
42
43
44
44
45
45
05 VEHICLE EQUIPMENT
5.1 Dashboard overview. . . . . . . . . . . . . . . . . . . . . . . . . . . . . . . . . . . . . . . . . . . . . . . . . . . . . . . . . .
5.2 Seats . . . . . . . . . . . . . . . . . . . . . . . . . . . . . . . . . . . . . . . . . . . . . . . . . . . . . . . . . . . . . . . . . . . . . . .
5.3 Instrument cluster functions and warning lamps. . . . . . . . . . . . . . . . . . . . . . . . . . . . . . .
5.3.2 Button on instrument cluster (left) . . . . . . . . . . . . . . . . . . . . . . . . . . . . . . . . . . . . . . . . .
5.3.1 Inner cluster . . . . . . . . . . . . . . . . . . . . . . . . . . . . . . . . . . . . . . . . . . . . . . . . . . . . . . . . . . . . . . .
5.3.3 Button on instrument cluster (right). . . . . . . . . . . . . . . . . . . . . . . . . . . . . . . . . . . . . . . . .
5.4 Indicator stalk. . . . . . . . . . . . . . . . . . . . . . . . . . . . . . . . . . . . . . . . . . . . . . . . . . . . . . . . . . . . . . .
5.5 Air scoop. . . . . . . . . . . . . . . . . . . . . . . . . . . . . . . . . . . . . . . . . . . . . . . . . . . . . . . . . . . . . . . . . . . .
5.5.1 Opening and closing the air scoop . . . . . . . . . . . . . . . . . . . . . . . . . . . . . . . . . . . . . . . . . . .
5.5.2 Removing the air scoop. . . . . . . . . . . . . . . . . . . . . . . . . . . . . . . . . . . . . . . . . . . . . . . . . . . . .
5.6 Storage room under bonnet. . . . . . . . . . . . . . . . . . . . . . . . . . . . . . . . . . . . . . . . . . . . . . . . . .
5.7 Bin . . . . . . . . . . . . . . . . . . . . . . . . . . . . . . . . . . . . . . . . . . . . . . . . . . . . . . . . . . . . . . . . . . . . . . . . . .
5.8 Multi-functional rear section . . . . . . . . . . . . . . . . . . . . . . . . . . . . . . . . . . . . . . . . . . . . . . . . .
5.8.1 Standard bag holder (except Monaco) . . . . . . . . . . . . . . . . . . . . . . . . . . . . . . . . . . . . . . .
5.9 Adjusting rearview mirror. . . . . . . . . . . . . . . . . . . . . . . . . . . . . . . . . . . . . . . . . . . . . . . . . . . . .
5.10 Refrigerator (upgrade). . . . . . . . . . . . . . . . . . . . . . . . . . . . . . . . . . . . . . . . . . . . . . . . . . . . . .
5.10.1 Energy saving tips. . . . . . . . . . . . . . . . . . . . . . . . . . . . . . . . . . . . . . . . . . . . . . . . . . . . . . . . .
5.10.2 Defrosting the refrigerator. . . . . . . . . . . . . . . . . . . . . . . . . . . . . . . . . . . . . . . . . . . . . . . .
5.10.3 To defrost the refrigerator, proceed as follows:. . . . . . . . . . . . . . . . . . . . . . . . . . . . .
5.10.4 Cleaning and maintenance. . . . . . . . . . . . . . . . . . . . . . . . . . . . . . . . . . . . . . . . . . . . . . . . . .
5.11 Interior light (upgrade / standard on LSV and Monaco) . . . . . . . . . . . . . . . . . . . . . . . .
5.12 Windshield wiper / washer (upgrade / standard on LSV and Monaco) . . . . . . . . . . .
5.12.1 Location of the windshield washer fluid . . . . . . . . . . . . . . . . . . . . . . . . . . . . . . . . . . . . .
5.13 Heated Windshield (UPGRADE / Standard on Lsv and monaco). . . . . . . . . . . . . . . . .
06 SERVICE
6.1 Service Intervals. . . . . . . . . . . . . . . . . . . . . . . . . . . . . . . . . . . . . . . . . . . . . . . . . . . . . . . . . . . . .
6.2 Service symbol in Instrument cluster. . . . . . . . . . . . . . . . . . . . . . . . . . . . . . . . . . . . . . . . . .
6.3 Service Actions. . . . . . . . . . . . . . . . . . . . . . . . . . . . . . . . . . . . . . . . . . . . . . . . . . . . . . . . . . . . . .
6.4 User self service. . . . . . . . . . . . . . . . . . . . . . . . . . . . . . . . . . . . . . . . . . . . . . . . . . . . . . . . . . . . .
46
47
48
49
49
50
51
52
52
53
54
55
56
56
57
58
58
59
59
59
60
61
62
63
65
65
66
67
XI
07 MAINTENANCE
7.1 Replacing light bulbs. . . . . . . . . . . . . . . . . . . . . . . . . . . . . . . . . . . . . . . . . . . . . . . . . . . . . . . . . . 69
7.1.1 Replacing the bulb of the headlight. . . . . . . . . . . . . . . . . . . . . . . . . . . . . . . . . . . . . . . . . . . 69
7.1.2 Replacing the bulb of the front position light (only on Monaco). . . . . . . . . . . . . . . . . 71
7.2 Changing a wheel. . . . . . . . . . . . . . . . . . . . . . . . . . . . . . . . . . . . . . . . . . . . . . . . . . . . . . . . . . . . . 73
7.3 Jack points. . . . . . . . . . . . . . . . . . . . . . . . . . . . . . . . . . . . . . . . . . . . . . . . . . . . . . . . . . . . . . . . . . . 74
7.4 Cleaning the vehicle. . . . . . . . . . . . . . . . . . . . . . . . . . . . . . . . . . . . . . . . . . . . . . . . . . . . . . . . . . . 75
7.4.1 Exterior . . . . . . . . . . . . . . . . . . . . . . . . . . . . . . . . . . . . . . . . . . . . . . . . . . . . . . . . . . . . . . . . . . . . 75
7.4.2 Wheels. . . . . . . . . . . . . . . . . . . . . . . . . . . . . . . . . . . . . . . . . . . . . . . . . . . . . . . . . . . . . . . . . . . . . 75
7.4.3 Rubber flooring. . . . . . . . . . . . . . . . . . . . . . . . . . . . . . . . . . . . . . . . . . . . . . . . . . . . . . . . . . . . . 75
7.4.4 Interior. . . . . . . . . . . . . . . . . . . . . . . . . . . . . . . . . . . . . . . . . . . . . . . . . . . . . . . . . . . . . . . . . . . . . 76
7.4.5 Seats. . . . . . . . . . . . . . . . . . . . . . . . . . . . . . . . . . . . . . . . . . . . . . . . . . . . . . . . . . . . . . . . . . . . . . 76
7.4.6 Batteries. . . . . . . . . . . . . . . . . . . . . . . . . . . . . . . . . . . . . . . . . . . . . . . . . . . . . . . . . . . . . . . . . . . 76
7.5 Controlling the brake fluid . . . . . . . . . . . . . . . . . . . . . . . . . . . . . . . . . . . . . . . . . . . . . . . . . . . . 77
7.6 Tow switch. . . . . . . . . . . . . . . . . . . . . . . . . . . . . . . . . . . . . . . . . . . . . . . . . . . . . . . . . . . . . . . . . . . 78
7.7 Towing without battery power. . . . . . . . . . . . . . . . . . . . . . . . . . . . . . . . . . . . . . . . . . . . . . . . . 79
7.8 Towing hook. . . . . . . . . . . . . . . . . . . . . . . . . . . . . . . . . . . . . . . . . . . . . . . . . . . . . . . . . . . . . . . . . . 80
7.9 Hauling. . . . . . . . . . . . . . . . . . . . . . . . . . . . . . . . . . . . . . . . . . . . . . . . . . . . . . . . . . . . . . . . . . . . . . . 80
7.10 Fuse box location. . . . . . . . . . . . . . . . . . . . . . . . . . . . . . . . . . . . . . . . . . . . . . . . . . . . . . . . . . . . 81
7.11 Fuse box Overview Golf car. . . . . . . . . . . . . . . . . . . . . . . . . . . . . . . . . . . . . . . . . . . . . . . . . . . 82
7.13 Fuse box Overview LSV & Monaco. . . . . . . . . . . . . . . . . . . . . . . . . . . . . . . . . . . . . . . . . . . . . 83
08
TROUBLESHOOTING
8.1
The car will not drive.. . . . . . . . . . . . . . . . . . . . . . . . . . . . . . . . . . . . . . . . . . . . . . . . . . . . . . . . .
8.2 The vehicle will only drive at a very slow speed.. . . . . . . . . . . . . . . . . . . . . . . . . . . . . . . . .
8.3 The vehicle has a lower range than usual. . . . . . . . . . . . . . . . . . . . . . . . . . . . . . . . . . . . . . .
8.4 The charger will not charge the batteries. . . . . . . . . . . . . . . . . . . . . . . . . . . . . . . . . . . . . .
8.5 What to do with a completely discharged battery. . . . . . . . . . . . . . . . . . . . . . . . . . . . . .
8.6 How to reset the vehicle. . . . . . . . . . . . . . . . . . . . . . . . . . . . . . . . . . . . . . . . . . . . . . . . . . . . . .
8.7 The lights do not work. . . . . . . . . . . . . . . . . . . . . . . . . . . . . . . . . . . . . . . . . . . . . . . . . . . . . . . .
8.8 The refrigerator does not work. . . . . . . . . . . . . . . . . . . . . . . . . . . . . . . . . . . . . . . . . . . . . . .
8.9 The refrigerator stops cooling when parked (less than 2 hours). . . . . . . . . . . . . . . . .
8.10 The brake pedal is soft, or presses down without resistance.. . . . . . . . . . . . . . . . . .
8.11 The vehicle vibrates in the steering wheel. . . . . . . . . . . . . . . . . . . . . . . . . . . . . . . . . . . . .
XII
85
85
85
85
85
86
86
86
86
86
86
09 VEHICLE TECHNICAL SPECIFICATIONS
9.1 Golf car vehicle specifications. . . . . . . . . . . . . . . . . . . . . . . . . . . . . . . . . . . . . . . . . . . . . . . . .
9.2 LSV & NEV vehicle specification . . . . . . . . . . . . . . . . . . . . . . . . . . . . . . . . . . . . . . . . . . . . . . .
9.3 Garia Monaco vehicle specification. . . . . . . . . . . . . . . . . . . . . . . . . . . . . . . . . . . . . . . . . . . .
9.4 Vehicle dimensions . . . . . . . . . . . . . . . . . . . . . . . . . . . . . . . . . . . . . . . . . . . . . . . . . . . . . . . . . . .
9.5 LSV Certification Label. . . . . . . . . . . . . . . . . . . . . . . . . . . . . . . . . . . . . . . . . . . . . . . . . . . . . . .
9.7 Garia Monaco manufacturer plate
................................................................................
87
88
90
92
93
95
10 NOTES
NOTES. . . . . . . . . . . . . . . . . . . . . . . . . . . . . . . . . . . . . . . . . . . . . . . . . . . . . . . . . . . . . . . . . . . . . . . . . . 96
11 ALPHABETIC INDEX
ALPHABETICAL INDEX. . . . . . . . . . . . . . . . . . . . . . . . . . . . . . . . . . . . . . . . . . . . . . . . . . . . . . . . . . . 100
XIII
WARRANTY
01
1. WARRANTY
In order to uphold the warranty it is important that all service actions are performed
according to the intervals specified by Garia. Please refer to your warranty and service book for the complete warranty terms and service conditions.
Please contact your local dealer for any questions regarding your Garia. To locate your
nearest dealer, please visit www.garia.com
1
01 WARRANTY
2
SAFETY
02
2. SAFETY
It is important to read and understand this Garia car manual and all safety and instruction labels before the vehicle is first used.
2.1 GARIA LSV AND MONACO
• Read ”Check-ups before use”.
• The Garia LSV / Garia Monaco is constructed to operate at 40 KM/H (25 MPH).
• This vehicle is only to be driven by people with a valid driver’s license.
• Always drive the vehicle from the driver’s side only, and only in areas intended
for the usage of this type of vehicle.
• The vehicle is equipped with seat belts. Always keep seat belts fastened whenever seated and the vehicle is in motion.
• Never allow more than one passenger in each seat. This vehicle is restricted to
two (2) occupants including the driver.
• Do not operate while under the influence of alcohol and/or drugs.
• Do not make any modifications or additions to the vehicle influencing its loading
capacity or safe use. Do not make any changes to the vehicle that are not in accordance with the user’s manual.
• Be aware that due to the quiet engine, pedestrians may have difficulties hearing
the vehicle.
• Be aware, when operating on public roads, that this vehicle offers significantly
less crash protection compared to normal cars, vans, trucks or other motorized vehicles. This will result in a higher risk of injuries or death in collisions, at
any speed especially in areas with heavy traffic or traffic with higher speeds.
2.2 GOLF CAR
• Read ”Check-ups before use” which is found on the following pages of this
manual, and perform these accordingly.
• This vehicle is only to be driven by people trained in and authorized to using this
type of vehicle, always from the driver’s side only and only in areas intended for
the usage of this type of vehicle.
• Never allow more than one passenger in each seat. This vehicle is restricted to
two (2) occupants including the driver.
• Do not operate while under the influence of alcohol and/or drugs.
• Do not drive the vehicle on public areas and roads. Some communities have
special regulations about driving this type of vehicle on public streets, always be
sure to observe the specific rules and regulations of the areas and communities
where the vehicle is being used.
• Do not make any modifications or additions to the vehicle influencing its loading
capacity or safe use. Do not make any changes to the vehicle that are not in accordance with this user’s manual.
3
02 SAFETY
2.3 CHECK-UPS BEFORE USE
Before the vehicle is put into service, the below points of this section should always
be followed to ensure the optimal, safe and correct operation of the vehicle. It is advisable to follow these points every time the vehicle is used.
Before using the vehicle, please check the following:
1. Batteries
2. Tire conditions
3. Body and chassis
4. Brakes
5. Steering
6. Reverse warning indicator (except Garia Monaco)
7. Pedal operation
2.3.1 BATTERIES
It is of great importance that the tire pressure is checked and adjusted regularly
before using the vehicle.
•
•
•
•
4
Fig. 2.1
Check that all wires are connected and correctly mounted.
Check that no corrosion is present on the battery poles.
Check that the compartment is dry and free from acid or water spills.
Check that batteries are placed correctly and held down by the battery bracket.
SAFETY
02
2.3.2 TIRE & PRESSURE CONDITIONS
2.3.3 CHECKING TIRE WEAR
Check tire surface for damages, cracks and foreign objects. When tire thread wears
down to 2,0 mm (0,08 in.), it is recommended that the tire is replaced. Please check
local legislation for minimum requirements of tire treads.
Tire pressure 10” Standard rim
205/50 - R 10: 30 PSI / 2 BAR
Tire pressure 12” upgrade rims
205/30 – R 12: 30 PSI / 2 BAR
Monaco Fig. 2.2
0,08 in. / 2,0mm
Monaco Fig. 2.3
5
02 SAFETY
2.3.4 BODY AND CHASSIS
Always visually inspect the chassis and body to make sure that all chassis and body
parts are present, correctly mounted and undamaged before using the vehicle.
Make sure that all electrical functions are working correctly. This includes:
•
•
•
•
•
•
•
Headlamps, both high and low beam
Position lights
Turn signal indicators
Horn
Hazard lights
Reflectors front and back (standard on LSV and Monaco)
Windshield wiper/washer (standard on LSV and Monaco)
2.3.4 BRAKES
Always make sure that brakes are functioning correctly. Do not drive, if brakes are not
functioning correctly.
When engaging the brake pedal, the pedal should show resistance after being depressed approximately 1/3 of its way. If it is possible to push the brake to the floor
without any resistance, it is an indication of a malfunction in the braking system.
Please consult a qualified repair shop immediately. It is recommended that repairs are
provided by an Authorized Garia Service Dealer. The pedal should feel firm at all times
and always return to its original position when released.
! WARNING
Always ensure that the ignition switch is turned “OFF” before the pedal operation is
tested. Vehicle can accelerate abruptly if it is set to the “F” or “R” position and potentially cause severe injury to persons or damage to property. Do not drive if brakes
are not working correctly.
6
SAFETY
02
2.3.5 STEERING
Golf Car Fig. 2.4
Check steering for excessive free play:
Before driving:
• Turn steering wheel slightly left and right.
• If too much free play is observed, or any unusual sounds appear from any of the
components, consult a qualified repair shop. Garia recommends that maintenance
is provided by an Authorized Garia Service Dealer.
7
02 SAFETY
2.3.6 REVERSE WARNING INDICATOR (EXCEPT GARIA MONACO)
Fig. 2.5
Control the reverse warning indicator function by selecting ”R” on the ignition switch
and reversing slowly. Make sure to operate safely and with sufficient space when
reversing. The audio warning signal should be activated. If it does not activate, please
consult a qualified repair shop. It is recommended that maintenance is provided by an
Authorized Garia Service Dealer.
8
SAFETY
02
2.3.7 PEDAL OPERATION
Perform the following check on the pedal operation to ensure that pedals are working
correctly as specified below.
! WARNING
Always ensure that the ignition switch is turned “OFF” before the pedal operation
is tested. Vehicle can accelerate abruptly if it is set to the “F” or “R” position and
potentially cause severe injury to persons or damage to property.
2.3.7.1 ACCELERATOR PEDAL
Fig. 2.6
Before driving, ensure that (with the iginiton key turned to “OFF”):
• The accelerator pedal is working correctly and moving freely.
• The pedal returns to its original position when released. The original position is
when the pedal is positioned as illustrated above.
9
02 SAFETY
2.3.7.2 BRAKE PEDAL
Fig. 2.7
Before driving, ensure that:
• The brake pedal feels firm and cannot be pressed more than 2/3 of the total
pedal travel distance.
• The pedal returns to its original position when released. The original position is
when the pedal is positioned as illustrated above.
! WARNING
Always ensure that the ignition switch is turned to “OFF” before the pedal operation
is tested. The vehicle can accelerate abruptly if it is set to the “F” or “R” position and
potentially cause severe injury to persons or damage to property.
10
SAFETY
02
2.4 DRIVING THE GARIA GOLF CAR
• Keep the entire body inside the vehicle at all times. Remain fully seated and hold
on to speed handles or other objects while driving.
• Do not start vehicle until all passengers are fully seated.
• The driver must keep both hands on the steering wheel and the eyes focused in
the direction in which the vehicle is driving.
• Show extra caution in populated areas or when reversing. Always reverse slowly
and pay attention to the road and surroundings.
• Avoid accelerating or decelerating in an abrupt manner.
• Always adjust the speed to the current terrain.
• Drive slowly when making turns and when going up and down slopes. Never turn
steering wheel sharply at high speeds.
• Never drive on slopes at an angle, use brakes to reduce speed when driving downhill.
Golf cars can cause serious injury or damage if used improperly or not maintained
according to the vehicle’s maintenance program. Before the vehicle is put into service,
all necessary safety precautions must be taken and all the additional rules and regulations of the area where the vehicle is being used must be observed.
Golf cars should be safe to use as long as the safety precautions explained in this
user’s manual and on the vehicle are upheld. Make sure that the vehicle is always
driven according to the current conditions, and adjust the speed and driving pattern
according to the terrain in which the vehicle is currently moving.
It is expected that many vehicles will be used for a variety of tasks beyond the original intended use of the vehicle. As a consequence of this, it is impossible to anticipate
and warn against every possible combination of circumstances that may occur. No
warnings can take the place of good common sense and prudent driving practices.
11
02 SAFETY
2.4.1 DRIVING THE GARIA LSV AND MONACO
• Each driver must carry a valid driver’s license.
• Keep entire body inside vehicle at all times. Remain fully seated and hold on to
handles or other objects while driving.
• The vehicle is equipped with seat belts. Always keep seat belts fastened whenever seated.
• Follow all traffic regulations and obey all rules and regulations.
• Do not start vehicle until all passengers are fully seated and fastened.
• Do not carry children on laps or in children’s seats, the vehicle is not constructed
for transporting children requiring a child safety seat.
• Do not allow anyone to hang onto the vehicle at any time.
• The driver must keep both hands on the steering wheel and the eyes focused in
the direction in which the vehicle is driving.
• Show extra caution in populated areas or when reversing. Always reverse slowly
and pay attention to the road and surroundings.
• The vehicle might not be as visible in the night time as it is during the day. Always
make sure to turn on the headlamps and tail lights whenever operating from dusk
to dawn.
• Avoid accelerating or decelerating in an abrupt manner.
• Always adjust the speed to the terrain where the vehicle is currently used.
• Drive slowly when making turns and when going up or down slopes. Never turn
steering wheel sharply at higher speeds to reduce the risk of the vehicle tipping
over or to prevent possible injury to an unsuspecting passenger.
• Never drive up or down slopes at an angle, use brakes to reduce speed when
driving downhill.
The Garia LSV and the Garia Monaco can cause serious injury or damage if used improperly or not maintained according to the vehicle’s maintenance program. Before the
vehicle is used, all necessary safety precautions must be taken and all the additional
instructions of the area where the vehicle is used must be observed.
The Garia LSV and the Garia Monaco should be safe to use as long as the safety precautions explained in the user’s manuals and on the vehicle are upheld. Make sure that
you always drive according to the current conditions and adjust the speed and driving
pattern according to the terrain in which the vehicle is moving.
It is expected that many Garia LSV / Garia Monaco vehicles will be used for a variety of tasks beyond the original intended use. As a consequence of this, it is impossible to anticipate and warn against every possible combination of circumstances that
may occur. No warnings can take the place of good common sense and prudent driving
practices.
12
SAFETY
02
2.4.2 DRIVING ON GOLF COURSES AND ROADS
Monaco Fig. 2.8
• Hills: Driving up and down steep hills and slopes should be avoided or, as a minimum, driven with the highest level of caution. If driving down hills or slopes is a
necessity, do this as slowly as possible while braking with the brake pedal. Furthermore, driving must not be at an angle that makes the vehicle tilt sideways. Warning: Risk of falling out!
• Avoid parking the vehicle on hills or tilted at an angle. Always make sure to park
the vehicle on as level grounds as possible.
• Sharp or blind curves: Use great caution around sharp or blind bends, adjust the
speed, so the turn can be made in a safe manner. Be prepared to stop the vehicle
or avoid possible obstacles if dangerous situations occur.
• Wet areas: Driving on wet grass or similar areas reduces the contact between
the vehicle and the surface and can cause instability. Hence, always drive slowly
and with caution, so you are always driving in a safe manner.
! WARNING
Always ensure to drive carefully at all times. Driving fast, irresponsibly or in any way
not according to this user’s manual can cause severe injuries or death to persons
and property damage.
13
02 SAFETY
2.4.3 DRIVER QUALIFICATIONS
The driver of the vehicle should as a minimum have read this complete user’s manual,
have full knowledge and understanding of the use of this vehicle and be in possession
of a valid driver’s license for motor vehicles.
The driver is required to drive responsibly and safely, in order to avoid damage to
property and/or injuries to others or him-/herself.
The driver must know about the rules and regulations for driving leisure vehicles in
the area where the vehicle is operated, and must follow these at all times. No persons
under the age of 16 shall be allowed to operate the vehicle.
In areas with pedestrians and other traffic, the driver must always exercise caution,
drive slowly and pay attention to the surroundings.
For the Gaira LSV and the Garia Monaco it is a legal requirement that all drivers of
these vehicles have a valid driver’s license. The Garia LSV and the Garia Monaco are
fitted with seat belts. It is required that these are fastened when the car is in motion.
2.4.4 SAFETY PRECAUTIONS WHEN MAINTAINING THE VEHICLE
When maintaining the vehicle, make sure to follow all safety precautions located on
the vehicle, described in this user’s manual, in the Garia Workshop Repair Manual and
especially the following:
• Ensure that the vehicle has been properly secured and cannot move, when vehicle
is being maintained.
• Ensure that the vehicle has the correct lifting support before any repair or maintenance is carried out.
• Avoid fire hazards and ensure that there is proper fire extinguishing equipment
within reach.
• The electrical system must be disconnected before ANY work is carried out on
this vehicle. (See chapter 4 for instructions on disconnecting power).
• Make sure that warning and information labels are in a readable condition. If any
label needs replacing to make the vehicle conform to the correct safety standards, please consult a qualified repair shop. It is recommended that maintenance
is provided by an Authorized Garia Service Dealer.
• Always use correct insulated tools when working on and around electrical installations, such as batteries, on the vehicle.
• Maintain all components that have an effect on safety and the safe operation of
the vehicle. This particularly includes the brakes, steering and warning devices.
14
SAFETY
02
• After each repair, service or other maintenance, the vehicle must be test driven
by qualified and authorized personnel on a specifically designated area, without
pedestrians or other traffic, to ensure that the vehicle is adjusted correctly and
functions as specified.
• Ensure that all maintenance service checks are filled out correctly in the Warranty and Service book supplied.
2.4.5 MAINTENANCE TO ENSURE SAFETY
To sustain safety it is important that the vehicle is maintained correctly. It is recommended to follow the below points in order to obtain the best possible safety:
• Maintenance is preventative: Always service and maintain the vehicle according
to maintenance programs stated in this user’s manual. By doing so, the car will
attain the highest level of safety and the warranty will be upheld. (See chapter 6
and 7 of this manual). If the specified service intervals are not adhered to, all applicable warranties will be void.
• Repairs: Allow only qualified, educated and authorized personnel to inspect, service and repair the vehicle. All applicable warranties will be void, if repair procedures are not followed as described in the Garia Workshop Repair Manual.
2.4.6 TRANSPORT RECOMMENDATIONS
When transporting the Garia on a opentrailer it is recommended that the follow
items are carefully uninstalled and stored saftly before transport can begin.
•
•
•
Air scoop
Waste bin
Seat cusion
The optimal transport method is by using a closed trailer, this insures the quality of
the vehicle at all time.
15
02 SAFETY
2.4.7 MIRRORS
The Garia LSV / Garia Monaco comes with factory fitted mirrors, adjustable for the
optimal viewing conditions enhancing the safety while driving.
Adjust the rearview mirror before driving. Do not adjust mirrors while driving. This
takes focus off the driving and can create dangerous situations.
Garia LSV Fig. 2.9
To adjust the mirrors, move the mirrors as described below:
Fig. 2.10
Fig. 2.11
! CAUTION
Make sure not to bend the mirror excessively in any direction as this can cause
permanent damage to the mirror.
16
SAFETY
02
2.4.8 SEAT BELTS GARIA LSV AND MONACO
The Garia LSV / Garia Monaco is equipped with three-point seat belts. Ensure that all
passengers have their seat belts fastened before putting the vehicle into movement.
The seat belt must at all times be worn tightly around the body. The seat belt shall not
be tensioned around any other objects than the person wearing the seat belt, e.g. the
armrest. Each seat belt assembly is constructed for one person only. Always make sure
to follow these instructions and those located on the vehicle before operating the
vehicle.
Note: If the passenger’s feet are not touching the floor, make sure to show extra caution when operating the vehicle. Always make sure that children are completely secured
from falling out of the vehicle before driving the vehicle.
! WARNING
ALWAYS wear seat belts correctly when driving. Failure to do so can cause serious
injuries or death in case of an accident.
Fig. 2.12
Fig. 2.13
Pull seat belt out in a straight way before
placing it around the body. Use left seat belt
for the left seat. Use right seat belt for the
right side.
Correct positioning, fasten seat belt. Ensure
that the seat belt is secured tightly around
the body. Do not allow seat belts to cross each
other.
17
03 BATTERIES
3. BATTERIES
Fig. 3.1
3.1 BATTERY SAFETY WARNING AND INSTRUCTIONS
Please read and comply with all of the following safety-related instructions and warnings prior to operating and maintaining the batteries in this vehicle. Failure to comply
with these instructions may result in serious personal injury, death and/or property
damage.
! DANGER
EXPLOSIVE GASES!
• Batteries generate explosive gases! Do not smoke in the vicinity of any batteries.
• Keep sparks and flames away from the batteries, vehicle and service area.
• Ventilate the area when charging batteries or operating a vehicle in an enclosed
space.
• Wear a full face shield and rubber gloves when working on or near batteries.
• Keep flames, sparks, cigarettes and fire away from batteries at all times. The gas
exhaust from the batteries causes fire and explosions. This will cause SERIOUS INJURY or DEATH.
RISK OF ELECTRIC SHOCK!
• The electricity stored in batteries can cause electric shock resulting in serious
bodily injury or death, even at low voltages.
• Use insulated tools when working near batteries or electrical connections.
• Use extreme caution to avoid short circuiting of components or wiring.
• Do not wear metal jewelry such as rings, watches, chains, etc., when servicing the
vehicle, watering system, battery or battery charger.
18
BATTERIES
03
3.1.1 BATTERY SAFETY
• Check that all connections and battery cables are securely attached to the terminals and tightened according to specification; too loose or too tight connections can result in post breakages, meltdown or fire.
• To avoid short circuits do not place any objects on batteries or terminals.
• Keep sparks, flames and metal objects away from batteries.
• The electrolyte is a solution of acid and water, so avoid skin contact.
• If acid comes into contact with your skin or eyes, flush with water immediately
and seek medical attention.
• Charge batteries in a well-ventilated area, as batteries produce gas fumes when
charging. Lift seat cushion to vertical position when charging.
• Never add acid to the battery.
! WARNING
Battery electrolyte is poisonous and dangerous, causing severe burns or other damages. It contains sulfuric acid. Avoid contact with skin, eyes or clothing.
Do not transport, store, handle or operate batteries except in an upright position.
Wear a full face shield and rubber gloves when working on or near batteries.
Emergency treatment:
EXTERNAL: Flush with water immediately
INTERNAL: Drink large quantities of water or milk. Follow with milk of magnesia,
beaten egg, or vegetable oil. Seek medical attention.
EYES: Flush with water for 15 minutes and acquire prompt medical attention.
Batteries produce explosive gases. Keep sparks, flames cigarettes or similar away
from the batteries. Seek medical attention.
Always ensure proper ventilation when charging or using in enclosed space. Always
shield eyes when working near batteries.
KEEP OUT OF REACH OF CHILDREN.
19
03 BATTERIES
3.2 GENERAL INFORMATION
This Garia is equipped with six 8 Volt lead acid batteries providing power for the vehicle’s operation. To ensure the best operation, always make sure that the vehicle is
maintained according to specified maintenance intervals. The batteries used in this vehicle are Trojan® T-875 T2 Wet Lead Acid Cell Batteries. The batteries are made of 65%
water and 35% acid with an electrolyte plate inside the battery.
3.3 CHARGING OF BATTERIES
Always follow the safety precautions mentioned below to avoid personal injury or death
or property damage when maintaining or storing batteries:
• Always follow procedures that are in accordance with applicable laws and regulations when charging and using charging facilities.
• Periodically inspect the facilities and the procedures used when charging and storing batteries to ensure that the correct safety conditions are in place.
• The vehicle shall only be charged using a vehicle-specific Garia charging cable. The
cable complies with the provisions of UL standards 2202.
Only charge batteries with the integrated Delta-Q on-board charger. This charger is
equipped with algorythms that allow the most optimal charging session at any state
of charge. It is carefully designed for the vehicle’s batteries. Do not attempt to charge
batteries in any other ways than by using the integrated on-board charger. By using
other chargers, the risk of over- and undercharging occurs, which can shorten the capacity of the batteries and potentially destroy them. The integrated on-board charger
is programmed to maximize battery performance.
The optimal charging time depends on a range of different factors. It is expected that
the battery can charge from a 30% state to a fully charged state in approximately 7
hours. This is, however, dependent on the weather conditions, the state of charge and
the general condition of the batteries.
When charging batteries, please be aware of the following:
• Batteries should be fully charged after each use, if not this will damage the batteries over time.
• Lead acid batteries do not have a memory effect and therefore do not need to be
fully discharged before recharging.
• Charge only in well-ventilated areas.
• The batteries will gas (bubble) towards the end of charge to ensure the electrolyte
is properly mixed.
• Never charge a frozen battery.
• Avoid charging at temperatures above 120°F (49°C).
• Only apply distilled water after charging.
20
BATTERIES
03
3.4 CHARGER LED
1
The charger LED is located to the right of the charger inlet plug in the dashboard.
When connecting the charger cable the LED will blink red-yellow-green. This indicates that the DeltaQ charger has registered the power input and can start charging the batteries. When charging, and the voltage on the batteries is below 80%
state, the charger LED will blink green repeatedly. When the total voltage exceeds
80% state of charge the LED will blink green slowly. When 100 % state of charge
is reached, the LED will stay illuminated with the green color to indicate that the
charging session is done.
In case of a charger malfunction the DeltaQ charger LED will blink red X amount of
times indicating the fault code on the charger. If this happens please contact the
nearest Garia dealer for further support.
21
03 BATTERIES
3.5 EQUIPMENT FOR HANDLING BATTERIES
•
Goggles, gloves and protective clothing: Always wear protective clothing, acidproof gloves and goggles when handling lead acid batteries, and remove all jewelry. Batteries are corrosive and failure to follow the above-mentioned instructions may result in personal injury or death as lead acid can cause severe burns
and destroy clothing. Jewelry is at risk if it comes in contact with the terminals of
the battery. Metals in contact with battery poles can cause arcs which can result
in severe personal injuries.
• Distilled or treated Water (i.e. de-ionized, reverse osmosis, etc.)
• Wrench with rubber handle
• Volt meter (for testing voltage)
• Retightening the battery posts is very important to insure that malfunctions are
kept at a minimum. Always use a torque wrench to tighten the battery posts. The
correct amount of torque is 12 Nm or 8.9 ft/lbs.
Handling of batteries should not occur if the user has no prior experience of handling
batteries. Please refer to Trojan® Battery’s website for more information regarding
battery handling: www.TrojanBattery.com
! CAUTION
Always keep baking soda and great amounts of water nearby. This will help neutralize
any possible acid spills from battery openings and prevent corrosive damage on batteries and the vehicle. Avoid all skin contact with acid.
3.6 BATTERY MAINTENANCE AND CARE
Maintaining batteries properly includes always charging batteris after use, ensuring the correct level of fluid in the batteries as well as general removal of corrosion,
dust, dirt and/or similar, apply anti-corrosion liquid if needed.
! WARNING
Watering a battery before charging (or with a low charge level) can lead to boil-over
resulting in potential bodily injury and potential damage to the watering system,
battery and vehicle.
Ensure that the work area is dry when servicing the vehicle, watering system, battery or battery charger.
22
BATTERIES
03
3.6.1 WATERING BATTERIES
The batteries need to be watered periodically. The frequency depends upon battery
usage and operating temperatures. Check new batteries every few weeks to determine the watering frequency of the vehicle. It is normal for batteries to require more
watering as they age.
Depending on the local climate, charging methods, application, etc. it is recommended
that batteries are checked at least once a month until they provide information on
how often the batteries need refilling.
Important things to remember:
1. Do not fill the batteries with water before charging. This will increase risk of acid
overflow from the battery, consequently losing capacity and causing corrosion.
2. Do not use water with a high mineral content. Use distilled or deionized water only.
Fully charge the batteries prior to adding water. Only add water to discharged or
partially charged batteries if the plates are exposed, and only until the plates are no
longer exposed.
3.6.2 USING THE HYDROLINK™ ON-BOARD WATER FILLER SYSTEM
Lead acid batteries require frequent refilling of distilled or deionized water. The Garia
is equipped with the Trojan® HydroLink™ Watering system, which eases the refilling of
water to the batteries. An approved Flow-Rite water supply is required for correct
refilling of the batteries.
Use only the approved Flow-Rite water supply that came with the vehicle. If the FlowRite water supply did not come with vehicle, please contact the nearest Garia dealer.
Use of unapproved water supply or modification of approved water supply can lead to
system failure and will void applicable warranties.
Only fill batteries after they have been fully charged and require water. Watering a
battery before charge (or with a low charge level) can lead to boil-over, resulting
in potential bodily injury and potential damage to the watering system, battery and
vehicle.
! WARNING
If at any time during the filling process a valve failure occurs, disconnect immediately
or too much water may be added to the cell. This can cause the battery to overflow
acid, causing corrosion and potential personal injury or damage to batteries.
23
03 BATTERIES
3.6.3 USING THE FLOW-RITE HAND PUMP
To operate the hand pump enclosed for watering the batteries, please follow the
procedure below.
Note: Other Flow-Rite products recommended for the Trojan® HydroLink™ Watering
system can also be used. Please see www.flow-rite.com for more information.
STEP 1
Check hand pump for proper operation.
Insert the hand pump filler assembly into a
jug of distilled water. Prime bulb by squeezing until it is filled with water.
Ensure that the device is free of holes or
other defects.
Bulb
Female coupler
Hand pump
filler assembly
Fig. 3.2
STEP 2
Remove the dust cover on the battery hose.
Male coupler
Fig. 3.3
STEP 3
Mate Couplers
Insert the male coupler on the HydroLink™
Watering System into the female coupler
on the Flow-Rite Hand pump.
Fig. 3.4
24
BATTERIES
03
STEP 4
Fill water to batteries.
Squeeze the bulb with firm pressure to
begin pumping water into the battery cells.
When the bulb becomes firm, all cells are
full and filling is complete.
Fig. 3.5
STEP 5
Disconnect.
When the bulb becomes firm, and not before, immediately disconnect the couplers
by depressing the push button on the
female coupler. Disconnecting before the bulb becomes firm will lead to underfilled cells that will impact the battery’s performance and shorten its life.
Button
Fig. 3.6
STEP 6
Replace dust cover.
Place dust cover back over the male coupler. Do not push cover past the large barb
on the coupler.
TIP: If the dust cover is slightly squeezed
when sliding it over the coupler, it will
create a vacuum, allowing it to hold tightly.
Fig. 3.7
25
03 BATTERIES
3.6.4 PREVENTIVE MAINTENANCE
Inspection of batteries
• Examine the outside appearance of the battery. Check the tops of the battery
and terminals. These need to be clean, free of dirt, debris and corrosion.
• Make sure the outside of the batteries remain dry at all times.
• If any fluids are present on the battery top, this could indicate that the battery
is being over-watered or that a malfunction in the Trojan® HydroLink™ System
has appeared. If so, contact your local repair shop, as there may be a problem
with the installation and it needs to be serviced. Only allow a trained battery
service technician to service batteries. It is recommended that battery maintenance is provided by a trained Authorized Garia Service Dealer in order to ensure
the best possible treatment of the vehicle.
Check battery cables and connections, ensure that all connections are in good
working order and replace connections that are damaged and/or worn. Tighten
all loose connections. It is recommended that battery maintenance is provided by
a trained Authorized Garia Service Dealer in order to ensure the best possible
treatment of the vehicle.
• Electrolyte levels: It is recommended that the electrolyte levels are checked in
each cell after the system has been installed and operational for three months.
Use the ‘Independent Water Level Indicator’ to check the electrolyte levels. HydroLink™ comes with an Independent, non-mechanical Water Level Indicator that
is simple to read: white means that the battery needs water and black means
that the battery has enough water.
Independent Water Level Indicator
Fig. 3.8
Your HydroLink™ Watering System requires regular preventative maintenance on at
least a quarterly basis.
Inspect the condition of all tubing connections and couplers and the water filling
system. Make sure that all parts are in good working condition, leak free and properly
connected. The coupler must have an O-ring and dust cover properly attached.
26
BATTERIES
03
3.6.5 CLEANING BATTERIES
• Clean the top of the battery, the terminals, and all connections with a cloth or
brush with a solution of baking soda and water (ensure that none of the baking
soda solution gets inside of the battery). Use 1lb of baking soda for 1 gallon of
water (120g for 1 liter of water).
• Rinse with plain water and dry the battery
• If possible, add a thin layer of terminal protector (Available at most battery dealers or auto parts stores).
• Always keep batteries dry and clean.
3.6.6 Removing corrosion from battery poles
Make sure that the poles and the surface of batteries are clean at all times. To remove corrosion, add a solution of water and baking soda. Use 1lb of baking soda for 1
gallon of water (120g for 1 liter of water). Do not allow any cleaning solution to enter
the battery cells. If baking soda is not available, a terminal brush can be used to clean
the battery poles. Terminal brushes are available at most local hardware supplies.
27
03 BATTERIES
3.7 STORAGE OF BATTERIES
• Plug the charger in when the car is in storage. The charger automatically maintenance charges the batteries.
• Store in a cool, dry place, protected from elements that can damage batteries.
• Disconnect external equipment to eliminate potential electric loads that may
discharge the battery.
• Batteries gradually self-discharge during storage. Monitor the specific gravity or
voltage every 4-6 weeks. Stored batteries should be given a boost charge when
they are at 70% state of charge (SOC) or less.
• When batteries are taken out of storage, recharge before use.
3.7.1 STORAGE IN HOT ENVIRONMENTS (HIGHER THAN 90°F (32°C))
If possible, avoid direct exposure to heat sources during storage. Batteries selfdischarge faster in high temperatures. If batteries are stored during hot summer
months, monitor the specific gravity or voltage more frequently (approximately every
2-4 weeks).
3.7.2 STORAGE IN COLD ENVIRONMENTS (LESS THAN 32°F (0°C))
If possible, avoid locations where freezing temperatures are expected during storage.
Batteries can freeze in cold temperatures if they are not fully charged. If batteries
are stored during cold periods, it is critical that they are kept fully charged. Never
charge a frozen battery.
3.7.3 WATER SUPPLIES
Water supplies must be drained and stored in an empty state if they will be exposed
to freezing temperatures. Failure to do so can cause permanent damage to the watering supply.
28
BATTERIES
03
3.7.4 WATERING SYSTEM
If the vehicle is taken out of service or put into storage for a period of 6 weeks or
longer, the HydroLink™ Watering System will require seasonal maintenance. No special
steps need to be taken for winterization of a HydroLink™ Watering System that is
installed on the batteries; however, the following steps need to be made when bringing
the vehicle back into service:
• After the batteries have been fully charged/equalized, check the HydroLink™
water level indicator on each battery and refill water if needed.
• Return the vehicle to its regular service.
• Restart the vehicle’s regular watering schedule (waiting at least 1 week until next
watering).
3.8 GENERAL INFORMATION ABOUT TROJAN® T-875 BATTERIES
• A new battery will not deliver its full rated capacity. This is normal and should be
expected as the battery needs to be ‘worked up’ over time.
• Trojan® batteries take between 50-100 cycles to ‘work up’ before providing full
peak capacity.
• When operating batteries at temperatures below 80°F (27°C), they will deliver
less than the rated capacity. For example at 0°F (-18°C), batteries will deliver
50% of its capacity, and at 80°F (27°C) the battery will deliver 100% of its
capacity.
• When operating batteries at temperatures above 80°F (27°C), they will deliver
more than the rated capacity, but the life of the batteries will be reduced.
The lifetime of a battery can be difficult to predict as, among other things, it varies
with charging cycles, frequency of usage and level of maintenance.
For further information regarding Trojan® batteries, please refer to Trojan® Battery’s
official website: www.TrojanBattery.com
For further information regarding the HydroLink™ Watering system with Snake™ Tubing, please refer to Trojan® Battery’s official website: www.TrojanBattery.com
29
03 BATTERIES
30
OPERATION
04
4. OPERATION
4.1 OVERVIEW
Standard or upgrade
Standard on LSV
Standard on Monaco
2
3
8
1
6
9
17
16
10
4
12
7
7
13
11
14
15
5
Monaco Fig. 4.1
1. Indicator stalk
2. Steering wheel
3. Instrument cluster
4. Brake pedal
5. Accelerator pedal
6. Ignition switch
7. Speed switch (standard on LSV and Monaco
8. Refrigerator unit
9. Heated windscreen switch (upgrade)
10.Wiper and washer switch (upgrade)
11.Interior light switch (upgrade)
12.Refrigerator switch (upgrade)
13.Charger plug with LED
14.Ball holder
15.12 V output
16.Bonnet switch
17.Hazard light switch
31
04 OPERATION
4.2 OVERVIEW GOLF CAR
5
4
7
1. Front wheel
2. Bonnet
3. Headlight
4. Air scoop
5. Roof
6. Seats
7. Rearview mirror
6
2
3
1
Golf car Fig. 4.2
1
7
5
2
4
3
1. Speed handles
2. Rear wing
3. Mudguard rear
4. Load area
5. Rear lights
6. Rear bumper
7. Bag holders
6
Golf car Fig. 4.3
5
2
3
1
4
Golf car Fig. 4.4
32
1. Pedals
2. Instrument cluster
3. Steering wheel
4. Batteries
5. Utility box
OPERATION
04
4.3 OVERVIEW LSV
1. LED turn signal
2. SAE approved head lights
3. SAE approved front reflector on A-pillar
4. 3-point seat belts
5. Rear wheel protector
4
3
1
2
5
LSV Fig. 4.2
1. Sideview mirrors
2. Rear reflector on B-pillar
3. SAE approved LED tail lights
4. Rear license plate holder
1
2
3
4
LSV Fig. 4.3
33
04 OPERATION
4.4 OVERVIEW MONACO
1. E-marked turnsignal light
2. E-marked position light
3. E-marked front lights
4. E-marked sideview mirrors
5. E-marked 3-point seat belt
6. Rear wheel protector
5
4
1
2
3
6
Monaco Fig. 4.2
1
1. Front mudguard
2. E-marked rear lights
3. E-marked reflector
4. License plate holder with
E-marked light
2
3
4
Monaco Fig. 4.3
34
04
OPERATION
4.5 SPEED SWITCH (STANDARD ON LSV AND MONACO)
2
2
1 1
1
1
4
4
3
3
Monaco Fig. 4.5
2 2
2 2
3
3
4
Monaco Fig. 4.6
4
Monaco Fig. 4.7
Speed switch functions:
The Garia LSV / Garia Monaco is equipped with a speed switch to change between
Garia ECO mode and Garia SPORT mode, making driving on golf courses more convenient, since the vehicle accelerates softer and reaches a speed of 16 mph / 25km/h.
Change the switch to SPORT mode and the vehicle can reach a speed of 25mph /
40km/h, and the vehicle will accelerate faster.
The speed switch position is in the cluster in the lower section of the display, where
the term ECO is displayed when the switch is turned to the left, in ECO mode. The
term SPORT will be displayed when the switch is turned to the right, in SPORT mode.
35
04 OPERATION
4.6 INSTRUMENT CLUSTER NOTIFICATIONS
4.6.1 CRITICAL BATTERY LEVEL
Critical battery level: This appears in cluster
when the vehicle has a minimum range left
and can only drive in limp mode at 4 Mph / 6
Kph. The vehicle requires charging urgently.
4.6.2 CURRENTLY NO MESSAGES
When pressing the right button on the
cluster it is possible to reveiw all active messages.
4.6.3 DO NOT TURN VEHICLE OFF FOR 2 MIN
This message is important to respect. The
vehicle requires a “cooldown” period of 2
minutes, due to seriously heavy use. After
two minutes the vehicle will return to normal
operation. The reason for this function is
to avoid overloading of important electrical
components in the drive system.
36
OPERATION
04
4.6.4 REDUCED POWER
Reduce speed for a short period of time, and
the vehicle will return to normal operation.
4.6.5 SERVICE DUE
The service due notification will appear
when the vehicle has reached the milage
or hour limit. Please contact the nearest
Garia dealer to get the service carried out
accordingly.
4.6.6 BATTERY DISCHARGE INDICATOR
Icon
Led’s
State of charge in
procent %
80 %
100 %
60 %
80 %
40 %
60 %
20 %
40 %
5 %
20 %
1 %
5 %
37
04 OPERATION
4.7 IGNITION SWITCH
Fig. 4.7
Ignition switch functions:
OFF: Most electrical applications are disabled. The refrigerator will function for an
additional two hours (the timer function is adjustable, please contact your dealer
for more information), if activated whilst the ignition switch is turned to ”R.N.F”. The
interior light and the 12V plug will still be functioning.The key can be removed in this
position.
R: Reverse. When the accelerator pedal is engaged, the parking brake releases automatically. The vehicle reverses. All electrical functions are in function (affecting battery power). Note: To reverse, turn key to N before turning to R.The reverse warning
indicator is activated when vehicle is reversing (except Monaco).
N: Neutral. The parking brake is engaged when the vehicle comes to a full stop. The
vehicle can be temporarily parked, all electrical applications are in function (affecting
battery power).
F: Forward, when the accelerator pedal is engaged, the parking brake releases automatically. The vehicle drives forward. All electrical functions are in function. (affecting
battery power).
! WARNING
Never push the accelerator pedal when turning the ignition key. The vehicle may move
suddenly if not operated correctly.
38
OPERATION
04
4.8 MAIN POWER SWITCH
Fig. 4.8
The main power switch is located on the right side of the battery compartment. The
switch disables all electrical functions except the automatic parking brake, the ability
to charge the vehicle and the back-up power for the instrument cluster unit.
When storing the vehicle for longer periods of time, it is recommended that the main
power is switched off, in order to experience as little discharging as possible.
When servicing or repairing the vehicle (especially the electrical system) always turn
main power switch to “OFF”.
IMPORTANT NOTE
NEVER LEAVE THE VEHICLE IN THE TOW FUNCTION. THIS WILL DRAIN THE
BATTERIES AND PERMANENTLY DAMAGE THE BATTERIES.
! WARNING
Serious injuries can occur when working on the electrical system, if the main power
switch is turned to “ON”. Always turn main power switch to ”OFF” before working on
the electrical system of the vehicle.
39
04 OPERATION
4.9 PARKING BRAKE
Fig. 4.9
This vehicle is equipped with an automatic parking brake system. When the vehicle
comes to a halt, the automatic parking brake will engage automatically after a short
delay (2-3 seconds). Until the parking brake is activated, an applied motor brake will
keep the vehicle steady until the parking brake is activated.
When the car starts moving in response to the accelerator pedal, the parking brake
will release automatically. The automatic parking brake can be switched off for towing
or repairing needs, however, note that this also disables most electrical functions on
the vehicle.
When the vehicle is not driving, the parking brake symbol appears in the instrument
cluster, unless the vehicle power has been turned off by either the ignition or main
power switch. The parking brake will still be activated when vehicle power is turned off,
although this does not appear in the instrument cluster.
If the parking brake is not functioning as described above, ensure that a qualified repair shop performs a parking brake check. Garia recommends that service is provided
by an Authorized Garia Service Dealer.
40
OPERATION
04
4.10 DRIVING, ACCELERATING
Fig. 4.10
1. Turn Main power switch to “ON”
2. Push the brake pedal and select “N”, and then ”F” for driving forward (or ”R” for
reversing).
3. Make sure that no people or obstacles are in the risk of being injured or damaged
by the vehicle. Push the accelerator pedal very gently and the vehicle will start to
move. Always accelerate carefully.
! CAUTION
Never bring the vehicle to a halt while using the accelerator. Always use brakes to
prevent the vehicle from moving.
NOTE
When accelerator pedal is engaged, the parking brake will release automatically.
41
04 OPERATION
4.11 STOPPING, BRAKING
Fig. 4.11
To brake or stop the vehicle, push the brake pedal carefully. The vehicle will gently
come to a halt. When the vehicle has come to a full stop, the automatic parking brake
will engage. The vehicle will not move until the accelerator pedal is engaged.
If an emergency occurs, the brakes are designed to handle an emergency braking incident. However, after any emergency braking incident, carry out a brake maintenance
check. Please consult a qualified repair shop. Garia recommends that maintenance is
provided by an Authorized Garia Service Dealer.
! WARNING
Any damage or malfunction on the braking system can result in severe injury or
death. Always make sure that the brakes are fully functioning.
42
OPERATION
04
4.12 ROUGH TERRAIN DRIVING
6.5 inches (165 mm)
Garia Monaco Fig. 4.12
Always make sure that the greatest precautions are taken when driving in rough
terrains. The vehicle’s ground clearance is 6.5 inches (approx. 165 mm). Always drive
slowly and always be ready to stop. Rough terrain driving can cause situations that
are damaging to the vehicle, therefore always drive very cautiously. Avoid driving in
hilly areas and at tilted angles. The weight distribution of the vehicle can cause it to
tip unexpectedly when placing the vehicle at excessive tilted angles. The vehicle is not
constructed for rough terrain use and this should be avoided as much as possible.
Garia Monaco Fig. 4.13
43
04 OPERATION
4.13 HILL HOLD AND ROLL BACK
The Garia features a hill hold function which keeps the vehicle at steady speeds when
starting and stopping on a slope.
When stopping, the motor will keep the vehicle steady for two (2-3) seconds before
the parking brake engages.
If the ignition switch is not turned off, the vehicle will remember the amount of torque
added when stopping, and apply the same amount of torque when starting again to
ensure a smooth start and a limited roll back.
Should motor stall appear, the parking brake will engage immediately and the controller will need to be reset with the key switch to “OFF”, following to “N” and finally to “F”
to start driving forward (or “R” for reversing).
4.14 EMERGENCY BRAKING
If the key switch is turned into the “OFF” position when the vehicle is moving, motor braking will stop the vehicle immediately. This type of braking can cause personal
injury. The parking brake will be engaged when the vehicle has come to a full stop.
NOTE: This type of braking is for emergency use only; should the service brake fail.
It can potentially cause personal injuries or damage to the drive train or tires of the
vehicle.
After any emergency braking incident, please contact a qualified repair shop for a
brake safety and function check. It is recommended that maintenance is provided by
an Authorized Garia Service Dealer.
! WARNING
Risk of personal injury!
Brake lights will not come on when performing emergency or motor braking. Only
perform this type of braking when you can closely follow the traffic around you, and
only in emergency situations.
Any damage to or malfunction of the braking system can result in severe injury or
death. Always make sure that the brakes are fully functioning.
44
OPERATION
04
4.15 MOTOR BRAKING
The Garia vehicle is equipped with a motor brake function allowing the user to brake
and stop the vehicle without activating the service brake. It is recommended only to
use the motor braking function in controlled emergency braking situations.
How to use the motor brake when driving forward:
• Turn key switch to “R”.
• Release accelerator pedal.
• Push accelerator pedal.
• Depending on how much the accelerator pedal is pushed, the motor brakes accordingly.
• Vehicle comes to a full stop.
• For reversing, release and push accelerator pedal again.
If the situation occurs when the vehicle is reversing, follow the above-mentioned
steps, only by turning the key switch to “F” instead of “R”.
4.16 BRAKING WITH THE PARKING BRAKE
If the parking brake should engage while driving at higher speeds than 6 mph (10
km/h) please contact a qualified repair shop for a parking brake safety and function
check. Parking brake performance degradation can occur if it has been subject to unintended use. It is recommended that maintenance is provided by an Authorized Garia
Service Dealer.
! WARNING
Risk of personal injury! This tool is for emergency braking only.
Brake lights will not come on when performing emergency or motor braking. Only
perform this type of braking when you can closely follow the traffic around you, and
only in emergency situations.
Any damage to or malfunction of the braking system can result in severe injury or
death. Always make sure that the brakes are fully functioning.
45
05 VEHICLE EQUIPMENT
5. VEHICLE EQUIPMENT
5.1 Dashboard overview
1
2 3
8
4
9
5
6
7
10 11 12 13 13 14
1
15
9
Fig. 5.1
1. Cup holders, two in each side
2. Hazard light switch
3. Steering wheel: pen holder and scorecard holder
4. Heated windshield switch (upgrade / standard on LSV and Monaco)
5. Windshield wiper/washer switch (upgrade / standard on LSV and Monaco)
6. Interior light switch (upgrade / standard on LSV and Monaco l)
7. Refrigerator switch (upgrade)
8. Button for opening the front bonnet
9. Storage space, left and right in dashboard
10. Charger inlet. For charging of batteries
11. Charger LED
12. Golf ball and tee holder
13. Speed switch (standard on LSV and Monaco)
14. Storage room lid (refrigerator lid, if chosen as upgrade)
15. 12V electrical outlet
46
VEHICLE EQUIPMENT
05
5.2 Seats
Monaco Fig. 5.2
5.2.2 Below the seats:
The battery compartment is located below the seats. This contains the main power
switch, the towing switch, the batteries, the brake fluid container and the VIN (vehicle
identification number). For access to the battery compartment, tip the seat as shown
in fig. 5.2. Please see chapter 3 for information regarding the batteries.
47
05 VEHICLE EQUIPMENT
5.3 Instrument cluster functions and warning lamps
5
6
4
3
7
10
8
2
1
9
Fig. 5.3
The instrument cluster unit combines all the information about the vehicle that the
driver needs for proper operation. If front lights are turned on, the cluster will automatically dim the display creating a more comfortable drive.
1. Brake fluid level warning indicator
2. Heated windshield
3. Position light
4. Turn signal, left
5. Battery charge indicator
6. Turn signal, right
7. High beam
8. Refrigerator
9. Parking brake activated
10.Digital display
48
VEHICLE EQUIPMENT
05
5.3.1 Inner cluster
1
2
3
4
1. Speedometer
2. Odometer, trip counter,operation counter
3. Clock
4. Speed switch position (standard on LSV and Monaco)
Fig. 5.4
5.3.2 Button on instrument cluster (left)
Fig. 5.5
1. Push button to change between overall distance and time as well as trip distance and trip time.
2. Hold button down to reset trip distance and trip time (approx. 3 seconds).
49
05 VEHICLE EQUIPMENT
5.3.3 Button on instrument cluster (right)
Fig. 5.6
The button on the right side of the instrument cluster adjusts the clock. To adjust,
hold down the button on the right side of the instrument cluster.
•
•
•
•
•
50
Hours will blink. Push repeatedly to set hours.
Wait for approximately 5 seconds.
Minutes start blinking. Push repeatedly to set minutes.
Wait until minutes stop blinking (approx. 5 seconds).
Clock is set.
VEHICLE EQUIPMENT
05
5.4 Indicator stalk
Indicator stalk overview:
1
3
2
Fig. 5.7
4
5
Fig. 5.8
1. Turn signal, right
2. Turn signal, left
3. High beam on / off (can only be activated when 4 is in third position)
4. Light off / position light / low beam on (when activated the light in the instrument cluster will automatically dim).
5. Horn
51
05 VEHICLE EQUIPMENT
5.5 Air scoop
5.5.1 Opening and closing the air scoop
Fig. 5.9
The Garia is equipped with an air scoop which channels fresh air into the cabin while
driving. The air scoop is adjustable in steps and also fully removable.
To open the air scoop, push the lever upwards. The air scoop can be opened in 2 different angles depending on the preferred airflow. To close the air scoop, pull the lever
downwards, and the air scoop will close.
52
VEHICLE EQUIPMENT
05
5.5.2 REMOVING THE AIR SCOOP
To fully remove the air scoop, open the air scoop to its maximum position, push the
Fig. 5.10
center lever to pull out the handle as illustrated, and then lift the air scoop out of its
hinges.
To re-install the air scoop, carefully place the air scoop back in the rear hinges and
push the handle into the roof frame until it locks (see Fig 5.10).
53
05 VEHICLE EQUIPMENT
5.6 Storage room under bonnet
Fig. 5.11
Fig. 5.12
The Garia is equipped with a lockable storage compartment under the bonnet.
To open the bonnet, push the bonnet button on the dashboard. The bonnet can be
opened by pushing the button under the dashboard as illustrated in figure 5.12, only
when the ignition switch is in “R,N,F” and the main power switch is turned to “ON”.
• Do not drive while bonnet is open.
• Do not open bonnet while driving.
54
VEHICLE EQUIPMENT
05
5.7 Bin
Fig. 5.13
This bin may be used for storing beverages. It may also function as a trash can. The
plastic insert is removable and the complete bin can be removed by opening the bin
strap.
NOTE: Be careful not to pull out the bin strap.
! WARNING
NEVER operate a vehicle under the influence of alcohol and/or drugs. Driving under
the influence of alcohol or drugs considerably reduces the ability to concentrate,
focus, judge speed and distance, and may result in severe personal injury, death or
excessive material damage.
Garia strongely discourages the operation of any vehicle while intoxicated by alcohol,
drugs or similar.
55
05 VEHICLE EQUIPMENT
5.8 Multi-functional rear section
Fig. 5.14
5.8.1 Standard bag holder (except Monaco)
The Garia bag holder system allows convenient transportation of two golf bags with
easy access to golf clubs and pockets on the bags.
Place golf bags in an angled position and tighten the straps to secure the golf bags
during transportation.
! CAUTION
When driving with golf bags please be aware that the total length of the car is increased and may cause dangerous situations which can cause material damage.
56
VEHICLE EQUIPMENT
05
5.9 Adjusting rearview mirror
Fig. 5.15
Adjust the rear view mirror to ensure that the view to the rear is as unobstructed
as possible. Wrong adjustment can cause dangerous traffic situations and accidents
resulting in severe personal injury, death or material damage.
The mirror has a convenient tip function that prevents blinding traffic coming from
behind. The anti-blinding function is activated by pushing the lever under the mirror
forward. Do not adjust mirrors while driving. This takes focus off the driving and can
create dangerous situations.
57
05 VEHICLE EQUIPMENT
5.10 Refrigerator (upgrade)
Fig. 5.16
The refrigerator provides cooling for foods and beverages when the vehicle is in operation. The ignition switch must be turned to “F,N,R”.
The refrigerator will continue its cooling function for an additional 2 hours after the
ignition switch has been turned to “OFF”, unless it is not turned off by its respective switch. The refrigerator will stop functioning, if turned off by the switch on the
dashboard, or if the power is disconnected by the main power switch in the battery
compartment.
5.10.1 Energy saving tips
•
•
•
•
Allow hot food to cool down before you place it in the refrigerator.
Only open the refrigerator when necessary.
Do not leave the lid open for longer than necessary.
Defrost the refrigerator when a layer of ice has formed.
NOTE
The use of the refrigerator requires battery power and decreases the vehicle’s
range. To avoid stalling while driving if battery power is low, avoid using optional extras excessively.
58
VEHICLE EQUIPMENT
05
5.10.2 Defrosting the refrigerator
Humidity can form frost on the inside of the refrigerator. This reduces the cooling
capacity. Defrost the refrigerator frequently to avoid this.
5.10.3 To defrost the refrigerator, PROCEED AS FOLLOWS:
•
•
•
•
•
Remove the contents of the refrigerator.
If necessary, place them in another cooling container to keep them cool.
Switch off the refrigerator.
Leave the cover open.
Wipe off the defrosted water.
5.10.4 Cleaning and maintenance
- Occasionally, clean the inside of the refrigerator with a damp cloth.
! CAUTION
Danger of damaging the refrigerator!
Do not use abrasive cleaning agents or hard objects during cleaning as these can
cause damage.
Never use brushes, scouring pads or hard and/or pointed tools to remove ice or to
loosen frozen objects.
59
05 VEHICLE EQUIPMENT
5.11 Interior light (upgrade / standard on LSV and Monaco)
Monaco Fig. 5.17
The interior dome light is placed in the headliner between the windshield and air
scoop. Turn the switch on the dashboard to switch the interior light on and off. Use
only when vehicle is not in movement. Avoid driving while interior light is on. It can obstruct the vision of the driver, especially when driving in the dark.
NOTE
The use of the interior light requires battery power and decreases the vehicle range.
To avoid stalling while driving if battery power is low, avoid using optional extras
excessively.
60
VEHICLE EQUIPMENT
05
5.12 Windshield wiper / washer (upgrade / standard on LSV and Monaco)
2
1
Monaco Fig. 5.18
The windshield wiper is activated by the switch on the dashboard. The location of the
switch is illustrated on page 46, figure 5.1. Turn the button one step to activate the wiping function. To activate the windshield washer function, turn and hold another step,
release when sufficient washer fluid has been applied to the windshield.
Make sure that the wiper blade is always in the optimum condition. For the best wiping performance, make sure that the blade is clean.
When wiper blade is worn, Garia recommends that it is replaced with an original Garia
spare part for the best wiper performance.
61
05 VEHICLE EQUIPMENT
5.12.1 Location of the windshield washer fluid
(upgrade / STANDARD ON LSV AND MONACO)
Monaco Fig. 5.19
Always make sure to have sufficient washer fluid when driving. Refill with standard
automotive windshield washer fluid and keep the correct levels within the “MAX” and
“MIN” markings on the windshield washer fluid container.
62
VEHICLE EQUIPMENT
05
5.13 Heated Windshield (UPGRADE / STANDARD ON LSV AND MONACO)
Fig. 5.20
In humid conditions or cold weather, the heated windshield provides easy defogging or
defrosting of the windshield.
The heated windshield is activated via the switch on the dashboard. If not deactivated,
the heated windshield turns off automatically after 30 minutes of operation, unless
power is turned off. When the heated windshield is on, a symbol appears in the instrument cluster.
NOTE
The use of the heated windshield requires battery power and decreases the vehicle range. To avoid stalling while driving if battery power is low, avoid using optional
extras excessively.
63
05 VEHICLE EQUIPMENT
64
SERVICE
06
6. SERVICE
6.1 SERVICE INTERVALS
In order to keep your Garia in the best possible condition, Garia has prepared a specially designed service program, to ensure that the vehicle constantly lives up to the
highest standards.
The following service intervals must be met to uphold the warranty.
• 12 months / 360 hours service
• 24 months / 720 hours service
• 36 Months / 1080 hours service
Besides the above-mentioned service intervals, additional daily, weekly and monthly
checks are required. These can be performed by the owner of the vehicle to uphold
the quality and functionality of the vehicle. The following pages explain how to ensure
the proper maintenance of your Garia.
If the vehicle is malfunctioning in any way not specified in this user’s manual, please
consult a qualified repair shop. Garia recommends that any work is provided by an
Authorized Garia Service Dealer.
The attached warranty and service book contains the space for service stamps and
service and repair remarks. Always be sure to remind your local dealer/repair shop to
apply stamps and comments after each service interval.
6.2 SERVICE SYMBOL IN INSTRUMENT CLUSTER
The vehicle is equipped with a memory function that reminds the user to service the
vehicle regularly. This symbol will be reset after each service by an Authorized Garia
Service Dealer and reappears when the next service is due. Always make sure that the
vehicle is maintained according to the service indicator in the instrument cluster. Failure to follow this will void all applicable warranties.
65
06 SERVICE
6.3 SERVICE ACTIONS
C = Check
CA = Check & Adjust
Months
R = Replace
S = Service
CL = Clean & Lubricate
L = Lubricate
12
24
36
48
60
72
84
360
720
1080
1440
1800
2160
2520
Tire pressure
CA
CA
CA
CA
CA
CA
CA
Visual inspection of tires & rims
C
C
C
C
C
C
C
C/S
R
C/S
R
C/S
R
C/S
Hours
CHECK:
Brake fluid level
Battery mounting & liquid state
S
S
S
S
S
S
S
Wires, battery cables & various connectors
CL
CL
CL
CL
CL
CL
CL
Steering for free play
S
S
S
S
S
S
S
Inspection of shocks, springs, cuffs
C
C
C
C
C
C
C
Inspection of front & rear lights
C
C
C
C
C
C
C
Headlight adjustment
CA
CA
CA
CA
CA
CA
CA
Washer nozzle position (if present)
CA
CA
CA
CA
CA
CA
CA
Wheel bearings for play & sound
S
S
S
S
S
S
S
Toe-in alignment
CA
CA
CA
CA
CA
CA
CA
S/CA
S/CA
R
S/CA
S/CA
R
S/CA
C
C
C
C
C
C
C
Front brakes
S/CL
S/CL
S/CL
S/CL
S/CL
S/CL
S/CL
Rear brakes (Drum brakes)
Differential oil
Windscreen washer fluid
66
S/CL
S/CL
S/CL
S/CL
S/CL
S/CL
S/CL
Discharge test
S
S
S
S
S
S
S
Heated windshield (if present)
C
C
C
C
C
C
C
Windshield for cracks & damages
C
C
C
C
C
C
C
Refrigerator (if present)
C
C
C
C
C
C
C
Lower A-arm
C/S
C/S
C/S
C/S
C/S
C/S
C/S
Upper A-arm
C/S
C/S
C/S
C/S
C/S
C/S
C/S
Rear trailing links
C
C
C
C
C
C
C
Rear Panhard rod
C
C
C
C
C
C
C
Transmission
C
C
C
C
C
C
C
A/C motor
C
C
C
C
C
C
C
Controller
C
C
C
C
C
C
C
Throttle box
CA
C
CA
C
CA
C
CA
Seat belts (if present)
C
C
C
C
C
C
C
Interior light (if present)
C
C
C
C
C
C
C
Seat adjustment (if present)
C
C
C
C
C
C
C
Score card holder
C
C
C
C
C
C
C
Side mirrors (if present)
C
C
C
C
C
C
C
Bag holder (if present)
C
C
C
C
C
C
C
Storage box (if present)
C
C
C
C
C
C
C
License plate light (if present)
C
C
C
C
C
C
C
Instrument cluster (service reset/ function)
CA
CA
CA
CA
CA
CA
CA
Center console buttons (if present)
C
C
C
C
C
C
C
SERVICE
06
6.4 User self service
Following the guidelines below, the user of the vehicle can, on a regular basis, make
sure that the Garia is in the best and safest working condition.
Garia recommends to strictly follow this schedule, and consult a qualified repair shop
if any part of the vehicle is not functioning correctly and cannot be replaced by the
user.
C = Check CR = Check and replace (if needed)
CHECK:
Tires and rims. (visual inspection of cracks, debris and damages)
Daily
General vehicle conditions (defects and damages)
C
Functionalty of the lights (bulbs, adjustment etc).
CR
Brake pedal travel
Weekly
CR
Monthly
C
C
C
Wiper function, windshield washer fluid, wiper blade.
CR
C
Batteries, battery shoes, cable assembly, acid etc (visual inspection)
CR
C
Tire pressure and tire wear
C
Functionality of the reverse warning indicator
C
Brake fluid level
C
67
06 SERVICE
68
MAINTENANCE
07
7. MAINTENANCE
7.1 Replacing light bulbs
7.1.1 Replacing the bulb of the headlight
Bulb type:
H9 12V 65W Golf car and LSV
H7 12V 55W on Monaco
Fig. 7.1
To replace the bulb of the headlight, access the socket from within the front storage
compartment. Disconnect the cable plug for the bulb and turn the bulb socket ¼ of
a turn counter clockwise. The bulb will release from the lamp fitting. Turn the bulb an
additional ¼ of a turn, so the cable fitting is facing upwards. The bulb can be removed
from the lamp fitting. Exchange the bulb with a new, suitable for the original type for
the vehicle and follow the guidance above in reverse. (Bulb type H9, 65W on LSV and
Golf Car / Bulb type on Monaco is H7, 55W)
69
07 MAINTENANCE
3
2
1
Fig. 7.2
1.
2.
3.
Remove the connection plug from the 12V bulb socket
Turn the bulb socket 1/4 of a turn counter clockwise to release it from the lamp socket.
Turn it an additional 1/4 of a turn counter clockwise so the socket faces upwards.
Remove the bulb.
! WARNING
Hot bulbs can cause burns. Always disconnect cables and do not touch the bulb until
it has cooled off. Never touch a lighted bulb.
NOTE
Never touch the glass of a bulb. Touching the glass will shorten the life of a bulb remarkably. Use a glove or a cloth when handling a light bulb.
70
MAINTENANCE
07
7.1.2 Replacing the bulb of the front position light (ONLY ON MONACO)
Bulb type:
W5W 12V glass socket
Monaco Fig. 7.4
1
3
2
Monaco Fig. 7.5
1.
2.
3.
To replace the 12V bulb of the front position light, access the socket from within
the front storage compartment.
Remove the insulation of the socket and then pull the socket out of the lamp fitting.
Replace the lamp, by pulling out the W5W bulb and replacing it with a new.
Then insert the socket into the lamp fitting and ensure that the insulation prevents moisture, dust or sand from entering the lamp
71
07 MAINTENANCE
! WARNING
Hot bulbs can cause severe burns. Always disconnect cables and do not touch the
bulb until it has cooled off. Never touch a lighted bulb.
NOTE
Never touch the glass of a bulb. Touching the glass will shorten the life of a bulb significantly. Use a glove or a cloth when handling a light bulb.
7.1.3 Replacing bulbs on the front indicator
The front turnsignal light is a LED system that is a closed circuit, and LEDs cannot be
replaced separately. Please consult a qualified repair shop. Garia recommends that all
maintenance and repairs are provided by an Authorized Garia Service Dealer.
7.1.4 Replacing bulbs of the rear light
The rear light LED system is a closed circuit, and LEDs cannot be replaced separately.
Please consult a qualified repair shop. Garia recommends that all maintenance and
repairs are provided by an Authorized Garia Service Dealer.
NOTE
In order to provide the required legal luminous intensity, all LEDs must function properly. Always replace lights, if any LED is not functioning correctly.
72
MAINTENANCE
07
7.2 Changing a wheel
Tigtening torque
89 ft lbs
(120Nm)
Wheel bolt size: 17 or 19 mm*
Fig. 7.6
When changing a wheel, always ensure that the vehicle is on an even surface enabling
it to be raised properly. Only use the marked jack-points to prevent any damage to
the vehicle (see next page).
• Place chocks around all wheels not being lifted to prevent vehicle from moving.
• Loosen the wheel nuts slightly (1/4 of a turn) before raising the vehicle (NEVER
completely unscrew ANY of the bolts when the vehicle has not been raised.)
• Always make sure that bolts are cross-loosened and cross-tightened as illustrated above.
• Raise the car and remove all bolts.
• The wheel can be removed and another can be mounted.
• Always use the same size and type of wheel for all 4 wheels on the vehicle.
• Use only original model-specific Garia standard or optional wheels to ensure safe
driving conditions and correct dimensions for the vehicle.
• When mounting a new wheel, reverse the steps mentioned above and tighten
bolts.
• Tighten the wheel bolts with a tightening torque of 89 ft-lbs (120 Nm).
• Check tightening of wheel bolts after one week of driving, retighten if necessary.
*depending on model
73
07 MAINTENANCE
7.3 Jack points
Monaco Fig. 7.7
When raising the vehicle for changing wheels or other work on the underside of the
vehicle, the vehicle must be raised on one of the illustrated jack points. Only use the
marked jack-points to prevent any damage to the vehicle.
• Never work under a vehicle that is only supported by a jack.
• Only lift vehicle on a firm, stable and level surface.
• Use jack stands and check that vehicle is stable and secure to work under.
• Chocks should be placed at the wheels not being raised to prevent vehicle from
rolling.
• Work with extreme caution, since lifting causes great unstability in the vehicle.
! WARNING
To reduce the possibility of severe injury or death from a vehicle falling from a jack
or a jack stand, ensure that the following precautions are taken.
• Vehicle is placed on a firm, stable and level surface
• No work is performed unless the vehicle is secured by jack stands.
• Chocks are in front of and behind wheels that are not being raised.
• Work with extreme caution, since a lifted vehicle can be very unstable.
74
MAINTENANCE
07
7.4 Cleaning the vehicle
When cleaning your Garia vehicle, the following procedure ensures the best possible
result to attain a look close to the vehicle’s appearance when new. Most importantly,
always make sure to turn the main power switch to “OFF” before working on an electric vehicle. The combination of water and high voltage is extremely dangerous and
could be fatal.
Do not clean any part of the vehicle with a high-pressure cleaner.
7.4.1 Exterior
Initially, remove the bin to avoid damage to the color or structure of the leather. Following, water the vehicle with running water (e.g. a garden hose) to wet the vehicle
and to wash away larger pieces of dirt, dust or similar. Avoid as much as possible
getting water on the seats and dashboard, especially around the area of electronic
switches and appliances. Although durable for small amounts of water, the interior
can be damaged when exposed to large quantities of water. Apply water mixed with
automotive shampoo (please follow manufacturer’s instructions regarding mixture
proportions and other instructions). Use a clean soft sponge or brush specifically for
automotive exterior cleaning for applying on vehicle exterior. Wash off shampoo with
running water (e.g. a garden hose) and dry vehicle with a chamois for automotive use.
7.4.2 Wheels
When using the same sponge for cleansing rims as exterior, it is strongly recommended that the exterior bodywork is cleaned before cleaning the wheels. If the cleaning
is done in reverse, the dust from the wheels can risk permanent damage by scratching the painted surface of the exterior. Wet the rims with running water. Apply rim
cleansing solution or automotive shampoo with a clean soft sponge or brush and rinse
after a short while with running water.
7.4.3 Rubber flooring
Wet the rubber with running water. Apply rubber cleansing solution or automotive
shampoo with a clean soft sponge or brush and rinse after a short while with running water. Dry surface gently with a chamois for automotive use. Allow flooring to dry
completely before usage to attain the best result. If the rubber flooring shows discoloration due to wear, tear and extreme weather conditions, it is recommended that an
aftermarket rubber shine solution is applied to attain ‘close-to-new’ looks.
75
07 MAINTENANCE
7.4.4 Interior
To clean the interior, use a moist cloth or chamois to wipe the surfaces. For thorough
cleaning, use automotive interior cleaning solutions and follow instructions carefully.
Avoid using running water or high pressure cleaner for cleaning the interior.
7.4.5 Seats
For cleaning the seats and other parts of the interior of similar fabric, wipe with
warm water using a wrung cloth. The water can contain mild detergents, with mixture
proportions according to manufacturer’s specifications. Do not use running water,
high-pressure cleaning, solvents, bleaches, abrasives, synthetic detergents, wax polishes or aerosol sprays. Avoid contact with sharp objects.
7.4.6 Batteries
Battery maintenance and care
Maintaining batteries properly includes always charging batteris after use, ensuring
the correct level of fluid in the batteries as well as general removal of corrosion, dust,
dirt and/or similar, apply anti corrosion liquid if needed.
FOR FUTHER INFORMATION PLEASE SEE CHAPTER 03
! WARNING
Watering a battery before charge (or with a low charge level) can lead to boil-over
resulting in potential bodily injury and potential damage to the watering system,
battery and vehicle.
Ensure that the work area is dry when servicing the vehicle, watering system, battery or battery charger.
! WARNING
Risk of electric shock! Always turn Main power switch “OFF” when working with water
around an electric vehicle.
Do not clean any part of the vehicle with a pressure cleaner.
76
MAINTENANCE
07
7.5 Controlling the brake fluid
Fig. 7.8
The brakes are a vital part when driving a Car. It is of utmost importance to ensure
that the brakes are functioning correctly at all times. Controlling the brake fluid level
is an indicator showing if the braking system is functioning correctly.
This vehicle is equipped with a brake fluid level warning indicator which is on the
instrument cluster. It informs the driver, if the brake fluid level is reaching a level too
low for safe braking operation. If the light is lit in this indicator, a check and a refill
could be necessary. It is recommended that a check of the brake fluid level is made
regularly. The brake fluid container is found under the seat in the battery compartment. Check that the fluid level is above the minimum requirement but still below the
maximum requirement. Too much or too little brake fluid can cause permanent damage to the entire braking system, putting your safety at risk.
Always use DOT 4 brake fluid.
If brake fluid levels are correct but the braking system shows irregularities, please
consult a qualified repair shop. Garia recommends that all maintenance and repairs
are provided by an Authorized Garia Service Dealer.
! WARNING
ALWAYS make sure that the braking system is functioning correctly. Malfunctioning
brakes can cause SERIOUS INJURY OR DEATH to drivers or people near the vehicle.
77
07 MAINTENANCE
7.6 Tow switch
Fig. 7.9
The vehicle is equipped with a towing switch which enables the car to be towed if
needed.
To activate the towing function, the switch in the battery compartment must be
engaged. This can only be done by using the additional key which came with the car at
its delivery. Please note, this key is not the same as the ignition key. It is recommended
that the key is removed from the keyhole whenever the towing function is not activated. Doing this prevents unauthorized removal of the vehicle.
To be able to activate the towing function, the ignition switch on the steering column
must be turned to the ”N”-position. Furthermore it is necessary that the main power
switch in the battery compartment is turned to the “ON”-position. Select “TOW” to
activate the towing function.
Activating the towing function discharges the battery. Do not store vehicle with
towing switch turned to “TOW”, since this eventually will discharge the batteries and
permanently damage the batteries. Fully discharging the batteries shortens the life of
the battery. Activating the towing function disables the ignition information, meaning
that the vehicle will not drive.
Always make sure to take the best safety precautions when releasing parking brake.
Activating the towing switch disables most electrical appliances in the vehicle.
! WARNING
The vehicle can roll unexpectedly at all times when the parking brake is released,
even on level ground. This can cause a severe accident or death.
78
MAINTENANCE
07
7.7 Towing without battery power
Fig. 7.10
If vehicle batteries are completely discharged or malfunctioning and there is no possibility of activating the towing function through the towing switch, the parking brake
can be released by manually engaging the lever on the motor as illustrated above.
Push the lever to release the parking brake and the vehicle can be towed.
Access the lever from the underside of the vehicle or by removing the load area floor.
Once the towing session has taken place, it is of great importance to activate the
parking brake before vehicle is put into service.
Always take the greatest safety precautions when releasing parking brake. If unsure
on how release the parking brake manually it is recommended that you contact the
nearest Garia dealer or service shop.
! WARNING
The vehicle can roll unexpectedly at all times when parking brake is released, even on
level ground. This can cause a severe accident!
Activate automatic parking brake function before vehicle is put into service!
79
07 MAINTENANCE
7.8 Towing hook
Fig. 7.11
If the vehicle requires to be towed, the towing hook can be mounted underneath the
front body as illustrated above. (Towing hook is standard equipment on all vehicles)
! WARNING
Use caution when towing a vehicle.
Do not attempt to tow vehicle with any other device than an approved automotive
towing rope.
Do not tow vehicle on highways or other public roads not specified for Golf Car use.
Only tow one vehicle at a time.
The vehicle can roll unexpectedly at all times when parking brake is released, even on
level ground. This can cause a severe accident.
Do not exceed 10 mph (16 km/h) while towing.
7.9 Hauling
This Garia Golf Car is not constructed for hauling. This includes other vehicles, trailers
or other devices. Failure to heed this warning will void all applicable warranties.
80
MAINTENANCE
07
7.10 Fuse box location
Fig. 7.12
The fuse box is situated as illustrated above.
If a malfunction in the electrical system occurs, it is recommended to check the fuses.
Always be sure to replace fuses for the same amperes as specified on the following
page. Replacing fuses for other amperes than specified can cause malfunctions or
break-downs on the electrical system.
It is fairly easy to dertermine if a fuse is defective/blown, disconnect the fuse from
the socket in the fuse box. see illustration below on how to dertermin if the fuse is
defective.
OK
Defective
! CAUTION
Danger of damaging the device!
Only replace fuses for the same amperes as specified in this user’s manual. Replacing
fuses for other amperes than specified can cause serious damage to the electrical
system of the vehicle.
81
07 MAINTENANCE
7.11 Fuse box Overview Golf car
FUSE BOX SCHEMATIC
Fuse Amp
7,5
F1
F9
5
F12
F10
5
Wiper and
washer
Actuator,
instrument
cluster
Interior light
F11
15
Refrigerator
F9
F12
10
12V output
F15
5
Keyswitch
F17
5
Heated windscreen
F8
F5
F2
10A
F3
F11
F10
F7
F1
7,5A
15
5A
F8
F14
F15
5A
F16
5A
Brake lights
10A
5
15A
F7
5A
Hazard light
15A
5
15A
F5
F17
5A
10
5A
F3
10A
15
10A
F2
Usage
Horn, direction lights
Parking light,
high beam
Low beam
G21 901 023 00
Fig. 7.13
82
MAINTENANCE
07
7.13 Fuse box Overview LSV & Monaco
FUSE BOX SCHEMATIC
F10
5
F11
15
Refrigerator
F12
15
F14
20
12V out and
cluster
Charger
F15
5
Keyswitch
F17
5
Heated windscreen
F12
F6
F3
F11
F8
F7
F5
F4
F2
F1
F10
7,5A
15
5A
F8
5A
5
15A
F7
F14
F15
5A
5
15A
F5
Low and high
beam
Hazard light,
12V tow
Bonnet
actuator and
cluster
Wiper and
washer
Interior light
15A
15
5A
F3
15A
15
15A
F2
F17
20A
Usage
Horn, direction lights
Position light
5A
Fuse Amp
7,5
F1
G21 901 022 00
Fig. 7.14
83
07 MAINTENANCE
7.13 Storage
When storing your vehicle for longer periods of time, please perform the following
operations.
• Charge the batteries and check the fluid levels. Do this at least once a month.
If frequent charging is not posible, the charger is designed to be connected for
longer periods of time. The on-board charger has a maintenance charging algorythme that keep the batteries healthy for a longer period of storage.
• Clean the tops of the batteries with a solution of baking soda and water. Use 1lb
of baking soda for 1 gallon of water (120g for 1 litre of water) to remove corrosion. Do not allow this solution to enter the battery cells.
• Turn the ignition key to the ‘OFF’ position.
• Remove key and store it in a safe place.
• Turn the Main power switch in the battery compartment to ‘OFF’.
• Remove the key from the towing key switch. This should only be present when
vehicle is being towed. Always store in a safe place.
• Clean the vehicle and apply a rust inhibitor on exposed locations.
• See chapter 3 for special precautions when storing batteries.
84
TROUBLESHOOTING
08
8.1 The car will not drive.
•
•
•
•
•
•
Check if Main power switch is “ON” in battery compartment.
Check if Towing switch is “OFF” in battery compartment.
Check if Ignition switch is in “F” or “R”.
Check the battery indicator in the instrument cluster to see if batteries are
sufficiently charged.
Reset the vehicle - please see next page on how to reset the vehicle.
If all of the above are confirmed, please consult a qualified repair shop. Preferably an Authorized Garia Service Dealer.
8.2 The vehicle will only drive at a very slow speed.
• Are the batteries sufficiently charged? If vehicle voltage is below 37.5V the
vehicle may have switched to LOS-mode (limited operation strategy). It is
a safety program that allows the vehicle to drive at very low speeds only.
Charge batteries fully to switch off the LOS mode.
• Reset the vehicle - please see next page on how to reset the vehicle.
• Please consult a qualified repair shop. Preferably an Authorized Garia Service Dealer.
8.3 The vehicle has a lower range than usual.
• One or more batteries may be malfunctioning. Batteries will typically experience lower capacity after many cycles of charging.
• Allow batteries to fully charge, and check for correct water levels.
• If this does not help, please consult a qualified repair shop. Preferably an
Authorized Garia Service Dealer.
8.4 The charger will not charge the batteries.
• Check that the power inlet is supplying power to the charger.
• Check that the charger LED is indicating that the batteries are charging.
• Charger may be overheating in hot weather conditions. Allow charger to cool
down or restart charging in a cooler environment.
• Reconnect the charger plug.
• If this does not help, please consult a qualified repair shop. Preferably an
Authorized Garia Service Dealer.
8.5 What to do with a completely discharged battery.
• Engage a full charging cycle of the battery.
• If this does not help, please consult a qualified repair shop. Preferably an
Authorized Garia Service Dealer.
85
08 TROUBLESHOOTING
8.6 How to reset the vehicle.
• If the vehicle shows any electrical errors, resetting the electrical system
mayhelp. Resetting the vehicle is done by turning the Main power switch
to“OFF”, then wait approximately 30 seconds, and turning it to “ON” again.
• If that does not help, apply the charger cable for 1 hour, when done cycle
between “R,N,F” and back to off (this will reset the DBI on the controller).
• If this does not help, please consult a qualified repair shop. Preferably an
Authorized Garia Service Dealer.
8.7 The lights do not work.
• Check the fuse. If fuse is not intact, replace it with a new one.
• Check if bulbs are functioning correctly. If not, replace with new ones.
• If none of the above prove helpful, please consult a qualified repair shop.
Preferably an Authorized Garia Service Dealer.
8.8 The refrigerator does not work.
• Turn ignition on (turn to ‘N’), and activate the refrigerator on the ‘refrigerator’ button on the dashboard. The refrigerator symbol in the instrument
cluster will be lit if power is on and ignition switch is not turned to ‘Off’.
• Check the fuse. If fuse is not intact, replace with a new.
• If none of the above prove helpful, please consult a qualified repair shop.
Preferably an Authorized Garia Service Dealer.
8.9 The refrigerator stops cooling when parked (less than 2 hours).
• Main power switch must be on.
• Check the fuse. If fuse is not intact, replace it with a new one.
• If none of the above prove helpful, please consult a qualified repair shop.
Preferably an Authorized Garia Service Dealer.
8.10 The brake pedal is soft, or presses down without resistance.
• Do not drive vehicle, brakes may be malfunctioning. Please consult a qualified
repair shop. Preferably an Authorized Garia Service Dealer.
8.11 The vehicle vibrates in the steering wheel.
• Please check tire pressure, apply 30 psi in each tire as recommended in this
manual and by the supplier.
86
VEHICLE TECHNICAL SPECIFICATIONS
09
9.1 Golf car vehicle specifications
In compliance with the EC Machinery directive
VIN: UJGL2L3LXAUXXXXXX
WEIGHTS
Number of seats: Two
Design Curb Weight: 1212 lb (550 Kg)
Distribution F/R: 40/60 %
STANDARD FEATURES:
GVWR: 1984 lb (1000 Kg)
Rear wheel drive
GAWR F/R: 882/1323 lb (400/600 Kg)
Hydraulic brake system: Discs brake on front axle, drum brakes on rear axle
Payload: 770 lb (350 Kg)
Regenerative braking
Speedometer
DIMENSIONS
Odometer
Wheelbase: 71 inches (1800 mm)
State-of-charge meter
Track F/R: 36/39 inches ( 922/1000 mm)
Reverse warning alarm
Length: 92 inches (2330 mm)
Service display
Width: 48 inches (1210 mm)
On board battery charger
Height: 73 inches (1850 mm)
Headlamps (high, low beam and integrated position light)
Ground Clearance: 6.5 inches (165 mm)
Stop and tail lights
Front and rear turn signal LEDs
Parking Brake
CHARGER
Windshield
Location: On board
Type: Integrated DeltaQ charger/converter
BATTERY
Input Voltages: 110/220 VAC
Manufacturer: Trojan
Type: Lead Acid
Number of Modules: 6
Standard tires
Weight pr. module: 29 kg / 64 punds
Tire Manufacturer: Carlisle
Weight of Pack: 174 kg / 364 punds
Tire Model: Tour Max
Pack Location: Under the seats
Tire Size: 205-50-10
Nominal module voltage: 8V
Tire Pressure: 30 psi
Nominal system voltage: 48V
Battery capacity: 170 Ah (C20)
Optional tires
Tire Manufacturer: ITP
MOTOR
Tire Model: Ultra GT
Manufacturer: Leroy Somer
Tire Size: 205-30-12
Type: TRA 145 AC Electric
Tire Pressure: 30 psi
Max net. Power: 4.0 bhp (3.0 KW)
REAR AXLE
PERFORMANCE
Manufacturer: Comex SpA
Controller: Curtis 1234-5271 275AMP
Gear ratio 12,3:1
Max attainable speed: 19mph / 24km/h
87
09 VEHICLE TECHNICAL SPECIFICATIONS
9.2 LSV & NEV vehicle specification
In compliance with FMVSS 571.500
VIN: UJGL2L3LXAUXXXXXX
WEIGHTS
Number of seats: Two
Design Curb Weight: 1212 lb (550 Kg)
Distribution F/R: 40/60 %
STANDARD FEATURES:
GVWR: 1984 lb (1000 Kg)
Rear wheel drive
GAWR F/R: 882/1323 lb (400/600 Kg)
Hydraulic brake system: Discs brake on front axle, drum brakes on rear axle
Payload: 770 lb (350 Kg)
Regenerative braking
Two-point seat belts, conforming to CFR571.209
DIMENSIONS
Speedometer
Wheelbase: 71 inches (1800 mm)
Odometer
Track F/R: 36/39 inches ( 922/1000 mm)
State-of-charge meter
Length: incl. license plate holder:
92inches(2330mm)
Reverse warning alarm
Width excl. mirrors: 48 inches (1210 mm)
Service display
Width incl. mirrors: 60 inches (1540mm)
On board battery charger
Height: 73 inches (1850 mm)
Headlamps (high, low beam and integrated position light)
Ground clearance: 6.5 inches (165 mm)
Stop & tail lights
Front and rear turn signal LEDs
CHARGER
Reflectors on each side and on rear
Location: On board
Exterior mirrors, 2 side mirrors and interior mirror
Type: Integrated DeltaQ charger/converter
Parking Brake
Input Voltages: 110/220 VAC
Windshield DOT and AS1 marked conforming to CFR571.205
Windshield moisture removing device
TIRES conforming to CFR571.110
VIN system conforming to CFR part 565
Standard tires
Certification label conforming to CFR part 567
Tire Manufacturer: Carlisle
Speed switch
Tire Model: Tour Max
Tire Size: 205-50-10
Tire Pressure: 30 psi
Continued on next page
88
VEHICLE TECHNICAL SPECIFICATIONS
09
BATTERY
Manufacturer: Trojan
Optional tires
Type: Lead Acid
Tire Manufacturer: ITP
Number of Modules: 6
Tire Model: Ultra GT
Weight pr. module: 29 kg / 64 punds
Tire Size: 205-30-12
Weight of Pack: 174 kg / 384 punds
Tire Pressure: 30 psi
Pack Location: Under the seats
Nominal module voltage: 8V
REAR AXLE
Nominal system voltage: 48V
Manufacturer: Comex SpA
Battery capacity: 170 Ah (C20)
Gear ratio 12,3:1
MOTOR
Manufacturer: Leroy Somer
PERFORMANCE
Type: TRA 145 AC Electric
Controller: Curtis 1234-5271 275AMP
Max net. Power: 4.0 bhp (3.0 KW)
Max attainable speed: 25mph / 40km/h
89
09 VEHICLE TECHNICAL SPECIFICATIONS
9.3 GARIA MONACO VEHICLE SPECIFICATION
EC type aproval number: e12*2002/24*0474*00
VIN: UJGGHS313XUXXXXXX
WEIGHTS
Number of seats: Two
Design Curb Weight: 1212 lb (550 Kg)
Distribution F/R: 40/60 %
STANDARD FEATURES:
GVWR: 1984 lb (100 Kg)
Rear wheel drive
GAWR F/R: 882/1323 lb (400/600 Kg)
Hydraulic brake system: Discs brake on front axle, drum brakes on rear axle
Payload: 770 lb (350 Kg)
Regenerative braking
Three-point seat belts
DIMENSIONS
Speedometer
Wheelbase: 71 inches (1800 mm)
Odometer
Track F/R: 36/39 inches ( 922/1000 mm)
State-of-charge meter
Length: incl. license plate holder:93 inches (2355) mm)
Speed switch
Width excl. mirrors: 48 inches (1210 mm)
Service display
Width incl. mirrors: 60 inches (1540mm)
On board battery charger
Height: 73 inches (1850 mm)
Headlights (high & low beam)
Ground Clearance: 6.5 inches (165 mm)
Position light
Stop and tail lights
CHARGER
Front and rear turn signal LEDs
Location: On board
Rear Reflectors
Type: Integrated DeltaQ charger/converter
Exterior mirrors, 2 side mirrors and interior mirror
Input Voltages: 110/220 VAC
Parking Brake
Windshield DOT and AS1 marked
STANDARD TIRES
Windshield moisture removing device
Tire Manufacturer: Carlisle
Tire Model: Tour Max
Tire Size: 205-50-10
Tire Pressure: 30 psi
Continued on next page
90
VEHICLE TECHNICAL SPECIFICATIONS
09
BATTERY
Manufacturer: Trojan
OPTIONAL TIRES
Type: Lead Acid
Tire Manufacturer: ITP
Number of Modules: 6
Tire Model: Ultra GT
Weight pr. module: 29 kg / 64 pounds
Tire Size: 205-30-12
Weight of Pack: 174 kg / 384 punds
Tire Pressure: 30 psi
Pack Location: Under the seats
Nominal module voltage: 8V
REAR AXLE
Nominal system voltage: 48V
Manufacturer: Comex SpA
Battery capacity: 170 Ah (C20)
Gear ratio 12,3:1
MOTOR
PERFORMANCE
Manufacturer: Leroy Somer
Controller: Curtis 1234-5271 275AMP
Type: TRA 145 AC Electric
Max attainable speed: 25mph / 40km/h
Max net. Power: 4.0 bhp (3.0 KW)
91
09 VEHICLE TECHNICAL SPECIFICATIONS
9.4 Vehicle dimensions
92
VEHICLE TECHNICAL SPECIFICATIONS
09
9.5 LSV Certification Label
Certification label of the vehicle can be found in the headlíner above the head of the
driver, near the B-pillar. The certification label contains all information required by the
NHTSA according to 49 CFR 571.500.
The label is placed as illustrated below.
Example of a certification label
NOTICE
Please note, this plate/sticker may not be removed from vehicle.
93
09 VEHICLE TECHNICAL SPECIFICATIONS
9.6 Golf Car Certification Label
Certification label of the vehicle can be found in the headlíner above the head of the
driver, near the B-pillar. The certification label contains all information required by the
European commission and U.S. law.
The label is placed as illustrated below.
Example of a certification label
NOTICE
Please note, this plate/sticker may not be removed from the vehicle.
94
VEHICLE TECHNICAL SPECIFICATIONS
09
9.7 Garia Monaco manufacturer plate
Manufacturer plate is located underneath the seat by the main switch. The plate contains the vehicle’s unique VIN and the type approval number (e12*2002/24*0474*00)
The plate is placed as illustrated below.
Example of a Manufacture plate
NOTICE
Please note, this plate/sticker may not be removed from vehicle.
95
10 NOTES
96
NOTES
10
97
10 NOTES
98
NOTES
10
99
11 ALPHABETICAL INDEX
11. INDEX
C
A
Accelerating . . . . . . . . . . . . . . . . . . . . . . . . 41
Accelerator. . . . . . . . . . . . . . . . . . . . . . . . . 09
Adjust Mirror . . . . . . . . . . . . . . . . . . . . . . 16
Air Scoop
Close. . . . . . . . . . . . . . . . . . . . . . . . . . . . . . 52
Open. . . . . . . . . . . . . . . . . . . . . . . . . . . . . . 52
Anti roll back. . . . . . . . . . . . . . . . . . . . . . . . 44
Audio warning signal. . . . . . . . . . . . . . . . . 08
Automatic parking brake. . . . . . . . . . . . . 40
B
Batteries . . . . . . . . . . . . . . . . . . . . . . . . . . . 18
Charging. . . . . . . . . . . . . . . . . . . . . . . . . . 20
Charger LED. . . . . . . . . . . . . . . . . . . . . . . 21
Cleaning. . . . . . . . . . . . . . . . . . . . . . . . . . . 27
Handling. . . . . . . . . . . . . . . . . . . . . . . . . . . 22
Inspection of. . . . . . . . . . . . . . . . . . . . . . 27
Maintenance. . . . . . . . . . . . . . . . . . . . . . . 22
On-board water filler system. . . . . . . 24
Safety. . . . . . . . . . . . . . . . . . . . . . . . . . . . . 18
Storage. . . . . . . . . . . . . . . . . . . . . . . . . . . 28
Watering. . . . . . . . . . . . . . . . . . . . . . . . . . 24
Bin . . . . . . . . . . . . . . . . . . . . . . . . . . . . . . 55
Body and Chassis. . . . . . . . . . . . . . . . . . . . 06
Bonnet
Open. . . . . . . . . . . . . . . . . . . . . . . . . . . . . . 54
Storage Compartment. . . . . . . . . . . . . 54
Brake fluid. . . . . . . . . . . . . . . . . . . . . . . . . . 77
Braking
Emergency braking. . . . . . . . . . . . . . . . . 44
Paring brake. . . . . . . . . . . . . . . . . . . . . . . 45
Braking pedal. . . . . . . . . . . . . . . . . . . . . . 42
Buttons on instrument cluster. . . . . . . 59
100
Changing a Wheel . . . . . . . . . . . . . . . . . . . 73
Charger
Malfunctioning. . . . . . . . . . . . . . . . . . . . . 78
Charging Batteries . . . . . . . . . . . . . . . . 20
Check-ups before use . . . . . . . . . . . . . . . 4
Cleaning
Cleaning the vehicle. . . . . . . . . . . . . . . . 75
Exterior. . . . . . . . . . . . . . . . . . . . . . . . . . . 75
Interior. . . . . . . . . . . . . . . . . . . . . . . . . . . . 76
Rims. . . . . . . . . . . . . . . . . . . . . . . . . . . . . . 75
Rubber flooring. . . . . . . . . . . . . . . . . . . . 75
Seats. . . . . . . . . . . . . . . . . . . . . . . . . . . . . 76
Controlling the brake fluid. . . . . . . . . . . .77
D
Dashboard. . . . . . . . . . . . . . . . . . . . . . . . . . 46
Driver Qualifications. . . . . . . . . . . . . . . . . 14
Driving
Forward. . . . . . . . . . . . . . . . . . . . . . . . . . . 38
Hills . . . . . . . . . . . . . . . . . . . . . . . . . . . . . . 13
Populated areas. . . . . . . . . . . . . . . . . . . 11
Public areas and roads. . . . . . . . . . . . . 03
Rough terrains . . . . . . . . . . . . . . . . . . . . 43
Sharp or blind turns. . . . . . . . . . . . . . . . 13
Wet areas. . . . . . . . . . . . . . . . . . . . . . . . . 13
E
Electrical outlet 12V. . . . . . . . . . . . . . . . . 46
Emergency braking . . . . . . . . . . . . . . . . . . 44
F
Flow-Rite
Hand pump Instructions. . . . . . . . . . . . 24
Fuses
Fuse box location. . . . . . . . . . . . . . . . . . 81
Golf Car. . . . . . . . . . . . . . . . . . . . . . . . . . . 82
LSV and Monaco. . . . . . . . . . . . . . . . . . . 83
ALPHABETICAL INDEX
olf bag transportation . . . . . . . . . . . . . 56
G
Golf ball and tee-holder. . . . . . . . . . . . . . 46
Ground clearance. . . . . . . . . . . . . . . . . . . . 43
11
Low battery range. . . . . . . . . . . . . . . . . . . 85
Low beam. . . . . . . . . . . . . . . . . . . . . . . . . . . 52
M
H
Hauling. . . . . . . . . . . . . . . . . . . . . . . . . . . . . . 78
Heated windscreen. . . . . . . . . . . . . . . . . . 63
High beam. . . . . . . . . . . . . . . . . . . . . . . . . . . 52
Hill hold
Anti roll back . . . . . . . . . . . . . . . . . . . . . . 44
Horn . . . . . . . . . . . . . . . . . . . . . . . . . . . . . . 51
Main Power switch. . . . . . . . . . . . . . . . . . . 39
Maintenance. . . . . . . . . . . . . . . . . . . . . . . . 39
Motor
Motor braking. . . . . . . . . . . . . . . . . . . . . 45
Multifunctional rear section. . . . . . . . . . 57
Optional. . . . . . . . . . . . . . . . . . . . . . . . . . . 47
Standard. . . . . . . . . . . . . . . . . . . . . . . . . . 47
I
O
Ignition
Forward. . . . . . . . . . . . . . . . . . . . . . . . . . . 38
Ignition switch functions. . . . . . . . . . . 38
Neutral. . . . . . . . . . . . . . . . . . . . . . . . . . . . 38
Off . . . . . . . . . . . . . . . . . . . . . . . . . . . . . . 38
Reverse. . . . . . . . . . . . . . . . . . . . . . . . . . . 38
Important labels/notifications. . . . . . . . V
Important Manual information. . . . . . . . III
Indicator arm . . . . . . . . . . . . . . . . . . . . . . . 51
Instrumentation layout . . . . . . . . . . . . . . 47
Interior light . . . . . . . . . . . . . . . . . . . . . . . . 61
In use
Golf Car. . . . . . . . . . . . . . . . . . . . . . . . . . . 11
LSV and Monaco. . . . . . . . . . . . . . . . . . . 12
Occupants. . . . . . . . . . . . . . . . . . . . . . . . . . 03
Odometer . . . . . . . . . . . . . . . . . . . . . . . . . . 50
On-board water filler system. . . . . . . . . 25
Operation. . . . . . . . . . . . . . . . . . . . . . . . . . . 25
J
Raising the vehicle. . . . . . . . . . . . . . . . . . . 74
Rear view mirror. . . . . . . . . . . . . . . . . . . . . 58
Refrigerator. . . . . . . . . . . . . . . . . . . . . . . . 59
Repairs. . . . . . . . . . . . . . . . . . . . . . . . . . . . . 14
Replace
Fuses. . . . . . . . . . . . . . . . . . . . . . . . . . . . . 82
The bulb of the head light. . . . . . . . . . . 63
The front indicator. . . . . . . . . . . . . . . . . 71
The rear indicator. . . . . . . . . . . . . . . . . . 72
The Window washer fluid . . . . . . . . . . . 69
The Wiper blade. . . . . . . . . . . . . . . . . . . . 62
Reset the car. . . . . . . . . . . . . . . . . . . . . . . 86
Jack-points. . . . . . . . . . . . . . . . . . . . . . . . . 74
L
Labels. . . . . . . . . . . . . . . . . . . . . . . . . . . . . . III
Lights
The front indicator. . . . . . . . . . . . . . . . . 70
The head light . . . . . . . . . . . . . . . . . . . . . 70
The rear indicator. . . . . . . . . . . . . . . . . . 72
Tail lights. . . . . . . . . . . . . . . . . . . . . . . . . . 72
Troubleshooting . . . . . . . . . . . . . . . . . . . 87
P
Parking brake . . . . . . . . . . . . . . . . . . . . . . . 40
Parking brake symbol. . . . . . . . . . . . . . . . 40
Park light . . . . . . . . . . . . . . . . . . . . . . . . . . . 52
Pedal operation . . . . . . . . . . . . . . . . . . . . . 09
Pen holder . . . . . . . . . . . . . . . . . . . . . . . . . . 31
R
101
11 ALPHABETICAL INDEX
Reverse warning signal. . . . . . . . . . . . . . . 08
Reversing. . . . . . . . . . . . . . . . . . . . . . . . . . . 08
Rough terrain driving. . . . . . . . . . . . . . . . 43
S
Safety
Before use . . . . . . . . . . . . . . . . . . . . . . . . 03
Score card holder. . . . . . . . . . . . . . . . . . . 31
Seat belts . . . . . . . . . . . . . . . . . . . . . . . . . . 17
Service
Self-service. . . . . . . . . . . . . . . . . . . . . . . 67
Service actions. . . . . . . . . . . . . . . . . . . . 66
Service interval. . . . . . . . . . . . . . . . . . . . 65
Service symbol. . . . . . . . . . . . . . . . . . . . . 65
Speedometer . . . . . . . . . . . . . . . . . . . . . . . 50
Stopping. . . . . . . . . . . . . . . . . . . . . . . . . . . . 10
Storage
of batteries. . . . . . . . . . . . . . . . . . . . . . . 29
of vehicle. . . . . . . . . . . . . . . . . . . . . . . . . . 84
Storage room. . . . . . . . . . . . . . . . . . . . . . . 55
T
Technical specification
Golf car. . . . . . . . . . . . . . . . . . . . . . . . . . . 88
Low Speed Vehicle (LSV). . . . . . . . . . . . 89
Monaco . . . . . . . . . . . . . . . . . . . . . . . . . . . 91
Tee-holder. . . . . . . . . . . . . . . . . . . . . . . . . . 31
Tires
Pressure. . . . . . . . . . . . . . . . . . . . . . . . . . 05
Tire conditions. . . . . . . . . . . . . . . . . . . . . 05
Tire wear. . . . . . . . . . . . . . . . . . . . . . . . . . 05
Towing
Towing hook . . . . . . . . . . . . . . . . . . . . . . . 78
Towing switch. . . . . . . . . . . . . . . . . . . . . . 78
Towing without battery power. . . . . . 79
Transportation of golf bags. . . . . . . . . . 57
Trash can. . . . . . . . . . . . . . . . . . . . . . . . . . . 56
Trojan
HydroLink water filler system. . . . . . . 25
102
T-875 batteries. . . . . . . . . . . . . . . . . . . . 30
Troubleshooting
Batteries. . . . . . . . . . . . . . . . . . . . . . . . . . 85
Lights. . . . . . . . . . . . . . . . . . . . . . . . . . . . . 86
Refrigerator. . . . . . . . . . . . . . . . . . . . . . . 86
Reset the car. . . . . . . . . . . . . . . . . . . . . . 86
Turn signal. . . . . . . . . . . . . . . . . . . . . . . . . . 43
V
Vehicle technical specification
Golf Car. . . . . . . . . . . . . . . . . . . . . . . . . . . 88
Low speed Vehicle (LSV). . . . . . . . . . . . 89
Monaco . . . . . . . . . . . . . . . . . . . . . . . . . . . 91
Vehicle certification label
Golf car. . . . . . . . . . . . . . . . . . . . . . . . . . . 94
Low Speed Vehicle (LSV). . . . . . . . . . . . 95
Monaco Manufacture Plate. . . . . . . . . 96
W
Warning labels. . . . . . . . . . . . . . . . . . . . . . . IV
Watering batteries. . . . . . . . . . . . . . . . . . 30
Wheel
Changing. . . . . . . . . . . . . . . . . . . . . . . . . . 73
Window wiper/washer . . . . . . . . . . . . . . . 62
Windshield
Defogging. . . . . . . . . . . . . . . . . . . . . . . . . 64
Defrosting . . . . . . . . . . . . . . . . . . . . . . . . 64
Heating . . . . . . . . . . . . . . . . . . . . . . . . . . . 64
ALPHABETICAL INDEX
11
103
11 ALPHABETICAL INDEX
104
User’s Manual: Garia golf and leisure vehicle.
© 2012 by Garia A/S
3rd Edition
All rights reserved. Any reprinting or unauthorized use without the
written permission of Garia A/S is prohibited.
Copyrighted material.
This manual may not be reproduced in its entirety or in parts without
the written permission of Garia A/S, After Sales and Support Department
Printed in Denmark