1
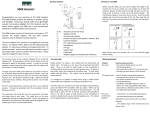
Safety Instructions:
1.
Do not use this radio near water.
2.
Clean with a dry cloth.
3.
Do not block any ventilation openings.
4.
Do not use near hot objects or appliances.
5.
Use accessories provided by manufacturer.
6.
Unload the battery when the unit has not
been used for long time.
7.
Do not allow this unit to be exposed to water,
steam, sand or other environmental hazards.
8.
Do not leave your radio where excessive heat
could cause damage such as expose to direct
sunlight in a parked car where the heat from
1
the sun can easily build up to extreme levels
and damage the unit.
Specifications:
Model: POCKET
Radio: Digital DAB+ & FM Radio
Dimension: 89x52x17mm
Weight(Net): Approx. 75g (Including battery)
FM Frequency: 87.5-108MHz with RDS
DAB+ Frequency: Band III (174.0-239.0MHz)
Headphones: 32 ohm, in-ear style
Output Power: 0.3W(Speaker), 5mW
(headphone)
2
Power Source: Micro USB (5V,0.6A)
Charging Time: Approx. 2.5 Hours
Usage Time: Approx. 6 Hours(Speaker), 8
Hours(headphone)
Approvals: CE, RoHS, C-tick
3
(4)(3)(2)(1)
(12)
(6)
(8)
(7)
(10)(9)
(11)
(1)
Power / DAB+ or FM Mode Switch
(2)
Volume Up
(3) Volume Down
(4)
Preset
(5) Telescopic Antenna
(6)
Color LCD Display
(7) Speaker
(8)
Scan Scroll Wheel
(9) Key Lock/Unlock
(10)
Micro USB Socket (11) Li Battery Compartment
(12)
Earphone Jack
4
Charging the radio:
The POCKET features a 3.7V, 1000mAh
rechargeable Lithium battery.
The POCKET is supplied with one ‘USB to
micro-USB’ cable for power charging.
Before first time to operate, please fully
charge the battery.
1.
Open battery cover and insert the Lithium
rechargeable battery.
2.
Plug the micro USB into the socket(on the
right side of the radio), connect the other end
USB to power supply such as USB port of
computer or USB power adaptors.
5
3.
The radio will begin charging the battery. It
will take approximately 2.5 hours to fully
charge the battery.
4.
The charging icon will flash during charging
and stop charging when the radio is fully
charged.
Speaker:
The POCKET features a high-quality 8 Ω 0.3W
speaker.
Headphones:
The POCKET features a pair of high-quality
6
earpieces which also act as radio antenna. The
3.5mm jack is located on the top of the radio,
it is provided for use with stereo headphones
or earpieces.
Important:
Excessive volume from earpieces or
headphone may cause damage to your ears.
Operating your radio:
1.
Make sure the battery is charged.
2.
Press and hold the “POWER/MODE” button to
turn on the radio.
7
3.
The display will show the BUSH logo and then
enter DAB mode (FM mode if you selected FM
before turning off), “DAB” logo will be shown
on the middle top of the display in DAB mode
whereas “FM” logo will be shown in FM
mode.
4.
Adjust the volume to comfortable level
(Volume Level: 0-20).
DAB+/FM Band Select:
1.
Press “POWER/MODE” button to select DAB+
or FM mode, you will see the icon “DAB” or
“FM” on middle top of the display.
8
2.
When you turn off the radio, mode will be
memorized.
Search and select channels: DAB+ mode
1.
Make sure the radio is in DAB+ mode.
2.
Press and hold “SCAN” Scroll Wheel button,
the radio will scan and memorize all the
channels automatically. (Cancel auto-scan by
pressing the Scroll Wheel button)
3.
Select channel by scrolling up and down the
“SCAN” Scrolling Wheel button, then press the
“SCAN” Scrolling Wheel button to confirm.
4.
All the channels being scanned will be
9
memorized until another scan is performed.
Service Information: DAB+ mode
The Service Information display - Technical
information on the current status of the
station being broadcasted.
While listening to DAB+, the display will show
the followings if applicable
1. Program type
2. Multiplex Name
3. Time
4. Channel Name
5. Frequency
6. Volume level
10
7. Signal Strength
Presets: DAB+ mode
1.
Make sure you are in DAB+ mode.
2.
When you are listening the DAB+ station you
would like to preset, press and hold the
“PRESET” button for 3 seconds, a list with
heading “MEMORY” will show on the display,
you will see vacant 1, vacant 2...etc in the list.
Select vacant station by scrolling up and down
the “SCAN” Scrolling Wheel button and then
press the “SCAN” Scrolling Wheel button to
confirm.
(If the preset space is occupied, the original
11
preset station will be overwritten.)
3.
To play the preset stations, press once the
“PRESET” button and select the preset
station(the name of channel will be displayed)
by scrolling up and down the “SCAN” Scrolling
Wheel button, then press the “SCAN” Scrolling
Wheel button to confirm.
4.
Max. 20 preset stations for DAB+ radio mode.
Search and select channels : FM
mode(auto-memorized)
1.
Make sure the radio is in FM mode.
2.
Press and hold “SCAN” Scroll Wheel button,
12
the radio will scan all the channels
automatically. (Cancel auto-scan by pressing
once the “SCAN” Scroll Wheel button)
3.
All the channels will be memorized.
4.
Select channel by scrolling up and down the
“SCAN” Scrolling Wheel button.
5.
Press and hold “SCAN” Scroll Wheel button to
exit.
Manual tuning: FM mode
1.
Make sure the radio is in FM mode.
2.
Scroll up the “SCAN” Scrolling Wheel button
to higher frequency, vice versa.
13
3.
Scroll up and hold the “SCAN” Scrolling Wheel
button to scan the next channel at higher
frequency, vice versa.
Service Information: FM mode
While listening to FM radio, the display will
show the followings if applicable
1. Program type
2. Frequency
3. Channel Name
4. Volume level
5. Signal Strength
14
Presets: FM mode
1.
Make sure you are in FM mode.
2.
When you are listening the FM station you
would like to preset, press and hold the
“PRESET” button for 3 seconds, a list with
heading “MEMORY” will show on the display,
you will see vacant 1, vacant 2...etc in the list.
Select vacant station by scrolling up and down
the “SCAN” Scrolling Wheel button and then
press the “SCAN” Scrolling Wheel button to
confirm.
(If the preset space is occupied, the original
preset station will be overwritten.)
15
3.
To play the preset stations, press once the
“PRESET” button and select the preset
station(the name of channel will be displayed)
by scrolling up and down the “SCAN” Scrolling
Wheel button, then press the “SCAN” Scrolling
Wheel button to confirm.
4.
Max. 20 preset stations for FM radio mode.
Radio Antenna:
1.
For DAB+ and FM reception there is a built-in
telescopic antenna at the rear of the unit.
2.
Extend the antenna and move it around to
obtain the best reception.
16
3.
Headphone or earpieces as antenna when you
plug in 3.5mm jack.
Sleep mode:
1.
Press and hold both “SCAN” Scroll Wheel
button and “Vol-“ button for 2 secs to enter
sleep mode, you will see ‘0 min.’ flashing in
red color.
2.
Scroll up and down to select the duration from
5 min. to 90 min. (Select ‘0min’ to exit the
sleep mode or wait for 5secs to exit sleep
mode automatically.)
3.
Press “SCAN” Scroll Wheel button again to
17
confirm, you will see the selected duration in
red color on the top of the display.
4.
Press and hold both “SCAN” Scroll Wheel
button and “Vol-“ button for 2 secs to cancel
the sleep mode.
Key Lock Function:
1.
Key lock switch is located at the right-hand
side of the radio. When the key lock switch is
set to “LOCK>” position, “Vol+”, “Vol-“ and
“POWER/BAND” buttons will be disabled.
Display will show a “lock icon” on the top of
the display.
18
2.
To switch off the key lock function, switch the
key lock button to off position. The key lock
function will be disabled.
Select Background Color:
1.
Set the key lock switch to “LOCK>” position.
2.
Press and hold both “Vol-” button and “SCAN”
Scroll Wheel button for 2 seconds, color
background options will be shown on the
screen.
3.
Select the background color by scrolling up
and down the “SCAN” Scrolling Wheel button
and then press the “SCAN” Scrolling Wheel
button to confirm.
19
Power Off and Maintenance:
1.
Please shut down the power when not in use.
2.
Please do not wipe it with rough materials.
3.
Remove the battery from the product if it is
not going to be used for a long period of time.
4.
Please do not attempt to open product or
change inner parameter.
*Information of this user manual is subject to
change without prior notice.
20