1
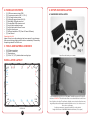
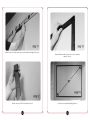
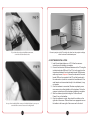
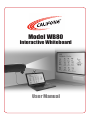
Model WB80
Interactive Whiteboard
User Manual
Model WB80 Interactive
Whiteboard
Thank you for purchasing the Califone® Model WB80 Interactive Whiteboard.
We encourage you to visit our website www.califone.com to register your
product for its warranty coverage, to sign up to receive our
newsletter, download our catalog, and learn more about the complete
line of Califone® audio visual products, including portable and installed
wireless PA systems, multimedia players and recorders, headphones
and headsets, computer peripheral equipment, visual presentation
products and language learning materials.
califone.com
3
1. IMPORTANT SAFETY INSTRUCTIONS
Before using this product, read the instruction manual for important safety
information. Please retain this manual for future reference and warranty
information.
Troubleshooting & Servicing
Do not attempt to service or repair the device yourself. Refer all servicing
to qualified service personnel. Do not attempt to modify the device in any
way. Doing so could invalidate your warranty.
Moisture and heat sources
Do not use this apparatus near water (for example, sinks, baths, pools) or
expose it to rain, moisture, dripping or splashing liquids. Do not expose
the unit to high temperatures, high humidity or direct sunlight.
Cleaning
When cleaning the device, please use a soft, dry cloth. Never use
Benzene, paint-thinner, or other chemicals on the device.
Location
Place the device in stable location, so it will not fall causing damage to
the device or bodily harm.
Intended use
The product may only be used with the original parts intended for it. The
product may only be used in closed and dry rooms. The intended use
includes adherence to the specified installation instructions. The
manufacturer accepts no liability for damage arising due to improper use.
WARNING: Changes or modifications to this unit not expressly approved
by the party responsible for compliance could void the user’s authority to
operate the equipment.
IMPORTANT
This device complies with Part 15 of the FCC Rules. Operation is subject
to the following two conditions:
(1) This device may not cause harmful interference, and (2) this device
must accept any interference received, including interference that may
cause undesired operation.
The unit’s circuitry may cause interference to nearby radios. To prevent
interference, either switch the unit off or move away from the affected
radio.
NOTE: This equipment has been tested and found to comply within the
limits for a class B digital device, pursuant to Part 15 of the FCC Rules.
These limits are designed to provide reasonable protection against
harmful interference in a residential installation. This equipment
generates, uses and can radiate radio frequency energy and, if not
installed and used in accordance with the instructions, may cause
harmful interference to radio communications. However, there is no
guarantee that interference will not occur in a particular installation. If this
equipment does cause harmful interference to radio or television
reception, which can be determined by turning the equipment off and on,
the user is encouraged to try to correct the interference by one or more of
the following measures:
•
•
•
•
Reorient or relocate the receiving antenna.
Increase the separation between the equipment and receiver.
Connect the equipment into an outlet on a circuit different from
that to which the receiver is connected.
Consult the dealer or an experienced radio / TV technician for
help.
NOTE: Shielded cables may be required to be used with this unit to ensure compliance with the Class B FCC limits.
califone.com
califone.com
4
5
2. PACKAGE CONTENTS
4. SETUP AND INSTALLATION
•
•
•
•
•
•
•
•
•
•
•
4.1 HARDWARE INSTALLATION
(1) USB corner sensor piece (R-B)
(3) Corner sensor pieces (L-B, L-U, R-U)
(16) Full-length sensor pieces
(2) Half-length sensor pieces (4 & 4A)
(1) Male-Male USB extension cord
(1) Female-Male USB extension cord
(1) bag of black anodized screws
(1) bag of black plastic Screw Covers
(1) bag of silver screws
(1) Software Installation CD (Draw & Present Software)
(1) User Manual
Unpacking the Unit
Inspect the unit once the packaging has been opened for any damage
that occurred during shipping and contact us immediately. Please keep
the packing material for further use.
3. TOOLS AND MATERIALS NEEDED
•
•
•
•
(1) Phillips screw driver
(1) Level (3’ preferred)
(1) Tape measure
(1) Roll of 1/2” (0.5”) double-sided mounting tape
Unpack box and itemize your contents
INSTALLATION LAYOUT
L-U
9
8
7
6
5
R-U
4A
4
3A
3
2A
2
1A
1
L-B 9A
8A
7A
califone.com
6
6A
5A
R-B
Select wall/whiteboard surface to mount WB80. The WB80 requires a 48” high x 64”
wide area. IMPORTANT: The wall must be flat to ensure the white board sensors have
line-of-sight to each other. The wall can be slightly concave, but should not have any
large bumps that could disrupt the path between the sensors. Use a level to ensure
there are no such bumps.
Use the tape measure to measure from the floor to the desired
califone.com
height of the bottom of the WB80.
Mark the wall 4 times (1 foot apart).
7
Use the level to draw a level line connecting the marks just made on the wall.
Apply all pre-cut strips of (0.5”) double-sided mounting tape to Sensors
califone.com
Remove backing from double-sided tape from the (1) USB corner sensor piece (labeled
“R-B”) and mount to the bottom right hand corner to begin the build onto the level
line created in Step 3.
IMPORTANT: During installation of all modules and corner pieces, be careful to avoid
bending any of the pins. Also, ensure that the modules are properly connected to each
other by ensuring there are no gaps and the tops/sides of the modules are flat and
aligned
with each other.
califone.com
8
9
Pre-cut strips of (0.5”) double-sided mounting tape into the following lengths:
(16) - 12.75” lengths
(2) - 6.25” lengths
(4) - 1” lengths
Return to bottom right hand corner on level line and begin build
upward (Sensors 1- 3). Note the sensor number label located on the
side of each sensor. Refer to the Installation Layout on Page 6 of this manual.
Attach corner sensor “L-B” to Sensor 9A to begin building
upward (use level). Attach sensor 1A upward from left bottom corner piece and
continue with sensors 2A - 3A. Then attach half-sized sensor piece 4A.
Begin build along level line with Sensors 5A - 9A
Attach corner sensor “L-U” to Sensor 4A.
califone.com
califone.com
10
11
Attach Sensor 9 to Top left corner sensor and assemble to the right (Sensors 9-5).
Attach half-sized 4 with corner piece to Sensor 3 and then
attach to Sensor 5.
Attach corner sensor “R-U” to half-sized Sensor 4.
You have now completed installing all sensors.
califone.com
califone.com
12
13
If you desired to make your installation permanent,
screw in the black anodized screws.
Connect a projector to the PC and align the video from the projector to display
within the interactive whiteboard space.
4.2 SOFTWARE INSTALLATION
Once you have installed all the screws, push in the black plastic screw caps to
cover the all the screws to create a nice looking install.
1. Install the included software on a PC. Follow the onscreen
instructions until installation is complete.
2. Connect the Interactive Whiteboard hardware to the PC using the
included male-male USB cord. If the PC is too far away from the
interactive whiteboard, the included male-female USB extension
cable may be used. Important: Ensure the male end of the malefemale USB cord is connected to the PC and the female end to
the male-male cord, which is connected to the whtieboard. If the
male-female cord is connected directly to the whiteboard, it may
not operate.
3. Once the hardware is connected, Windows may display one or
more screens to confirm installation of the hardware. Follow the
onscreen instructions until the hardware installation is complete.
4. Start the software by double clicking the “Califone Draw &
Present” icon on the desktop.
5. Once the software is running, there should be a toolbar on the
right side of the screen. There will also be an appropriate icon on
the taskbar in the lower right of the screen next to the clock.
califone.com
califone.com
14
15
4.3 CALIBRATION
Important: Before operating the interactive whiteboard, calibrate it with
the following steps:
1. Use the PC mouse to right click on the “Califone Draw & Present”
icon on the taskbar in the lower right of the screen. Click “Screen
Calibration (WB80 Interactive Whiteboard)”.
2. As each of the nine crosshair flashes on the screen, use a finger
or pointing device to touch the cooresponding crosshair on the
interactive whiteboard space. After calibrating the nine points, the
crosshairs will disappear from the screen.
3. The interactive whiteboard is now ready to use.
5. BASIC OPERATION
Use this to “blank” the screen, causing it to go black. Select it again to unblank
the screen.
Use this function to hide upper and lower parts of the screen. Reposition the
window using the arrows on the top, bottom. Select this function again to
resume the normal display.
Opens a Clock/Timer function. Right click on the clock for further options.
Use this function for recording a session. Recordings will be saved in avi format
in the WB80 application directory in the CapMovie folder. NOTE: This function is
not available in Windows Vista or Windows 7.
Use this function to save a snapshot of the current screen. Images will be saved
as a jpeg file. A dialog box will open so the user may choose where to save the
file.
Open a dialog box to adjust settings.
5.1 INTERACTIVE WHITEBOARD OPERATION
Use the interactive whiteboard as a mouse on a PC by touching/
dragging along the interactive whiteboard space with a finger or pointing
device.
NOTES:
• “Left click” must be pressed while using the pen/eraser/magnifier/
focus functions.
• Right click on the background to change additional settings such as
zoom and transparency.
5.2 SOFTWARE OPERATION
The software included with the WB80 has several functions which
can be accessed by touching the icons on the right side of the screen. The
functions are as follows:
Icon
Function
Show/hide whiteboard.
Select to use red color pen to draw on whiteboard/desktop.
Select to use blue color pen to draw on whiteboard/desktop.
Select to use multi-color pen to draw on whiteboard/desktop.
Select to use an eraser on whiteboard/desktop.
Magnify parts of the screen. Select this function again to resume the normal
display.
Mouse Left & Right Click Options:
1. Using the PC mouse or interactive whiteboard, right click the
“Califone Draw & Present” icon on the taskbar in the lower right
of the screen. Several items will be shown, including:
2. “Keep Left Mouse Key Down”: By default this is enabled, causing
the mouse left click button to effectively be constantly pressed
when pointing on the interactive whiteboard. This is useful for
drawing. Disable this option so the mouse left click event will not
occur using the interactive whiteboard. This mode is useful for
simply pointing to items on the screen.
3. “Simulate mouse Right key”: By default this is enabled, causing
the mouse right click to happen if a finger/pointer is held on
the same spot on the screen for more than 2 seconds. Disable
this option allows the user to hold the pointer in the same spot
constantly without enacting a right click event.
Use this function to focus on certain parts of the screen. Resize the window
using the arrows on the top, bottom, left and right. Select this function again to
resume the normal display.
califone.com
califone.com
16
17
6. TROUBLESHOOTING
Not working
•
•
•
•
•
•
•
8. WARRANTY
Ensure the software is properly installed.
After installation of the software, try restarting
the PC.
Ensure the whiteboard/software has been
properly calibrated.
Ensure the sensors are installed in the exact
layout as shown in the user manual (on page 6).
Ensure none of the module pins are bent and
modules are properly seated to each other (no
gaps, etc.)
Ensure all USB plugs are properly connected to
each other and to the computer’s USB port.
If using the male-female USB extension cord,
make sure it’s connected to the PC and then
to the male-male cord, whcih is connected to
the whiteboard. If the male-female USB cord is
connected directly to the whiteboard, it may not
operate.
Software does not show that the
whiteboard is connected
•
Try disconnecting and reconnecting the
whiteboard to the PC.
Mouse pointer does not move on
the screen as intended.
•
Try recalibrating the whiteboard/software.
Califone warrants this product to be free from defective material
and workmanship for one year from the purchase date. Our “Project
Intercept” Customer Satisfaction program will replace defective parts and
repair malfunctioning equipment under this warranty when the defect
occurs under normal use.
All Damage Claims Must Be Made With the Freight Carrier
Notify the freight carrier immediately if you observe any damage to the
shipping carton or product. Repack the unit in the carton and await
inspection by the carrier’s claim agent. Notify your dealer of the pending
freight claim.
Returning Your Unit for Service or Repairs
Should your unit require service, contact our Customer Service
Department online at califone.com/techsupport or via email warranty@
califone.com or by phone at 800-722-0500 / 818-407-2400 to first obtain
an RA (Return Authorization) number before returning it to Califone. The
unit must be returned to our factory via prepaid transportation only after
the factory issues an RA number, which must be clearly written on the
outside of the box.
7. SPECIFICATIONS & FEATURES
Power Requirement
Uses USB power
Sensor Type
Infrared
Whiteboard Area
80” diagonal (48” Height x 64” Width)
Resolution
4096 x 4096 Points (Precision <2mm)
Response Time
Initial: < 25 ms
Continuous Use: < 16 ms
Max Cursor Speed
180 Points / sec
Operating System Compatibility
Windows 2000/XP/Vista/Windows 7 32-bit
& 64-bit
Product Dimensions
48” x 64” x 0.5” (installed)
Product Weight (incl. accessories)
5 lbs.
califone.com
califone.com
18
19
Califone® International, Inc.
1145 Arroyo Avenue, #A
San Fernando, CA 91340 USA
Toll Free 800.722.0500 | Toll Free Fax 877.402.2248
International Customers call 818.407.2400 or Fax 818.407.2405
califone.com
Califone WB80 Rev 01 0511