1
Sun Role Manager 4.1
Administration Guide
Sun Microsystems, Inc.
4150 Network Circle
Santa Clara, CA 95054
U.S.A.
Part No: 820-5758
September 2008
©2008 Sun Microsystems, Inc. 4150 Network Circle Santa Clara, CA 95054 U.S.A.
Sun Microsystems, Inc. has intellectual property rights relating to technology embodied in the product that is described in this document. In particular, and without
limitation, these intellectual property rights may include one or more U.S. patents or pending patent applications in the U.S. and in other countries.
U.S. Government Rights – Commercial software. Government users are subject to the Sun Microsystems, Inc. standard license agreement and applicable provisions of
the FAR and its supplements.
This distribution may include materials developed by third parties.
Parts of the product may be derived from Berkeley BSD systems, licensed from the University of California. UNIX is a registered trademark in the U.S. and other
countries, exclusively licensed through X/Open Company, Ltd.
Sun, Sun Microsystems, the Sun logo, the Solaris logo, the Java Coffee Cup logo, docs.sun.com, Java, JDBC, and Solaris are trademarks or registered trademarks of Sun
Microsystems, Inc. in the U.S. and other countries. All SPARC trademarks are used under license and are trademarks or registered trademarks of SPARC International,
Inc. in the U.S. and other countries. Products bearing SPARC trademarks are based upon an architecture developed by Sun Microsystems, Inc. FireWire is a trademark
of Apple Computer, Inc., used under license. Netscape and Netscape Navigator are trademarks or registered trademarks of Netscape Communications Corporation.
Mozilla is a trademark or registered trademark of Netscape Communications Corporation in the United States and other countries. PostScript is a trademark or
registered trademark of Adobe Systems, Incorporated, which may be registered in certain jurisdictions. OpenGL is a registered trademark of Silicon Graphics, Inc.
ORACLE is a registered trademark of ORACLE CORPORATION.
The OPEN LOOK and SunTM Graphical User Interface was developed by Sun Microsystems, Inc. for its users and licensees. Sun acknowledges the pioneering efforts
of Xerox in researching and developing the concept of visual or graphical user interfaces for the computer industry. Sun holds a non-exclusive license from Xerox to
the Xerox Graphical User Interface, which license also covers Sun's licensees who implement OPEN LOOK GUIs and otherwise comply with Sun's written license
agreements.
Products covered by and information contained in this publication are controlled by U.S. Export Control laws and may be subject to the export or import laws in other
countries. Nuclear, missile, chemical or biological weapons or nuclear maritime end uses or end users, whether direct or indirect, are strictly prohibited. Export or
reexport to countries subject to U.S. embargo or to entities identified on U.S. export exclusion lists, including, but not limited to, the denied persons and specially
designated nationals lists is strictly prohibited.
DOCUMENTATION IS PROVIDED “AS IS” AND ALL EXPRESS OR IMPLIED CONDITIONS, REPRESENTATIONS AND WARRANTIES,
INCLUDING ANY IMPLIED WARRANTY OF MERCHANTABILITY, FITNESS FOR A PARTICULAR PURPOSE OR NON-INFRINGEMENT, ARE
DISCLAIMED, EXCEPT TO THE EXTENT THAT SUCH DISCLAIMERS ARE HELD TO BE LEGALLY INVALID.
Sun Microsystems, Inc. détient les droits de propriété intellectuelle relatifs à la technologie incorporée dans le produit qui est décrit dans ce document. En particulier, et
ce sans limitation, ces droits de propriété intellectuelle peuvent inclure un ou plusieurs brevets américains ou des applications de brevet en attente aux Etats-Unis et dans
d'autres pays.
Cette distribution peut comprendre des composants développés par des tierces personnes.
Certaines composants de ce produit peuvent être dérivées du logiciel Berkeley BSD, licenciés par l'Université de Californie. UNIX est une marque déposée aux EtatsUnis et dans d'autres pays; elle est licenciée exclusivement par X/Open Company, Ltd.
Sun, Sun Microsystems, le logo Sun, le logo Solaris, le logo Java Coffee Cup, docs.sun.com, Java, JDBC, et Solaris sont des marques de fabrique ou des marques
déposées de Sun Microsystems, Inc. aux Etats-Unis et dans d'autres pays. Toutes les marques SPARC sont utilisées sous licence et sont des marques de fabrique ou des
marques déposées de SPARC International, Inc. aux Etats-Unis et dans d'autres pays. Les produits portant les marques SPARC sont basés sur une architecture
développée par Sun Microsystems, Inc. FireWire est une marque de Applex Computer, Inc., utilisé sous le permis. Netscape est une marque de Netscape
Communications Corporation. Netscape Navigator est une marque de Netscape Communications Corporation. Mozilla est une marque de Netscape Communications
Corporation aux Etats-Unis et à d'autres pays. PostScript est une marque de fabrique d'Adobe Systems, Incorporated, laquelle pourrait être déposée dans certaines
juridictions. OpenGL est une marque d?pos?e de Silicon Graphics, Inc. ORACLE est une marque d'pos'e registre de ORACLE CORPORATION.
L'interface d'utilisation graphique OPEN LOOK et Sun a été développée par Sun Microsystems, Inc. pour ses utilisateurs et licenciés. Sun reconnaît les efforts de
pionniers de Xerox pour la recherche et le développement du concept des interfaces d'utilisation visuelle ou graphique pour l'industrie de l'informatique. Sun détient une
licence non exclusive de Xerox sur l'interface d'utilisation graphique Xerox, cette licence couvrant également les licenciés de Sun qui mettent en place l'interface
d'utilisation graphique OPEN LOOK et qui, en outre, se conforment aux licences écrites de Sun.
Les produits qui font l'objet de cette publication et les informations qu'il contient sont régis par la legislation américaine en matière de contrôle des exportations et
peuvent être soumis au droit d'autres pays dans le domaine des exportations et importations. Les utilisations finales, ou utilisateurs finaux, pour des armes nucléaires, des
missiles, des armes chimiques ou biologiques ou pour le nucléaire maritime, directement ou indirectement, sont strictement interdites. Les exportations ou
réexportations vers des pays sous embargo des Etats-Unis, ou vers des entités figurant sur les listes d'exclusion d'exportation américaines, y compris, mais de manière
non exclusive, la liste de personnes qui font objet d'un ordre de ne pas participer, d'une façon directe ou indirecte, aux exportations des produits ou des services qui sont
régis par la legislation américaine en matière de contrôle des exportations et la liste de ressortissants spécifiquement designés, sont rigoureusement interdites.
LA DOCUMENTATION EST FOURNIE "EN L'ETAT" ET TOUTES AUTRES CONDITIONS, DECLARATIONS ET GARANTIES EXPRESSES OU
TACITES SONT FORMELLEMENT EXCLUES, DANS LA MESURE AUTORISEE PAR LA LOI APPLICABLE, Y COMPRIS NOTAMMENT TOUTE
GARANTIE IMPLICITE RELATIVE A LA QUALITE MARCHANDE, A L'APTITUDE A UNE UTILISATION PARTICULIERE OU A L'ABSENCE DE
CONTREFACON.
Table of Contents
Who should read this guide.............................................................................................................9
Documentation Conventions.........................................................................................................10
Chapter 1 Role Manager Introduction.................................................................................................11
Identity Warehouse...................................................................................................................12
Role Engineering and Management.........................................................................................12
Identity Certification..................................................................................................................13
Identity Auditing........................................................................................................................13
Chapter 2 My Settings..........................................................................................................................15
My Profile...................................................................................................................................15
Change Password.....................................................................................................................16
My Proxy Assignments.............................................................................................................17
Chapter 3R ole Manager Configuration...............................................................................................19
System Configuration....................................................................................................................19
Proxy Assignment Notification.................................................................................................19
Mail Server Settings..................................................................................................................20
Role Manager Server Settings..................................................................................................20
Namespaces..............................................................................................................................20
Attribute Categories..................................................................................................................24
Attributes...................................................................................................................................25
Glossary.....................................................................................................................................29
Provisioning Servers.................................................................................................................33
Identity Certification..................................................................................................................38
Configure Email Notifications...................................................................................................40
Configure Revoke Action..........................................................................................................41
Configure Reporting Changes..................................................................................................42
Security......................................................................................................................................42
Chapter 4 Role Manager Security........................................................................................................45
System Privileges......................................................................................................................45
Business Privileges..................................................................................................................49
Role Manager Roles..................................................................................................................50
Role Manager User....................................................................................................................53
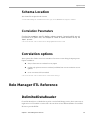
Chapter 5 Data Correlation..................................................................................................................57
5
Introduction....................................................................................................................................57
Correlation Rules...........................................................................................................................57
Examples........................................................................................................................................59
Manual Correlation.........................................................................................................................59
Chapter 6 Role Manager Logging........................................................................................................65
Review Audit Logs....................................................................................................................65
Review System Logs.................................................................................................................69
Chapter 7 Role Manager ETL Process................................................................................................73
Introduction....................................................................................................................................73
Transformation Process...........................................................................................................74
Transformation Graphs.............................................................................................................74
Metadata....................................................................................................................................75
Node...........................................................................................................................................76
Edge...........................................................................................................................................77
Phase.........................................................................................................................................77
Role Manager CloverETL extensions.......................................................................................77
Transformation Configuration..................................................................................................78
ETL Graphs Location................................................................................................................78
ETL Drop Location....................................................................................................................78
ETL Complete Location............................................................................................................78
ETL Output Location.................................................................................................................78
Import Process...............................................................................................................................79
Schema Files.............................................................................................................................79
Import process Configuration..................................................................................................79
Maximum Concurrent Imports..................................................................................................80
Maximum Errors Limit...............................................................................................................80
Batch Size..................................................................................................................................80
Drop Location............................................................................................................................80
Complete Location....................................................................................................................80
Schema Location.......................................................................................................................81
Correlation Parameters.............................................................................................................81
Correlation options...................................................................................................................81
Role Manager ETL Reference........................................................................................................81
DelimitedDataReader ...............................................................................................................81
DelimitedDataWriter .................................................................................................................82
ExcelDataReader ......................................................................................................................82
Transformation Examples..............................................................................................................82
Merge.........................................................................................................................................82
Filter...........................................................................................................................................83
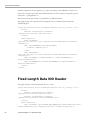
Fixed Length Data NIO Reader.................................................................................................84
Database Input .........................................................................................................................85
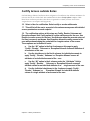
Chapter 8 Identity Certifications..........................................................................................................91
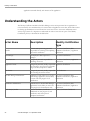
Understanding the Actors..............................................................................................................92
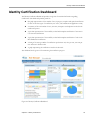
Identity Certification Dashboard....................................................................................................93
New Identity Certification...............................................................................................................94
View and Search Certifications....................................................................................................101
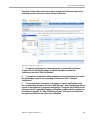
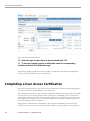
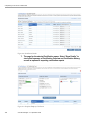
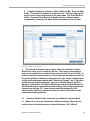
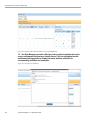
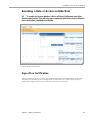
Completing a User Access Certification.....................................................................................104
Step2........................................................................................................................................108
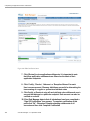
Completing a Role Entitlement Certification...............................................................................113
Completing an Application Owner Certification.........................................................................117
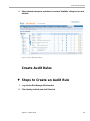
Chapter 9 Identity Audit.....................................................................................................................121
Introduction..................................................................................................................................121
Audit Rules and Policies..............................................................................................................122
Create Audit Rules and Audit Policies...................................................................................122
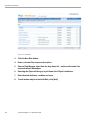
Create Audit Rules..................................................................................................................123
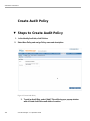
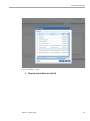
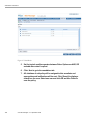
Create Audit Policy..................................................................................................................126
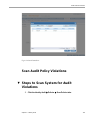
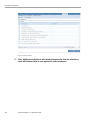
Scan Audit Policy Violations..................................................................................................129
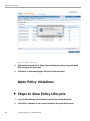
Open Policy Violations............................................................................................................132
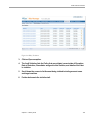
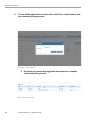
Manage Life-Cycle of Audit Violation.....................................................................................134
Chapter 10 Role Manager Scheduling...............................................................................................137
UI Based Import/Export Scheduler.........................................................................................138
File Based Import/Export Scheduler......................................................................................141
Scheduling Certifications............................................................................................................145
Scheduling Reports......................................................................................................................145
Scheduling Reminder Emails......................................................................................................148
Scheduling Role Mining Task......................................................................................................149
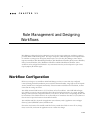
Chapter 11 Role Management and Designing Workflows................................................................153
Workflow Configuration...............................................................................................................153
Workflow Design: Assign Policy and Role Owners....................................................................155
Workflow Design: Add a Step......................................................................................................157
Role Versioning............................................................................................................................161
Role History..................................................................................................................................165
Role Status...................................................................................................................................170
Chapter 12 Role Provisioning Rules (Rule-Based Role Assignment) and Role Consolidation.....173
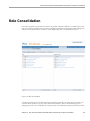
Role Consolidation.......................................................................................................................177
Load/Unload Data From Database...............................................................................................179
How CloverETL Works with Databases..................................................................................179
DBConnection.........................................................................................................................179
Mapping JDBC data types onto Clover types........................................................................180
JDBC to CloverETL.................................................................................................................181
CloverETL to JDBC.................................................................................................................182
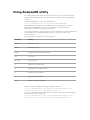
Using AnalyzeDB utility...............................................................................................................183
DBInputTable component............................................................................................................184
DBOutputTable component.........................................................................................................184
Executing SQL/DML/DDL Statements against DB......................................................................186
DBExecute Component...........................................................................................................186
Representation of Data within CloverETL...................................................................................189
What Types of Data Fields CloverETL Supports........................................................................189
Specification of Record Format...................................................................................................191
Naming.....................................................................................................................................191
Delimiters......................................................................................................................................192
Field Formats and Other Features...............................................................................................192
nullable....................................................................................................................................192
format.......................................................................................................................................193
Number Format........................................................................................................................196
Locale.......................................................................................................................................196
Specifying Default Values for Fields...........................................................................................196
Preface
Who should read this guide
The Sun Role Manager 4.1 Administration Guide is intended for use by service providers, deployment
engineers and system administrators who are responsible for installing the SunTM Role Manager software
(formerly Vaau's RBACx product) on the target systems and administering it.
9
Preface
Documentation Conventions
The following conventions are used in this guide.
10
Information in …
Indicates …
<Italics_Brackets>
A variable that you must enter or select
<RBACX_HOME>
A variable whose value is name of the directory where Role
Manager is installed
“Bold”
Information that you must type exactly as shown
Bold Italics
An option on the toolbar or Menu that you must select
[Square Brackets]
A button you must click
Sun Role Manager 4.1 · September 2008
1
1
C H A P T E R
1
Role Manager Introduction
Figure 1-1 Role Manager
Sun Microsystems understands that organizations today need to be in complete control of their enterprise
security. The SunTM Role Manager 4.1 software (formerly Vaau's RBACx product) addresses all aspects of
Role Based Access Control (RBAC), enabling an enterprise to quickly and effectively embrace new
opportunities, improves operational efficiencies, reduce costs, and proactively manage virtually all security
threats and risks to the IT security of the organization. The Sun Role Manager software (Role Manager)
contains areas that are grouped as follows: Identity Warehouse, Role Engineering & Management, Identity
Certification and Identity Auditing.
iis11
Role Manager Introduction
Identity Warehouse
The Role Manager Identity Warehouse captures and stores relevant entitlement data from systems
containing a simple to a complex entitlement structure. These entitlement feeds are imported on a
scheduled basis and Role Manager accommodates an n-level entitlement structure which can be stored in
the Role Manager data repository. Role Manager has an import engine which supports complex entitlement
feeds from a text or xml file and also includes ETL (Extract, Transform, Load) processing capabilities. Role
Manager also captures the glossary description of each entitlement and this can be inputted as a separate feed
to Role Manager. Glossary information provides business descriptions that are associated with the raw
entitlement data for improved usability and understandability. The complete entitlement data can be
correlated during the certification phase and the entitlement hierarchy can be shown as part of the drilldown entitlements.
Role Engineering and Management
One of the most challenging problems in managing large networks is the complexity of security
administration. Role based access control (also called role based security) has become the predominant
model for advanced access control because it reduces the complexity and cost of security administration in
large networked applications. Most information technology vendors have incorporated RBAC into their
product line, and the technology is finding applications in areas ranging from health care to defense, in
addition to the mainstream commerce systems for which it was designed.
Role Based Access Control (RBAC) is emerging as an alternative to traditional access control methodologies
as it established a framework to facilitate management of users and information assets across an enterprise
in a controlled and effective manner. The primary concept of RBAC is that access to information assets is
assigned by using pre-defined roles and approved roles.
Role Manager provides a complete mechanism to define roles which are based on different access levels on
different platforms. Role can be defined based on the collected user entitlements or can be generated using
the software's Role Mining Interface. The Role Mining component in Role Manager uses sophisticated
algorithms to generate roles based on user entitlements and the cuts the role definition time to about 50 %.
Role Manager offers an enhanced workflow engine to manage the lifecycle of roles; this new workflow
engine provides the ability to design various workflow processes and also allows users to call external
functions from the workflow. It also provides a complete setup of security, workflow and auditing features
to manage the lifecycle of rules. This functionality will help companies obtain greater efficiencies from a
role-based access control model. Multiple rules to assign new and existing users specific role based access
can be defined in Role Manager. The rule management feature provides a robust rule creation engine with a
vast combination of user attributes (such as job codes, department, location, etc.) and multiple conditions to
assign and de-assign roles from users.
12
Sun Role Manager 4.1 · September 2008
Role Manager Introduction
Identity Certification
Managing enterprise-wide attestation is a major challenge. Organizations must align a strategy to provide
review of granular entitlements of a user’s access within the organization to the user’s manager(s). Today,
there are various challenges involving this with a single user having access to a multitude of platforms,
systems, and applications. Organizations must be able to manage increasing costs associated with gathering
the user entitlements and distributing them across to managers. They must also be able to manage increased
security risks associated with the escalating volume of gathering and distributing these entitlements. Also
federal requirements mandate the needs to address Time-Based Certifications, Granular Entitlements,
certify Contractors on Unique Schedules, Set Baseline and Certify Incremental Changes and provide a
Certification Dashboard of all the certifications issued.
To help ensure all the above needs Role Manager provides an Identity Certification module which enables
easy handling of the collecting and distributing user entitlements and provides scheduled certifications on
these entitlements. In addition, Role Manager provides a unique features which allows user to certify on
granular entitlements and entitlements which are outside of user roles. Furthermore, business friendly
glossary names can be stored and displayed for each entitlement during certification and can be stored in
Role Manager.
This powerful Identity Certification module is further extended in Role Manager to provide the ability to
perform certifications at the instance or server level of a resource, providing advanced drill down capabilities
for users, and advanced filtering and searching capabilities on the certification interface.
The Role Manager Identity Certification module has three important Certification types:
1.
2.
3.
User Access Certification: Allows certifier to certify role and entitlements associated with a user
Role Entitlement Certification: Allows role owners to certify roles and role content
Application Certification: Allows application owners to certify entitlements pertaining to an
application narrowed down by each instance of the application
Identity Auditing
Exception Monitoring is an integral piece of Identity Auditing and Management. In organizations today,
there are numerous exceptions of user accounts on various target systems. A detective mechanism to
monitor and acquire exceptions is needed in organizations where a centralized store for all the exceptions
would be available. Organizations must be able to manage Continuous Exception Monitoring, Segregation
of Duty (SoD) Violations, Detective Scanning, Inter & Intra-Application SoD Enforcement, Actual vs.
Assigned Exceptions, Exception Lifecycle Management. All the above exceptions can be captured in Role
Manager and produced in a central repository. Role Manager provides the capability to define Audit policies
and the ability to capture / report any exceptions from these policies.
Role Manager provides a Compliance Dashboard for Executives and Auditors which enable them to
monitor these exceptions from a central point. Additionally, the various exceptions generated are stored in
Role Manager and a security analyst can accept them or mitigate these risks and exceptions.
Chapter 1 · Role Manager Introduction
13
2
2
C H A P T E R
2
My Settings
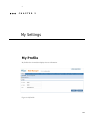
My Profile
My Profile tab as shown below displays the user information.
Figure 2-1 My Profile
iis15
My Settings
Change Password
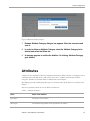
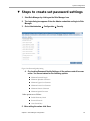
This option is used to change the password of the current user.
▼ Steps to change password
1. Start Role Manager by clicking on the Role Manager Icon
2. The login dialog box appears. Enter the Admin credentials and login to
Role Manager
3. Go to My Settings My Profile Change Password tab
Figure 2-2 Change Password
4. Enter the values required and click on save.
16
Sun Role Manager 4.1 · September 2008
My Settings
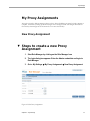
My Proxy Assignments
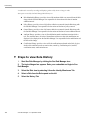
This option is used to delegate managers when on leave. These Guidelines are created to help a manager to
complete certificates by setting up another manager on the manager's behalf. The delegate should be set
from the day that manager leaves and cannot be set to more than 30 days.
New Proxy Assignment
▼ Steps to create a new Proxy
Assignment
1. Start Role Manager by clicking on the Role Manager Icon
2. The login dialog box appears. Enter the Admin credentials and login to
Role Manager
3. Go to My Settings My Proxy Assignment New Proxy Assignment
Figure 2-3 New Proxy Assignments
Chapter 2 · My Settings
17
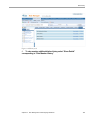
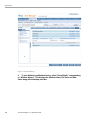
My Settings
4. A form as shown above comes up. Enter your Name, Description; select
your delegate, Start Date and End Date.
Figure 2-4 New Proxy Assignments Form
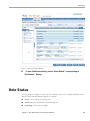
5. Click Ok.
6. A new Proxy Assignment will be created.
Figure 2-5 List of New Proxy Assignments
18
Sun Role Manager 4.1 · September 2008
3
3
C H A P T E R
3
Role Manager Configuration
System Configuration
Proxy Assignment Notification
This option enables email notifications to be sent to the users who have been set as proxy using the My
Settings New Proxy Assignment tab.
An email Template can be selected for the proxy user.
Figure 3-1 Proxy Assignment Notification
iis19
System Configuration
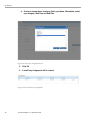
Mail Server Settings
This option helps in setting up the mail server.
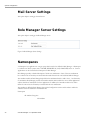
Role Manager Server Settings
This option helps in setting up the Role Manager server.
Figure 3-2 Role Manager Server Settings
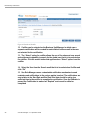
Namespaces
A Namespace is an application or a target system which needs to be defined in Role Manager. A Namespace
is a collection of all the systems such as UNIX®, WINDOWS NT, SAP, ORACLE®, and so on. Custom
Applications can also be defined as Namespaces in Role Manager.
Role Manager provides a detailed description of all the user entitlements. Some of the user entitlements
have various levels of hierarchy associated with them and all these levels can be defined in Role Manager.
The metadata module in Role Manager helps define the entitlement details as well as the n – level hierarchy
of entitlements. Role Manager provides the metadata module which enables the user to define applications
and the detail list of entitlements for these applications. In addition, the metadata model can be used to
define the various levels of hierarchy associated with the user entitlements.
The metadata is defined in Role Manager through the Configuration section and the order in which the
attributes need to be defined for the metadata are:
Namespaces
Attribute Categories
Attributes
20
Sun Role Manager 4.1 · September 2008
System Configuration
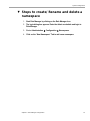
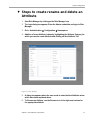
▼ Steps to create/ Rename and delete a
namespace
1. Start Role Manager by clicking on the Role Manager Icon
2. The login dialog box appears. Enter the Admin credentials and login to
Role Manager
3. Go to Administration Configuration Namespaces
4. Click on the “New Namespace” Tab to add a new namespace
Chapter 3 · Role Manager Configuration
21
System Configuration
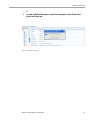
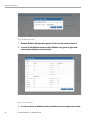
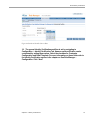
Figure 3-3 New Namespace
5. A dialog box appears where the user needs to enter the Name of the new
Namespace along with the Short Name of the Namespace which is a 3
letter abbreviation.
6. To Rename a Namespace, highlight a namespace and click on Rename tab.
Figure 3-4 Rename Namespace
7. Rename Namespace dialogue box appears. Enter the new name and save
22
Sun Role Manager 4.1 · September 2008
System Configuration
it.
8. In order to Delete Namespace select the namespace to be deleted and
select the Delete tab.
Figure 3-5 Delete Namespace
Chapter 3 · Role Manager Configuration
23
System Configuration
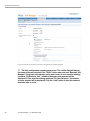
9.
A message appears to confirm the deletion. On Clicking namespace gets
deleted.
Attribute Categories
Attributes are entitlements which need to be defined for every user. Attributes are grouped into Attribute
Categories. Each Attribute Category is defined by a set of similar attributes. Attribute Categories are
uniquely defined in a Namespace
▼ Steps to create rename and delete an
Attribute Category
1. Start Role Manager by clicking on the Role Manager Icon
2. The login dialog box appears. Enter the Admin credentials and login to Role
Manager
3. Go to Administration G Configuration
Namespaces
4. Addition of a new Attribute Category is done by highlighting the Namespace
for which you need to create Attribute Category and clicking on New
Attribute Category Tab.
5. A dialog box appears where the user needs to enter the Name of the new
Attribute Category along with the category order.
6. To Rename an Attribute Category, highlight the Attribute Category and click
on Rename tab.
24
Sun Role Manager 4.1 · September 2008
System Configuration
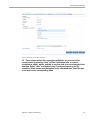
Figure 3-6 Rename Attribute Category
7. Rename Attribute Category dialogue box appears. Enter the new name and
save it.
8. In order to delete an Attribute Category select the Attribute Category to be
deleted and select the Delete tab.
9. A message appears to confirm the deletion. On clicking Attribute Category
gets deleted.
Attributes
Attributes are the entitlements under each namespace which map to different objects in a namespace such as
a Database name in MS SQL Server, UID in Unix and so forth. Attributes are listed under Attribute
Categories. Attributes are the fields which are defined under each namespace.
Role Manager provides a detailed properties page of an attributes where all the details of an attribute can be
defined.
The various parameters which are used to define an attribute are:
Table 3-1 Attribute Parameters
Name
Name of the attribute
Description
Description of the attribute
Min Length
The minimum length which can be specified for an attribute
Chapter 3 · Role Manager Configuration
25
System Configuration
Max Length
The Maximum length which can be specified for an attribute
Case
Specifies whether the attribute value can be upper / lower case
Edit Type
Specifies the data type of the attribute
Order
Specifies the order in which the attribute is listed or imported
Min Value
The minimum value that the attribute can have
Max Value
The maximum value that the attribute can have
Default Value
The default value an attribute can have when it is imported
Values
A predefined list of values that the attribute can have
Label
The display label for the attribute
In addition to these parameters there are a set of flags which can be defined for an attribute
26
Space Allowed
Allows the attribute values to have a space in them
Multiple Value
Allows an attribute to have a comma separated multiple values
Hidden
The attribute value can be hidden (for password fields)
Managed
To display an attribute or import it, the managed flag needs to be set for the attribute
Auditable
This allows the attribute to be checked for audit exceptions
Minable
This allows Role Manager to run its mining algorithms over this attribute to produce
roles.
Mandatory
This flag when selected specifies all the privileges for the attribute such as managed,
importable etc.
Importable
This allows the attribute to be imported from a CSV / Text File
Sun Role Manager 4.1 · September 2008
System Configuration
▼ Steps to create rename and delete an
Attribute
1. Start Role Manager by clicking on the Role Manager Icon
2. The login dialog box appears. Enter the Admin credentials and login to Role
Manager
3. Go to Administration Configuration Namespaces
4. Addition of a new Attribute is done by highlighting the Attribute Category for
which you need to create Attribute and clicking on New Attribute Tab.
Figure 3-7 New Attribute
5. A dialog box appears where the user needs to enter the New Attribute values
which have been explained above.
6. To Rename an Attribute, use the Rename icon in the right most column for
the appropriate attribute
Chapter 3 · Role Manager Configuration
27
System Configuration
Figure 3-8 Rename Attribute
7. Rename Attribute dialogue box appears. Enter the new name and save it
8. In order to Edit Attribute,select the Edit Attribute icon given in right most
column and modify the required values
Figure 3-9 Edit Attribute
9. In order to delete an Attribute select the Delete icon in the right most column
28
Sun Role Manager 4.1 · September 2008
System Configuration
of the attribute
Figure 3-10 Delete Attribute
10. A message appears to confirm the deletion. On clicking Attribute gets deleted.
Glossary
Most of the values for Attributes and Resources do not make sense to a User’s Manager. User Friendly
names for all attributes and resources can be defined under the Glossary . The Metadata defines the schema
of the data to be represented in Role Manager.
A complete list of all the attribute and resource values along with their friendly names can be listed from the
‘Glossary’ section in Role Manager.
▼ Steps to create and modify Glossary
1. Start Role Manager Java Applet by clicking on the Role Manager Java Applet
Icon
2. The login dialog box appears. Enter the Admin credentials and login to Role
Manager
3. Go to Identity Warehouse -> Endpoints
Chapter 3 · Role Manager Configuration
29
System Configuration
Figure 3-11: View Endpoints
4. This gives a list of all the endpoints in the identity warehouse. Select the
endpoint for which an attribute value is to be modified in the glossary by
clicking on the Endpoint. Select the Data Management Tab
30
Sun Role Manager 4.1 · September 2008
System Configuration
Figure 3-12 Data Management
5. This gives a list of all the attributes associated with the endpoint. Select the
attribute one of whose value's in to be modified in the glossary. A complete
list of attribute values will be listed on the right pane.
Chapter 3 · Role Manager Configuration
31
System Configuration
6. To give a new glossary value to an attribute value click on the attribute value
Figure 3-13 Attribute Value Details
7. Attribute Value Details box opens up. A user friendly value can be specified
for the attribute in the “Glossary” field. A Data Owner van also be selected
for the attribute value. Select the icon in the Data Owner field to get a User
Selection box. Select “Ok” when all the values in this window have been
selected
32
Sun Role Manager 4.1 · September 2008
System Configuration
Figure 3-14 Attribute Value Details
8. The user friendly value is now set as the glossary value for the attribute
value. It can be used to provide information about the attribute value in more
user friendly terms to the end user and can be leveraged in decision making
in during various processes like certification, role mining etc
9. Similar to Attribute Glossary, a Resource Glossary can be defined by
selecting a Resource under an Attribute. The resource values, along with the
glossary definition are listed on the right pane.
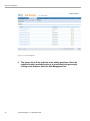
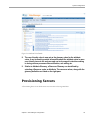
Provisioning Servers
A Provisioning Server is one which creates user accounts on the target machines.
Chapter 3 · Role Manager Configuration
33
System Configuration
Figure 3-15 Provisioning Servers
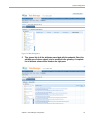
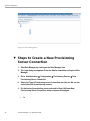
▼ Steps to Create a New Provisioning
Server Connection
1. Start Role Manager by clicking on the Role Manager Icon
2. The login dialog box appears. Enter the Admin credentials and login to Role
Manager
3. Go to Administration Configuration Provisioning Servers New
Provisioning Server Connection
4. Select the Type of Provisioning server Connection and click ok. We can set
connection with 4 provisioning servers.
5. On the basis of provisioning server selected in Step 4 different New
Provisioning Server Connection setup screens are displayed.
a.
34
CA
Sun Role Manager 4.1 · September 2008
System Configuration
Figure 3-16 New provisioning server connection - CA
Table 3- 2 New provisioning server connection – CA
Connection Name
Enter a name for the new connection being created with the CA eTrust Admin. This connection
name is used during import process instead of the Host Name and Port which is difficult to
remember.
Host Name
Enter the Host name
Clear Port
“20380” <Default Value>
TLS Port
“20390” <Default Value>
Domain Name
Enter the name of your domain
User Name
“etaadmin” <default username>
Password
“*******”
Enter the password set for the ETA user
Chapter 3 · Role Manager Configuration
35
System Configuration
b.
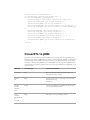
SUN IDM
Figure 3-17 New Provisioning server connection – SUN IDM
Table 3-3 New Provisioning server connection – SUN IDM
Connection Name
Enter a name for the new connection being created with the SUN IDM. This connection name is
used during import process instead of the Host Name and Port which is difficult to remember.
SPML URL
Here, SPML URL pattern is
http://<IDM applicationservername>:<portnumber>/idm/servlet/rpcrouter2
E.g. http://localhost:8080/idm/servlet/rpcrouter2
36
User Name
“configurator” <default username>
Password
“configurator” <default password>
Sun Role Manager 4.1 · September 2008
System Configuration
c.
IBM
Figure 3-18 New Provisioning server connection – IBM
Table 3-4 New Provisioning server connection - IBM
Connection Name
Enter a name for the new connection being created with the IBM. This connection name is used
during import process instead of the Host Name and Port which is difficult to remember. E.G “VAAUTIM”
Host Name
Enter the Host name
Port
“2809” <Default Port Number>
LDAP Context
Enter “ou=vaau, dc=com”
User Name
“itim manager “ <default username>
Password
“secret”
<default password>
Chapter 3 · Role Manager Configuration
37
System Configuration
d.
File
Figure 3-19 New Provisioning server connection – File
Connection Name
Enter a name for the new connection being created. This connection name is used during
import process from a file
Import Drop Location
Give the path of the drop folder where the input file to be imported is put
Import Complete Location
Give the path of complete folder used in import process
Import Schema Location
Give the Path of the schema folder where the schema file for import process is put.
Export Drop Location
Specifies the path of the location where output file will be dropped after the successful export.
Export Schema Location
Give the Path of the schema folder where the schema file for export process is put.
Identity Certification
This section discusses configuration of Identity Certification.
1.
38
Log into the Role Manager Web-Interface using a JavaTM enabled web
browser
Sun Role Manager 4.1 · September 2008
System Configuration
2.
Click on the Administration Configuration tab and then Identity
Certification
Figure 3-20 Identity Certification
This figure details the options available for configuration of how you wish your certification to display
access for attestation. When Roles are defined for your organization, a combination of Certify Roles and
Entitlements outside Roles will allow you to monitor Actual versus Assigned exceptions for a completed
RBAC framework of attestation. Certify on All Entitlements will display all entitlements, even those within
the role, for attestation.
Require Revoke Comments prompts the user for a comment whenever any revoke action is initiated. It also
makes the comment field active in certification of entitlements.
Role Manager supports highly privileged entitlements for certification of system administrators only, for
example: Hierarchical radio button needs to be checked when certifying on hierarchical namespace
attributes.
1.
2.
Select the desired certification configurations based on the
requirements of the organization
Click on the Administration > Configuration tab and then Identity
Certification
3. Select the desired certification configurations based on the
requirements of the organization.
Chapter 3 · Role Manager Configuration
39
System Configuration
Configure Email Notifications
Role Manager supports various notification, reminder, and escalation emails that can be configured in this
screen. Multiple email templates can be defined for each suited purpose. These email templates support
HTML and can be used with variable characters as shown in the following interactive demonstration:
Follow the given steps to Create New Email Template and Configure Email Notifications
1.
From the Web-Interface click on Administration Configuration tab
and then Email Templates
2.
Click on New Email Template
3.
Fill the form using variable entries wherever required
4.
Click [Save]
5.
Return to the Identity Certification Administration Configuration
screen
6.
Select the notifications desired and click on “…” to choose required
email template
7.
Assign the reminder intervals for Pending Certification emails
8.
Click [Save]
Figure 3-21 New Email Template
40
Sun Role Manager 4.1 · September 2008
System Configuration
Figure 3-22 Email Template Details
Configure Revoke Action
Certification can be configured to send appropriate emails along with manager’s comments when user access
is revoked by a manager. Emails can be sent when a manager selects ‘Does Not Work For Me’ or ‘Revoke
Access’ from the roles and entitlements certification screen.
Figure 3-23 Configure Revoke Action
Chapter 3 · Role Manager Configuration
41
System Configuration
Configure Reporting Changes
Reporting actions can be configured by the Reporting Changes options given on the Identity Certification
configuration page. These options are relevant when considering the actions to be taken in the case of
employee verification options “Does Not Work for Me”, “Terminated” and “Works for Some One Else”.
When reporting changes is enabled the details of employees verified by selecting the options mentioned is
recorded separately. Create new certification per reporting manager option creates a new certification for
each user selected as the actual “certifier” by using the “Works for Some One Else” option.
▼ Steps to configure reporting changes
1.
Log into the Role Manager Web-Interface using a JavaTM enabled web
browser
2.
Click on the Administration Configuration tab and then Identity
Certification
3.
Select the checkbox for Enable Reporting Changes
4.
Select the checkbox to record reporting changes if required
5.
Select checkbox for Create new certification per reporting manager to
create new certification for changes in certifier during the certification
process
Security
This tab is used to set the Password policies in Role Manager
42
Sun Role Manager 4.1 · September 2008
System Configuration
▼ Steps to create set password settings
1. Start Role Manager by clicking on the Role Manager Icon
2. The login dialog box appears. Enter the Admin credentials and login to Role
Manager
3. Go to Administration Configuration Security
Figure 3-24 Password Quality Setting
4. On checking Password Quality Settings, all the options under it become
active. You can set values for the following options
Minimum Password Length
Minimum Alphabetic Characters
Minimum Upper Case Characters
Minimum Lower Case Characters
Minimum Numeric Characters
Minimum Special Characters
Other options are as follows:
Enable Dictionary Check
Password Intervals
Grace Period Days
5. After setting the values click Save.
Chapter 3 · Role Manager Configuration
43
4
4
C H A P T E R
4
Role Manager Security
Role Manager Security is based on the principles of Role Based Access Control. It allows users to be
assigned one or more roles, which correspond to different privilege levels within the system. Roles can be
defined by the Role Manager administrator per the requirements of the organization.
There are several System Level and Business Unit Level privileges available in Role Manager that can be
assigned to Role Manager Roles. The System and Business Level privileges are listed in the tables below.
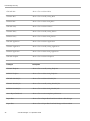
System Privileges
Privileges
Description
CREATE Business Unit
Allows a User to add new Business Units
UPDATE Business Unit
Allows a User to modify existing Business Units
DELETE Business Unit
Allows a User to delete existing Business Units
CREATE Global User
Allows a User to add new Global Users
UPDATE Global User
Allows a User to modify existing Global Users
DELETE Global User
Allows a User to delete existing Global Users
iis45
Role Manager Security
46
CREATE Role
Allows a User to add new Roles
UPDATE Role
Allows a User to modify existing Roles
DELETE Role
Allows a User to delete existing Roles
CREATE Policy
Allows a User to add new Policies
UPDATE Policy
Allows a User to modify existing Policies
DELETE Policy
Allows a User to delete existing Policies
CREATE Application
Allows a User to add new Applications
UPDATE Application
Allows a User to modify existing Applications
DELETE Application
Allows a User to delete existing Applications
CREATE Endpoint
Allows a User to add new Endpoints
Privileges
Description
UPDATE Endpoint
Allows a User to modify existing Endpoints
DELETE Endpoint
Allows a User to delete existing Endpoints
CREATE Schedule Job
Allows a User to add new Schedule Jobs
UPDATE Schedule Job
Allows a User to modify existing Schedule Jobs
DELETE Schedule Job
Allows a User to delete existing Schedule Jobs
Access Report Dashboard
Allows a User to review compliance performance
Import Data
Allows a User to Import Data from ETrust Admin to Role Manager
Export Data
Allows a User to Export Data from Role Manager to ETrust Admin
Sun Role Manager 4.1 · September 2008
Role Manager Security
Configure System
Allows a User to configure the IAM Servers and Attributes
Access to Application view
Allows a User access application view
Access to Audit view
Allows a User access audit view
Access to Business Units view
Allows a User Access to Business Unit view
Access to Endpoints view
Allows a User Access to Endpoint view
Access to Policies view
Allows a User Access to Policies view
Access to Roles view
Allows a User Access to Roles view
Access to Scheduler view
Allows a User Access to Scheduler view
Access to Users view
Allows a User Access to Users view
RBACx Administrator
Allows a User Role Manager Administrator access
Run Business Unit Reports
Allows a User Run Business Unit Reports
Run System Reports
Allows a User Run System Reports
Run Audit Reports
Allows a User Run Audit Reports
Access the Users tab in Business Unit
View
Allows a User Access to the Users tab in Business Unit View
Access the Roles tab in Business Unit
View
Allows a User Access to the Roles tab in Business Unit View
Access the Policies tab in Business Unit
View
Allows a User Access to the Policies tab in Business Unit View
Access the business unit selection tab in
Applications view
Allows a User Access to the business unit selection tab in Application view
Chapter 4 · Role Manager Security
47
Role Manager Security
48
Access the policies tab in Applications
view
Allows a User Access to the policies tab in Application view
Access the global users tab in
Applications view
Allows a User Access to the global users tab in Application view
Access the policies tab in Endpoint view
Allows a User Access to the policies tab in Endpoint view
Access the business Units tab in Roles
view
Allows a User Access to the business Units tab in Roles view
Access the users tab in Roles view
Allows a User Access to the users tab in Roles view
Access the policies tab in Roles view
Allows a User Access to the policies tab in Roles view
Access the exclusion roles tab in Roles
view
Allows a User Access to the exclusion roles tab in Roles view
Access the roles tab in Users view
Allows a User Access to the roles tab in Users view
Access the business Units tab in Users
view
Allows a User Access to the business Units tab in Users view
Access the accounts tab in Users view
Allows a User Access to the accounts tab in Users view
Access the applications tab in Users view
Allows a User Access to the applications tab in Users view
Create IDC Certification
Allows a User to Create a new Identity Certification
Access to IDC view
Allows a User Access to Identity Certification view
Access to Security tab in Thin Client
Allows a User Access to the Security Tab in the Thin Client
Access to Glossary tab in Thin Client
Allows a User Access to the Glossary Tab in the Thin Client
Access to System(audit logs) tab in Thin
Client
Allows a User Access to the System(audit logs) Tab in the Thin Client
Access to Password Configuration tab in
Thin Client
Allows a User Access to the Password Configuration Tab in the Thin Client
Sun Role Manager 4.1 · September 2008
Role Manager Security
Access to Audit Event Logs sub-tab
under System tab in Thin Client
Allows a User Access to the Audit Event Logs sub-tab under System Tab in the
Thin Client
Access to Import Logs sub-tab under
System tab in Thin Client
Allows a User Access to the Import Logs sub-tab under System Tab in the Thin
Client
Access to web service method Find
Users in a given role
Allows a User Access to the web service method Find Users in a given role
Access Policies sub-tab under Identity
Audit tab in Thin Client
Allows a User Access to the Policies sub-tab under Identity Audit Tab in the
Thin Client
Access Rules sub-tab under Identity
Audit tab in Thin Client
Allows a User Access to the Rules sub-tab under Identity Audit Tab in the Thin
Client
Access Policy Violations sub-tab under
Identity Audit tab in Thin Client
Allows a User Access to the Policy Violations sub-tab under Identity Audit Tab
in the Thin Client
Access the Role Management tab in the
Main View
Allows a User Access to the Role Management tab in the main view
Access to My Requests tab in the Main
View
Allows a User Access to the My Requests tab in the main view
Business Privileges
Privileges
Description
Access Business Unit
Allows a user access to Business Unit details
Add child Business Unit to Business Unit
Allows a user to add child Business Units
Add/remove Global User to/from Business Unit
Allows a user to add/remove Global Users
Add/remove Role to/from Business Unit
Allows a user to add/remove Roles
Chapter 4 · Role Manager Security
49
Role Manager Security
Add/remove Policy to/from Business Unit
Allows a user to add/remove Policies
Add/remove Application to/from Business Unit
Allows a user to add/remove Applications
Sign-off Reports
Allows a user to sign-off reports
Certify Entitlements
Allows a user to certify associated entitlements
Privileges are assigned to roles. There are System and Business Unit roles.
System roles are assigned system level privileges.
Business Unit roles are assigned business level privileges.
Roles are assigned to users.
Role Manager Roles
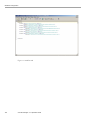
Follow the steps given below to create a New Role:
1. Log in to Role Manager
2. Browse to the Security Tab under Administration
3. Click on Role Manager Roles
4. Click [New Role Manager Role]
Figure 4-1: New Role Manager Role Wizard
5. Enter Role Name and Description. Click [Next]
50
Sun Role Manager 4.1 · September 2008
Role Manager Security
6. Add System Privileges. Select System privileges from left and assign it to the
right side
Figure 4-2 Adding System Privileges
7. Delete a System Privilege. Select the privilege from the list on the right and
click Back[<].
Figure 4-3 Deleting System Privileges
Chapter 4 · Role Manager Security
51
Role Manager Security
8.
Add Business Privileges. To do so, Select System privileges from left and
assign it to the right side
9. Delete Business Privileges. Select the privilege from the list on the right and
click Back [<].
10. Click NEXT when the privilege list is complete to save the new Role
52
Sun Role Manager 4.1 · September 2008
Role Manager Security
Role Manager User
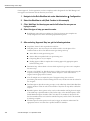
▼ To create/update/delete a Role
Manager user
1. Log in to Role Manager Web-Interface using a JavaTM enabled web
browser.
2. Browse to the Security Tab under Administration
3. Click on [Role Manager Users] [New Role Manager User]
Figure 4-5 Adding New User
4. Complete User Information and click next.
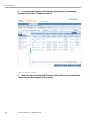
5. Add System Roles. To add system roles, select the role(s) from the list
on the left and click Next [>].
Chapter 4 · Role Manager Security
53
Role Manager Security
Figure 4-6 Adding System Roles to a User
54
Sun Role Manager 4.1 · September 2008
Role Manager Security
6. Remove System Roles. To delete system roles, select the role(s) from the
list on the right and click Back [<].
Figure 4-7 Removing System Role
7. Click Next.
8. Add Business Unit Roles. To add Business Unit roles, select the
Business Unit from left, all the related roles come in the Available
Business unit role(s). Select the role from the list on the top and click the
button.
9. Delete Business Unit Role. To delete a business Unit role assigned to
the user, select the role from Selected Business Unit roles and click on
the other button. It will be taken off from this list and appear in the
Available Business Unit Roles List.
Chapter 4 · Role Manager Security
55
Role Manager Security
10. Once the Roles have been assigned to the user, click Save. A New user will be
created and will appear in the Role Manager Users List.
▼ Steps to modify User Password
1. Log in to Role Manager Web-Interface using a JavaTM enabled web
browser
2. Browse to the Security Tab
3. Click on [Role Manager Users]
4. Select user and select the update password icon.
5. Enter the new password
56
Sun Role Manager 4.1 · September 2008
5
5
C H A P T E R
5
Data Correlation
Introduction
In order to construct the Identity Warehouse in Role Manager, globalusers and their entitlements across
various namespaces and target systems need to be imported in Role Manager. A commonly used method to
import this data is to use the automated Role Manager Import process via flat files. Globalusers need to be
imported in Role Manager first, following which their entitlements in the various namespaces can be
imported as well.
The process of associating globalusers to their entitlements is called correlation. In Role Manager, multiple
correlation rules can be defined in order to accurately associate globalusers to their entitlements. This
chapter lists various rules and examples to correlate globalusers to their entitlements using a combination of
correlation rules and expressions.
Role Manager provides powerful correlation capabilities in the form of manual correlation. This enables a
user to manually correlate accounts that do not have any users associated with them(orphan accounts) as
well as change the association of already correlated accounts
Correlation Rules
Correlation rules are defined in the schema (.rbx) files under the Role Manager schema folder. These
rules, once defined, are evaluated in the same order as found in the schema file. Below is an example of
a schema file with multiple correlation rules:
iis57
Correlation Rules
#
# @iam:namespace name="Summarization" shortName="SUM"
#
# @IdentityCorrelationRule rule="$globalUser.userName=$account.userName"
# @IdentityCorrelationRule rule="$globalUser.FirstName=$account.FirstName"
# @IdentityCorrelationRule rule="$globalUser.LastName=$account.LastName"
# @IdentityCorrelationRule rule="$globalUser.MiddleName=
$account.FirstName(-1.1)$account.LastName "
# @IdentityCorrelationRule rule="$globalUser.userName=[defaultuser]"
userName,endPoint,domain,comments,suspended,locked,name,FunctionCode,FirstName
, MiddleName, LastName
As shown in the example above, the left side of the rule (before the “=” sign) is associated to the
globaluser and the right side of the role is associated to the accounts. Only one attribute can be set at a
time for globalusers (left side of the rule), but any number of expressions can be configured on the right
side for accounts.
The globaluser attribute and the globaluser table column should bear the same name for this feature to
function correctly. For example, “userName” is the attribute that appears in the Role Manager table for
global users and should be named accordingly.
No patterns can be applied to the globaluser attribute, for example:
#globaluser.userName(-10) is not allowed.
When one globaluser accurately meets a certain rule designed for it, the correlation is established
between the user and entitlements and no further expressions are evaluated for that account.
If however, more than one globaluser meets a correlation rule for a given account, the next correlation
rule is evaluated. Subsequently, both results are intersected, and if as result of this intersection, only one
globaluser meets both rules, that globaluser is correlated to the account.
For example, suppose the following rules are configured:
# @IdentityCorrelationRule
# @IdentityCorrelationRule
rule="$globalUser.FirstName=$account.FirstName"
rule="$globalUser.LastName=$account.LastName"
An account has the following attributes, FirstName=”John”, LastName=”Cook”. When evaluating the first
rule, Role Manager may find many globalusers with “John” as FirstName, but when it evaluates the second
rule and the intersection is made, we probably find that only one globaluser meets both rules.
The default correlation rule to associate users to their entitlements on the basis of their user ids is:
$globaluser.userName=$account.userName
Note – The correlation method used in previous versions of Role Manager using the <correlationkey>
tag also works with Role Manager 4.1, so old schema files are not required to be changed.
58
Sun Role Manager 4.1 · September 2008
Examples
Examples
Let us assume a user has the following attributes:
FirstName=”John”
LastName=”Cook”
Various pattern matching scenarios can be created in order to match the users to their entitlements. These
are the results for the following pattern examples:
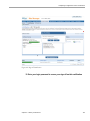
$account.FirstName$account.LastName
“JohnCook”
$account.FirstName(-10)
"John
"
$account.FirstName(+10)
"
John"
$account.FirstName(/_/+10)
"______John"
$account.FirstName(/_/-10)
"John______"
$account.FirstName(3)
"John"
$account.FirstName(+5)
" John"
$account.FirstName(+2.3)
"ohn"
$account.FirstName(-2.3)
"Joh"
$account.FirstName(-1.1)
"J"
$account.FirstName(-1.1)$account.LastName "JCook"
$account.FirstName(-1.1)_$account.LastName
"J_Cook"
Note:
The sign (-) signifies that the text is left justified .
The sign (+) signifies that the text is right justified .
The first number inside the parenthesis indicates the minimum number of characters.
The number after the period is used to truncate the string starting from that position.
Manual Correlation
Manual correlation refers to the ability to manually correlate accounts to users. This capability proves very
helpful in situations where the existing correlation rules result in accounts that are not automatically
associated with any user. Such accounts are referred to by the term “Orphan Accounts”. Role Manager
provides the ability to manually correlate such account to a specific user. Manual correlation is also useful
when the ownership of an account needs to be changed from one User to another.
Chapter 5 · Data Correlation
59
Manual Correlation
▼ Steps to correlate Orphan Account to
User
1.
Start Role Manager by clicking the Role Manager Icon
2.
The login dialog box appears. Enter your credentials and login to Role Manager
3.
Select the Identity Warehouse Tab and then select the Users Tab
4.
Select the Orphan Accounts Tab
5.
The panel on the left displays all the namespaces that can be expanded to
endpoints and further expanded to available orphan accounts
6.
Select a namespace or endpoint to view all the available orphan accounts
Figure 5-1 Available Orphan Accounts
60
7.
Select account(s) by selecting the corresponding checkbox and then select
“Assign to User”
8.
A pop-up opens up that allows searching and selecting a User
Sun Role Manager 4.1 · September 2008
Manual Correlation
Figure 5-2 Search and Select a User
9.
10.
Using the quick search or advanced search feature search for the User to be
assigned the orphan account(s)
Select the desired User from the search result and click “Ok”
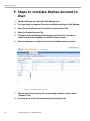
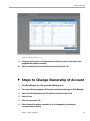
▼ Steps to Change Ownership of Account
1.
Start Role Manager by clicking the Role Manager Icon
2.
The login dialog box appears. Enter your credentials and login to Role Manager
3.
Select the Identity Warehouse Tab and then select the Users Tab
4.
Select a User
5.
Select the accounts Tab
6.
Select account(s) whose ownership is to be changed by selecting the
corresponding checkbox
Chapter 5 · Data Correlation
61
Manual Correlation
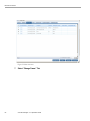
Figure 5-3 Select Accounts
7.
62
Select “Change Owner” Tab
Sun Role Manager 4.1 · September 2008
Manual Correlation
8.
A pop-up opens up that allows searching and selecting a User
9.
Using the quick search or advanced search feature search for the User to be
assigned the account(s)
10.
Select the desired User from the search result and click “Ok”
Chapter 5 · Data Correlation
63
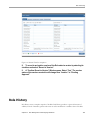
6
6
C H A P T E R
6
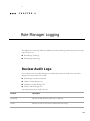
Role Manager Logging
Role Manager has various logs which are available and can be used during trouble-shooting. The two major
types of logs are the
Role Manager Audit Logs
Role Manager System Logs
Review Audit Logs
Every operation done on the Role Manager is recorded and reported in the Audit Event view in Role
Manager. The current audit events include.
Role Manager User Password Update
Addition of Role Manager User
Modification of Role Manager User
Deletion of Role Manager User
The details captured by the Audit events are:
Function
Description
Timestamp
Denotes the time when the audit event was captured
UserId
Denotes the user id of the account which initiates the change
iis65
Role Manager Logging
UserName
Denotes the name of the user account which initiates the change
Action
One of the following action are shown in this column ADD, MODIFY, DELETE,
LOGIN, LOGOUT
Description
The description of the audit event is provided here
Remote IP Address
IP Address of the machine which initiates the change
Remote Host Name
Host Name of the machine which initiates the change
Server IP address and Host Name
Role Manager Address
In addition to the audit events, the import logs for the various feed imports are recorded in Role Manager.
The Import logs are again divided into three categories.
User Import
Account Import
Glossary Import
The details captured by the Import logs are:
66
Function
Description
Imported By
This outlines the method used to import the feed files. In this case, this will be
represented as BATCH.
Source
Denotes the source of import. For this version all imports will be FILE_IMPORT
Import Type
Denoted as Accounts, Glossary, Users depending on type
Total number of records
Total number of records in the feed file
Records Imported
Total number of records imported by Role Manager
Number of Errors
Denotes the number of errors encountered during the Feed import
Start time
Start Time of Import
End Time
End Time of Import
Sun Role Manager 4.1 · September 2008
Role Manager Logging
Read Time
NA
End Time
NA
Description
The file name is specified in the description
To review the audit events in Role Manager follow these steps:
1. Log in to Role Manager Web-Interface using a JavaTM enabled web
browser
2. Click the System tab
3. Search on User or Actions as needed
4. Select the time period from to and From Calendars as needed.
5. Click
. Result: The events matching the search criteria display.
Figure 6-1 Audit Event Logs
6. Display event details as needed.
Chapter 6 · Role Manager Logging
67
Role Manager Logging
7. Click the Close icon to return to the filtered Audit Event Logs list.
Follow the given steps to review the import logs for the various feed imports and export them to a csv file.
1. Log in to Role Manager Web-Interface using a JavaTM enabled web
browser
2. Click the System tab
3. Click on [Import Logs] under the System tab
4. Select the type of Import logs (Accounts, User or Glossary) as needed.
5. Review details of the logs.
6. Click the export button to export the logs to a .csv file.
Figure 6-2: Export Logs
7. Click ok at the save dialog and select a location.
8. Click the Close icon to return to Import Logs page.
68
Sun Role Manager 4.1 · September 2008
Role Manager Logging
Review System Logs
The application logs are generated and stored under the C:/Vaau/RBACx2006/tomcat55/logs/ folder
and the file name is called rbacx.log. The log captures various details such as the import /export
information, ETL processing and also any exceptions which arise while running the application. There are
different levels in the rbacx.log and these can be adjusted and modified as needed. The properties file which
is used to alter the logging level is found under $RBACX_HOME/WEB-INF folder and the file name is
log4j.properties
The contents of this file with the ideal logging levels are specified below.
log4j.rootLogger=INFO, file
# Console Appender
log4j.appender.console=org.apache.log4j.ConsoleAppender
log4j.appender.console.layout=org.apache.log4j.PatternLayout
log4j.appender.console.layout.ConversionPattern=%d{ABSOLUTE} %-5p [%c{1}] %m%n
# File Appender
log4j.appender.file=org.apache.log4j.DailyRollingFileAppender
log4j.appender.file.file=C:/Vaau/RBACx2006/tomcat55/logs/rbacx.log
log4j.appender.file.layout=org.apache.log4j.PatternLayout
log4j.appender.file.layout.ConversionPattern=%d{ABSOLUTE} %-5p [%c{1}] %m%n
log4j.appender.file.ImmediateFlush=true
log4j.appender.file.DatePattern='.'yyyy-MM-dd
# Tomcat logging
log4j.logger.org.apache.catalina=WARN
# DON'T EDIT FOLLOWING
log4j.logger.com.vaau.commons.springframework.context.ContextLifecycleListener
=INFO
#VAAU commons logging
log4j.logger.com.vaau.commons=WARN
#RBACx Core logging
log4j.logger.com.vaau.rbacx=WARN
log4j.logger.com.vaau.rbacx.core=WARN
log4j.logger.com.vaau.rbacx.service=WARN
log4j.logger.com.vaau.rbacx.manager=DEBUG
# RBACx Security logging
log4j.logger.com.vaau.rbacx.security=WARN
Chapter 6 · Role Manager Logging
69
Role Manager Logging
#RBACx Scheduling logging
log4j.logger.com.vaau.rbacx.scheduling=DEBUG
# RBACx ETL
log4j.logger.com.vaau.rbacx.etl=DEBUG
#RBACx IAM logging
log4j.logger.com.vaau.rbacx.iam=WARN
#RBACx Reporting logging
log4j.logger.com.vaau.rbacx.reporting=WARN
#RBACx Audit logging
log4j.logger.com.vaau.rbacx.audit=WARN
# RBACx Role-Mining logging
log4j.logger.com.vaau.rbacx.rolemining=WARN
log4j.logger.com.vaau.commons.datamining=WARN
# RBACx IDC logging
log4j.logger.com.vaau.rbacx.idc=INFO
# SqlMap logging configuration. Change WARN to DEBUG if want to see all sql
statements
log4j.logger.com.ibatis=WARN
log4j.logger.com.ibatis.common.jdbc.SimpleDataSource=WARN
log4j.logger.com.ibatis.common.jdbc.ScriptRunner=WARN
log4j.logger.com.ibatis.sqlmap.engine.impl.SqlMapClientDelegate=WARN
log4j.logger.org.springframework.jdbc.datasource.DataSourceTransactionManager=
WARN
log4j.logger.java.sql.Connection=WARN
log4j.logger.java.sql.Statement=WARN
log4j.logger.java.sql.PreparedStatement=WARN
#Spring Framework
log4j.logger.org.springframework=WARN
log4j.logger.org.springframework.rules.values=WARN
log4j.logger.org.springframework.context.support=WARN
log4j.logger.org.springframework.transaction=WARN
log4j.logger.org.springframework.aop.interceptor=WARN
log4j.logger.org.springframework.richclient=WARN
log4j.logger.org.springframework.richclient.image=WARN
#JIAM log
log4j.category.com.ca=WARN
70
Sun Role Manager 4.1 · September 2008
Role Manager Logging
#Acegisecurity
log4j.logger.org.acegisecurity=WARN
log4j.logger.org.acegisecurity.event.authentication.LoggerListener=FATAL
#Quartz scheduler
log4j.logger.org.quartz=WARN
#DWR
log4j.logger.uk.ltd.getahead.dwr=FATAL
log4j.logger.org.directwebremoting=FATAL
#ehcache
log4j.logger.net.sf.ehcache=ERROR
#CloverETL
log4j.logger.org.jetel=ERROR
#C3p0
log4j.logger.com.mchange=ERROR
The highlighted log items are required in the current release of Role Manager. A few more parameters to
keep in mind are the Security and the IAM logging. These will report the Security and any exceptions in the
entitlement data.
Chapter 6 · Role Manager Logging
71
7
7
C H A P T E R
7
Role Manager ETL Process
Introduction
The Role Manager IAM service provides the ability to import users, accounts, roles and policies data
through CSV and Excel files. It also supports a wide range of data transformations during the import
process.
The Role Manager IAM Service processes the CSV files placed in a drop location and creates or updates
objects in the Role Manager database. IAM service uses different schema files (templates) to parse different
data feeds i.e. users, accounts, roles, policies. After a successful processing of the data feeds, they are moved
to a Completed location.
In addition to the Role Manager import functionality, Role Manager also provides the functionality to
transform the data feed before they are put into the drop location. For example, Role Manager has the
ability to read Excel and raw data files using the transformation graphs. Transformation graphs are xml files
that contain a state machine style processing instructions. Further details are given in the Transformation
graph section.
Following is the overall processing of data feeds.
iis73
Introduction
Figure 7-1: Role Manager ETL Process
Transformation Process
Role Manager transforms data files dropped into the ETL drop location using the transformation graphs.
Role Manager uses CloverETL to perform all the transformation processing. At the end of transformation
ETL Manager writes the files to a specified drop location, which is usually configured as input for IAM
Service.
Transformation Graphs
Graphs are xml files that contain a state machine style processing instructions. The basic elements in graphs
are: Parameters, Nodes, Edges, Metadata and Phases.
Following is an example of an ETL graph:
74
Sun Role Manager 4.1 · September 2008
Introduction
Figure 7-2: Sample ETL Graph
<Graph name="testing" rbacxRegxLookupFiles="tss_\w*_accounts[\.\w]*">
<Global>
<Metadata id="InMetadata" fileURL="$
{graphsLocation}/metadata/TSSAccount.fmt"/>
</Global>
<Phase number="0">
<Node id="INPUT" type="com… …DelimitedDataReader" fileURL="$
{inputFile}"/>
<Node id="TRANSFORM" type="REFORMAT" transformClass="com… …
ReformatAccount" />
<Node id="OUTPUT" type="com… …DelimitedDataWriter" fileURL="$
{outputFile}"/>
<Edge id="INEDGE" fromNode="INPUT1:0" toNode="COPY:0"
metadata="InMetadata"/>
<Edge id="OUTEDGE" fromNode="COPY:0" toNode="OUTPUT:0"
metadata="InMetadata"/>
</Phase>
</Graph>
In above example Role Manager ETL processor will transform all the files dropped in ETL location that
match “tss_\w*_accounts[\.\w]*” format. For example,
tss_endpoint01_accounts.csv
tss_endpoint02_accounts.csv
tss_endpoint02_accounts.csv
So a different transformation can be applied to each namespace and an endpoint with-in a namespace.
Metadata
The metadata is the definition of the records that goes from node to node. In above example graph, the
Metadata is defined in a file called “TSSAccount.fmt”. There are two types of records: “delimited” and
“fixed”. When the record is defined as “delimited” then the attribute “delimiter” is required. And when it is
defined as “fixed” a “size” attribute is required
Below is the content of “TSSAccount.fmt”:
Chapter 7 · Role Manager ETL Process
75
Introduction
<?xml version="1.0" encoding="UTF-8"?>
<Record name="TestInput" type="delimited">
<Field name="name" type="string" delimiter=","/>
<Field name="comments" type="string" delimiter=","/>
<Field name="endPoint" type="string" delimiter=","/>
<Field name="domain" type="string" delimiter=","/>
<Field name="suspended" type="string" delimiter=","/>
<Field name="locked" type="string" delimiter=","/>
<Field name="AcidAll" type="string" delimiter=","/>
<Field name="AcidXAuth" type="string" delimiter=","/>
<Field name="FullName" type="string" delimiter=","/>
<Field name="GroupMemberOf" type="string" delimiter=","/>
<Field name="InstallationData" type="string" delimiter=","/>
<Field name="ListDataResource" type="string" delimiter=","/>
<Field name="ListDataSource" type="string" delimiter=","/>
<Field name="M8All" type="string" delimiter="\r\n"/>
</Record>
Node
Nodes are elements that do perform some specific task. In this example, the Node “INPUT” reads from a
CSV file, the node “TRANSFORM” transforms the data and the last Node, “OUTPUT”, writes the
resulting records into a CSV File.
The elements “type” refers to classes in CloverETL or to classes provided in Role Manager. You can specify
a complete class name or short class name.
Role Manager provides following Nodes to read and write CSV files:
com.vaau.rbacx.etl.clover.components.DelimitedDataReader and
com.vaau.rbacx.etl.clover.domain.DelimitedDataWriter
We can read Excel files with the Node:
com.vaau.rbacx.etl.clover.components.ExcelDataReader
See the Appendix 1 for the complete set of CloverETL Nodes.
76
Sun Role Manager 4.1 · September 2008
Introduction
Edge
Edge connects Nodes. Nodes may have more than one input or output, to indicate which port we are
connecting we add a semicolon and the port number to the Node we want to connect.
<Edge id="INEDGE" fromNode="INPUT1:0" toNode="COPY:0" metadata="InMetadata"/>
In the above example, we are connecting the output port 0 of the Node “INPUT1” to the input port 0 of
the Node “COPY”, and that the records are described in the xml element “InMetadata”.
Phase
Transformation tasks are performed in phases. When the first phase is finished, the second starts and so on.
Role Manager CloverETL extensions
The elements “rbacxRegxLookupFiles” and “rbacxExecuteAlways” are not part of the CloverETL graph
definition. They are processed by Role Manager ETL Manager.
The attribute “rbacxRegxLookupFiles” is a regular expression for file names.
ETL Manager scans the drop location with this regular expression; when it finds a file that matches this
pattern, ETL Manager runs the graph with the following parameters:
inputFile : Absolute path of the file found in the Drop Location.
graphsLocation
: Graph Location
outputLocation
: Output Location
dropLocation : Drop Location
outputFile
: Absolute path for the output File.
If the element “rbacxRegxLookupFiles” equals true, but no file was found, ETLManager runs the graph
without defining the parameters inputFile and outputFile. This can be used when reading from a database.
Chapter 7 · Role Manager ETL Process
77
Introduction
Transformation Configuration
ETL properties are configured in RBACX_HOME/conf/iam.properties.
ETL Graphs Location
This is the location where we place the CloverETL graph files.
eTLManager.graphsLocation=/opt/Vaau/RBACx2006/imports/etl/graphs
ETL Drop Location
This is the location where we drop the data files that need transformation
eTLManager.dropLocation=/opt/Vaau/RBACx2006/imports/etl/drop
ETL Complete Location
All processed files are moved to this location after the ETL Manager completes the processing of the file.
eTLManager.completeLocation=/opt/Vaau/RBACx2006/imports/etl/complete
ETL Output Location
We can use this location to place the output of the transformation. If we want the output to be imported by
Role Manager IAM service, then this location should point to the IAM File Imports Drop Location.
eTLManager.outputLocation=/opt/Vaau/RBACx2006/imports/drop
78
Sun Role Manager 4.1 · September 2008
Import Process
Import Process
Role Manager IAM service imports all the files from a pre-configured drop location, insert or updates
objects in its repository and archives all the feeds. IAM Service can import multiple files at the same time
and can insert or update Role Manager database using different batch sizes.
IAM service requires a schema file (*.rbx) corresponding to each feed type.
Schema Files
Schema files are templates for data feeds. IAM Service uses a regular expression to pick a schema file to
parse a data feed. For example using the following regular expression IAM service links the data feeds to
their corresponding schema file. Remember each namespace has its own schema file when importing
accounts.
<shortnamespacename>_\w*_accounts[\.\w]*
Where:
\w*: any alphanumeric character
[\.\w]*: any alphanumeric character or dot
Following is an example of Top secret schema file.
The uncommented row of the file should have account attributes or account namespace attributes separated
by comas. The names of the account attributes are case sensitive.
# @iam:namespace name="CA-Top Secret" shortName="tss"
name<CorrelationKey>,comments,endPoint,domain,suspended,locked,AcidAll,AcidXAu
th,FullName,
GroupMemberOf,InstallationData,ListDataResource,ListDataSource,M8All
In the above example where name, comments, endpoint, domain suspended and locked are account
attributes, and AcidAll, AcidXAuth, FullName, GroupMemberOf, InstallationData, ListDataResource,
ListDataSource and M8All are namespaces attributes. The field “name” is used as Correlation Key. The
correlation key is used to link the user with account.
Import process Configuration
File Import properties are configured in RBACX_HOME/conf/iam.properties.
Chapter 7 · Role Manager ETL Process
79
Import Process
Maximum Concurrent Imports
This setting specifies the number of files to import concurrently. Default is 2.
fileIAMSolution.maxConcurrentImports = 2
Maximum Errors Limit
This setting specifies the maximum number of errors per file before aborting the process.
fileIAMSolution.rowErrorsLimit = 3
In the above example, if file imports process encounter 3 errors then the import is aborted.
fileIAMSolution.rowErrorsLimit=-1
In the above example, there is no limit to the number of errors.
Batch Size
This setting specifies the number of records to read and process in a batch during an import:
fileIAMSolution.batchSize=500
Drop Location
The files to be imported are placed in this location:
accountsFileImport.dropLocation=/opt/Vaau/RBACx2006/import/drop
Complete Location
Input files are moved to a complete location after processing:
accountsFileImport.completeLocation=/opt/Vaau/RBACx2006/import/drop
80
Sun Role Manager 4.1 · September 2008
Import Process
Schema Location
The schema files are placed in this location:
accountsFileImport.schemaLocation=/opt/Vaau/RBACx2006/import/schema
Correlation Parameters
Correlation parameters specify whether orphans accounts (accounts which are not
correlated to a global user) are dropped or saved as orphan accounts during the
import process
com.vaau.rbacx.iam.correlation.dropOrphanAccounts=true
Correlation options
These options allow further control over correlation of accounts to users during the import process.
Options available are
●
always: all accounts are correlated on every import
●
orphan: only orphan accounts are correlated, established user-account associations are not
updated
●
never: accounts are NOT correlated
com.vaau.rbacx.iam.correlation.correlate=always
Role Manager ETL Reference
DelimitedDataReader
CloverETL already has a csv Reader but we prefer to use the Role Manager version, but in some cases we
might want to use CloverETL’s version. That is the case when we have different delimiters for each field.
We have to provide fileURL.
Chapter 7 · Role Manager ETL Process
81
Role Manager ETL Reference
<Node id="INPUT" type="
com.vaau.rbacx.etl.clover.components.DelimitedDataReader " fileURL="$
{inputFile}"/>
DelimitedDataWriter
The same can be said for DelimitedDataWriter.
<Node id="OUTPUT" type=" com.vaau.rbacx.etl.clover.domain.DelimitedDataWriter"
fileURL="${outputFile}"/>
ExcelDataReader
This Role Manager Node reads Excel files.
Attributes:
fileURL : This attribute is Mandatory.
Row_From
: Number of the initial Row. (Optional, Default value = 1)
Row_To : Number of the final Row. (Optional, Default value= -1 (All))
Col_From
: Number of the initial Column. (Optional, Default value=1)
There is no Col_To because the reader uses the Metadata in order to know how many columns it has to
read.
<Node id="INPUT1" type="com.vaau.rbacx.etl.clover.components.ExcelDataReader"
fileURL="${inputFile}" Row_From="1" />
Transformation Examples
Merge
This graph will be executed when a file with the pattern "tss_\w*_accounts[\.\w]*" is found in the drop
location by the ETL Manager. It will read the file_01.dat, file_02.dat and file_03.dat csv files using the
“com.vaau.rbacx.etl.clover.components.DelimitedDataReader” node and then merge the data with the
“MERGE” node. The outputFile will keep the sort order stated in mergeKey="ShipName;ShipVia". The
82
Sun Role Manager 4.1 · September 2008
Transformation Examples
file with the pattern "tss_\w*_accounts[\.\w]*" is moved to the completed location. The files file_01.dat,
file_02.dat and file_03.dat will stay in the “c:\tss” folder. The output file will have the same name that the
inputFile.
<Graph name="TestingMerge" rbacxRegxLookupFiles="tss_\w*_accounts[\.\w]*">
<!-This graph illustrates usage of MERGE component. It merges data based on
specified key.
-->
<Global>
<Metadata id="InMetadata" fileURL="$
{graphsLocation}/metadata/tss_accunts.fmt"/>
</Global>
<Phase number="0">
<Node id="INPUT1"
type="com.vaau.rbacx.etl.clover.components.DelimitedDataReader"
fileURL="c:\tss\file_01.dat"/>
<Node id="INPUT2"
type="com.vaau.rbacx.etl.clover.components.DelimitedDataReader "
fileURL="c:\tss\file_02.dat"/>
<Node id="INPUT3"
type="com.vaau.rbacx.etl.clover.components.DelimitedDataReader "
fileURL="c:\tss\file_03.dat"/>
<Node id="MERGE" type="MERGE" mergeKey="ShipName;ShipVia"/>
<Node id="OUTPUT"
type="com.vaau.rbacx.etl.clover.domain.DelimitedDataWriter" fileURL="$
{outputFile}"/>
<Edge id="INEDGE1" fromNode="INPUT1:0" toNode="MERGE:0"
metadata="InMetadata"/>
<Edge id="INEDGE2" fromNode="INPUT2:0" toNode="MERGE:1"
metadata="InMetadata"/>
<Edge id="INEDGE3" fromNode="INPUT3:0" toNode="MERGE:2"
metadata="InMetadata"/>
<Edge id="OUTEDGE" fromNode="MERGE:0" toNode="OUTPUT:0"
metadata="InMetadata"/>
</Phase>
</Graph>
Filter
This graph demonstrates functionality of Extended Filter component.
It can filter on text, date, integer, numeric fields with comparison operators: [ >, <, ==, <=, >=, !=].
Text fields can also be compared to a Java regexp using ~= operator.
A filter can be made of different parts separated by a logical operator AND, OR. Parenthesis for grouping
Chapter 7 · Role Manager ETL Process
83
Transformation Examples
individual comparisons are also supported - e.g. $Age>10 and ($Age <20 or $HireDate<"2003-01-01")
Filter works on single input record, where individual fields of record are reference using dollar sign and
field's name - e.g. $Age,$Name, etc.
Date format used for date constans is yyyy-MM-dd or yyy-MM-dd hh:mm:ss.
This graph produces one output file where all employees have in the fileld comments the pattern
“DELTSO[0-9]*0”.
<Graph name="Testing Filter" rbacxRegxLookupFiles="tss_\w*_accounts[\.\w]*">
<Global>
<Metadata id="InMetadata" fileURL="$
{graphsLocation}/metadata/InAccounts.fmt"/>
</Global>
<Phase number="0">
<Node id="INPUT1"
type="com.vaau.rbacx.etl.clover.components.DelimitedDataReader" fileURL="$
{inputFile}"/>
<Node id="FILTEREMPL2" type="EXT_FILTER">
$comments~="DELTSO[0-9]*0"
</Node>
<Node id="OUTPUT1"
type="com.vaau.rbacx.etl.clover.components.DelimitedDataWriter" fileURL="$
{outputFile}"/>
<Edge id="INEDGE1" fromNode="INPUT1:0" toNode="FILTEREMPL2:0"
metadata="InMetadata"/>
<Edge id="INNEREDGE3" fromNode="FILTEREMPL2:0" toNode="OUTPUT1:0"
metadata="InMetadata"/>
</Phase>
</Graph>
Fixed Length Data NIO Reader
This graph transforms a Fixed Length Data file into a csv File.
<Graph name="Testing Filter" rbacxRegxLookupFiles="tss_\w*_accounts[\.\w]*">
<Global>
<Metadata id="OutMetadata" fileURL="$
{graphsLocation}/metadata/InAccounts.fmt"/>
<Metadata id="InMetadata" fileURL="$
{graphsLocation}/metadata/InAccountsFixedWith.fmt"/>
</Global>
<Phase number="0">
<Node id="INPUT1" type="FIXLEN_DATA_READER_NIO" OneRecordPerLine="true"
SkipLeadingBlanks="true" LineSeparatorSize="2" fileURL="${inputFile}"/>
84
Sun Role Manager 4.1 · September 2008
Transformation Examples
<Node id="COPY" type="SIMPLE_COPY"/>
<Node id="OUTPUT1"
type="com.vaau.rbacx.etl.clover.components.DelimitedDataWriter" fileURL="$
{outputFile}"/>
<Edge id="INEDGE1" fromNode="INPUT1:0" toNode="COPY:0"
metadata="InMetadata"/>
<Edge id="OUTEDGE1" fromNode="COPY:0" toNode="OUTPUT1:0"
metadata="OutMetadata"/>
</Phase>
</Graph>
This are the Records Definitions:
The content of the file InAccounts.fmt is the same than the one in the page 5.
Below is the content of the file InAccountsFixedWith.fmt
<?xml version="1.0" encoding="UTF-8"?>
<Record name="TestInput" type="fixed">
<Field name="name" type="string" size="16"/>
<Field name="comments" type="string" size="16"/>
<Field name="endPoint" type="string" size="16"/>
<Field name="domain" type="string" size="5"/>
<Field name="suspended" type="string" size="10"/>
<Field name="locked" type="string" size="10"/>
<Field name="AcidAll" type="string" size="10"/>
<Field name="AcidXAuth" type="string" size="10"/>
<Field name="FullName" type="string" size="40"/>
<Field name="GroupMemberOf" type="string" size="60"/>
<Field name="InstallationData" type="string" size="60"/>
<Field name="ListDataResource" type="string" size="10"/>
<Field name="ListDataSource" type="string" size="10"/>
<Field name="M8All" type="string" size="10"/>
</Record>
Database Input
We use this node to import data from databases.
In the following example, the ETL Manager will execute the graph for each file that matches the pattern in
rbacxRegxLookupFiles.
<Graph name="Testing Filter" rbacxRegxLookupFiles="tss_\w*_accounts[\.\w]*">
<Global>
<Metadata id="InMetadata" fileURL="$
Chapter 7 · Role Manager ETL Process
85
Transformation Examples
{graphsLocation}/metadata/InAccountsFromDB.fmt"/>
<Metadata id="OutMetadata" fileURL="$
{graphsLocation}/metadata/OutAccounts.fmt"/>
<DBConnection id="InterbaseDB" dbConfig="$
{graphsLocation}/dbConfig/Rbacx.cfg"/>
</Global>
<Phase number="0">
<Node id="INPUT1" type="DB_INPUT_TABLE"
dbConnection="InterbaseDB">
<SQLCode>
select * from tss_01_accounts
</SQLCode>
</Node>
<Node id="COPY" type="REFORMAT" >
import
import
import
import
org.jetel.component.DataRecordTransform;
org.jetel.data.DataRecord;
org.jetel.data.SetVal;
org.jetel.data.GetVal;
public class reformatAccount extends DataRecordTransform{
int counter=0;
DataRecord source;
DataRecord target;
public boolean transform(DataRecord _source[], DataRecord[] _target) {
StringBuffer strBuf = new StringBuffer(80);
source=_source[0];
target=_target[0];
try {
SetVal.setString(target,"name",GetVal.getString(source,"name"));
SetVal.setString(target,"comments",GetVal.getString(source,"comments"
));
SetVal.setString(target,"endPoint",GetVal.getString(source,"endPoint"
));
SetVal.setString(target,"domain",GetVal.getString(source,"domain"));
SetVal.setString(target,"suspended",getBooleanString(GetVal.getInt(so
urce,"suspended")));
SetVal.setString(target,"locked",getBooleanString(GetVal.getString(so
urce,"locked")));
SetVal.setString(target,"AcidAll",GetVal.getString(source,"AcidAll"))
;
SetVal.setString(target,"AcidXAuth",GetVal.getString(source,"AcidXAut
h"));
SetVal.setString(target,"FullName",GetVal.getString(source,"FullName"
));
SetVal.setString(target,"GroupMemberOf",GetVal.getString(source,"Grou
pMemberOf"));
86
Sun Role Manager 4.1 · September 2008
Transformation Examples
SetVal.setString(target,"InstallationData",GetVal.getString(source,"I
nstallationData"));
SetVal.setString(target,"ListDataResource",GetVal.getString(source,"L
istDataResource"));
SetVal.setString(target,"ListDataSource",GetVal.getString(source,"Lis
tDataSource"));
SetVal.setString(target,"M8All",GetVal.getString(source,"M8All"));
}
catch (Exception ex) {
errorMessage = ex.getMessage() + " ->occured with record :" +
counter;
return false;
}
counter++;
return true;
}
private String getBooleanString(int value){
if(value==0)
return "FALSE";
else
return "TRUE";
}
}
</Node>
<Node id="OUTPUT1"
type="com.vaau.rbacx.etl.clover.components.DelimitedDataWriter" fileURL="$
{outputFile}/>
<Edge id="INEDGE1" fromNode="INPUT1:0" toNode="COPY:0"
metadata="InMetadata"/>
<Edge id="OUTEDGE1" fromNode="COPY:0" toNode="OUTPUT1:0"
metadata="OutMetadata"/>
</Phase>
</Graph>
If we don’t want to put a file in the drop location to make this graph to be executed, we may add the
attribute “rbacxExecuteAlways=true”
<Graph name="Testing Filter" rbacxExecuteAlways="true" >
<Global>
<Metadata id="InMetadata" fileURL="$
{graphsLocation}/metadata/InAccountsFromDB.fmt"/>
<Metadata id="OutMetadata" fileURL="$
{graphsLocation}/metadata/OutAccounts.fmt"/>
<DBConnection id="InterbaseDB" dbConfig="$
{graphsLocation}/dbConfig/Rbacx.cfg"/>
Chapter 7 · Role Manager ETL Process
87
Transformation Examples
</Global>
<Phase number="0">
<Node id="INPUT1" type="DB_INPUT_TABLE"
dbConnection="InterbaseDB">
<SQLCode>
select * from tss_01_accounts
</SQLCode>
</Node>
<Node id="COPY" type="REFORMAT" >
import org.jetel.component.DataRecordTransform;
import org.jetel.data.DataRecord;
import org.jetel.data.SetVal;
import org.jetel.data.GetVal;
public class reformatAccount extends DataRecordTransform{
int counter=0;
DataRecord source;
DataRecord target;
public boolean transform(DataRecord _source[], DataRecord[] _target) {
StringBuffer strBuf = new StringBuffer(80);
source=_source[0];
target=_target[0];
try {
SetVal.setString(target,"name",GetVal.getString(source,"name"));
SetVal.setString(target,"comments",GetVal.getString(source,"comments"
));
SetVal.setString(target,"endPoint",GetVal.getString(source,"endPoint"
));
SetVal.setString(target,"domain",GetVal.getString(source,"domain"));
SetVal.setString(target,"suspended",getBooleanString(GetVal.getInt(so
urce,"suspended")));
SetVal.setString(target,"locked",getBooleanString(GetVal.getString(so
urce,"locked")));
SetVal.setString(target,"AcidAll",GetVal.getString(source,"AcidAll"))
;
SetVal.setString(target,"AcidXAuth",GetVal.getString(source,"AcidXAut
h"));
SetVal.setString(target,"FullName",GetVal.getString(source,"FullName"
));
SetVal.setString(target,"GroupMemberOf",GetVal.getString(source,"Grou
pMemberOf"));
SetVal.setString(target,"InstallationData",GetVal.getString(source,"I
nstallationData"));
SetVal.setString(target,"ListDataResource",GetVal.getString(source,"L
istDataResource"));
SetVal.setString(target,"ListDataSource",GetVal.getString(source,"Lis
tDataSource"));
88
Sun Role Manager 4.1 · September 2008
Transformation Examples
SetVal.setString(target,"M8All",GetVal.getString(source,"M8All"));
}
catch (Exception ex) {
errorMessage = ex.getMessage() + " ->occured with record :" +
counter;
return false;
}
counter++;
return true;
}
private String getBooleanString(int value){
if(value==0)
return "FALSE";
else
return "TRUE";
}
}
</Node>
<Node id="OUTPUT1"
type="com.vaau.rbacx.etl.clover.components.DelimitedDataWriter" fileURL="$
{outputLocation}/tss_01_accounts.dat"/>
<Edge id="INEDGE1" fromNode="INPUT1:0" toNode="COPY:0"
metadata="InMetadata"/>
<Edge id="OUTEDGE1" fromNode="COPY:0" toNode="OUTPUT1:0"
metadata="OutMetadata"/>
</Phase>
</Graph>
Chapter 7 · Role Manager ETL Process
89
8
8
C H A P T E R
8
Identity Certifications
Sun Role Manager is the Industry leading solution that provides enterprise level certifications of user
entitlements, role content and application access. It supports periodic certification of user entitlements
(access) by business managers, role owners and application owners. Sun Role Manager also supports
granular certifications – to support systems that have complex security models for authorization.
Sun Role Manager includes a robust and fully customizable glossary feature, which helps translate cryptic
access permissions into business friendly terms. Certifications in progress and completed certifications can
be viewed under the Compliance dashboard, enabling auditing analysts to view reports of certified
certifications.
The Identity Certification module includes a configurable workflow functionality which has the ability to
send reminder notices and escalations to various actors designated to be a part of the certification process.
This is more of an administrator level function and has been explained in detail in the Sun Role Manager 4.1
Administrators Guide.
This powerful Identity Certification module is extended in Sun Role Manager 4.1 to provide the ability to
perform certifications at the instance or server level of a resource, provides advanced drill down capabilities
for users, and advanced filtering and searching capabilities on the certification interface.
The Identity Certification module has three Certification types:
●
User Access Certification: Allows certifier to certify Role Membership and User Entitlements
●
Role Entitlement Certification: Allows certifier to certify roles and role content
●
Application Owner Certification: Allows certifier to certify entitlements pertaining to an
iis91
Identity Certifications
application narrowed down by each instance of the application
Understanding the Actors
The Identity Certification module in Sun Role Manager assists various personnel in an organization to
review and certify user entitlement data, role content data and application access data, which further assists
in cleaning up entitlement access and ensures that users have access to the correct entitlements across
various target systems. It is important to understand the various actors that are a part of the Identity
Certification process, as described in the table below:
Actor Name
Description
Identity Certification
Type
Certifier
Generic term representing personnel
User Access Certification, Role
responsible for reviewing and completing Entitlement Certification, Application
any kind of certification
Certification
User Manager
An employee’s direct “reports to”
manager
User Access Certification
Access Reviewer
Designated personnel responsible for
reviewing user access
User Access Certification, Application
Certification
Application Owner
Designated personnel (usually) responsible Application Certification
for reviewing a users access in a particular
target system by endpoint or domain
Role Owner
Designated personnel (usually) responsible Role Entitlement
for reviewing role and its content
Sun Role Manager Administrator
Administrator with full access to the Sun
Role Manager application; has the ability
to create and view progress of all
certifications
User Access Certification, Role
Entitlement Certification, Application
Certification
Certification Administrator
Limited access to the Sun Role Manager
application; has the ability to create and
view progress of all certifications only
User Access Certification, Role
Entitlement Certification, Application
Certification
Audit Analyst/Auditor
Accesses the Identity Certification
Dashboards to view progress of each
certification and view reports of
completed certifications
Identity Certification Dashboard
92
Sun Role Manager 4.1 · September 2008
Identity Certification Dashboard
Identity Certification Dashboard
The Identity Certification Dashboard provides a single view for statistical information regarding
certifications. The dashboard provides panels for:
●
Bar graph representation of the number of new, in progress, complete and expired certifications
for each of the three types of certification (user access, role entitlement and application owner)
●
A summary of the total number of users, accounts, namespaces and endpoints involved in the
certification process
●
A pie chart representation of the certified, revoked and incomplete certification of accounts in
User Account Certifications
●
A pie chart representation of the certified, revoked and incomplete certification of roles in the
Role Entitlement certifications
●
A listing of the average number of certifications per business unit, roles per user, accounts per
user and users in business units
●
A graph representing the notifications issued in the last week
The dashboard can be great tool for monitoring the certification progress.
Figure 8-1: Identity Certification Dashboard
Chapter 8 · Identity Certifications
93
Identity Certification Dashboard
New Identity Certification
▼ Steps to Create a New Identity Certification Job
Log into the Sun Role Manager Web-Interface using a Java-enabled web
browser
1.
2.
Log in with credentials of administrator or business units manager
3.
Select the My Certifications Tab under Identity Certification Tab
4.
Click New Certification
5. The Create Certification window opens. Fill in the Certification Name. Select
the type of certification to be created from User Access, Role Entitlement and
Application Owner. To create an incremental Certification select the Checkbox
for Incremental. Select Next
6. Select the User Selection Strategy. This step is applicable only if the type of
certification is selected as “User Access”. For Role Entitlement and Application
Owner Certification type User selection is done on the basis of Business units.
For User Access certifications there is the option of doing a custom user
selection
7. For Role Entitlement Certifications, Application Owner Certifications and
User Access certifications where User Selection Strategy is selected as “By
Business Unit” the Business Unit Selection window opens. Click Add Business
Unit(s) button to add business units for user selection
94
Sun Role Manager 4.1 · September 2008
New Identity Certification
Figure 8-2 By Business Unit
8. The Select Business Unit(s) window opens up. Drill down into business
units to select the business unit for selecting users. To select a business unit
select the corresponding checkbox(s) and click “Ok”
9.
Use the corresponding checkboxes and “Remove Business Units” button
to remove business units. Select “Next”
10. If the certification type is “User Access” and the user selection strategy is
“By User Selection” a user selection window opens up that allows users to be
selected using the advanced user search or quicksearch capabilities. Select
users for certification from the search result by using corresponding
checkboxes. No users are included by default. Select “Next”
11. The Period and Certifier window opens up. This window allows selecting the
certifier, start and end dates, and customized configuration and email templates
for the certification
Chapter 8 · Identity Certifications
95
New Identity Certification
Figure 8-3 Period and Certifier
12. Certifier can be selected as the Business Unit Manager in which case a
separate certification will be created for each distinct business unit in the user
set selected for the certification
13. The “Select” option for certifier allows the use of the advanced user search
and quicksearch capability to search for the global user that is to be selected as
the certifier. Click the search button that appears when “Select” option is set for
certifier
14. Select the User from the Search result that is to be selected as Certifier and
click “Ok”
15. Sun Role Manager uses a customizable notification mechanism to send
reminders and notifications to the various parties involved. The notifications are
sent relative to the Start Date and End Date. End date should be set to give
sufficient time to the certifier to complete the certification. Once the End date is
passed the Certification is marked as “Expired” and cannot be edited or
completed
96
Sun Role Manager 4.1 · September 2008
New Identity Certification
Figure 8-4 Period and Certifier Choose Date
16. The general Identity Certification workflow is set by navigating to
Configuration > Identity Certification Tab. However each certification can be
customized by setting these values. Select the checkbox for Customize
Configuration and Email Template. For more information on these fields refer to
the Identity Certification section in the chapter on Sun Role Manager –
Configuration. Click “Next”
Chapter 8 · Identity Certifications
97
New Identity Certification
Figure 8-5 Period and Certifier Customize Configuration and Email Template
17. The final configuration summary page opens. The certifier field will display
the name of the user selected if the “Select” option was used and “Business Unit
Manager” if business unit manager option was chosen. If user selection strategy
used was “By Business Unit”, number of business units selected will be
displayed. If user selection strategy used was “By User Selection”, the number
of users selected will be displayed. Click the “view” button to view the names of
business units or users
98
Sun Role Manager 4.1 · September 2008
New Identity Certification
Figure 8-6 Period and Certifier Summary
18. There are two options for running the certification. It can be run at the
current instant by selecting “Now” for Run Certification field, or it can be
scheduled as a daily, weekly, monthly or one time task to be run at any particular
data/time. Select “Later” to schedule a task. A new panel opens up for the
scheduler. Select a name and description for the scheduled task. Select the type
of the task and the corresponding fields
Chapter 8 · Identity Certifications
99
New Identity Certification
Figure 8-7 Run Certification
19. Select “Create” to create the certification
20. The Certification Jobs window opens and displays the new task created
100
Sun Role Manager 4.1 · September 2008
New Identity Certification
Figure 8-8 Certification Jobs
21. The created certification Jobs can be viewed from the “Certification Jobs”
view. When a job is run using the “Run now” or schedule features it will be
available in the certifier’s “My Certifications” view
View and Search Certifications
The “My Certifications” view under the “Identity Certifications” Tab provides the main interface in Sun
Role Manager to view and access certifications. By default the view shows New and In Progress
certifications. Filters are provided to view All or any combination of New, In Progress, Complete and
Expired certifications. For further precision a certification search capability is provided that can be used in
conjunction with the filters to quickly search for a certification
Chapter 8 · Identity Certifications
101
View and Search Certifications
▼ Steps to Search and View Certifications
1. Log into the Sun Role Manager Web-Interface using a Java-enabled web
browser
2.
Log in with credentials of administrator or certifier
3.
Select the My Certifications Tab under Identity Certification Tab
4. New and In Progress Certifications are available for view by default. This is
also indicated by the selected value in the drop down option “Show Me”
Figure 8-8 My Certifications New and In Progress
5. Select the appropriate value in the drop down option “Show Me” to get the
desired certifications view
6. The Search panel can accessed by clicking the expand icon. Use the Search
panel to search within the current certification view. Search can be done on
Certification Name, Business Unit, Created By and Updated By fields. Search
conditions can be created using Begins With, Ends With, Contains, Equals To,
102
Sun Role Manager 4.1 · September 2008
View and Search Certifications
Does Not Contain. More restrictions can be imposed on the search criterion by
selecting a period in which to search for the certification
Figure 8-9 Search My Certifications
7. To select a certification for viewing progress or performing verification
actions click the Certification Name or use the checkbox to select the
certification and click “Edit Certification”
8. To complete a certification whose attestation actions have been done select
the certification using its corresponding checkbox and click “Complete
Certification”
9. To view reports for a complete, in progress or expired certification select
the corresponding checkbox and click “View Reports”. Sun Role Manager allows
reports to be viewed for in progress certifications. This gives the flexibility of not
having to wait till a potentially lengthy certification completes before reports can
be viewed or exported. A “View Certification Report” box opens up which lists
the reports available for the particular certification
Chapter 8 · Identity Certifications
103
View and Search Certifications
Figure 8-10 View Certification Report
10. Select the type of report that is to be viewed and click “Ok”
11. To view the reminder logs for a certification select the corresponding
checkbox and click “View Reminder Logs”
The following modules provide instructions for certifiers (User Managers, Role Owners and Application
Owners) to sign off the different types of Certifications.
Completing a User Access Certification
This sub-section describes how to sign off a user access certification for attestation and reporting purposes.
User Access Certification in Role Manager is a two step process.
Step 1: Employment Verification. This step entails confirming or denying whether the certifier is responsible
for the accesses of the user being certified. Various options such as 'Terminated', 'Does not work for me'
and 'Works for someone else' can be used for reporting an incorrect access. Indicating an incorrect access at
step1 completes the certification process for the user. If 'Works for me' option is selected then step two of
the certification process must be completed
Step2: Approve or Revoke Roles and Entitlements. This step must be undertaken for each user who is
verified as “Works for me” by the certifier. Step2 entails certifying or revoking all the accesses granted to a
104
Sun Role Manager 4.1 · September 2008
Completing a User Access Certification
user. This includes Roles as well as entitlements outside roles.
Sun Role Manager provides flexibility for the certifier in completing the certification process. Step1 can be
can be completed for as many users as desired before going to Step2. The certifier may opt to complete
Step1 for all users and then complete Step2 for all users verified as “Works for me” or the certifier may
verify a user in Step1 and then go to Step2 to complete the certification for the user. Irrespective of the
approach taken Step2 displays all the users that have been verified by the certifier as “Works for me”
▼ Steps to Complete a User Access Certification
Step 1
1. Log into the Sun Role Manager Web-Interface using a Java-enabled web
browser
2.
Log in with credentials of administrator or certifier
3.
Click Identity Certification tab
4.
Click My Certifications
5. Click the New or In-Progress Certification or search for the required
certification using the “Show Me” option and certification search feature
6. Select the Certification to complete by clicking on the Certification Name or
selecting the corresponding checkbox and clicking “Edit Certification”
Chapter 8 · Identity Certifications
105
Completing a User Access Certification
Figure 8-10 Certification Details
7. The page for the selected Certification opens. Select “Show Details” to
view a brief summary of Certification Overview and Certification History,
as well as options for exporting certification reports
Figure 8-11 Complete Employee Verification
106
Sun Role Manager 4.1 · September 2008
Completing a User Access Certification
8. Complete Employee Verification . Select “Works for Me’, ‘Does Not Work
for Me’, ‘Terminated’ or ‘Reports to Another Person’. “Click to change for all”
can be used to change all the users to the same status. The ‘Does Not Work
for Me’, ‘Terminated’ and ‘Reports to Another Person’ options prompt a
corresponding comments box where further information can be provided.
Figure 8-12 Employee Verification
9. The ‘Reports to Another Person’ option allows the selection of another
Global User as the correct certifier for the user. This causes a new workflow
where a new certification is created for the newly selected “Correct Certifier” to
certify the particular user’s accesses. This new process will take place only if in
the general Identity Certification configurations or in the custom configurations
for the certification under consideration “Reporting Changes” and “Create New
Certification per Reporting Manager” have been enabled. Refer to Sun Role
Manager- Configuration > Identity Certification portion of Sun Role Manager 4.1
Admin Guide for more information on these settings. After filling in appropriate
comment and clicking “Ok” a new window opens that allows use of the
Advanced User Search or quicksearch feature to select a Global User as the
appropriate certifying authority
10.
Selecting “Works For Me” makes the user eligible for review in Step2.
11. When one or more users have been verified by selecting “Works for me”
and their roles and entitlements are to be certified select “Go To Step2”
Chapter 8 · Identity Certifications
107
Completing a User Access Certification
Step2
12. Complete the certification process for a user by certifying the roles and
entitlements associated with the user. The “Group Data By” option can be used
to filter the users to be certified based on various attributes such as 'location',
'Job Code', 'manager' etc.
Certify Roles
Once Roles have been defined for the Business Unit, Sun Role Manager can help your organization move to
an attestation based on Roles. Business Unit managers would be responsible for certifying membership of
Roles and Role Owners are responsible for role content.
13. Select the user to certify by clicking the name of the user
Figure 8-13 Approve or Revoke Roles and Entitlements
14. Select “Certify or Revoke Roles”. This will show all Roles associated to user
15. Click Certify/ Revoke on Role membership for the user
108
Sun Role Manager 4.1 · September 2008
Completing a User Access Certification
Certify Access outside Roles
Sun Role Manager Identity Certification allows configuration of certifications that will show entitlements for
each user that only lie outside a Role. This combined with the above Certify by Role completes a Role
Based Access Attestation procedure. This allows an organization to identify and treat Actual versus
Assigned access as an exception with high priority.
16. Select a User for certification. Select certify or revoke entitlements
17. This will list all the user’s accounts in the various namespaces with detailed
access permissions on each endpoint
18. The certification options at this stage are Certify, Revoke, Unknown and
Exception allowed. Use Certify option to confirm valid access for the user. Use
Revoke to revoke access for the user. Use Unknown when the accurate nature of
the User’s access is not known. Use Exception allowed to certify access to the
user while acknowledging the undesirable or irregular nature of the access.
These options can be used at 4 levels:
a. Use the “All” option in the first 4 columns on this page to apply
‘Certify’, ‘Revoke’, ‘Unknown’ or ‘Exception Allowed’ across all attributes of
all accounts of the user
b. Use the checkboxes in the first 4 columns for individual accounts to
apply ‘Certify’, ‘Revoke’, ‘Unknown’ or ‘Exception Allowed’ across all
attributes of an individual account of the user
c. Use the “All” option in the 4 columns under the “Attributes” field to
apply ‘Certify’, ‘Revoke’, ‘Unknown’ or ‘Exception Allowed’ across all
attribute values for an individual attribute of an
single account of the user
d. Use the individual checkboxes in the 4 columns to apply ‘Certify’,
‘Revoke’, ‘Unknown’ or
‘Exception Allowed’ for individual attribute
values of a single attribute of an account of the user
Chapter 8 · Identity Certifications
109
Completing a User Access Certification
Figure 8-14 Certify or Revoke Entitlements for Group Membership
19. Sun Role Manager provides a Glossary feature which translates the cryptic
access entitlements into business friendly terms. Click the highlighted access
entitlement (with hyperlink) to display the actual attribute value and its
corresponding definition and comments
Figure 8-15 Glossary and Attributes
110
Sun Role Manager 4.1 · September 2008
Completing a User Access Certification
Revoking a Role or Access outside Role
20. To revoke any access whether it lies in a Role or Entitlement, select the
Revoke radio button. This will bring up a comments field which must be filled for
post certification (remediation) activities
Figure 8-20 Revoke Comments
Sign-off on Certification
Identity Certification supports a series of post certification activities which include reports, revoke emails
and kicking off a workflow process if integrated with an IAM solution. To complete and sign off on a
certification, complete the above steps to certify or revoke access for each user.
Chapter 8 · Identity Certifications
111
Completing a User Access Certification
Figure 8-21 Certification Details
21. Complete attesting access of all users. Role Manager detects when a
certification is completed and prompts for sign-off on the certification. Select
“Yes” on the sign-off certification screen to sign-off certification
112
Sun Role Manager 4.1 · September 2008
Completing a User Access Certification
Figure 8-22 Sign-off Certification
22. To sign-off at a later instant use “Complete Certification” button
23. Enter your login password to secure your sign-off on this certification
Completing a Role Entitlement Certification
This sub-section describes how to sign off a role entitlement certification for attestation and reporting
purposes.
▼ Steps to Complete a Role Entitlement
Certification
1. Log into the Sun Role Manager Web-Interface using a Java-enabled web
browser
2. Log in with credentials of administrator or certifier
Chapter 8 · Identity Certifications
113
Completing a Role Entitlement Certification
3. Click Identity Certification tab
4. Click My Certifications
5. Click the New or In-Progress Certification or search for the required
certification using the “Shoe Me” drop down option
6. Select the Certification to complete by clicking on the Certification Name
or using the corresponding checkbox and clicking “Edit Certification”
Figure 8-22 Edit Certification Status
7. Click ‘Certify’ or ‘Revoke’ for each Role that the certifier is an owner for.
Applying ‘Revoke’, ‘Unknown’ or ‘Exception Allowed’ to a role requires
entering a comment to signify as to why the role should no longer belong
under the certifier's ownership or if all its underlying entitlements are
incorrect in case of “Revoke”
114
Sun Role Manager 4.1 · September 2008
Completing a Role Entitlement Certification
Figure 8-23 Review Role Entitlements
8. Click [Review] to review the Role Entitlements
9. Assign ‘Certify’, ‘Revoke’, ‘Unknown’ or ‘Exception Allowed’ to sign off
each attribute value within each policy that belongs to a particular role.
Each policy can also be certified as a whole. Applying ‘Revoke’,
‘Unknown’ or ‘Exception Allowed’ to an attribute requires entering a
comment to signify as to why the attribute/policy should no longer be
associated with the role in case of “Revoke”, why the nature of the
association of the attribute/policy is unknown in the case of “Unknown”
and what is the exception and why is it being allowed in the case of
“Exception Allowed”
Chapter 8 · Identity Certifications
115
Completing a Role Entitlement Certification
Figure 8-24 Sign-off Certification
10.If Sun Role Manager detects that all attestations have been completed a
“Sign Off Certification” box appears. To complete certification at this
point click “Ok”. Otherwise Complete attesting entitlements of all roles
and then click Complete Certification
11.Enter your login password to secure your signoff on this certification
Figure 8-25 Complete Certification
116
Sun Role Manager 4.1 · September 2008
Completing an Application Owner Certification
Completing an Application Owner Certification
This sub-section describes how to sign off an application owner certification for attestation and reporting
purposes.
▼ Steps to Complete an Application Owner
Certification
1. Log into the Sun Role Manager Web-Interface using a Java-enabled web
browser
2. Log in with credentials of administrator or certifier
3. Click Identity Certification tab
4. Click My Certifications
5. Click the New or In-Progress Certification or search for the required
certification using the available search filters
6. Select the Certification to complete by clicking on the Certification Name
or using the corresponding checkbox and clicking “Edit Certification”
Chapter 8 · Identity Certifications
117
Completing an Application Owner Certification
Figure 8-26 Edit Certification Status
7. Click [Review] to view application entitlements. It is important to note
that these application entitlements are filtered on the basis of their
application endpoints.
8. Click ‘Certify’, ‘Revoke’, ‘Unknown’ or ‘Exception Allowed’ for each
User’s access account. Glossary definitions are useful in determining the
true meaning of a cryptic or system level attribute value
9. Click Certify or Revoke to sign off each attribute value within each user’s
account that belongs to a particular endpoint. Each account can also be
certified as a whole.
10.If Sun Role Manager detects that all attestations have been completed a
“Sign Off Certification” box appears. To complete certification at this
point click “Ok”. Otherwise Complete attesting entitlements of all
accounts and then click Complete Certification
118
Sun Role Manager 4.1 · September 2008
Completing an Application Owner Certification
Figure 8-27 Sign-off Certification
11.Enter your login password to secure your sign-off on this certification
Chapter 8 · Identity Certifications
119
9
9
C H A P T E R
9
Identity Audit
Introduction
Organizations must be able to manage Continuous Exception Monitoring. Segregation of Duty (SoD)
Violations, Detective Scanning, Inter & Intra-Application SoD Enforcement, Actual vs. Assigned
Exceptions, Exception Lifecycle Management. All the above exceptions can be captured in Role Manager
and produced in a central repository. Role Manager provides the capability to define Audit policies and the
ability to capture/report any exceptions from these policies.
Role Manager provides a Compliance Dashboard for Executives/Auditors which enable them to monitor
these exceptions from a central point. Also, the various exceptions generated are stored in Role Manager
and a security analyst can accept them or mitigate these risks/exceptions.
The Role Manager Audit Module ensures that users only have the access that they should for their job
responsibility. Following are some of the key features of the Identity Auditing module:
Actual Account Scanning: Role Manager scans actual accounts for Identity Audit exceptions.
Irrespective of how an account is provisioned or modified (directly or through a provisioning solution)
–Role Manager will be able to detect any audit exceptions, since the scanning is done at the actual
account details level.
Compliance Dashboard: Role Manager provides a detailed dashboard for auditors, security
administrators and compliance teams to review the status, history and trend of identity audit exceptions
in the enterprises.
Exception Lifecycle Management: Role Manager stores every action that is conducted on an audit
exception and creates a history of the exception. This allows administrators to get a complete step-bystep history and lifecycle of the exception if required.
iis121
Introduction
By closely monitoring user access privileges, who approved access privileges, and what access privileges
shouldn’t be there, Role Manager provides organizations with the data required to take informed
corrective actions in order to remediate policy violations. Role Manager provides a platform to enforce
policies and generate audit trails that can be used to certify compliance with various laws and
regulations.
Following types of exceptions are monitored by the system on a scheduled basis:
Actual vs. Assigned: The system will monitor all instances where a user’s actual access in the target
system does not match the access assigned to the user based on the roles assigned to the user
Terminated User with Accounts: The system will monitor all instances where a terminated user has
active accounts
Audit Rules and Policies
Create Audit Rules and Audit Policies
▼ Steps to set Auditable Attributes
before Identity Audit
122
1.
Open your Java enabled web browser
2.
Log into the Role Manager Web-Interface from your Java enabled web browser
3.
The login dialog box appears. Enter the relevant credentials and login to Role
Manager
4.
Click the Administration C Configuration tab and then Namespaces link
Sun Role Manager 4.1 · September 2008
Audit Rules and Policies
5.
Select desired namespace and check or uncheck ‘Auditable’ dialog box for each
attribute
Figure 9-1 Set Auditable Attributes
Create Audit Rules
▼ Steps to Create an Audit Rule
1.
Log into the Role Manager Web-Interface
2.
Click Identity Audit tab and click Rules link
Chapter 9 · Identity Audit
123
Audit Rules and Policies
Figure 9-2 Audit Rules
124
3.
Click the New Rule button.
4.
Enter a relevant Rule name and description
5.
Select a Role Manager object from the drop down list – options will include User
and each defined Namespace.
6.
Selecting the Object will bring up a pull down list of Object’s attributes.
7.
Select desired attributes, condition and value
8.
To add another object to the Audit Rule, click [Add]
Sun Role Manager 4.1 · September 2008
Audit Rules and Policies
Figure 9-3 Add Audit Rules
9. Click Add when rule creation is complete.
Figure 9.4 Completed Rule Creation
Chapter 9 · Identity Audit
125
Audit Rules and Policies
Create Audit Policy
▼ Steps to Create Audit Policy
1.
In the Identity Audit tab, click Policies.
2.
Select New Policy and assign Policy name and description.
Figure 9-5 Create Audit Policy
3. To add an Audit Rule, select [Add]. This will bring up a pop up window
with all listed Audit Rules and dates of creation.
126
Sun Role Manager 4.1 · September 2008
Audit Rules and Policies
Figure 9-6 Add Rules to Policy
4. Check all desired Rules and click Ok
Chapter 9 · Identity Audit
127
Audit Rules and Policies
Figure 9-7 Check Rules
5. Set the logical condition operator between Rules. Options are AND, OR
and add more rules if required.
6. Click Next to go to the remediators tab.
7. All violations of said policy will be assigned to this remediator and
appropriate email notifications will be sent. Click [Search] to display a
search box for users. Select one user and click OK and then Finish to
save the policy.
128
Sun Role Manager 4.1 · September 2008
Audit Rules and Policies
Figure 9-8 Search Remediator
Scan Audit Policy Violations
▼ Steps to Scan System for Audit
Violations
1. Click the Identity Audit Policies Scan Policies tabs.
Chapter 9 · Identity Audit
129
Audit Rules and Policies
Figure 9-9 Scan Policies
2.
130
Click Add Business Unit(s) to add certain business units from the selection or
check All Business Units to scan against the entire warehouse.
Sun Role Manager 4.1 · September 2008
Audit Rules and Policies
Figure 9-10 Select Business Unit
3. Click Ok to select the required Business Units. Click Next. This will guide
the user to the Policy Violation Scan page where listed on top is the
number of users being scanned and the progress of the audit scan. The
following message appears once the scan is completed:
Chapter 9 · Identity Audit
131
Audit Rules and Policies
Figure 9-11 Policy Violation Scan
3.
And violations found will be listed. Users violating the policy along with Audit
Rule exception are also listed.
4.
Click Save to start managing the life-cycle of this exception.
Open Policy Violations
▼ Steps to View Policy Lifecycle
132
1.
Log into Role Manager Web Interface and click the Identity Audit tab.
2.
Click Policy Violations to list all saved violations from your Audit scans.
Sun Role Manager 4.1 · September 2008
Audit Rules and Policies
Figure 9-12 Policy Violations
3.
Click an Open exception.
4.
The Audit Violation lists the Policy that was violated, current state of Exception,
Date of Detection, Remediator assigned to this Violation, and details of the User
in violation.
5.
Scroll down the screen to list Account being violated including account name
and target machine.
6.
Further below note the violation trail.
Chapter 9 · Identity Audit
133
Audit Rules and Policies
Manage Life-Cycle of Audit Violation
▼ Steps to Manage life-cycle of an Audit
Violation
1.
134
The options for a remediator are to assign the violation to another person,
immediately close the violation or close with an accepted risk with an end date for
this risk.
2.
Click Close as Risk Accepted.
3.
This will bring up a screen where you need to assign a future date until when this
risk is acceptable.
4.
Assign a mitigating control in the comments for this accepted risk.
5.
Click Ok. Your action will show up in the violation trail for auditors and
management/auditors to keep track of.
Sun Role Manager 4.1 · September 2008
Audit Rules and Policies
Figure 9-13 – Close as Risk Accepted
6.
To assign another Remediator to this violation, click Assign.
7.
This will bring up a User Search dialog box. Find relevant user and click ok.
Figure 9-14 – Assign Violation to User
Chapter 9 · Identity Audit
135
Audit Rules and Policies
8.
To close this Exception with no further action, click Close. You will need to enter
your comments in the pop up box.
Figure 9-15 – Close as Fixed
9. All actions are recorded and logged with date stamps for a complete
audit violation life-cycle trail.
Figure 9.-16 Violation Trail
136
Sun Role Manager 4.1 · September 2008
10
10
C H A P T E R
1 0
Role Manager Scheduling
The current scheduler is based in the configuration files and is specific to every App Server. The scheduler is
packaged between two files in Role Manager and these are found under the $RBACX_HOME/WEB-INF
folders. The two files which enable the scheduling service are scheduling-context.xml and jobs.xml.
Figure 10-1 Jobs.xml
iis137
Role Manager Scheduling
Figure 10-2 Scheduling-context.xml
In the current architecture these files are found in the following path.
C:/Vaau/RBACx2006/tomcat55/WEB-INF>
Scheduling-context.xml
jobs.xml
UI Based Import/Export Scheduler
Role Manager provides a UI based scheduler for every data import and export capability available. The Role
Manager administrator can easily navigate to the scheduler and create jobs to import users, accounts, roles,
or to export roles, policies, etc.
138
Sun Role Manager 4.1 · September 2008
Role Manager Scheduling
Figure 10-3 Schedule Job Types Export
Chapter 10 · Role Manager Scheduling
139
Role Manager Scheduling
To create a new Import/Export job using this scheduler,
1. Navigate to Administration Configuration Import/Export tab
2. Click Schedule Job
3. Select the Job Type
4. Select the connection to use. It is important to select the correct Server
Type on the screen from the dropdown menu. All IAM Servers created in
the Provisioning Servers menu will be displayed in this dropdown menu.
Also, the File Server option is a standard option that is displayed, which
signifies a flat file (csv, xml, etc.) data import or export.
Figure 10-4 Import/Export Tab
5. Provide the name and description of the job
6. Enter the required job scheduling information and click finish
Figure 10-5 New Job
7. Each namespace consists of an endpoint; hence it is also important to
140
Sun Role Manager 4.1 · September 2008
Role Manager Scheduling
select the correct endpoint in case of an entitlement import or export.
Figure 10-6 NameSpace and Endpoints
Note – Certain data imports/exports (such as role import/export, users import/export) do not require
Namespaces or Endpoints information to be specified.
File Based Import/Export Scheduler
The file based scheduler is packaged between two files in Role Manager and these are found under the
$RBACX_HOME/WEB-INF folders. The two files which enable the scheduling service are schedulingcontext.xml and jobs.xml.
Scheduling-Context.xml
The scheduling-context.xml file enables the user to enable the three imports in Role Manager (User import,
Account import, Glossary import) and the actual schedule for each import and export is specified in the
jobs.xml. The schedule for every job is specified using a Cron Expression. A "Cron-Expression" is a string
comprised of 6 or 7 fields separated by white space which specifies the schedule for every job. A few sample
Cron expressions are listed below:
Cron Expression
Definition
Chapter 10 · Role Manager Scheduling
141
Role Manager Scheduling
0 0 12 * * ?
Fire at 12pm (noon) every day
0 15 10 ? *
Fire at 10:15am every day
0 15 10 * * ?
Fire at 10:15am every day
0 15 10 * * ? *
Fire at 10:15am every day
0 15 10 * * ? 2007
Fire at 10:15am every day during the year 2007
0 * 14 * * ?
Fire every minute starting at 2pm and ending at 2:59pm, every day
0 0/5 14 * * ?
Fire every 5 minutes starting at 2pm and ending at 2:55pm, every day
0 0/5 14,18 * * ?
Fire every 5 minutes starting at 2pm and ending at 2:55pm, AND fire every 5 minutes starting at
6pm and ending at 6:55pm, every day
0 0-5 14 * * ?
Fire every minute starting at 2pm and ending at 2:05pm, every day
0 10,44 14 ? 3 WED
Fire at 2:10pm and at 2:44pm every Wednesday in the month of March.
0 15 10 ? * MON-FRI
Fire at 10:15am every Monday, Tuesday, Wednesday, Thursday and Friday
0 15 10 15 * ?
Fire at 10:15am on the 15th day of every month
0 15 10 L * ?
Fire at 10:15am on the last day of every month
0 15 10 ? * 6L
Fire at 10:15am on the last Friday of every month
0 15 10 ? * 6L
2002-2005
Fire at 10:15am on every last Friday of every month during the years 2002, 2003, 2004 and 2005
0 15 10 ? * 6#
Fire at 10:15am on the third Friday of every month
0 0/30 8-9 5,20 * ?
Fires every half hour between the hours of 8 am and 10 am on the 5th and 20th of every month.
Note that the trigger will NOT fire at 10:00 am, just at 8:00, 8:30, 9:00 and 9:30
142
Sun Role Manager 4.1 · September 2008
Role Manager Scheduling
0 30 23-19 ? * *
Fires at 10:30, 11:30,12:30 and 13:30 on every Wednesday and Friday
10 0/5 * * * ?
Fire every 5minutes and 10 seconds
0 0/5 * * * ?
Fire every 5 minutes
The current schedule which is fixed for the various jobs is listed below
Job
Schedule
GDW User Import
Fires at 7:05 am every day
Glossary Import
Fire at 10:05am every day
Account Import
Fire every 15 minutes between 12 am and 4pm and between 9 pm to 12 pm everyday
Account Export
Fire at 7:05 pm everyday
Follow the given steps to enable the four jobs in Role Manager
1.
Log on to the Application Server
2.
Browse to
<opt/IBM/WebSphere/AppServer/profiles/lnx80041_AppSrv01/installedAp
ps/lnx80041Cell01/rbacx_war.ear/rbacx.war/WEB-INF>
3.
Edit the scheduling-context.xml file
a. To enable User import uncomment the User Import tags found on
line 110 and 125
b. To enable Account import uncomment the Account Import tags
found on line 111 and 126
c. To enable Glossary import uncomment the Glossary Import tags
found on line 113 and 128
A snapshot of these lines is listed below
<! -- Uncomment the line before to use this account import job. Multiple jobs
can be added,
1. Define a job in jobs.xml
2. Add a reference to job below -->
Chapter 10 · Role Manager Scheduling
143
Role Manager Scheduling
<ref bean="usersImportJob"/>
<ref bean="accountsImportJob"/>
<!--ref bean="rolesImportJob"/-->
<ref bean="glossaryImportJob"/>
</list>
</property>
<property name="triggers">
<list>
<! -- Uncomment the line before to use this account import job. Multiple
triggers can be added,
1. Define a trigger in jobs.xml
2. Add a reference below -->
<ref bean="usersImportTrigger"/>
<ref bean="accountsImportTrigger"/>
<!--ref bean="rolesImportTrigger"/-->
<ref bean="glossaryImportTrigger"/>
Follow the given steps to update schedule of the three jobs
1.
Log on to the Application Server
2.
Browse to
<opt/IBM/WebSphere/AppServer/profiles/lnx80041_AppSrv01/installedAp
ps/lnx80041Cell01/rbacx_war.ear/rbacx.war/WEB-INF>
3.
Edit the jobs.xml file
a. To update the User Schedule edit the cron expression on line
26
b. To update the Account Schedule edit the cron expression on
line 65
c. To update the Glossary Schedule edit the cron expression on
line 161
Scheduling Certifications
Role Manager provides a standard scheduler that can be used to schedule certifications to run at a daily,
weekly, monthly or one time jobs. The scheduler provides full scheduling capability. Certifications can be
scheduled during the certification creation process. For more details on scheduling a certification refer to the
Create a New Certification section of the Identity Certification chapter
144
Sun Role Manager 4.1 · September 2008
Scheduling Reports
Scheduling Reports
▼ Steps to Schedule a Report
1. Start Role Manager by clicking on the Role Manager Icon
2. The login dialog box appears. Enter the Admin credentials and login to
Role Manager
3. Click Reports Schedule Reports New Report Job
Figure 10-7 New Report Job
4. Enter the report job name, description and which report you would like to
run on a scheduled basis.
Chapter 10 · Role Manager Scheduling
145
Scheduling Reports
Figure 10-8 Schedule Business Unit Reports
Generating Reports
5. Select the Business Unit you would like to run the report for by clicking
“Add Business Unit”. The Business Unit tree view appears in a separate
display.
146
Sun Role Manager 4.1 · September 2008
Scheduling Reports
Figure 10-9 Select Business Units
6. Scroll below to select the date and time for the report job to execute.
Figure 10-10 Create Report Job
7. Click to create the report job.
Chapter 10 · Role Manager Scheduling
147
Scheduling Reports
8. To delete a report job, click the Delete icon.
Scheduling Reminder Emails
▼ Steps to configure Reminder Emails
Similar to the Identity Certification Reminder Email Workflow, reminder emails can be configured to send
emails to various actors based on pre-defined email templates.
1.
To configure this workflow, click Administration Configuration Reports tab.
Figure 10-11 Configuration Reports
2.
148
To configure the workflow, select the reminder level for Data Owner (or Report
Owner), select the Reminder Interval and add the pre-defined email template
(created in the Email Templates tab).
Sun Role Manager 4.1 · September 2008
Scheduling Reminder Emails
Figure 10-12 Email Templates Tab
3.
Click Create to save the workflow settings. This workflow functions in the same
fashion as the Identity Certification workflow, hence the same concepts apply to
this workflow as well.
Scheduling Role Mining Task
Role Manager allows scheduling of Role Mining Tasks using the standard scheduler integrated with Role
Manager.
▼ Steps to schedule Role Mining Task
1. Start Role Manager by clicking on the Role Manager Icon
2. The login dialog box appears. Enter the Admin credentials and login to
Chapter 10 · Role Manager Scheduling
149
Scheduling Role Mining Task
Role Manager
3. Select the Role Engineering Tab. This gives the Task scheduler view by
default. All role mining tasks created are listed here
Figure 10-13 Role Mining Option Details
4. Click the Schedule icon for the role mining task to be scheduled. This
opens the Task Scheduler
Figure 10-14 Task Scheduler
5. Select a Daily, Weekly, Monthly or One Time Task and fill in the
150
Sun Role Manager 4.1 · September 2008
Scheduling Role Mining Task
corresponding fields. Select “Schedule” when all values are selected.
This will schedule a Role mining task to be run at the intervals selected.
Chapter 10 · Role Manager Scheduling
151
11
11
C H A P T E R
1 1
Role Management and Designing
Workflows
Role Manager is designed to be the authoritative source for roles in any architecture, and thus it contains a
powerful module for Role Management. The major component of Role Management is the implementation
of workflows to manage roles throughout their lifecycles. Out of the box, Role Manager comes with six
important workflows: Role Membership Workflows, Role Modification Workflow, Role Creation Workflow,
Policy Creation Workflow, Policy Modification Workflow and Mass Modification Workflow. These
workflows can be configured and tailored to any environment since they are based upon the open source
Open Symphony Workflow engine.
Workflow Configuration
Before we can begin to use workflows within Role Manager, we have to ensure that they configured
correctly. During the default installation process with the automated installer, using SQL server and Apache
Tomcat, workflows are configured automatically. If the environment is different from the default, we must
ensure that the settings are correct.
The default external folder location is ‘C:\Vaau\rbacx-4.0\conf\workflows’. The OS Workflow Engine
uses xml files to store the various workflows. Those files are housed in this location. As a result, since Role
Manager comes with three configured workflows out of the box, all three of the corresponding xml files will
be located here. If the folder location of the ‘conf\workflows’ is somewhere other then ‘C:\Vaau\rbacx-4.0’
then we need to input the location in the workflows.xml file.
The workflows.xml file is located in the application server directory under ‘{application server webapps
directory}\rbacx\WEB-INF\classes\workflows.xml’
Ensure that the location of the workflow xml files for the external rbacx folder is correct. If not, change
them, save the file, and restart the application server to reflect the changes.
iis153
Workflow Configuration
Figure 11-1 workfows.xml
154
Sun Role Manager 4.1 · September 2008
Workflow Design: Assign Policy and Role Owners
Workflow Design: Assign Policy and Role
Owners
The current workflow setup in Role Manager can be seen under the ‘Workflows’ tab under Administration
Configuration. We can easily assign and reassign both policy and role owners from this section. The
following example will show a step-by-step approach with an existing workflow:
1.
Navigate to the Role Workflow tab under Administration Configuration
2.
Select the Workflow to edit (Role Creation in this example)
Figure 11-2 Edit Workflows
3.
From the Edit Workflow screen, click on ‘Approve Role’ from the Policy
Owner Approval step
Chapter 11 · Role Management and Designing Workflows
155
Workflow Design: Assign Policy and Role Owners
Figure 11-2 General Workflow Action Details
4.
156
Select the ‘Assignee’ tab
Sun Role Manager 4.1 · September 2008
Workflow Design: Assign Policy and Role Owners
Figure 11-3 Workflow Action Details Assignee tab
5.
Select the type of Assignee and the Selected Assignee and click the Save
button
The process to add or change the Role Owner is similar and involves selecting the Approve Role Step from
the Role Owner Approval step instead of the Policy Owner Step.
Workflow Design: Add a Step
To modify an existing workflow, click on the name of the workflow. In this screen, we can see all the
current steps within the workflow. Steps can be added or removed by simply clicking the appropriate
button. Let’s walk through the modification of the ‘Role Creation Workflow’ by adding another approver.
▼ Role Creation Workflow Modification
Figure 11-4 Edit Workflow
After each step in the workflow, there is a column called ‘Operation’ which contains the ‘Add Step’ and
‘Delete Step’ options. For this example, we are going to add a step after ‘Start Workflow’ and before ‘Policy
Chapter 11 · Role Management and Designing Workflows
157
Workflow Design: Add a Step
Owner Approval’. In this organization, we have an employee who is designated as the ‘Role Manager’ and
must approve and document all roles when they are created.
1. Navigate to the Role Workflow tab under Administration Configuration
2. Select the Workflow to edit (Role Creation in this example)
3. Click ‘Add Step’ for the step you want to fall before the one you are
trying to create.
4. Select the type of step you want to create.
Role Manager comes with two templates out of the box, however more templates are
usually designed for the clients needs during implementation phases
5. After selecting ‘Approval Step’ we get the following window.
158
Step Name: Name for this step within this workflow
Link (Role) Status: The status that the role will be in while it is in this phase of the
workflow. Role can be in a few different status types during each step:
Active: Role is actively provisioning users
Inactive: Role is suspended and is not provisioning users
Composing: Role is not yet complete
Pending Approval: Role is complete but is awaiting approval by appropriate parties
before becoming active
Destination Step: Allows admin to choose which step the role goes into once it completes
the current step
Assignee: The Global User, Role, Role Owner, or Policy Owner who will be approving this
step. After selecting the assignee, another window will open to search and locate the
assignee from the group that was selected.
Note: If multiple users are required as part of the approval step, then a role nonprovisioning role must be created containing all those users, and the role must be selected as
the ‘Assignee’.
Due Date Options: This allows setting an expiry on the added step. Select Enable Due Date
Options checkbox. Fill in the value for the number of days that the step will be valid before
it expires
Reminder Options: These options can be used to send reminders notifying about the expiry
of the added step a specified number of days before expiry at the selected frequency. Select
Enable Reminder Options checkbox. Fill in the value for the number of days before due
date that reminder will be sent. Select the reminder frequency and the form of the reminder
by selecting a template
Escalation Options: These options can be used to trigger an escalation mechanism if the
appropriate action is not taken after a specified number of reminders
Sun Role Manager 4.1 · September 2008
Workflow Design: Add a Step
Figure 11-5 Workflow Step
6. Once the step has been saved, it appears in the appropriate location both
on the left pane, and diagrammatically in the right pane.
Chapter 11 · Role Management and Designing Workflows
159
Workflow Design: Add a Step
Figure 11-6 Workflow Completion
Role Versioning
Sun Role Manager provides sophisticated role versioning capabilities, allowing role engineers and
administrators to create different versions of roles so that modifications made to a role do not affect the
original role. Sun Role Manager allows ‘n’ number of versions to be created for any particular role, requiring
a version to be approved before it is made active. This feature assists in managing the lifecycle of roles
ensuring no role modifications are made without approval and that there is always a previous version of the
role to fall back on. Sun Role Manager provides sophisticated role version management with the ability to
compare versions and revert to any version. All versions have an audit trail of when and by whom they were
created and approved. Comparing two versions gives an individual comparison all the attributes, owners,
business units, policies and exclusion roles of a role in a tabular fashion. Different color codes are used to
indicate values that are unmodified, modified, added or deleted.
The key Role Versioning features in Sun Role Manager are:
160
●
Version Creation: Sun Role Manager automatically creates a new version for a Role when the
definition of a Role is changed. Role definition changes due to number of actions on role
properties such as policy addition/removal, change in an associated policy, addition/removal of
owners, change in name, manual change in status etc
●
Version Comparison: Sun Role Manager allows the comparison of two versions of role. Role
properties are divided into General, Ownership, Business Units, Policies or Exclusion Roles
Sun Role Manager 4.1 · September 2008
Role Versioning
modules for comparison. All properties for the compared versions are displayed side by side and
the changes are highlighted with color codes for modification, addition and deletion
●
Reverting to a Version: Sun Role Manager stores all created versions of a role. Only one version
of a role can be active at an instant. A Role can easily be reverted to any of the inactive versions
using the Revert to Version capability.
▼ Steps to Manage Role Versions (View, Compare, Revert)
1.
Start Sun Role Manager by clicking the Sun Role Manager icon
2. The login dialogue box appears. Enter your credentials and login to Sun
Role Manager
3.
Select the Role view by selecting it from the Identity Warehouse Tab
4.
Select a Role from the Roles panel on the left
5.
Select the Versions Tab
Figure 11-7 Versions Tab
Chapter 11 · Role Management and Designing Workflows
161
Role Versioning
6. To compare two versions select them by selecting their corresponding
checkboxes and select “Compare Versions”
Figure 11-8 Compare Versions
7. Select the General, Ownership, Business Units, Policies or Exclusion Roles
Tab to compare these aspects of the versions
162
Sun Role Manager 4.1 · September 2008
Role Versioning
Figure 11-9 General View for comparison
8. To revert to an inactive version of the Role select a version by selecting its
checkbox and select “Revert to Version”.
9. A “Confirm Revert to Version” Window opens. Select “Yes”. The version
status of the version reverted to will change from “Inactive” to “Pending
Approval”
Role History
Role History creates a complete snapshot of the Role. Role History provides at a glance all instances of
addition/removal of members, policies and owners as well as modification to attribute values of the Role.
Chapter 11 · Role Management and Designing Workflows
163
Role History
An audit trail is created by recording and displaying when and by whom a change is made.
The aspects covered by Sun Role Manager Role History are:
●
Role Membership History: provides a view of all members added to or removed from the Role
along with the Sun Role Manager User responsible for the action and the date of member
addition/removal
●
Policy History: provides a view of all policies added to or removed from the Role along with
the Sun Role Manager User responsible for the action and the date of policy removal
●
Owner History: provides a view of all owners added to or removed from the Role along with
the Sun Role Manager User responsible for the action and the date of owner addition/removal
●
Attribute History: provides a view of all modifications made to attributes associated with a
role. The Attribute name, old value of the attribute and the new value after modification are
displayed. Also displayed are the Sun Role Manager User responsible for the modification and
the date of the change.
●
Certification History: provides a view of all the certifications performed on the Role. It gives
details of the certification such as creation date, created by, certification period, certifier,
certification status, certification date etc
▼ Steps to view Role History
1.
Start Sun Role Manager by clicking the Sun Role Manager icon
2. The login dialogue box appears. Enter your credentials and login to Sun
Role Manager
164
3.
Select the Role view by selecting it from the Identity Warehouse Tab
4.
Select a Role from the Roles panel on the left
5.
Select the History Tab
Sun Role Manager 4.1 · September 2008
Role History
Figure 11-10 History Tab
6.
To view member addition/deletion history select “Show Details”
corresponding to “Role Member History”
Chapter 11 · Role Management and Designing Workflows
165
Role History
Figure 11-11 Role Member History
7. To view Policy addition/deletion history select “Show Details”
corresponding to “Policy History”
166
Sun Role Manager 4.1 · September 2008
Role History
Figure 11-12 Show Details
8. To view Owner addition/deletion history select “Show Details”
corresponding to “Owner History”
Chapter 11 · Role Management and Designing Workflows
167
Role History
Figure 11-13 Owner History
9. To view Attribute modification history, select “Show Details” corresponding
to “Attribute History”. This displays the Attribute Name, Old Value and New
Value along with timestamp and User.
168
Sun Role Manager 4.1 · September 2008
Role History
Figure 11-14 Show Attribute Details
10.
To view Certification history, select “Show Details” corresponding to
“Certification History”.
Role Status
As a role progresses through the various steps of a workflow, it can be set to a number of different statuses.
The role statuses that Role Manager supports are as follows:
Active:
Inactive: Role is suspended and is not provisioning users
Composing: Role is not yet complete
Role is actively provisioning users
Chapter 11 · Role Management and Designing Workflows
169
Role Status
170
Pending Approval: Role is complete but is awaiting approval by appropriate parties before becoming
active
Decomissioned:
Role is disabled and will no longer be used
Sun Role Manager 4.1 · September 2008
12
12
C H A P T E R
1 2
Role Provisioning Rules (Rule-Based
Role Assignment) and Role
Consolidation
Role Manager can assign to new or existing users on the basis of pre-defined rules or criteria. The rules are
usually based on HR attributes, but Role Manager has the ability to define rules based on any attribute
stored within the identity warehouse for anyone of its users.
Examples of Rules might be: If a user if based in the Midwest region, and works in Chicago, IL campus,
provide access to ‘Base Employee Chicago Role’. Though this is a very simplistic example, the Role
Manager rule engine allows an administrator to define multiple rules to define a criteria using ‘AND’ and
‘OR’ operators between rules, and ‘equals’, ‘does not equal’, ‘contains’, ‘does not contain’, ‘is null’, and ‘is
not null’ within rule conditions. Thus, many rules can be defined in order to distinguish groups of users
from one another and automatically assign a role to them. This feature of Role Manager greatly decreases
on boarding times for new employees and reduces the chance and delays associated with granting incorrect
access.
Let’s walkthrough the process of setting up a rule in Role Manager using the examples mentioned above:
1. Migrate to the Role Provisioning Rules window under the Role
Management tab
2. Click on the ‘New Rule’ button
3. A window appears that asks for a Rule Name and Rule Description
iis171
Role Provisioning Rules (Rule-Based Role Assignment) and Role Consolidation
Figure 12-1 New Role Provisioning Rule
172
Sun Role Manager 4.1 · September 2008
Role Provisioning Rules (Rule-Based Role Assignment) and Role Consolidation
4. Click next and you will be taken to the Rule Conditions screen. Here you
can define the various rules to select a group of users and assign them
to a role.
To add more rules, click the add button
Each rule by default is separated by an ‘AND’ operator
The number of rule conditions is not limited
Figure 12-2 Rule Conditions
5. Once all the Conditions have been set, click next and select the Role to
which these users will be assigned.
Figure 12-3 Select Role
6. This leads to the Unassign Rule Option page. These options can be
applied to unassign roles based on the conditions created for the rule in
step 4. Any users that do not satisfy all the conditions associated with
Chapter 12 · Role Provisioning Rules (Rule-Based Role Assignment) and Role Consolidation
173
Role Provisioning Rules (Rule-Based Role Assignment) and Role Consolidation
the rule and have the Role assigned to them will have the Role deassigned when this rule will be evaluated
Figure 12-4 Unassign Rule Option
7. When the un-assign options have been selected click “Finish” to save
the rule
174
Sun Role Manager 4.1 · September 2008
Role Provisioning Rules (Rule-Based Role Assignment) and Role Consolidation
Role Consolidation
Over time, enterprises end up with roles that are very similar. It becomes difficult to consolidate these roles
since they contain overlapping users and access. The Role Consolidation engine built into Role Manager can
analyze and consolidate roles on the basis of either Memberships (users) or Entitlements (Access).
Figure 12-5 Rule Consolidation
It works by examining two roles and reporting the intersection, meaning, everything the two roles have in
common will be reported. ‘Cut-offs’ can be set and work similarly to the cut-offs used during the role
mining process. The ‘cut-off’ will filter the results, and only show similarities between the two selected roles
Chapter 12 · Role Provisioning Rules (Rule-Based Role Assignment) and Role Consolidation
175
Role Consolidation
that fall above the cut-off percentage. This allows us to filter out many of the access similarities that are
common across multiple roles since they are more or less base role type accesses.
A screenshot of Role Consolidation screen evaluating similarity by entitlements. In this mode, Role Manager
analyzes two different roles and displays their similarity by comparing the number of policies they share.
Figure 12-6 Role Consolidation Evaluating by Entitlements
Figure 12-7 Role Consolidation Similarity Results
176
Sun Role Manager 4.1 · September 2008
Appendix I: CloverETL how-to
Load/Unload Data From Database
How CloverETL Works with
Databases
To simplify things, CloverETL uses JDBC to work (talk to) with databases. If your database of heart
has a driver supporting the JDBCTM API, CloverETL can be used to unload data stored within
database table or can populate database table with internal data.
DBConnection
Before any attempt to connect to database can be made, the way of connecting to the database has to
be described. For this purpose, DBConnection must be specified first. Within the graph definition, it
can be done following way.
<DBConnection id="InterbaseDB" dbConfig="Interbase.cfg"/>
It specifies that CloverETL should set up database connection called InterbaseDB. All required
parameters (JDBC driver name, DB connect string, user name & password) can be found in config
file called Interbase.cfg.
The content of dbConfig file is standard Java preferences file. It contains names of parameters with
values for parameters. The possible parameters lists following table:
Parameter name
Description of parameter
Example of parameter's value
dbDriver
Specifies name of class
containing JDBC driver for
your database.
This class must be visible to
Java (i.e. be part of
CLASSPATH)
org.postgresql.Driver
dbURL
URL for connecting to
database - the name of
JDBC driver to use, IP
address where the server
listens, name of database
instance, port, etc.
jdbc:postgresql://192.168.1.100/mydb
user
Username under which to
connect to database
Admin
password
Password to be used
free
driverLibrary
Optional parameter. Where to
look for JDBC driver class.
c:\Oracle\product\10.1.0\Client_1\jdbc\lib\ojdbc14.jar
.. other specific
parameter...
Optional parameters
specific for your JDBC
driver
Oracle example: defaultRowPrefetch=10
Sample listing of Postgres.cfg file with definition of connection to PostgreSQL database:
dbDriver=org.postgresql.Driver
dbURL=jdbc:postgresql://192.168.1.100/mydb
user=david
password=unknown
All parameters can be also directly specified when defining connection:
<DBConnection id="InterbaseDB" dbDriver="org.postgresql.Driver"
dbURL="jdbc:postgresql://192.168.1.100/mydb" user="david"
password="unknown"/>
If you use the dbConfig parameter, it has the precedence and all the connection parameters will be
sought in specified properties file !
Mapping JDBC data types onto
Clover types
When working with database through JDBC drivers, CloverETL needs to map its internal data types
onto JDBC data types. The variety of DB (JDBC) field types is huge but most of them (with
exception of BLOBs) can be mapped onto Clover internal types without losing any information.
JDBC to CloverETL
Following table lists JDBC data types and corresponding CloverETL data types. The conversion is
done automatically by CloverETL when analyzing DB tables using org.jetel.database.AnalyzeDB
utility. This conversion can also be made manually using presented table.
JDBC (DB) data type
CloverETL data type
INTEGER
SMALLINT
TINYINT
INTEGER
BIGINT
LONG
DECIMAL
DOUBLE
FLOAT
NUMERIC
REAL
NUMERIC
CHAR
LONGVARCHAR
VARCHAR
OTHER
STRING
DATE
TIME
TIMESTAMP
DATE
BOOLEAN
BIT
STRING
(true value coded as "T"
false value coded as "F")
Following example illustrates the conversion. First, the DDL (Oracle DB) definition of database table
is presented and then Clover's version of the same using its internal datatypes.
create table MYEMPLOYEE
(
EMP_NO
NUMBER not null,
FIRST_NAME VARCHAR2(15) not null,
LAST_NAME
VARCHAR2(20) not null,
PHONE_EXT
VARCHAR2(4),
HIRE_DATE
DATE not null,
DEPT_NO
CHAR(3) not null,
JOB_CODE
VARCHAR2(5) not null,
JOB_GRADE
NUMBER(4,2) not null,
JOB_COUNTRY VARCHAR2(15) not null,
SALARY
NUMBER(15,2) not null,
FULL_NAME
VARCHAR2(35)
);
<?xml version="1.0" encoding="UTF-8"?>
<!-- Automatically generated from database null -->
<Record name="EMPLOYEE" type="delimited">
<Field name="EMP_NO" type="numeric" delimiter="," format="#"/>
<Field name="FIRST_NAME" type="string" delimiter="," />
<Field name="LAST_NAME" type="string" delimiter="," />
<Field name="PHONE_EXT" type="string" nullable="yes" delimiter="," />
<Field name="HIRE_DATE" type="date" delimiter="," format="dd/MM/yyyy"
/>
<Field name="DEPT_NO" type="string" delimiter="," />
<Field name="JOB_CODE" type="string" delimiter="," />
<Field name="JOB_GRADE" type="numeric" delimiter="," />
<Field name="JOB_COUNTRY" type="string" delimiter="," />
<Field name="SALARY" type="numeric" delimiter="," />
<Field name="FULL_NAME" type="string" nullable="yes" delimiter="\n" /
>
</Record>
CloverETL to JDBC
The reverse conversion from CloverETL to JDBC data type (usually done when populating target
DB table) is again driven by JDBC datatypes. There are some exceptions caused by non existence of
certain field types on CloverETL's side. These exceptions are handled automatically by CloverETL.
Internally it is done by calling different than standard JDBC methods for populating DB fields with
values. See following table for explanation. See source code (org.jetel.database.CopySQLData) to get
complete insight.
JDCB type
CloverETL type
Conversion performed
Timestamp
Date
Date is converted to Timestamp and the target is set
using setTimestamp() method
Boolean
Bit
String
If string contains "T" or "t" the target is set to be True,
otherwise False using
setBoolean()
Decimal
Double
Numeric
Real
Integer
Conversion from Integer to Decimal is made, the target
is set using setDouble() method
Other
(includes
NVARCHAR
&
NCHAR)
String
The target is set using setString() method
Using AnalyzeDB utility
CloverETL package contains simple utility which can analyse source or target database table and
produce Clover's metadata description file. This metadata can be later on used by any DB related
component.
Running AnalyzeDB utility is simple, use command like this:
java -cp cloverETL.rel-1-x.zip org.jetel.database.AnalyzeDB
AnalyzeDB needs several parameters to be specified. At least it must know how to connect to
database and which DB table to analyze. For specifying database connection, the same
DBConnection parameter file can be used (see text above).
For specifying which table to analyze, SQL query must be specified which is executed against DB and
the returned result set is examined for field types. This way, only portion of table can be
extracted/analyzed.
See following table for complete list of options/parameters:
Parameter
Meaning
-dbDriver
JDBC driver to use
-dbURL
Database name (URL)
-config
Config/Property file containing parameters
-user
User name
-password
User's password
-d
Delimiter to use (standard is [,])
-o
Output file to use (standard is stdout)
-f
Read SQL query from filename
-q
SQL query on command line
-info
Displays list of driver's properties
Example of using AnalyzeDB to get field types of employee DB table:
java -cp cloverETL.rel-1-x.zip org.jetel.database.AnalyzeDB -config
postgres.sql -q "select * from employees where 1=0"
Using such a command, all the data fields will be examined. When only some of the fields should be
extracted, specify them in the SQL query:
java -cp cloverETL.rel-1-x.zip org.jetel.database.AnalyzeDB -config
postgres.sql -q "select emp_no,full_name from employees where 1=0"
DBInputTable component
For unloading data from database table, use DBInputTable component. It requires DBConnection to
be specified (dbConnection parameter) and SQL command (sqlQuery parameter), which will be
executed against database specified by DBConnection.
Individual fields fetched from database are mappend onto Clover data record/fields (see JDBC to
CloverETL table) - the structure of Clover record is determined by specified Clover metadata
(metadata is assigned to Edge which connects DBInputTable with other components connected to
DBInputTable).
Example of transformation graph which uses DBInputTable component:
<?xml version="1.0" encoding="UTF-8"?>
<Graph name="TestingDB">
<Global>
<Metadata id="InMetadata" fileURL="metadata/employee.fmt"/>
<DBConnection id="PosgressDB" dbConfig="Posgress.cfg"/>
</Global>
<Phase number="0">
<Node id="INPUT" type="DB_INPUT_TABLE" dbConnection="PosgressDB"
sqlQuery="select * from employee"/>
<Node id="OUTPUT" type="DELIMITED_DATA_WRITER_NIO" append="false"
fileURL="employees2.list.out"/>
<Edge id="INEDGE" fromNode="INPUT:0" toNode="OUTPUT:0"
metadata="InMetadata"/>
</Phase>
</Graph>
SQL command (sqlQuery) can be more complicated than the example above suggests. You can use
any valid SQL construct but make sure the metadata corresponds to number and types of returned
data fields.
See CloverETL examples for more variations of DBInputTable usages.
DBOutputTable component
When there is a need to populate DB table with data comming from CloverETL transformation
graph, the DBOutputTable component can be used to fulfill it. It is complement to DBInputTable.
It maps CloverETL data records/individual fields onto target DB table fields. It can perform simple
data conversions to successfully map CloverETL basic data types on to target DB variants - see
CloverETL to JDBC table above.
Following example illustrates usage of DBOutputTable:
<?xml version="1.0" encoding="UTF-8"?>
<Graph name="TestingDB2">
<Global>
<Metadata id="InMetadata" fileURL="metadata/myemployee.fmt"/>
<DBConnection id="PosgressDB" dbConfig="posgress.cfg"/>
</Global>
<Phase number="0">
<Node id="INPUT" type="DELIMITED_DATA_READER_NIO"
fileURL="employees.list.dat" />
<Node id="OUTPUT" type="DB_OUTPUT_TABLE" dbConnection="PosgressDB"
dbTable="myemployee" />
<Edge id="INEDGE" fromNode="INPUT:0" toNode="OUTPUT:0"
metadata="InMetadata"/>
</Phase>
</Graph>
Should you need to populate only certain fields of target DB table (when for instance one fields is
automatically populated from DB sequence), dbFields parameter of DBOutputTable can be used:
<Node id="OUTPUT2" type="DB_OUTPUT_TABLE" dbConnection="PosgressDB"
dbTable="myemployee" dbFields="FIRST_NAME;LAST_NAME" />
One more parameter of DBOutputTable can be used to precisely specify mapping from CloverETL
data record to DB table record. It allows for specifying which source (Clover) field is mappend onto
which target DB table field. The parameter name is cloverFields and contains list of source fileds
(from source) record which should be considered for populating target DB table.
Coupled with dbFields, it specifies 1:1 mapping. Individual fields are mapped according to the order
in which they apper in dbFields & cloverFields respectively. The driving side which determines how
many fields will be populated is always dbFields parameter. When there is no dbFields parameter
present, CloverETL assumes that all target fields should be populated in the order in which they
appear in the target DB table.
Following examples illustrates how to pick certain fields from source data record (CloverETL record)
regardless their order and map them onto target DB table fields (again, regardless their order):
<?xml version="1.0" encoding="UTF-8"?>
<Graph name="TestingDB3">
<Global>
<Metadata id="InMetadata" fileURL="metadata/myemployee.fmt"/>
<DBConnection id="PosgressDB" dbConfig="posgress.cfg"/>
</Global>
<Phase number="1">
<Node id="INPUT" type="DELIMITED_DATA_READER_NIO"
fileURL="employees2.list.tmp" />
<Node id="OUTPUT" type="DB_OUTPUT_TABLE" dbConnection="InterbaseDB"
dbTable="myemployee"
dbFields="FIRST_NAME;LAST_NAME"
cloverFields="LAST_NAME;FIRST_NAME" />
<Edge id="INEDGE" fromNode="INPUT:0" toNode="OUTPUT:0"
metadata="InMetadata"/>
</Phase>
</Graph>
The resulting mapping between fields specified in example above is:
Source field (CloverETL)
Target field (DB table)
LAST_NAME
FIRST_NAME
FIRST_NAME
LAST_NAME
Executing SQL/DML/DDL Statements
against DB
DBExecute Component
Sometimes you need to execute single (or multiple) commands against DB which does not require
any input. For example create new table, add data partition, drop index or something totally different.
Fot this, CloverETL offers DBExecute component which takes specified commands and executes
them one by one against DB. You may define whether all commands form one transaction or
whether they should be DB commit after each command.
Following is a simple example of DBExecute:
<?xml version="1.0" encoding="UTF-8"?>
<Graph name="TestingExecute">
<Global>
<DBConnection id="InterbaseDB" dbConfig="interbase.cfg"/>
</Global>
<Phase number="0">
<Node id="DBEXEC" type="DB_EXECUTE" dbConnection="InterbaseDB"
inTransaction="N">
<SQLCode>
create table EMPLOYEE
(
EMP_NO
NUMBER not null,
FIRST_NAME VARCHAR2(15) not null,
LAST_NAME
VARCHAR2(20) not null,
PHONE_EXT
VARCHAR2(4),
HIRE_DATE
DATE not null,
DEPT_NO
CHAR(3) not null,
JOB_CODE
VARCHAR2(5) not null,
JOB_GRADE
NUMBER(4,2) not null,
JOB_COUNTRY VARCHAR2(15) not null,
SALARY
NUMBER(15,2) not null,
FULL_NAME
VARCHAR2(35)
);
insert into employee values(2,'Robert','Nelson','250',
28/12/1988,'600','VP',2.0,'USA'
105900.0,'Nelson, Robert');
insert into employee values(4,'Bruce','Young','233',
28/12/1988,'621','Eng',2.0,'USA',97500.0,'Young,
Bruce');
insert into employee values(5,'Kim','Lambert','22',
06/02/1989,'130','Eng',2.0,'USA'
102750.0,'Lambert, Kim');
insert into employee values(8,'Leslie','Johnson','410',
05/04/1989,'180','Mktg',3.0,'USA'
64635.0,'Johnson, Leslie');
insert into employee values(9,'Phil','Forest','229',
17/04/1989,'622','Mngr',3.0,'USA',75060.0,'Forest,
Phil');
</SQLCode>
</Node>
</Phase>
</Graph>
Appendix 2: CloverETL How To
Data Record Format Description
Representation of Data within CloverETL
CloverETL works with data in terms of data records and data fields within records. Internally, all records are
represented as variable length data. It means, that every data field consumes only as much memory as it is
needed for storing field's value. If you have field of type STRING specified to be of 50 chars in length and
this field is populated with string of 20 characters, only 20 characters are allocated in memory.
Moreover, CloverETL doesn't insist on any length to be specified. There is of course internal length
maximum for any field, but it should be enough to accommodate even very long strings. We speak about
strings because for other types there is fix size of the field regardless of the actual value.
Despite the information just given, there are some cases when it matters whether you specify the size of
each field or not. This will be discussed in following text.
What Types of Data Fields CloverETL
Supports
Following table gives list of all supported types of data (so far) together with ranges of values for each type:
187
Preface
Data type name
Based on
Size
string
java.lang.String
depends on actual
data length
date
java.util.Date
64bit - sizeof(long)
starts: January 1, 1970, 00:00:00 GMT
increment: 1ms
integer
java.lang.Integer
32bit - sizeof(int)
min: -231
max: 231-1.
numeric
java.lang.Double
64bit - sizeof(double)
min:2-1074
max: (2-2-52)·21023
long
lava.lang.Long
64bit – size of (long)
min:263-1
max: -263
decimal
byte
188
Range of values
not yet implemented
Java.lang.Byte
depends on actual
data length
Sun Role Manager 4.1 · September 2008
min: 0
max: 255
Preface
Specification of Record Format
One way of putting together description of record format is to create some Java code and use CloverETL
classes/methods calls.
The easier way is to create XML description of record format which can be read by CloverETL and
materialized in memory automatically.
It is customary to use .fmt extension for XML file containing metadata describing format of data record.
Following example shows simple metadata describing record containing three data fields:
<?xml version="1.0" encoding="UTF-8"?>
<Record name="TestInput" type="delimited">
<Field name="Name" type="string" delimiter=";"/>
<Field name="Age" type="numeric" delimiter="|"/>
<Field name="City" type="string" delimiter="\n"/>
</Record>
This simple examples shows definition of data record named "TestInput" specified as delimited - this is
some additional info used by CloverETL components.
The record has three fields:
Name (of type string)
Age (of type numeric)
City (of type string).
Naming
The is no strict rule for naming fields (and records). It is however good to use the same rules as for naming
Java variables: i.e. use only letters [a-zA-Z], numbers [0-9] (not at the first place) and [_] (underscore).
The encoding specified for the XML file is UTF-8 - it is imperative that when creating, you really save the
file using the encofing specified in encoding tag. Otherwise XML parser used by CloverETL won't be able
correctly interpret the file.
189
Preface
Delimiters
Each field in above given example has specified delimiter character. This information is used by data parser
when parsing data records (of this structure) from external text files. The same delimiters are used on the
other hand when CloverETL outputs internal data records (of this structure) into output text files.
Delimiters can be of any length (actually up to 32chars) and each field can have different one. Basic control
characters as \t (tabulator), \n (line feed) and \r (carriage return) are supported.
Field Formats and Other Features
Following example is a little bit more complicated and shows additional features:
<?xml version="1.0" encoding="UTF-8"?>
<!-- Automatically generated from database null -->
<Record name="EMPLOYEE" type="delimited">
<Field name="EMP_NO" type="integer" delimiter="," format="#"/>
<Field name="FIRST_NAME" type="string" delimiter="," />
<Field name="LAST_NAME" type="string" delimiter="," />
<Field name="PHONE_EXT" type="string" nullable="yes" delimiter="," />
<Field name="HIRE_DATE" type="date" delimiter="," format="dd/MM/yyyy" />
<Field name="BIRTH_DATE" type="date" delimiter="," locale="en"/>
<Field name="DEPT_NO" type="string" delimiter="," />
<Field name="JOB_CODE" type="string" delimiter="," />
<Field name="JOB_GRADE" type="numeric" delimiter="," format="#" />
<Field name="JOB_COUNTRY" type="string" delimiter="," />
<Field name="SALARY" type="numeric" delimiter="," />
<Field name="FULL_NAME" type="string" nullable="yes" delimiter="\n" />
</Record>
nullable
As you can see, some fields (PHONE_EXT for example) have attribute nullable set to yes. It basically
means that for this field, it is allowed to contain null value. The default is yes/true (field can contain null) !
The exact behaviour is influenced by concrete data parser or data formatter, but simply put, when field is
not specified to be nullable and application tries to put null value in it, this operation fails (which can result
in stopping the whole transformation process).
190
Sun Role Manager 4.1 · September 2008
Preface
format
Format attribute can be used for specifying expected format of data when parsing in or printing out of
CloverETL. In this case, HIRE_DATE field is of type date and is specified, that date values in external
textual data will look like this: 19/12/1999
For all possible format specifiers (control characters), see documentation for java.text.SimpleDateFormat.
Similar to HIRE_DATE is JOB_GRADE field, which is of type numeric. Here the format specifies, that
data is expected to be integer numbers only (no decimal point allowed).
See following tables for date and number format specifiers.
Date
Letter
Date or Time Component
Presentation
Examples
G
Era designator
Text
AD
y
Year
Year
1996; 96
M
Month in year
Month
July; Jul; 07
w
Week in year
Number
27
W
Week in month
Number
2
D
Day in year
Number
189
d
Day in month
Number
10
F
Day of week in month
Number
2
E
Day in week
Text
Tuesday; Tue
a
Am/pm marker
Text
PM
H
Hour in day (0-23)
Number
0
k
Hour in day (1-24)
Number
24
191
Preface
K
Hour in am/pm (0-11)
Number
0
h
Hour in am/pm (1-12)
Number
12
m
Minute in hour
Number
30
s
Second in minute
Number
55
S
Millisecond
Number
978
z
Time zone
General time zone
Pacific Standard Time; PST; GMT-08:00
Z
Time zone
RFC 822 time zone
-0800
Examples:
Date and Time Pattern
Result
"yyyy.MM.dd G 'at' HH:mm:ss z"
2001.07.04 AD at 12:08:56 PDT
"EEE, MMM d, ''yy"
Wed, Jul 4, '01
"h:mm a"
12:08 PM
"hh 'o''clock' a, zzzz"
12 o'clock PM, Pacific Daylight Time
"K:mm a, z"
0:08 PM, PDT
"yyyyy.MMMMM.dd GGG hh:mm aaa"
02001.July.04 AD 12:08 PM
"EEE, d MMM yyyy HH:mm:ss Z"
Wed, 4 Jul 2001 12:08:56 -0700
"yyMMddHHmmssZ"
010704120856-0700
192
Sun Role Manager 4.1 · September 2008
Preface
Number
Symbol
Location
Localized?
Meaning
0
Number
Yes
Digit
#
Number
Yes
Digit, zero shows as absent
.
Number
Yes
Decimal separator or monetary decimal separator
-
Number
Yes
Minus sign
,
Number
Yes
Grouping separator
E
Number
Yes
Separates mantissa and exponent in scientific notation. Need not be
quoted in prefix or suffix.
;
Subpattern
boundary
Yes
Separates positive and negative subpatterns
%
Prefix or suffix
Yes
Multiply by 100 and show as percentage
\u2030
Prefix or suffix
Yes
Multiply by 1000 and show as per mille
(\u00A4)
Prefix or suffix
No
Currency sign, replaced by currency symbol. If doubled, replaced by
international currency symbol.
If present in a pattern, the monetary decimal separator is used instead
of the decimal separator.
'
Prefix or suffix
No
Used to quote special characters in a prefix or suffix, for example,
"'#'#" formats 123 to "#123". To create a single quote itself, use two
in a row: "# o''clock".
193
Preface
Number Format
When specifying format for numbers, Clover(Java) uses default system locale setting (unless other locale is
specified through locale option.
This is important in cases when you are parsing data where decimal numbers use "," (comma) as decimal
seperator whereas system default (national) says it is "." (point).
In such case, use locale option together with format option to change expected decimal delimiter.
Example:
<Field name="Freight" type="numeric" delimiter="|" format="#.#" locale="en.US"
/>
Locale
Instead of specifying format patameter (or together with format), you may specify a locale parameter – it
states which geographical, political, or cultural region you want your information to be/is formatted for.
Thus instead of specifying format for date field, specify Germany locale (eg. locale=“de“), for instance.
Clover will automatically choose proper date format used in Germany.
There are cases when both format and locale parameters have their sense – for example when specifying
format of decimal numbers. You define format/pattern with decimal separator and locale specifies, whether
the separator is a comma or dot.
Specifying Default Values for Fields
CloverETL offers for each field default value to be specified. This value is used (in certain cases) when field
is assigned to be null, but null value is not allowed for this field. It contrasts a little bit with what was stated
befor, but only on a first sight.
Following example shows fields with specified default values:
<?xml version="1.0" encoding="UTF-8"?>
<Record name="Orders" type="delimited">
<Field name="OrderID" type="numeric" delimiter="|" format="#" />
<Field name="OrderDate" type="date" delimiter="|" format="dd.MM.yyyy"
default="01.01.1900" nullable="no" />
<Field name="Amount" type="number" delimiter="\n" default="0.0"
nullable="no" />
</Record>
194
Sun Role Manager 4.1 · September 2008
Preface
In this example, OrderDate is defaulted to 1.1.1900 in case it is not present in text data which this record is
parsed from. In general, when this field is assigned null value, this specified default value is assigned instead.
The same holds for Amount field, except the default is specified to be 0.
That said, there is one more important note: this behaviour is not default and concerns only data parsers. If
you in your code attempt to assign null value into not-nullable field, the BadDataFormatException will be
raised.
If you use any of clover's data parsers, you may specify DataPolicy which states what should happen if
parsed value can't be assigned to data field (as in case when value is null and field is not-nullable).
There are three different data policies defined:
strict - any problem causes BadDataFormatException - this is the default behaviour
controlled - similar to strict, but on top logs the problematic value
lenient - if default value exists (is defined for filed), CloverETL attemts to assign that default value
195