1
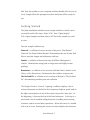
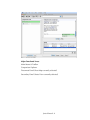
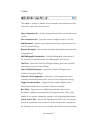
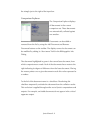
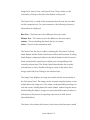
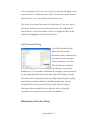
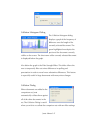
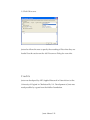
User’s Manual
Juxta 1.3.1 : 8 July 2008
www.patacriticism.org/juxta
Wh at is Jux ta?
Juxta is an open-source cross-platform tool for comparing and collating
multiple witnesses to a single textual work. The software allows users to
set any of the witnesses as the base text, to add or remove witness texts,
to switch the base text at will, and to annotate Juxta-revealed
comparisons and save the results.
Juxta presents several kinds of analytic visualizations. The most basic
collation offers a split frame comparison of a base text with a witness
text, along with a display of the digital images from which the base text
is derived. Additionally, Juxta has several visualizations for the collation
of multiple witnesses. Juxta can display a heat map of the textual
variants that allows the user to locate—at the level of any textual
unit—all witness variations from the base text. Users can also view the
collation as a histogram, which displays the density of all variation from
the base text and serves as a useful finding aid for variants in long
documents. Finally, Juxta can output a lemmatized schedule (in HTML
format) of the textual variants in any set of comparisons.
In sta lli ng Jux ta
Juxta requires Windows XP or Mac OS X to run. If you received a Juxta
CD, simply insert the CD in your computer and follow on-screen
prompts. Otherwise, you must obtain the Juxta installer. Go to
http://www.patacriticism.org/juxta and click on the “Download Juxta”
Juxta Manual: 1
link. Save the installer to your computer and then double-click its icon to
run it. Simply follow the prompts from there and Juxta will be ready for
use.
Getting Started
The Juxta installation includes several sample collations, which can be
accessed from the File menu. Select “File”, then “Open Sample”
(File->Open Sample) and then select a JXT file for the sample you wish
to view.
The four sample collations are:
Damozel—a collation of seven versions of the poem “The Blessed
Damozel” by Dante Gabriel Rossetti. Demonstrates the use of Juxta XML
files to associate images and milestones with text.
Hamlet—a collation of three early texts of William Shakespeare's
Hamlet. Demonstrates using Juxta on large texts with highly variant
spellings.
Renaissance—a collation of two versions of Walter Pater’s Studies in the
History of the Renaissance. Demonstrates the collation of prose texts.
The Orchard Pit—a collation of two versions of Rossetti’s “The Orchard
Pit”, demonstrating another prose text collation.
The Display Window, General. Opening a collation displays a list of
witness documents on the left (in the Comparison Explorer panel) and on
the right a transcription of one of the witness texts as the “base text” (at
the beginning, it chooses the first of the listed witnesses). At the top is a
menu with a set of standard editing functions for adding and removing
witnesses, and for several other operations. Below this menu is a toolbar
with a set of icons. Running the mouse over them displays the functions
Juxta Manual: 2
they perform. There is also an input box for entering words to search for
in all the texts in the comparison set. See the section on searching
below.
The upper panel at the right (Document Panel) displays a
transcription of the base text. If the small (right) function box below the
panel is clicked, the window splits to allow a comparison of texts to be
displayed. The two small boxes above the text display area allow one to
choose the comparison pair. The base text is always the left of the two.
The lock icon between these two boxes (by default, “on”) can be clicked
to unlock so that the comparison text transcription can be independently
scrolled.
The lower right panel is an area for displaying any annotations
that have been made to the texts. Just below this lower right panel are
four buttons that allow the user to control which information is displayed
for the panel. When Juxta starts, “Notes” is displayed, which displays
the user's annotations. The two small icons at the lower right allow the
user to unlock the notes from their related transcriptions or to remove the
notes. “Images” sets the panel to display any digital images for the
transcriptions, if they were included in the initial data. Like the notes,
these images can be unlocked from their transcriptions in the panel
above. In addition, the images can be zoomed in and out using the two
small icons which appear at the bottom of the “Images” tab. The
“Moves” button displays all the moves that the user has specified.
Clicking on a move scrolls the documents to display the moved text. The
trash can icon removes the currently selected move. Please see the
section on creating moves, below. The "Search" button displays the
results of the last search operation. Clicking on a search item scrolls the
texts to display the item in context.
Juxta Manual: 3
Collating and Annotating Operations, General. Clicking a witness text
on the left will make that the base text. The box at the left of each
witness text can be unchecked to remove it from the collation. The
boxes to the right of each witness text visualize (in shades of blue) the
global degree of difference between the base text and this witness, with
degree of difference signaled by increase in the gradient color difference.
In the right display panel, a "heat map" is superimposed (in blue)
on the base text. Blue highlighting signals degrees of variance of the
base text from the witnesses being compared. Clicking anywhere on the
heat map produces a list of variants in a box in the right margin. You
can also left-click and drag the mouse to highlight a region and display
all of the variants for the highlighted section. Clicking on the star in the
pop up box allows you to enter annotations for that difference.
You can create a new comparison set (File->New Comparison
Set) and then add your own documents (Edit->Add Document).
Documents must either be in a specific XML format – described later in
this document – or in a plain text format. Loading a document
automatically collates it using the current collation settings.
Once the material has been collated, you can analyze the results,
comparing differences among documents and interpreting the data.
When you are ready to publish your work from Juxta, you can
output a critical apparatus as an HTML document (File->Generate
Critical Apparatus). You can also save your comparison set (File->Save
or File->Save As) for later work or for sharing with others who use Juxta.
These outputs preserve all notes and annotations that have been created
during the editorial operation.
Collating passages that appear out of order. In the side-by-side difference
view, indicate the moved passage by dragging the mouse over the
Juxta Manual: 4
passage in both the base and the witness texts. The move button (on the
upper right, next to the selection of the witness text) will become
enabled when text on both sides have been selected. Click the move
button and the move will be created. You will see an outline of the
passages and a line connecting them. There is also an entry in the Moves
pane for each move created. Clicking the entry brings the move into
view.
Searching in all text. Juxta's search feature allows you to find a word or
phrase in all the texts in the current collation set. Type the search terms
you want in the input box that appears on the tool bar and press the
enter key (or click in the icon to right of the input box). The results are
displayed in the Search panel, and all the matching terms are highlighted
in the texts. Clicking on a search result in the Search panel causes it to
scroll into view. The search works for whole words only, so if you search
for "work", for example, the term "working" will not be found. If you
search for more than one word, then it finds them in any order, as long
as they appear close to each other in the text. For instance, searching for
"question be" in Hamlet will return (among other results) "be, that is the
question".
Jux ta Use r I nte rfa ce
The Main Window is where most of the user interface resides. The major
functional areas are shown below. Each of these panels can be resized
by clicking and dragging its divider bar.
Juxta Manual: 5
Major Functional Areas
Main Menu & Toolbar
Comparison Explorer
Document Panel (Heat Map currently selected)
Secondary Panel (Notes View currently selected)
Juxta Manual: 6
Toolbar
The toolbar is a place to find the most commonly used functions in Juxta.
From left to right, these functions are:
Open Comparison Set – Loads a comparison set from a previously saved
.jxt file.
Save Comparison Set – Saves the current comparison set to a .jxt file.
Add Document – Imports a new document into the comparison set (see
Add Document Dialog).
Remove Document – Removes the currently selected document from the
comparison set.
Edit Bibliographic Information – Edit the bibliographic information of
the currently selected document (see Bibliographic Info Dialog).
Find Text – Opens the Find Text Dialog for finding text in the currently
selected document (see Find Dialog).
Open Collation Histogram – Opens the Collation Histogram (see
Collation Histogram Dialog).
Generate Critical Apparatus – Generates a critical apparatus for the
currently selected document (see Generate Critical Apparatus Dialog).
Toggle Location Markers – Toggles location marker display in the
Document Panel for lines (or stanzas if these are marked).
Re-Collate – Documents are collated automatically when a new
document is added or removed from the Comparison Set. This is only
needed if you want to change the options, such as ignoring punctuation.
Search Text In Files - Type in the input box and click on the icon to do a
search of a particular term or terms in all documents in the comparison
set. Note that you can see a list of recently searched for terms by clicking
Juxta Manual: 7
the triangle just to the right of the input box.
Comparison Explorer
The Comparison Explorer displays
all documents in the current
comparison set. These documents
are automatically collated against
one another.
Documents can be added or
removed from the list by using the Add Document and Remove
Document buttons on the toolbar. The display name of a document can
be modified by editing its “short name” field in the Bibliographic Info
Dialog.
The document highlighted in green is the current base document, from
which comparisons are made. Each of the documents has a meter to the
right indicating its degree of difference from the base document. Placing
the mouse pointer over a given document reveals this value expressed as
a number.
To the left of the document name is a checkbox. Deselecting this
checkbox temporarily excludes the document from the collation results.
This exclusion is applied throughout the rest of Juxta's computations and
outputs. For example, excluded documents do not appear in the critical
apparatus output.
Juxta Manual: 8
Document Panel
The Document Panel can
display the results of an entire
collation or it can zoom in on a
specific comparison between
two texts. To facilitate this, the
Document Panel has two
modes: Heat Map View and
Comparison View. These modes can be toggled with the tabs at the
bottom of the panel.
Line numbering and other markings can be summoned by clicking on
the “Toggle Location Marks” button on the toolbar.
When the Heat Map View is selected, Juxta displays a collation against
the current base text. The current base text is the text highlighted in
green in the Comparison Explorer to the left of the Document Panel.
The text is color coded to indicate the degree of variance evident at any
particular area of the text. Lighter shades of blue indicate that fewer
witness vary from the base text at this location. The darker the shade of
blue, the more witnesses differ at this location.
Clicking on the text itself reveals all variants for a particular location.
The variants display in the right hand margin of the text as depicted
below:
Juxta Manual: 9
When such variations are displayed one can add critical annotations.
The operation is initiated by mousing over the witness label (displayed in
green) and clicking the grayed-out star that appears on mouse over. This
will display an “Edit Note” box where the annotation is entered. The
note appears in the Secondary Panel below the Document Panel.
When an editorial note has been entered about a specific variant, the
grayed-out star is displayed in bold (
) and remains on display if the
comparison set is saved.
There are four types of differences reported by Juxta. As the image
illustration above shows, they are marked with the following glyphs:
— Indicates a difference between base and witness text at this
location.
— Indicates that there is text present at this location in the witness
text where there is no such text present in the base text.
— Indicates that there is text present in the base text that is not
present at this location in the witness text.
__ Indicates there there is a move defined.
If the user clicks on a difference when in Annotation Mode the Edit Note
dialog will appear.
Juxta Manual: 10
The Comparison View allows for side-by-side inspection of two texts.
While the Heat Map View permits the user to view the status of the base
text relative to all of the other texts in the collation, the Comparison
View focuses on just two texts at a time. As the user scrolls through the
comparison, the two texts are kept in step with one another. The user
can easily flip back and forth between the Heat Map View and the
Comparison View by selecting a highlighted difference from either text.
Line numbering and other markings can be summoned in this view by
clicking on the “Toggle Location Marks” button on the toolbar.
Here is the toolbar in the comparison panel:
The two drop-down controls allow you to choose any of the texts for the
left and right sides. The lock icon between the drop-down controls
toggles between having the two texts scroll together and having the text
each have a scroll bar so they can be scrolled independently. The icon
on the upper right side is the Move command. It is enabled when there is
a selection made in both texts.
Secondary Panel
The Secondary Panel houses
supporting information relevant to
the document or documents
currently being displayed in the
Document Panel. The Secondary
Panel has four modes: Notes View,
Juxta Manual: 11
Image View, Moves View, and Search View. These modes can be
selected by clicking on the tabs at the bottom of the panel.
The Notes View is a table of the annotations that the user has recorded
for this comparison set. For each annotation, the following columns of
information are displayed:
Base Text – The base text for the difference this note marks.
Witness Text – The witness text for the difference this note marks.
Lemma – The text heading that heads the list of variants.
Notes – The text of the annotation itself.
The Notes View also has a toolbar containing the Document Tracking
Mode Button and the Delete Note Button. When the Document Tracking
Mode Button is depressed (which is the default behavior) the Document
Panel automatically repositions to display text corresponding to the
currently selected note. The Delete Note Button deletes the currently
selected note or notes. Double clicking on a note in the Notes View
brings up the Edit Note Dialog for the selected note.
The Image View displays an image associated with the text presently in
the Document Panel. The image can be zoomed using the buttons on the
toolbar below the image area. The image can be panned by pointing to it
with the mouse, holding down the mouse button, and moving the mouse
while holding the button. Images are associated with location markers or
milestones in the process of importing a document in XML format
(described below).
The Moves View shows the location of each move that has been created
Juxta Manual: 12
in the comparison set. To see a move, click on it and it will appear in the
Document View. To delete a move, click on it and click on the "Remove
Selected View" icon on the bottom of the Moves View.
The Search View shows the results of the last search. Click on a search
item and it will be shown in the Document View. The "Highlight All
Search Results" icon on the bottom of this view toggles whether all the
matches are highlighted in the Document View.
Add Document Dialog
The Add Document Dialog
allows the user to add a
document to the comparison set.
Documents can be imported
either as plain text or as XML
files. If plain text is selected,
then the text is assumed by
default to be UTF-8 encoded. Alternate text encodings can be selected in
the encoding drop down box in the lower right of the dialog. If a Juxta
XML document is selected, then the encoding is determined by reading
specifications inside the XML file. The bibliographic data for Juxta
compatible files can be previewed to the right of the file chooser.
Selecting a document adds it to the collation and re-collates the
comparison set to take into account this new addition.
Bibliographic Information Dialog
Juxta Manual: 13
The Bibliographic Information
Dialog can be summoned by
clicking on the Bibliographic Info
Button on the toolbar. This dialog
allows the user to view and
update the bibliographic
information for the currently selected document. The short title displayed
here is used to identify this document in the Comparison Explorer and is
also used as the witness sigla for this document in an exported critical
apparatus. In fact, the entirety of the bibliographic information is output
as part of the critical apparatus.
Edit Note Dialog
The Edit Note Dialog allows the
user to view and update the
currently selected note. Checking
the “Include Image” box adds a
link to the base-text's image for this
note in the critical apparatus. The
image is obtained from the XML
location marker that denotes the
location of this difference.
Find Dialog
The Find Dialog allows for simple text search in the currently selected
document. “Wrap Search” permits Juxta to search over line breaks.
Juxta Manual: 14
Collation Histogram Dialog
The Collation Histogram dialog
displays a graph of the frequency of
difference over the length of the
currently selected document. The
green highlighted area depicts the
portion of the document currently
visible on the screen. The short name of the currently selected document
is displayed below the graph.
Also below the graph is the Filter Strength Slider. This slider allows the
user to temporarily filter out minor differences in spelling and
punctuation in order to reveal more substantive differences. This feature
is especially useful in large documents with many minor changes.
Collation Dialog
When documents are added to the
comparison set, Juxta
automatically collates them against
all of the other documents in the
set. The Collation Dialog is useful
when you wish to re-collate the comparison set with new filter settings.
Juxta Manual: 15
The following filters are available: ignore white space; ignore
punctuation; and ignore case.
D o c u m e n t X M L Fo r m a t
<?xml version="1.0" encoding="UTF-8"?>
<juxta-document>
<bibliographic>
<title>Title</title>
<short-title>Sigla</short-title>
<author>Author</author>
<editor>Editor</editor>
<source>Source</source>
<date>Date</date>
<notes>Your notes.</notes>
</bibliographic>
<text>The text of the document begins here…
<m_s id="xyz" type="p" n="1" img=”images/page1.jpg”/>This
text is marked by the location marker p1.<m_e
refid="xyz"/>
…and ends here.</text>
</juxta-document>
In addition to plain text files, documents can be loaded in a Juxta
specific XML format, which is depicted above. This format allows for the
custom placement of location markers (which could indicate pages,
stanzas, paragraphs, lines, etc.) and the association of images with
location markers. It also allows bibliographic information for each
document to be stored (see Bibliographic Information Dialog).
The <bibliographic> section of the Juxta XML document is largely selfexplanatory to scholars familiar with text markup. All fields must be
included even if they contain no data.
Juxta Manual: 16
The <text> section contains the actual text of the document. However,
the text to be compared is not nested within a hierarchy of XML tagging;
it is still, essentially, plain text. Line breaks in the text continue to be
interpreted by Juxta as the end of a prose paragraph or the end of a line
of verse. Within this section, spans of text can be marked with location
markers (those familiar with the Textual Encoding Initiative may prefer to
think of them as “milestones”). Location markers are specified using a
pair of unary tags related by a common reference id. Juxta uses two
unary tags instead of a single opening and closing tag to avoid the
problems inherent in a strict hierarchical marking system. Location
marker tags have the following format:
<m_s id=”xyz” type=”p” n=”1” img=”images/page1.jpg” />
The <m_s> tag is a start tag (“m_s” stands for “milestone start”). All text
following this tag will be included in the marked location until the
corresponding end tag is found. The <m_s> tag has the following
attributes:
“id” – This is a unique identifier for this location. No other <m_s> tag in
this document may share this identifier.
“type” – This is usually a short prefix that denotes the type of marker. Its
primary effect is on the numbering of locations. See the “Damozel”
sample for examples of page, stanza, and line numbering.
“n” (number) – This is the ordinal number of this location. This attribute
is optional; if it is not specified then the number for this location is
considered to be one greater than the number of the previous section of
the same type.
Juxta Manual: 17
“img” (image) – This is the image to associate with this location. This
attribute is also optional. If it is specified, the image file must reside in a
sub-directory named “images” within the folder containing the XML file.
Juxta can read JPG and GIF file formats.
<m_e refid=”xyz”/>
This is an end tag. It ends the location marked by the <m_s> tag with the
“id” attribute equal to this tag’s “refid”.
Th e Pe r i l s o f “ P l a i n Te x t ”
There is one thing that every scholar manipulating and preparing digital
texts should know about “plain text” files: there is no such thing as a
plain text file. All text files, whether they explicitly specify it or not, are
encoded when they are saved to disk. Possible encodings include “utf-8”
and “cp-1252” formats.
This fact can cause problems as the file moves from one computer and
operating system to another. This is because different computer
operating systems make differing assumptions as to how “plain text” or
“ascii” files are encoded. For example, files prepared on Windows
machines with applications like Notepad can generate code in the CP1252 format, which is a Microsoft Windows™ specific encoding. If these
files are then shared across the network to a Mac computer and opened
as “plain text” they may be corrupted on the screen. Characters such as
“ö” and “æ” may appear like this:
We recommend using a cross-platform compatible encoding format such
Juxta Manual: 18
as UTF-8. When Juxta loads plain text files, it assumes that they are
encoded in this format. Most text editing programs will allow you to
specify the encoding type of a plain text file. For example, to generate a
UTF-8 encoded text file from Microsoft Word 2002, take the following
steps:
1) Select “Save” or “Save As..” and then select “Plain Text (.txt)” as the
type of the file.
2) The dialog below will appear. Select “Other encoding” and then
select “Unicode (UTF-8)” from the list of encodings.
Juxta Manual: 19
3) Click OK to save.
Juxta also allows the user to specify the encoding of files when they are
loaded. See the section on the Add Document Dialog for more info.
Credits
Juxta was developed by ARP (Applied Research in Patacriticism) at the
University of Virginia in Charlottesville, VA. Development of Juxta was
made possible by a grant from the Mellon Foundation.
Juxta Manual: 20