1
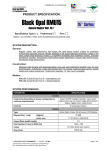
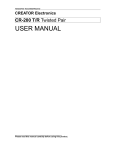
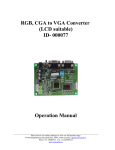
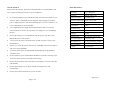
SPECIFICATION
USAGE NOTICE
Please follow all warnings, precautions and maintenance as recommended in this
user’s manual to maximize the life of your LCD Monitor.
◆
◆
◆
Screen Size
15.1” Diagonal
Resolution
SXGA 1024 x 768
To avoid any damage to the LCD Monitor and risk of electronic shock, do not
Number of Colors
16.2M Colours
spill any water or other fluids into the Monitor. If this happens, turn off the
Pixel Pitch and Format
0.297 x 0.297 mm
power, unplug the power cord and send the Monitor to your local dealer or our
Brightness
250 cd/㎡
service department as soon as possible.
Contrast Ratio
700: 1
Use a Regulated power supply with the specification of DC 12 Volt with
Operating Temp.
5℃ ~ 35℃
centre pin Positive. Do not use any other power supplies as you can damage
Storage Temp
-5℃ ~ +60℃
the unit.
Backlight
CCFL
Do not place objects on or suspend them with the power cord. This could
Viewing Angle
R/L 60 deg, U/D 45 deg
Power Consumption
1.25A DC 12V
Video Input level
1.0Vpp ±0.5Vpp, S-video
Video Impedance
75Ω
PC Input
15 pin D-sub
damage the power cord and unit.
◆
Do not twist the power cord unnecessary. And do not place it close to any
heated objects.
◆
Do not try to repair the power cord when it is damaged or broken but replace it
with a new one immediately.
◆
Avoid any metal objects or inflammable items dropping into the Monitors
ventilation slots.
◆
Do not attempt to open or disassemble the Monitor yourself as this may cause
an electric shock. It will also invalidate the warranty.
◆
Do not use this monitor in any areas that are susceptible to excessive dust, dirt
and humidity.
◆
Do not set the monitor up in, direct sunlight, extremely hot or cold
environments.
◆
Do not expose the LCD monitor to rain or moisture.
Page 1 of 6
Page 6 of 6
4. Installation
Package
This Monitor comes with all the items listed below.
The unit in a metal case is suitable for mounting into furniture, walls etc.
Check to make sure your unit is complete. If not report the missing items to your
Insert four screws into the mounting holes at the front panel and mount the
dealer immediately.
device to desired location.
Front View
Fig. 1
.Monitor Unit x 1
.Power adaptor x 1
.RCA Video Cable x 1
. S- Video Cable x 1
. 15 pin D-Sub Cable x 1
Application range
The LCD color monitors active matrix technology offers a sharp and high
contrast display. It can be universally used for Surveillance systems, In-
Rear View: Inputs Fig. 2
Vehicle Reverse monitoring systems or for Multimedia applications. The
additional Audio input enables sound reception via Headphones.
Page 2 of 6
Page 5 of 6
2
3
1.
Inputs and Connectors on the LCD monitor:
4. OSD Control Key
1.
1. DC 12 Volt Power Input
2. PC Input
3. S-Video input
4. AV Composite Video input
Auto Key: Automatically adjusts H-Position, V-Position, Pixel Clock
and Phase, for an optimal image.
2.
Up Key:
To increase the value of the chosen item
3.
LED Power Indicator: Green is On, Red is standby.
4. Power Key:
Power ON/OFF
2. Connections
5. Down Key:
To decrease the value of the chosen item
1) Connect the video source to the Video input Connector ( 3 ) for S-Video or
6.
Connector ( 4 ) for AV Composite Video Input or Connector (4) for PC Input.
Menu Key: To enter the main menu of the on-screen display
. Main power on/off
2) Connect the Regulated 12V power supply to Connector ( 1 )
The positive pole must be connected to the center contact.
5.
Trouble Shooting
i.
3. Operation
If power LED is off: check if the power cable is securely
connected.
1) The above in “connections” above must be carried out first.
ii.
If power LED is RED in color: check if the video cable is securely
2) Switch on Main power button to turn on the power. The green LED will light.
connected and you have a video signal. Also check if using PC
3) Select the correct Video Input.
input that your computer is switched on.
4) Use OSD controls to adjust the Brightness and Contrast in order to obtain an
image as clear and sharp as possible.
Page 3 of 6
iii.
If power LED is GREEN in color: check if the H SYNC frequency
is out of range. Adjust the brightness and contrast control.
Page 4 of 6
LM – 1511
15.1” Color TFT LCD M onitor
M etal Housing
User’s M anual
Version 3.0
4