1
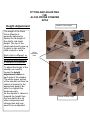
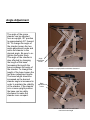
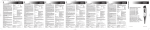
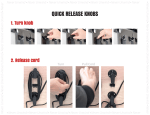
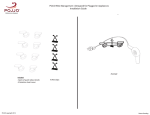
INSTRUCTION MANUAL
ALICIA PRONE STANDER
Size Large—APS2
Warnings
The use and adjustment of this stander must only be with the recommendation
and guidance of a qualified therapist or physician. Adult supervision is
required at all times. Never leave a child unattended while the product is in
use.
Prospect Designs, Inc will not be responsible for damage or injury resulting
from any modification to this equipment by anyone other than the
manufacturer.
Prospect Designs, Inc will not be responsible for damage or injury resulting
from misuse or neglect of this equipment.
USE
The Alicia Prone stander is designed to provide the child with ability to experience
weight bearing in an upright or forward leaning position while the combination of
adjustments and supports hold the child in good postural alignment.
Never leave a child unattended.
CARE
Regular inspections should be done to check for loose or missing hardware or any
signs of cracked or broken parts. Contact the manufacturer immediately if you
suspect an unsafe condition.
All components may be cleaned with a mild soapy water or non-abrasive
commercial cleaner approved for use on vinyl and wood. Care should be taken to
not use excessive amounts of water and wood parts should be wiped dry after
cleaning.
WARRANTY
All Prospect Designs, Inc products are guaranteed to be free from defects in
materials and workmanship for the life of the product. Should any part break or fail
Prospect Designs, Inc. will repair or replace it at no charge to the original owner
FITTING AND ADJUSTING
THE
ALICIA PRONE STANDER
APS2
Stander in lowest height
Height Adjustment
The height of the Alicia
Prone Stander is
generally adjusted in
relation to the height of
the child’s mid-chest
height. The top of the
chest pad should come up
to about in line with the
child’s armpit or axila .
Each child is different so
this and every adjustment
should be determined by
a therapist or physician.
To adjust the height of the
stander you need to
loosen the height
adjustment knobs on
each side of the stander.
The whole upper portion
of the stander can then be
raised or lowered to the
appropriate height. Be
sure to re-tighten the
knobs securely.
As the stander is raised or
lowered the height from
the foot platform to all
other components will
change also and may
need to be re-adjusted.
Height
adjustment
knob
Stander in tallest height
Angle Adjustment
The angle of the prone
stander can be adjusted
from an upright, 90° position
to approximately 30° forward
tilt. To change the angle of
the stander loosen the two
angle adjustment knobs and
move the stander to the
desired angle. Be sure to retighten the knobs firmly.
The angle of the stander is
also effected by changing
the length of the base.
Increasing the length the
base increases the angle of
the stander. To change the
length of the base loosen the
two base adjustment knobs.
The base length should be
increased as the desired
stander angle is increased in
order to maintain the stability
of the stander. If the stander
is in a more upright position
the base can be safely
shortened to make the
stander more compact.
Angle
Adjustment
knobs
Stander in upright position with base shortened
Base
adjustment
knobs
Stander with maximum forward tilt and
maximum base length
Tray Adjustment
The tray is adjustable for both
height and angle.
HEIGHT ADJUSTMENT
Loosen the knobs on each
side of the stander and raise
or lower the whole tray
assembly to the desired
height.
Tray in lowest position
TRAY ANGLE
Loosen the knobs on each
side of the tray assembly to
change the incline of the tray.
Tray in highest position
Tray angle adjusted to incline