1
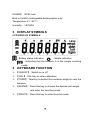
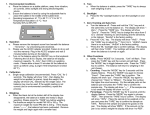
Intelligent-Lab Models PBW PMW USER MANUAL CONTENTS 1 INSTRUCTIONS FOR USE .................................................. 3 2 PARAMETERS ....................................................................... 3 3 DISPLAY SYMBOLS ............................................................. 4 4 KEYBOARD FUNCTION ...................................................... 4 5 OPERATION ........................................................................... 5 5.1 UNIT SELECT ....................................................................... 5 5.2 COUNTING FUNCTION ...................................................... 5 5.3 ZERO AND TARE FUNCTION........................................... 5 5.4 RS232 TRANSMISSION ..................................................... 5 5.5 CALIBRATION ..................................................................... 5 6 ADVANCED FUNCTION SETTING.......................................... 7 7 POWER .................................................................................... 9 8 PROBLEMS & SOLUTIONS ................................................ 9 2 1 INSTRUCTIONS FOR USE 1) Keep the balance away from high temperatures and damp environments; 2) Avoid shock loading or objects dropping on the balance; 3) The load placed on the weigh pan must not exceed the maximum weighing capacity of the balance. 4) Please warm up the balance for 15~20 minutes before operation. 5) Ensure the platter is clear before turning on. 6) Items to be weighed should be placed at the center of the platter when being weighed, and should not exceed the dimension of the platter. 7) If the balance is not used for a long period of time, recharge it every 3 months so as to ensure a long life of the battery (if fitted). Fully recharge it before using again. Take care not to keep the balance being charged for too long. 7) Please note when the low battery symbol on the screen, the battery needs to be recharged. 2 Parameters MODEL: PMW, PBW series; Division: 30 000~300 000; Load cell: 350Ωload cell; DISPLAY: Large LCD display with built-in backlight 3 POWER: DC9V and Built-in 6V4AH rechargeable battery(option only) Temperature: 5℃~40℃; Humidity: ≤85%RH 3 DISPLAY SYMBOLS LCD DISPLAY SYMBOLS - Battery status indication - - Stable indication - Indicating that the balance is in the simple counting mode. 4 KEYBOARD FUNCTION 【ON/OFF】: Switch on or off 【CAL】: CAL Key to enter calibration. 【TARE】: Tare Key to deduct the container weight or zero the balance. 【MODE】: Press this key to choose the desired unit weight and enter the counting mode. 【PRINT】: Press this key to enter the print mode. 4 5 OPERATION 5.1 UNIT SELECTION Press the 【MODE】 Key to choose the desired unit weight。 5.2 COUNTING FUNCTION Place a sample of the item which needs to be counted and press MODE. The balance will show”COU”,Press CAL to select 10, 20, 50, 100, 150, 200, 250 or 500 [equal to how many you use in the sample]).Press MODE to confirm. Press the 【MODE】 key again to return back to the weighing mode. 5.3 ZERO AND TARE FUNCTION To zero or tare the balance press the TARE key, this will return the display to zero. Always press TARE before weighing. 5.4 RS232 TRANSMISSION (OPTION) Press PRINT to enter printing. Baud Rate: 1200 /2400/4800/9600 BPS Data format: 8 Data Bit, No Parity Bit, 1 Stop Bit Output Weigh: Note A- XXXXXXXX SP XXX B C D A Display Weigh: B Symbolic(+/-) 6 Data, Decimal point C- The space character D- Unit Weight 5.5 CALIBRATION For maximum accuracy, calibration is required before use. Indicators your balance may need to be calibrated: - If your balance is not weighing correctly - Your balance is stuck at zero - Inconsistent/Inaccurate weights 5 Instructions for external calibration 1.) First remove all objects from weighing pan 2.) Press the CAL key until the balance shows “CAL”, calibration will begin. 3.) The balance will show the required weight for calibration. Place the required weight as indicated on the screen on the center of the pan。 4.) Once the required weight is placed on the balance it will show lines across the screen -------, Then it will show the required weight once more. 5.) Then remove the weight and the screen will show -----then return back to zero. Calibration is complete. Note: Please make sure you are using the proper weighing mode (g) when calibrating. Internal Linearization (For scale technicians only) T 1.) First remove all objects from weighing pan. 2.) Press CAL key until the balance shows “CAL”. 3.) The balance will show & flash the required weight for calibration. 4.) Press MODE key until the balance shows “CAL” and the required weight once more. 5.) Place the required weight as indicated on the screen in the center of the pan. Once the required weight is placed on the balance it will show lines”------” across the screen. 6.) The display will then show the next weight in the linearization sequence. Add this weight 7.) Repeat the procedure 5. & 6. until the display returns to 6 zero and no more weights are called for. Linearity calibration is complete. 6 Advanced function setting Press PRINT until the screen shows “SET-UP”, then it'll enter the advanced function setting. 1) C Function (Zero Tracking): Press PRINT to select, press MODE to confirm, press ON/OFF to exit. C---1: No zero tracking C---2: Zero tracking +/-1d (default) C---3: Zero tracking +/-2d Note: The larger the value, the more stable the system; the smaller the value is, the more sensitive the system is. 2) P Function (data transmission mode): Press PRINT to select, press MODE to confirm, press ON/OFF to exit. P---1: Single transmission, data transmission if PRINT is pressed once.(default) P---2: Continuous transmission. Press PRINT to transmit continuously, and then press PRINT to stop continuous transmission. 3) BL Function (power-saving mode) Press PRINT to select, press MODE to confirm, press ON/OFF to exit. BL---1: Power-saving mode turns on. Power-saving mode will auto turn off within 60 seconds if the balance is not used. (default) BL---2: Power-saving mode is off. 7 4) FA Function (weighing speed) Press PRINT to select, press MODE to confirm, press ON/OFF to exit. FA---1: Weighing speed is natural.(default) FA---2: Weighing speed is faster. 5) b Function (Baud Rate selection) Press PRINT to select, press MODE to confirm, press ON/OFF to exit. b---1: 1200 bps(default) b---2: 2400 bps b---3: 4800 bps b---4: 9600 bps 6) U Function (unit select) Press PRINT to select, press MODE to confirm, press ON/OFF to exit. U---ON: The selected weight unit displays on the screen. U---OFF: The selected unit weight disappears on the screen. 7) RES Function (factory default setting) Press PRINT to select, press MODE to confirm, press ON/OFF to exit. RES---0: Not restore the default settings; RES---1: Restore default settings. Note: View the sensor code: press TARE for about 4 seconds will display the sensor code; press “CAL” to exit. 7 POWER LOW BATTERY LCD series has the function of detecting the battery all the time. When appears on the upper left corner of the display, the battery needs recharging. If you don’t recharge in time, the power will be automatically cut off to protect the 8 battery after using 2~3 minutes. Please immediately recharge the battery. It is important to charge the battery when the Icon shows, failure to recharge will cause damage to the battery. Charging tips In LCD series when Battery status indication is “ ”and stays solid, it means the battery is fully charged (Usually, it takes about 8~10 hours to charge fully.). 8 PROBLEMS & SOLUTIONS Problems When the screen Reason Solutions appears Interference/overload Power off/Re-calibrate “------“ or "_ _ _ _" 1.Evironment is not good. Improve the environment, stop drafts, vibration etc. 2. There is something impacting Unstable weights Remove the obstruction. the pan. 3. The object being weighed Keep the object stll. may be moving. 1.The balance didn’t calibrate Calibrate again. correctly. Incosistent/inaccuate weights 2. Didn’t tare before weighing. 3. Low battery Tare Replace or Recharge the battery 9 Intelligent –Lab range of balances We have a combined 60 years of experience in the weighing and measurement industry, both in the USA and worldwide. With contacts in over 50 countries, we provide you with the weighing and measurement equipment you need. QUALITY - Products solidly built from the ground up with superior engineering and components for exacting results. VALUE - Equipment priced for real-world business applications, with superior service and support. EXPERIENCE - Expert advice to help you choose just the right product for your application. Quality + Value + Experience…it adds up to the Intelligent Investment. www.intelligentwt.com © Intelligent Weighing Technology, Inc. 2014 All rights reserved worldwide. The information contained herein is the property of Intelligent Weighing Technology, Inc. and is supplied without liability for errors or omissions. No part may be reproduced or used except as authorized by contract or other written permission. The copyright and the foregoing restriction on reproduction and use extend to all media in which the information may be embodied. 10