1
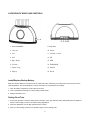
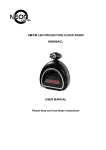
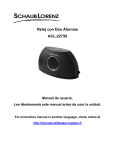
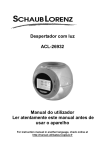
Dual Alarm Clock ACL-22750 USER MANUAL Please keep and read these instructions For instruction manual in another language, check online at http://manuel-utilisateur.logisav.fr Important safety instructions - please read carefully and keep for future reference To reduce the risk of fire or electric shock, do not expose this product to water, rain or moisture. To prevent the risk of electric shock, do not remove the cover or back of this product. In case of product failure, only qualified personnel can repair. There are no user-serviceable parts inside. CAUTION ! Dangerous tension inside the product ! Do not open. Risk of electric shock ! No parts can be repaired by the end-user. Only qualified personnel can repair and maintain this product. - If the electric cord is damaged, it must be replaced by the manufacturer or qualified after-sales personnel in order to avoid any danger. - The product must be installed in accordance with local laws. - Damaged batteries must be properly disposed. In order to protect the environment, please dispose the batteries properly, in accordance with local laws (information is available at your reseller). Where to install the product - Place the product on a straight, rigid and stable place. Do not place the product on a carpet. - Do not place the product on top of another that may cause overheating (for example, a receiver or amplifier). - Do not place anything underneath the product (for example, CDs or magazines). Proper ventilation - Place the product in a sufficiently–aerated place to avoid overheating. Allow at least 10cm spacing at the back and top of the product, and 5cm spacing on both sides to prevent overheating. - Do not place items such as newspapers, tablecloth, curtains, in front of the ventilating openings. Do not expose the product to high temperatures, moisture, water and dust. - The apparatus shall not be exposed to dripping or splashing. No object filled with liquids, such as vases, shall be placed on the apparatus. - Do not place other items close to this product that may damage it (for example, objects containing water or lightened candles). - No naked flame sources, such as lighted candles, should be placed on the apparatus. Electric supply - Please unplug the product in case of prolonged non-use. - This product is intended to be used under temperate climate and should not be used under tropical climate. - The mains plug is used as the disconnect device, so the disconnect device shall remain readily operable If the supply cable is damaged, it must be replaced by the manufacturer or qualified after-sales personnel to avoid any danger. - This product must be connected to an electrical supply 230V ~ 50Hz. - Only use this product with the AC adaptor provided. 1 This product is compliant with directives 2006/95/CE (abrogating the directive 73/23/CEE modified by the directive 93/68/CEE) and 2004/108/CE (abrogating the directive 89/336CEE). This logo set on the product means that the recycling of this apparatus comes within the framework of the directive 2002/96/EC of January 27, 2003 concerning the waste on electrical and electronic equipment (WEEE). - The presence of dangerous substances in the electrical and electronic equipments can have potential consequences on the environment and human health in the cycle of reprocessing this product. - Therefore, at the end of its lifetime, this product shall not be disposed with other non-recycled waste. - As the end user, your role is of prime importance in the cycles of re-using, recycling, and other forms of valorization of this electrical and electronic equipment. Local authorities and resellers have set special procedures for the purpose of collecting and recycling this product. - You have the obligation to use the selective waste collection systems put in place by your local authorities. 2 LOCATIONS OF RADIO AND CONTROLS 1. Snooze/DIMMER 9. Skip down 2. Time set 10. Power 3. AL1 11. Volume +/- knob 4. AL2 12. SD 5. Nap / Sleep 13. USB 6. Function 14. EARPHONE 7. Pause / Play 15. AUX IN 8. Skip up 16. DC IN Install/Replace Backup Battery Make sure the DC adaptor is connected to the AC outlet 230V~50Hz. Otherwise your setting of the clock may be lost when replacing batteries. The two AA batteries is used for clock back-up only (batteries not provided). 1. Open the battery compartment on the bottom of the clock. 2. Insert 2 AA batteries matching the positive polarity marked inside 3. Replace the battery cover. Setting Clock Time 1. Press Time set button to enter the setting mode to set date, month, year and time orderly. Repeatedly press the TIME set button to select a digit you want to set and the setting digit flashes. 2. When the digit flashes, turn the Skip up/down button to adjust. 3. When you finish setting, press the Time set button again to fix the setting mode. 3 Listening to your USB, SD card or others portable audio devices 1. Insert one end of the Connection Cable into the AUX IN jack on your audio device and the other end of the Connection Cable into the AUX IN of your clock. 2. Turn on your audio device to play music. 3. Insert a USB device or SD card to the USB port or SD card slot. 4. Press Function button on the clock to enter USB or SD mode, the selected USB or SD icon will appear on the display. The clock will play the audio files in your USB or SD card automatically. 5. You can press skip up/down to play the next or previous audio file. 6. Turn the Volume +/– knob on the clock to adjust the volume. The unit cannot read my USB device. - Once you have plugged your device to the unit, you may need to switch on the USB device before it can operate. This unit does not support a direct USB connection with a computer. You need to use a USB device, or a MP3 player. This unit is not compatible with hard disk connected to the USB. Please use instead a USB stick or a compatible memory card. The unit cannot read my memory card. - Check firstly that your memory card is compatible with the unit. Supported memory cards are SD and SDHC. We have tested this unit with most of the market’s memory cards ; we cannot however guarantee a full compatibility with all the cards in the market because of the multiple technology standards in use. Should you have a compatibility problem: please use a memory card with a lower capacity (2GB or lower) or else connect the unit through a USB device. Listening to the Radio FM Antenna Extend FM wire antenna fully for best FM reception (do not strip, alter or attach to other antennas). 1. Press the POWER button on the clock to turn on the clock 2. Repeatedly press the FUNCTION button, until the FM icon will appear on the display. 3. Repeatedly press the Skip up /down button on the clock to tune a radio station. 4. Press and hold Skip up /down button for auto tuning, the clock will store stations automatically after you finish tuning. 5. Turn volume +/– knob on the clock to adjust the volume. Setting and using the Alarm setting Alarm1 or Alarm2 1. Press the Al1 or Al2 button on the clock to activate ALARM1 or ALARM2, the Al1 or Al2 icon will appear on the display. 2. Press and hold the Al1 or Al2 button until hour digit flashes. Turn the Skip up /down button to adjust hour digit. 3. Press the Al1 or Al2 button, minute digits flashes. Turn the Skip up/down button to adjust the minute digit. 4. Repeatedly press the FUNCTION button to select a wake up alarm, the selected icon (Beep / SD / USB / FM) illuminates. 4 When alarm sounds Press the POWER button on the clock to turn off the alarm. The alarm will sound again next day at the same time. To cancel the alarm, press the Al1 or Al2 button until Al1 or Al2 icon will disappear on the display. Press the SNOOZE/DIMMER to silence the alarm for 9 minutes. NAP Operation You can set a nap time of 15, 30, 45 or 60 to turn on/off the radio/audio source automatically. 1. If the clock is playing audio, press POWER button to turn off the audio device. Or, press POWER button to turn on radio/radio source. 2. Repeatedly press Nap/Sleep button until the corresponding time 15, 30, 45, 60 minutes appears on the display. 3. The radio/audio sources will turn on/off after the selected minutes have passed. 4. To cancel the Nap timer, press the Nap / Sleep button, until OFF appears on the display. Dimmer Control Repeatedly press the DIMMER button to adjust the backlight intensity of the LCD display. Maintenance To Store You may leave the unit on display, or you can store it in its box in a cool, dray place. To Clean Use only a soft dry cloth to clean the enclosure of the unit. NEVER use liquids or abrasive cleaner to clean. Modifications Not authorized by the manufacturer may void users authority to operate this device. 5 For instruction manual in another language, check online at http://manuel-utilisateur.logisav.fr SAV ADMEA / LOGISAV ZI du clos des charmes 26 rue du clos des charmes 77090 COLLEGIEN - FRANCE 6