1
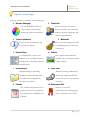
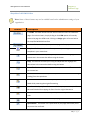
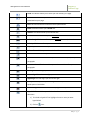
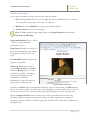
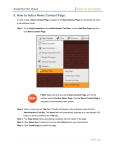
User Guide Chapter 6 Teacher Pages SharpSchool User Manual Chapter 6: Teacher Page Table of Contents Introduction .............................................................................................................................................. 3 Tips for Teacher Pages .............................................................................................................................. 4 Teacher Page Pitfalls ................................................................................................................................. 5 Key Information ........................................................................................................................................ 6 I. How to add a Teacher Page .............................................................................................................. 6 II. How to Edit Teacher Page ................................................................................................................. 9 ^ŚĂƌƉ^ĐŚŽŽů͛Ɛtz^/tz'ĚŝƚŽƌ ...................................................................................................... 10 Publish a Teacher Page ................................................................................................................... 17 III. Photo Gallery .............................................................................................................................. 18 Customize an Album ....................................................................................................................... 22 IV. Classroom Calendar .................................................................................................................... 25 V. Contact Me ...................................................................................................................................... 26 VI. Announcements (News Engine) .................................................................................................. 28 VII. Useful Links ................................................................................................................................. 34 1) Upload a Single File ................................................................................................................. 34 2) Upload Multiple Files .............................................................................................................. 36 3) Creating Folders for your Files ................................................................................................ 38 4) Creating links to resources on the internet ............................................................................ 39 5) Modifying the Contents of the Document Container ............................................................. 39 VIII. How to add more pages .............................................................................................................. 42 IX. How to Manage Sub-‐Pages ......................................................................................................... 44 1) How to Hide or Show a Page ................................................................................................... 44 2) How to Order a Page ............................................................................................................... 45 3) How to Archive a Page ............................................................................................................ 46 4) How to retrieve archived pages .............................................................................................. 46 5) Delete a Sub-‐page ................................................................................................................... 46 2 | P a g e SharpSchool User Manual Chapter 6: Teacher Page Tips for Teacher Pages Here are some tips to enhance your teacher page. 1. Attractive Homepage 2. Teacher Bio Use the WYSIWYG Editor to Use this section to let visitors create attractive and inviting know more about your education, homepages with customizations. training, volunteer experience and other accomplishments. 3. Contact information 4. Multimedia Visitors to the site should be able Give your teacher page personality to contact the teachers. by including pictures, videos and colorful text. 5. Dynamic Blogs 6. Galleries Use SharpSchool to create and Invite parents and community maintain your own Blogs. Increase members into your classroom with participation by allowing comments a Photo Gallery. and RSS feeds. 7. Share Resources 8. Useful Links Simplify sharing by uploading Instead of creating cumbersome documents, forms and help sheets documents, simply include links for students LQWR6KDUS6FKRRO·V to relevant sites for your students Document Containers. to browse 9. Calendar 10. Achievement Wall Give students and parents time to 6KRZFDVH\RXUFODVV·V prepare for tests and assignments achievements by including pages E\SRVWLQJWKHPRQ6KDUS6FKRRO·V such as ´6WXGHQWRIWKH:HHN.µ Calendar. 4 | P a g e SharpSchool User Manual Chapter 6: Teacher Page II. How to Edit Teacher Page After you have created a teacher page you will be taken WR6KDUS6FKRRO·V:<6,:<*:KDW<RX See Is What You Get) Editor. This editor has been designed to give teachers without technical experience the ability to create and maintain their own web pages. A detailed description of all features available in the editor has been included in Table 1: SharpSchool WYSIWYG Editor. Now you can now begin creating your unique teacher page! Figure 5: Edit a Teacher Page Note: A pre-packaged list of sub-pages is available on the left navigation bar of the teacher page7KLVLV6KDUS6FKRRO·V7HDFKHU Package that includes Announcements, Photo Gallery, Classroom Calendar, Document Container, Useful Links, and a Contact Me page. From this area, teachers may easily add more pages to their site. 9 | P a g e SharpSchool User Manual Chapter 6: Teacher Page ǯ Editor Note: Some of these features may not be available based on the administrator settings of your organization. Feature Description < > HTML: The Editor allows technical and non-‐technical users to create their pages. For technical users, simply clicking on the HTML option will instantly convert the page into HTML code. Clicking on Design again will revert back to the simplified WYSIWYG interface. Preview: This button allows you to preview a page before you publish it. Template: The Templates button allows you to use preexisting content templates in your content box. Cut: This function will allow you to quickly cut and move text. Highlight the chosen text in the content box before using this button. Copy: This function will allow you to copy and duplicate text. Highlight the desired text in the content box before using this button. Paste: This function allows you to paste cut or copied text to a different area of the content box. Paste as Plain Text: This button pastes text; however it removes all formatting (coding) from the copied text. Paste from Word: This button allows you to paste text copied from Microsoft Word while preserving the original formatting. Paste from Word, strip font: This button will allow you paste text copied from Microsoft Word while stripping the fonts from the original document. Paste as HTML: This function allows you to paste cut or copied text as HTML code. Print: This button prints the contents of your page. Spell Checker: This button runs a spell check on your page and notifies you of any errors that are found. 10 | P a g e SharpSchool User Manual Chapter 6: Teacher Page Undo: This button allows you to undo your last action(s) on a page. Redo: This button allows you to redo the action or actions that were last committed on your page. Find: This tool searches the content area for specified text. Bold: This button allows you to BOLD text. Italicize: This button allows you to Italicize text. Underline: This button allows you to underline text. Strikethrough: This button allows you to cross out (cross out) selected text. Subscript: This button allows you to convert text into a subscript. Superscript: This button allows you to convert text into a superscript. Bullets: This tool allows you to create bulleted lists. Numbered: This tool allows you to create numbered lists. Increase Indents: This button allows you to increase indents (tabs) for your paragraphs. Decrease Indents: This button allows you to decrease indents for your paragraphs. Left Align: This tool aligns your text to the left. Center Align: This tool center aligns your text. Right Align: This tool aligns your text to the right. Justify: This tool equalizes your text to give it a clean, streamlined look with equal space on both sides. Remove Alignment: This tool removes any alignments in your text. Hyperlink: This tool allows you to link selected text to another website or document. 1) To include a hyperlink first highlight the text or area you want hyperlinked. 2) Click on icon. 11 | P a g e SharpSchool User Manual Chapter 6: Teacher Page 3) Enter the Link Text, Tooltip and the URL and click OK Remove Link: This tool allows you to remove a hyperlink from a text. Insert Image: This tool allows you to insert an image in the content box. 1) To insert an image, click on the icon. This opens an Image Manager box. 12 | P a g e SharpSchool User Manual Chapter 6: Teacher Page 2) In this window you may select an image that has been uploaded to your site. If you wish to select an image from your computer, click on Upload. Select the image by clicking on Select, and click Upload. 3) Once the image has been uploaded, double-‐click the image to insert it. 4) You will return to the Image Properties box from where you can customize the size of the image, border etc. Click on OK when completed. 13 | P a g e SharpSchool User Manual Chapter 6: Teacher Page Customize the Width and Height of images here. 5) To resize an image: Either click on the image and drag it to the size required or right-‐click on the image and click Properties. 14 | P a g e SharpSchool User Manual Chapter 6: Teacher Page Insert Table: This tool allows you to insert tables in your content box. A popup menu will appear prompting you to select the dimensions of your table. Horizontal Line: This button inserts a horizontal line on the page. Insert Symbol: Allows you to insert symbols (from a pre-‐defined list) into the content area. Insert Form Element: This tool allows you to include form elements on your page such as Checkbox, Radio Button, Text Box, Text Area, Dropdown, Button, Hidden Field, and Password. Paragraph Style: This button allows you to customize the Style of text on your page. Size: This button allows you to customize the Format of text on your page. Font: This button allows you to customize the Font of text on your page. Real Font Size: This button allows you to customize the Size of the text on your page. Text Color: This button allows you to change the color of text on your page. Background Color: This button allows you to change the background color of text of your page. About: This function can be used to ask for context sensitive help and information. 15 | P a g e SharpSchool User Manual Chapter 6: Teacher Page Insert Formula: This button allows you to insert a formula to calculate values. Insert Video: This tool allows you to insert embedded videos on your page. Insert Recorder: This tool allows you to record a video from a webcam and publish it on your page. Insert Flash: This tool allows you to insert Flash videos on your page. Style Builder: Allows to add style to your text. Media Manager: You can use this tool to insert media onto your page, such as MP3 audio files, AVI video files. Document Manager: This tool allows you to insert links to documents on to your page such as PDF files, Microsoft Word files, Microsoft Excel files to name a few. Table 1: SharpSchool WYSIWYG Editor 16 | P a g e SharpSchool User Manual Chapter 6: Teacher Page Publish a Teacher Page Once content is added to the page, there are three options available: 1) Save: Selecting Save will save all of the changes but will not publish them live on your site. You may return to this page at a later date to complete it. 2) Publish: By selecting Publish, the changes are instantly made live. 3) Cancel: Cancel will not save any changes. Note: To Edit a published page, simply return to the Page Properties menu and click Check-Out & Edit Page. Page Administration (Figure 6: Publish a Teacher Page) lists important information, such as: Page Owner: Identifies the owner of a page. We recommend that the teachers be assigned ownership of their own pages. Last Modified: Identifies the date the page was last updated. Follow-up Tasks: Features three options, Review, Move and Archive. Under the Review option, you have the ability to schedule a reminder to review a particular page on a predefined date. On this date, 6KDUS6FKRRO·VV\VWHPZLOOHPDLOthe page owner to update the page. Figure 6: Publish a Teacher Page Likewise, the Archive option automatically archives the page on a selected date. The Move feature allows you to move a page on a specific date or when the page is a certain number of days old. You also have the option to move just the current page and all sub-pages or just the sub-pages only. Finally the Approval Notes section is where a page owner can include review notes for the individual assigned to approve the page before it goes live. Many organizations set approval workflows on pages in order to ensure the quality and standard of the content that is published on their public site. 17 | P a g e