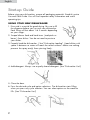
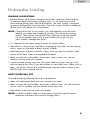
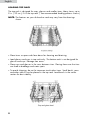
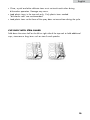
1
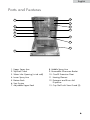
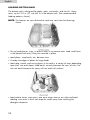
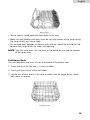
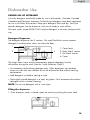
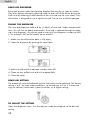
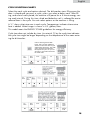
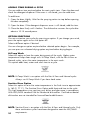
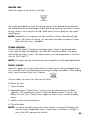
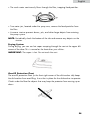
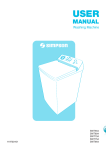
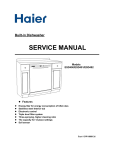
24" Built-In Dishwasher
24" Lave-Vaisselle Incorpere
24" Lavavajillas Empotrado
Part # DW-9999-18
User Manual
Guide de l'Utilisateur
Manual del Usuario Modelo
DWL4035DBWW • DWL4035DBBB • DWL4035MBSS
Quality
n
Innovation
n
Style
English
SAFETY PRECAUTIONS
Warning! – To reduce the risk of fire, electric shock, or injury to persons, always exercise basic safety precautions, including the following:
1. Read all instructions before using the appliance.
2. Use the dishwasher only for its intended function.
3. Use only detergents or rinse agents recommended for use in a
dishwasher, and keep them out of the reach of children.
4. When loading items to be washed:
1) Locate sharp items so that they are not likely to damage the door
seal;
2) Load sharp knives with the handles up to reduce the risk of cut-type
injuries.
5. Do not wash plastic items unless they are marked "dishwasher safe” or
the equivalent. For plastic items not so marked, check the manufacturer's
recommendations.
6. Do not touch the heating element during or immediately after use.
7. Do not operate the dishwasher unless all enclosure panels are properly
in place.
8. Do not tamper with controls.
9. Do not abuse, sit on, or stand on the door, lid, or dish racks of the
dishwasher.
10. To reduce the risk of injury, do not allow children to play in or on the
dishwasher.
11. U
nder certain conditions, hydrogen gas may be produced in a hot
water system that has not been used for two weeks or more.
HYDROGEN GAS IS EXPLOSIVE. If the hot water system has not been
used for such a period, before using the dishwasher turn on all hot
water faucets and let the water flow from each for several minutes,
This will release any accumulated hydrogen gas. As the gas is
flammable, do not smoke or use an open flame during this time.
12. R
emove the door or lid to the washing compartment when removing
an old dishwasher from service or discarding it.
SAVE THESE INSTRUCTIONS
1
English
Thank you for purchasing our Haier
product. This easy-to-use manual
will guide you in getting the best
performance from your Haier
dishwasher.
Remember to record the model and
serial number. They are on a label
in the dishwasher.
Model number
Serial number
Date of purchase
Staple your receipt to your manual. You will need it to obtain
warranty service.
2
English
Table Of Contents
PAGE
Safety Precautions ......................................................................1-2
Before Using Your Dishwasher ..............................................................4
Parts and Features ........................................................................6
Parts and Features ...............................................................................6
Start-up Guide.................................................................................7
Using Your New Dishwasher ................................................................7
Dishwasher Loading ..................................................................8-13
Loading Suggestions ............................................................................8
Loading Top Rack ...........................................................................9-10
Loading Bottom Rack ....................................................................11-12
Loading Silverware Basket ..................................................................13
Dishwasher Use .......................................................................13-23
Proper Use of Detergent .....................................................................14
Detergent Dispenser ......................................................................14-16
Rinse Aid Dispenser............................................................................17
Cycle Selection Charts ..................................................................18-19
Canceling a Cycle..............................................................................20
Changing a Cycle or Setting ..............................................................20
Adding Items During a Cycle ..............................................................21
Option Selections .........................................................................21-22
Cycle Status Indicators........................................................................23
Wash System.....................................................................................23
Drying System ...................................................................................24
Overfill Protection Float ......................................................................24
Washing Special Items ............................................................25-26
Dishwasher Care .....................................................................26-27
Cleaning .....................................................................................26-27
Drain Air Gap...................................................................................27
Storing..............................................................................................27
Troubleshooting .......................................................................28-31
Assistance or Service.....................................................................32
Warranty .......................................................................................33
3
English
Before Using Your Dishwasher
!
WARNING
Tip Over Hazard
• Do not use dishwasher until completely installed.
• Do not push down on open door, doing so can
result in serious injury or cuts.
!
WARNING
Electrical Shock Hazard
• Electrically ground dishwasher.
• Connect ground wire to green ground connector in
terminal box.
• Do not use an extension cord.
• Failure to follow these instructions can result in
death, fire, or electrical shock.
• Install where dishwasher is protected from the elements. Protect against
freezing to avoid possible rupture of fill valve. Such ruptures are not covered
by the warranty. See "Storing" in the "Dishwasher Care" section for winter
storage information.
• Install and level dishwasher on a floor that will hold the weight and in an area
suitable for its size and use.
•R
emove all shipping plugs from hoses and connectors (such as the cap on
the drain outlet) before installing. See Installation Instructions for complete
information.
4
English
GROUNDING INSTRUCTIONS
For a grounded, cord-connected dishwasher:
The dishwasher must be grounded. In the event of a malfunction or
breakdown, grounding will reduce the risk of electric shock by providing a
path of least resistance for electric current. The dishwasher is equipped with a
cord having an equipment- grounding conductor and a grounding plug. The
plug must be plugged into an appropriate outlet that is installed and grounded
in accordance with all local codes and ordinances.
WARNING:
Improper connection of the equipment-grounding conductor can result in a risk
of electric shock. Check with a qualified electrician or service representative if
you are in doubt whether the dishwasher is properly grounded. Do not modify
the plug provided with the dishwasher; if it will not fit the outlet, have a proper
outlet installed by a qualified electrician.
For a permanently connected dishwasher:
The dishwasher must be connected to a grounded metal, permanent wiring
system, or an equipment- grounding conductor must be run with the circuit
conductors and connected to the equipment- grounding terminal or lead on the
dishwasher.
5
English
Parts and Features
13
1
7
2
8
3
9
4
5
10
11
12
6
1. Upper Spray Arm
8. Middle Spray Arm
2. Top Rack Track
9. Removable Silverware Basket
3. Water Inlet Opening (in tub wall)
10. Overfill Protection Float
4. Lower Spray Arm
11. Heating Element
5. Bottom Rack
12. D
etergent and Rinse Aid
Dispenser
6. Vent System
7. Adjustable Upper Rack
13. Cup Shelf with Stem Guard (2)
6
English
Start-up Guide
Before using your dishwasher, remove all packaging materials. Read this entire
Use and Care Guide. You will find important safety information and useful
operating tips.
USING YOUR NEW DISHWASHER
1. R
inse aid is essential for good drying. Be sure to fill
the dispenser before you use your new dishwasher.
Each filling will last about 1 to 3 months depending
on your usage.
2. S
crape leftover food and hard items ( toothpicks or
bones ) from dishes. You do not need to pre-rinse
your dishes.
3. P
roperly load the dishwasher. ( See" Dishwasher Loading" ) Load dishes with
space in between so water will reach the soiled surfaces. Make sure nothing
prevents the spray arm(s) from spinning freely..
4. Add detergent. Always use a quality brand detergent. (See "Dishwasher Use")
5. Close the door.
6. P
ress the desired cycle and option selections. The dishwasher starts filling
when you press any cycle selection. You can select options as the machine
fills. (See "Dishwasher Use")
7
English
Dishwasher Loading
LOADING SUGGESTIONS
•R
emove leftover food, bones, toothpicks and other hard items from the dishes
To conserve water and energy and save time, it is not necessary to rinse
dishes before putting them into the dishwasher. The wash system is designed
to remove food particles from the water. The wash system includes a chopping
device which will reduce size of food items.
NOTE: If hard items such as fruit seeds, nuts, and eggshells enter the wash
module, you might hear chopping, grinding, crunching, or buzzing
sounds. These sounds are normal when hard items enter the module.
Do not let metallic items (such as pot handle screws) get into the
wash module. Damage can occur.
• It is important for the water spray to reach all soiled surfaces.
• L oad dishes so they are not stacked or overlapping if possible. For best drying
results, water must be able to drain from all surfaces.
• L oad heavy pots and pans carefully. Heavy items can dent the stainless steel
interior of the door if they are dropped or bumped.
•M
ake sure pot lids and handles, pizza pans, cookie sheets, etc., do not
interfere with the spray arm rotation.
•C
onserve water, energy and save time spent hand-rinsing by running a rinse
cycle to keep dishes moist if you do not plan to wash them soon. Foods such as
eggs, rice, pasta, spinach and cooked cereals may be hard to remove if they
are left to dry over a period of time.
QUIET OPERATING TIPS
To avoid thumping/clattering noises during operation:
• Make sure lightweight load items are secured in the racks.
•M
ake sure pot lids and handles, pizza pans, cookie sheets, etc., do not touch
interior walls or interfere with the rotation of the spray arm.
• Load dishes so they do not touch one another.
NOTE: F or built-in models, keep sink drain plugs closed during dishwasher
operation to prevent noise transfer through drains.
8
English
LOADING TOP RACK
The top rack is designed for cups, glasses and smaller items, Many items, up to
9 in. ( 22 cm ), fit in the top rack. ( See recommended loading patterns shown )
NOTE: T he features on your dishwasher rack may vary from the drawings
shown.
• Place items so open ends face down for cleaning and draining.
• L oad glasses and cups in top rack only. The bottom rack is not designed for
glasses and cups. Damage can occur.
•P
lace cups and glasses in the rows between tines. Placing them over the tines
can lead to breakage and water spots.
• T o avoid chipping, do not let stemware touch other items. Small bowls, pans
and other utensils can be placed in the top rack. Load bowls in the center
section for best stability.
9
English
•C
hina, crystal and other delicate items must not touch each other during
dishwasher operation. Damage may occur.
• L oad plastic items in the top rack only. Only plastic items marked
"dishwashe safe" are recommended.
• Load plastic items so the force of the spray does not move them during the cycle.
CUP SHELF WITH STEM GUARD
Fold down the extra shelf on the left or right side of the top rack to hold additional
cups, stemware or long items such as utensils and spatulas.
10
English
LOADING BOTTOM RACK
The bottom rack is designed for plates, pans, casseroles, and utensils. Many
items, up to 12.2 in. (31 cm) tall, fit in the bottom rack. (See recommended
loading patterns shown)
NOTE: T he features on your dishwasher rack may vary from the drawings
shown.
•D
o not load glasses, cups, or plastic items in the bottom rack. Load small items
in the bottom rack only if they are secured in place.
• Load plates, soup bowls, etc. between tines.
• Overlap the edges of plates for large loads.
• L oad soup, cereal, and serving bows in the rack in a variety of ways depending
upon their size and shape. Load bowls securely between the rows of tines. Do
not nest bowls because the spray will not reach aIl surfaces.
• L oad cookie sheets, cake pans, and other large items at the sides and back.
Loading such items in front can keep the water spray from reaching the
detergent dispenser
11
English
• Secure heavily soiled cookware face down in the rack.
•M
ake sure pot handles and other items do not stop rotation of the spray arm(s).
The spray arm(s) must move freely.
•D
o not load items between the bottom rack and the side of the dishwasher tub
because they might block the water inlet opening.
NOTE: S
pin the spray arms. Be sure items in the basket do not stop the rotation
of the spray arms.
Fold-Down Rack
You can fold down two rows of tines at the back of the bottom rack.
1. Grasp the tip of the tine that is in the tine holder.
2. Gently pull the tine out of the tine holder.
3. L ay the row of tines down in the rack to make room for larger dishes, bowls,
pots, pans or roasters.
12
English
LOADING SILVERWARE BASKET
Load the silverware basket while it is in the bottom rack or remove the basket
and place on a counter or table for loading. (See recommended loading pattern
shown)
NOTE: U
nload or remove the basket before unloading the racks to avoid water
drops from falling on the silverware.
• L oad items with covers down, using the separators to prevent silverware
nesting.
•P
lace small items such as baby bottle caps, jar lids, corncob holders, etc. in the
section(s) with hinged cover(s). Close the cover to hold small items in place.
•W
hen covers are up, mix items in each section of the basket with some
pointing up and some down to avoid nesting. Spray cannot reach nested items.
IMPORTANT: Always load sharp items (knives, skewers, etc.) pointing down.
Be sure that nothing protrudes through bottom of the basket or rack that may
block the wash arm.
NOTES:
•D
o not load silver or silver-plated silverware with stainless steel. These metals
can be damaged by contact with each other during washing.
•S
ome foods (such as salt, vinegar, milk products, fruit juices, etc.), can pit or
corrode silverware. Run a rinse cycle if you do not have a full load to wash
immediately.
13
English
Dishwasher Use
PROPER USE OF DETERGENT
Use only detergent specifically made for use in dishwasher. Cascade, Cascade
Complete and Electrasol Automatic Dishwashing Detergents have been approved
for use in all Haier dishwashers. Keep your detergent fresh and dry. Don't put
powder detergent into the dispenser until you're ready to wash dishes.
All wash cycles except RINSE ONLY require detergent in the main and pre-wash
cup.
Detergent Dispenser
The detergent dispenser has 2 sections. The small Pre-Wash section empties
detergent into dishwasher when you close the door.
1
3
2
1.
2.
3.
4.
Cover latch
Main Wash section
Pre-Wash section
Cover
4
The larger Main wash section automatically empties detergent into the
dishwasher during the wash (See the "cycle Selection Charts")
•U
se automatic dishwashing detergent only. Other detergents can produce
excessive suds that can overflow out of the dishwasher and reduce washing
performance.
• Add detergent just before starting a cycle.
•S
tore tightly closed detergent in a cool, dry place. Fresh automatic dishwasher
detergent results in better cleaning.
NOTE: Do not use detergent with a rinse cycle.
Filling the dispenser
1. If the dispenser cover is closed, open the cover by pushing the cover latch.
14
English
2. Fill the Main Wash section with detergent. See "How much detergent to use."
3. Fill the Pre-Wash section, if needed.
4. Close the dispenser cover.
It is normal for the cover to open partially when dispensing detergent.
NOTE: U
se both sections for cycles with 2 washes. Use only the main wash
section for cycles with 1 wash, See the "Cycle Selection Charts" for more
details.
How much detergent to use
• T he amount of detergent to use depends on the hardness of your water and the
type of detergent. If you use too little, dishes won't be clean . If you use too
much in soft water, glassware will etch.
•D
ifferent brands of dishwasher detergent have different amounts of
phosphorous for softening water. If you have hard water and use a detergent
with a phosphorous content of less than 8.7%, you might need to use more
detergent, or use a detergent with a phosphorous content higher than 8.7%.
15
English
Water Hardness
Amount of Detergent
Soft to Medium Hard Water
For normally soiled loads
0 to 6 grains per gallon
•P
artially fill the Main Wash
section with 4 tsp.
•C
ompletely fill the Pre-Wash
section
NOTE: F ill the Pre-Wash section
halfway if dishes are
pre-rinsed or the water is
very soft (0 to 3.2/12 2
grains per gallon)
For heavily soiled loads
•P
artially fill the Main Wash section
with 6 tsp.
• Completely fill the Pre-Wash section
Medium to hard water
For normal and heavily soiled loads
7 to 12 grains per gallon
• Partially fill the Main Wash section
with 6 tsp.
• Completely fill the Pre-Wash section
Very Hard Water
For normally and heavily soiled loads
13 grains per gallon and above
•C
ompletely fill the main wash
section
NOTE: It might be necessary to use
the Pots and Pans, or a normal cycle
with Hi- Temp Scrub, for best wash
performance with very hand water.
• Completely fill the Pre-Wash section
• T urn the rinse aid dispenser to
a higher setting. See "Rinse Aid
Dispenser" later in this section
NOTE: Fill amounts shown are for standard powdered detergent. Amounts may
vary if you use liquid or concentrated powdered detergent. Follow instruction on
the package when using liquid dishwasher detergent or concentrated powdered
detergent.
If you use detergent tablets, use one whole tablet in the Main Wash section only
for all loads and water hardness levels.
16
English
RINSE AID DISPENSER
Rinse aids prevent water from forming droplets that can dry as spots or streaks.
They also improve drying by allowing water to drain off of the dishes during the
final rinse by releasing a small amount of the rinse aid into the rinse water. Your
dishwasher is designed to use a liquid rinse aid. Do not use a solid or bar-type.
FILLING THE DISPENSER
The rinse aid dispenser holds 4.8 oz ( 145ml ) of rinse aid. Under normal conditions, this will last for about three months. Rinse aid is released through an opening in the dispenser. You do not need to wait until the dispenser is empty to refill
it. Try to keep it full, but be careful not to overfill it.
1. Make sure the dishwasher door is fully open.
2. Open the dispenser by pushing the cover latch.
3. Add rinse aid until the indicator window looks full.
4. Clean up any spilled rinse aid with a damp cloth.
5. Close the cover.
RINSE AID SETTING
The amount of rinse aid released into the final wash can be adjusted. The factory
setting is at 2. For most water conditions, set the adjuster to 2 or 3. If there are
rings or calcium ( hard water ) spots on dishes, try a higher setting.
TO ADJUST THE SETTING
Open the dispenser cover. Turn the adjuster inside the dispenser to the desired
setting.
17
English
CYCLE SELECTION CHARTS
Select the wash cycle and options desired. The dishwasher starts filling once the
door is closed and you press a cycle, unless you select a delay wash. After filling, and a brief wash period, the machine will pause for a 5 minute energy saving soak interval. During this time, dried and baked on soil is softened for easier
removal later in the cycle. You can select options as the machine is filling.
5 where extra
A "•"7shows what steps are in each6cycle. Temperatures indicate
heat is added. Water usage is shown in U.S. gallons/liters.
This model meets the ENERGY STAR® guidelines for energy efficiency.
PANTONE�COOL GRAY 3C
Cycle time does not include dry time. An asterisk
(*) by the cycle time indicates
PANTONE�427C
the cycle time might be longer depending on the temperature of the water entering theDWL3525�WHITE�VERSION-160780101
dishwasher.
E
7
D
7
6
6
Use for all soil types and dish
loads. This cycle has additional
checks for soil in the water to give
added wash action time. The wash
action will pause several times
throughout the cycle, for up to 70
seconds, to check the soil level in
the wash water.
5
5
4
4
PANTONE�COOL GRAY 3C
PANTONE�COOL GRAY 3C
PANTONE�427C
PANTONE�427C
DWL4035�WHITE�VERSION-160860101
DWL3525�WHITE�VERSION-160780101
DWL3525�WHITE�VERSION-160780101
61*
C
DWL7075�WHITE�VERSION 01 20 400 0 17 -160870101
DWL4035�WHITE�VERSION-160860101
DWL4035�WHITE�VERSION-160860101
B
BACKGROUND:WHITE�COLOR
DWL7075�WHITE�VERSION
012040 00 17 -160870101
DWL7075�WHITE�VERSION 0120 40 00 17 -160870101
T
BUTTON�BACKGROUND:PANTONE�427C
BUTTON TOP &�BOTTOM:PANTONE�COOL GRAY 3C
FONTS:PANTONE�COOL GRAY 9C
18
English
5�WHITE�VERSION-160860101
PANTONE�COOL GRAY 3C
PANTONE�427C
WHITE�FROST(X1
160780101
TRANSPA
5�WHITE�VERSION 012040 00 17 -160870101
6
5
57*
4
3
160860101
PANTONE�COOL GRAY 3C
PANTONE�427C
WHITE�F
VERSION-160780101
ACKGROUND:WHITE�COLOR
UTTON�BACKGROUND:PANTONE�427C
TRANSPARENT SMOKE
0120 40 00
17 -160870101
UTTON
TOP
&�BOTTOM:PANTONE�COOL GRAY 3C
ONTS:PANTONE�COOL GRAY 9C
SE
EA
EL CE
R
EEN
PR FER LY
RE E�ON
US
37*
ED:PANTONE�RED�1805C
VERSION-160860101
ENTER�DESCRIPTION
ED�WINDOW:WHITE�FROST.
SEGMENT DISPLAY WINDOW:TRANSPARENT SMOKE
004/04/02
ITE�COLOR
6
5
4
OUND:PANTONE�427C
TRANSPARENT S
VERSION 0120 40 00 17 -160870101
TTOM:PANTONE�COOL
GRAY 3C
SE
EA
EL CE
E-R REN
R
P
LY
FE
RE E�ON
US
COOL GRAY 9C
D�1805C
QUALITY
SYMBOLS
5
19
ACKGROUND:PANTONE�427C
OP &�BOTTOM:PANTONE�COOL GRAY 3C
4
APPR:
CH'KD:
REV DESCRIPTION
1
OUND:WHITE�COLOR
6
=0
4�PLACES
3�PLACES
C
=0
2�PLACES
1�PLACE
DRWN:
heat and water as needed.
AY WINDOW:TRANSPARENT
SMOKE
EC�NO:
ENTER�DESCRIPTION
• If the incoming water temperature is less than the recommended temperature or
TE�FROST. food soils are heavy, the cycle will automatically compensate by adding time,
GENE
(UN
3
ANG
DRAFT W
MUST R
WITHIN�
English
CANCELLING A CYCLE
Anytime during a cycle, press
Cancel
Your dishwasher will start a 2-minute drain (if needed). Let the dishwasher drain
completely. The light turns off after 2 minutes.
NOTE: If your dishwasher does not need draining, press CANCEL again to turn
the light turns off. Select a new cycle and options.
To stop the drain
You can press CANCEL again to stop the drain immediately. Remember to drain
the dishwasher before starting a new cycle.
To clear the indicators
Press CANCEL before starting the dishwasher to clear all options and cycles.
CHANGING A CYCLE OR SETTING
During the first fill of a cycle
1. Press a new cycle and/or options.
2. Check the detergent dispensers.They must be filled properly for the new cycle.
After the first fill of a cycle
1. Press
Cancel
Your dishwasher will start a 2-minute drain (if needed). Let the dishwasher drain
completely. The light turns off after 2 minutes.
NOTE: If your dishwasher does not need draining,press CANCEL again to turn
the light off.
1. Check the detergent dispensers. They must be filled properly for the new cycle.
2. Press a new cycle and/or options.
20
ADDING ITEMS DURING A CYCLE
You can add an item anytime before the main wash starts. Open the door and
check the detergent dispenser If the cover is still closed, you can add items.
To add items
1. O
pen the door slightly. Wait for the spraying action to stop before opening
the door completely.
2. Open the door. If the detergent dispenser cover is still closed, add the item.
3. C
lose the door firmly until it latches. The dishwasher resumes the cycle after
about a 10-15 second pause.
OPTION SELECTIONS
You can customize your cycles by pressing an option. If you change your mind,
press the option again to turn the option off.
Select a different option if desired.
You can change an option anytime before selected option begins. For example,
you can press an unheated drying option anytime before drying begins.
Hi-Temp Wash
Select this option to heat the water during parts of the cycle. Higher water
temperatures helps clean tough soils. Hi-Temp Wash, with the Pots & Pans or
Normal cycles, raises the water temperature in the main wash.
This option adds heat, water and wash time to a cycle.
11
NOTE: H
i-Temp Wash is an option with the Pots & Pans and Normal cycles.
Always use Hi-Temp Wash if you have hard water.
Sanitize Rinse Option
Select this option to raise the water temperature in the final rinse to approximately 160 F ( 71°C ). The Sanitize Rinse Option adds heat and time to the cycle.
This high temperature rinse sanitizes your dishes and glassware in accordance
With NSF/ANSI standard 184 for Residential dishwasher. Certified residential
dishwasher are not intended for licensed food establishments.
NOTE: S
anitize Rinse is an option with the Pots & Pans and Normal cycle. Only
these sanitization cycles have been designed to meet the NSF/ANSI
requirements.
21
HEATED DRY
Select this option to dry dishes with heat.
Not selecting heated dry skips the drying period. If the heated drying period is
not selected the dishes take longer to dry and some spotting can occur. For best
drying, always use a liquid rinse aid. Some items (such as plastics) may need
towel drying.
NOTE: H
eated Dry is an option with Pots and Pans Wash, Normal and Light
cycles. For faster air drying, you can open the door a couple of inches
after the final rinse is complete.
STEAM OPTION
Use for all dish loads, including extra large loads. Steam is generated early
in the cycle to help wet baked on soils from dish load and soften it for easier
removal by the wash system. The steam cycle raises the temperature in the final
rinse to 150ºF (66ºC).
NOTE: This option can be used with all cycles except Rinse Only and Speed Wash.
DELAY HOURS
Select this option to run your dishwasher at a later time or during off-peak hours.
You can add items to the load anytime during the delay countdown. After adding
items, close the door firmly until it latches.
You can delay the start of a cycle up to 9 hours.
To delay the start:
1. Open the door
2. R
epeatedly press "Delay Hours" until you see the desired hours of delay
lighted in LED indicator on the left. When the delay reaches 12 hours, the
delay turns off. Press "Delay Hours" again to select a new number of delay
hours.
3. Select a wash cycle and options
4. Close the door
NOTE: T o cancel the delay and cycle, press Cancel. To cancel the delay and
start the cycle immediately, press "Delay Start" until there is no light in
any of the LED indicators on the left.
22
English
CYCLES STATUS
INDICATORS
Follow the progress of your dishwasher with the Cycle Status indicators.
Sensing
Sensing light glows during the sensing parts of the cycle. Your dishwasher senses
soil levels at various times during the dishwasher cycle. Washing pauses, while
sensing occurs.
Washing
Displayed during pre-wash and main wash periods.
Rinsing
Displayed during rinse periods.
Drying
Lights up when the dishwasher is drying after the final rinse.
Sanitized
Displayed when cycle has met sanitization conditions. The light will remain ON
until door is opened.
Wash System
An energy saving soak interval is used for most cycles shortly after the initial
water fill. During the 5 minutes of soaking, dried and baked on food is loosened
without using energy. Later in the cycle the robust wash action removes the
softened food more efficiently. The six-level wash system provides excellent
cleaning results. Three levels of filtration and a soil collector system filter the wash
water and prevent food particles from redepositing on the clean dishes.
23
English
• The wash water continuously flows through the filter, trapping food particles.
• T wo water jets, located under the spray arm, remove the food particles from
the filter.
•A
coarse strainer prevents bones, pits, and other large objects from entering
the pump system.
NOTE: P
eriodically check the bottom of the tub and remove any objects on the
strainer.
Drying System
During drying, you can see hot vapor escaping through the vent at the upper left
corner of the door.This is normal as the heat dries your dishes.
IMPORTANT: The vapor is hot. Do not touch the vent.
Overfill Protection Float
The overfill protection float (in the front right corner of the dishwasher tub) keeps
the dishwasher from overfilling. It must be in place for the dishwasher to operate.
Check under the float for objects that may keep the protector from moving up or
down
24
English
Washing Special Items
If you have doubts about washing a particular item, check with the manufacturer
to see if it is dishwasher safe.
Material Dishwasher Safe / Comments
Aluminum
Yes
High water temperature and detergents can
affect finish of anodized aluminum.
Disposable Aluminum
No
Do not wash disposable aluminum pans in the
dishwasher These might shift during washing and
transfer black marks to dishes and other items.
Bottles and cans
No
Wash bottles and cans by hand. Labels
attached with glue can loosen and clog the spray
arms or pump and reduce washing performance.
Cast Iron
No
Seasoning will be removed and iron will rust.
China / Stoneware
Yes
Always check manufacturer's recommendations
before washing. Antique, hand-painted, or
over-the-glaze patterns may fade, gold leaf can
discolor or fade.
Crystal
Yes
Check manufacturer's recommendations before
washing. Some types of leaded crystal can etch
with repeated washing.
Gold
No
Gold-colored flatware will discolor
Glass
Yes
Milk glass yellows with repeated dishwasher
washing.
Hollow-Handle Knives
No
Handles of some knives are attached to the blade
with adhesives which can loosen if washed in the
dishwasher.
Pewter Brass, Bronze
25
No
High water temperatures and detergent can
discolor or pit the finish.
English
Material Dishwasher Safe / Comments
Disposable Plastics
No
Cannot withstand high water temperatures and
detergents.
Plastics
Yes
Always check manufacturer's recommendations
before washing. Plastics vary in their capacity to
withstand high temperatures and detergents.
Load plastics in top rack only.
Stainless Steel
Yes
Run a rinse cycle if not washing immediately.
Prolonged contact with food containing salt,
vinegar, milk products, or fruit juice can damage
finish.
Sterling Silver or Silver Plate
Yes
Run a rinse cycle if not washing immediately.
Prolonged contact with food containing salt, acid,
or sulfide (eggs, mayonnaise, and seafood) can
damage finish.
Tin
No
Can rust.
Wooden Ware
No
Wash by hand. Always check manufacturer's
instructions before washing. Untreated wood can
warp, crack, or lose its finish.
DISHWASHER CARE
Cleaning
Cleaning the exterior
In most cases, regular use of a soft, damp cloth or sponge and a mild detergent
is all that is necessary to keep the outside of your dishwasher looking nice and
clean.
Cleaning the interior
Hard water minerals can cause a white film to build up on the inside surfaces,
especially just beneath the door area.
Do not clean the dishwasher interior until it has cooled. Wear rubber gloves.
Do not use any type of cleanser other than dishwasher detergent because it may
cause foaming or create suds.
26
English
To clean interior
Make a paste with powdered dishwasher detergent on a damp sponge and
clean.
OR
Use liquid automatic dishwasher detergent and clean with a damp sponge.
OR
See the vinegar rinse procedure in "spotting and filming on dishes" in
"Troubleshooting."
NOTE: Run a Normal cycle with detergent after cleaning the interior.
DRAIN AIR GAP
Check the drain air gap anytime your dishwasher isn't draining well. Some state
or local plumbing codes require the addition of a drain air gap between a builtin dishwasher and the home drain system. If a drain is clogged, the drain air
gap protects your dishwasher from water backing up into it.
The drain air gap is usually located on top of the sink or countertop near the
dishwasher.
NOTE: The drain air gap is an external plumbing device that is not part of your
dishwasher. The warranty provided with your dishwasher does not cover service
costs directly associated with the cleaning or repair of the external drain air gap.
To clean the drain air gap
Clean the drain air gap periodically to ensure proper drainage of your
dishwasher. Follow the cleaning instructions provided by the manufacturer. With
most types: Lift off the chrome cover. Unscrew the plastic cap. Check for any soil
buildup. Clean if necessary.
STORING
Storing for the Summer
Protect your dishwasher during the summer months by turning off the water
supply and power supply to the dishwasher.
Winterizing your dishwasher
Protect your dishwasher and home against water damage caused by freezing
water lines. If your dishwasher is left in a seasonal dwelling or could be exposed
to near freezing temperatures, have your dishwasher winterized by authorized
service personnel.
27
English
Troubleshooting
Try the solutions suggested here first and possibly avoid the cost of a service call...
DISHWASHER IS NOT OPERATING PROPERLY
•D
ishwasher does not run or stops during a cycle
It is normal for most cycles to pause for 5 minutes near the start of a cycle to let the
dishes soak. This reduces energy required to clean the dishes.
Is the door closed tightly and latched?
Is the right cycle selected? Refer to the Cycle Selection charts.
Is there power to the dishwasher? Has a household fuse blown or circuit
breaker tripped?
Has the motor stopped due to an overload? The motor automatically resets
itself within a few minutes. If it does not restart, call for service.
Is the water shut-off valve (If installed) turned on?
Is it normal for certain cycles to repeatedly pause for 15 to 65 seconds during
the main wash.
•D
ishwasher will not fill
Is the overfill protection float able to move up and down freely? Press down to release.
•D
ishwasher seems to run too long
Is the water supplied to the dishwasher hot enough? The dishwasher runs
longer while heating water Refer to the "Dishwasher Performance Tips" section.
A delay automatically occurs in some wash and rinse cycles until the water
reaches the proper temperature.
• Water remains in the dishwasher
Is the cycle complete and not in a pause?
It is normal to have a small amount of clean water around the outlet in the bottom of the
tub, to keep the water seal lubricated.
If the drain hose is connected to a food waste disposer, make sure the dispenser is
empty.
Make sure the knockout plug has been removed from the food waste disposer.
Check to see if the drain hose is kinked.
•D
etergent remains in the covered section of the dispenser
Is the cycle complete?
Is the detergent lump-free? Replace detergent if necessary.
Was a dish item blocking the dispenser?
•W
ater residue on the front of the access panel
Was too much detergent used? Refer to the "Detergent Dispenser" section.
Is the brand of detergent making excess foam? Try a different brand to reduce
foaming and eliminate buildup.
•O
dor in the dishwasher
Are dishes washed only every 2 or 3 days? Run a rinse cycle once or twice a
day until you have a full load.
Does the dishwasher have an unpleasant smell? Run a vinegar rinse as described in
"Spotting and filming on dishes" later in this troubleshooting guide.
•C
ondensation on the kitchen counter (built-in models)
Is the dishwasher aligned with the countertop? Moisture from the vent in the dishwasher
console can form on the counter. Refer to the lnstallation Instructions for more information.
28
English
Dishes are not completely clean
•F
ood soil left on the dishes
Is the dishwasher loaded correctly? Refer to the "Dishwasher Loading" section.
Did you choose the cycle that describes the most difficult soil in your
dishwasher? lf you have some items with heavier soils, use a heavier cycle.
Is the water temperature too low? For best dishwashing results, water should
be 120ºF (49 ºC) as it enters the dishwasher. Refer to the "Dishwasher
Performance Tips" section.
Did you use the correct amount of fresh detergent? Use recommended
dishwasher detergents only. Refer to the "Detergent Dispenser " section. Never
use less than 1 tb (15g) per load. Detergent must be fresh to be effective.
Store detergent in a cool, dry area Heavy soil and/or hard water generaily
require extra detergent.
Is detergent caked in dispenser? Use fresh detergent only. Do not allow
detergent to sit for several hours in a wet dispenser. Clean dispenser when
caked detergent is present.
Is the pump or spray arm clogged by Iabels from bottles and cans? If you
wash bottles and cans in your dishwasher, check for labels clogging the pump
or spray arm.
Is the home water pressure high enough for proper dishwasher filling? Home
water pressure should be 20 to 120 psi (138 to 828 kPa) for proper
dishwasher fill. A booster pump on the water supply can be added if pressure
is too low.
Are high suds slowing the wash arm? Never use soap or laundry detergents.
Use recommended dishwasher detergents only.
SPOTS AND STAINS ON DISHES
•S
potting and filming on dishes
Is your water hard or is there a high mineral content in your water?
Conditioning the final rinse water with a liquid rinse aid helps eliminate
spotting and filming. Keep the rinse aid dispenser filled. Always use a
high-temp option. If your water hardness is 13 grains or above, it is strongly
recommended that you install a home water softener if you do not wish to
drink softened water, have the softener installed onto your hot water supply.
Is the water temperature too low? For best dishwashing results, water should
be 120ºF (49ºC) as it enters the dishwasher. Refer to the "Dishwasher
Performance Tips" section.
Did you use the correct amount of effective detergent? Use recommended
dishwasher detergents only. Refer to the "Detergent Dispenser" section. Never
Use less than 1 tb (15g) per load. Detergent must be fresh to be effective.
Store detergent in a cool, dry area. Heavy soil and/or hard water generally
require extra detergent.
29
English
Is the home water pressure high enough for proper dishwasher filling? Home water
pressure should be 20 to 120 psi ( 138 to 828 kpa ) for proper dishwasher fill. A
booster pump on the water supply can be added if pressure is too low.
NOTE: To remove spots and film from dishes, try a white vinegar rinse. This
procedure is intended for occasional use only vinegar is an acid and using it too
often could damage your dishwasher.
1. W
ash and rinse dishes. Use an air-dry or an energy saving dry option.
Remove all silverware or metal items.
2. P
ut 2 cups ( 500 mL ) white vinegar in a glass or dishwasher-safe measuring
cup on the bottom rack.
3. R
un the dishwasher through a complete washing cycle using an air-dry or an
energy saving dry option. Do not use detergent. Vinegar will mix with the
wash water.
•S
ilica film or etching (silica film is a milky, rainbow-colored
deposit; etching is a cloudy film)
Sometimes there is a water/chemical reaction with certain types of glassware.
This is usually caused by some combination of soft or softened water, alkaline
washing solutions, insufficient rinsing, overloading the dishwasher, and the
heat of drying. It might not be possible to prevent the problem, except by hand
washing.
T o slow this process use a minimum amount of detergent but not less than 1
tb (15 g) per load. Use a liquid rinse aid and under load the dishwasher to
allow thorough rinsing. Silica film and etching are permanent and cannot be
removed. Do not use heated drying.
•W
hite spots on cookware with non-stick finish
Has the dishwasher detergent removed cookware seasoning? Reseason cookware after washing in the dishwasher.
•B
rown stains on dishes and dishwasher interior
Does your water have high iron content? Rewash dishes Using 1 - 3 tsp
(5-15 ml) of citric acid crystals added to the covered section of the detergent
dispenser .Do not use detergent. Follow with a Normal wash cycle with
detergent. If treatment is needed more often than every other month, the
lnstallation of an iron removal unit is recommended.
•B
lack or gray marks on dishes
Are aluminum items rubbing dishes during washing? Disposable aluminum
items can break down in the dishwasher and cause marking, Hand wash these
items. Remove aluminum markings by using a mild abrasive cleaner.
•O
range stains on plastic dishes or dishwasher interior
Are large amounts of tomato-based foods on dishes placed in the dishwasher?
It may be necessary to use a stain removal product to remove stains from your
dishwasher.Stains will not affect dishwasher performance.
30
English
DISHES DO NOT DRY COMPLETELY
•D
ishes are not dry
Did you load your dishwasher to allow proper water drainage?
Do not overload. Refer to the "Dishwasher Loading" section. Use a liquid rinse
aid to speed drying.
Are the plastics wet? Plastics often need towel drying.
Is the rinse aid dispenser empty? Refer to the "Rinse Aid Dispenser" section.
id you use an air-dry or energy-saving dry option? Use a heated drying
D
option for dryer dishes.
DISHES ARE DAMAGED DURING A CYCLE
•C
hipping of dishes
Did you load the dishwasher properly? Load the dishes and glasses so they are
stable and do not strike together from washing action. Minimize chipping by
moving the rack in and out slowly.
NOTE: A
ntiques, feather-edged crystal, and similar types of china and glassware
might be too delicate for automatic dishwashing. Wash by hand.
NOISES
•G
rinding, grating, crunching or buzzing sounds
A hard object or powder detergent granulates have entered the wash module.
When the object is ground up, the sound should stop.
31
English
Assistance or Service
Before calling for assistance or service, please check "Troubleshooting". It may
save you the cost of a service call. If you still need help follow the instructions
below.
When calling, please have the purchase date and the complete model and serial
number of your appliance. This information will help us to better respond to your
request.
If you need replacement parts
If you need to order replacement parts, we recommend that you only use factory
specified parts. These parts will fit right and work right. To locate factory specified replacement parts in your area, call our Customer Interaction Center telephone number ( 1-877-337-3639 ) or your nearest designated service center
32
English
Limited Warranty
In-Home Service
1 Year Warranty
For 12 months from the date of original
retail purchase, Haier will repair or replace
any part free of charge that fails due to a
defect in materials or workmanship,
including labor.
3 Years Limited Warranty
(Parts Only)
For 36 months from the date of original
retail purchase, Haier will provide a
replacement part free of charge for any part
which fails due to manufacturing defect.
Stainless Steel Tub and Door Liner
The Stainless steel tub and door liner are
warranted for the life of the dishwasher for
rust through.
NOTE: A
ssociated external inlet water and
drain plumbing parts are not
covered by this warranty.
Exceptions: Commercial or Rental
Use Warranty
90 days labor from date of original
purchase
90 days parts from date of original
purchase No other warranty applies
For Warranty Service
Contact your nearest authorized service
center. All service must be performed by a
Haier authorized service center. For the
name and telephone number of the nearest
authorized service center please call
1-877-337-3639.
Before calling, please have the
following information available:
Model number and serial number of your
appliance (found on the left side of door
opening). The name and address of the
dealer you purchased the unit from and
the date of purchase. A clear description
of the problem. A proof of purchase (sales
receipt).
33
This warranty covers appliances
within the continental United States,
Puerto Rico and Canada. What is
not covered by this warranty:
Replacement or repair of household fuses,
circuit breakers, wiring or plumbing. A
product whose original serial number has
been removed or altered. Any service
charges not specifically identified as
normal such as normal service area or
hours. Damage to dishware. Damage
incurred in shipping. Damage caused
by improper installation or maintenance.
Damage from misuse, abuse accident, fire,
flood, or acts of nature. Damage from
service other than an authorized Haier
dealer or service center. Damage from
incorrect electrical current, voltage or
supply. Damage resulting from any
product modification, alteration or
adjustment not authorized by Haier.
Adjustment of consumer operated controls
as identified in the owners manual. Hoses,
knobs and all attachments, accessories and
disposable parts. Labor, service transportation, and shipping charges for the removal
and replacement of defective parts beyond
the initial 12-month period. Damage from
anything other than normal household use.
Any transportation and shipping charges.
THIS LIMITED WARRANTY IS GIVEN
IN LIEU OF ALL OTHER WARRANTIES,
EXPRESSED OR, INCLUDING THE
WARRANTIES OF MERCHANTABILITY AND
FITNESS FOR A PARTICULAR PURPOSE
The remedy provided in this warranty is
exclusive and is granted in lieu of all other
remedies. This warranty does not cover
incidental or consequential damages, so
the above limitations may not apply to you.
Some states do not allow limitations on
how long an implied warranty lasts, so the
above limitations may not apply to you. This
warranty gives you specific legal rights, and
you may have other rights, which vary, from
state to state.
Haier America
New York, NY 10018
IMPORTANT
Do Not Return This Product To The Store
If you have a problem with this product, please contact the
“Customer Satisfaction Center” at 1-877-337-3639.
DATED PROOF OF PURCHASE REQUIRED FOR WARRANTY SERVICE
IMPORTANT
Ne pas Réexpédier ce Produit au Magasin
Pour tout problème concernant ce produit, veuillez contacter le service des
consommateurs ‘Customer Satisfaction Center’ au 1-877-337-3639.
UNE PREUVE D’ACHAT DATEE EST REQUISE POUR BENEFICIER DE LA GARANTIE.
IMPORTANTE
No regrese este producto a la tienda
Si tiene algún problema con este producto, por favor contacte el “Centro de Servicio al
Consumidor” al 1-877-337-3639 (Válido solo en E.U.A).
NECESITA UNA PRUEBA DE COMPRA FECHADA PARA EL SERVICIO DE LA GARANTIA
115V, 60 Hz
Made in China
Fabriqué en Chine
Hecho en China
Haier
New York, NY 10018
Printed in China
v1: Issued September 2009
v2: Issued June 2010
DWL4035
© 2010 Haier America Trading, LLC. All Rights Reserved. 101092